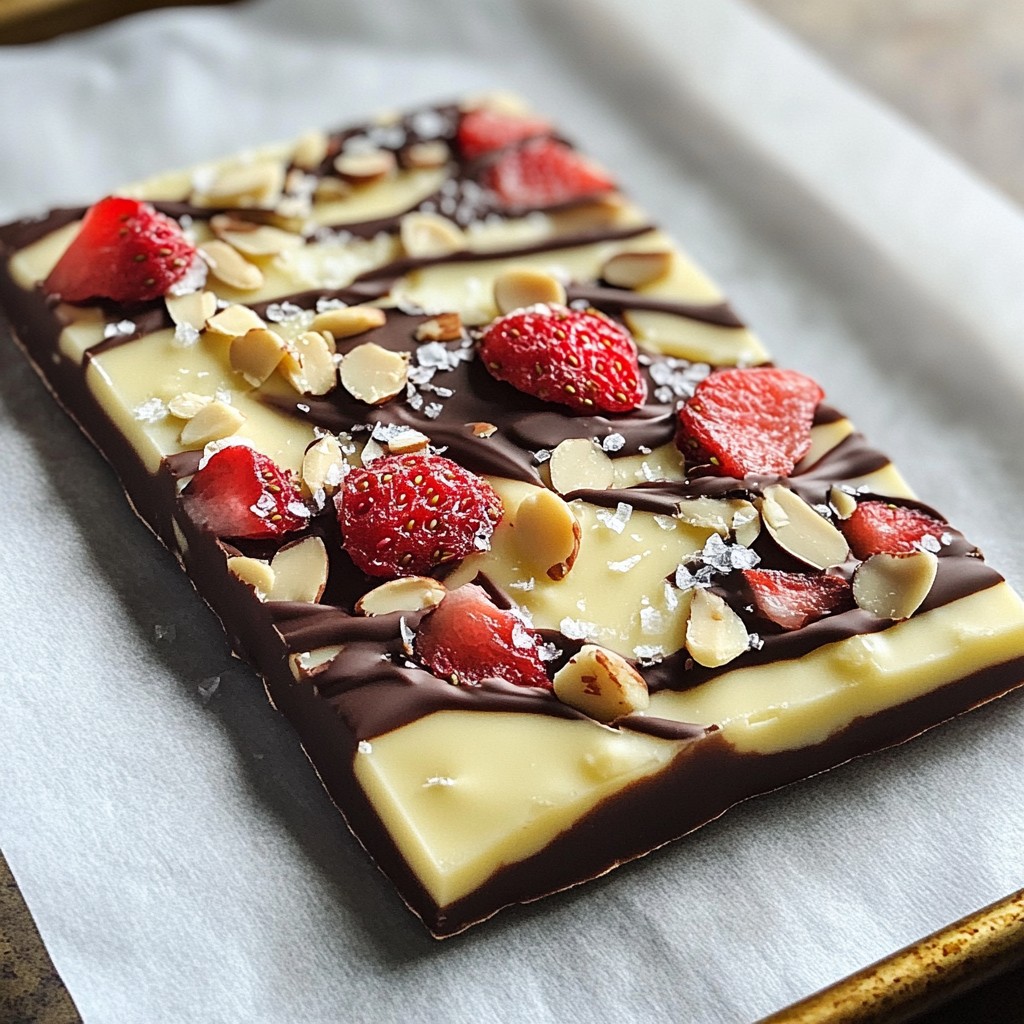
Who doesn’t love a sweet treat? Chocolate Covered Strawberry Bark adds a fun twist to classic snacks. Easy to make, this treat combines dark and white chocolate with freeze-dried strawberries and nuts. It’s great for sharing or enjoying solo! In this article, I’ll guide you through the simple steps and share tips to make it shine. Let’s dive into this delicious recipe that you’ll want to try today!
Why I Love This Recipe
- Decadent Layers: The combination of dark and white chocolate creates a rich and satisfying flavor profile that is hard to resist.
- Easy to Make: This recipe requires minimal effort and ingredients, making it perfect for beginners or a quick treat.
- Customizable: You can easily swap out the freeze-dried strawberries and nuts for your favorite toppings, making each batch unique.
- Perfect for Sharing: This bark is great for parties or gifting, allowing you to share a delicious treat with friends and family.
Ingredients
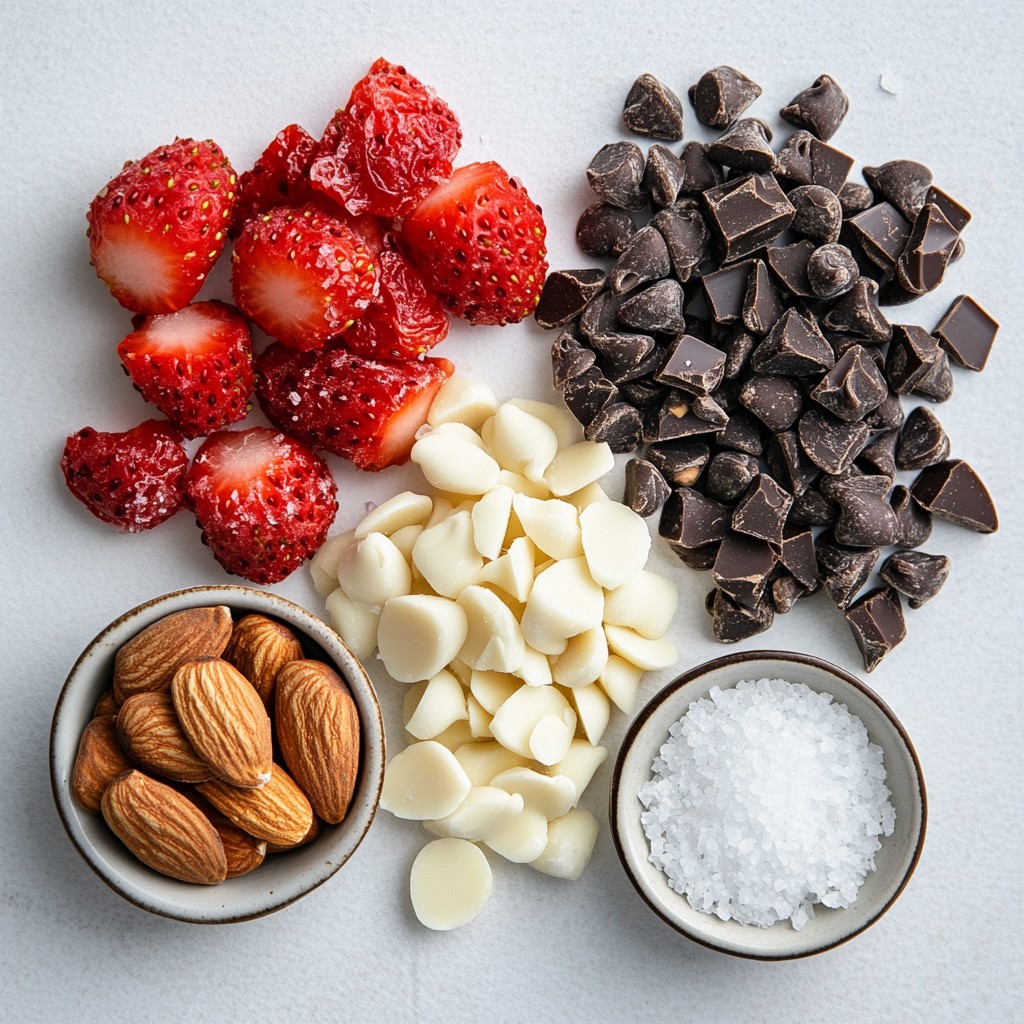
To make Chocolate Covered Strawberry Bark, gather these tasty ingredients:
- 1 cup dark chocolate chips
- 1 cup white chocolate chips
- 1 cup freeze-dried strawberries
- 1/2 cup chopped almonds (or any nuts of your choice)
- Optional sea salt
These simple ingredients create a delightful treat. The dark chocolate gives a rich flavor. The white chocolate adds sweetness and creaminess. Freeze-dried strawberries bring a fruity crunch. Nuts add texture and a nice bite. You can use any nuts you like. If you want a salty touch, sprinkle some sea salt on top. This mix makes the bark both tasty and fun to eat!
Step-by-Step Instructions
Preparing the Baking Sheet
Start by grabbing a baking sheet. Line it with parchment paper. This makes it easy to lift the bark later. You want to cover the whole sheet. This simple step saves time and mess.
Melting Dark Chocolate
Next, take your dark chocolate chips. Place them in a microwave-safe bowl. Heat them in 30-second bursts. Stir the chocolate after each time. Keep going until it is smooth. It should not be too hot. This helps keep the chocolate shiny.
Assembling the Bark Layers
Pour the melted dark chocolate onto the prepared baking sheet. Use a spatula to spread it evenly. Aim for about 1/4-inch thick. Now, place this in the fridge for 15 minutes. It needs to set before adding more layers. While you wait, melt the white chocolate chips the same way. Once the dark chocolate is firm, pour the white chocolate on top. Spread it gently to make a pretty design.
Final Setting and Serving
Before the white chocolate sets, sprinkle freeze-dried strawberries and chopped almonds on top. You can add sea salt for a tasty kick. Place the baking sheet back in the fridge. Let it chill for 30 minutes or until it is fully set. Finally, break the bark into pieces. Serve it right away or store it in an airtight container. Enjoy your sweet treat!
Tips & Tricks
Perfecting the Chocolate Melting Process
To melt chocolate well, use a microwave. Heat in 30-second bursts. Stir the chocolate each time. This keeps it smooth and prevents burning. Dark chocolate melts at a lower heat. Be patient; it will melt fully. You can also use a double boiler if you prefer. Just make sure water does not touch the chocolate. This method helps control the heat.
Customizing with Various Nuts and Fruits
Get creative with your toppings! You can use any nuts you like. Almonds add a nice crunch, but walnuts or pecans work too. If you want more flavor, try adding coconut flakes. For fruit, freeze-dried strawberries are great, but you can use mango or blueberries. Just remember to chop larger fruit pieces into smaller bits.
Maintaining Texture and Flavor
Keep an eye on the chocolate thickness. Aim for about 1/4-inch thick layers. This ensures a good bite. Adding sea salt enhances the sweet and salty mix. It draws out the rich chocolate taste. If you want a stronger fruit flavor, add more freeze-dried fruit. Just sprinkle it on before the chocolate sets to keep it crunchy.
Pro Tips
- Use Quality Chocolate: The taste of your bark is heavily influenced by the quality of chocolate you use. Opt for high-quality, premium chocolate for the best flavor.
- Customize Your Toppings: Feel free to experiment with different toppings! Try using nuts, dried fruits, or even crushed cookies to create your own unique flavor combinations.
- Cooling Time is Key: Ensure you allow enough time for the chocolate to set properly in the refrigerator. This will help the bark break into clean, even pieces.
- Store Properly: Keep the bark in an airtight container to maintain its freshness and prevent it from becoming too soft or sticky.
Variations
Using Milk or Semi-Sweet Chocolate
You can easily change the chocolate types in this recipe. If you prefer a sweeter taste, use milk chocolate chips. For a richer flavor, semi-sweet chocolate works well. Just melt them the same way as dark chocolate. The key is to ensure they are smooth before spreading.
Incorporating Different Freeze-Dried Fruits
While freeze-dried strawberries are great, feel free to mix it up. You can use freeze-dried raspberries, blueberries, or even bananas. Each fruit brings its own unique flavor. Just chop the fruits into small pieces and sprinkle them on top like you would with strawberries.
Drizzling Additional Chocolate
Add more chocolate for a fun look and taste! After spreading the white chocolate, melt some extra dark or milk chocolate. Use a spoon or a piping bag to drizzle it over the bark. This adds a nice touch and makes the bark even more delicious.
Storage Info
Best Practices for Storing Bark
To keep your chocolate covered strawberry bark fresh, store it in an airtight container. This will help keep moisture out. Layer pieces of parchment paper between layers to prevent sticking. Avoid storing bark in direct sunlight. A cool, dry place works best.
Shelf Life and Freshness Tips
When stored properly, the bark can last up to two weeks. However, for the best taste, eat it within a week. If you notice any changes in smell or texture, it’s best to toss it. Keep an eye out for signs of moisture or melting chocolate.
Serving Suggestions
Serve the bark as a sweet treat after meals or as party snacks. You can also break it into smaller pieces for sharing. Pair it with fresh fruit or nuts for added texture. It makes a great gift when packaged nicely in a box or jar.
FAQs
Can I use fresh strawberries instead of freeze-dried?
No, fresh strawberries will not work well. They have moisture that can ruin the bark. Freeze-dried strawberries stay crunchy and add great flavor. They also mix well with chocolate. If you want the best results, use freeze-dried strawberries.
How do I prevent the chocolate from seizing?
To avoid seizing, keep water away from chocolate. Even a tiny drop can ruin it. Use dry bowls and utensils. If you see chocolate start to clump, add a bit of vegetable oil. This can help bring it back to smooth.
What are the best ways to melt chocolate safely?
Melt chocolate in a microwave-safe bowl. Use 30-second bursts, stirring between each. This helps keep it smooth. You can also use a double boiler. Just make sure the bowl does not touch the water. Both methods work great.
Can this recipe be made vegan?
Yes, you can make this recipe vegan. Use dairy-free chocolate chips instead. There are many brands that offer great options. Check the labels to ensure they are vegan. You can still enjoy the same sweet treat without dairy.
How do I make the bark more festive for holidays?
Add colorful sprinkles or nuts for a holiday touch. You can also use seasonal fruits like dried cranberries or pumpkin seeds. Drizzle some colored chocolate on top for fun. Let your creativity shine to make it festive!
In this blog post, you learned how to make delicious chocolate bark. We covered the full list of ingredients and outlined easy steps for preparation. I shared tips for perfect melting and ideas for fun variations. You also found storage tips to keep your bark fresh.
Making chocolate bark is simple and fun. You can mix flavors, customize nuts, and impress friends and family. Enjoy your tasty treats and share them with others!