Chocolate Caramel Oat Carmelitas Irresistible Treat

WANT TO SAVE THIS RECIPE?

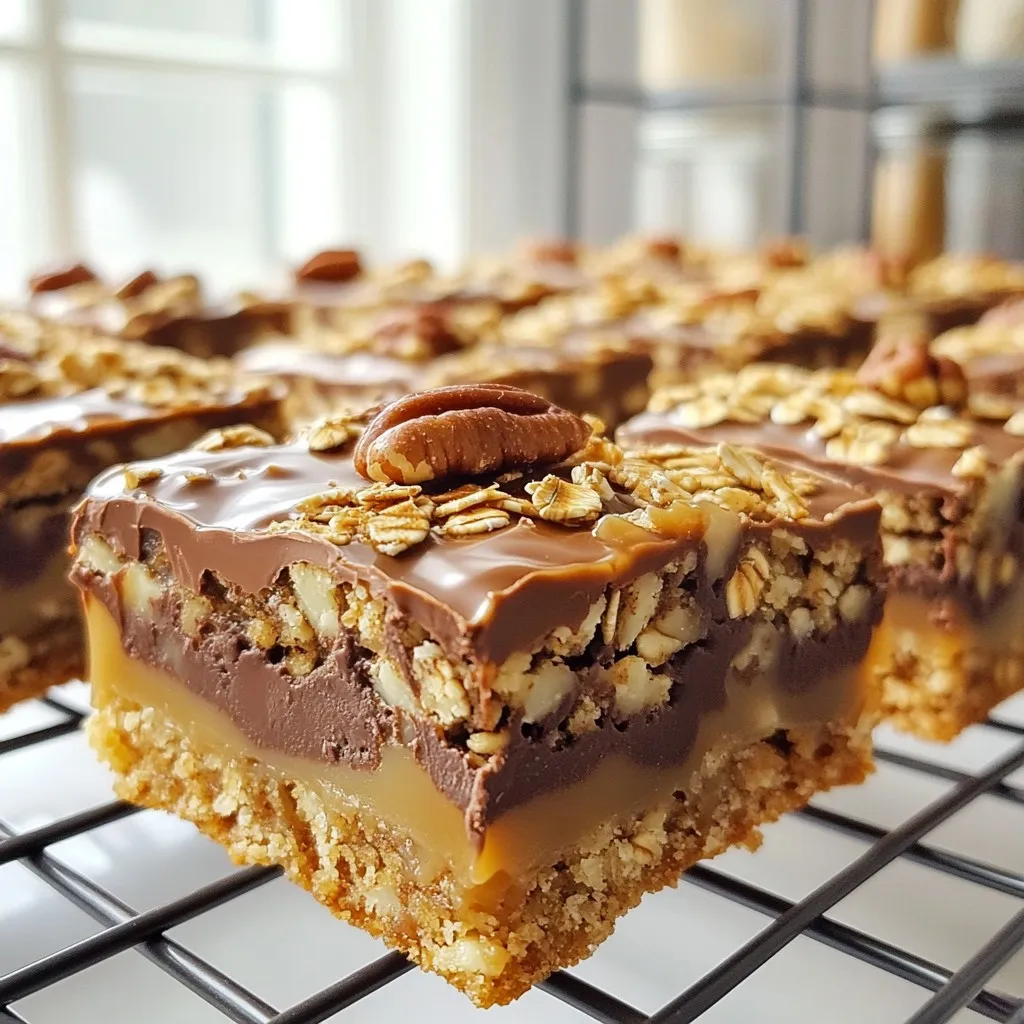
If you have a sweet tooth, you need to try my Chocolate Caramel Oat Carmelitas! These delicious treats blend oats, chocolate, and caramel for a flavor explosion. They’re simple to make and perfect for any occasion. In this post, I’ll guide you through the ingredients and steps to create these irresistible bars. Let’s dive into the world of gooey goodness and satisfy your cravings today!

Why I Love This Recipe

  1. Decadent Flavor: The combination of rich chocolate and gooey caramel creates an irresistible treat that satisfies any sweet tooth.
  2. Easy to Make: This recipe comes together quickly, making it perfect for last-minute dessert cravings or gatherings.
  3. Versatile Ingredients: With options for nuts and varying types of chocolate, you can customize these Carmelitas to suit your taste.
  4. Perfect for Sharing: Cut into squares, these treats are ideal for parties, picnics, or simply sharing with friends and family.

Ingredients

List of Ingredients

– 1 cup rolled oats

– 1 cup all-purpose flour

– 1/2 cup brown sugar

– 1/2 teaspoon baking soda

– 1/2 teaspoon salt

– 1/2 cup unsalted butter, melted

– 1/2 cup chocolate chips

– 1/2 cup caramel sauce (store-bought or homemade)

– 1/4 cup chopped pecans (optional)

Optional Ingredient Substitutions

You can swap the all-purpose flour for whole wheat flour for a nutty flavor. If you want a gluten-free option, use almond flour or oat flour. Instead of pecans, try walnuts or almonds for a different crunch. For a richer taste, use dark chocolate chips.

Tips for Fresh Ingredients

Always check your oats for freshness. Old oats can lose their flavor. Store your chocolate chips in a cool, dry place. This keeps them smooth and melty. If you make homemade caramel sauce, use it within a week for the best taste. Fresh butter adds a rich flavor to your Carmelitas.

Step-by-Step Instructions

Preheat and Prepare

Start by preheating your oven to 350°F (175°C). This step is key for even baking. Next, prepare a 9×9-inch baking dish. You can grease it lightly or line it with parchment paper. Lining with paper makes it easy to lift out the squares later.

Mixing Dry Ingredients

In a large mixing bowl, combine the rolled oats, all-purpose flour, brown sugar, baking soda, and salt. Mix these dry ingredients thoroughly. This ensures that every bite of your Carmelitas has a great flavor.

Combining with Wet Ingredients

Now, pour the melted butter into your dry mix. Stir well until it forms a crumbly dough. This mixture will create the base of your Carmelitas. You want it to have a nice, sandy texture.

Layering the Ingredients

Take half of the oat mixture and press it into the bottom of your prepared baking dish. Make sure to pack it down firmly. Next, spread the caramel sauce evenly over this oat layer. Follow this by sprinkling the chocolate chips on top of the caramel. If you like nuts, add the chopped pecans at this stage.

Now, use the remaining oat mixture to crumble over the top. Aim to cover everything evenly. This layer adds a nice crunch to your treats.

Baking the Carmelitas

Place the baking dish in your preheated oven. Bake for 25 to 30 minutes. You want the top to turn a golden brown. Once done, take it out and let it cool completely in the dish. This cooling step is important before cutting into squares.

Tips & Tricks

How to Ensure Perfect Texture

For the best texture, use rolled oats. They add chewiness and hold up well. Mix the dry ingredients well before adding butter. This helps the oats blend evenly. When you press the oat mixture, do it firmly. This creates a strong base. Bake until golden brown, but not too dark. This helps keep the squares soft and chewy.

Storing Your Carmelitas

Let the Carmelitas cool completely before storing. This helps them keep their shape. Place them in an airtight container. They can last up to a week at room temperature. If you want them to last longer, refrigerate them. Just remember to let them warm up before serving for the best taste.

Serving Suggestions

Carmelitas are great on their own but can be even better. Try serving them with vanilla ice cream. The cold ice cream pairs well with the warm Carmelitas. You can also drizzle extra caramel sauce on top. For a crunch, add chopped nuts. Enjoy them at parties or just for a cozy night in!

Pro Tips

  1. Use Cold Butter: For a crumblier texture, consider chilling the butter slightly before melting. This helps maintain a better structure in the oat mixture.
  2. Customize Your Nuts: Feel free to swap out the pecans for your favorite nuts or seeds, like walnuts or sunflower seeds, to add a different flavor and crunch.
  3. Experiment with Chocolate: Try using a mix of milk, dark, and white chocolate chips for a more complex flavor profile in each bite.
  4. Storage Tips: Store leftover Carmelitas in an airtight container at room temperature for up to a week, or refrigerate them for longer freshness.

Variations

Nut-Free Option

If you want to make these treats nut-free, just skip the pecans. The recipe still tastes great without them. You can also use seeds like sunflower or pumpkin seeds for extra crunch. They add a nice texture and a hint of flavor.

Gluten-Free Option

To create a gluten-free version, swap the all-purpose flour for a gluten-free blend. Make sure to choose a blend that works well for baking. Also, check your oats to ensure they are certified gluten-free. This way, everyone can enjoy these delicious squares!

Flavor Variations

You can easily switch up the flavors in these Carmelitas. Add a pinch of cinnamon or nutmeg for warm spice notes. If you love fruits, try adding dried fruit like cranberries or raisins. You can also mix in different types of chocolate, like dark or white. Each change gives a new twist to this classic treat!

Storage Info

Best Practices for Storing Carmelitas

To keep your Carmelitas fresh, store them in an airtight container. This helps maintain their soft texture. Place a piece of wax paper between layers to avoid sticking. Keep them at room temperature for easy access. If you live in a warm area, store them in the fridge to prevent melting.

How Long Do They Last?

Carmelitas can last about one week at room temperature. If stored in the fridge, they may last up to two weeks. Be sure to check for any signs of spoilage, like an off smell or changes in texture. This ensures you enjoy them at their best!

Freezing Carmelitas

Freezing is a great option if you want to save some for later. Cut the Carmelitas into squares and wrap each one in plastic wrap. Place them in a freezer-safe bag or container. They can last up to three months in the freezer. When you’re ready to enjoy them, let them thaw at room temperature or heat them slightly in the oven.

FAQs

Can I use quick oats instead of rolled oats?

Yes, you can use quick oats. They will change the texture a bit. Quick oats are finer than rolled oats. This might make your Carmelitas softer. If you want a chewy bite, stick with rolled oats.

How do I make homemade caramel sauce?

To make caramel sauce, you need sugar, butter, and cream. Start by melting sugar in a pan over medium heat. Stir until it turns golden brown. Remove from heat and add butter. Once melted, slowly stir in cream. Let it cool before using it in the recipe.

What can I serve with Chocolate Caramel Oat Carmelitas?

These treats pair well with several options. You can serve them with a scoop of vanilla ice cream. A drizzle of extra caramel sauce adds a nice touch. Fresh fruit or whipped cream also works well. Get creative and enjoy!

Can I make Carmelitas ahead of time?

Yes, you can make Carmelitas ahead of time. They store well in an airtight container. Keep them at room temperature for up to three days. For longer storage, refrigerate them. Just warm them before serving for the best taste.

What is the best way to cut into squares?

To cut your Carmelitas into squares, let them cool completely. Use a sharp knife for clean cuts. For neat squares, warm the knife slightly before cutting. This helps reduce sticking. Aim for even pieces so everyone gets a treat!

Carmelitas are easy and fun to make, as we explored in this post. We started with the key ingredients and their possible substitutes. Then, I shared clear steps for mixing, layering, and baking. I offered tips for texture and storage to keep your treats fresh. Finally, I showed you variations to try. Enjoy your baking and share these sweet treats with friend

- 1 cup rolled oats - 1 cup all-purpose flour - 1/2 cup brown sugar - 1/2 teaspoon baking soda - 1/2 teaspoon salt - 1/2 cup unsalted butter, melted - 1/2 cup chocolate chips - 1/2 cup caramel sauce (store-bought or homemade) - 1/4 cup chopped pecans (optional) You can swap the all-purpose flour for whole wheat flour for a nutty flavor. If you want a gluten-free option, use almond flour or oat flour. Instead of pecans, try walnuts or almonds for a different crunch. For a richer taste, use dark chocolate chips. Always check your oats for freshness. Old oats can lose their flavor. Store your chocolate chips in a cool, dry place. This keeps them smooth and melty. If you make homemade caramel sauce, use it within a week for the best taste. Fresh butter adds a rich flavor to your Carmelitas. {{ingredient_image_1}} Start by preheating your oven to 350°F (175°C). This step is key for even baking. Next, prepare a 9x9-inch baking dish. You can grease it lightly or line it with parchment paper. Lining with paper makes it easy to lift out the squares later. In a large mixing bowl, combine the rolled oats, all-purpose flour, brown sugar, baking soda, and salt. Mix these dry ingredients thoroughly. This ensures that every bite of your Carmelitas has a great flavor. Now, pour the melted butter into your dry mix. Stir well until it forms a crumbly dough. This mixture will create the base of your Carmelitas. You want it to have a nice, sandy texture. Take half of the oat mixture and press it into the bottom of your prepared baking dish. Make sure to pack it down firmly. Next, spread the caramel sauce evenly over this oat layer. Follow this by sprinkling the chocolate chips on top of the caramel. If you like nuts, add the chopped pecans at this stage. Now, use the remaining oat mixture to crumble over the top. Aim to cover everything evenly. This layer adds a nice crunch to your treats. Place the baking dish in your preheated oven. Bake for 25 to 30 minutes. You want the top to turn a golden brown. Once done, take it out and let it cool completely in the dish. This cooling step is important before cutting into squares. For the best texture, use rolled oats. They add chewiness and hold up well. Mix the dry ingredients well before adding butter. This helps the oats blend evenly. When you press the oat mixture, do it firmly. This creates a strong base. Bake until golden brown, but not too dark. This helps keep the squares soft and chewy. Let the Carmelitas cool completely before storing. This helps them keep their shape. Place them in an airtight container. They can last up to a week at room temperature. If you want them to last longer, refrigerate them. Just remember to let them warm up before serving for the best taste. Carmelitas are great on their own but can be even better. Try serving them with vanilla ice cream. The cold ice cream pairs well with the warm Carmelitas. You can also drizzle extra caramel sauce on top. For a crunch, add chopped nuts. Enjoy them at parties or just for a cozy night in! Pro Tips Use Cold Butter: For a crumblier texture, consider chilling the butter slightly before melting. This helps maintain a better structure in the oat mixture. Customize Your Nuts: Feel free to swap out the pecans for your favorite nuts or seeds, like walnuts or sunflower seeds, to add a different flavor and crunch. Experiment with Chocolate: Try using a mix of milk, dark, and white chocolate chips for a more complex flavor profile in each bite. Storage Tips: Store leftover Carmelitas in an airtight container at room temperature for up to a week, or refrigerate them for longer freshness. {{image_2}} If you want to make these treats nut-free, just skip the pecans. The recipe still tastes great without them. You can also use seeds like sunflower or pumpkin seeds for extra crunch. They add a nice texture and a hint of flavor. To create a gluten-free version, swap the all-purpose flour for a gluten-free blend. Make sure to choose a blend that works well for baking. Also, check your oats to ensure they are certified gluten-free. This way, everyone can enjoy these delicious squares! You can easily switch up the flavors in these Carmelitas. Add a pinch of cinnamon or nutmeg for warm spice notes. If you love fruits, try adding dried fruit like cranberries or raisins. You can also mix in different types of chocolate, like dark or white. Each change gives a new twist to this classic treat! To keep your Carmelitas fresh, store them in an airtight container. This helps maintain their soft texture. Place a piece of wax paper between layers to avoid sticking. Keep them at room temperature for easy access. If you live in a warm area, store them in the fridge to prevent melting. Carmelitas can last about one week at room temperature. If stored in the fridge, they may last up to two weeks. Be sure to check for any signs of spoilage, like an off smell or changes in texture. This ensures you enjoy them at their best! Freezing is a great option if you want to save some for later. Cut the Carmelitas into squares and wrap each one in plastic wrap. Place them in a freezer-safe bag or container. They can last up to three months in the freezer. When you’re ready to enjoy them, let them thaw at room temperature or heat them slightly in the oven. Yes, you can use quick oats. They will change the texture a bit. Quick oats are finer than rolled oats. This might make your Carmelitas softer. If you want a chewy bite, stick with rolled oats. To make caramel sauce, you need sugar, butter, and cream. Start by melting sugar in a pan over medium heat. Stir until it turns golden brown. Remove from heat and add butter. Once melted, slowly stir in cream. Let it cool before using it in the recipe. These treats pair well with several options. You can serve them with a scoop of vanilla ice cream. A drizzle of extra caramel sauce adds a nice touch. Fresh fruit or whipped cream also works well. Get creative and enjoy! Yes, you can make Carmelitas ahead of time. They store well in an airtight container. Keep them at room temperature for up to three days. For longer storage, refrigerate them. Just warm them before serving for the best taste. To cut your Carmelitas into squares, let them cool completely. Use a sharp knife for clean cuts. For neat squares, warm the knife slightly before cutting. This helps reduce sticking. Aim for even pieces so everyone gets a treat! Carmelitas are easy and fun to make, as we explored in this post. We started with the key ingredients and their possible substitutes. Then, I shared clear steps for mixing, layering, and baking. I offered tips for texture and storage to keep your treats fresh. Finally, I showed you variations to try. Enjoy your baking and share these sweet treats with friends!

Chocolate Caramel Oat Carmelitas

Delicious layered bars with oats, chocolate, and caramel.
Prep Time 15 minutes
Cook Time 30 minutes
Total Time 50 minutes
Course Dessert
Cuisine American
Servings 16
Calories 200 kcal

Ingredients
  

  • 1 cup rolled oats
  • 1 cup all-purpose flour
  • 1 2 brown sugar
  • 1 2 teaspoon baking soda
  • 1 2 teaspoon salt
  • 1 2 cup unsalted butter, melted
  • 1 2 cup chocolate chips
  • 1 2 cup caramel sauce
  • 1 4 cup chopped pecans (optional)

Instructions
 

  • Preheat the oven to 350°F (175°C). Grease a 9x9-inch baking dish or line it with parchment paper for easier removal.
  • In a large mixing bowl, combine the rolled oats, flour, brown sugar, baking soda, and salt. Mix well.
  • Pour the melted butter into the dry ingredients and stir until the mixture resembles a crumbly dough.
  • Press half of the oat mixture firmly into the bottom of the prepared baking dish.
  • Spread the caramel sauce evenly over the oat layer.
  • Sprinkle the chocolate chips evenly over the caramel.
  • If using, sprinkle the chopped pecans over the chocolate chips.
  • Use the remaining oat mixture to crumble over the top, covering everything as evenly as possible.
  • Bake in the preheated oven for 25-30 minutes, or until the top is golden brown.
  • Remove from oven and allow to cool completely in the baking dish before cutting into squares.

Notes

Once cooled, cut the Carmelitas into squares and arrange them on a serving platter. Drizzle with extra caramel sauce and sprinkle with a few chocolate chips on top for a decorative touch. Enjoy with a scoop of vanilla ice cream for an extra treat!
Keyword bars, caramel, chocolate, oats

WANT TO SAVE THIS RECIPE?

Leave a Comment

Recipe Rating