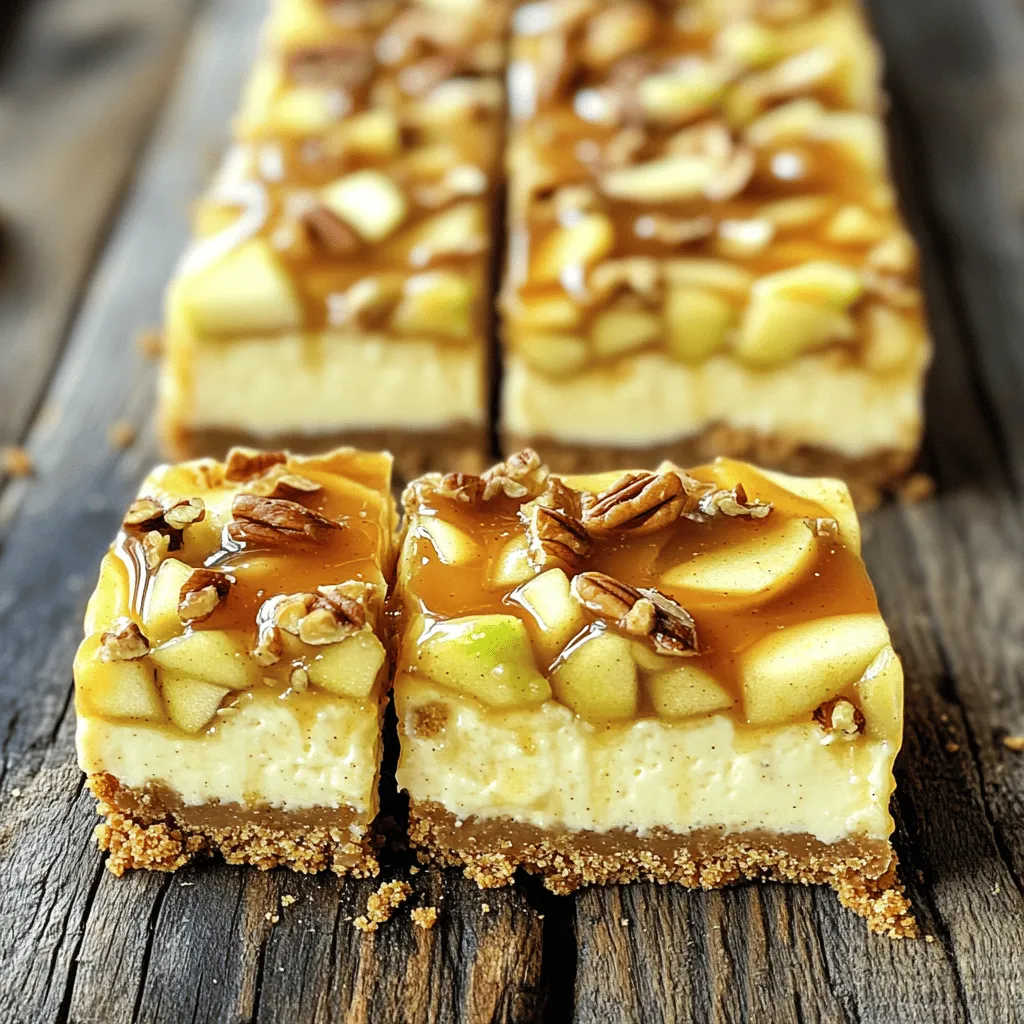
Fall is here, and it’s time to indulge in sweet treats like my Caramel Apple Cheesecake Bars. Imagine creamy cheesecake layered with apple goodness, all drizzled with rich caramel. It’s the perfect dessert for gatherings or a cozy night in. In this post, I’ll guide you through each step, share tips to avoid common mistakes, and even provide options if you want to tweak the recipe. Let’s make something delicious together!
Ingredients
List of Ingredients
To make these delicious caramel apple cheesecake bars, gather the following ingredients:
– 1 cup graham cracker crumbs
– 1/4 cup granulated sugar
– 1/2 cup unsalted butter, melted
– 2 (8 oz) packages cream cheese, softened
– 1 cup powdered sugar
– 1 teaspoon vanilla extract
– 2 large eggs
– 2 cups finely chopped apples (about 2 medium apples, peeled and cored)
– 1 teaspoon ground cinnamon
– 1/4 cup caramel sauce (plus more for drizzling)
– 1/2 cup chopped pecans or walnuts (optional)
Necessary Tools and Equipment
You will need a few tools to make these bars. Here’s what I recommend:
– 8×8 inch baking dish
– Parchment paper
– Mixing bowls
– Electric mixer
– Spatula
– Measuring cups and spoons
– Knife and cutting board
Ingredient Substitutions
If you need to make some swaps, here are a few ideas:
– Graham cracker crumbs: Use crushed cookies like digestive biscuits or vanilla wafers.
– Granulated sugar: Coconut sugar works well for a healthier option.
– Cream cheese: Neufchâtel cheese or a vegan cream cheese can be used.
– Eggs: For an egg-free version, use 1/4 cup of applesauce per egg.
– Chopped apples: Pears or a mix of both can add a fun twist.
– Chopped nuts: Omit them if you want a nut-free version or swap for seeds like pumpkin.
These swaps keep the spirit of the recipe while making it work for your needs. Enjoy the process and feel free to get creative!
Step-by-Step Instructions
Preparing the Oven and Dish
First, set your oven to 325°F (160°C). This temperature helps the bars bake evenly. Next, take an 8×8 inch baking dish and line it with parchment paper. Make sure to leave some paper hanging over the edges. This makes removing the bars easy later on.
Making the Crust
In a medium bowl, mix together 1 cup of graham cracker crumbs, 1/4 cup of granulated sugar, and 1/2 cup of melted unsalted butter. Stir these ingredients until they blend well. Now, press this mixture firmly into the bottom of your baking dish. This forms a solid crust. Bake it for 10 minutes and then let it cool slightly.
Crafting the Cheesecake Filling
In a large bowl, beat together 2 packages of softened cream cheese with an electric mixer. Mix until it is smooth and creamy. Gradually add in 1 cup of powdered sugar and 1 teaspoon of vanilla extract. Keep mixing until everything is smooth. Next, add 2 large eggs one at a time. Mix just until blended after each egg. Be careful not to overmix!
Then, fold in 2 cups of finely chopped apples, 1 teaspoon of ground cinnamon, and 1/4 cup of caramel sauce. If you want a crunchy touch, you can also add 1/2 cup of chopped pecans or walnuts. Mix gently to combine everything well.
Baking the Cheesecake Bars
Pour the cheesecake mixture over your cooled crust. Use a spatula to smooth the top. Place it in your preheated oven and bake for 35-40 minutes. Keep an eye on it; the center should be set and only slightly jiggly.
After baking, let the cheesecake bars cool at room temperature for about 30 minutes. Then, move them to the fridge for at least 2 hours. This helps them firm up nicely. Once chilled, lift the bars out using the parchment paper and cut them into squares.
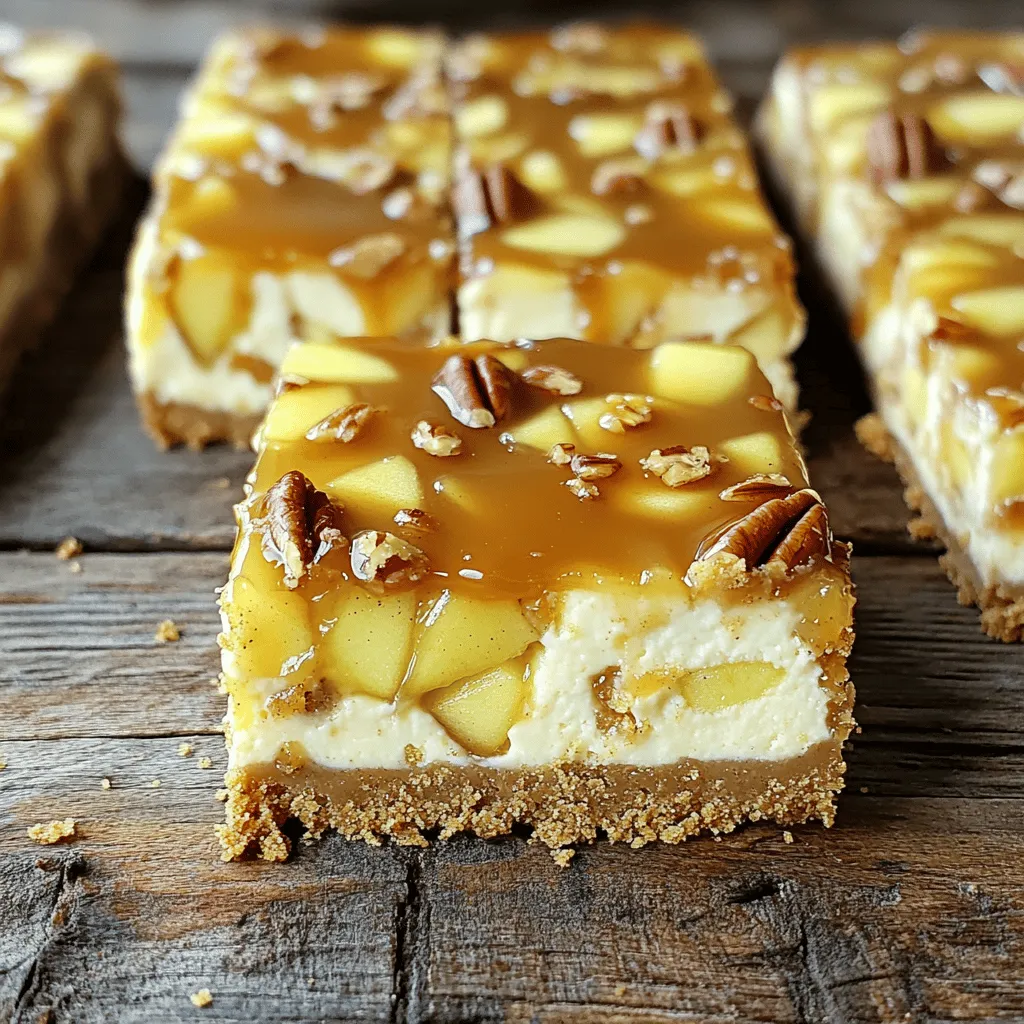
Before serving, drizzle some extra caramel sauce on top for a sweet finish. Enjoy your caramel apple cheesecake bars!
Tips & Tricks
Achieving the Perfect Texture
To get the best texture for your caramel apple cheesecake bars, focus on your cream cheese. Make sure it is soft before mixing. This helps you avoid lumps. Beat it well until smooth. Add the eggs slowly. Mix just until blended. Overmixing can make your bars tough. Fold in the apples gently. This keeps them from breaking apart.
Common Mistakes to Avoid
One common mistake is not cooling your crust enough. If it’s hot, the cheesecake filling can melt. Let it cool for a few minutes. Another mistake is using too many apples. Stick to about two medium apples. Too much moisture can make the bars soggy. Watch the baking time closely. If you bake them too long, they can crack.
Serving Suggestions
These bars shine when served with a drizzle of caramel sauce. Drizzle some on top right before serving. You can also add a sprinkle of chopped pecans or walnuts for crunch. Serve them chilled for a refreshing treat. Pair them with a scoop of vanilla ice cream for a delightful dessert. For a cozy feel, enjoy them with warm apple cider.
Variations
Alternative Flavor Add-ins
You can easily switch up the flavors in these caramel apple cheesecake bars. Try adding different fruits like pears or peaches. For a nutty twist, add almond extract instead of vanilla. You can even fold in some chocolate chips for a rich taste. Adding spices like nutmeg or ginger can give your bars a warm kick. Each variation brings a new flavor adventure.
Gluten-Free Options
If you need a gluten-free version, it’s simple. Use gluten-free graham cracker crumbs for the crust. Make sure to check your caramel sauce for gluten as well. Most brands are fine, but it’s good to be safe. The rest of the ingredients are usually gluten-free too, so you can enjoy these bars worry-free.
Vegan Adaptations
To make these bars vegan, replace the cream cheese with a plant-based option. You can use a vegan cream cheese or silken tofu blended until smooth. Substitute the eggs with flax eggs or applesauce. For the butter, use coconut oil or vegan margarine. These swaps keep the bars tasty while fitting a vegan diet. Don’t forget to check your caramel sauce for dairy!
Storage Info
Best Practices for Refrigeration
After baking, let the caramel apple cheesecake bars cool completely. Place them in an airtight container. This helps keep them fresh. Store them in the fridge for best results. The cold helps the flavors blend and stay tasty.
Freezing Instructions
If you want to save some for later, freezing works well. Cut the bars into squares, then wrap each piece tightly in plastic wrap. Place the wrapped bars in a freezer-safe bag or container. This prevents freezer burn. You can freeze them for up to three months.
How Long They Last
In the fridge, these cheesecake bars last about five days. If you freeze them, they stay good for three months. For the best taste, eat them fresh. But they still taste great even after some time.
FAQs
Can I make these bars ahead of time?
Yes, you can make these bars a day in advance. This allows the flavors to blend well. Just store them in the fridge. Cover them tightly with plastic wrap to keep them fresh. They taste great chilled or at room temperature.
What type of apples are best for this recipe?
I recommend using tart apples like Granny Smith. They add a nice contrast to the sweet cheesecake. Honeycrisp apples also work well for a sweeter flavor. Make sure to peel and core them before chopping. This step helps the texture blend smoothly in the bars.
How do I prevent the cheesecake from cracking?
To avoid cracks, mix your ingredients gently. Overmixing introduces air, which can cause cracks. Also, bake the cheesecake at a low temperature. Let it cool slowly in the oven with the door slightly open. This gradual cooling helps maintain a smooth top.
You now have a complete guide on making delicious cheesecake bars. We covered ingredients, tools, and various substitutions. I walked you through step-by-step instructions for baking, tips to perfect your bars, and variations for any diet. Remember, good storage keeps them fresh longer. Don’t be afraid to try new flavors or make them ahead of time. Enjoy baking and sharing these treats! You’ll impress everyone with your cheesecake bars!