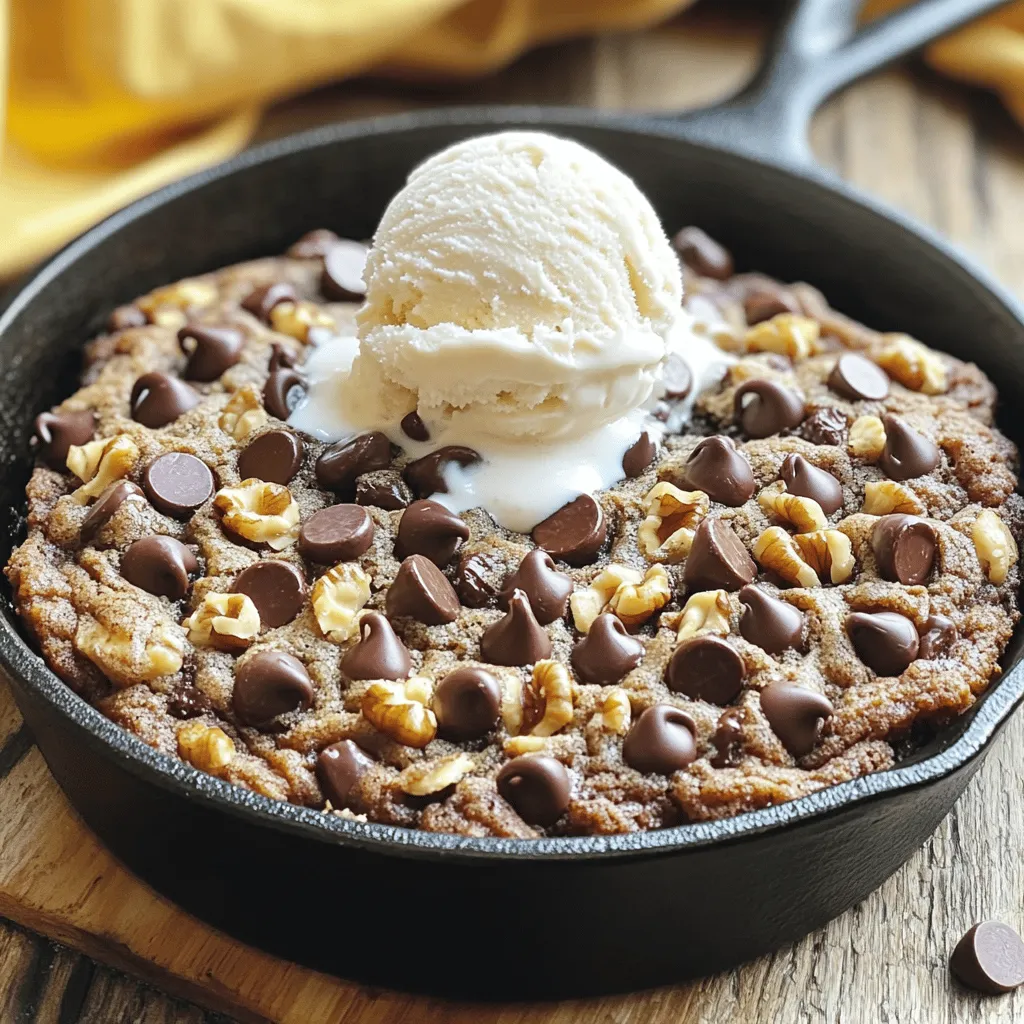
Chocolate Chip Cookie Skillet Simple and Tasty Delight
Are you ready to indulge in a warm, gooey treat? A Chocolate Chip Cookie Skillet is the ultimate delight for
Are you ready to indulge in a warm, gooey treat? A Chocolate Chip Cookie Skillet is the ultimate delight for
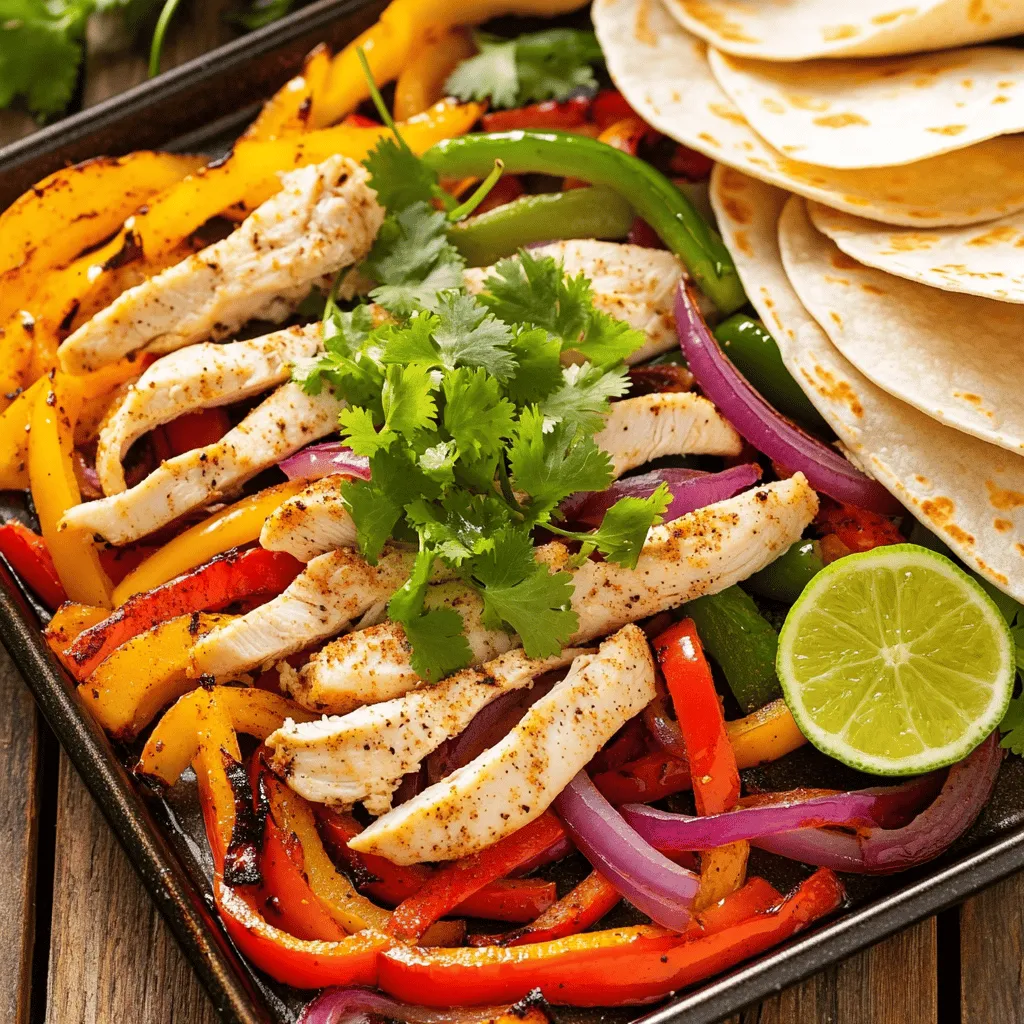
Looking for a quick and tasty dinner? Sheet Pan Fajitas are your answer! This bold, flavorful dish combines chicken, vibrant

Looking for a quick and healthy dinner idea? A veggie stir-fry can be your go-to dish! It’s colorful, packed with
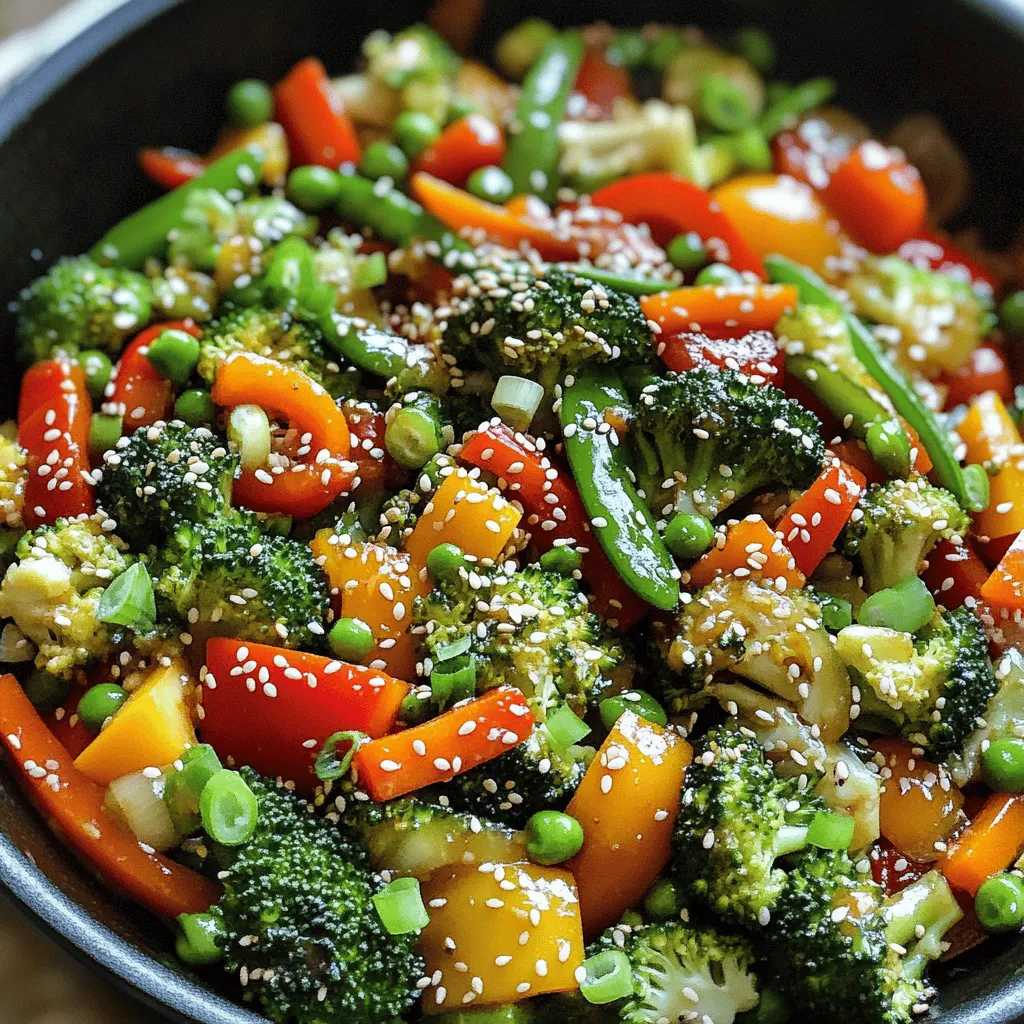
Looking for a quick and healthy dinner idea? A veggie stir-fry can be your go-to dish! It’s colorful, packed with
![- 1 pound (450g) large shrimp, peeled and deveined - 3 tablespoons olive oil - 4 cloves garlic, minced - Zest and juice of 1 large lemon - 1 teaspoon red pepper flakes - 1 teaspoon dried oregano - 1/2 cup cherry tomatoes, halved - 2 cups baby spinach - Salt and black pepper to taste - Fresh parsley for garnish - Servings: 4 - Each serving provides a balanced mix of protein and veggies, making it healthy and filling. 1. First, grab a large skillet. Heat 3 tablespoons of olive oil over medium heat. 2. Once the oil is warm, add 4 cloves of minced garlic. Cook for about 1 minute. 3. Next, sprinkle in 1 teaspoon of red pepper flakes. This will add a nice kick. 1. Now, it’s time to add the shrimp. Use 1 pound of large shrimp, peeled and deveined. 2. Season the shrimp with 1 teaspoon of dried oregano, salt, and black pepper. 3. Cook the shrimp for 2-3 minutes. Turn them occasionally until they are pink and opaque. 1. Add 1/2 cup of halved cherry tomatoes to the pan. Cook for an additional 2 minutes until they soften. 2. Pour in the juice and zest of 1 large lemon. Stir everything to coat the shrimp and tomatoes. 3. Lastly, toss in 2 cups of baby spinach. Cook for another minute until it wilts. 4. Taste your dish and adjust the seasoning if needed. 5. Remove from heat and let it sit for a minute. This helps the flavors blend. 6. Garnish your meal with freshly chopped parsley before serving. For the complete recipe, check out [Full Recipe]. To get the best out of your shrimp, you need to know when they are done. Cook shrimp until they turn pink and opaque. This usually takes about 2-3 minutes on medium-high heat. If you overcook them, they can become tough. For a rich lemon flavor, use both the juice and zest of your lemon. The zest adds a bright taste without being too sour. Squeeze fresh lemon juice just before serving. This gives your dish a fresh kick. When cooking, choose a large skillet. A sauté pan can also work, but it might not hold all your shrimp. A skillet helps with even cooking. Always cook on medium-high heat. This gives a nice sear to the shrimp. A good sear adds flavor and texture. If the heat is too low, the shrimp can steam instead of sauté. Garnish your dish with fresh parsley. It adds a pop of color and freshness. You can also add lemon slices for a nice look. For serving, pair shrimp with rice or crusty bread. This helps soak up the tasty sauce. A green salad on the side makes for a complete meal. For the full recipe, check the recipe section above. {{image_2}} You can swap out shrimp for other proteins. Chicken works well. Just cut it into small pieces. Tofu is a great choice for a plant-based option. Make sure to press and cube it before cooking. Both alternatives will soak up the flavors nicely. For vegetables, you can use bell peppers or zucchini. Slice them thin and add them with the shrimp. They add color and crunch. You can even mix in snap peas or asparagus for more variety. Want more heat? Try different types of peppers. Jalapeños add a fresh kick. Habaneros bring more heat if you dare. Just chop them finely and adjust to your taste. Herbs can change the dish’s flavor too. Basil or thyme can add a lovely twist. You can even use fresh dill for a bright taste. Experiment with what you love most. If you need a gluten-free option, this dish is perfect as is. Just ensure your seasonings are gluten-free. For low-carb or keto diets, skip the tomatoes. They add carbs, but you can replace them with more greens. Extra spinach or broccoli can help keep it filling and tasty. To keep your One-Pan Lemon Garlic Shrimp fresh, let it cool first. Place the shrimp in an airtight container. This helps keep it from drying out. Use glass or plastic containers that seal well. These are the best for storage. When reheating, avoid high heat to keep the shrimp tender. The stovetop works best. Heat on low and stir gently. If you use the microwave, cover the dish loosely. This helps to steam it a bit. Heat in short bursts to warm evenly. This dish stays fresh in the fridge for up to three days. If you want to freeze it, place it in a freezer-safe container. It can last for up to three months in the freezer. Just remember to label it with the date! Yes, you can use frozen shrimp. Just thaw them first. Place shrimp in cold water for 15 minutes. This helps them cook evenly. *Cooking time may change.* Start with about 4 minutes for the shrimp. Check until they turn pink and opaque. To add heat, increase the red pepper flakes. Start with 1.5 teaspoons for a kick. You can also add diced fresh chili peppers. Jalapeños or serranos work well. For more flavor, try a splash of hot sauce. This dish pairs well with several sides. Here are some great options: - Rice: White or brown rice soaks up the sauce. - Pasta: A light pasta like angel hair complements the shrimp. - Salad: A fresh salad adds crunch and color. - Bread: Crusty bread is perfect for dipping. These sides create a balanced meal and enhance the shrimp's flavors. For the full recipe, check the earlier sections. This blog post covers a simple yet delicious One-Pan Lemon Garlic Shrimp recipe. You learned about the key ingredients, cooking steps, and ways to enhance the dish. I included tips for perfecting the recipe, variations for different diets, and storage info. In conclusion, cooking shrimp can be easy and fun with this recipe. You can impress friends and family, or enjoy a tasty meal yourself. Happy cooking!](https://recipespursuit.com/wp-content/uploads/2025/04/772476e9-c6d2-43bc-8b21-a94baf413494.webp)
Looking for a quick and tasty dinner option? This One-Pan Lemon Garlic Shrimp is packed with flavor yet simple to
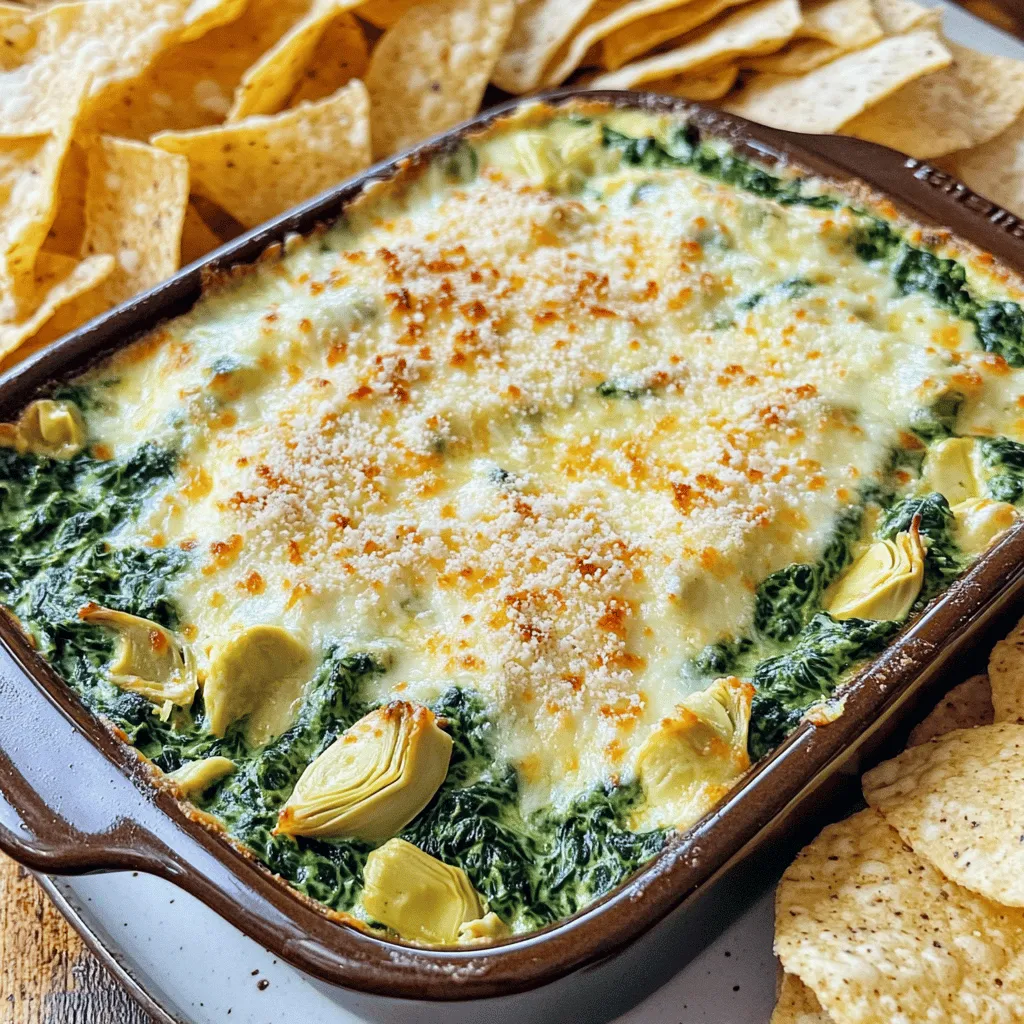
Are you ready to dive into a world of flavor with creamy, rich goodness? My Creamy Spinach and Artichoke Dip
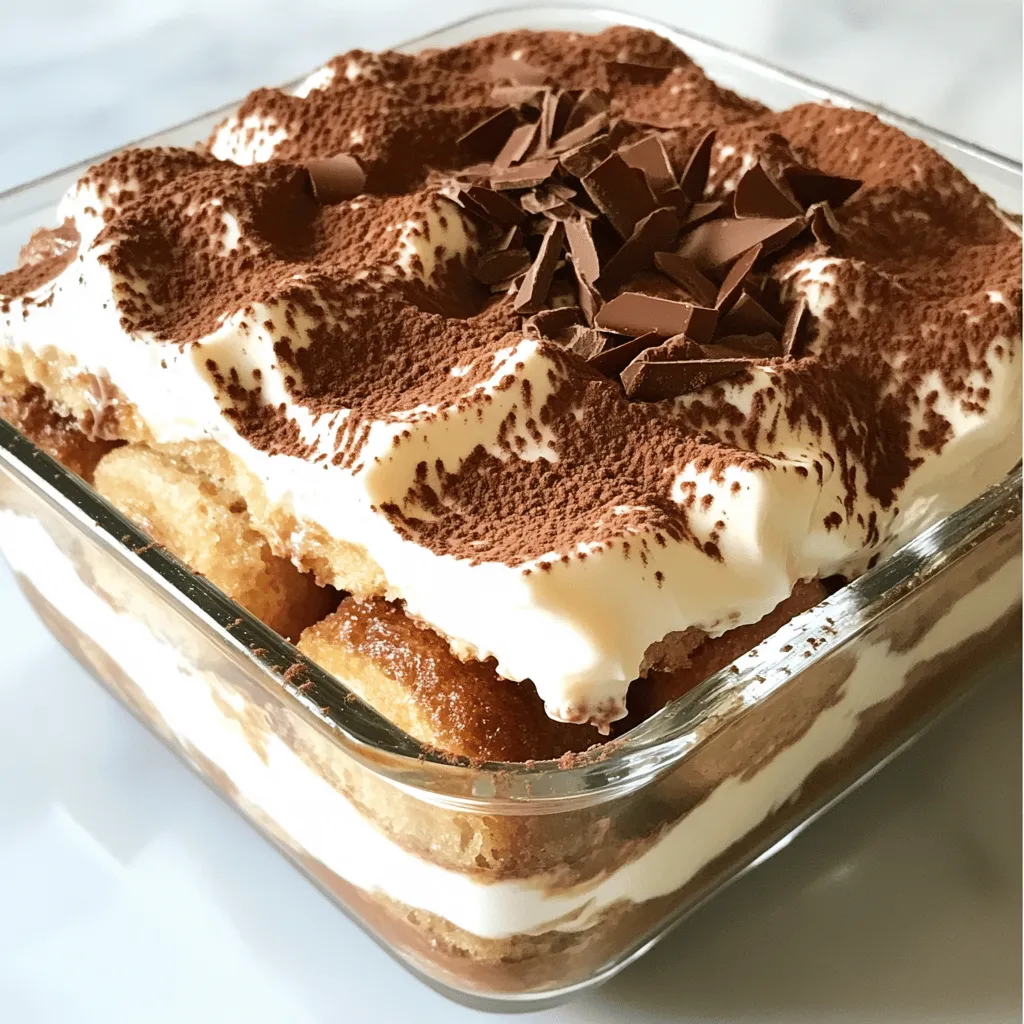
Are you ready to impress your friends and family with a delicious dessert? This No-Bake Tiramisu Delight in Simple Layers

Looking for a cool treat to beat the summer heat? You’ve come to the right place! This Mango Sorbet recipe
![To make fried banana with brown sugar, you need simple and fresh ingredients. Here’s what you will need: - 4 ripe bananas, peeled and sliced diagonally - 1 cup all-purpose flour - 1/2 cup cornstarch - 1 teaspoon baking powder - 1/2 teaspoon salt - 1/2 cup cold water (adjust for batter consistency) - 1 cup brown sugar, packed - 1 teaspoon cinnamon (optional) - Oil for frying - Fresh mint leaves for garnish These ingredients come together to create a sweet treat that's easy to make. Each item adds flavor and texture to the dish. The ripe bananas provide natural sweetness. The flour and cornstarch create a light batter that crisps up nicely. The brown sugar becomes a warm syrup, making each bite a delightful experience. For the perfect finish, the mint leaves add a pop of color. You can adjust the cinnamon for extra warmth. It’s a simple list, but it packs a big flavor punch. For the full recipe, check the details in the article. Mixing the batter First, grab a large mixing bowl. Add 1 cup of all-purpose flour, 1/2 cup of cornstarch, 1 teaspoon of baking powder, and 1/2 teaspoon of salt. Mix these dry ingredients well. Next, slowly pour in 1/2 cup of cold water. Whisk until the batter is smooth. You want it to be thick enough to coat the bananas but not too thick. Adjust the consistency by adding more water or flour if needed. Preparing the frying oil Now it's time to heat the oil. Use a deep pan or frying skillet for this. Pour enough oil to cover the bottom by about an inch. Heat the oil over medium heat. To check if it's ready, drop a small amount of batter into the oil. If it sizzles, you’re good to go! Frying the banana slices Take your ripe bananas and slice them diagonally. Dip each slice into the batter, making sure it’s well-coated. Gently place the slices into the hot oil. Fry them for about 2-3 minutes on each side. You want them to be golden brown and crispy. Once done, move the fried bananas to a plate lined with paper towels. This helps absorb extra oil. Melting the sugar and optional cinnamon In a small skillet, add 1 cup of packed brown sugar. If you like, sprinkle in 1 teaspoon of cinnamon for extra flavor. Heat it over medium heat. Stir continuously. Watch as the sugar melts into a thick syrup. This should take about 2-3 minutes. Once melted, remove it from heat. Presentation tips for enhancing the dish Now, let’s plate the fried bananas. Arrange them nicely on a serving plate. Drizzle the warm brown sugar syrup over the bananas. Let them soak for a minute to absorb the sweetness. For an added touch, garnish with fresh mint leaves. This not only looks great but adds a nice pop of color. Enjoy your sweet treat! For fried bananas, the batter must be smooth and light. Start with all-purpose flour and cornstarch. Mix them well and add water slowly. Whisk until it is smooth. If it is too thick, add more water. If it is too thin, sprinkle in a little more flour. The right batter should coat the bananas well but not be heavy. Oil is key for frying. Use enough oil to cover the bananas. Heat the oil to medium. You can test it by dropping a bit of batter in. If it sizzles, it’s ready. Fry the banana slices for about 2-3 minutes on each side. They should be golden brown and crispy. Avoid overcrowding the pan, as this can lower the oil temperature. Fried bananas taste great on their own, but you can enhance them. Serve with a scoop of vanilla ice cream for a rich treat. Add a sprinkle of nuts for crunch. A drizzle of warm brown sugar syrup makes them sweet and sticky. Fresh mint leaves add a bright touch to the plate. Enjoy these simple ideas to make your dish special. For more details on how to make this dessert, check the Full Recipe. {{image_2}} If you want to switch things up, try different fruits. Plantains are a great choice. They give you a nice, starchy taste. Apples or pears can also work well. Just slice them thinly. For the batter, you can use rice flour for a gluten-free option. This change keeps the dish light and crispy. Adding spices can take your dish to the next level. Consider a pinch of nutmeg or cardamom for warmth. You can also sprinkle some sea salt for a sweet-salty mix. Want a nutty flavor? Add chopped nuts on top after drizzling with brown sugar. Chocolate sauce or caramel can also be tasty toppings. Fried bananas have many regional styles. In Indonesia, they serve them with grated coconut. In the Philippines, they add a caramelized coating. In some parts of Latin America, they enjoy them with cheese. Each culture adds its unique spin, making this dish a fun way to explore global flavors. To keep your fried bananas fresh, store them in an airtight container. Place a paper towel at the bottom to absorb moisture. This helps prevent sogginess. You can keep them at room temperature for a few hours. For longer storage, put the container in the fridge. They stay good for about two days, but they taste best fresh. To restore crispiness, reheat fried bananas in a toaster oven. Set it to 350°F (175°C). Place the bananas on a baking sheet for 5-7 minutes. This method keeps them crunchy. If you use a microwave, they may turn soft. So, avoid that if possible. You can freeze fried bananas, but it’s best to do this right after cooking. Let them cool completely. Then, place them in a single layer on a baking sheet. Freeze them for about an hour. After freezing, transfer them to a freezer bag. Remove as much air as you can. They can last for up to a month. When ready to eat, thaw them overnight in the fridge and reheat in the toaster oven. Enjoy the sweetness all over again from the [Full Recipe]! How to make Fried Banana with Brown Sugar crispy? To get crispy fried bananas, focus on the batter. Make it light and smooth. Use cold water to keep the batter airy. Fry the bananas in hot oil, about 350°F (175°C). Avoid crowding the pan, so they fry evenly. Flip them gently to avoid breaking. Can I use other types of bananas? Yes, you can use different bananas! While ripe bananas give the best flavor, try plantains for a twist. Plantains are starchier and less sweet. They also turn golden and crispy when fried. Just remember, ripe bananas will add more sweetness. What to serve with Fried Banana with Brown Sugar? Serve fried bananas warm with a scoop of vanilla ice cream. The cold ice cream pairs well with the warm, sweet bananas. You can also add a sprinkle of chopped nuts for crunch. Fresh fruit or yogurt can balance the sweetness too. Fried banana with brown sugar is a fun treat. Each serving has about 250 calories. They contain healthy vitamins and minerals from bananas. Bananas are rich in potassium, which helps your heart. They also give you energy fast. Enjoy this treat in moderation to keep it healthy! If you have allergies, try these swaps. For gluten-free, use gluten-free flour instead of all-purpose flour. You can mix rice flour with cornstarch for a good result. For a vegan option, use a plant-based milk instead of water for the batter. This keeps the recipe tasty and safe for everyone. This article covered how to make delicious fried bananas with brown sugar. We discussed the key ingredients, the cooking steps, and tips to ensure a perfect outcome. You learned about variations and storage options too. Fried bananas are tasty snacks that you can enjoy in many ways. Experiment with different flavors and toppings. Using this guide, you can create your own version and impress your friends and family. Enjoy your cooking journey and the sweet results!](https://recipespursuit.com/wp-content/uploads/2025/04/fcef019a-40bb-4874-9614-d6dd6fd7d702.webp)
Fried bananas with brown sugar are a delicious treat you can easily make at home! This simple recipe brings together
![- 1 ½ cups graham cracker crumbs - ½ cup unsalted butter, melted - 1 cup sugar, divided - 4 (8-ounce) packages cream cheese, softened - 1 cup canned pumpkin puree - 3 large eggs - 1 teaspoon vanilla extract - 2 teaspoons ground cinnamon - ½ teaspoon ground nutmeg - ½ teaspoon ground ginger - ½ teaspoon salt - 1 cup sour cream - Whipped cream and pumpkin spice for garnish (optional) This list holds the key to making a great pumpkin cheesecake. The graham cracker crumbs give the crust a sweet crunch. The melted butter binds it all together. Use sugar to sweeten the filling and balance the pumpkin flavor. Cream cheese acts as the base, while pumpkin puree brings in that lovely fall taste. Eggs help to set the cheesecake, making it smooth and rich. Vanilla adds depth, while spices like cinnamon, nutmeg, and ginger create warmth. Salt enhances all the flavors. Lastly, sour cream gives a nice tang and creaminess. With these simple ingredients, you can create a dessert that shines at any gathering. If you want the full details on how to bring it all together, check the full recipe. 1. Preheat the oven and grease the pan: Start by setting your oven to 325°F (160°C). Grab a 9-inch springform pan and grease it with cooking spray or butter to prevent sticking. 2. Mixing graham cracker crumbs and melted butter: In a mixing bowl, combine 1 ½ cups of graham cracker crumbs and ½ cup of melted butter. Add ¼ cup of sugar to the mix. Stir until it looks like wet sand. 3. Forming the crust and baking: Press the crumb mixture firmly into the bottom of your pan. Make sure it is even. Bake this crust for 10 minutes, then set it aside to cool. 1. Beating the cream cheese and sugar mixture: In a large bowl, use an electric mixer to beat 4 packages of softened cream cheese until smooth. Slowly add in the remaining ¾ cup of sugar and mix until blended. 2. Incorporating pumpkin puree and other ingredients: Add 1 cup of canned pumpkin puree to the cream cheese. Mix in 3 large eggs and 1 teaspoon of vanilla extract. Blend until everything is well combined. 3. Pouring batter into the crust: Gently stir in 2 teaspoons of ground cinnamon, ½ teaspoon each of ground nutmeg, ground ginger, and salt. Carefully pour this batter over the cooled crust. Use a spatula to smooth the top. 1. Baking time and temperature: Place the cheesecake in the preheated oven. Bake for 60 to 70 minutes. The center should be set but still slightly jiggly. The edges need to be firm. 2. Tips for preventing cracks during baking: To avoid cracks, turn off the oven and crack the door open. Let the cheesecake cool slowly for about an hour inside the oven. 3. Cooling and refrigerating for best results: Once cooled to room temperature, spread 1 cup of sour cream over the top. Refrigerate for at least 4 hours, or better yet, overnight. This helps the cheesecake set perfectly. For the full recipe, check out the details above! To get a smooth cheesecake, all your ingredients must be at room temperature. Cold cream cheese can lead to lumps. Let the cream cheese sit out for about 30 minutes before mixing. When you mix, use a low speed on your mixer. This helps blend everything without adding too much air. Too much air can cause cracks as the cheesecake bakes and cools. For a richer flavor, use fresh spices instead of the ground ones. Freshly grated nutmeg or cinnamon sticks give a warm, bold taste. If you don’t have fresh spices, the ground ones work well too. You can add options like chocolate chips or caramel for extra fun. These can make your cheesecake even more special. Garnishing is key for a great presentation. Top your slices with whipped cream and a sprinkle of pumpkin spice. You can also add pecans or caramel drizzle for flair. Pair your cheesecake with warm cider or coffee. These drinks complement the pumpkin flavor. For a light touch, serve with fresh fruit like berries or slices of apple. For the full recipe, check out the Full Recipe section. {{image_2}} If you want to skip baking, try a no-bake version. Here’s a quick outline: - Use the same crust ingredients: graham cracker crumbs and melted butter. - For the filling, mix cream cheese, sugar, and pumpkin puree until smooth. - Add vanilla, cinnamon, nutmeg, and ginger. Mix well. - Instead of eggs, use 1 cup of whipped cream for lightness. - Pour the filling into the crust and chill for at least 4 hours. This method saves time and keeps it creamy and rich. For a plant-based treat, swap out key ingredients. Here’s how: - Replace the cream cheese with vegan cream cheese or blended cashews. - Use flax eggs instead of regular eggs. Mix 1 tablespoon of flaxseed meal with 2.5 tablespoons of water; let it sit for 5 minutes. - Follow the same steps as the original recipe, ensuring to mix well. This vegan cheesecake still offers great flavor and smooth texture. You can change the crust for different tastes and diets: - Nut-based crusts: Combine ground almonds or walnuts with melted coconut oil. This option is gluten-free. - Chocolate crust: Use chocolate cookies instead of graham crackers for a rich twist. - Cookie crust: Try crushed Oreos or gingersnaps for a fun flavor change. These crusts add a unique touch and can make your cheesecake stand out. To keep your pumpkin cheesecake fresh, store it in the fridge. Wrap it in plastic wrap or place it in an airtight container. This helps to lock in moisture and flavor. Ensure your fridge is set below 40°F (4°C) for best results. If you want to keep it longer, you can freeze it. Slice the cheesecake into pieces and wrap each slice in plastic wrap. Place the wrapped slices in a freezer bag. This method keeps it tasty for up to three months. When you're ready to eat, thaw the slices in the fridge overnight. Pumpkin cheesecake lasts about 5-7 days in the fridge. Always check for signs of spoilage. Look for an off smell, mold, or changes in texture. If any of these occur, it’s best to toss it. To reheat individual slices, place them on a microwave-safe plate. Heat for about 10-15 seconds at a time. Check after each interval. This prevents overheating, which can change the texture. For the best results, you can also use an oven. Preheat to 250°F (121°C) and warm the slices for 15-20 minutes. This keeps the cheesecake creamy and delicious. The best time to make pumpkin cheesecake is during fall. This is when pumpkin is in season and flavors shine. Many people enjoy it for Thanksgiving too. It pairs well with the holiday spirit and warm flavors. You can serve it at gatherings or cozy family dinners. Yes, you can use fresh pumpkin. Fresh pumpkin gives a rich flavor and nice texture. However, it requires more prep time. You must roast and puree the pumpkin beforehand. Canned pumpkin is easy and saves time. It also has a consistent taste. Choose what fits your schedule best. To avoid cracks, follow a few key steps. First, mix your ingredients gently. Overmixing can create air bubbles. Second, allow the cheesecake to cool in the oven. After baking, crack the oven door for an hour. This gradual cooling helps prevent cracks. Finally, chill the cheesecake overnight for the best results. Yes, you can make this cheesecake ahead of time. It keeps well in the fridge for about five days. Just be sure to cover it tightly with plastic wrap. For longer storage, you can freeze it for up to three months. Thaw it in the fridge overnight before serving. This makes it easy for parties or special occasions. Check the [Full Recipe] for more details. In this article, we explored the best ingredients for pumpkin cheesecake, step-by-step instructions, and tips for perfecting your recipe. We also discussed variations like no-bake and vegan options, plus storage tips to keep your cheesecake fresh. Whether you're a beginner or a pro baker, you can create a delicious pumpkin cheesecake. Enjoy experimenting with flavors and impressing your friends and family. Remember, baking is both an art and a science. Have fun with it!](https://recipespursuit.com/wp-content/uploads/2025/04/a49f0b7a-8cd0-4f02-82dc-bb645ca98460.webp)
Craving a fall favorite? This Best Pumpkin Cheesecake recipe combines creamy, smooth texture with the rich flavors of pumpkin and
