Skip to content
DisclaimerTerms Of UseGDPR PolicyCookie Policy

Recipes Pursuit

  • Home
  • Drinks
  • Appetizers
  • Dinner
  • Dessert
  • About
  • Contact
  • Privacy Policy
DisclaimerTerms Of UseGDPR PolicyCookie Policy

Emma Smith

- 1 pound ground beef - 1 cup breadcrumbs - 1/2 cup grated Parmesan cheese - 1/4 cup fresh cilantro, chopped - 1 tablespoon taco seasoning - 1 teaspoon garlic powder - 1/2 teaspoon onion powder - 1/4 teaspoon cayenne pepper (optional) - 1 large egg - 1 can (8 oz) refrigerated crescent roll dough - 1 cup shredded cheddar cheese - 1/2 cup salsa - Sour cream and additional cilantro for garnish The main star here is ground beef. I love using it for meatballs. It’s juicy and flavorful. Breadcrumbs help bind the meatballs. They also give a nice texture. Parmesan cheese adds a salty, nutty taste. It makes the meatballs richer. Fresh cilantro gives a bright flavor. The taco seasoning adds that classic taco taste. The crescent roll dough is fun. It makes a tasty outer layer. When baked, it gets golden and flaky. Shredded cheddar cheese melts beautifully. It adds creaminess. Salsa gives a nice kick and moisture. You can switch it up! Add cayenne pepper for heat. If you like spice, toss in jalapeños. Want a twist? Use ground turkey instead of beef. You can even try different cheeses, like pepper jack. Consider adding black beans or corn for extra flavor and texture. The possibilities are endless! For the complete recipe, check out the Full Recipe. First, gather your ingredients. You need ground beef, breadcrumbs, cheese, and spices. I love using fresh cilantro. It adds a bright flavor. In a large bowl, mix the ground beef, breadcrumbs, and cheese. Add the cilantro, taco seasoning, and spices. Don’t forget the egg! This helps bind everything together. Mix well until you have a smooth mixture. Next, shape the mixture into golf ball-sized meatballs. Aim for about one inch in diameter. Place them on a plate as you go. You should have about 12-16 meatballs. Now, get your crescent roll dough. Unroll it and lay it flat on a baking sheet. Make a large circle, with the points of the triangles facing out. Overlap the dough a bit to form a nice ring shape. With your meatballs ready, place them around the outer edge of the dough ring. Leave some space between each meatball. Next, sprinkle the shredded cheddar cheese over the meatballs. This will melt and create a yummy layer. Drizzle salsa over the meatballs as well. It adds moisture and flavor. Now, fold the points of the crescent roll dough over the meatballs. Tuck them under the ring to seal everything inside. This helps keep the meatballs juicy. Preheat your oven to 375°F (190°C). Once heated, place the ring in the oven. Bake for 25-30 minutes. Look for a golden brown crust and cooked meatballs. The internal temperature should reach 160°F for safety. When it’s done, take it out and let it cool for a few minutes. Slice the Taco Meatball Ring carefully. Serve it on a large platter. Add sour cream and extra cilantro for garnish. This creates a beautiful and tasty meal. Enjoy! To make great meatballs, combine your ingredients well. Mix the ground beef, breadcrumbs, and seasonings in a bowl. Use your hands for this. This helps blend all the flavors. Make sure to form meatballs that are about one inch wide. This size cooks evenly and stays juicy. If you want a softer meatball, add a little milk to the mix. When using crescent roll dough, keep it cold. Cold dough is easier to handle. Unroll it gently to avoid tearing. Lay it out in a circle on your baking sheet. Overlap the triangles slightly to form a ring. This makes a nice base for your meatballs. For an extra crispy crust, brush the dough with a little melted butter before baking. Presentation is key to making your meal pop. Serve the Taco Meatball Ring on a big platter. Add dollops of sour cream on top of the meatballs. Sprinkle fresh cilantro around the dish. This adds color and freshness. You can also drizzle extra salsa for a fun touch. A well-presented dish makes every bite feel special. Check out the Full Recipe for more tips! {{image_2}} You can make a tasty vegetarian version of the Taco Meatball Ring. Use lentils, black beans, or chickpeas instead of meat. Mash them up and mix with breadcrumbs and cheese. Add taco seasoning for flavor. Form them into meatballs just like the original recipe. This way, you still enjoy the fun and flavor! If you like heat, spice up your meatballs! Add more cayenne pepper or some chopped jalapeños to the mix. You can also use spicy taco seasoning. For an extra kick, drizzle hot sauce over the finished ring. This adds bold flavor and makes every bite exciting. Cheese lovers can enjoy this dish even more. Try mixing different cheeses into the meatball mix. Use pepper jack for spice or mozzarella for a gooey texture. You can also add fresh herbs like oregano or parsley to the meat mixture. This will bring freshness and depth to the flavor. For the full recipe, check the details above! After you enjoy your Taco Meatball Ring, store any leftovers in the fridge. Place them in an airtight container. They will stay fresh for about three days. Make sure to let it cool down before sealing. This helps keep the flavors intact. If you want to save the Taco Meatball Ring for later, freezing is a great option. Wrap the whole ring tightly in plastic wrap. Then, place it in a freezer bag. It can last for up to three months in the freezer. When you're ready to eat it, just thaw overnight in the fridge. To reheat, preheat your oven to 350°F (175°C). Place the Taco Meatball Ring on a baking sheet. Cover it with foil to keep it moist. Heat for about 15-20 minutes, or until warm. If you prefer, you can use the microwave for a quick option. Just be careful not to overcook it, or the meatballs might dry out. Enjoy your meal again with all its tasty flavors! It takes about 25 to 30 minutes to cook the Taco Meatball Ring. Preheat the oven to 375°F (190°C) first. Then, bake until the dough is golden and the meatballs are done. An internal temperature of 160°F means they are safe to eat. Yes, you can use different types of meat. Ground turkey, chicken, or pork all work well. Each type of meat brings a unique taste. Just make sure to adjust cooking time if needed, as some meats may cook faster or slower. You can serve many sides with the Taco Meatball Ring. Try a fresh salad or some tortilla chips. Guacamole and salsa make great dips. You can also add some rice or beans for a heartier meal. This dish pairs well with sour cream and extra cilantro for flavor. For the full experience, check out the Full Recipe to get inspired! You now have a simple guide to make a tasty Taco Meatball Ring. We explored the key ingredients and how to customize them. I shared step-by-step instructions, tips to improve texture, and storage tricks. Feel free to try variations like vegetarian options or spicy flavors. Remember, cooking is fun! Enjoy your meal and share it with others. Your Taco Meatball Ring will impress. Happy cooking!

Taco Meatball Ring Flavorful and Fun Meal Idea

Looking for a fun and tasty meal idea? The Taco Meatball Ring is your answer! It’s easy to make, full

To make Air Fryer Lasagna Fritta, gather these main ingredients: - 8 lasagna noodles, cooked and chilled - 1 cup ricotta cheese - 1 cup shredded mozzarella cheese - 1/2 cup grated Parmesan cheese - 1 egg, beaten - 1 tablespoon fresh parsley, chopped - 1 teaspoon garlic powder - 1 teaspoon onion powder - 1 teaspoon Italian seasoning - Salt and pepper to taste - 1 cup marinara sauce (for dipping) - Cooking spray These ingredients create a delicious filling and crispy outside that you will love. You can enhance the flavor of your Air Fryer Lasagna Fritta with these optional ingredients: - Fresh basil for a burst of freshness - Crushed red pepper for heat - Spinach or kale for extra greens - Italian sausage for a meaty twist Adding any of these can take your dish to the next level. If you have dietary needs, here are some substitutes: - Use gluten-free lasagna noodles for a gluten-free option. - Swap ricotta with dairy-free cheese for a vegan dish. - Use egg replacements like flaxseed meal mixed with water for an egg-free option. These swaps ensure everyone can enjoy this tasty treat. For the full recipe, check out the details. To make the cheese filling, start by gathering your ingredients. In a bowl, mix the ricotta cheese, mozzarella cheese, and Parmesan cheese. Add the beaten egg, chopped parsley, garlic powder, onion powder, Italian seasoning, salt, and pepper. Use a fork or spoon to blend everything well. The mixture should be creamy and smooth. This filling is key to your lasagna fritta's flavor. If you want a richer taste, feel free to add more Parmesan cheese. Now it’s time to assemble your rolls. Take a cooked lasagna noodle and lay it flat on a clean surface. Spoon a generous amount of your cheese filling along one edge of the noodle. Roll it up tightly, like a burrito, to keep the filling inside. Make sure the seam is on the bottom to prevent unrolling. Repeat this for each noodle until you use all the filling. You will end up with delicious rolls ready for air frying. Preheat your air fryer to 375°F (190°C). This step ensures even cooking and crispiness. While it heats, spray the basket with cooking spray to avoid sticking. Place the rolls seam-side down in a single layer, making sure they don’t touch. Lightly spray the tops with more cooking spray for extra crunch. Cook them for 8 to 10 minutes. Watch closely as they turn golden brown and crispy. Once done, let them cool for a minute. Serve with marinara sauce for dipping. Enjoy your crispy and flavorful lasagna fritta! To get that perfect crispy texture, follow these steps: - Use cooked noodles. Cook the lasagna noodles until they are al dente. This keeps them firm. - Chill the noodles. Let the noodles cool after cooking. Chilling helps them hold their shape. - Don’t skip the spray. Lightly spray the tops of the rolls with cooking spray. This adds crunch as they fry. - Space them out. Place the rolls in a single layer in the air fryer. Give them room to breathe. - Check the time. Aim for 8-10 minutes at 375°F. Watch closely for that golden color. Here are some mistakes that can ruin your lasagna fritta: - Overstuffing the noodles. Don’t pack too much filling inside. Keep it light and even. - Skipping seasoning. Don’t forget to add salt and pepper to the filling. A little flavor goes a long way. - Not preheating the air fryer. Always preheat for even cooking. It helps achieve that crispy exterior. - Crowding the basket. Avoid putting too many rolls in at once. This can lead to soggy results. To keep your leftovers tasting great, follow these steps: - Air fry for best results. Preheat your air fryer to 375°F and cook for 3-5 minutes. This keeps them crispy. - Use a microwave if needed. If you're short on time, microwave in short bursts. This is quick but may lose crispiness. - Cover with a paper towel. If microwaving, cover the fritta with a paper towel. This helps absorb moisture and keeps them from getting soggy. For the complete recipe, check out the Full Recipe. Enjoy your crispy and flavorful delight! {{image_2}} To make a vegetarian Air Fryer Lasagna Fritta, swap out the meat for veggies. You can use spinach, mushrooms, or zucchini. Just chop them up and sauté them briefly. Mix these veggies into your cheese filling. This adds great flavor and color. Plus, it makes your dish healthier and lighter. You can still enjoy all those cheesy layers without the meat. For gluten-free Air Fryer Lasagna Fritta, choose gluten-free lasagna noodles. Many brands offer options that taste great. Ensure all your other ingredients are also gluten-free. Check the labels on cheese and sauces. With these swaps, you can enjoy the same crispy texture without the gluten. You can boost the taste of your Air Fryer Lasagna Fritta with some simple changes. Try adding fresh herbs like basil or oregano to the cheese mixture. You can even mix in some sun-dried tomatoes for a sweet touch. If you love heat, a pinch of red pepper flakes can bring the spice. These small tweaks create a unique dish every time, keeping it fresh and exciting. For the full recipe, click here. To store your Air Fryer Lasagna Fritta, wait until they cool down. Place them in an airtight container. They will stay fresh in the fridge for up to three days. Make sure to separate layers with parchment paper if you stack them. This keeps them from sticking together. You can freeze these tasty rolls for later. First, let them cool completely. Then, wrap each roll in plastic wrap. Place the wrapped rolls in a freezer-safe bag. They will last for up to two months. When you want to eat them, just take them out and thaw in the fridge overnight. Reheating is easy and quick. For the best results, use an air fryer. Set it to 350°F (175°C) and heat for about 5-7 minutes. You can also use an oven. Preheat it to 350°F (175°C) and bake for 10-15 minutes. This way, they stay crispy. Enjoy your delicious Air Fryer Lasagna Fritta again! For the complete recipe, check out the Full Recipe. Air Fryer Lasagna Fritta is a fun twist on classic lasagna. It features rolled lasagna noodles filled with creamy cheese. You cook these rolls in an air fryer, making them crispy and golden. The air fryer gives them a crunchy texture without deep frying. You can dip these bites in marinara sauce for added flavor. It’s a great way to enjoy lasagna in a new form. No, it's best to use cooked lasagna noodles. Uncooked noodles will not soften properly in the air fryer. They need to be boiled and chilled first for the right texture. Cooked noodles roll easily and hold the filling well. So, stick with cooked noodles for the best results. To add some heat, you can mix in red pepper flakes into the cheese filling. You can also use spicy Italian sausage instead of just cheese. Another option is to add jalapeños or hot sauce to the marinara dip. Adjust the spice to your liking for a tasty kick. These small changes can make your Air Fryer Lasagna Fritta exciting! Air Fryer Lasagna Fritta brings fun to your kitchen. You learned the ingredients, steps, and tips to make it right. Whether you want a crunchy texture or a spicy kick, you've got options. Always remember to store leftovers properly for later enjoyment. I hope this guide helps you make delicious meals your way. Enjoy your cooking adventure!

Air Fryer Lasagna Fritta Crispy and Flavorful Delight

Are you ready to take your taste buds on a crispy adventure? In this blog post, I’ll share my tried-and-true

For this tasty stuffed chicken, gather these simple ingredients: - 4 boneless, skinless chicken breasts - 2 cups mushrooms, finely chopped (button or cremini work well) - 1 small onion, finely chopped - 2 cloves garlic, minced - 1/2 cup spinach, finely chopped - 1/2 cup low-fat cream cheese, softened - 1/2 cup shredded mozzarella cheese - 1 teaspoon dried thyme - 1 teaspoon dried basil - Salt and pepper to taste - 1 tablespoon olive oil - Fresh parsley for garnish Each serving is not only delicious but also healthy. Here’s what you get per serving: - Calories: 290 - Protein: 32g - Carbohydrates: 6g - Dietary Fiber: 1g - Fat: 14g - Saturated Fat: 6g This dish packs protein from the chicken and cheese, plus vitamins from the mushrooms and spinach. You can easily swap ingredients for your own tastes or needs: - Chicken: Use turkey breasts for a lighter option. - Mushrooms: Try portobello for a meatier texture. - Cream Cheese: Greek yogurt works well for a tangy twist. - Cheese: Swap mozzarella for cheddar or feta for more flavor. - Herbs: Use fresh herbs if you have them; they add great taste. These changes keep the dish fresh and fun. Check the Full Recipe for more cooking tips! 1. Start by preheating your oven to 375°F (190°C). This step warms up the oven for even cooking. 2. In a skillet, pour in the olive oil and heat it over medium heat. 3. Add the finely chopped onion and minced garlic to the skillet. Cook until the onion is soft and clear, which takes about 3-4 minutes. 4. Next, toss in the finely chopped mushrooms. Cook them until they turn brown, which takes about 5-7 minutes. 5. Add the chopped spinach into the mix and stir. Cook until the spinach wilts, which should take about 2 minutes. 6. Season the mixture with thyme, basil, salt, and pepper to taste. Remove from heat and let it cool a bit. 7. In a bowl, combine the mushroom mixture with softened cream cheese and shredded mozzarella. Mix well until everything is blended. 8. Take each chicken breast and use a sharp knife to make a pocket. Cut horizontally, but do not slice all the way through. 9. Stuff each chicken breast with the mushroom filling. If needed, use toothpicks to keep the filling inside. 10. Place the stuffed chicken breasts in a greased baking dish. Sprinkle salt and pepper on top for added flavor. 11. Bake in the preheated oven for 25-30 minutes. Check that the chicken reaches an internal temperature of 165°F (74°C). 12. Once done, remove the chicken from the oven. Let it rest for 5 minutes before serving. 13. Garnish each stuffed chicken breast with fresh parsley for a touch of color. This adds a nice visual appeal to your dish. 14. Serve the healthy mushroom stuffed chicken with your favorite sides for a tasty weeknight meal. Enjoy the savory flavors and feel good about your healthy choice! 15. For the complete recipe, check out the Full Recipe section earlier in the article. To make stuffed chicken just right, focus on the filling. Use fresh ingredients for flavor. I love using mushrooms, spinach, and creamy cheese. This mix adds taste and keeps the chicken moist. When you cut the chicken, make sure to create a deep pocket. Not cutting all the way through helps hold the filling better. After stuffing, secure the opening with toothpicks if needed. This keeps the filling inside while it cooks. One big mistake is overcooking the chicken. This can make it dry and tough. Use a meat thermometer to check the internal temperature. It should reach 165°F (74°C) for safety. Another mistake is not seasoning enough. Don’t skip the salt and pepper. They enhance the taste of every bite. Lastly, be careful not to rush the cooling of the filling. Letting it cool a bit makes it easier to handle. For this recipe, a sharp knife is key. It helps you cut the chicken properly. I also recommend a large skillet for cooking the filling. A good baking dish ensures even cooking. You might want a meat thermometer for best results. It helps you know when the chicken is done. Lastly, having toothpicks on hand can help keep your filling snug. You can find all the details in the Full Recipe for a tasty way to enjoy this dish. {{image_2}} You can mix things up with your stuffing. Try adding some diced bell peppers for a sweet crunch. Chopped sun-dried tomatoes add a tangy flavor. You might also like to add nuts for a bit of crunch. Pine nuts or walnuts work well. Fresh herbs like parsley or chives boost the taste too. These additions will make your mushroom stuffing even more exciting. If you want to switch proteins, turkey works great. Turkey breasts are lean and tasty. You can also use pork tenderloin for a richer flavor. For a vegetarian option, try stuffed portobello mushrooms. They are meaty and absorb flavors well. This way, you can enjoy a filling meal without chicken. For a dairy-free version, substitute cream cheese with a plant-based cream. Nutritional yeast can add a cheesy flavor without dairy. If you need to keep it low-carb, use zucchini or eggplant instead of chicken. Both options can hold the stuffing nicely. For gluten-free diets, ensure all ingredients are certified gluten-free. These swaps make this dish fit various dietary needs while keeping it delicious. For the full recipe, check out the Savory Mushroom-Stuffed Chicken Delight. After enjoying your mushroom stuffed chicken, let it cool down. Place the leftovers in an airtight container. Store it in the fridge for up to three days. This keeps the chicken fresh and ready for a quick meal. When you're ready to eat your leftovers, preheat your oven to 350°F (175°C). Place the stuffed chicken in a baking dish. Cover it with foil to keep it moist. Heat for about 15-20 minutes, or until it's warm. You can also use the microwave for a quick option. Heat on medium power for 2-3 minutes, checking to avoid overcooking. You can freeze the mushroom stuffed chicken for longer storage. Wrap each piece in plastic wrap, then place it in a freezer bag. Be sure to remove as much air as possible. It will stay good for up to three months. When you're ready to eat, thaw it in the fridge overnight before reheating. For best flavor, enjoy it within a month. For the full recipe, refer to the detailed instructions above. The best mushrooms for stuffing chicken are button or cremini. Both have great flavor and texture. You can also try shiitake or portobello for a bolder taste. They add a nice earthiness to your dish. I like to finely chop them to blend well with the filling. This way, every bite is packed with yummy mushroom goodness. Yes, you can prepare this dish ahead of time. You can stuff the chicken breasts and then cover them in the fridge. Just make sure to cook them within 24 hours for the best taste and safety. When you're ready to cook, just take them out and bake. This makes dinner easy on busy weeknights! To check if the chicken is done, use a meat thermometer. The inside should reach 165°F (74°C). If you don't have a thermometer, you can cut into the thickest part. The juices should run clear, not pink. This ensures your meal is safe and delicious. Trust me, no one likes dry chicken, so avoid overcooking! For the detailed cooking method, you can refer to the Full Recipe. This blog post covered how to make stuffed chicken, from ingredients to storage. You learned about the key ingredients and their nutrition. I shared tips to perfect your dish and highlighted common mistakes to avoid. You can use various proteins and customize the stuffing. Remember to store leftovers properly and reheat them safely. With these steps, you can create a tasty meal every time. Enjoy your cooking journey and impress your friends and family!

Healthy Mushroom Stuffed Chicken Tasty Weeknight Meal

Are you ready to spice up your weeknight dinners? This Healthy Mushroom Stuffed Chicken is packed with flavor and nutrients.
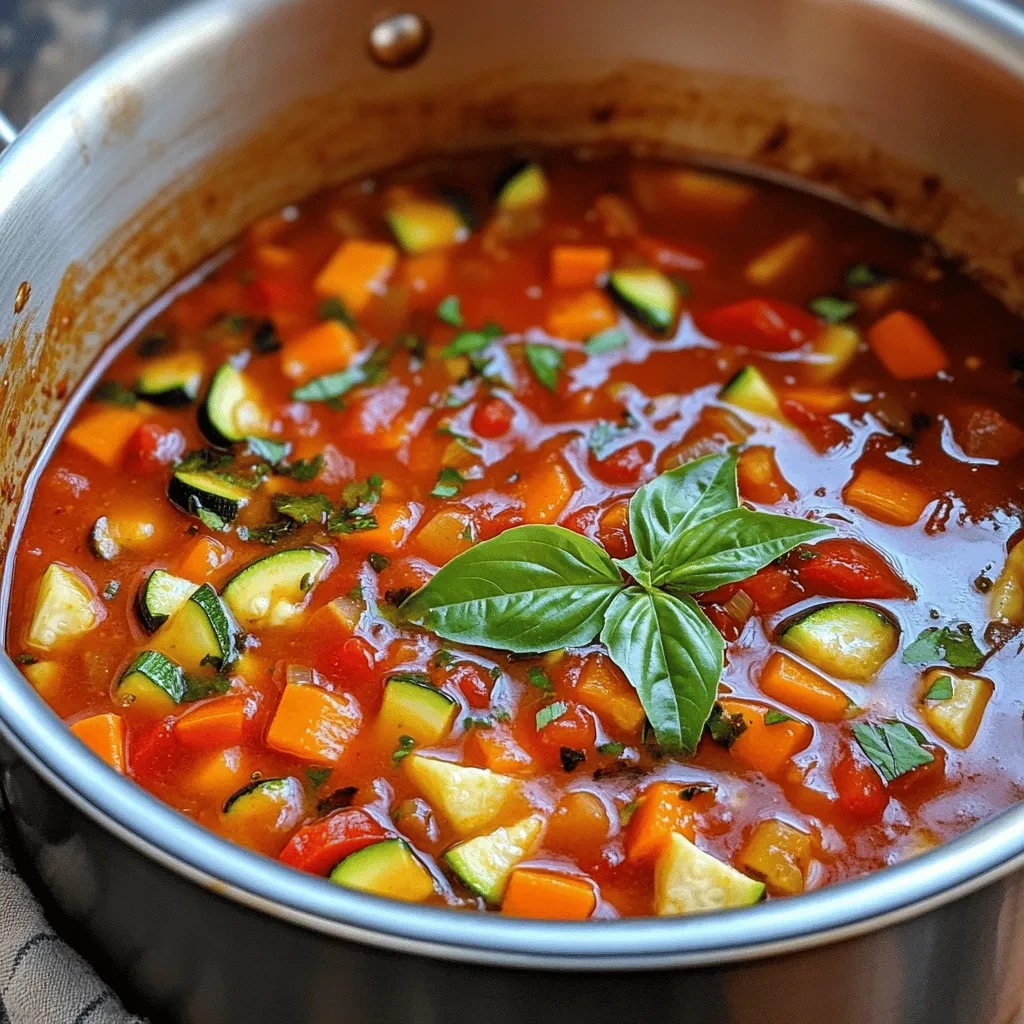
To make a tasty taco soup, you will need some simple ingredients. Here’s what you need: - 1 lb ground beef or ground turkey - 1 medium onion, diced - 1 bell pepper, diced (any color) - 2 cloves garlic, minced - 1 can (15 oz) black beans, rinsed and drained - 1 can (15 oz) corn, drained - 1 can (14.5 oz) diced tomatoes with green chilies - 1 can (15 oz) tomato sauce - 2 cups beef or chicken broth - 1 packet taco seasoning - 1 teaspoon cumin - Salt and pepper to taste - Optional toppings: shredded cheese, sour cream, diced green onions, tortilla chips Each ingredient adds a layer of flavor. The ground meat gives it heartiness. The beans and corn add texture. The tomatoes and broth create a rich base. Taco seasoning and cumin bring that classic taco taste. For added fun, try different toppings. Shredded cheese melts beautifully on top. Sour cream adds creaminess. Fresh green onions give a nice crunch. Tortilla chips add a delightful crunch. This taco soup is not just easy; it’s also a crowd-pleaser. For the full recipe, you can check out the complete instructions. 1. Sauté vegetables for base flavor Start by heating a splash of olive oil in a large pot over medium heat. Add the diced onion and bell pepper. You want to cook them until they are soft and the onion looks clear. This should take about 5 minutes. 2. Brown the ground beef or turkey Next, add the minced garlic. Cook it for one more minute until it smells great. Then, add the ground beef or turkey. Break it apart with a spatula as it cooks. Make sure it is brown and no longer pink. This will take about 5 to 7 minutes. Drain any fat that is left in the pot. 3. Combine all ingredients in a pot Now, it’s time to mix in the fun stuff. Add the black beans, corn, diced tomatoes, tomato sauce, and broth to the pot. Don’t forget to add the taco seasoning and cumin. Stir everything well so it all blends together. 4. Simmer and adjust seasoning Bring the mixture to a boil. Once it’s bubbling, turn down the heat and let it simmer for 15 minutes. This helps all the flavors mix nicely. Taste the soup and add salt and pepper as needed. Enjoy your warm and tasty taco soup! For the full recipe, check out the section above. To make your taco soup burst with flavor, I suggest using homemade taco seasoning. The fresh spices really make a difference. You can mix chili powder, cumin, and paprika for a quick blend. Allowing the soup to sit for a while also helps. This way, the flavors can blend and deepen. If you can, let it chill overnight. You will taste the improvement. Taco soup is best served hot. A few garnishments can elevate your meal. I love adding shredded cheese and a dollop of sour cream. You can also sprinkle diced green onions on top for freshness. For sides, cornbread pairs well with the soup. Tortilla chips make a great crunchy addition too. You can dip the chips into the soup for extra fun! Using a slow cooker can make your life easier. Just throw in all the ingredients and let it simmer. It’s perfect for busy days. If you have leftovers, freezing is a smart choice. Cool the soup first, then store it in freezer-safe bags. When you want to enjoy it later, just thaw and reheat. This way, you have a quick meal ready anytime! For the complete recipe, don't forget to check out the [Full Recipe]. {{image_2}} You can easily change a few ingredients in taco soup. If you want a leaner meal, swap ground beef for ground turkey. This will cut down on fat but keep the taste rich. You can also change the beans. Use kidney beans, pinto beans, or even black-eyed peas. Each choice can add a new twist to the soup. For those who prefer no meat, a vegetarian option is simple. Just leave out the meat and add more beans or veggies. You can also use vegetable broth instead of beef or chicken broth. If you need it gluten-free, check your taco seasoning and use gluten-free broth. These small changes can help everyone enjoy this tasty meal. To keep your taco soup fresh, store it in the fridge. Use an airtight container to prevent spills and keep the soup tasty. It lasts about three to four days in the fridge. If you want to save it for longer, freezing is a great option. For freezing, let the soup cool to room temperature first. Then, pour it into freezer-safe bags or containers. Leave some space at the top, as the soup will expand when frozen. Taco soup can stay good for up to three months in the freezer. When you are ready to enjoy your taco soup again, I recommend reheating it on the stove. Pour the soup into a pot over medium heat. Stir often to heat evenly. You can also use the microwave. Place the soup in a microwave-safe bowl, then cover it loosely. Heat in short bursts, stirring in between, until hot. Avoid overcooking by watching the soup closely. If it starts to bubble too much, lower the heat or stop heating. This keeps the flavors bright and fresh. Enjoy your taco soup like it's the first time! Taco soup lasts for about three to four days in the fridge. Make sure to store it in an airtight container. This keeps it fresh and helps the flavors stay intact. If you want it to last longer, consider freezing it. Yes, you can make taco soup ahead of time. It tastes even better the next day! Just prepare it, let it cool, and store it in the fridge. When you are ready to eat, heat it up on the stove or in the microwave. Taco soup pairs well with several sides. You can serve it with cornbread or tortilla chips. A fresh salad or sliced avocado adds a nice touch too. For a fun twist, try adding some crushed tortilla chips right on top! Taco soup can be a healthy choice. It is packed with protein from the meat and fiber from the beans. You can also add your favorite veggies to boost the nutrition. Just watch your portion sizes and toppings for better health. Absolutely! You can control the spice in taco soup. If you like it mild, use less taco seasoning or skip the pepper. For more heat, add chopped jalapeños or extra chili powder. Taste as you go to find your perfect balance. For the complete recipe, check out the Full Recipe. This blog post covered how to make a tasty taco soup. You learned about key ingredients and simple steps for preparation. I shared tips for enhancing flavors and suggested how to serve it well. You can swap ingredients for different diets and store leftovers easily. Remember, taco soup is flexible and fun to make. Try your own twists on the recipe. Enjoy your cooking!

Quick & Easy Taco Soup Flavorful and Satisfying Meal

Looking for a meal that’s quick, easy, and full of flavor? My Quick & Easy Taco Soup checks all the

- 1 cup fresh spinach, chopped - 1 cup canned artichoke hearts, drained and chopped - ½ cup cream cheese, softened - ½ cup sour cream - 1 cup shredded mozzarella cheese - ¼ cup grated Parmesan cheese - 1 teaspoon garlic powder - ½ teaspoon salt - ¼ teaspoon black pepper - 1 package of phyllo pastry dough (about 16 sheets) - Olive oil spray or melted butter for brushing - Mixing bowl - Muffin tin - Knife or pizza cutter - Baking sheet I love how simple yet satisfying Spinach Artichoke Dip Bites are. You start with fresh spinach and canned artichoke hearts. These bring a bright flavor and great texture to the dish. The cream cheese and sour cream make the filling rich and creamy. Shredded mozzarella and grated Parmesan add a cheesy goodness that melts in your mouth. For seasoning, garlic powder, salt, and black pepper enhance the flavors. You can’t forget the phyllo pastry dough. It gives the bites a flaky and crispy crust. For brushing, you can use olive oil or melted butter. Both options add a nice golden color and flavor. You’ll need a mixing bowl to mix everything. A muffin tin helps shape the bites perfectly. A knife or pizza cutter is handy for cutting the dough. Finally, a baking sheet will catch any drips while baking. With these ingredients and tools ready, you’re set to make delicious Spinach Artichoke Dip Bites. Check out the Full Recipe for complete instructions! To start, gather your ingredients. Combine the chopped spinach, artichokes, cream cheese, sour cream, mozzarella, and Parmesan cheese in a mixing bowl. Make sure to mix well. You want all the flavors to blend. Next, season the mixture with garlic powder, salt, and black pepper. Stir until everything is evenly mixed. This filling is the heart of your bites. Now, preheat your oven to 375°F (190°C). While it heats, unroll the phyllo dough on a clean surface. Take one sheet of dough and lay it flat. Lightly brush it with olive oil or melted butter. Then, place a second sheet on top and repeat the brushing. This adds flavor and helps the layers stick together. With the dough ready, it's time to cut it. Use a sharp knife or pizza cutter to slice the phyllo into 3-inch squares. You should get about 12 squares from each set of two sheets. Now, gently press each square into a greased mini muffin tin. Let the edges hang over the sides. Once all squares are in the tin, fill each phyllo cup with the spinach-artichoke mixture. Spoon it generously, filling them to the brim. Finally, place the muffin tin in the oven and bake for 15-20 minutes. You want the phyllo to turn crispy and golden brown. Enjoy your delicious bites! For the complete recipe, check the Full Recipe section. Handling phyllo dough can be tricky. Here are some tips to make it easier: - Keep it covered: Always cover the phyllo sheets with a damp towel. This keeps them from drying out. - Use a light touch: When brushing with olive oil or butter, be gentle. You want to keep the layers intact. - Work quickly: Phyllo dough dries fast. Prepare your cups and fill them as soon as possible. For even filling distribution, follow these steps: - Spoon carefully: Use a small spoon to add the filling. This helps you control the amount. - Level it out: Smooth the filling to be even across each cup. This ensures all bites have the same great taste. For a stunning presentation, try these ideas: - Vibrant platter: Arrange the bites on a colorful platter. Add some fresh basil leaves for flair. - Garnish with cheese: A sprinkle of extra Parmesan adds a nice touch. When it comes to dips or sauces, consider these options: - Creamy ranch: This pairs well with the rich flavors of the bites. - Spicy sriracha: For those who like a kick, this adds great heat. To keep your Spinach Artichoke Dip Bites fresh, follow these storage tips: - Airtight container: Place the bites in an airtight container. This keeps them from getting soggy. - Refrigerate: Store them in the fridge for up to three days. For the best taste when reheating: - Oven method: Preheat your oven to 350°F (175°C). Bake for about 10 minutes. This keeps them crispy. - Microwave caution: If using a microwave, heat in short bursts. This may make them soft. Enjoy your delicious bites with these simple tips and tricks! For the full recipe, refer back to the main section. {{image_2}} You can switch up the cheeses to make it your own. Try adding feta for a tangy kick. Goat cheese also works well for a creamy texture. If you want a sharper taste, use cheddar cheese. You can also mix in different vegetables. Swap spinach for kale or Swiss chard. For a crunch, add diced bell peppers or mushrooms. These swaps keep the bites exciting and fresh. If you're gluten-free, use gluten-free phyllo dough. You can also try puff pastry as a substitute. Both options still give you that flaky texture. For a vegan version, replace cream cheese and sour cream with vegan alternatives. Use cashew cream or tofu for a creamy base. Make sure to choose a vegan cheese that melts well. This way, everyone can enjoy the dip bites. These bites shine at parties and gatherings. They are easy to grab and enjoy. Serve them warm on a colorful platter for a great look. For kids, make mini versions using smaller phyllo squares. You can also add fun shapes with cookie cutters. Serve with a side of marinara or ranch for dipping. These adaptations make the bites fun and appealing for all ages. Spinach Artichoke Dip Bites taste best fresh. You can store them in the fridge for about 3 days. Just keep them in an airtight container. The flavors may change a bit over time, but they will still be tasty. For the best experience, reheat them in the oven to restore the crispness. Yes, you can freeze Spinach Artichoke Dip Bites. Wrap them well in plastic wrap or foil. Place them in a freezer-safe bag. They can last up to 2 months in the freezer. To enjoy, thaw them in the fridge overnight. Reheat them in the oven to get that crispy crust back. You can serve many tasty things with Spinach Artichoke Dip Bites. Here are some ideas: - Fresh veggie sticks like carrots and celery - Crunchy pita chips or tortilla chips - A light salad with vinaigrette - Creamy ranch or yogurt dip These pairings create a fun and delicious spread for any gathering! Ingredients: - 1 cup fresh spinach, chopped - 1 cup canned artichoke hearts, drained and chopped - ½ cup cream cheese, softened - ½ cup sour cream - 1 cup shredded mozzarella cheese - ¼ cup grated Parmesan cheese - 1 teaspoon garlic powder - ½ teaspoon salt - ¼ teaspoon black pepper - 1 package of phyllo pastry dough (about 16 sheets) - Olive oil spray or melted butter for brushing Instructions: 1. Prep the Filling: In a bowl, mix the spinach, artichokes, cream cheese, sour cream, mozzarella, Parmesan, garlic powder, salt, and black pepper. Stir well to combine. 2. Prep the Phyllo Dough: Preheat your oven to 375°F (190°C). Unroll the phyllo dough. Place one sheet on a flat surface and brush it lightly with olive oil or melted butter. Add a second sheet on top and brush again. 3. Cut the Dough: Use a knife or pizza cutter to slice the phyllo into 3-inch squares. Each set of two sheets gives you about 12 squares. 4. Form the Cups: Press each square into a greased mini muffin tin, letting the edges hang over. Do this until all squares are used, making about 12 cups. 5. Fill the Cups: Spoon the spinach-artichoke mix into each phyllo cup, filling to the top. 6. Bake: Place the muffin tin in the oven. Bake for 15-20 minutes, until the phyllo is golden and crispy. 7. Cool and Serve: Once baked, take the bites out of the tin. Let them cool slightly before serving. This recipe is simple and fun. You can find the full recipe in the section above. Enjoy your tasty bites! In this article, we explored how to make delicious Spinach Artichoke Dip Bites from scratch. You learned about key ingredients, like fresh spinach and cream cheese, as well as how to handle phyllo dough. We discussed tips for perfect bites and some fun variations. Now, you have the tools and insights to create these tasty treats for any gathering. Get ready to impress your friends and family with your cooking skills! Enjoy the process and the tasty results.

Savory Spinach Artichoke Dip Bites Simple Recipe

If you’re craving a tasty snack that dazzles at parties, look no further! These Savory Spinach Artichoke Dip Bites are

To make a tasty Zucchini Noodle Alfredo, you need the following ingredients: - 4 medium zucchinis, spiralized into noodles - 1 cup cauliflower florets, steamed - 1 cup unsweetened almond milk - 1/4 cup nutritional yeast - 2 tablespoons olive oil - 1 tablespoon garlic, minced - 1 tablespoon onion powder - 1 teaspoon vegetable broth powder (optional) - Salt and pepper, to taste - Fresh parsley, chopped (for garnish) - Grated Parmesan cheese (optional, for a non-vegan version) These ingredients create a creamy and rich sauce that pairs perfectly with the zucchini noodles. Feel free to customize your Alfredo dish with these optional ingredients: - Fresh spinach or kale for added greens - Cherry tomatoes for a burst of color and flavor - Mushrooms for extra earthiness - Red pepper flakes for a spicy kick - Cooked chicken or shrimp for added protein Adding these can enhance the dish and make it your own. This dish is not only delicious but also packed with nutrients. Here’s a quick look at the nutritional benefits: - Zucchini is low in calories and high in vitamins A and C. - Cauliflower is rich in fiber and antioxidants. - Nutritional yeast adds protein and B vitamins. - Almond milk is a low-calorie dairy alternative. This recipe is a great option for a light meal that doesn't skimp on flavor. It fits well into vegan and gluten-free diets, offering a nourishing choice for many. Enjoy the creamy goodness without the guilt! For the full recipe, check out the detailed cooking instructions. To start, you need four medium zucchinis. Spiralize them into noodles using a spiralizer or a vegetable peeler. If you don’t have a spiralizer, a peeler works well too. After spiralizing, set the noodles aside. They should look like thin pasta strands. This makes the dish light and fun. For the sauce, you will need one cup of steamed cauliflower florets. Steam them until they are soft, which takes about ten minutes. Once cooked, place the florets in a blender. Add one cup of unsweetened almond milk, one-fourth cup of nutritional yeast, two tablespoons of olive oil, one tablespoon of minced garlic, and one tablespoon of onion powder. Season with salt and pepper. Blend all these until the mixture is smooth and creamy. If you like, you can add vegetable broth powder for extra flavor. Taste and adjust the seasoning if needed. Now, grab a large skillet and heat a little olive oil over medium heat. Add your spiralized zucchini noodles and sauté them for about three to four minutes. You want them to soften just a bit. Then, pour your creamy Alfredo sauce over the noodles in the skillet. Stir well to coat all the noodles. Let it cook for another minute to warm the sauce. Finally, remove it from the heat. Serve right away, garnishing with fresh parsley and some grated Parmesan cheese if you want. Enjoy your delicious Zucchini Noodle Alfredo! For the complete details on this recipe, check the Full Recipe. Pick firm zucchinis that feel heavy for their size. Look for smooth skin without spots. Smaller zucchinis taste better and are less watery. They also spiralize easier. Aim for zucchinis about 6 to 8 inches long. Always wash them well before using. To make a rich and creamy sauce, blend the cooked cauliflower well. The almond milk adds creaminess without the calories. Nutritional yeast gives it a cheesy flavor without dairy. Adjust the salt and pepper to your taste. You can also add a splash of vegetable broth for extra depth. Sauté the zucchini noodles for only a few minutes. Overcooking makes them mushy. Pat them dry after spiralizing to remove excess moisture. You can also salt them lightly and let them sit. This draws out water before cooking. Serve the dish right away for the best texture. For the full recipe, check out the detailed steps. {{image_2}} You can make this dish vegan easily. Instead of using regular milk, use almond milk. Nutritional yeast gives a cheesy flavor without dairy. It’s rich in vitamins, too. You won’t miss the cream! This recipe is naturally gluten-free. Zucchini is a great substitute for pasta. If you want extra flavor, try gluten-free pasta. Just cook it separately and mix it with the sauce. It will still taste fantastic. Want to add protein? Chicken or shrimp works great! Cook chicken breast in the skillet before adding the zucchini noodles. If you prefer shrimp, sauté them until pink. Both options will make your meal heartier and more satisfying. For the full recipe, check out the previous sections. You can store leftover Zucchini Noodle Alfredo in an airtight container. Place it in the fridge. It will stay fresh for up to three days. Make sure to cool it down before sealing. This keeps the noodles from getting too soggy. To reheat, use a skillet over medium heat. Add a splash of almond milk to keep it creamy. Stir often for even heating. You can also use a microwave. Heat it in 30-second intervals, stirring in between. This way, it warms up without drying out. Freezing Zucchini Noodle Alfredo is not ideal. The zucchini noodles can get mushy when thawed. However, you can freeze the Alfredo sauce. Just pour it into a freezer-safe bag or container. It will last up to three months. When ready, thaw it overnight in the fridge before using. Then, cook fresh zucchini noodles when you’re ready to eat. For the full recipe, check out my guide. Yes, you can. Any non-dairy milk works well. You can try oat milk, soy milk, or coconut milk. Each type gives a unique flavor. If you prefer dairy, whole milk or cream will also work. Just remember, the taste may change a bit. You can spiralize zucchini using a vegetable peeler. Simply peel the zucchini into long strips. Keep peeling until you reach the seeds in the center. You can also use a box grater for thin noodle-like strands. Just be careful with your fingers. This method may take a bit longer, but it works great! Zucchini Noodle Alfredo pairs well with many dishes. Consider serving it with grilled chicken or shrimp for protein. A side salad with fresh greens adds a nice crunch. You can also serve garlic bread for a classic touch. For a heartier meal, add roasted veggies. Enjoy mixing and matching! Zucchini Noodle Alfredo is a fresh twist on pasta. You learned essential and optional ingredients, along with their nutritional benefits. We covered step-by-step instructions to create this creamy dish and shared tips for perfect noodles. You can customize it easily with vegan and gluten-free options. Don’t forget about proper storage and reheating tips for leftovers. Enjoy making this dish with friends! It’s tasty, healthy, and fun to prepare.

Zucchini Noodle Alfredo Creamy and Simple Dish

If you’re looking for a quick, tasty meal, Zucchini Noodle Alfredo is for you. This twist on Alfredo sauce uses

To make a creamy mushroom risotto, you need some fresh and simple ingredients. Each one plays a key role in creating the rich and satisfying dish you crave. Here’s what you’ll need: - 1 cup Arborio rice - 4 cups vegetable broth - 1 medium onion, finely chopped - 2 cloves garlic, minced - 2 cups mixed mushrooms (cremini, shiitake, and button), sliced - 1/2 cup heavy cream - 1/2 cup grated Parmesan cheese - 3 tablespoons olive oil - 1 tablespoon butter - Salt and pepper to taste - Fresh parsley, chopped (for garnish) Arborio rice is special because it absorbs liquid well and becomes creamy. You will cook it slowly to release its starches. Vegetable broth adds flavor and depth. Onions and garlic give a nice base, while mixed mushrooms add texture and earthiness. Heavy cream and Parmesan cheese create a rich and creamy finish. Olive oil and butter provide a smooth base for cooking. Finally, salt and pepper enhance all the flavors, and parsley makes a lovely garnish. For the full recipe, check out the link provided. 1. Heating the broth Start by pouring the vegetable broth into a saucepan. Heat it over low heat. Keep it warm but do not boil. This helps the rice cook evenly. 2. Sautéing onions and garlic In a large skillet, add 2 tablespoons of olive oil. Heat it over medium heat. Then, add the finely chopped onion and minced garlic. Cook this mix until the onion turns soft and clear. This should take about 5 minutes. 3. Cooking the mushrooms Next, add the sliced mushrooms into the skillet. Stir and cook them until they turn golden and soft. This takes about 8-10 minutes. Season with salt and pepper. Remember to save half of the mushrooms for later. 4. Toasting the rice Add 1 cup of Arborio rice to the skillet. Stir it for about 2 minutes. This toasts the rice and coats it with oil. It gives the risotto a rich flavor. 5. Gradually adding the broth Now, take a ladle of warm broth and pour it into the rice. Stir constantly. Wait until the rice absorbs the liquid before adding more. Repeat this for about 18-20 minutes. The rice should be creamy and slightly firm (al dente). 6. Finishing with cream and cheese Once the rice is cooked, mix in 1/2 cup of heavy cream, 1 tablespoon of butter, and 1/2 cup of grated Parmesan cheese. Stir until everything is smooth and creamy. Taste and adjust the salt and pepper if needed. 7. Serve Remove the skillet from heat. Let it sit for a couple of minutes. This helps the flavors mix well. Serve hot, topping it with the reserved mushrooms and fresh parsley. For the complete recipe, check the [Full Recipe]. To get that dreamy, creamy texture in your risotto, you must stir often. This constant stirring helps release the starch from the Arborio rice. The starch makes the dish smooth and rich. Next, keep your broth warm. If you add cold broth, it will cool down the cooking rice. This will change the cooking time and texture. Warm broth helps the rice cook evenly. Finally, always choose Arborio rice. This rice has the right starch needed for creamy risotto. Other types of rice may not give you the same great results. One big mistake is overcooking the rice. You want it creamy but still slightly firm, or "al dente." If you cook it too long, it will turn mushy. Another common error is skipping the toasting step. Toasting the rice for a few minutes adds flavor. It also helps the rice absorb the broth better. Don’t forget to season your risotto! Adding salt and pepper at each step boosts flavor. Taste as you go to find the right balance. For the full recipe, check out the complete directions above. {{image_2}} To make this creamy mushroom risotto even better, consider these fun swaps: - Replacing heavy cream: You can use coconut cream or cashew cream for a lighter touch. These options add a nice flavor without dairy. - Adding seasonal vegetables: Think about mixing in fresh peas, spinach, or asparagus. These veggies add color and nutrients. You can toss them in during the last few minutes of cooking. Want to amp up the taste? Here are some great ideas: - Herbs, spices, and alliums: Fresh thyme, rosemary, or sage work wonders in risotto. Just add them when you sauté the onions for a fragrant kick. A pinch of red pepper flakes can also give it a nice heat. - Incorporating proteins like chicken or shrimp: If you want to make it a meal, add cooked chicken or shrimp. Sauté them with the mushrooms for extra flavor. They make the dish heartier and more satisfying. These variations keep your creamy mushroom risotto exciting and delicious. For the full recipe, check the earlier sections! To keep your creamy mushroom risotto fresh, store it in the fridge. Use an airtight container to avoid moisture loss. It can last for about 3 to 4 days. Make sure to cool the risotto first before sealing it up. For longer storage, consider freezing the risotto. Portion it into smaller containers for easy use. It can stay good in the freezer for up to 2 months. Just remember to label the containers with the date. You have two great options for reheating: stovetop or microwave. If you choose the stovetop, place the risotto in a skillet with a splash of broth or water. Heat it over low heat, stirring often. This method keeps the texture creamy. If you prefer the microwave, place the risotto in a bowl. Add a little broth or water and cover it loosely. Microwave on medium power, checking every minute to stir. Adjust the consistency as needed, adding more liquid if it looks dry. Enjoy your risotto just like it was made fresh! You can find the full recipe above. You can serve creamy mushroom risotto with many tasty options. Grilled chicken or shrimp pairs well. A simple green salad adds freshness. Garlic bread makes a great side too. You could also enjoy it with steamed vegetables for a light meal. To make risotto gluten-free, use gluten-free vegetable broth. Always check the labels on your broth and cheese. Arborio rice is naturally gluten-free, so you’re in luck there. This way, you can enjoy creamy mushroom risotto without worry. While Arborio rice is best for risotto, you can try Carnaroli or Vialone Nano. These types also create that creamy texture. If you use other rice, the dish may not be as creamy. Stick to these options for the best results. Risotto is done when the rice is creamy and tender. It should have a slight bite, or al dente. Taste a spoonful to check. If it’s too hard, add more broth and cook a little longer. Risotto is unique because it needs constant stirring. This helps release the rice's starch. Other rice dishes often boil rice in water without stirring. Risotto has a creamy texture, while other rice dishes can be dry. You can find the full recipe for creamy mushroom risotto in the article. This includes all the ingredients and step-by-step instructions to make this delightful dish. This blog post explored making creamy mushroom risotto, starting with key ingredients like Arborio rice and broth. We covered simple steps, from sautéing onions to finishing with cream and cheese. I shared tips on achieving a perfect creamy texture and common mistakes to avoid. You learned about vegetarian options, flavor boosters, and storing leftovers effectively. Now, you have the tools to create a delicious risotto at home. Enjoy your cooking journey!

Creamy Mushroom Risotto Delightful and Simple Recipe

Welcome to your new favorite dish—Creamy Mushroom Risotto! This recipe is simple yet rich and full of flavor. You’ll fall

To make a simple and tasty homemade spaghetti sauce, you'll need these fresh ingredients: - 2 tablespoons olive oil - 1 medium onion, finely chopped - 3 cloves garlic, minced - 2 medium carrots, diced - 1 zucchini, diced - 1 red bell pepper, diced - 1 can (28 oz) crushed tomatoes - 1 tablespoon tomato paste - 1 teaspoon dried oregano - 1 teaspoon dried basil - ½ teaspoon red pepper flakes (optional for heat) - Salt and pepper to taste - 1 tablespoon balsamic vinegar - Fresh basil leaves for garnish These ingredients combine to create a rich and vibrant sauce. I love using fresh vegetables because they add great flavor and nutrients. The olive oil provides a smooth base, while the onion and garlic give a wonderful aroma. Carrots and zucchini add sweetness and texture. The crushed tomatoes serve as the heart of the sauce, making it hearty and comforting. Don't forget the herbs! Oregano and basil bring a classic Italian taste. The red pepper flakes can add a little kick, but you can skip them if you prefer a milder sauce. Balsamic vinegar adds a nice depth. Fresh basil leaves on top make it look beautiful and taste fresh. For the full recipe, follow the steps to create your own homemade spaghetti sauce. It's an easy and satisfying dish that will impress your family and friends! 1. Cooking the vegetables: Start by heating 2 tablespoons of olive oil in a large saucepan over medium heat. Add one finely chopped onion and sauté for about 3-4 minutes. The onion should turn translucent. Then, mix in 3 minced garlic cloves and cook for one more minute. The aroma will fill your kitchen! 2. Adding tomatoes and seasoning: Next, toss in 2 diced carrots, 1 diced zucchini, and 1 diced red bell pepper. Sauté these for about 5-7 minutes until they soften. After that, pour in one 28 oz can of crushed tomatoes and 1 tablespoon of tomato paste. Stir this mixture well. Now, season it with 1 teaspoon each of dried oregano and dried basil, along with salt and pepper to taste. If you like it spicy, add ½ teaspoon of red pepper flakes. 3. Allowing the sauce to simmer: Bring the sauce to a gentle simmer. Cook it uncovered for 20-25 minutes. Stir occasionally. This helps the sauce thicken and develop flavor. 1. Incorporating balsamic vinegar: Just before serving, add 1 tablespoon of balsamic vinegar. This gives the sauce a nice sweetness and depth. Stir it in well. 2. Adjusting seasonings: Taste your sauce and adjust the seasonings as needed. If you want more flavor, you can add a pinch more salt or herbs. This simple and tasty homemade spaghetti sauce pairs well with your favorite pasta. Enjoy crafting this delightful dish! For the complete recipe, check the Full Recipe section above. - Best practices for sautéing: Start by heating olive oil in your pan. Add onions first and let them sweat until soft. This brings out their sweet flavor. Then add garlic, but be careful not to burn it. Garlic cooks fast! - How to achieve the desired sauce thickness: If your sauce is too thin, let it simmer longer. This allows extra water to evaporate. Stir it often to avoid sticking. If it’s too thick, add a splash of water or broth. - Importance of fresh herbs: Fresh herbs make a big difference. They add bright flavors to your sauce. If you can, use fresh basil instead of dried. Add them at the end so they stay vibrant. - Ideal pasta pairings: Spaghetti is a classic choice for this sauce. You can also try it with penne or fettuccine. Each pasta shape holds the sauce in a unique way. - Garnishing options: Top your dish with fresh basil leaves for a pop of color. A sprinkle of grated Parmesan cheese adds richness. You can also drizzle olive oil for extra flavor. - Suggested side dishes: Serve your spaghetti with a simple side salad. Garlic bread pairs well too. You might consider roasted vegetables for a healthy touch. {{image_2}} For your homemade spaghetti sauce, you can change things up with different veggies. Instead of carrots, try bell peppers or mushrooms. You can also add spinach or kale for more nutrients. When it comes to tomatoes, using fresh tomatoes is great if you have them. Just peel and chop them, then replace the canned ones. They add a bright flavor! Canned tomatoes are still an easy option. They are always ready when you need them. For herbs, consider using thyme or parsley instead of oregano or basil. Mixing and matching can create a unique taste for your sauce. This sauce works for many diets. For a vegetarian or vegan version, just skip the cheese topping. You can also add lentils for protein. They blend well into the sauce. If you need gluten-free options, serve the sauce over gluten-free pasta. Zucchini noodles, or "zoodles," are a fun choice too! You get a healthy meal without missing out on taste. To keep your leftover sauce fresh, use airtight containers. Glass jars work great. Plastic containers also work but may stain. Store the sauce in the fridge for up to five days. If you want to keep it longer, freeze it. The sauce lasts for three months in the freezer. Make sure to leave space in the container for expansion when freezing. To reheat on the stovetop, pour the sauce into a pan. Heat it over medium-low heat. Stir often to prevent sticking. It should take about 10 minutes to heat through. For a quick method, use the microwave. Transfer the sauce to a microwave-safe bowl. Cover it loosely to avoid splatters. Heat in 30-second intervals, stirring in between. This should take about 1-2 minutes. Enjoy your sauce hot! For the full recipe, check out the Savory Garden Medley Spaghetti Sauce. How long does homemade spaghetti sauce last? Homemade spaghetti sauce lasts about 5 to 7 days in the fridge. Store it in an airtight container. If you want it to last longer, freeze it. Frozen sauce can last up to 3 months. Always check for any off smells before using. Can I make homemade spaghetti sauce ahead of time? Yes, you can make the sauce a day or two before you need it. This allows the flavors to blend. Just store it in the fridge and heat it up when you're ready. It will taste even better after sitting! What can I add to spice up the sauce? To spice up your sauce, consider adding: - Extra red pepper flakes - A splash of red wine - Chopped olives or capers - Fresh herbs like parsley or thyme - A bit of sugar to balance acidity These additions can enhance the flavor and make it unique. How to make sauces using different tomatoes? You can use fresh tomatoes, canned tomatoes, or even tomato puree. For fresh tomatoes, use about 2 pounds, chopped. For canned, crushed or diced tomatoes work well. You may need to adjust cooking time to let fresh tomatoes break down. What are some classic Italian sides to serve? Classic Italian sides include: - Garlic bread - Caprese salad - Antipasto platter - Roasted vegetables - Caesar salad These sides pair nicely with spaghetti sauce. Enjoy your meal! In this blog post, I covered how to make a delicious homemade spaghetti sauce. We listed the key ingredients, explained simple steps, and shared tips for the best results. You learned how to store and reheat leftovers, plus essential variations for your sauce. Making your own sauce is easy and fun. You can customize it to your taste. Enjoy your cooking and the tasty meals you create!

Homemade Spaghetti Sauce Simple and Tasty Recipe

If you want to elevate your pasta game, homemade spaghetti sauce is a must-try. With just a few fresh ingredients,

For a vibrant veggie stir fry, use fresh vegetables for the best taste. Here’s what you need: - 1 cup broccoli florets - 1 red bell pepper, thinly sliced - 1 cup snap peas - 1 medium carrot, julienned - 1 zucchini, sliced These colorful veggies add crunch and flavor. You can mix and match based on what you like. Seasonings bring out all the yummy flavors in your stir fry. Here are the essentials: - 3 cloves garlic, minced - 1-inch piece ginger, grated - 2 tablespoons soy sauce - 1 tablespoon sesame oil - 1 tablespoon olive oil - Salt and pepper to taste These seasonings create a nice balance of taste. They enhance the vegetables and make them shine. Garnishes make your dish look good and taste even better. Consider these options: - 1 teaspoon sesame seeds (for garnish) - Fresh herbs, like cilantro or green onions These little touches add flair and extra flavor. You can adjust them to fit your taste or what you have at home. For a complete guide, check the Full Recipe. Start by washing all your veggies well. I like to chop them into even pieces. This helps them cook nicely. For the broccoli, cut it into small florets. Thinly slice the red bell pepper. Julienning the carrot gives it a nice look. For the zucchini, slice it into half-moons. Don't forget the snap peas; just trim the ends off. Mince the garlic and grate the ginger. Having everything ready makes cooking easier. Heat olive oil in your skillet or wok over medium-high heat. Once it’s hot, add the garlic and ginger. Sauté for about 30 seconds until you smell their wonderful aroma. Next, toss in the broccoli and carrots. Stir-fry them for 3-4 minutes until they soften a bit. Now, add the bell pepper, zucchini, and snap peas. Continue to stir-fry for another 3-5 minutes. You want them to be crisp-tender. Now, pour in the soy sauce and sesame oil. Toss everything well to coat. Cook for another minute or two. Finally, season it with salt and pepper to your liking. To get the best stir fry, keep the heat high. This helps sear the veggies quickly. Make sure not to overcrowd the pan; it steams them instead of frying. Cut your veggies to similar sizes for even cooking. Always have your sauce ready to go. This way, you can add it at the right time. Lastly, serve your stir fry hot. It tastes best when fresh! Cut your veggies evenly for perfect cooking. Use a sharp knife for smooth cuts. For speed, stack and slice. For example, slice bell peppers into thin strips. Julienne carrots for quick cooking. Cut broccoli into small florets. This helps them cook at the same rate. High heat is key to a great stir fry. Heat your pan well before adding oil. This keeps your veggies crisp. Stir them quickly to cook evenly. Don't overcrowd the pan. If you add too many veggies, they will steam, not fry. Prepping ahead saves time on busy nights. Chop your veggies the day before. Store them in the fridge. You can also use frozen veggies for a quick meal. They cook fast and taste great. With these tips, your Easy Veggie Stir Fry will be ready in no time! Check the Full Recipe for more details. {{image_2}} You can easily add protein to your stir fry. Tofu is a great choice. Use firm or extra-firm tofu for the best texture. Cut it into cubes and sauté it until golden brown. Chicken is another easy option. Use thin strips to cook it quickly. Add the chicken after the garlic and ginger. Cook it until it’s no longer pink. Shrimp cooks fast and adds a nice flavor. Toss in peeled and deveined shrimp after the veggies start to soften. Cook until they turn pink and opaque. Feel free to switch up the veggies. Bell peppers, carrots, and snap peas are great, but you can use others too. Try mushrooms for a rich taste or bok choy for a nice crunch. You can also change the flavor profile. Add a splash of lime juice for zing. Use chili paste for heat. A sprinkle of fresh herbs like cilantro can brighten the dish. To keep it gluten-free, use tamari instead of soy sauce. Tamari has the same taste but is safe for those avoiding gluten. For a vegan twist, ensure any added protein is plant-based. Tofu works well here. You can skip the sesame oil if you prefer a lighter taste. Explore these variations to make your veggie stir fry unique. Check out the Full Recipe for more ideas on how to prepare this tasty dish! After you finish your veggie stir fry, let it cool down. This step helps keep your food safe. Place the stir fry in a shallow container. Spread it out to cool faster. Once cool, cover it tightly. Store it in the fridge for up to three days. To reheat your stir fry, use a skillet or microwave. If using a skillet, add a splash of water. Heat it over medium heat, stirring often. This keeps the veggies from drying out. If using the microwave, place it in a safe dish. Cover it loosely and heat in 30-second bursts. Stir between intervals to ensure even heating. You can freeze your veggie stir fry for later use. Allow it to cool completely before freezing. Use an airtight container or freezer bag. Remove as much air as possible to prevent freezer burn. It can stay frozen for up to three months. When ready to eat, thaw it in the fridge overnight. Reheat it using the methods above. For the full recipe, check out the Vibrant Veggie Stir Fry . You can use other sauces for flavor. Try hoisin sauce or teriyaki sauce. You can also mix equal parts of vinegar and water for a tangy taste. Add garlic and ginger to boost flavor. For a creamy touch, use peanut sauce. Each will give your stir fry a unique taste. To make your stir fry saucy, add more liquid. Use vegetable broth or stock for depth. Mixing cornstarch with cold water creates a thick sauce. Add this mix during cooking. You can also try adding canned tomatoes for a rich flavor. Adjust the amount based on your taste. Yes, you can prep veggies ahead of time. Wash and chop them a day before and store in the fridge. Use airtight containers to keep them fresh. This saves time when you cook. Just remember, some veggies may lose crunch after a day. Use fresh ones for the best taste. - 1 cup broccoli florets - 1 red bell pepper, thinly sliced - 1 cup snap peas - 1 medium carrot, julienned - 1 zucchini, sliced - 3 cloves garlic, minced - 1-inch piece ginger, grated - 2 tablespoons soy sauce - 1 tablespoon sesame oil - 1 tablespoon olive oil - 1 teaspoon sesame seeds (for garnish) - Salt and pepper to taste You can find the full recipe for this colorful dish [here](#). It’s quick and easy! Each serving offers a healthy balance of nutrients. - Calories: Approximately 150 - Protein: 4g - Carbohydrates: 10g - Fat: 10g - Fiber: 3g This veggie stir fry is great for a quick meal. The mix of colors and flavors makes it fun to eat. Plus, it’s packed with vitamins! Enjoy this dish any night of the week. In this post, I've shared how to make a tasty veggie stir fry. We covered fresh vegetables, key seasonings, and even optional garnishes. I explained the steps for cooking and offered tips for the best results. You can mix in proteins, try different veggies, and adapt for special diets. Plus, I shared how to store and reheat leftovers. Now you can enjoy a quick, healthy dish anytime. Happy cooking!

Easy Veggie Stir Fry Simple and Quick Weeknight Meal

Looking for a quick and tasty dinner? This Easy Veggie Stir Fry is your answer! In just a few simple

To make your 5-ingredient Nutella lava cake, you need simple items. Here’s what you’ll need: - 1 cup Nutella - 2 large eggs - 1/4 cup all-purpose flour - 2 tablespoons unsalted butter, melted - A pinch of sea salt Each ingredient plays a key role. The Nutella brings rich chocolate flavor. The eggs help the cake rise and stay moist. Flour gives it structure, while butter adds richness. A pinch of sea salt enhances all the flavors. You can use any brand of Nutella you like. It’s best to use fresh eggs for the best texture. Choose a good all-purpose flour for a perfect mix. Melt the butter gently so it blends well. The sea salt should be fine, not coarse. This recipe is not just easy; it’s also fun. You can prepare it quickly and impress your friends or family. For the full recipe, check the detailed instructions. Enjoy every bite! - Preheat your oven to 350°F (175°C). - Grease four ramekins with unsalted butter. Start by getting your oven hot. Preheating ensures even baking. While the oven warms up, grab your ramekins. Use a small amount of unsalted butter to grease them well. This step helps the cakes slide out easily later. - Combine Nutella and melted butter. - Incorporate eggs and mix well. - Fold in flour and sea salt carefully. Now, let’s make the batter. In a mixing bowl, add your Nutella and the melted butter. Stir them together until smooth. Next, crack in the eggs one at a time. Mix well after adding each egg for a rich mixture. Finally, add the flour and a pinch of sea salt. Use a spatula to fold these in gently. Be careful not to overmix; we want a light batter. - Divide batter into ramekins. - Bake for 10-12 minutes. - Invert and serve carefully. Time to bake! Spoon the batter into your greased ramekins. Fill each one about two-thirds full. Place them on a baking sheet for easy handling. Bake in your preheated oven for 10 to 12 minutes. Look for firm edges, but the center should still jiggle a bit. Once done, take them out and let them sit for one minute. Carefully invert each ramekin onto a plate. Tap gently to release the cake. Watch out! The filling will be hot and gooey. Enjoy your 5-Ingredient Nutella Lava Cake indulgent dessert delight! For the full recipe, check out the details above. To make the best lava cake, you need to avoid overmixing the batter. Mixing too much can make the cake dense. You want it light and fluffy, so mix just until you see no flour. This keeps your cake airy. Ensuring a gooey center is the key to a great lava cake. Bake them only until the edges are firm. The center should still jiggle a bit. If you bake too long, you lose that oozy goodness. Trust me, a short bake makes all the difference. Pair your lava cake with vanilla ice cream or whipped cream. The cold creaminess contrasts perfectly with the warm cake. It creates a delightful mix of flavors and textures. Add a garnish of fresh berries or a chocolate drizzle on top. This not only looks great but adds a burst of flavor. Berries give a tartness that balances the sweetness of the cake. For the full recipe, check out the complete guide to making this indulgent treat! {{image_2}} You can switch things up with dark chocolate instead of Nutella. Dark chocolate brings a rich taste. This swap gives your cake a deeper flavor. Just melt it with butter as you would with Nutella. If you need a gluten-free option, try using almond flour or coconut flour. Both will work well. The texture may change slightly, but they still create a delicious lava cake. Adjust your baking time as needed. For a boost of flavor, add a splash of vanilla extract. This simple addition can brighten the taste. You might also try a touch of espresso powder for a coffee kick. It pairs well with chocolate. Adding nuts or chocolate chips can enhance your cake's texture. Try walnuts or hazelnuts for crunch. Chocolate chips provide extra gooeyness. Both options make each bite more exciting. For the full recipe, check the section above. After you enjoy your Nutella lava cakes, you might have some left. You can store them in the fridge. Place the cooled cakes in an airtight container. They will stay fresh for up to three days. When you want to eat them again, you can reheat them. To reheat, use the microwave. Heat for about 15-20 seconds. Check if it’s warm enough. You can also use an oven. Preheat it to 350°F (175°C) and heat for 5-7 minutes. This will keep the gooey center nice and warm. If you want to make lava cakes ahead, you can freeze them unbaked. Pour the batter into greased ramekins. Cover each ramekin tightly with plastic wrap. They can stay in the freezer for up to a month. When you are ready to bake them, take the ramekins out. Let them thaw in the fridge overnight. Once thawed, bake them as per the full recipe instructions. This way, you can enjoy fresh lava cakes any time! To make this recipe dairy-free, you can swap the butter for a plant-based alternative. Coconut oil works great as a substitute. For Nutella, look for a dairy-free chocolate spread. Many brands now offer delicious vegan options that taste amazing. Yes, you can use different sizes or types of baking dishes. If you choose larger ramekins, you will need to bake them longer. For smaller ones, reduce the bake time. Always check for doneness. You want the edges firm and the center slightly wobbly. To ensure your lava cakes are done, look for a few signs. The edges should be set and firm. The center should still jiggle a bit. This means the gooey chocolate inside is ready to flow. If they are too firm, you might lose that perfect lava center. In this blog post, I shared a simple lava cake recipe packed with rich flavors. We covered essential ingredients and step-by-step baking instructions. I also shared tips to help you achieve that perfect gooey center. Consider variations to make the recipe your own and how to store any leftovers. Remember, baking should be fun and allow for creativity. With these easy steps, you'll impress anyone with your delicious lava cakes. Enjoy making these treats and sharing them with your friends or family!

5-Ingredient Nutella Lava Cake Indulgent Dessert Delight

Craving something rich and gooey? Look no further than my 5-Ingredient Nutella Lava Cake! This indulgent dessert is quick, easy,

Older posts
Newer posts
← Previous Page1 … Page72 Page73 Page74 … Page82 Next →

dsad

© 2025 Recipes Pursuit • Built with GeneratePress

Our Policies

  • Copyright Policy
  • Cookie Policy
  • GDPR Policy
  • Privacy Policy
  • Disclaimer
  • Terms Of Use

More Information

  • Home
  • About
  • Contact
  • Appetizers
  • Dessert
  • Dinner
  • Drinks
©2025, Recipes Pursuit About Back To Top