Skip to content
DisclaimerTerms Of UseGDPR PolicyCookie Policy

Recipes Pursuit

  • Home
  • Drinks
  • Appetizers
  • Dinner
  • Dessert
  • About
  • Contact
  • Privacy Policy
DisclaimerTerms Of UseGDPR PolicyCookie Policy

Emma Smith

- 2 pounds of baby carrots, trimmed - 1/4 cup pure maple syrup - 1/4 cup brown sugar - 3 tablespoons olive oil - 1 teaspoon cinnamon - 1/2 teaspoon nutmeg - Salt and pepper to taste - Fresh parsley, chopped (for garnish) When choosing baby carrots, look for ones that are bright in color. They should feel firm and smooth. Avoid carrots with soft spots or wrinkles. Fresh carrots taste the best and hold their shape when cooking. Using pure maple syrup is key for this recipe. It adds a rich flavor that mixes well with the brown sugar. Avoid fake syrup; it lacks the depth of real maple. Brown sugar comes in light and dark varieties. Light brown sugar has a milder flavor, while dark brown sugar has more molasses. For this recipe, either works well, but dark brown sugar boosts the sweetness and color. 1. Preheat the oven to 425°F (220°C). This high heat helps caramelize the carrots. 2. In a large bowl, mix together the maple syrup, brown sugar, olive oil, cinnamon, nutmeg, salt, and pepper. Whisk until the sugar dissolves. This creates a sweet glaze for the carrots. 1. Add the trimmed baby carrots to the bowl. Toss them well to coat every carrot in the glaze. 2. Spread the carrots out on a large baking sheet. Make sure they are in a single layer for even roasting. 3. Roast the carrots in the oven for 25-30 minutes. Remember to toss them halfway through. This ensures they cook evenly and get tender. 1. After roasting, take the carrots out of the oven and let them cool for a minute. 2. Transfer the carrots to a serving dish. Garnish with fresh parsley for a pop of color and flavor. Serve these delicious carrots on a rustic platter. Drizzle any leftover glaze from the pan on top for extra sweetness. They make a perfect side for any meal! To get that perfect caramelization, roast your carrots in a single layer. This helps them cook evenly and brown nicely. If you stack them, they will steam instead of roast. The best temperature for roasting is 425°F (220°C). This high heat brings out the natural sugars in the carrots and the sweet glaze. Want to add more flavor? Try adding herbs like thyme or rosemary. A pinch of chili flakes can add heat if you like spice. For sweeteners, you can swap out brown sugar for coconut sugar or honey. Each option gives a different twist to the dish. One common mistake is overcrowding the pan. This leads to uneven cooking and less caramelization. Another mistake is skipping the tossing step. Toss the carrots halfway through cooking to ensure they brown on all sides. This simple step makes a big difference in flavor and texture. {{image_2}} You can switch maple syrup for honey if you want. Honey adds a nice floral taste. You can also use coconut sugar instead of brown sugar. Coconut sugar gives a deeper flavor and is less sweet. It works well with the carrots, too. For a crunchy twist, add walnuts or pecans. They give a nice crunch and extra flavor. Mixing in other vegetables can change things up. Try adding sweet potatoes or parsnips. They roast well and taste great with the sweet glaze. You can make this dish vegan-friendly by using maple syrup and olive oil. Both are plant-based and keep the recipe delicious. For gluten-free options, there’s no need to change anything. All the ingredients are naturally gluten-free, so you can enjoy them worry-free. Store leftover roasted carrots in the fridge. Place them in an airtight container. Make sure the carrots cool before sealing. They will stay fresh for about 3 to 5 days. The best way to reheat roasted carrots is in the oven. Preheat the oven to 350°F (175°C). Spread the carrots on a baking sheet. Heat for about 10 to 15 minutes. This method keeps them crisp. You can also use a microwave. Heat in short bursts to avoid sogginess. Use a covered bowl and add a splash of water. You can freeze roasted carrots for later use. Allow them to cool completely. Place them in a freezer-safe bag. Remove as much air as possible. They can last up to 3 months in the freezer. When ready to eat, thaw in the fridge overnight. For the best texture, reheat in the oven after thawing. Baby carrots are perfect for this dish. They are tender and sweet. Regular carrots can also work, but they need more prep. You must peel and cut them into even pieces. Baby carrots roast quickly and caramelize well. Their small size makes them easy to enjoy. Yes, you can prep these carrots ahead. Wash and trim the baby carrots a day before. Mix the glaze and toss the carrots in it. Store them in the fridge in a covered bowl. When ready, just spread them on a baking sheet and roast. This saves time and makes dinner easier. Roasted carrots can last for about 3 to 5 days in the fridge. Make sure to store them in an airtight container. This keeps them fresh and tasty. If they lose some texture, try reheating them in the oven. This will help bring back some crispness. Roasting baby carrots is simple and rewarding. You learned the right ingredients, like pure maple syrup and brown sugar. I shared preparation steps, roasting tips, and variations. Remember, choose quality ingredients for the best taste. Keeping them in a single layer ensures a perfect roast. Feel free to try different sweeteners and add nuts for crunch. Lastly, store leftovers properly and enjoy them later. Experiment, have fun, and enjoy your delicious roasted carrots!

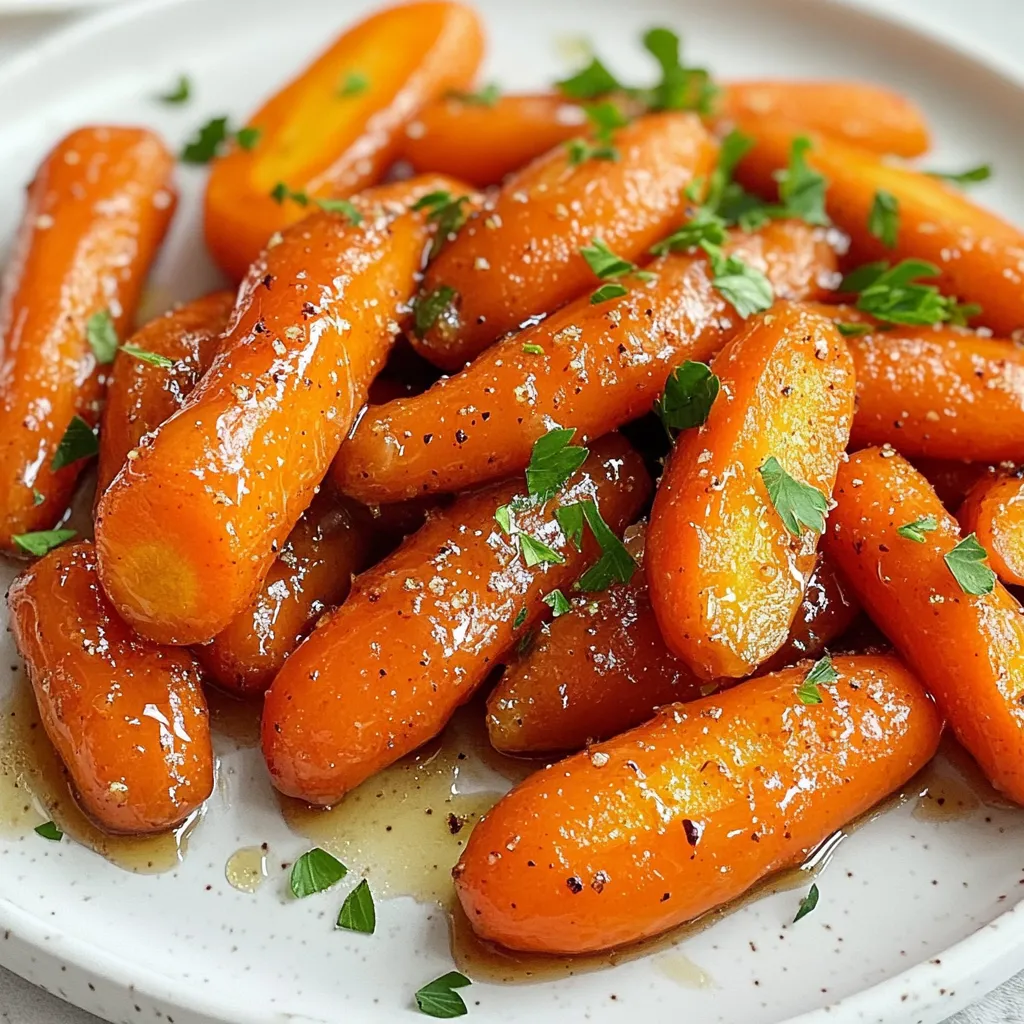
Brown Sugar Maple Roasted Carrots Irresistible Delight

Are you ready to elevate your side dish game? Brown Sugar Maple Roasted Carrots are a sweet and savory delight

- 1 pound Italian sausage (or chicken sausage) - 1 medium onion, finely chopped - 3 cloves garlic, minced - 1 can (14.5 oz) diced tomatoes, undrained - 1 cup chicken broth - 1 cup heavy cream - 8 oz penne pasta, uncooked - 1 cup baby spinach To create a creamy and tasty dish, start with quality ingredients. I love using Italian sausage for its rich flavor. Chicken sausage works well too for a lighter meal. The onion and garlic add depth, while the diced tomatoes give a pop of color and moisture. Chicken broth enhances the taste, making every bite savory. Heavy cream is key for that luscious texture, and the uncooked penne pasta absorbs all the goodness during cooking. - 1 teaspoon Italian seasoning - Salt and pepper to taste - Fresh basil leaves, for garnish - Grated Parmesan cheese, for serving Seasonings make the dish shine. Italian seasoning blends herbs that transport you to Italy. A pinch of salt and pepper balances flavors. Fresh basil offers a burst of freshness on top, while grated Parmesan brings a salty finish. These simple touches elevate your creamy Tuscan sausage pasta to a gourmet level. First, you need to cook the sausage. Heat a skillet over medium-high heat. Add the Italian sausage and break it into pieces. Cook it until it turns brown. Drain any extra fat from the skillet. Then, transfer the cooked sausage to your slow cooker. Next, chop your onion and mince the garlic. Add both to the slow cooker with the sausage. This mix adds great flavor to your dish. Now, grab a can of diced tomatoes and pour it into the slow cooker. Do not drain them; the juice will add to the sauce. Next, add one cup of chicken broth. It helps to keep the pasta moist during cooking. Sprinkle in one teaspoon of Italian seasoning, salt, and pepper. Stir the mixture well to blend all the flavors. Cover the slow cooker and set it to cook. If you choose low, let it go for four hours. If you prefer high, it will be ready in two hours. About 30 minutes before serving, it’s time to add the pasta. Stir in eight ounces of uncooked penne pasta and one cup of heavy cream. Make sure to mix it well. Cover the slow cooker again and continue cooking until the pasta is al dente. Once the pasta is ready, toss in one cup of baby spinach. Stir until the spinach wilts. Taste the dish and adjust the seasoning if needed. Serve the pasta hot. Top it with fresh basil leaves and grated Parmesan cheese for a delightful finish. To boost the taste of your Slow Cooker Creamy Tuscan Sausage Pasta, try adding a pinch of red pepper flakes or a dash of smoked paprika. These spices bring warmth and depth to the dish. Fresh herbs like thyme or oregano can also elevate the flavor. If you want to switch up the sausage, you can use chicken sausage for a lighter meal or even turkey sausage for a leaner option. To get perfect pasta, add it to the slow cooker 30 minutes before serving. Make sure the penne pasta is uncooked when you add it. Stir it gently to prevent sticking. Check the pasta for doneness. It should be tender but still firm, known as al dente. If you prefer a creamier sauce, you can add a bit more heavy cream. For a lighter touch, use half and half instead. Presentation matters! Serve your pasta in shallow bowls. Top each bowl with extra grated Parmesan and a sprig of fresh basil for a pop of color. You can pair this dish with a simple side salad or garlic bread for a full meal. A glass of white wine, like Pinot Grigio, complements the flavors well. Enjoy your delicious creation! {{image_2}} You can easily make this dish vegetarian. Just swap the sausage for a plant-based protein. Options like lentils or chickpeas work great. They add protein and flavor. For extra veggies, consider adding bell peppers, zucchini, or mushrooms. These will give your dish more texture and taste. If you need a gluten-free meal, choose gluten-free pasta instead of penne. Cook it according to the package instructions before adding it to the slow cooker. Note that gluten-free pasta often cooks faster, so check it a bit earlier. This will help keep it from getting mushy. You can switch the heavy cream for a lighter sauce option. Try using half-and-half or even a non-dairy milk. For a tomato-based twist, add more diced tomatoes and skip the cream. This change offers a fresh flavor that is still rich and tasty. To keep your Slow Cooker Creamy Tuscan Sausage Pasta fresh, store it in an airtight container. This method helps lock in flavor and moisture. You can refrigerate it for up to 3 days. Make sure to cool the pasta before sealing it. If you want to save some for later, freezing is a great option. Divide the pasta into portions. Place each portion in a freezer-safe container. You can freeze it for up to 3 months. When you’re ready to eat, take it out and let it thaw overnight in the fridge. When it comes to reheating, you have two main options: microwave or stovetop. For the microwave, place a portion in a bowl and cover it with a lid. Heat it for about 2-3 minutes, stirring halfway through. For stovetop, use a skillet on low heat. Stir often until it's heated through. To keep the texture and flavor, add a splash of broth or cream while reheating. This helps restore the creaminess and avoids dryness. Enjoy your pasta just as delicious as when it was fresh! Yes, you can. For a lighter dish, try using milk or Greek yogurt. Both options add creaminess but keep the calories lower. Another choice is to use cashew cream. Just blend soaked cashews with water until smooth. This gives a nice texture without heavy cream. Adjusting serving sizes is simple. If you need more servings, just double the ingredients. For fewer servings, halve them. Keep the same ratios for flavor. Remember, cooking time may change slightly, especially for the pasta, so check it often. You can use frozen sausage, but it’s best to thaw it first. Cook it in a skillet until browned for even flavor. Then, add it to the slow cooker. If you add it frozen, the cooking time may need to be longer. Always ensure it reaches a safe temperature before serving. In this blog post, I’ve shared how to make a delicious Slow Cooker Creamy Tuscan Sausage Pasta. We covered the main ingredients like sausage, vegetables, and cream. I explained each step, from cooking the sausage to adding pasta. Tips on flavor, storage, and variations are also included. In closing, this dish is simple, tasty, and adaptable. Enjoy making it your own while savoring every bite.

Slow Cooker Creamy Tuscan Sausage Pasta Delight

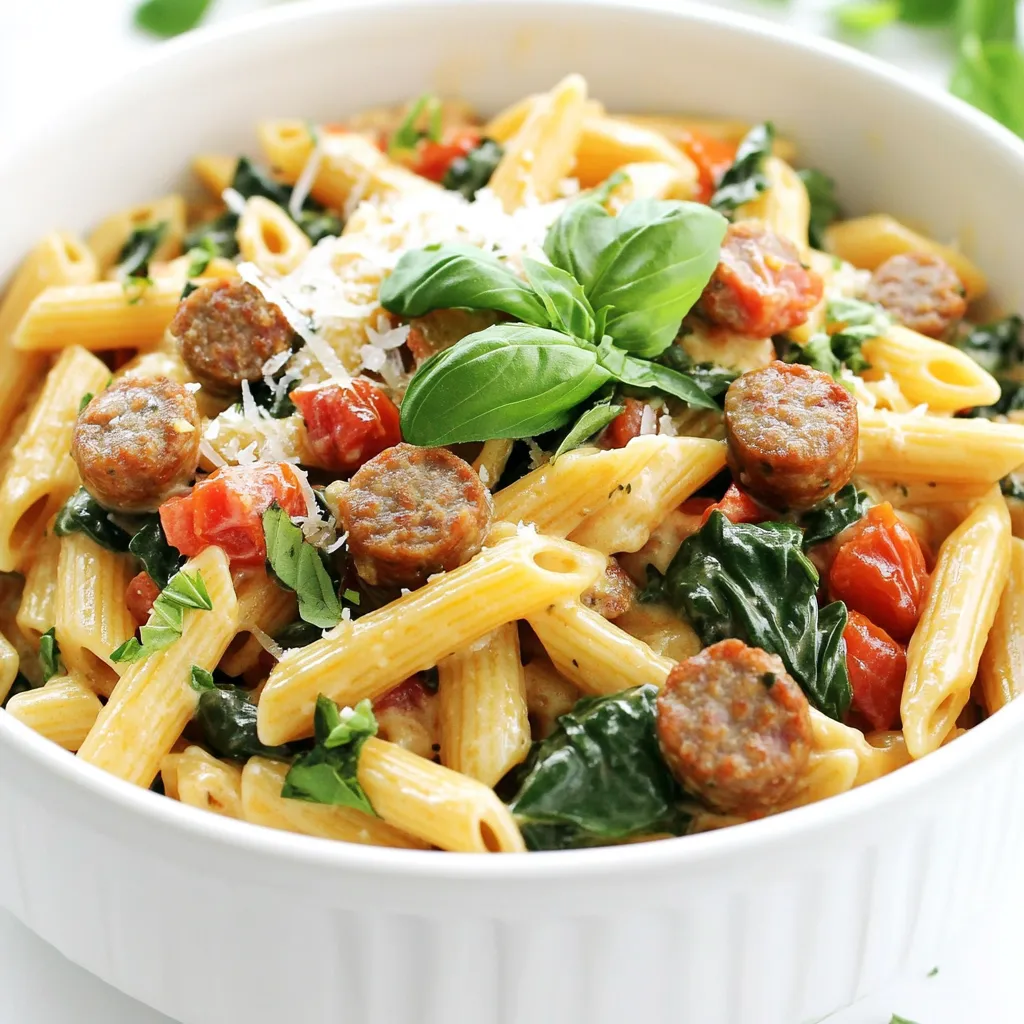
Looking for a warm, filling meal that practically cooks itself? My Slow Cooker Creamy Tuscan Sausage Pasta Delight is just

- 2 cups whole milk - 1 cup heavy cream - 6 oz dark chocolate - 1/2 cup caramel sauce - 1 teaspoon vanilla extract - 1/4 teaspoon sea salt - Whipped cream for topping - Additional caramel sauce for drizzling - Extra sea salt for garnish Gathering your ingredients is the first step to making this warm salted caramel hot chocolate. The blend of whole milk and heavy cream creates a rich base. Dark chocolate adds depth, while caramel sauce brings sweetness. Vanilla extract enhances the flavor, and sea salt balances everything with a touch of savory. You can also add more caramel sauce for drizzling. A sprinkle of extra sea salt on top makes each sip even better. Using high-quality dark chocolate will make a big difference in taste. I recommend using chocolate that has at least 60% cocoa for a deep flavor. Remember, the better your ingredients, the better your drink will be! Start by pouring 2 cups of whole milk and 1 cup of heavy cream into a medium saucepan. Stir gently over medium heat until you see small bubbles. This means it is close to simmering. Do not let it boil, as boiling can change the texture. Next, take 6 ounces of chopped dark chocolate and add it to the milk and cream mixture. Stir the mixture well. Keep stirring until the chocolate melts and blends smoothly. This creates a rich base for your hot chocolate. Now, pour in 1/2 cup of caramel sauce and add 1 teaspoon of vanilla extract. Whisk the mixture until it is velvety and well combined. This step adds sweetness and depth to your hot chocolate. Once your mixture is smooth, stir in 1/4 teaspoon of sea salt. Taste the hot chocolate and adjust the salt to your liking. It should have that perfect salted caramel flavor. Then, remove the saucepan from heat. Pour the hot chocolate into mugs. Top each mug with whipped cream and drizzle more caramel sauce on top. Finish by sprinkling a pinch of sea salt for that extra touch. Enjoy your warm salted caramel hot chocolate! You can make your hot chocolate sweeter by adding more caramel. Start with a little extra and stir it in. Taste as you go. This way, you can find the right level of sweetness. Try using different types of chocolate too. Dark chocolate gives a rich flavor. Milk chocolate adds sweetness. You may even mix both for a fun twist. Each type changes the taste in a unique way. To get the best salted caramel flavor, use about 1/4 teaspoon of sea salt. This adds a nice contrast to the sweetness. Taste your hot chocolate after stirring in the salt. If you want it saltier, add a pinch more. Adjust it to match your taste. Always remember that everyone’s taste is different. What’s perfect for you might not be for someone else. So, keep tasting until it’s just right for you. Pair your warm salted caramel hot chocolate with a tasty snack. Some great choices are popcorn, cookies, or even a slice of cake. These can make your treat even more special. For a cozy look, serve your hot chocolate in nice mugs. You can add a small caramel candy on the side. Use a fancy straw for fun. It makes the whole experience better. {{image_2}} To make this warm salted caramel hot chocolate dairy-free, you can switch to plant-based milk and cream. Almond, oat, or coconut milk work well. Use a rich option like full-fat coconut cream for a creamy texture. This keeps flavors bold and satisfying, just like the original recipe. Adding flavors can make your hot chocolate even more exciting. For a minty twist, mix in peppermint extract. You can also add hazelnut syrup for a nutty flavor. Just a tablespoon or two will enhance your drink without overpowering it. These tweaks bring new joy to each sip. When the weather warms up, you can enjoy an iced version of this treat. Prepare the hot chocolate as usual, then let it cool. Pour the mix over ice in a tall glass. Top with whipped cream and a drizzle of caramel sauce. Add a sprinkle of sea salt for that perfect salted touch. Enjoy this cool treat during sunny days! You can store Warm Salted Caramel Hot Chocolate in the fridge. It will last for up to three days. Make sure to keep it in an airtight container. This helps keep the flavors fresh. If you notice any separation, just stir it before enjoying. To reheat, pour the hot chocolate into a saucepan. Heat it over low heat. Stir gently to avoid burning. You can also use a microwave. Heat in 30-second bursts. Stir in between to keep it smooth. Avoid overheating to keep the perfect texture. You can freeze this hot chocolate for later. Pour it into freezer-safe containers. Leave some space at the top for expansion. When you want to enjoy it, take it out and thaw in the fridge overnight. To reheat, follow the same steps as above for best results. Yes, you can easily make this recipe vegan. To do this, you need to swap out the dairy. Use plant-based milk like almond, soy, or oat milk. For cream, coconut cream works great. Instead of dark chocolate, try using vegan chocolate chips. Make sure your caramel sauce is also dairy-free. There are many brands that offer vegan caramel. With these swaps, you still get a delicious salted caramel hot chocolate. Making caramel sauce at home is simple and fun. Start with sugar in a saucepan over medium heat. Stir the sugar as it melts to avoid burning. Once it turns golden brown, carefully add butter. Mix it in until melted. Then, slowly add heavy cream, stirring well. You can add a pinch of sea salt for flavor. Let it cool before using. You can store any leftover caramel in a jar! You can use milk chocolate, but the flavor will change. Milk chocolate is sweeter and creamier. It lacks the deep richness of dark chocolate. If you prefer a sweeter drink, milk chocolate works well. You might want to reduce the caramel sauce slightly to balance the sweetness. Experiment and see what you like best! This blog post covered how to make rich salted caramel hot chocolate. You learned about the required and optional ingredients, step-by-step instructions, and tips for customization. We also explored variations like dairy-free options, flavored versions, and serving suggestions. Incorporating these ideas can enhance your hot chocolate experience. Enjoy experimenting with flavors and textures! With just a few tweaks, you can make this treat your own. Stay cozy and happy sipping!

Warm Salted Caramel Hot Chocolate Irresistible Treat

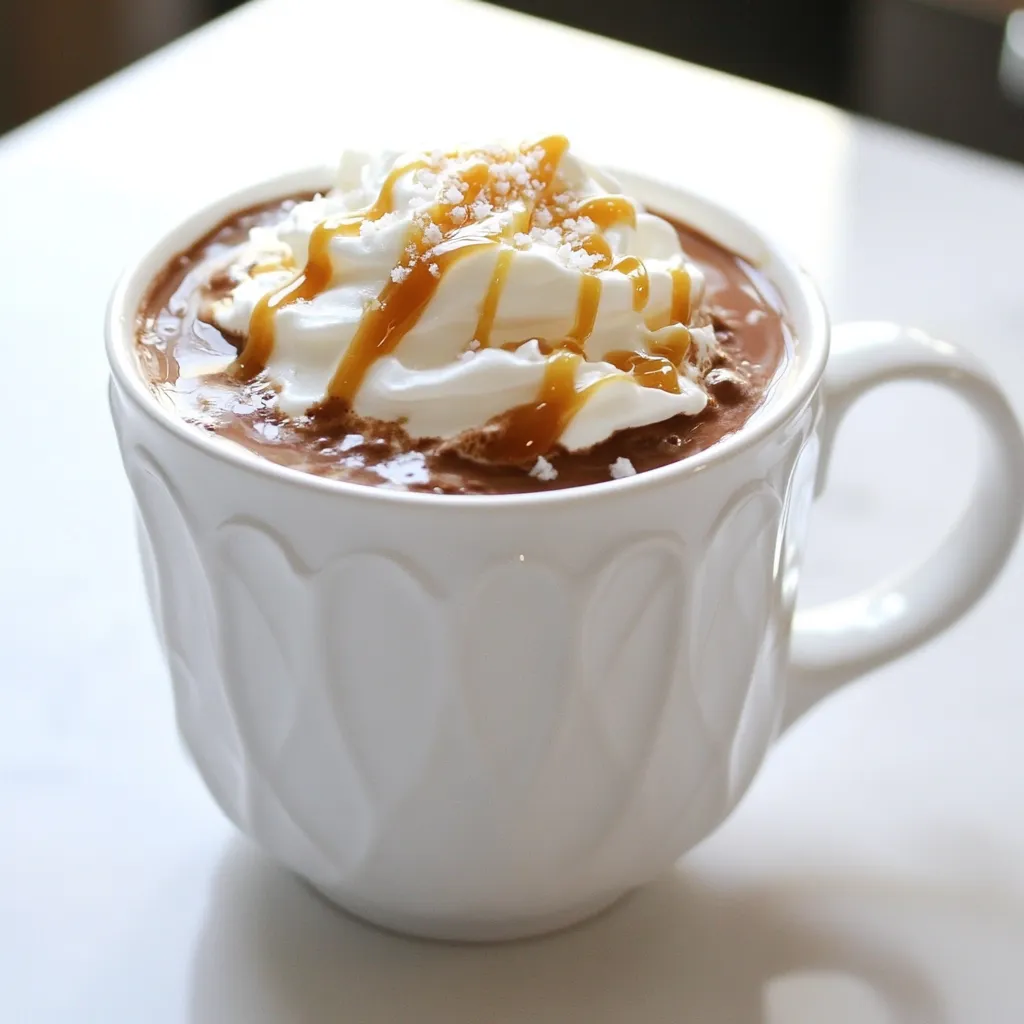
Indulge in the ultimate comfort drink with my Warm Salted Caramel Hot Chocolate! This rich, creamy delight combines the deep

To make bakery-style Funfetti sugar cookies, gather the following ingredients: - 2 ¾ cups all-purpose flour - 1 teaspoon baking soda - ½ teaspoon baking powder - 1 teaspoon salt - 1 cup unsalted butter, softened - 1 ½ cups granulated sugar - 1 large egg - 1 teaspoon vanilla extract - ½ teaspoon almond extract - ½ cup rainbow sprinkles (plus more for topping) - ½ cup powdered sugar (for rolling) Using these fresh ingredients makes a big difference in flavor and texture. The butter should be soft but not melted. This helps create a light, fluffy cookie. You can find rainbow sprinkles at most grocery stores. They add fun color and crunch. Make sure to measure your flour correctly. Too much flour can make cookies dry. Use a spoon to scoop flour into your measuring cup, then level it off. This small step keeps your cookies soft and chewy. Now, you are ready for the next steps in the recipe! - Preheat your oven to 350°F (175°C). - Line a baking sheet with parchment paper. - In a medium bowl, whisk together: - 2 ¾ cups all-purpose flour - 1 teaspoon baking soda - ½ teaspoon baking powder - 1 teaspoon salt Set this mixture aside. - In a large mixing bowl, cream together: - 1 cup unsalted butter, softened - 1 ½ cups granulated sugar Use an electric mixer on medium speed until the mixture is light and fluffy. This should take about 2 to 3 minutes. - Add to the butter mixture: - 1 large egg - 1 teaspoon vanilla extract - ½ teaspoon almond extract Beat until everything is mixed well. - Gradually add the dry ingredients to the wet mixture. Mix on low speed until just combined. Be careful! Overmixing will change the cookie texture. - Gently fold in: - ½ cup rainbow sprinkles Make sure the sprinkles are evenly spread in the dough. - Roll the cookie dough into balls, about 1.5 inches in diameter. - Roll each ball in: - ½ cup powdered sugar Make sure each ball is fully coated. - Place the coated balls on the prepared baking sheet. Space them about 2 inches apart. - Flatten each ball slightly with the palm of your hand. - Top each cookie with a few extra rainbow sprinkles for that cheerful touch. - Bake in the preheated oven for 10-12 minutes. The edges should be lightly golden. The centers may look slightly underbaked; this is fine as they will firm up while cooling. - Remove the cookies from the oven. Let them cool on the baking sheet for 5 minutes. Then, transfer them to a wire rack to cool completely. To get that bakery-style texture, do not overmix the dough. Overmixing can lead to tough cookies. Mix just until the dry ingredients blend in. Measuring flour properly is key. Use a spoon to scoop flour into your measuring cup. Then level it off with a knife. This method helps prevent too much flour in your dough. You can add fun flavors to your cookies. Try using different extracts, like coconut or lemon. These can add a twist to the classic taste. When it comes to sprinkles, choose your favorites! You can mix traditional rainbow sprinkles with themed ones. Seasonal or holiday sprinkles can make your cookies stand out. Make your cookies shine by decorating them. Drizzle melted chocolate on top or add a sprinkle of sea salt. This contrast adds visual appeal and flavor. Serve funfetti cookies on a bright plate. You can stack them high for a fun display. Pair them with milk or a scoop of ice cream for a treat everyone will love. {{image_2}} You can change up your Funfetti cookies with some fun add-ins. Here are two great options: - Chocolate chips: Adding 1 cup of chocolate chips will give your cookies a rich taste. The mix of sprinkles and chocolate is always a hit. - Nuts or dried fruits: Chopped nuts or dried fruits can add a nice crunch. Consider using walnuts or cranberries for a unique twist. If you have dietary needs, you can still enjoy these cookies. Here are some simple swaps: - Gluten-free options: Use a gluten-free flour blend instead of all-purpose flour. This keeps the texture light and fluffy. - Vegan substitutions: Replace the egg with a flax egg. Mix 1 tablespoon of ground flaxseed with 2.5 tablespoons of water. Let it sit for a few minutes until it thickens. You can adapt these cookies for any season or holiday. Here are some ideas: - Holiday-themed sprinkles: For Christmas, use red and green sprinkles. For Easter, pastel colors are perfect. - Flavor variations for different occasions: Swap vanilla extract for peppermint extract in winter. For a summer treat, try coconut extract for a tropical flavor. To keep your funfetti sugar cookies fresh, use an airtight container. Glass or plastic containers work best. You can also stack cookies with parchment paper in between to prevent sticking. Your cookies will stay fresh for up to one week at room temperature. If you want them to last longer, consider freezing them. To freeze unbaked dough, shape the cookie balls first. Place them on a baking sheet and freeze until firm. Once frozen, transfer them to a zip-top bag. They can last for up to three months. When you’re ready to bake, just add a few extra minutes to the baking time. You can also freeze baked cookies. Let them cool completely, then wrap each cookie tightly in plastic wrap. Place them in a freezer-safe bag or container. They will stay fresh for about three months. If your cookies become hard, you can soften them. Place a slice of bread in the container with the cookies. The moisture from the bread will help soften them. This trick usually takes a few hours. When reheating, the best method is to use the oven. Preheat to 300°F (150°C). Place cookies on a baking sheet and warm for about 5 minutes. This restores their soft texture. You can also use a microwave, but only for a few seconds. Be careful not to overheat them, or they will become tough. How do I know when the cookies are done? You can tell the cookies are done when the edges are golden brown. The centers may look soft, but they will firm up as they cool. Can I use margarine instead of butter? Yes, you can use margarine. However, butter gives the best flavor and texture. What if my dough is too sticky? If your dough is sticky, add a bit more flour. Start with one tablespoon at a time until the dough is easier to handle. What can I use instead of almond extract? If you don't have almond extract, use more vanilla extract. You can also try coconut extract for a fun twist. Can I replace granulated sugar with brown sugar? Yes, you can use brown sugar. It will make the cookies a bit chewier and add a nice flavor. What drinks pair well with funfetti cookies? Funfetti cookies go great with milk, coffee, or even a sweet iced tea. The flavors balance nicely with the cookies. Can these cookies be used for dessert sandwiches? Absolutely! These cookies work well as dessert sandwiches. Just add frosting or ice cream between two cookies for a tasty treat. In this blog post, we explored the yummy world of funfetti cookies. We covered the key ingredients, easy steps, and tips for the best texture. Remember, you can make these cookies your own with different add-ins or flavors. Proper storage keeps them fresh, and you'll impress everyone with your baking. Enjoy making and sharing these cookies for any occasion!

Funfetti Sugar Cookies Bakery Style Easy Recipe

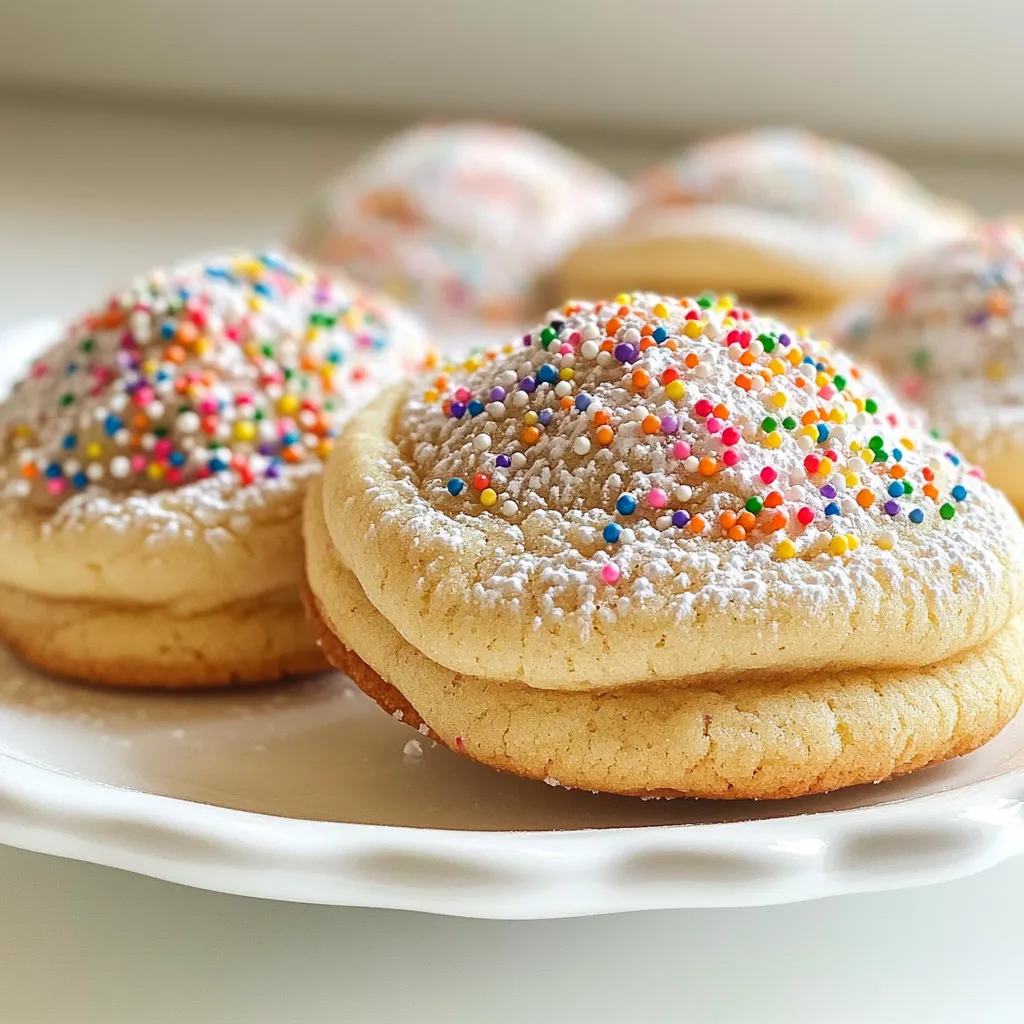
Who doesn’t love a delicious sugar cookie bursting with color? Today, I’ll show you how to make Funfetti Sugar Cookies

- 2 cans of refrigerated biscuit dough - 1 cup chopped pecans - 1 cup brown sugar - 1/2 cup granulated sugar - 1/2 cup unsalted butter, melted - 1 teaspoon cinnamon - 1 teaspoon vanilla extract - 1/2 cup caramel sauce You can swap the pecans for walnuts or almonds. If you want a lighter option, use coconut sugar instead of brown sugar. For a dairy-free version, try using coconut oil in place of butter. Always measure your ingredients with care. Use dry measuring cups for solids and liquid measuring cups for liquids. To make this delight, you will need a bundt pan. This pan helps shape the monkey bread as it bakes. You will also need mixing bowls to combine ingredients. Measuring cups and spoons are a must for accuracy. - Preheat your oven to 350°F (175°C). This will help the bread bake evenly. - Grease a bundt pan with butter or cooking spray. This prevents the bread from sticking. - Open the biscuit dough and cut each biscuit into quarters. This makes the pieces bite-sized. - Roll each piece into a small ball. Make sure they are uniform in size for even cooking. - Dip each ball into the melted butter, then roll it in a mixture of sugar and cinnamon. This adds a sweet flavor. - In the greased bundt pan, layer half of the chopped pecans at the bottom. This gives a nice crunch. - Add half of the coated biscuit balls over the pecans. This creates layers of flavor. - Pour half of the brown sugar over the biscuit layer. This will melt and create a sweet glaze. - Repeat the layers with the remaining pecans, biscuit balls, and brown sugar. This ensures every bite is tasty. - Drizzle melted butter over the top. Then mix vanilla extract into the caramel sauce and drizzle it over everything. This adds rich flavor. - Bake in the preheated oven for 30-35 minutes. The bread should turn golden brown. - Test for doneness by inserting a toothpick into the center. It should come out clean. This means it’s ready to enjoy! - Ensuring even baking: To bake monkey bread evenly, preheat your oven fully. Make sure to bake it until golden brown. A toothpick should come out clean when done. This ensures every piece cooks well. - Avoiding sticking issues: Grease your bundt pan well with butter or cooking spray. This step helps the bread slide out easily. You can also use parchment paper for extra safety. - Best ways to serve the monkey bread: Serve the monkey bread warm. Pull it apart while it’s hot. This makes it fun to eat! Place it on a nice plate for a great look. - Recommended sides or beverages: Pair this treat with coffee or milk. A scoop of vanilla ice cream also makes a great side. - Additional spices or extracts: Add nutmeg or cardamom for extra flavor. You can also try almond extract instead of vanilla for a twist. - Adding chocolate or fruit: Mix in mini chocolate chips or raisins. These additions add more taste and texture. You can even use dried cranberries for a tangy kick. {{image_2}} You can change the taste of your caramel pecan sticky monkey bread easily. Here are two fun ideas: - Chocolate Caramel Pecan Sticky Monkey Bread: Add chocolate chips to the biscuit balls for a sweet twist. The chocolate melts and mixes with the caramel. This gives a rich, gooey flavor that kids love. Just sprinkle a cup of chips in with the biscuit balls before you layer them in the pan. - Pumpkin Spice Monkey Bread: For a fall flavor, mix in pumpkin spice. Replace the cinnamon with one teaspoon of pumpkin spice. This gives the bread a warm, cozy taste. It's perfect for autumn gatherings. You can even add a bit of pumpkin puree to the melted butter for extra flavor. If you have special dietary needs, you can still enjoy this treat. Here are two options: - Gluten-free options: Use gluten-free biscuit dough. Many brands offer this now. Ensure the dough is labeled gluten-free to avoid cross-contamination. The rest of the recipe stays the same. - Vegan modifications: To make this recipe vegan, use plant-based butter and a vegan biscuit dough. You can also replace the caramel sauce with a vegan version. Many stores sell vegan caramel or you can make it at home. You might want more or less monkey bread. Here’s how to adjust: - Scaling the recipe up or down: If you want to serve more people, double the recipe. For fewer guests, cut it in half. Just keep the same baking method. - Cooking time adjustments: If you increase the recipe, baking time may change. Check the bread after 30 minutes. For a smaller batch, it might cook faster, so check at 25 minutes. Always use a toothpick to test for doneness. To keep your monkey bread fresh, store it in an airtight container. This helps prevent the bread from drying out. If you have a lot left, you can wrap it in plastic wrap first, then place it in the container. This extra layer keeps it moist and tasty for longer. Use a glass or plastic container with a tight lid. These types keep air out. You can also use a zip-top bag if you have one. Just make sure to squeeze out the air before sealing it. To reheat your monkey bread, the best method is in the oven. Preheat your oven to 350°F (175°C). Place the bread on a baking dish. Cover it with aluminum foil to keep it from drying out. Heat for about 10-15 minutes. If you want to use a microwave, do it carefully. Heat it in 15-second bursts. Check often to make sure it doesn't get too hot. You want it warm, not steaming. Both methods help keep the caramel and pecans tasty. If you want to save some for later, freezing works great! First, let the monkey bread cool completely. Then wrap it tightly in plastic wrap. After that, place it in a freezer-safe bag or container. This keeps it safe from freezer burn. To thaw, take it out of the freezer and leave it in the fridge overnight. If you're in a hurry, you can leave it on the counter for a few hours. Once thawed, reheat as mentioned above to enjoy that gooey goodness again! Monkey bread stays fresh for about 2 days at room temperature. If you place it in the fridge, it lasts up to a week. To keep it soft, cover it with plastic wrap or store it in an airtight container. Yes, you can prepare monkey bread in advance. You can assemble it the night before and place it in the fridge. Just remember to let it sit at room temperature for about 30 minutes before baking. This makes morning serving easy! I recommend using refrigerated biscuit dough for this recipe. Brands like Pillsbury or Annie's work great. They give a nice rise and create that perfect, fluffy texture. Yes, you can definitely use a slow cooker! Just layer your dough balls and pecans in the slow cooker. Cook on low for about 2 to 3 hours. Check for doneness with a toothpick before serving. This blog post covered how to make delicious monkey bread. We discussed ingredients, prep steps, and baking tips. You learned about flavor variations and storage methods to keep it fresh. Remember, monkey bread is fun and easy to make. It’s perfect for gatherings. Feel free to experiment with flavors and adapt the recipe to your taste. Enjoy every bite!

Caramel Pecan Sticky Monkey Bread Irresistible Delight

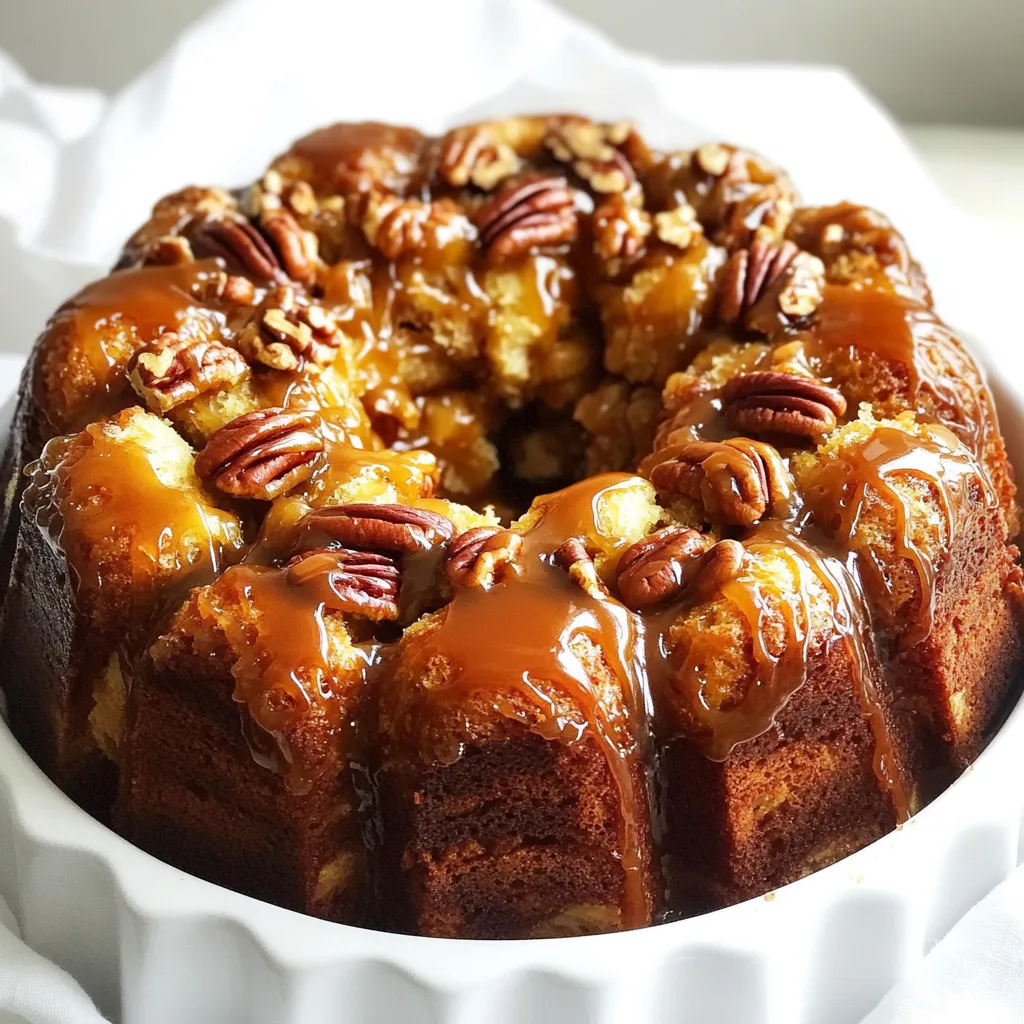
Get ready for a warm and sweet treat! This Caramel Pecan Sticky Monkey Bread combines gooey caramel, crunchy pecans, and

- 1 lb boneless chicken breast, cut into bite-sized pieces - 1/2 cup cornstarch - 2 tablespoons vegetable oil - 1/4 cup honey - 1/4 cup low-sodium soy sauce - 2 tablespoons rice vinegar - 2 teaspoons sesame oil - 1 tablespoon fresh ginger, minced - 2 garlic cloves, minced - 2 tablespoons sesame seeds - 3 green onions, chopped This recipe starts with the star of the dish: boneless chicken breast. It cooks up nice and tender. Next, we coat the chicken in cornstarch. This gives it a crispy edge that makes each bite so much better. For the sauce, I use honey. It adds sweetness and pairs well with soy sauce. Low-sodium soy sauce helps keep the dish tasty without too much salt. Rice vinegar adds a bit of tang, while sesame oil gives it a warm, nutty flavor. Aromatics play a big role here. Fresh ginger gives a zing, and minced garlic adds a nice aroma. After cooking, I top the dish with sesame seeds and chopped green onions. They give the dish a beautiful look and extra flavor. Using these ingredients, you create a meal that is better than takeout. You get bright flavors and a great texture. Plus, it’s easy to make at home! 1. Coating with cornstarch Start by placing 1 pound of boneless chicken breast, cut into bite-sized pieces, in a mixing bowl. Add 1/2 cup of cornstarch and toss the chicken well until it gets a nice, even coat. This step adds crispiness when you cook the chicken. 2. Cooking the chicken to golden brown Heat 2 tablespoons of vegetable oil in a large skillet or wok over medium-high heat. Once the oil is hot, add the chicken in a single layer. Cook for about 5 to 7 minutes, flipping the pieces occasionally. You want them to turn golden brown and be fully cooked. Remove the chicken from the pan and set it aside. 1. Sautéing ginger and garlic In the same pan, lower the heat to medium. Add 1 tablespoon of minced fresh ginger and 2 minced garlic cloves. Sauté them for about 30 seconds. You want to smell that wonderful aroma. 2. Mixing sauce ingredients In a separate bowl, mix together 1/4 cup of honey, 1/4 cup of low-sodium soy sauce, 2 tablespoons of rice vinegar, and 2 teaspoons of sesame oil. Also, add salt and pepper to taste. Carefully pour this mixture into the skillet with the ginger and garlic. 1. Thickening the sauce Let the sauce cook for about 2 to 3 minutes. This helps it to thicken nicely. 2. Mixing chicken with sauce and garnishing Return the cooked chicken to the pan. Toss it in the sauce until each piece is coated evenly. Cook for an additional minute. Before serving, sprinkle 2 tablespoons of sesame seeds and 3 chopped green onions over the top. This adds a nice crunch and a pop of color to your dish. Serve your Better Than Takeout Honey Sesame Chicken hot, over steamed rice or stir-fried veggies. Enjoy the taste of takeout right from your kitchen! To cook chicken evenly, cut it into small pieces. This helps all the pieces cook at the same time. Use a large skillet or wok to give the chicken space. Hot oil is key. Heat the oil until it shimmers. This helps the chicken brown well. Flip it only when it's golden. This creates a crisp outside. If you need alternatives, try maple syrup instead of honey. It gives a nice sweetness. For soy sauce, use tamari for a gluten-free choice. You can also use coconut aminos. This sauce is less salty but still tasty. If you want veggies, try bell peppers or broccoli. They add color and crunch. Serve your Honey Sesame Chicken over steamed rice or stir-fried veggies. Rice soaks up the sauce well. For a pop of color, add extra sesame seeds on top. Chopped green onions add freshness and look great. Use a nice plate to make your meal shine. {{image_2}} You can make baked honey sesame chicken for a lighter option. Just coat the chicken with cornstarch and place it on a baking sheet. Bake at 400°F (200°C) for about 20 minutes. This method cuts down on oil and fat while still giving you a crispy texture. For a low-sodium version, use low-sodium soy sauce and reduce the honey. You can also swap honey for a sugar-free sweetener. This keeps the great taste while making it friendlier for your diet. Want to spice things up? Add chili sauce to the sauce mix. A teaspoon or two will give your dish a nice kick. You can adjust the heat to your liking. You can also change up the veggies in this recipe. Try adding bell peppers, broccoli, or snap peas. These not only add color but also boost nutrition. Try a Korean-style honey sesame chicken by adding gochujang, a Korean chili paste. This gives a sweet and spicy flavor that is hard to resist. For a Thai peanut variation, mix in some peanut butter with the sauce. This will create a creamy texture that pairs well with the chicken. Top it off with crushed peanuts for extra crunch. Honey sesame chicken stays fresh in the fridge for about three days. To store it, place the chicken in an airtight container. This helps keep out air and moisture. You can also cover it tightly with plastic wrap. Make sure to let it cool down before sealing to avoid steam buildup. You can freeze honey sesame chicken for up to three months. To do this, let the chicken cool completely. Then, place it in a freezer-safe bag or container. Be sure to remove as much air as possible. When you're ready to eat, thaw it in the fridge overnight. To reheat, warm it in a skillet over medium heat. You can also use the microwave, but be careful not to overcook it. Making a large batch of honey sesame chicken is a great idea. You can enjoy it throughout the week. Pair it with steamed rice or stir-fried vegetables for a complete meal. Store the chicken and sides separately to keep everything fresh. This way, you can mix and match for variety. Yes, you can use chicken thighs. They are juicier and more flavorful. - Pros of chicken thighs: - They stay moist and tender. - They have a richer taste. - Cons of chicken thighs: - They have more fat. - They may take longer to cook. Both cuts work well. Choose based on your taste and health needs. To add heat, try these ideas: - Add a teaspoon of chili garlic sauce. - Mix in some red pepper flakes. - Toss in sliced fresh chili peppers. Start with a small amount and taste as you go. You can always add more if you want it spicier! Yes, you can make this recipe gluten-free. Use these alternatives: - Choose gluten-free soy sauce. - Use tamari instead of regular soy sauce. These swaps keep the flavor while making it safe for those with gluten sensitivities. Enjoy your meal without worry! This blog post covered how to make honey sesame chicken. We discussed the key ingredients, cooking steps, tips, and variations. You can enjoy this dish with rice or vegetables. Remember to store leftovers well for later meals. Whether you want a spicy kick or a healthier version, there are many ways to customize your dish. I hope you feel ready to try this recipe. Cooking can be fun and simple with the right guide and ideas!

Better Than Takeout Honey Sesame Chicken Delight

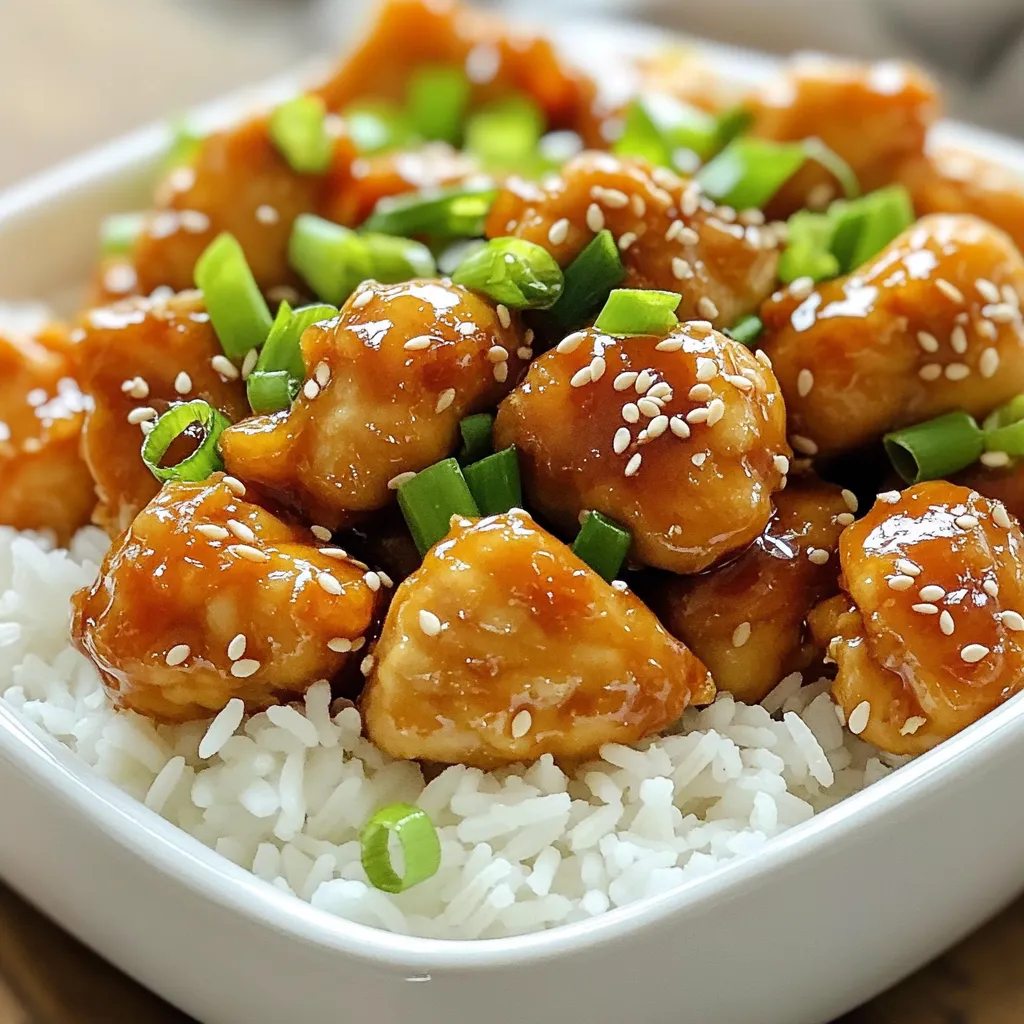
Craving a tasty and easy meal? Let me show you how to whip up my Better Than Takeout Honey Sesame

To make Slow Cooker Creamy Spinach Artichoke Dip, gather these ingredients: - 1 (10-ounce) package frozen chopped spinach, thawed and drained - 1 (14-ounce) can artichoke hearts, drained and chopped - 1 cup cream cheese, softened - 1/2 cup sour cream - 1/2 cup mayonnaise - 1 cup shredded mozzarella cheese - 1/2 cup grated Parmesan cheese - 2 cloves garlic, minced - 1 teaspoon onion powder - 1/2 teaspoon red pepper flakes (optional) - Salt and pepper to taste - Fresh parsley or cilantro, chopped (for garnish) When selecting fresh ingredients, look for vibrant colors and firm textures. - For artichokes, choose hearts that are tender and bright. - Spinach should be deep green and free from yellow leaves. - Check cheese for freshness by sniffing for any off odors. - Ensure garlic has firm cloves with no sprouting. You can easily adjust this dip for dietary needs: - Swap cream cheese for a dairy-free option like cashew cheese. - Use Greek yogurt instead of sour cream for a lighter dip. - For a gluten-free option, serve with veggie sticks or gluten-free chips. - Omit red pepper flakes for a mild flavor. These swaps help everyone enjoy this creamy delight! First, take your thawed spinach and squeeze out extra moisture. This step is key. If you skip it, your dip may turn watery. Use a clean kitchen towel or paper towel for this. Once dry, set the spinach aside. You want it ready to mix in later. In a large bowl, combine the cream cheese, sour cream, and mayonnaise. Use a mixer or spoon to blend until smooth. This creamy base is the heart of your dip. Next, add in the chopped artichokes and your dried spinach. Then, sprinkle in the shredded mozzarella and grated Parmesan cheese. Don’t forget the minced garlic, onion powder, and optional red pepper flakes for some heat. Mix everything well until it’s all combined. Now, transfer your mixture to the slow cooker. Set it to low heat. Cover the cooker and let it cook for 2 to 3 hours. Stir occasionally to ensure even heating. You'll know it's done when the dip is hot and bubbly. Once ready, give it a final stir. Taste and adjust the seasoning with salt and pepper if needed. Serve warm and garnish with fresh parsley or cilantro for a nice touch. Enjoy with your favorite dippers! To keep your dip nice and thick, start with the spinach. Squeeze out as much water as you can after thawing it. This step is key! If you skip it, your dip will end up too watery. Use a clean dish towel or cheesecloth for best results. Drain the artichoke hearts well too. You want all the moisture gone before mixing. Having the right tools makes cooking easy. For this dip, use a large mixing bowl to combine the ingredients. A sturdy spatula helps you mix everything well. A slow cooker is essential for making this dish. If you have a slow cooker with a removable insert, it makes serving easier. Finally, consider using measuring cups for accurate portions. Creamy dips need the right balance. Start with softened cream cheese for easy mixing. Combine it with sour cream and mayonnaise for a rich base. Stir until smooth before adding the other ingredients. The mozzarella and Parmesan give that extra creaminess. If your dip seems too thick, add a splash of milk to loosen it. Always taste before serving to adjust the flavor. {{image_2}} You can boost the flavor of your spinach artichoke dip by using different cheeses. For a richer taste, try adding cream cheese or gouda. You can also mix in cheddar for a sharper bite. Each cheese brings its own flavor profile, making the dip unique. Just remember to maintain a good balance. Too much cheese can make the dip overly thick or salty. If you love some heat, consider adding more spice to the dip. You can increase the red pepper flakes for extra warmth. Another option is to mix in diced jalapeños or hot sauce. These additions will give your dip a zesty kick. Just be careful not to overpower the other flavors. To make this dip vegan, replace the cream cheese, sour cream, and mayonnaise with plant-based alternatives. Look for vegan cream cheese and sour cream made from nuts or soy. You can also use cashew cream for a creamy texture. Swap out the cheese for nutritional yeast, which adds a cheesy flavor without dairy. These changes let everyone enjoy the dip! After enjoying your creamy spinach artichoke dip, let it cool. Then, scoop it into an airtight container. Make sure to seal it well. This way, it stays fresh and tasty. Store it in the fridge for up to three days. If you want to serve it again, just remember to follow the reheating tips below. You can freeze the dip for longer storage. After it cools, put it in a freezer-safe container. Leave some space at the top since the dip may expand when frozen. It can last for up to three months in the freezer. When you're ready to enjoy it, move it to the fridge overnight to thaw. To reheat the dip, use your slow cooker for best results. Add the thawed dip back to the slow cooker. Heat it on low for about an hour, stirring occasionally. You can also use your oven. Preheat it to 350°F and place the dip in an oven-safe dish. Cover it with foil to keep it moist. Bake for about 20 minutes or until hot. This keeps the dip creamy and delicious! Yes, you can make this dip ahead of time. Prepare the dip, but do not cook it yet. Place the mixture in the fridge for up to 24 hours. When you are ready to serve, just put it in the slow cooker. Cook it on low for about 2-3 hours. This helps the flavors blend well. You can serve this dip with many dippers. Here are some tasty options: - Pita chips - Tortilla chips - Fresh vegetable sticks (like carrots, celery, and bell peppers) - Sliced baguette - Crackers These options add fun textures and flavors. Each dipper helps balance the rich taste of the dip. This dip can last in the fridge for about 3-4 days. Make sure to store it in an airtight container. If you want to keep it longer, consider freezing it. Defrost it in the fridge overnight before reheating. We covered key tips for making spinach artichoke dip. Fresh ingredients boost flavor and texture. Preparing the creamy base is essential for the right consistency. Use the slow cooker for a simple cooking method. Explore variations by adding different cheeses or spices. Don't forget about storage: leftover dip can last well if stored properly. Enjoy this tasty dish with friends or family. With these steps, you can create a dip that impresses everyone.

Slow Cooker Creamy Spinach Artichoke Dip Delight

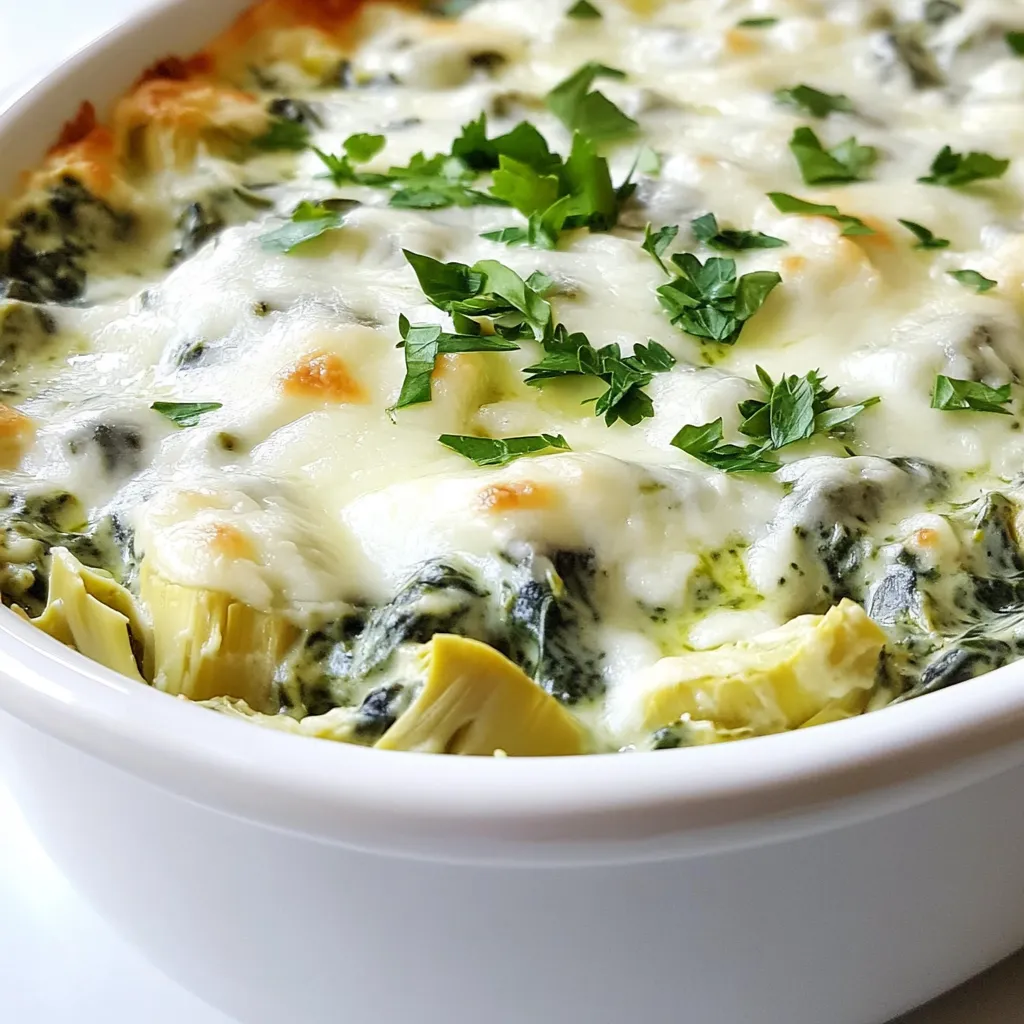
Looking for a crowd-pleasing dip that’s easy to make? You’ve found it! My Slow Cooker Creamy Spinach Artichoke Dip will

For these tasty sheet pan garlic herb chicken fajitas, you will need: - 1 lb boneless, skinless chicken breasts, sliced into thin strips - 1 red bell pepper, sliced - 1 yellow bell pepper, sliced - 1 red onion, sliced - 4 cloves garlic, minced These fresh ingredients create a colorful and flavorful base for your fajitas. The spices bring out the best flavors. Gather these essential seasonings: - 2 tablespoons olive oil - 1 teaspoon ground cumin - 1 teaspoon smoked paprika - 1 teaspoon dried oregano - 1 teaspoon chili powder - Salt and pepper to taste These spices add depth and warmth to your dish. To make your fajitas even better, consider these optional garnishes: - Fresh cilantro, chopped (for garnish) - Flour tortillas (for serving) You can also add toppings like avocado, sour cream, or salsa. Lime wedges on the side can brighten the flavors. Enjoy a fun, interactive meal as you build your own fajitas! First, set your oven to 425°F (220°C). This high heat helps cook the chicken and veggies quickly. While it heats, slice one pound of boneless, skinless chicken breasts into thin strips. Next, slice one red bell pepper and one yellow bell pepper. Don't forget to slice one red onion too. Then, mince four cloves of garlic. Gather all these ingredients in a large mixing bowl for easy access. In a small bowl, mix together two tablespoons of olive oil, one teaspoon of ground cumin, one teaspoon of smoked paprika, one teaspoon of dried oregano, and one teaspoon of chili powder. Add salt and pepper to your taste. Pour this oil and spice mix over the chicken and sliced vegetables. Toss everything together until the chicken and veggies are well-coated. This step adds great flavor to your dish! Spread the chicken and veggie mix evenly on a baking sheet lined with parchment paper. Make sure they are in a single layer. Place the sheet in the oven and roast for 20-25 minutes. Check that the chicken is cooked through and the veggies are tender. After roasting, take it out and sprinkle fresh chopped cilantro on top. Serve the fajitas warm with flour tortillas. Enjoy the mix of flavors and textures! To cook chicken just right, start with fresh, boneless breasts. Cut them into thin strips. This helps them cook evenly. Aim for a thickness of about half an inch. Use a meat thermometer to check for doneness. The internal temp should reach 165°F (74°C). Roasting at 425°F (220°C) achieves a nice, juicy texture. Make your fajitas pop with flavor. Marinate the chicken for at least 30 minutes. Use olive oil, garlic, and spices for a rich taste. Smoked paprika adds a smoky note. Don't skip the cumin; it gives depth. Toss everything well to coat each piece evenly. This step ensures every bite bursts with flavor. For a fun and colorful meal, think about how you serve. Use warm flour tortillas as a base. Lay out toppings in small bowls. Fresh cilantro, lime wedges, and avocado add flair. This makes it easy for everyone to build their own fajita. A mix of colors on the table creates a feast for the eyes. Enjoy the meal together! {{image_2}} You can easily swap chicken for beef or shrimp. For beef, thinly slice flank steak or sirloin. Marinate it just like the chicken. Cook it for about 15-20 minutes. For shrimp, use large, peeled shrimp. Shrimp cooks faster, so aim for just 10-15 minutes in the oven. Both options bring a new flavor twist to your fajitas. Want a veggie version? Use mushrooms, zucchini, or eggplant. Slice them into bite-sized pieces. Add black beans or chickpeas for protein. Toss them with the same spices for great flavor. For a fresh taste, try adding corn or diced tomatoes. These ingredients keep it colorful and delicious. Feel free to mix up the spices! Try taco seasoning for a zesty kick. You can also use Italian herbs for a different flavor. A dash of lime juice can brighten up the dish. If you like heat, add cayenne pepper to the spice mix. Play around with flavors to find your favorite combination! After enjoying your sheet pan garlic herb chicken fajitas, you might have some leftovers. To store them, let the fajitas cool to room temperature. Then, place them in an airtight container. This keeps the chicken and veggies fresh. Store the container in the fridge. Leftovers will stay good for about 3 to 4 days. If you want to keep your fajitas for longer, freezing is a great option. First, let the dish cool completely. Next, place the chicken and veggies in a freezer-safe bag. Squeeze out as much air as possible before sealing. You can also freeze them in an airtight container. They will last for up to 3 months in the freezer. Just remember to label the bag or container with the date. To reheat your fajitas, you have a few choices. The oven works well. Preheat it to 350°F (175°C). Spread the fajitas on a baking sheet and cover them with foil. Bake for about 15-20 minutes, or until heated through. You can also use the microwave. Place a portion on a microwave-safe plate and cover it. Heat on high for 1-2 minutes, stirring halfway. Always check the temperature to ensure it's hot enough to enjoy. You can keep your chicken fajitas in the fridge for 3 to 4 days. Store them in an airtight container. This keeps the chicken and veggies fresh. The flavors will continue to blend, making them even better the next day! Yes, you can prepare the fajitas ahead of time. Slice the chicken and veggies and mix them with the spices. Store everything in the fridge for up to 24 hours. When you're ready, just spread them on the sheet pan and roast. This makes weeknight dinners a breeze! Toppings can make your fajitas shine! Here are some great options: - Avocado or guacamole - Sour cream - Fresh salsa or pico de gallo - Shredded cheese - Jalapeños for heat - Lime wedges for zest - Chopped cilantro for freshness Feel free to mix and match your favorites! In this guide, we explored key ingredients and easy steps to make delicious fajitas. I shared tips for cooking chicken perfectly and offered fun variations to try. Storing leftovers correctly ensures you can enjoy them later, too. Remember, fajitas are versatile and can suit different tastes. Experiment with your favorite flavors and ingredients. Enjoy every bite!

Sheet Pan Garlic Herb Chicken Fajitas Simple Recipe

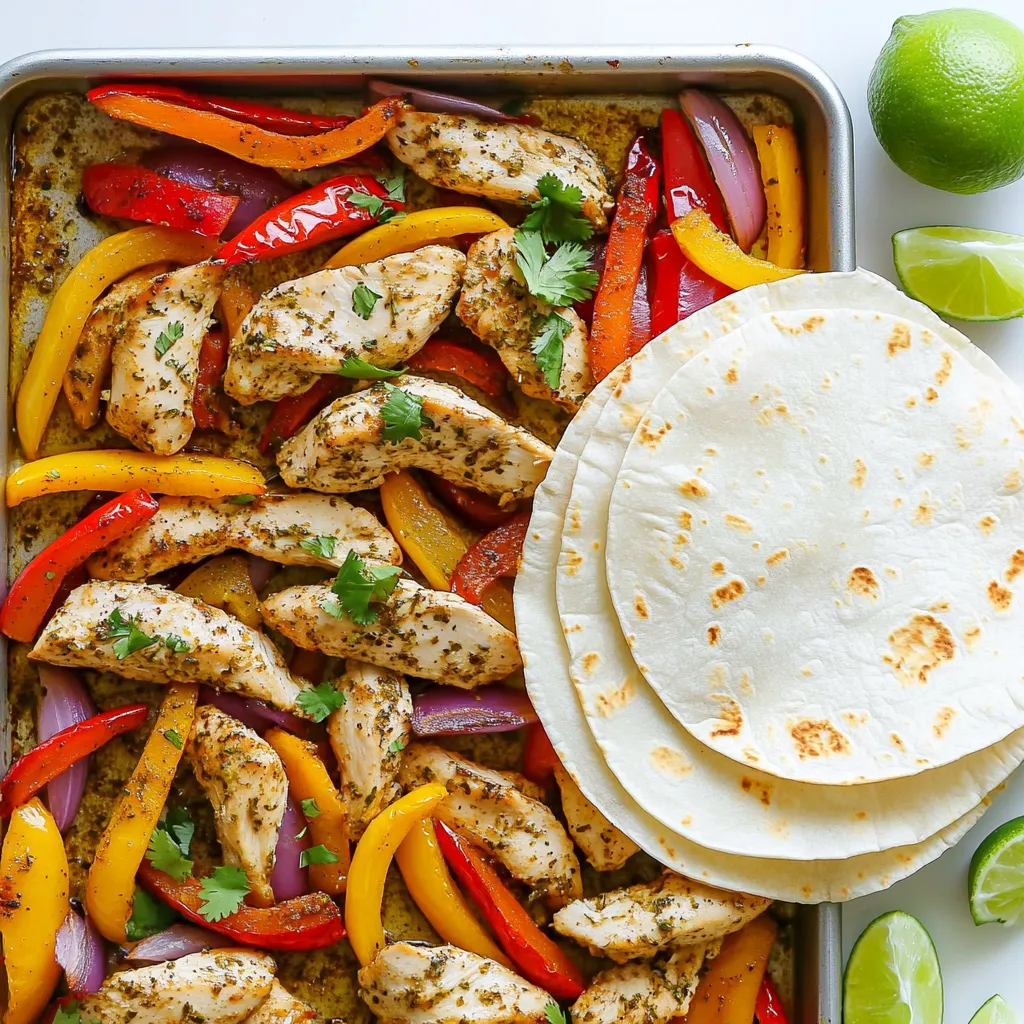
Ready to spice up your dinner routine? This Sheet Pan Garlic Herb Chicken Fajitas recipe is simple, quick, and bursting

- 1 cup canned pumpkin puree - 1/2 cup granulated sugar - 1/2 cup brown sugar, packed - 1/2 cup vegetable oil - 2 large eggs - 1 teaspoon vanilla extract - 1 1/2 cups all-purpose flour - 1 teaspoon baking powder - 1/2 teaspoon baking soda - 1 teaspoon ground cinnamon - 1/2 teaspoon ground nutmeg - 1/4 teaspoon salt The heart of these muffins lies in the key ingredients. Canned pumpkin puree offers a rich base, bringing warmth and moisture to each bite. The mix of granulated and brown sugar adds sweetness and depth, while vegetable oil keeps the muffins soft. Eggs bind it all together, giving structure and richness. - 8 oz cream cheese, softened - 1/4 cup powdered sugar - 1 teaspoon lemon juice - 1/2 teaspoon vanilla extract (for the cream cheese) For the cheesecake filling, cream cheese is essential. It provides that creamy, dreamy texture we love. Mixing in powdered sugar adds just the right amount of sweetness. Lemon juice brightens the flavor, while vanilla extract enhances the overall taste. - Nuts - Chocolate chips - Spices You can customize these muffins by adding fun extras. Nuts like walnuts or pecans give a nice crunch. Chocolate chips bring a sweet surprise. Want more spice? Consider adding ginger or cloves for a unique twist. These options let you make the muffins your own! First, you need to preheat your oven. Set it to 350°F (175°C). Next, get your muffin tin ready. You can use paper liners or lightly grease the tin. This way, your muffins release easily after baking. Now, let’s make the muffin batter. In a large bowl, mix the wet ingredients. Combine 1 cup of pumpkin puree, 1/2 cup of granulated sugar, 1/2 cup of brown sugar, 1/2 cup of vegetable oil, 2 large eggs, and 1 teaspoon of vanilla extract. Stir until the mixture is smooth. In another bowl, whisk the dry ingredients. You will need 1 1/2 cups of all-purpose flour, 1 teaspoon of baking powder, 1/2 teaspoon of baking soda, 1 teaspoon of ground cinnamon, 1/2 teaspoon of ground nutmeg, and 1/4 teaspoon of salt. Gradually add the dry mix to the wet ingredients. Stir just until combined. For the cheesecake swirl, take a separate bowl. Beat 8 oz of softened cream cheese until smooth. Add 1/4 cup of powdered sugar, 1 teaspoon of lemon juice, and 1/2 teaspoon of vanilla extract. Mix until the filling is creamy and well combined. Now, it’s time to fill the muffin tin. Spoon a layer of pumpkin batter into each muffin cup until they are 1/3 full. Add a tablespoon of the cream cheese mixture on top. Then, add more pumpkin batter until the cups are about 2/3 full. To create the swirl, use a toothpick or small knife. Gently swirl the cream cheese and pumpkin batter together to get a marbled look. Now, you’re ready to bake! To start, preheat your oven to 350°F (175°C). This temperature helps the muffins rise well. A good tip is to check your oven's actual temperature with an oven thermometer. Sometimes, ovens can be off. Bake your muffins for 18 to 20 minutes. Use a toothpick to check if they are done. If it comes out clean, they are ready! Mixing is key for great muffins. First, combine the wet ingredients well. This includes pumpkin puree, sugars, and oil. Next, whisk the dry ingredients separately. Then, add the dry mix to the wet mix. Stir just until combined. Overmixing makes muffins tough. Also, use room temperature cream cheese for the filling. This makes it easier to blend smoothly. Serving your muffins nicely makes them more fun to eat. Place them on a decorative plate. A light dusting of powdered sugar adds a nice touch. You can also add a dollop of whipped cream on top. For extra flair, sprinkle some cinnamon over the cream. These small details make your muffins look and taste even better! {{image_2}} You can change the flavor of these muffins by adding spices. Ginger and cloves add warmth and depth. Just a pinch can brighten the taste. Mix in half a teaspoon of ground ginger or cloves into your dry ingredients. This small change will give your muffins a cozy, holiday feel. If you want to swap sweeteners, use honey or maple syrup. These options add a unique flavor. If you prefer oil, try using melted coconut oil. It brings a nice touch to the muffins. Both changes keep the muffins soft and tasty. You can also change the size of your muffins. If you want mini muffins, use a smaller muffin tin. This allows for quick bites and fun treats. Bake mini muffins for about 12-15 minutes. Regular-sized muffins take 18-20 minutes, so keep an eye on them. To keep your pumpkin cheesecake swirl muffins fresh, let them cool completely. This step is key. Once cool, you can store them in an airtight container. You can use plastic wrap or a zip-top bag if you don’t have a container. Make sure the muffins don’t touch each other to avoid sticking. If you want to save some muffins for later, freezing is a great option. Wrap each muffin in plastic wrap, then place them in a freezer-safe bag. Label the bag with the date. When you want to enjoy one, remove it from the freezer. Let it thaw in the fridge overnight or microwave it for 20-30 seconds. Enjoy warm! These muffins are best eaten fresh. At room temperature, they will last about 3 days. If you store them in the fridge, they can last up to a week. Just remember to seal them well to avoid drying out. For the best taste, eat them within a few days! To keep muffins from sticking, use paper liners. They make cleanup easy. If you don’t use liners, grease your muffin tin well. Use cooking spray or butter. Make sure to cover all sides of the cups. This helps the muffins slide out without damage. Let the muffins cool slightly before removing them. This step prevents sticking and keeps them intact. Yes, you can make these muffins dairy-free! To replace cream cheese, use a dairy-free cream cheese. Look for brands that taste good. You can also use silken tofu blended until smooth. This gives a similar creamy texture. Add a bit of lemon juice for that tangy flavor. Your muffins will still taste great without dairy. Absolutely! Fresh pumpkin can be used in this recipe. Start by roasting or steaming the pumpkin. Then, mash it until smooth. This step is important for the right consistency. You may need to adjust the moisture level. If the fresh pumpkin is too wet, add a bit more flour. This keeps your muffins light and fluffy. In this article, we explored how to make delicious muffins with a creamy cheesecake swirl. We detailed key ingredients, like pumpkin puree and cream cheese, and provided step-by-step baking instructions. You learned about tips for perfect muffins, including texture and presentation ideas. Variations let you customize flavors, and storage tips keep your treats fresh. Remember, baking is all about experimenting. Enjoy the process, and your muffins will taste even better. Happy baking!

Pumpkin Cheesecake Swirl Muffins Delightful and Easy

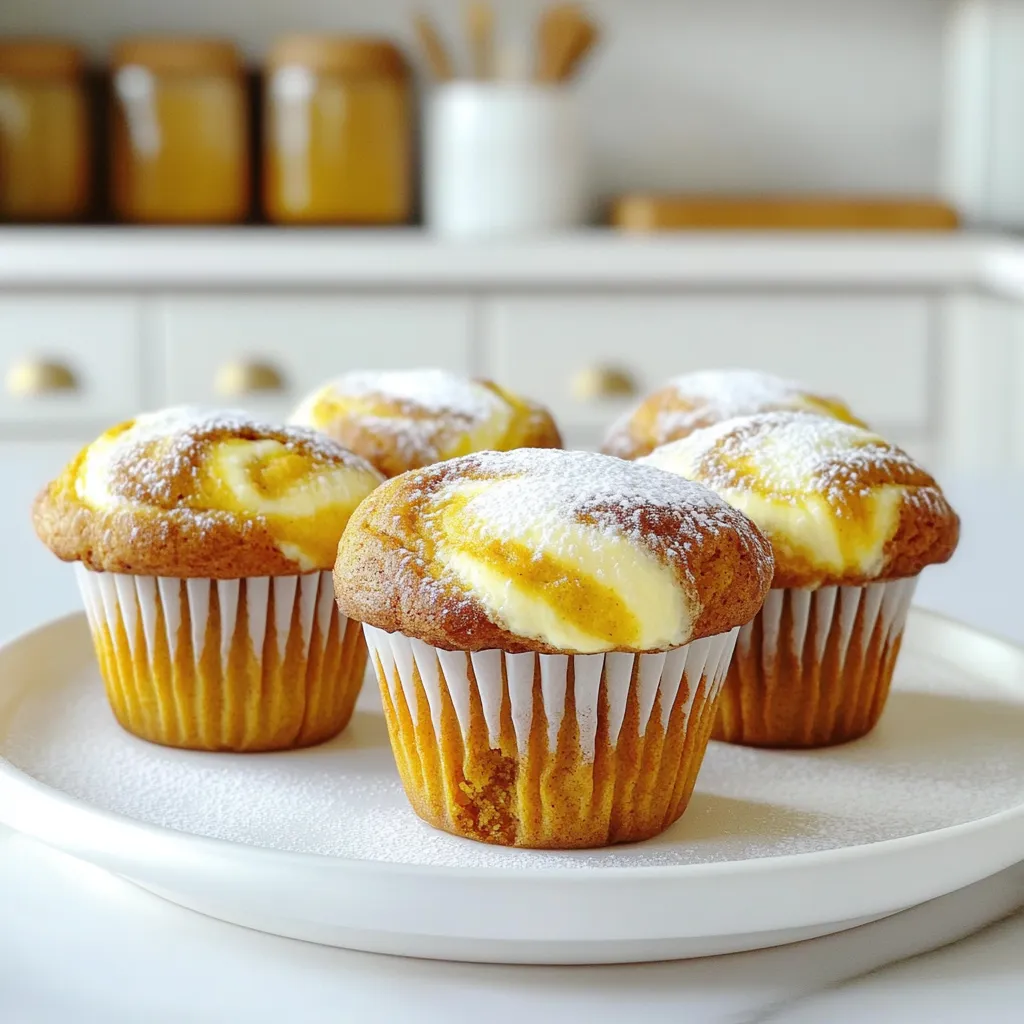
Get ready to indulge in a fall favorite that’s both delightful and easy! These Pumpkin Cheesecake Swirl Muffins bring together

To make these bars, you need the following ingredients: - 1 ½ cups crushed graham crackers - ½ cup unsalted butter, melted - 2 tablespoons granulated sugar - 16 oz cream cheese, softened - 1 cup powdered sugar - 1 teaspoon peppermint extract - 2 cups whipped cream (store-bought or homemade) - ½ cup semi-sweet chocolate chips - Fresh mint leaves for garnish (optional) These ingredients come together to create a creamy, minty delight. The crust gives a nice crunch. The filling is smooth and rich, with a lovely mint flavor. If you have special diet needs, you can make some swaps: - Use gluten-free graham crackers instead of regular ones. - For a dairy-free option, use a non-dairy cream cheese. - You can use coconut whipped cream instead of regular whipped cream. - If you want a low-sugar version, try using a sugar substitute for the powdered sugar. These alternatives still keep the bars tasty and enjoyable for everyone. I often use specific brands for the best results: - For graham crackers, I like Honey Maid or Kinnikinnick for gluten-free. - Use Kerry Gold unsalted butter for rich flavor. - For cream cheese, Philadelphia is a classic choice. - I recommend Ghirardelli for semi-sweet chocolate chips. Using quality ingredients makes a big difference in taste. Choose what you like best, and enjoy! 1. Start by mixing the crushed graham crackers, melted butter, and granulated sugar in a medium bowl. 2. Press this mixture firmly into the bottom of a 9x9 inch baking pan. This forms a strong crust. 3. In a large bowl, beat the softened cream cheese and powdered sugar until smooth and creamy. 4. Next, add the peppermint extract and mix until just combined. The mint flavor is key here. 5. Gently fold in the whipped cream. Do this slowly to keep the mixture light and airy. 6. Spread the mint cheesecake mixture evenly over the crust in the baking pan. 7. For the chocolate drizzle, melt the semi-sweet chocolate chips in the microwave. Use 30-second intervals and stir until smooth. 8. Drizzle the melted chocolate over the cheesecake layer. 9. Use a knife or toothpick to swirl the chocolate into the cheesecake. This creates a beautiful marbled effect. 10. Cover the pan with plastic wrap and place it in the fridge for at least 4 hours. This helps the bars set. 11. Once set, cut into bars and serve chilled. Add fresh mint leaves on top for a nice touch. - Use dry measuring cups for solids like graham crackers and sugar. - For sticky ingredients like butter, use a liquid measuring cup. - Level off with a straight edge for precise measurements. This keeps the balance in your bars. - If you use powdered sugar, sift it first to avoid clumps. This keeps your filling smooth. - Make sure your cream cheese is at room temperature. This helps it blend easily. - Be gentle when folding in the whipped cream to keep the air in. This gives a light texture. - Don’t overmix after adding the whipped cream. This can deflate your mixture. - Let the bars chill long enough. This ensures they set properly and hold their shape. When making No Bake Chocolate Mint Cheesecake Bars, avoid overmixing the cream cheese. This can lead to a dense texture. Also, be careful not to skip chilling the bars long enough. They need time to set properly. If you rush this step, the bars might be too soft. Lastly, ensure your whipped cream is fully folded in. This keeps your cheesecake light and fluffy. To get a rich chocolate drizzle, melt the chocolate chips slowly. Use a microwave in 30-second bursts, stirring often. This helps prevent burning the chocolate. Once melted, drizzle it using a spoon or a piping bag. For a nice touch, swirl the chocolate into the cheesecake layer. It creates a beautiful marbled look. For a fluffier cheesecake layer, start with room-temperature cream cheese. This mixes in smoothly and incorporates air. Use cold whipped cream for a lighter texture. Gently fold it in, making sure not to deflate it. Also, consider adding a bit more whipped cream if you want extra fluffiness. This will give your bars a nice lift and creamy feel. {{image_2}} You can make a mint chocolate chip version of these bars. Just add ½ cup of mini chocolate chips to the cheesecake mix. This gives a great crunch and extra flavor. You can also sprinkle some on top for a nice look. Kids love this twist! If you want a vegan version, swap cream cheese for a plant-based cream cheese. Use coconut cream instead of whipped cream. For the crust, you can use vegan butter. This way, you still get a rich taste without dairy. You can customize these bars with nuts or fruit. Chopped walnuts or pecans add a nice crunch. You can also fold in some crushed raspberries for a fruity flavor. They look pretty too! Just be sure not to add too much. To keep your No Bake Chocolate Mint Cheesecake Bars fresh, wrap them tightly. Use plastic wrap or aluminum foil. You can also store them in an airtight container. This helps prevent any unwanted odors or moisture. If you have a lot left, cut them into bars first. This makes it easier to grab a treat later. These bars can last in the fridge for about 5 days. Just make sure they are well covered. If you want to keep them longer, freeze them. They can last up to 2 months in the freezer. To freeze, wrap each bar individually. This makes it easy to enjoy later without thawing the whole batch. When you’re ready to enjoy, take the bars out of the fridge or freezer. If frozen, let them thaw in the fridge overnight. You can serve them cold straight from the fridge. If you prefer, warm them slightly in the microwave. Just heat for a few seconds. This can soften the chocolate drizzle, making it extra tasty. Yes, you can make these bars ahead of time. They taste even better after resting. I suggest making them a day before. This gives the flavors time to blend well. Just cover them tightly and keep them in the fridge. If you can't use cream cheese, try using Greek yogurt. It gives a nice tang. You can also use soft tofu for a vegan option. Just blend it until smooth. This way, you still get a creamy texture without the cheese. To adjust sweetness, change the amount of powdered sugar. Start with less and taste the mix. You can always add more later. If you want less sugar, use a sugar substitute. Just check how it measures against regular sugar. Absolutely! You can use milk chocolate, white chocolate, or dark chocolate. Each type brings a new taste. Just melt the chocolate the same way. The process stays easy, and you can create fun flavors. You’ve learned how to make No Bake Chocolate Mint Cheesecake Bars from scratch. We discussed the ingredients, steps, and tips to avoid mistakes. You can enjoy different variations based on your diet, from vegan to mint chocolate chip. Remember to store leftovers correctly for the best taste. These bars are a great treat for any occasion. Now, you are ready to impress your friends and family with a delicious dessert. Enjoy your baking adventure!

No Bake Chocolate Mint Cheesecake Bars Delightful Treat

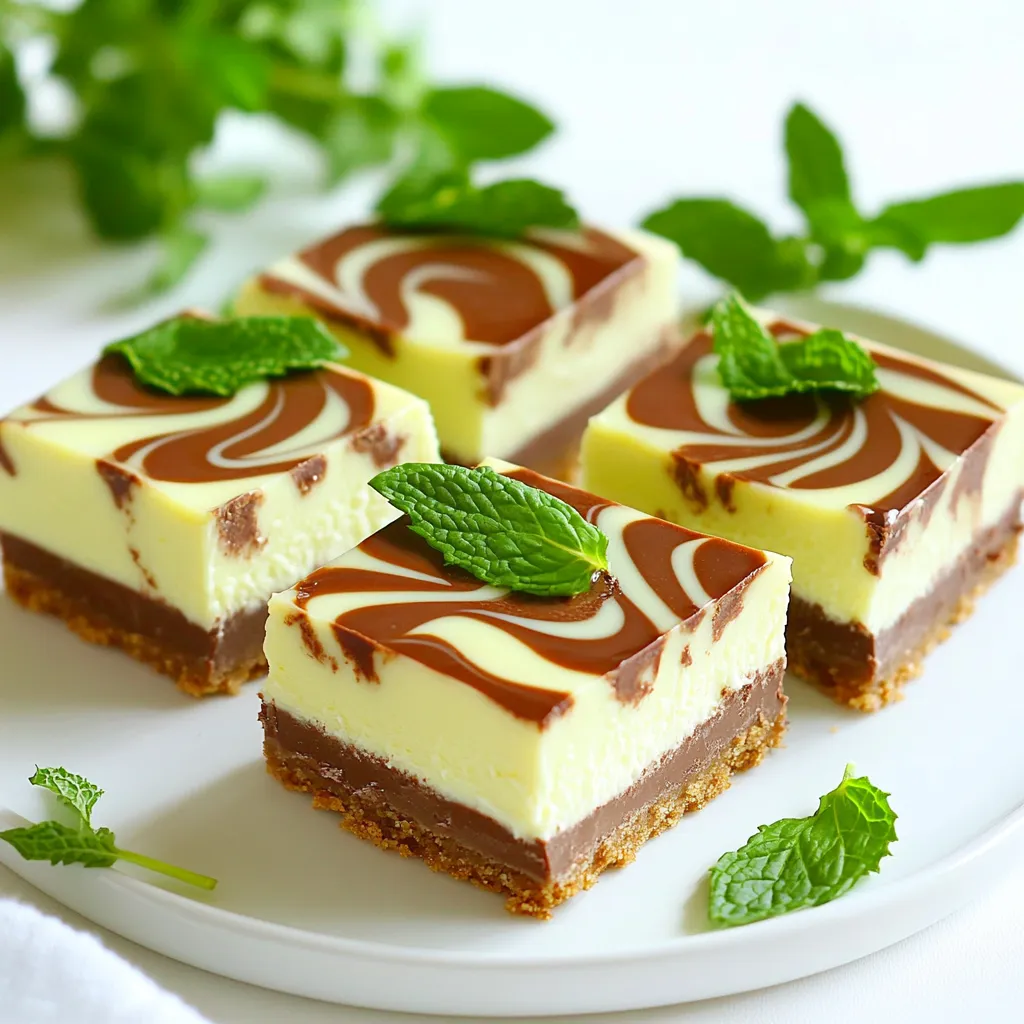
Are you ready to whip up a dessert that’s both easy and delicious? These No Bake Chocolate Mint Cheesecake Bars

Older posts
Newer posts
← Previous Page1 … Page6 Page7 Page8 … Page137 Next →

dsad

© 2025 Recipes Pursuit • Built with GeneratePress

Our Policies

  • Copyright Policy
  • Cookie Policy
  • GDPR Policy
  • Privacy Policy
  • Disclaimer
  • Terms Of Use

More Information

  • Home
  • About
  • Contact
  • Appetizers
  • Dessert
  • Dinner
  • Drinks
©2025, Recipes Pursuit About Back To Top