Skip to content
DisclaimerTerms Of UseGDPR PolicyCookie Policy

Recipes Pursuit

  • Home
  • Drinks
  • Appetizers
  • Dinner
  • Dessert
  • About
  • Contact
  • Privacy Policy
DisclaimerTerms Of UseGDPR PolicyCookie Policy

Emma Smith

- Zucchini (3 medium) - Red bell pepper (1, sliced) - Snap peas (1 cup, trimmed) - Carrot (1 small, julienned) - Cherry tomatoes (1 cup, halved) - Garlic (2 cloves, minced) - Ginger (1 tablespoon, grated) - Soy sauce (2 tablespoons; tamari for gluten-free) - Sesame oil (1 tablespoon) - Olive oil (1 tablespoon) - Sesame seeds (1 tablespoon) - Salt and pepper (to taste) Gather these fresh and pantry ingredients to make your zucchini noodle stir fry. Start with three medium zucchinis. You will spiralize them into noodles. Next, slice one red bell pepper. Grab one cup of snap peas and trim them. Use one small carrot and cut it into thin strips, called julienne. Lastly, halve one cup of cherry tomatoes. For the pantry items, grab two cloves of garlic and mince them. Use one tablespoon of fresh ginger, grated. You will also need two tablespoons of soy sauce, or tamari for gluten-free. Add one tablespoon of sesame oil and one tablespoon of olive oil. Don’t forget one tablespoon of sesame seeds. Use salt and pepper to taste. These ingredients make a colorful and tasty dish. You can find the full recipe of Zesty Zucchini Noodle Stir Fry to learn how to bring it all together! - Spiralize the Zucchini: Use a spiralizer to turn the zucchinis into noodles. This step makes them fun to eat and adds a nice texture. If you don’t have a spiralizer, a vegetable peeler works well too. Just make thin ribbons instead. - Prepare and Measure All Ingredients: Gather your sliced vegetables, garlic, and ginger. Having all ingredients ready makes cooking easier. Measure out the soy sauce and sesame oil. This prep work keeps you organized. - Heat the Pan and Add Olive Oil: Place a large skillet or wok on medium-high heat. Pour in the olive oil. Let it heat until it shimmers. This step is key for a good stir-fry. - Sauté Garlic and Ginger: Add minced garlic and grated ginger to the hot oil. Stir for about 30 seconds. You will smell a lovely aroma. This step adds depth to your dish. - Incorporate Sliced Vegetables into the Skillet: Quickly toss in the red bell pepper, snap peas, and julienned carrot. Stir-fry for about 3-4 minutes. Keep the veggies bright and tender-crisp. This helps retain their nutrients. - Add Zucchini Noodles and Stir-Fry: Gently fold in the zucchini noodles. Stir-fry for another 2-3 minutes. Ensure they soak up all those tasty flavors without turning mushy. You want them to stay firm. - Drizzle with Soy Sauce and Sesame Oil: Pour the soy sauce and sesame oil over the stir-fry. Toss everything together well. This step brings all the flavors together nicely. - Add Tomatoes and Green Onions: Fold in the halved cherry tomatoes and chopped green onions. Season with salt and pepper. Cook for one more minute. This warmth brings out the sweetness of the tomatoes. You can find the full recipe for Zesty Zucchini Noodle Stir Fry to explore these steps further. To make the best zucchini noodle stir fry, avoid overcooking your zucchini noodles. They should stay crisp and tender. Cook them for only 2-3 minutes. This keeps their bright color and fresh taste. Use high heat for a proper stir-fry. This helps the veggies cook quickly while keeping their crunch. Heat your pan until it’s hot before adding oil. This ensures everything sizzles right away. Presentation matters! Garnish your dish with sliced green onions and a sprinkle of sesame seeds. This adds color and texture. Serve your stir fry in large bowls for a cozy feel. You can also use plates for a more formal touch. A squeeze of lime on top brightens the dish and makes it pop. Want more heat? Add chili flakes to your stir fry. Just a pinch can give it a nice kick. Consider adding protein options to make it more filling. Chicken, tofu, or shrimp work great. Cook your protein first, then add the veggies. This way, everything blends well together. For the complete recipe, check out the [Full Recipe]. {{image_2}} You can mix in different vegetables to keep things fun. Broccoli adds a nice crunch. Bell peppers bring a sweet flavor. You can use seasonal veggies too. Think about adding squash in summer or Brussels sprouts in fall. The goal is to use what you love or what is fresh. Want a different taste? Try teriyaki sauce instead of soy sauce. It adds a sweet and savory twist. If you like making your own sauces, there are many options. You can blend soy sauce with honey or a splash of lime. Making a homemade stir-fry sauce gives you full control over the flavor. For gluten-free meals, use tamari instead of soy sauce. It tastes great and works well. If you want to go low-carb, skip the noodles and use just veggies. You can also make it vegan by leaving out any meat or adding tofu. This dish is flexible, so feel free to change it based on your needs. To store your leftover zucchini noodle stir fry, use an airtight container. Glass or plastic containers work well. Make sure to cool the stir fry to room temperature before sealing. This helps to keep it fresh. Your leftovers will last for about 3 to 4 days in the fridge. When you’re ready to eat, just reheat in a pan or microwave. If you want to freeze your stir fry, follow these steps: - Allow the stir fry to cool completely. - Portion it into freezer-safe bags or containers. - Remove as much air as possible before sealing. - Label with the date for easy tracking. You can freeze zucchini noodle stir fry for up to two months. When you’re ready to enjoy, thaw it overnight in the fridge. To reheat, use a skillet over medium heat until warm. You can also microwave it in short bursts, stirring in between. This keeps the flavors intact without making the noodles mushy. Yes, you can use regular pasta. If you prefer a traditional option, spaghetti works well. Just follow the cooking time on the package. You can also try other noodles like rice noodles or whole wheat pasta. These options give a different taste and texture but still pair nicely with the stir fry. The dish lasts about three to four days in the fridge. Make sure to store it in an airtight container. This keeps it fresh and safe to eat. If you notice any off smells or changes, it's best to throw it out. You can serve this stir fry with grilled chicken or shrimp for extra protein. It also pairs well with a light salad or steamed rice. For a fun twist, try adding some fresh lime or cilantro on top. These flavors enhance the dish and make it even tastier. For the complete details on how to make this dish, check out the [Full Recipe](#) for Zesty Zucchini Noodle Stir Fry 🥒. In this blog post, we covered how to make a delicious zucchini noodle stir-fry. We listed fresh and pantry ingredients, shared step-by-step instructions, and offered tips for perfecting your dish. To enhance flavor, we suggested variations and adjustments for different diets. Cooking can be fun and easy. With these tips, you can create tasty meals that fit your needs. Enjoy experimenting with different veggies and sauces!

Zucchini Noodle Stir Fry Flavorful and Healthy Meal

Looking for a quick, healthy meal? Try this Zucchini Noodle Stir Fry! With colorful veggies and vibrant flavors, it’s perfect

- 12 oz fettuccine pasta - 2 cups cherry tomatoes, halved - 1 tablespoon olive oil - 3 cloves garlic, minced - 1 cup heavy cream - 1 cup fresh basil leaves, chopped - 1 teaspoon dried oregano - Salt and pepper to taste - ½ cup grated Parmesan cheese (plus extra for serving) - Red pepper flakes (optional, for spice) When I make Creamy Tomato Basil Pasta, I focus on fresh, simple ingredients. The fettuccine pasta is the base of this dish. It cooks quickly and holds the creamy sauce well. I love using cherry tomatoes for their sweet burst of flavor. Their bright color looks great on the plate too. I always add minced garlic for depth. It gives a lovely aroma and taste. Heavy cream makes the sauce rich and smooth. Fresh basil adds a wonderful pop of green and a hint of sweetness. In terms of seasoning, I use dried oregano for a warm, earthy flavor. Salt and pepper bring out all the tastes nicely. Parmesan cheese adds a touch of saltiness and creaminess. If you want some heat, a pinch of red pepper flakes does the trick. This recipe is not just easy; it’s also flexible. Feel free to play with the ingredients. You can swap in your favorite pasta or add extra veggies. For the full recipe, check out the instructions! First, grab a large pot and fill it with water. Add salt to the water. Bring it to a boil. Once boiling, add 12 ounces of fettuccine pasta. Cook it according to the package instructions until it is al dente. This usually takes about 8 to 10 minutes. Before draining, reserve half a cup of pasta water. Drain the pasta in a colander and set it aside. Next, take a large skillet and heat 1 tablespoon of olive oil over medium heat. Once hot, add 3 minced garlic cloves. Cook it for about 1 minute. Stir often to avoid burning the garlic. After that, toss in 2 cups of halved cherry tomatoes. Season with 1 teaspoon of dried oregano, salt, and pepper to taste. Cook this mixture for 5 to 7 minutes. You want the tomatoes to soften and start to burst. Now, lower your heat and stir in 1 cup of heavy cream. Let it simmer gently for about 3 to 4 minutes. Mix in ½ cup of grated Parmesan cheese. Keep stirring until the cheese melts, and the sauce becomes smooth. If the sauce seems too thick, add some of the reserved pasta water slowly until you achieve your desired consistency. Finally, add the cooked fettuccine to the skillet. Gently toss the pasta in the creamy sauce to coat it well. Stir in 1 cup of chopped fresh basil. Adjust the seasoning with more salt, pepper, or even red pepper flakes if you like some heat. Serve this delicious dish in a wide bowl. Top it with extra Parmesan and fresh basil leaves for a lovely finish. For the full recipe, check out the link. To get the best texture, cook your pasta until it is al dente. This means it should have a slight bite when you chew it. Follow the package directions, but keep an eye on the timer. It usually takes about 8 to 10 minutes for fettuccine. Reserving pasta water is key. Before you drain your pasta, save about half a cup of the starchy water. This water helps make your sauce creamy and ties everything together. Garlic adds a lot of flavor, so use fresh cloves. I like to use three cloves, but you can add more if you love garlic. As for herbs, fresh basil is best. It gives a bright taste. You can also add a teaspoon of dried oregano for more depth. Using fresh ingredients makes a big difference. Choose ripe cherry tomatoes for the best flavor. They should be sweet and juicy. Fresh basil brings a lovely aroma and vibrant color to your dish. For a beautiful serve, use wide bowls. This allows the sauce to shine. Drizzle a little olive oil on top and sprinkle with freshly cracked black pepper. Garnish with extra Parmesan cheese and fresh basil leaves. This makes the dish look appetizing and inviting. Serve your creamy tomato basil pasta warm and enjoy it right away. You can pair it with a side salad or garlic bread for a complete meal. {{image_2}} You can switch up the pasta you use. Try penne or spaghetti. Both work well with the sauce. If you need a dairy-free option, use coconut cream. It gives a nice flavor and a creamy texture. You can also use cashew cream for a nutty twist. This way, you still enjoy a rich taste. Adding proteins can boost the meal. Chicken or shrimp adds heartiness. Cook them separately, then mix them into the pasta. You can also add vegetables for extra crunch. Spinach or bell peppers are great choices. Just sauté them with the garlic or toss them in with the tomatoes. Different regions add their flair to tomato sauces. In Italy, you might find basil and garlic as staples. In the South, you can add a bit of heat with cayenne pepper. If you want a touch of Asian flavor, try adding soy sauce or ginger. Each twist gives a new life to the creamy tomato basil pasta. To keep your creamy tomato basil pasta fresh, store it right. First, let it cool to room temperature. Then, place it in an airtight container. This helps keep moisture in and odors out. Use a glass or plastic container with a tight lid. Make sure to eat it within three days for the best taste. When reheating, avoid the microwave if you can. Instead, use a skillet. Heat it on low and add a splash of water or broth. This keeps the sauce creamy. Stir often to prevent sticking. If you must use the microwave, heat it in short bursts. Stir in between to help it heat evenly. Watch out for a watery sauce. If it gets too thin, stir in some extra cheese or cream to restore the texture. To make this dish vegan, swap heavy cream with coconut cream or cashew cream. For cheese, use nutritional yeast or vegan cheese. These swaps keep the creamy texture while making it plant-based. You still get the rich flavor without any dairy. Yes, you can freeze this pasta. To do this, let it cool completely. Store it in an airtight container. When you’re ready to eat, thaw it in the fridge overnight. Reheat gently on the stove. You may need to add a touch of water to thin the sauce. This pasta pairs well with garlic bread or a fresh side salad. A simple arugula salad with lemon dressing adds a nice crunch. You can also serve it with roasted vegetables for extra flavor. These sides complement the creamy sauce nicely. To adjust spice, simply add or reduce red pepper flakes. If you want more heat, sprinkle in extra flakes while cooking. If it’s too spicy, add a bit more cream or cheese to mellow it out. You can always taste and adjust as you go! Creamy Tomato Basil Pasta is simple to make with tasty ingredients. We covered essential ingredients, step-by-step cooking, and helpful tips. You can adapt the recipe with variations and store leftovers easily. This dish is great for any meal. With some practice, you can perfect it. Enjoy your flavorful pasta, and don’t forget to share it with others. Cooking can be fun and rewarding!

Creamy Tomato Basil Pasta Easy Flavorful Recipe

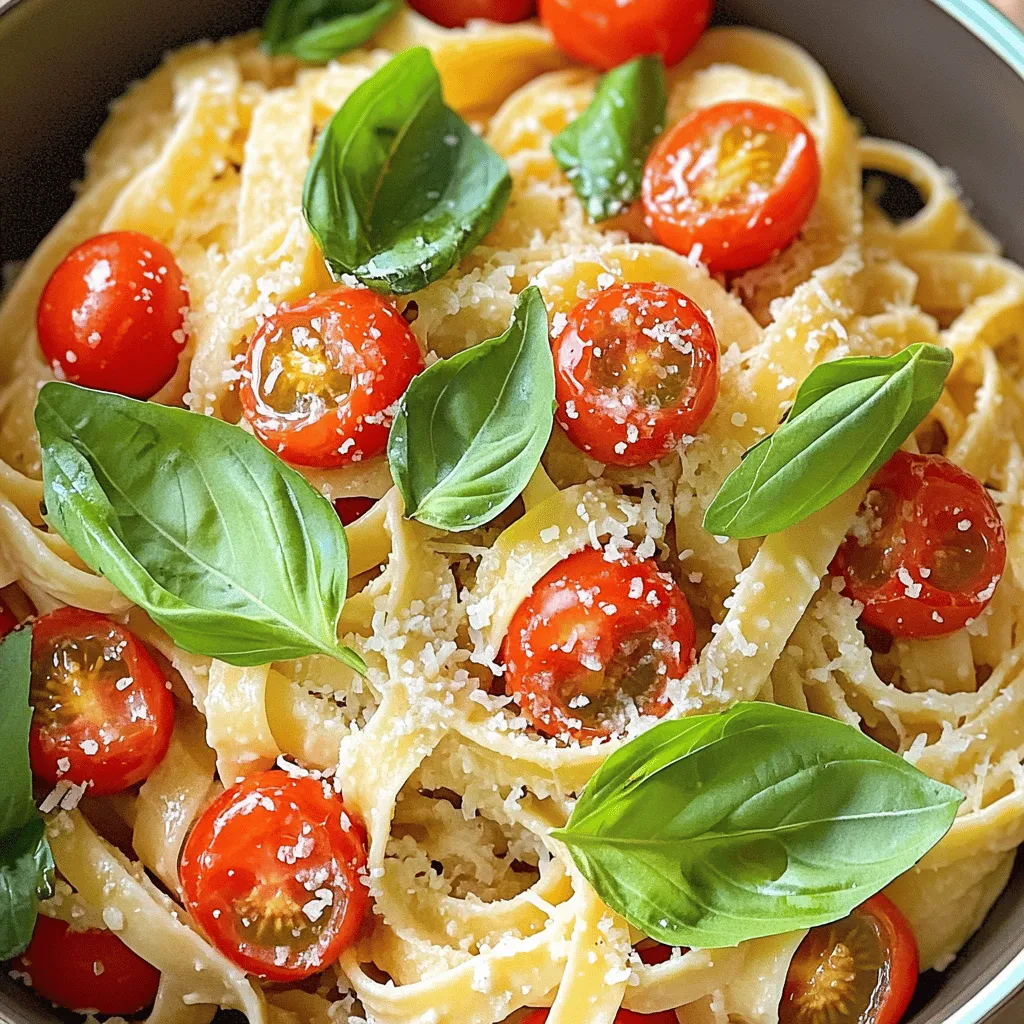
Looking for a quick and tasty meal? You’ve found the right recipe! Creamy Tomato Basil Pasta is not just easy

- 2 cups cooked chicken, shredded - 2 cups broccoli florets (fresh or frozen) - 1 cup cooked rice (white or brown) - 1 cup cheddar cheese, shredded - 1/2 cup cream of chicken soup - 1/2 cup milk - 1 teaspoon garlic powder - 1/2 teaspoon onion powder - 1/2 teaspoon paprika - Salt and pepper to taste - 1/2 cup breadcrumbs (optional for topping) - 2 tablespoons olive oil When making Cheesy Broccoli Chicken Casserole, it’s key to gather fresh and quality ingredients. Start with cooked chicken, which adds protein and flavor. You can use leftover chicken or rotisserie chicken for ease. Broccoli gives a nice crunch and pairs perfectly with cheese. Rice rounds out the dish, making it filling. The cream of chicken soup and milk create a creamy base. Garlic powder, onion powder, and paprika add depth to the flavor. Don't forget to season with salt and pepper to enhance taste. If you want a crispy topping, use breadcrumbs mixed with olive oil. - Alternative cheeses - Different vegetables (e.g., carrots, bell peppers) - Seasoning variations Feel free to customize your casserole! Swap cheddar for mozzarella or pepper jack for a kick. You can also mix in other veggies like carrots or bell peppers for added color and nutrition. Adjust the spices based on your taste for a fun twist. For the full recipe, check out the [Full Recipe]. - Preheat the oven to 375°F (190°C). - Prepare a greased 9x13 inch baking dish. - In a large bowl, combine cooked chicken, broccoli, and rice. - In another bowl, mix cream of chicken soup, milk, garlic powder, onion powder, paprika, salt, and pepper. - Pour the soup mixture over the chicken and rice mix. Stir until everything is well coated. - Fold in 3/4 cup of the shredded cheddar cheese. - Transfer the mixture into the greased baking dish and spread evenly. - If you want a crunchy topping, mix breadcrumbs with olive oil and sprinkle on top. - Finish by topping the dish with the remaining 1/4 cup of cheddar cheese. - Bake in the preheated oven for 25-30 minutes until bubbly. - Let it cool for a few minutes before serving. This recipe is simple and full of flavor. You can find the Full Recipe to follow along easily. Enjoy the cooking! To get the best creaminess in your casserole, use a mix of cream of chicken soup and milk. This blend gives a rich and smooth base. Make sure to mix it well to avoid lumps. You want every bite to be creamy and delicious. For a crispy breadcrumb topping, mix breadcrumbs with olive oil. This will help them brown nicely in the oven. Sprinkle them evenly over the top before baking. Adding herbs or spices can boost the flavor. Try adding thyme or basil for a fresh taste. A dash of cayenne pepper can add heat if you like spice. For side dishes, a light salad pairs well. You can also serve it with some crusty bread. These sides will balance your meal and add more texture. For the best results, choose a glass or ceramic baking dish. These materials hold heat well and cook evenly. Make sure it is at least 9x13 inches for the perfect fit. Key kitchen tools include a mixing bowl, measuring cups, and a whisk. These items help you combine all your ingredients easily and quickly. {{image_2}} You can easily make this casserole gluten-free. Use gluten-free breadcrumbs for the topping. Swap the cream of chicken soup with a gluten-free version. This keeps the dish tasty without the gluten. For a low-fat option, use low-fat cheese and milk. You can also use Greek yogurt instead of cream of chicken soup. This keeps it creamy while cutting some fat. Choose lean chicken breast for a healthier protein source. Want to spice things up? Try adding some diced jalapeños for a kick. You could mix in some hot sauce for a bold flavor. Adding a bit of cayenne pepper can also bring the heat. To give your casserole a global twist, add spices like cumin or curry powder. These spices add warmth and depth. You can even mix in some soy sauce for an Asian flair. Each addition gives a new taste to this classic dish. Feel free to use seasonal veggies for a fresh twist. In spring, add peas or asparagus. In fall, consider using butternut squash or pumpkin. Seasonal veggies not only taste great but also add color. During the holidays, think about adding cranberries for a festive touch. You can also top it with roasted nuts for crunch. These small changes can make your dish feel special for any occasion. For the full recipe, check the earlier notes. To keep your cheesy broccoli chicken casserole fresh, use airtight containers. Glass or plastic containers work well. Make sure to let the casserole cool first. Place it in the fridge within two hours after cooking. Store it for up to four days. When reheating, aim to keep your casserole moist. Cover it with foil to prevent drying out. You can reheat it in the oven at 350°F (175°C) for about 20 minutes. For a quick option, use the microwave. Heat in short bursts of one minute, stirring in between, until hot. If you want to save it for later, freezing works great. Allow the casserole to cool completely before freezing. Use freezer-safe containers or wrap it tightly in plastic wrap. It can last up to three months in the freezer. To thaw, place it in the fridge overnight before reheating. Can I use rotisserie chicken? Yes, you can use rotisserie chicken. It saves time and adds great flavor. Just shred it before mixing. How long can the casserole be stored in the fridge? You can store the casserole in the fridge for up to three days. Make sure to cover it well. Can I make this dish ahead of time? Yes, you can prepare the casserole ahead. Assemble it and keep it in the fridge. Bake it when ready to eat. What to do if the casserole is too dry? If the casserole is too dry, add more milk or soup. Stir it in before baking. Fixing over-seasoned dishes If the dish is too salty, add more rice or broccoli. This helps balance the flavors. Best sides to complement the casserole Serve this casserole with a fresh salad or garlic bread. These sides add freshness and taste. Presentation ideas for guests For a nice look, serve in individual bowls. Sprinkle fresh herbs on top for color. This blog gave you a full guide to make a delicious chicken casserole. You learned about the essential and optional ingredients, along with easy steps to bake it. I shared tips to enhance flavor and texture while offering variations to fit different diets. Proper storage and reheating tips were covered too. Now you're ready to make this dish your own. Enjoy customizing it and sharing it with friends and family!

Cheesy Broccoli Chicken Casserole Simple and Tasty

If you’re looking for a meal that’s both simple and tasty, this Cheesy Broccoli Chicken Casserole is for you! With

- 1 lb (450g) beef sirloin, thinly sliced against the grain - 1 cup shiitake mushrooms, sliced - 1 bell pepper, thinly sliced (any color) To make this dish shine, I choose beef sirloin for its tender texture. It cooks quickly and holds flavor well. Shiitake mushrooms add a rich, earthy taste and chewy texture. You can pick any color bell pepper, but red or yellow adds sweetness. - 3 tablespoons soy sauce - 1 tablespoon oyster sauce - 1 tablespoon hoisin sauce These sauces bring depth to the dish. Soy sauce adds saltiness and umami. Oyster sauce gives it a hint of sweetness. Hoisin sauce complements with its rich flavor profile. Together, they create a savory base that pulls all the flavors together. - 2 green onions, sliced for garnish - Cooked jasmine rice or noodles, for serving Green onions add a fresh crunch and a pop of color. Serve this stir-fry over fluffy jasmine rice or noodles. They soak up the sauce and balance the dish nicely. For more tips on serving, check out the Full Recipe. To start, you need to marinate the beef. In a bowl, combine the sliced beef with 1 tablespoon of soy sauce, 1 teaspoon of sesame oil, and a pinch of salt and pepper. Mix it well. Let the beef marinate for at least 15 minutes. This step adds flavor and helps tenderize the meat. Next, you will prepare the stir-fry sauce. Gather these ingredients: 2 tablespoons of soy sauce, 1 tablespoon of oyster sauce, and 1 tablespoon of hoisin sauce. In a small bowl, whisk together these sauces and add a dash of pepper. Make sure to mix it until it’s smooth. Set the sauce aside for later. Now, it’s time to cook the beef. Heat vegetable oil in a large pan or wok over medium-high heat. Once the oil is hot, add the marinated beef. Spread it out into a single layer. Sear the beef for about 2-3 minutes until it turns brown. Flip the beef and cook for another 2 minutes. Once cooked, remove the beef from the pan and set it aside. In the same pan, add a little more oil if needed. Toss in the sliced onions, bell pepper, shiitake mushrooms, minced garlic, and ginger. Stir-fry everything for about 5 minutes. You want the vegetables to be tender but still crisp. Now, return the cooked beef to the pan with the vegetables. Pour the stir-fry sauce over the mixture. Toss everything together until well mixed. Cook for an additional 2-3 minutes. This helps the flavors blend well, making your dish more delicious. For serving, plate the beef and mushroom stir-fry over a bed of jasmine rice or noodles. This adds a nice base to your dish. Finally, sprinkle sliced green onions on top for garnish. This adds a fresh touch that enhances the look and flavor of your meal. For stir-frying, I recommend using beef sirloin. It is tender and flavorful. You can also use flank steak or ribeye. When slicing beef, always cut against the grain. This keeps the meat tender and easy to chew. Aim for thin slices, about 1/4 inch thick. Use a sharp knife for the best results. Feel free to switch up the vegetables! You can use broccoli, snap peas, or carrots. Each adds unique flavors and texture. If you like it spicy, add sliced chili peppers or a dash of hot sauce. You can even adjust the sauce to make it sweeter or saltier. Personalize it to your taste! To get tender beef, don’t overcrowd the pan. Cook in small batches if needed. This helps the beef sear nicely. For crisp vegetables, stir-fry them over high heat. Keep them moving in the pan to avoid overcooking. Aim for a bright color and slight crunch. This way, your dish stays fresh and vibrant! {{image_2}} To store leftovers, place them in an airtight container. This helps keep the dish fresh and tasty. The beef stir-fry will last about 3 to 4 days in the fridge. Make sure to let it cool before sealing it up. For reheating, use a skillet or microwave. If using a skillet, add a splash of water or soy sauce. This keeps the beef juicy and the veggies crisp. Heat on medium until warmed through. In the microwave, cover the dish with a damp paper towel. This traps steam and helps keep the dish moist. To freeze the dish, let it cool completely. Place it in a freezer-safe container and seal it tightly. This dish can be frozen for up to 3 months. When you’re ready to eat, thaw it in the fridge overnight. Reheat it in a skillet for the best texture. You can easily make this dish vegetarian. Just swap the beef with tofu. Use firm tofu for better texture. Cut it into bite-sized pieces. Marinate it just like you would the beef. For the sauce, switch to plant-based options like soy sauce and mushroom sauce. This keeps the umami flavor without meat. If you need a gluten-free meal, avoid soy sauce with wheat. Use tamari instead. Check other sauces too. Some may have gluten. Use cornstarch to thicken your sauce if needed. It gives the same texture without the gluten. Want heat? Add chili flakes or hot sauce to your stir-fry. Start with a little, then taste. You can always add more. Balance the heat with a touch of honey or sugar. This gives the dish a nice kick without losing flavor. Yes, you can use other mushrooms in this dish. If you can't find shiitake, try these options: - Button mushrooms - Cremini mushrooms - Portobello mushrooms (slice thinly) Each type brings its unique flavor. For instance, cremini mushrooms add a deeper taste. Feel free to mix and match to find your favorite combo! For this stir-fry, jasmine rice is a great choice. It’s fragrant and fluffy. If you prefer noodles, try these options: - Rice noodles - Soba noodles - Udon noodles These accompaniments soak up the sauce nicely. Choose what you enjoy most! Making this dish ahead is easy. You can prep the beef and veggies in advance. Follow these tips: - Marinate the beef the night before. This adds flavor. - Chop the vegetables and store them in the fridge. - Cook the dish just before serving for the best taste. This way, you save time and enjoy fresh flavors! For the complete recipe, check the Full Recipe section above. In this blog post, we explored a tasty stir-fry dish. We covered key ingredients like beef sirloin and shiitake mushrooms. Flavor enhancers such as soy sauce added depth. I shared step-by-step instructions for marinating, cooking, and serving. You learned tips for perfect texture and variations to suit your dietary needs. Remember, cooking is about creativity and fun. With these tips, you can make a delicious meal every time. Enjoy your cooking adventure!

Asian Beef with Mushrooms Flavorful Stir-Fry Recipe

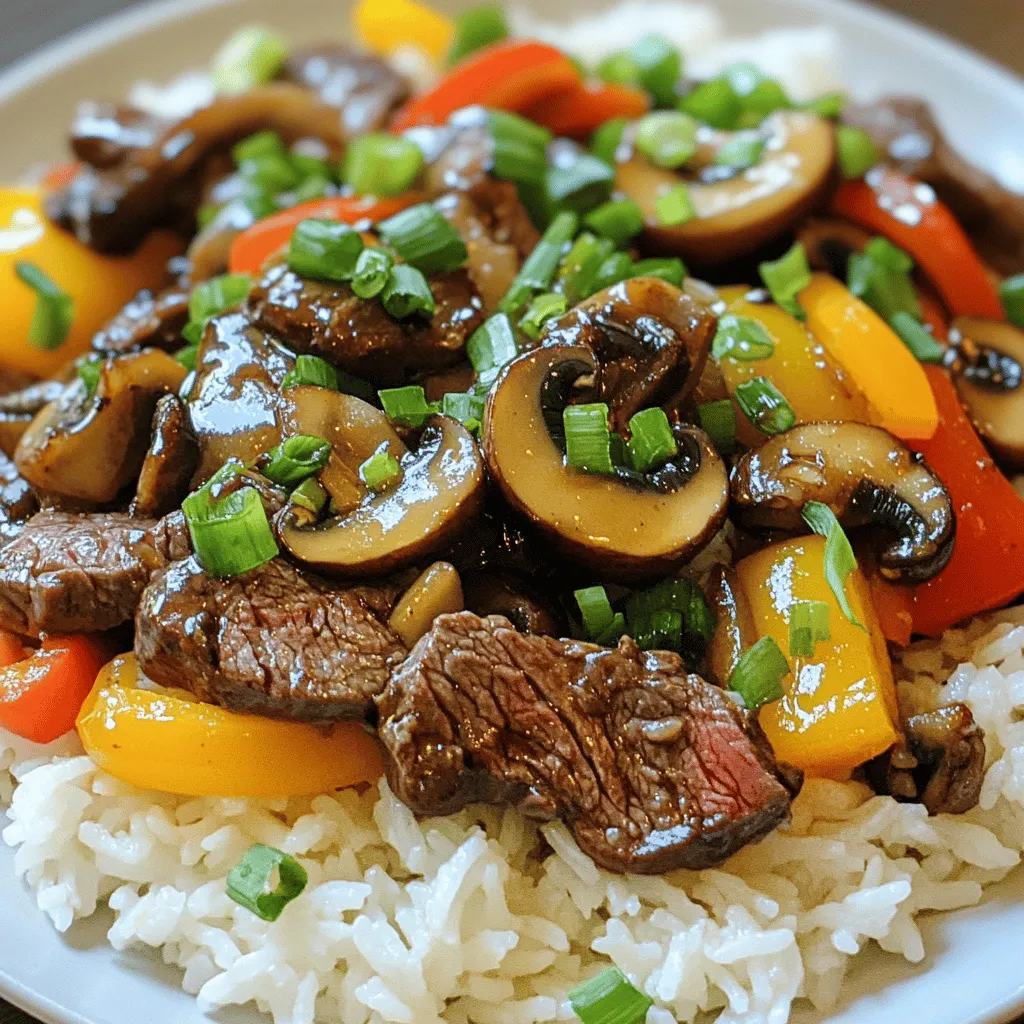
Looking to spice up your dinner routine? Dive into this Asian Beef with Mushrooms stir-fry! With tender beef sirloin, savory

To make this delightful pie, you will need the following ingredients: - For the Crust: - 1 ½ cups all-purpose flour - ½ cup unsalted butter, softened - ¼ cup granulated sugar - 1 large egg - 1 teaspoon vanilla extract - ½ teaspoon baking powder - Pinch of salt - For the Filling: - 4 medium apples (like Granny Smith or Honeycrisp), peeled, cored, and sliced - ½ cup brown sugar - 1 teaspoon cinnamon - ¼ teaspoon nutmeg - 1 tablespoon lemon juice - For the Cream Cheese Layer: - 8 oz cream cheese, softened - ½ cup powdered sugar - 1 teaspoon vanilla extract - Snickerdoodle Topping: - ¼ cup granulated sugar - 1 teaspoon cinnamon - 1 tablespoon unsalted butter, melted You can easily swap some ingredients if you need to. For the crust, you can use gluten-free flour instead of all-purpose flour. If you want a dairy-free pie, try using vegan butter in the crust and a dairy-free cream cheese substitute. For apples, you can use any sweet or tart variety you like, such as Fuji or Braeburn. If you don’t have brown sugar, white sugar works too, but it may change the flavor a bit. When picking apples, look for firm ones. They should feel heavy for their size. Avoid any with bruises or soft spots. Granny Smith apples give a nice tart flavor. Honeycrisp apples add sweetness and crunch. Mixing different apples can give your pie a more complex taste. Always taste an apple before buying it to ensure it’s sweet enough for your pie. For the complete recipe, check the Full Recipe section! Start by mixing the softened butter and granulated sugar in a bowl. You want it creamy and smooth. Next, add the egg and vanilla extract. In another bowl, whisk the flour, baking powder, and salt. Slowly add this dry mix to the wet mix. Stir until just combined. Shape the dough into a disc and wrap it in plastic. Chill it in the fridge for about 30 minutes. This step helps your crust stay flaky. While your crust chills, prepare the filling. Take four medium apples and peel, core, and slice them. Toss those apple slices with brown sugar, cinnamon, nutmeg, and lemon juice in a large bowl. Make sure each slice is well coated. Set the filling aside and let the flavors blend together. Once your crust is ready, preheat your oven to 375°F (190°C). Roll out the chilled dough on a floured surface until it's large enough for a 9-inch pie pan. Transfer the crust to the pie pan and trim off any extra dough. Next, spread the cream cheese mixture evenly over the crust. Layer the apple filling on top of the cream cheese. For the snickerdoodle topping, mix sugar and cinnamon in a small bowl. Sprinkle this over the apples and drizzle melted butter on top. Now, it's ready for baking. For the full recipe and all the details, check the Snickerdoodle Cream Cheese Apple Pie 🥧 section. To make a flaky crust, keep your butter cold. Use unsalted butter, and cut it into small pieces. Blend it into the flour gently. You want small bits of butter to stay in the dough. This helps create layers. After mixing, chill the dough for at least 30 minutes. This step is key. It keeps the crust from shrinking when baking. You can adjust the spices to make the pie your own. If you love cinnamon, feel free to add more. Try adding a dash of ginger for a warm kick. If nutmeg isn’t your favorite, leave it out. Taste the filling before you bake it. This way, you can find the right balance of flavors that you enjoy most. Baking is both an art and a science. Make sure your oven is preheated to 375°F (190°C) before placing the pie in. This helps the crust rise and brown nicely. Use a pie shield or aluminum foil to cover the edges if they brown too quickly. Check the pie after 30 minutes. If the apples are soft and the crust is golden, it’s done. Let it cool for about 15 minutes before slicing. This helps the filling set. For the full recipe, check out the detailed instructions above. {{image_2}} If you need a gluten-free crust, use almond flour or coconut flour. Mix one cup of almond flour with 1/4 cup of melted butter. Add one egg and a pinch of salt. Blend it well. Press the dough into your pie pan. This will give you a tasty and safe option. While apples are classic, try other fruits too. Pears add a sweet twist. Cherries give a nice tartness. You can even mix fruits for more flavor. Just keep the spices, like cinnamon, to balance the sweetness. Nuts can add a great crunch! Walnuts or pecans work well. Chop them up and sprinkle them on top of the apple layer. You can also add oats to the topping for texture. This makes the pie even more delightful. For the full recipe, check out the Snickerdoodle Cream Cheese Apple Pie instructions above. To keep your leftover pie fresh, place it in the fridge. Use an airtight container or cover it with plastic wrap. This keeps the pie moist and tasty. It will last up to four days in the fridge. Make sure to slice the pie before storing. This way, it’s easy to grab a piece later. Freezing the pie works well too. First, let the pie cool completely. Wrap it tightly in plastic wrap. Then, place it in a freezer-safe bag or container. Write the date on it. This pie can last up to three months in the freezer. When you are ready to eat it, thaw it overnight in the fridge. For reheating, preheat your oven to 350°F (175°C). Place the pie in the oven for about 15-20 minutes. This warms it up without making it soggy. If you want, you can use the microwave. Heat it in 30-second bursts until warm. Enjoy the warm, creamy, and spiced goodness of your Snickerdoodle Cream Cheese Apple Pie again! Check the Full Recipe to enjoy this treat from scratch. Yes, you can make the crust ahead of time. Prepare it as directed. After rolling it out, wrap it in plastic wrap. Store it in the fridge for up to two days. If you want to freeze it, wrap it well and store it for up to three months. Just remember to let it thaw in the fridge overnight before using. The pie stays fresh in the fridge for about five days. Make sure to cover it well with plastic wrap or foil. This helps keep it moist and tasty. If you want to keep it longer, I suggest freezing it. The flavors still shine even after freezing and reheating. You can serve this pie with a dollop of whipped cream. Vanilla ice cream is another great option. It adds a nice creaminess that pairs well with the pie's flavors. Caramel sauce drizzled on top can also enhance the flavor. If you want to keep it light, serve it with a scoop of fresh fruit salad. Enjoy your delicious creations with friends and family! For the complete recipe, check out the Full Recipe. In this post, we explored how to make a Snickerdoodle Cream Cheese Apple Pie. We covered essential ingredients and substitutes, along with tips for choosing apples. You learned how to prepare the crust, fill the pie, and assemble it perfectly. We shared tricks for a flaky crust and ways to adjust spices to fit your taste. Lastly, we discussed storage, freezing, and reheating techniques. This pie is a delightful treat. By following these steps, you can impress everyone with your baking skills. Enjoy your tasty creation!

Snickerdoodle Cream Cheese Apple Pie Delight Recipe

Get ready to indulge in a dessert that combines the warm flavors of snickerdoodles with creamy apple pie. I’m here

- 4 large flour tortillas - 6 large eggs - 1 cup black beans, drained and rinsed - 1 cup diced bell peppers (red, yellow, or green) - 1 small onion, finely chopped - 1 cup fresh spinach, chopped - 1 cup shredded sharp cheddar cheese - 1 teaspoon ground cumin - 1 teaspoon smoked paprika - ½ teaspoon salt - ¼ teaspoon black pepper - ¼ cup fresh cilantro, chopped (for garnish) - 1 avocado, sliced (for topping) - Salsa or hot sauce (for serving) These ingredients make a tasty breakfast burrito. The flour tortillas hold all the goodness inside. The eggs give the burrito its heartiness. Black beans add protein and fiber, while bell peppers and onion bring color and crunch. Fresh spinach boosts the nutrients. Sharp cheddar cheese adds richness and flavor. Spices like cumin and smoked paprika add warmth and depth. The cilantro and avocado on top create a fresh finish. Salsa or hot sauce gives the burrito a zesty kick. Feel free to adjust the ingredients to suit your taste. This recipe is flexible and fun! You can find the full recipe in the cooking section. Sautéing Vegetables Start by heating a large skillet over medium heat. Add the chopped onion and diced bell peppers. Sauté them for about 5 minutes. They should soften but still hold their shape. Next, add the black beans and sauté for an additional 2 minutes. This warms them up and mixes in their flavor. Whisking Egg Mixture In a bowl, crack the six large eggs. Add the ground cumin, smoked paprika, salt, and black pepper. Whisk everything together until well combined. This mixture will make your eggs flavorful and vibrant. Assembling the Burrito Place a flour tortilla on a flat surface. Scoop a generous amount of the egg mixture into the center of the tortilla. Sprinkle a handful of the shredded cheddar cheese on top. This will add a nice melty texture to your burrito. Cooking the Egg Mixture Pour the egg mixture into the skillet with the sautéed vegetables and beans. Let it cook for a minute without stirring. Then, gently stir the eggs. After a few minutes, add the fresh spinach. Cook until the eggs are just set, about 3 to 4 minutes. Remove the skillet from the heat. Folding and Rolling the Burritos To fold your burrito, take the sides of the tortilla and fold them over the filling. Then, roll it up from the bottom to the top. This keeps all the deliciousness inside. Repeat this with the remaining tortillas and filling. Crisping the Burritos If you want a crispy texture, heat a clean skillet over medium-low heat. Place the burritos seam-side down in the skillet. Grill them for about 2 minutes on each side, until they turn golden brown. This adds a nice crunch and enhances the overall flavor. - Achieving Perfect Scrambled Eggs To make great scrambled eggs, start with fresh eggs. Whisk them well until mixed. Use medium heat and a non-stick pan for even cooking. Stir gently and don’t rush. Remove them from heat just before they fully set. They will keep cooking from the heat. - Choosing the Right Tortillas Flour tortillas are soft and easy to roll. Look for large ones for more filling. If you want a bit more flavor, try whole wheat tortillas. Always warm your tortillas slightly before filling them. This makes them more pliable and less likely to tear. - Best Accompaniments Serve your burritos warm with fresh salsa or hot sauce. You might like avocado slices or a dollop of sour cream. A side of fresh fruit adds a nice touch, too. - How to Customize with Toppings Get creative with toppings! Try chopped cilantro, diced tomatoes, or shredded lettuce. You can even add jalapeños for some heat. Mix and match to find your favorite combo. - Low-Calorie Options Consider using egg whites instead of whole eggs to cut calories. You can also use low-fat cheese or skip cheese altogether. Load up on veggies to keep it filling and tasty. - Vegetarian/Vegan Substitutes For a vegetarian burrito, keep the eggs but use plant-based cheese. For a vegan option, swap eggs for tofu or chickpea scramble. Black beans add protein and keep it hearty. {{image_2}} You can change your burrito fillings to fit your taste. - Meat Lovers’ Burrito: Add cooked bacon, sausage, or chorizo. These meats give a hearty bite. Mix in the eggs and veggies for a filling meal. - Veggie-Only Burrito: Skip the meat and load up on extra veggies. Try mushrooms, zucchini, or corn. The flavor stays strong with spices and cheese. Boost the taste of your burrito with simple changes. - Adding Spicy Elements: If you like heat, add jalapeños or hot sauce. This brings a kick to your breakfast. - Incorporating Different Cheeses: Switch up your cheese. Use pepper jack for spice, or feta for a tangy twist. Each cheese will change the taste. Make your breakfast more fun with themed burritos. - Tex-Mex Style: Add salsa and avocado for a Tex-Mex flair. You can even add cilantro and lime for freshness. - Southwestern Style: Use black beans, corn, and a hint of lime juice. This gives a bright flavor that’s perfect for early mornings. Feel free to explore these variations. They can make your savory breakfast burritos even more exciting! For the full recipe, check out the recipe section. - Refrigeration Tips: Store leftover burritos in an airtight container. They will stay fresh for up to three days in the fridge. Make sure to let them cool to room temperature before sealing. - Reheating Instructions: To reheat, you can use a microwave or a skillet. In the microwave, heat for about 1-2 minutes. If using a skillet, warm them over medium heat for about 3-4 minutes on each side until heated through. - Freezing Burritos: You can freeze your burritos for up to three months. Wrap each burrito tightly in plastic wrap and then place them in a freezer bag. This keeps them fresh and prevents freezer burn. - Best Practices for Thawing: To thaw, move the burritos from the freezer to the fridge overnight. If you're in a hurry, you can microwave them straight from the freezer. Just add an extra minute or two to the microwave time. - Preparing in Batches: Make a big batch of burritos on the weekend. You can freeze some and enjoy the rest during the week. This saves time and makes breakfast easy. - Quick Grab-and-Go Options: Wrap burritos in foil or parchment paper. This makes them easy to grab when you're in a rush. You can take them to work or school for a tasty meal on the go. For the full recipe, check out the Savory Breakfast Burritos section. You can prepare breakfast burritos in advance easily. First, cook the filling as directed in the Full Recipe. Then, let it cool completely. After that, fill the tortillas and wrap them tightly. Place them in an airtight container in the fridge. They will last for up to two days. When ready to eat, just heat them in the microwave or skillet. This method saves time on busy mornings. Yes, breakfast burritos freeze very well. After wrapping them tightly, place them in a freezer bag or container. They can last up to three months in the freezer. To reheat, take them out and let them thaw in the fridge overnight. You can then warm them in the microwave or oven. This method keeps them tasty and fresh. If you want an egg-free option, try using tofu or chickpea flour. Silken tofu can mimic the texture of scrambled eggs. Just crumble it and cook it like eggs. For chickpea flour, mix it with water and spices to create a batter. Cook it in a skillet until set. Both options are packed with protein and flavor. Breakfast burritos taste great with various sides. Here are a few ideas: - Fresh fruit salad - Hash browns or home fries - A simple green salad - Greek yogurt with honey - Sliced avocado or guacamole These sides add color and balance to your meal. To avoid soggy burritos, use dry fillings. Drain black beans well and pat vegetables dry before cooking. Also, let the filling cool before wrapping it. Another tip is to layer ingredients wisely. Place wet toppings, like salsa, on the side rather than inside the burrito. This keeps your burrito firm and enjoyable to eat. This blog shared all you need to make great breakfast burritos. You learned about the tasty ingredients, step-by-step cooking, and helpful tips to make them shine. We also looked at variations and storage tips for meal prep. Breakfast burritos can be fun and flexible meals. Whether you love spicy or want something simple, you can customize them or make them healthy. Now, it’s your turn to try these ideas in your kitchen! Enjoy making your breakfast burritos delicious and unique.

Savory Breakfast Burritos Quick and Easy Recipe

Kick-start your day with my Savory Breakfast Burritos! This quick and easy recipe combines tasty eggs, savory black beans, and

For a delicious avocado toast with poached egg, you will need: - 2 ripe avocados - 4 slices of whole-grain bread - 4 large eggs - 1 tablespoon white vinegar - 1 teaspoon lemon juice - Salt and pepper to taste - 1/4 teaspoon red pepper flakes - Fresh chives or cilantro, chopped (for garnish) - Olive oil for drizzling These ingredients make a simple yet tasty dish. The ripe avocados give a creamy texture. Whole-grain bread adds a nice crunch. The poached eggs provide protein and richness. Using lemon juice brightens the flavor. The addition of red pepper flakes gives a hint of heat. Fresh herbs like chives or cilantro enhance the dish's taste and look. Drizzling olive oil adds a touch of luxury. For the full recipe, check the steps to create this amazing meal. Enjoy your cooking! Toasting bread is simple. You can use either a toaster or a grill pan. - Toaster: Just place the slices in and set it to your desired level. - Grill Pan: Heat the pan over medium heat. Add the bread and toast for a few minutes on each side. Aim for a golden brown color. This gives a nice crunch to your avocado toast. Next, let’s get your avocado ready. First, cut each avocado in half. Remove the pit carefully. - Scoop the avocado flesh into a bowl. - Mash it with a fork until smooth. Add a squeeze of lemon juice, salt, and pepper for flavor. Mix it well and set it aside. Poaching eggs adds a tasty touch to your toast. Use vinegar in the water when poaching. - Fill a saucepan with about 3 inches of water. - Bring it to a gentle simmer, then add a tablespoon of white vinegar. Crack each egg into a small bowl. Slide the egg into the water gently. - Poach for about 3-4 minutes for a runny yolk. - Cook longer if you want a firmer yolk. Use a slotted spoon to remove the eggs when done. This simple method gives you a perfect poached egg every time. For the full recipe, check the detailed instructions above. Enjoy your cooking! To get a creamy avocado, choose ripe avocados. They should yield slightly when you press them. Cut them in half and remove the pit. Use a fork to mash the flesh in a bowl. Mix in lemon juice, salt, and pepper. This adds flavor and helps keep the color. For poached eggs, the vinegar is key. It helps the egg whites stay together. Use a small pot filled with water. Bring it to a gentle simmer, not a boil. Crack each egg into a small bowl first. Then, gently slide it into the simmering water. Poach the eggs for 3 to 4 minutes for runny yolks. If you want firmer yolks, leave them in longer. Pair your avocado toast with sides like fresh fruit, yogurt, or a light salad. These add color and taste. You can also serve it with a sprinkle of nuts for crunch. For presentation, arrange the toasts on a big plate. Add lemon or lime slices for a pop of color. A sprig of chives on each egg looks nice too. This makes the dish feel special and inviting. One common mistake is over-mashing the avocado. You want it creamy but still have some chunks. This adds texture to the toast. Another mistake is poaching eggs poorly. If the water is too hot, the eggs will break apart. Keep the heat low and the water at a gentle simmer. This ensures your eggs come out perfectly every time. {{image_2}} To take your avocado toast to a new level, try adding spices and herbs. A pinch of cumin or garlic powder can give your dish a warm kick. Fresh herbs like basil or cilantro also add brightness. You can even sprinkle some feta or goat cheese for a creamy finish. Cheese options like sharp cheddar or pepper jack can add a fun flavor twist. If you prefer gluten-free options, look for gluten-free bread made from almond or coconut flour. These choices taste great and work well with avocado. For a low-carb meal, try using cloud bread or lettuce wraps. Both options keep your toast light and fresh while still being filling. While poached eggs are classic, feel free to switch it up. A fried egg can add a nice crispy edge. Just cook the egg sunny-side up or over-easy for runny yolks. If you want something different, consider scrambled eggs on top. They add a soft texture and are quick to make, making breakfast even easier. For the full recipe, check out the [Full Recipe]. To keep your avocado toast fresh, store each part separately. For avocados, wrap them tightly in plastic wrap. This keeps air out and slows browning. You can also store them in an airtight container with lemon juice, which helps too. For any leftover poached eggs, store them in the fridge in a bowl of cold water. This keeps them moist and prevents them from drying out. Use these eggs within a day for the best taste. To reheat toast, place it in a toaster for a quick crisp. You can also use an oven at a low heat. Avoid the microwave, as it makes the toast soggy. For eggs, gently warm them in a pot of hot water for a few minutes. This keeps the eggs tender without cooking them further. Enjoy your meal again with these simple tips! For the full recipe, check the earlier section. Yes, you can prep for avocado toast ahead of time. Here are some tips: - Avocados: Keep them whole until you are ready to use them. Cut avocados brown fast. - Toast: You can toast the bread early. Just warm it up before serving. - Eggs: Poach the eggs and store them in cold water. This keeps them fresh until ready to eat. If you want to skip white vinegar, try these alternatives: - Apple cider vinegar: A mild flavor that works well. - Lemon juice: Adds a nice zest and helps the egg hold its shape. - Salt water: Just add a bit of salt to the water for a different taste. Look for these signs to know your egg is ready: - Timing: Poach for about 3-4 minutes for runny yolks. - Visual cues: The egg white should be set, and the yolk should still jiggle slightly. Avocado toast is not just tasty; it packs some great nutrients: - Healthy fats: Avocados have monounsaturated fats that are good for your heart. - Fiber: Whole-grain bread and avocados provide fiber, aiding digestion. - Vitamins: Avocados are rich in vitamins C, E, and K, boosting your health. Avocado toast can be vegan-friendly. Here are some ideas: - Egg alternatives: Use tofu scramble or chickpea salad instead of eggs. - Toppings: Add sliced tomatoes, radishes, or sprouts for extra flavor and nutrition. For the full recipe, check out the detailed instructions above. Avocado toast is a simple dish made from fresh ingredients. You now know how to toast bread, prepare ripe avocados, and poach eggs to perfection. You also learned ways to enhance flavor and avoid common mistakes. Experiment with variations and storage tips to keep your meals fresh. Avocado toast is healthy and can fit many diets. With these skills, you can make a delicious meal that everyone will love. Enjoy creating your unique versions and impress your friends!

Avocado Toast with Poached Egg Quick and Tasty Meal

Looking for a quick, tasty meal that packs a punch? Avocado Toast with Poached Egg is it! This dish combines

To make Spicy Garlic Roasted Chickpeas, you need these simple items: - 1 can (15 oz) chickpeas, drained and rinsed - 2 tablespoons olive oil - 4 cloves garlic, minced - 1 teaspoon smoked paprika - 1/2 teaspoon cayenne pepper (adjust for heat preference) - 1 teaspoon ground cumin - 1 teaspoon sea salt - 1 tablespoon fresh parsley, chopped (for garnish) You can change some ingredients based on your needs. Here are a few ideas: - Chickpeas: You can use dried chickpeas if you soak and cook them first. - Olive oil: Use avocado oil or coconut oil for different flavors. - Garlic: Garlic powder works if you don’t have fresh garlic. - Spices: Try using chili powder or curry powder instead of smoked paprika. - Salt: Low-sodium salt is a good choice for less sodium. Freshness matters, especially for chickpeas. Here are tips to find the best: - Canned chickpeas: Check the expiration date. Choose cans without dents. - Dried chickpeas: Look for whole, unbroken beans. They should be firm and dry. - Organic options: If you can, choose organic chickpeas. They often have better flavor. - Local markets: Visit local farmers' markets for fresh, high-quality options. For the full recipe, check out the Spicy Garlic Roasted Chickpeas section. Start by preheating your oven to 400°F (200°C). This heat is key for crispy chickpeas. Next, take one can of chickpeas, drain, and rinse them well. Spread the chickpeas on a clean kitchen towel. Pat them dry to get rid of excess moisture. The drier they are, the crispier they will become. In a large bowl, mix the dry chickpeas with 2 tablespoons of olive oil, 4 minced garlic cloves, 1 teaspoon of smoked paprika, 1/2 teaspoon of cayenne pepper, 1 teaspoon of ground cumin, and 1 teaspoon of sea salt. Toss everything until the chickpeas are nicely coated. Once your chickpeas are seasoned, line a baking sheet with parchment paper. This step makes for easy cleanup. Spread the seasoned chickpeas in a single layer on the sheet. Roast them in the preheated oven for 25-30 minutes. Remember to stir halfway through. This ensures even cooking. The chickpeas should turn golden brown and crispy. After roasting, take the baking sheet out of the oven. Let the chickpeas cool for a few minutes. They will continue to crisp up as they cool. This step is important for getting that perfect crunch. For a pop of color and flavor, garnish with 1 tablespoon of fresh parsley before serving. Enjoy your spicy garlic roasted chickpeas as a tasty snack or topping! For a complete guide and all the details, refer to the Full Recipe. Roasting chickpeas is simple, but small mistakes can ruin them. Here are some pitfalls to watch out for: - Not drying the chickpeas: Wet chickpeas will turn soft, not crispy. Always pat them dry after rinsing. - Overcrowding the pan: If chickpeas are too close, they steam instead of roast. Spread them in a single layer. - Skipping the stirring: Stir halfway through roasting. This helps them cook evenly and get crispy all over. To make your spicy garlic roasted chickpeas even better, try these ideas: - Add more heat: If you love spice, increase the cayenne pepper or add chili powder. - Try new herbs: Fresh herbs like rosemary or thyme can add a unique taste. - Mix in zest: A bit of lemon or lime zest can brighten the flavor of the chickpeas. Getting that perfect crunch is key. Here’s how to ensure even roasting: - Use a preheated oven: Starting with a hot oven helps the chickpeas crisp up quickly. - Choose the right baking sheet: A rimmed sheet will keep the chickpeas from rolling around. - Avoid using foil: Parchment paper works best. It allows for air circulation while keeping cleanup easy. For the full recipe, check the ingredients and instructions listed above. Enjoy your cooking! {{image_2}} You can spice up your roasted chickpeas in many ways. Try adding lemon zest for a bright touch. For a sweet twist, mix in maple syrup or honey before roasting. You can also use different spices, like curry powder or chili lime seasoning, to change the taste. Each mix gives you a new flavor to enjoy. This recipe is already vegan and gluten-free, which is great! If you want to make it even healthier, use less oil. You can also add nutritional yeast for a cheesy flavor without dairy. Just sprinkle it on before serving. Feel free to get creative and swap spices to match your taste. Spicy garlic roasted chickpeas are great as a snack on their own. You can also toss them in salads for a tasty crunch. Use them as a topping for soups or grain bowls to add texture. They make a fun addition to party platters. Try serving them with a dip, like hummus or yogurt sauce, for extra flavor. You can find the full recipe above to guide you in making these delicious treats! After enjoying your spicy garlic roasted chickpeas, store leftovers in an airtight container. This keeps them fresh longer. Make sure the chickpeas are completely cool before sealing the container. If you have extra, you can also use zip-top bags for better space-saving. To reheat and maintain crispiness, use the oven. Preheat it to 350°F (175°C). Spread the chickpeas on a baking sheet in a single layer. Heat them for about 10 minutes, checking often. This helps restore their crunch while warming them up. Avoid the microwave, as it can make them soft. Properly stored, your chickpeas can last up to one week. Check for signs of spoilage before eating. Look for any off smells, unusual colors, or a soggy texture. If you notice any of these signs, it's best to discard them. Freshness is key for enjoying this flavorful snack. Yes, you can use dried chickpeas. First, soak them overnight in water. Then, cook them until tender. This process takes more time but gives you great flavor. Once cooked, you can follow the same steps from the Full Recipe. Just remember to dry them well before roasting. To change the spice level, you can add or reduce cayenne pepper. If you like it milder, use less. For more heat, add more cayenne. You can also try different spices, like chili powder or black pepper, for a unique twist. Taste the mixture before roasting to find your perfect balance. Yes, spicy garlic roasted chickpeas are very healthy. They are high in protein and fiber, which keeps you full. Chickpeas also have good vitamins and minerals. Using olive oil adds healthy fats. Just watch the portion size, as they are easy to snack on! In this blog post, we explored how to make spicy garlic roasted chickpeas. We covered all the ingredients, including substitutions for different diets. You learned step-by-step cooking instructions to achieve crispy texture. We also shared tips to avoid common mistakes and enhance flavors. Finally, we discussed storage methods and answered your burning questions. These chickpeas make a healthy and tasty snack. With practice, you can create your perfect version. Enjoy experimenting with flavors and make this recipe your own. Happy cooking!

Spicy Garlic Roasted Chickpeas Crispy Flavor Boost

Are you ready to spice up your snack game? My Spicy Garlic Roasted Chickpeas are a game-changer! These crispy bites

- 1.5 lbs beef sirloin, thinly sliced - 1 medium onion, finely chopped - 3 cloves garlic, minced - 8 oz button mushrooms, sliced - 1 cup beef broth - 1 tablespoon Worcestershire sauce - 1 teaspoon Dijon mustard - 2 tablespoons olive oil - 1 tablespoon soy sauce - 1 teaspoon paprika - 1 cup sour cream - 2 tablespoons all-purpose flour - Salt and pepper to taste - Chopped fresh parsley, for garnish - 8 oz egg noodles (for serving) Getting the right ingredients is key for your Instant Pot beef stroganoff. You want to pick quality beef sirloin. Thin slices help it cook fast and stay tender. A medium onion adds sweetness and depth. Fresh garlic gives a lovely aroma. Use button mushrooms for their mild taste. For the broth, choose a good beef broth. It adds rich flavor. Worcestershire sauce and Dijon mustard bring umami notes. The soy sauce and paprika enhance the dish's overall taste. Sour cream adds creaminess, while flour thickens the sauce. Seasoning with salt and pepper is vital to balance flavors. Fresh parsley makes a nice garnish and adds color. Don't forget the egg noodles; they are the perfect base for this meal. Check out the full recipe for more tips and tricks to make this dish shine! - Set the Instant Pot to sauté mode. - Add olive oil and let it heat up. Start by heating the olive oil in your Instant Pot. This step is crucial. It helps to create a nice base for your dish. The oil should shimmer but not smoke. - Sauté onions and garlic until translucent. - Incorporate mushrooms, sauté until moisture is released. - Add beef sirloin and sear on all sides. Next, toss in the chopped onion and minced garlic. Stir them until the onions turn soft and clear. This takes about three minutes. Then, add the sliced mushrooms. Keep stirring until they give off their moisture. After that, mix in the beef sirloin. Season with salt, pepper, and paprika. Cook until the beef is browned on all sides, which usually takes five to seven minutes. - Pour in broth and sauces; close lid and cook on high pressure. - Natural release pressure, then quick release remaining pressure. Now, it’s time for the magic of pressure cooking. Pour in the beef broth, Worcestershire sauce, soy sauce, and Dijon mustard. Stir well to combine everything. Secure the lid and set the pot to high pressure for ten minutes. After the timer goes off, let it sit for five minutes. This is called natural release. Then, carefully do a quick release to let out any remaining steam. - Whisk sour cream and flour; temper with hot beef mixture. - Combine back into Instant Pot and simmer to thicken. - Cook egg noodles as directed and serve over noodles. In a small bowl, whisk together the sour cream and flour until smooth. Scoop out some hot beef mixture and slowly mix it into the sour cream. This step is important to avoid lumps. Pour this mixture back into the Instant Pot and stir it well. Let it simmer for a few minutes to thicken. While that’s happening, cook your egg noodles according to the package. Once everything is ready, serve the beef stroganoff over the noodles. Enjoy your meal! For the full recipe, check the provided details. - Use thinly sliced beef for even cooking. This helps all pieces cook the same way. - Avoid overcrowding the pot for better browning. This keeps the meat juicy and tasty. - Add a splash of red wine for richer flavor. It deepens the taste and adds complexity. - Stir in fresh herbs like thyme or rosemary for aroma. These herbs bring freshness to the dish. - If sauce is too thin, simmer uncovered for a few minutes. This will help it thicken nicely. - Adjust salt and pepper to personal taste preferences. Always taste as you go to get it just right. {{image_2}} You can easily make this dish gluten-free. Just swap the egg noodles for gluten-free pasta or zucchini noodles. This keeps the meal light and tasty. I love using spiralized zucchini for a fresh twist. It absorbs the sauce well and adds a nice crunch. If you prefer a vegetarian meal, simply replace the beef with mushrooms. Use a mix of cremini and portobello for great flavor. Add vegetable broth instead of beef broth to keep it rich and savory. This will give you a hearty dish that everyone will enjoy. For a lighter option, you can use chicken or turkey instead of beef. Thinly slice the meat and follow the same cooking steps. Both chicken and turkey absorb the flavors nicely, making a delicious alternative. You will end up with a dish that’s just as comforting but with a different taste. Store your beef stroganoff in an airtight container in the refrigerator. It will stay fresh for up to 3 days. Make sure to let it cool before you seal it up. This helps maintain its flavor and texture. You can freeze the stroganoff if you want to save it for later. Use portioned containers and freeze for up to 2 months. When you want to eat it, just take it out and let it thaw in the fridge overnight. To reheat, do it gently. You can use the stove or microwave. If it looks a bit thick, add a splash of broth to bring it back to life. Stir well as you reheat to ensure even warmth. Enjoy it just like the first time! Total cooking time is approximately 35 minutes, including preparation and pressure release. This quick cooking method makes it easy to enjoy a hearty meal without spending hours in the kitchen. Yes, you can prepare it ahead and store it in the fridge for up to 3 days. Just make sure to keep it in an airtight container. This makes it easy to have a delicious meal ready to go for busy days. Serve with egg noodles, rice, or mashed potatoes, along with a side of vegetables. These sides soak up the tasty sauce, making each bite even better. You can also add some fresh bread for a complete meal. You can whisk in additional flour or let it simmer longer until desired thickness. If you want a creamier sauce, try adding more sour cream at the end. This gives that rich flavor we all love in beef stroganoff. This recipe shows how to make a tasty Instant Pot Beef Stroganoff. You’ve learned about the main ingredients, cooking steps, and tips to enhance flavor. I included variations like gluten-free and vegetarian options to suit your needs. Remember, storing leftovers properly can save time later. Enjoy your meal on noodles or rice for a satisfying dish. Happy cooking and experimenting with your own flavors!

Instant Pot Beef Stroganoff Quick and Tasty Meal

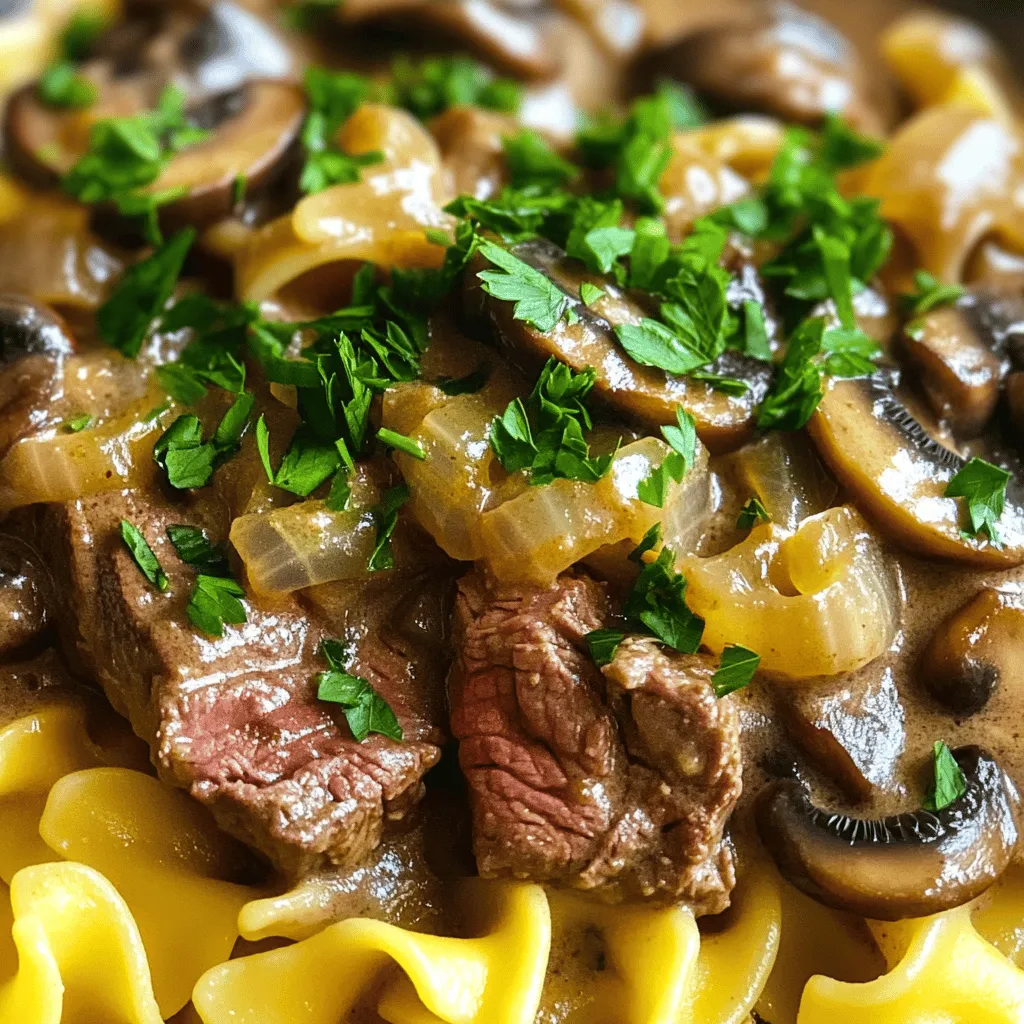
Looking for a quick and tasty meal? My Instant Pot Beef Stroganoff is just the ticket! In about 35 minutes,

To make a perfect Chocolate Chip Cookie Skillet, you need these key items: - 1 cup unsalted butter, softened - 1 cup brown sugar, packed - 1/2 cup granulated sugar - 2 large eggs - 2 teaspoons vanilla extract - 3 cups all-purpose flour - 1 teaspoon baking soda - 1/2 teaspoon salt - 1 1/2 cups semi-sweet chocolate chips These ingredients work together to create a rich and gooey cookie. The butter adds a nice creaminess, while the sugars give sweetness and depth. You can also add some fun flavors with these optional items: - 1/2 cup chopped walnuts - Ice cream, for serving Walnuts add a nice crunch, and ice cream makes this dish extra special. The cold ice cream melts into the warm cookie, creating a delightful mix of textures. If you have dietary needs, don't worry! Here are some swaps: - Use coconut oil instead of butter for a dairy-free version. - Substitute gluten-free flour for all-purpose flour if you're gluten-sensitive. - Use flax eggs instead of regular eggs for a vegan option. These substitutions let everyone enjoy this tasty treat. You can still get that warm, gooey cookie experience with these changes. For the full recipe, check the details above! Start by preheating your oven to 350°F (175°C). While the oven heats, grease a 10-inch cast iron skillet. Use a bit of butter or non-stick spray to cover the bottom and sides. This helps the cookie slide out easily later. In a large mixing bowl, combine 1 cup of softened butter, 1 cup of brown sugar, and 1/2 cup of granulated sugar. Use a hand mixer or a whisk to cream these together. Mix until the mixture looks light and fluffy. Add in 2 large eggs, one at a time, mixing well after each. Then stir in the 2 teaspoons of vanilla extract. This will add a nice flavor to your cookie. In another bowl, whisk together 3 cups of all-purpose flour, 1 teaspoon of baking soda, and 1/2 teaspoon of salt. Slowly add this dry mix to your wet ingredients. Stir until just combined; do not overmix. Next, fold in 1 1/2 cups of semi-sweet chocolate chips and 1/2 cup of chopped walnuts if you like them. The dough should be thick and sticky. Pour the cookie dough into your prepared skillet. Spread it evenly to cover the bottom. Place the skillet in the oven and bake for 25-30 minutes. The edges should turn golden brown, and the center should feel set but soft. Once done, remove it from the oven and let it cool for about 10 minutes. This helps the cookie firm up before serving. You can enjoy it warm, maybe with a scoop of ice cream on top for a tasty treat. For the complete recipe, check the Full Recipe. To get that perfect cookie texture, focus on mixing. Cream the butter and sugars well. This step adds air, making the cookie light. Don't overmix once you add the flour. Overmixing can lead to tough cookies. Bake until the edges are golden and the center is still soft. This will give you a chewy middle with crispy edges. I love serving this cookie warm right from the skillet. Top it with a scoop of ice cream for a delicious treat. Drizzle some chocolate sauce or caramel on top for extra flavor. You can also sprinkle sea salt on top to balance the sweetness. Fresh berries make a great side too, adding a fruity touch. To keep your cookie fresh, let it cool completely. Then, cover it tightly with plastic wrap or foil. You can also store it in an airtight container. It stays good for about three days at room temperature. For longer storage, refrigerate it for up to a week. If you want to save it longer, slice it and freeze pieces. Just thaw them in the fridge when you're ready to enjoy! For the full recipe, check the earlier section. {{image_2}} You can make your Chocolate Chip Cookie Skillet even more fun! Try adding different toppings. Here are a few ideas: - Peanut butter chips for a nutty flavor. - M&Ms for color and crunch. - Toasted coconut for a tropical twist. - Dried fruit, like cranberries or cherries, gives a sweet touch. Mix these in with your chocolate chips, or sprinkle them on top before baking. Each adds a special taste! You can easily adapt this recipe for different diets. For a gluten-free option, use a gluten-free flour blend. Just make sure it has a good mix of starches and proteins. For vegan cookies, swap the butter with coconut oil and the eggs with flax eggs. Mix 1 tablespoon of ground flaxseed with 2.5 tablespoons of water. Let it sit for 5 minutes to thicken. These changes keep the cookie tasty! Change up the flavors based on the season! In fall, add pumpkin spice and some pumpkin puree. This gives a warm taste that feels cozy. In winter, try peppermint extract and crushed candy canes for a festive treat. In summer, fresh berries like blueberries or strawberries can brighten your cookie. With these ideas, your Chocolate Chip Cookie Skillet can be a year-round delight! You can find a chocolate chip cookie skillet at many fun spots. Many restaurants make this tasty treat a star on their dessert menu. Here are some places to check out: - Popular restaurants serving Chocolate Chip Cookie Skillet: Look for local diners or bistros that serve comfort food. Many have a signature skillet cookie. Some even top it with ice cream. It’s a great way to share a sweet treat! - Recommended bakeries for the best versions: Local bakeries often put their spin on this classic. Seek out bakeries that use fresh ingredients. They may use special chocolate or add unique toppings. Check for reviews to find the best options! - Info on ordering a skillet cookie for delivery: Many restaurants and bakeries offer delivery. Use food apps or websites to place your order. Look for places that serve it warm. That way, you enjoy it fresh from the oven. This makes your dessert even better! Finding the perfect chocolate chip cookie skillet can be so fun! I recommend trying out a few places to see which one you like best. You can also make it at home using the Full Recipe. Enjoy your delicious adventure! Yes, you can use a different oven-safe skillet or a baking dish. Just ensure it can handle high heat. Cast iron gives a nice crust, but other options work well too. Just remember to adjust the baking time if needed. Look for a golden-brown edge and a slightly soft center. You can also insert a toothpick into the center. If it comes out clean or with just a few crumbs, it's ready. Yes, you can freeze it! Cut the cookie into pieces and wrap each piece tightly. Place them in a freezer bag for extra protection. When you want to eat it, let it thaw, then warm it up in the oven. Vanilla is a classic choice, but chocolate or cookie dough flavors are great too. You can even try mint chocolate chip or salted caramel for a fun twist. The warm cookie pairs well with any of these flavors! In this post, we explored how to make a delicious Chocolate Chip Cookie Skillet. We covered essential ingredients and helpful tips for the best results. You learned about variations and where to enjoy this treat. Remember, the right mix of flavors can make your skillet cookie special. You can also adapt it for any diet. Now, get ready to bake your own delicious dessert! Enjoy the warm, gooey goodness with friends or family.

Chocolate Chip Cookie Skillet Simple and Tasty Delight

Are you ready to indulge in a warm, gooey treat? A Chocolate Chip Cookie Skillet is the ultimate delight for

Older posts
Newer posts
← Previous Page1 … Page54 Page55 Page56 … Page59 Next →

dsad

© 2025 Recipes Pursuit • Built with GeneratePress

Our Policies

  • Copyright Policy
  • Cookie Policy
  • GDPR Policy
  • Privacy Policy
  • Disclaimer
  • Terms Of Use

More Information

  • Home
  • About
  • Contact
  • Appetizers
  • Dessert
  • Dinner
  • Drinks
©2025, Recipes Pursuit About Back To Top