Skip to content
DisclaimerTerms Of UseGDPR PolicyCookie Policy

Recipes Pursuit

  • Home
  • Drinks
  • Appetizers
  • Dinner
  • Dessert
  • About
  • Contact
  • Privacy Policy
DisclaimerTerms Of UseGDPR PolicyCookie Policy

Emma Smith

To make a delicious fried rice, you need a few key items. Here’s what you will need: - 2 cups jasmine rice (cooked and cooled) - 1 cup mixed vegetables (peas, carrots, corn) - 2 large eggs, beaten - 1/2 cup green onions, chopped - 2 cloves garlic, minced - 3 tablespoons soy sauce - 1 tablespoon sesame oil - 1 tablespoon vegetable oil - 1 teaspoon ginger, grated - Salt and pepper to taste These ingredients work together to create a tasty and satisfying dish. The jasmine rice gives a nice texture, while the mixed veggies add color and nutrients. Garlic and ginger bring great aromas that enhance the flavor. You can easily change this recipe by adding a few extras. Here are some optional ingredients you might try: - 1/2 cup cooked chicken or shrimp, diced - Bell peppers, diced - Mushrooms, sliced - Peanuts or cashews for crunch - A dash of hot sauce for heat These ingredients let you personalize your fried rice. You can use any leftover proteins or veggies you have. This makes the dish fun and unique! If you don’t have some items on hand, don’t worry! Here are a few substitutions you can use: - Brown rice or quinoa can replace jasmine rice. - Any frozen mixed veggies work well in place of fresh ones. - Tamari or coconut aminos can substitute for soy sauce. - For a vegan option, use tofu instead of eggs or meat. These alternatives keep the recipe flexible and accessible. You can still enjoy a great fried rice even if you lack some ingredients. Just remember to adjust the cooking time based on what you use! To make great fried rice, start with the right rice. I recommend jasmine rice. Cook it according to the package. Once done, let it cool. For the best texture, refrigerate it overnight. This helps the rice dry out. Dry rice fries better and won’t get mushy. Next, let’s cook the eggs. Heat a large skillet or wok over medium heat. Add one tablespoon of vegetable oil. Once it’s hot, pour in the beaten eggs. Scramble them gently until fully cooked. This should take about 2 minutes. Then, transfer the eggs to a plate. Keep them aside for later. Now, it’s time to make it smell amazing! In the same skillet, add a bit more oil. Pour in the sesame oil and let it heat up. Then, add minced garlic and grated ginger. Stir these for about 30 seconds. They should be fragrant but not burnt. After that, toss in your mixed veggies. Stir them for 2-3 minutes until they soften. Once your veggies are ready, add the cooled rice to the skillet. Break up any clumps as you mix. Heat the rice for about 2-3 minutes. Then, pour soy sauce over everything and stir well. It’s time to add the scrambled eggs back in. Mix everything together and season with salt and pepper. Finally, add the chopped green onions and any proteins if you like. Stir again for about a minute. Your fried rice is now ready to serve hot! Enjoy it in vibrant bowls, maybe with sesame seeds and lime wedges for an extra pop. You can find the Full Recipe above. To make the best fried rice, use cooled jasmine rice. Freshly cooked rice can be too wet. Chill it overnight in the fridge. This helps keep the grains separate. For flavor, add soy sauce and sesame oil. They give a rich taste. Always taste your rice for salt. Adjust if needed. Avoid using too much oil. It can make the rice greasy. Also, don’t overcrowd the pan. This can lead to steaming instead of frying. Stir often but gently. Over-stirring can break the rice and make it mushy. Lastly, skip the frozen veggies if you can. Fresh veggies taste better and add texture. Use a large skillet or wok for even cooking. A spatula is great for mixing without breaking rice. A cutting board and knife will help chop veggies. If you like, a rice cooker can save time. Finally, have measuring spoons handy for soy sauce and sesame oil. For a complete guide, see the Full Recipe. {{image_2}} You can easily switch up the protein in your fried rice. Chicken and shrimp are two popular choices. For chicken, use cooked, diced pieces. For shrimp, peel and devein them first. Add these proteins when you sauté the veggies. This way, they warm up and blend in well. You can also use pork or beef if you like. Each option brings a unique flavor to the dish. If you prefer a meat-free dish, you have great options. Tofu is an excellent protein source. Opt for firm tofu and sauté it until golden. You can also use tempeh for a nutty flavor. For a vegan twist, skip the eggs and use more veggies. Try adding mushrooms, bell peppers, or even broccoli. This keeps your fried rice colorful and tasty while staying plant-based. Fried rice varies widely across cultures. In Thailand, you may find pineapple fried rice, which adds a sweet touch. In Indonesia, nasi goreng often features sweet soy sauce and spicy sambal. Chinese fried rice might include ingredients like soy sauce and sesame oil. Each region has its own spin, making fried rice a fun dish to explore. Try these twists to discover new flavors and styles. Enjoy creating your own version of fried rice! Check out the Full Recipe for a classic take. Store leftover fried rice in an airtight container. Let it cool down first. Place it in the fridge. It will stay fresh for about three to four days. If you want to keep it longer, freezing is a great option. When reheating fried rice, use a skillet or wok. Add a splash of water or broth to help steam the rice. Heat it over medium heat. Stir often to ensure even warming. This keeps the rice from drying out. You can also use the microwave, but the skillet gives better texture. Yes, you can freeze fried rice! Allow it to cool completely. Portion it into freezer-safe bags or containers. Remove as much air as possible. This helps prevent freezer burn. It can last in the freezer for about one month. When ready to eat, thaw it overnight in the fridge and reheat as mentioned above. For a complete guide, check out the Full Recipe. Yes, you can use leftover rice for fried rice. In fact, it works best! Cold rice has less moisture. This helps prevent stickiness. The grains stay separate, leading to a better texture. If you have fresh rice, cool it first. Spread it on a tray and let it sit for a bit. The best vegetables for fried rice include: - Peas - Carrots - Corn - Bell peppers - Broccoli - Green onions These veggies add color and taste. You can mix and match based on what you like. Frozen mixed vegetables are also a great choice. They are quick and easy to use. To make fried rice less sticky, use cold rice. Cook the rice a day before if you can. Also, make sure not to overcook your rice. When frying, avoid adding too much liquid. Keep the heat high to fry the rice quickly. Stir it gently to keep the grains separate. Fried rice can be healthy, depending on what you add. Using lots of vegetables boosts nutrition. You can also use brown rice for more fiber. If you limit oil and soy sauce, you keep calories lower. Adding protein like chicken or shrimp helps balance the dish. Always keep portion sizes in check for a healthy meal. In this post, we covered how to make delicious fried rice. We discussed key ingredients, step-by-step instructions, and tips for great flavor. You learned about variations and how to store leftovers too. Fried rice is versatile and can fit any taste. Use these ideas to create your perfect dish. With practice, your fried rice will always turn out great!

Flavorful Favorite Fried Rice Recipe to Try Today

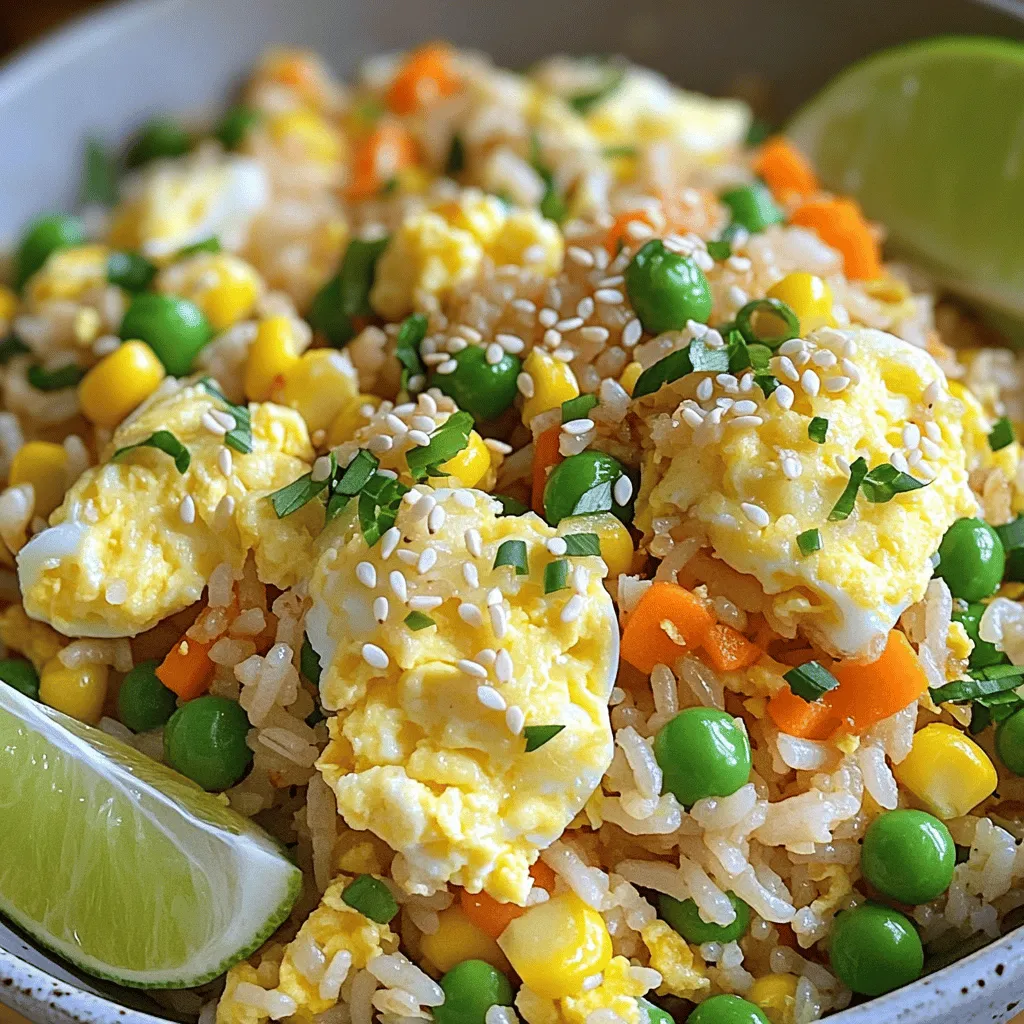
Are you ready to elevate your rice game? My flavorful favorite fried rice recipe is just what you need. It’s

To make this delightful chocolate chip pumpkin bread, gather these ingredients: - 1 ¾ cups all-purpose flour - 1 teaspoon baking soda - ½ teaspoon baking powder - ½ teaspoon salt - 1 teaspoon ground cinnamon - ½ teaspoon ground nutmeg - ¼ teaspoon ground ginger - ½ cup granulated sugar - ½ cup brown sugar, packed - ½ cup vegetable oil or melted coconut oil - 2 large eggs - 1 cup pumpkin puree (canned or fresh) - 1 teaspoon vanilla extract - 1 cup semi-sweet chocolate chips - ½ cup chopped walnuts or pecans (optional) You can swap out some ingredients if needed: - Use whole wheat flour for a healthier option. - Swap granulated sugar with coconut sugar for a lower glycemic index. - Replace oil with applesauce for a lighter version. - Use flax eggs in place of regular eggs for a vegan option. - Almond extract can replace vanilla extract for a different flavor twist. Fresh ingredients make a big difference in your baking. They enhance flavor and texture. For instance, fresh pumpkin puree gives a rich taste. Old spices lose their aroma, so check their freshness. Using fresh eggs helps the bread rise better. Always choose high-quality chocolate chips for the best gooeyness. When you use fresh ingredients, your chocolate chip pumpkin bread will taste amazing! Start by preheating your oven to 350°F (175°C). This step warms the oven to the right heat. It helps the bread cook evenly. Grease a 9x5-inch loaf pan or line it with parchment paper. This makes it easier to remove the bread later. Next, gather your dry ingredients. In a medium bowl, whisk together: - 1 ¾ cups all-purpose flour - 1 teaspoon baking soda - ½ teaspoon baking powder - ½ teaspoon salt - 1 teaspoon ground cinnamon - ½ teaspoon ground nutmeg - ¼ teaspoon ground ginger Set this bowl aside. In a large mixing bowl, combine the sugars and oil. Add: - ½ cup granulated sugar - ½ cup brown sugar, packed - ½ cup vegetable oil or melted coconut oil Whisk in 2 large eggs, 1 cup pumpkin puree, and 1 teaspoon vanilla extract. Mix until smooth. Now, it's time to bring it all together. Gradually add the dry mix to the wet mix. Stir gently until just combined. Be careful not to overmix! Overmixing can make the bread tough. Finally, fold in 1 cup of semi-sweet chocolate chips. If you like, add ½ cup of chopped walnuts or pecans. This adds nice texture and flavor. Now, pour the batter into your prepared loaf pan. Smooth the top with a spatula. For the full recipe, check out the details above! For the best results, set your oven to 350°F (175°C). This temperature helps the bread rise well. Bake it for about 55 to 65 minutes. Check for doneness by inserting a toothpick into the center. If it comes out clean, your bread is ready. If not, give it a few more minutes. Each oven can be a bit different, so keep an eye on it. Overmixing can make your bread tough. To prevent this, mix your dry and wet ingredients gently. Use a rubber spatula or a wooden spoon. Stir just until you no longer see dry flour. It’s okay if the batter has a few lumps. The more you mix, the less fluffy your bread will be. Serve your chocolate chip pumpkin bread warm or at room temperature. Slice it nice and thick for a hearty treat. You can spread butter or cream cheese on top for extra flavor. For a fun touch, sprinkle some chocolate chips or nuts on top before baking. This makes it look special and inviting. Pair it with a hot drink for a cozy snack. Enjoy it with friends or family for a delightful time! {{image_2}} You can add nuts or dried fruits to your chocolate chip pumpkin bread. I love using walnuts or pecans. They add a nice crunch. You can also try dried cranberries or raisins for sweetness. Just fold in about half a cup of your choice into the batter. This makes each bite interesting and delightful. Spices can change the flavor of your bread. Besides cinnamon, you might try adding cloves or allspice. They bring warmth and depth. You can also use different extracts. Almond or orange extracts can add a unique twist. Just use one teaspoon of any extract you choose. This way, you can make your bread stand out. If you need gluten-free bread, swap all-purpose flour for a gluten-free blend. Make sure it works for baking. For a vegan version, use flax eggs. Mix one tablespoon of flaxseed meal with three tablespoons of water. Let it sit for five minutes. You can replace eggs with this mixture. This keeps your bread tasty and kind to all diets. Check the Full Recipe for more tips and ideas on making your chocolate chip pumpkin bread your own! To keep your chocolate chip pumpkin bread fresh, wrap it tightly in plastic wrap. You can also use foil for extra protection. Store it at room temperature for up to three days. If you want to keep it longer, consider freezing it. Freezing your leftover bread is easy. First, let the bread cool completely. Then, wrap it in plastic wrap and place it in a freezer bag. This will keep out air and moisture. You can freeze it for up to three months. When ready to eat, just thaw it at room temperature. To maintain the best flavor and texture, slice only what you need. Keep the rest wrapped. This helps prevent it from drying out. Avoid storing your bread in the fridge, as this can make it stale faster. Enjoy your delicious pumpkin bread for days to come! For the full recipe, check out the instructions above. To make your chocolate chip pumpkin bread moist, use enough pumpkin puree. This ingredient keeps the bread soft and fluffy. Also, don't overbake it. Check for doneness by inserting a toothpick. If it comes out clean, your bread is ready. Adding a bit of oil helps too. You can use vegetable oil or melted coconut oil for extra moisture. Yes, you can use fresh pumpkin. Just make sure to cook it first. Cut the pumpkin into chunks, steam or bake until soft, and then puree it. Fresh pumpkin can add a nice flavor. It may also change the texture a little, but that’s okay. You will still get a great loaf of bread. If you want to skip the eggs, you have options. You can use unsweetened applesauce instead. A quarter cup of applesauce equals one egg. You can also use mashed banana or a flaxseed mixture. For the flaxseed, mix one tablespoon of ground flaxseed with three tablespoons of water. Let it sit for a few minutes until it thickens. These substitutes work well and keep the bread tasty! You learned about making chocolate chip pumpkin bread, from fresh ingredients to tasty variations. Remember, fresh ingredients make a big difference in flavor. Follow our tips to bake perfectly and store leftovers well. Try different nuts, spices, or even gluten-free options to make it your own. I hope you feel ready to bake with confidence! Enjoy every bite of your delicious creation.

Chocolate Chip Pumpkin Bread Delightful and Easy Recipe

Are you ready to bake something delicious and easy? My Chocolate Chip Pumpkin Bread recipe is just what you need!

For this recipe, use 6 ripe peaches. Look for peaches that smell sweet and feel slightly soft. Slice the peaches and remove the pits. Fresh peaches give the best flavor and texture. You can also mix in some nectarines for a twist. You will need a few sweeteners and flavorings. Use 1/4 cup granulated sugar to sweeten the peaches. Add 1 tablespoon of lemon juice to brighten the flavors. A teaspoon of vanilla extract brings warmth to the dish. Lastly, sprinkle in 1 teaspoon of ground cinnamon for that cozy taste. The topping is what makes this dish special. Gather 1 cup of rolled oats and 1/2 cup of all-purpose flour. Use 1/3 cup of packed brown sugar for rich sweetness. Melt 1/4 cup of unsalted butter to bind it all together. Don’t forget a pinch of salt (1/4 teaspoon) to balance the flavors. For a fun treat, serve it with vanilla ice cream or whipped cream. For the complete recipe, check out the Full Recipe section. Start by washing the peaches well. Next, slice them in half and remove the pit. You want to cut the peaches into thin slices. This helps them cook evenly. In a large bowl, mix the sliced peaches with granulated sugar, lemon juice, vanilla extract, and ground cinnamon. Toss gently until the peaches are well coated. This adds flavor and sweetness. After that, pour the peach mixture into a greased 9x9 inch baking dish. Make sure to spread it evenly. Grab another bowl to make the oat topping. In this bowl, combine rolled oats, all-purpose flour, brown sugar, melted butter, and salt. Stir until it becomes crumbly and mixed well. You want a nice texture that will bake into a crisp. This topping adds a great crunch to the soft peaches. Once ready, evenly sprinkle the oat mixture over the peaches in the baking dish. Cover them fully for the best flavor. Preheat your oven to 350°F (175°C). Once the oven is hot, place your baking dish inside. Bake for about 30-35 minutes. You want the topping to turn golden brown and the fruit to bubble. This shows that everything is cooked well. After baking, remove the dish and let it cool slightly. Serve warm, and don’t forget the optional vanilla ice cream or whipped cream. It makes the dish even better! For more details, check out the Full Recipe. When picking peaches, look for ones that feel slightly soft. They should have a sweet scent, too. The skin should be free of dark spots or wrinkles. If they are too firm, let them sit at room temperature for a day or two. This allows them to ripen. Ripe peaches will add sweetness and juiciness to your crisp. To get the best oat topping, use rolled oats. They create a nice, chewy texture. Mixing them with flour helps bind the topping. Melted butter adds richness and crunch. Don’t overmix! You want clumps for an even bake. Sprinkle the topping generously over the peaches. This ensures every bite is filled with flavor. Adding spices can take your peach crisp to the next level. Ground cinnamon adds warmth and depth. You can also try nutmeg for a unique twist. A dash of ginger can bring a slight zing. Adjust the spices to your taste. You want the flavors to complement the sweet peaches, not overpower them. For more ideas, check the Full Recipe for hints on extra flavors. {{image_2}} You can easily add nuts or seeds to your peach crisp. This extra crunch makes it even more fun. Try adding chopped walnuts or pecans. They blend well with the sweet peaches. You can also use sunflower or pumpkin seeds. This adds a nice bite and boosts nutrition. Just mix them into the oat topping. About half a cup works well. This change can make your dessert more exciting and hearty. Peach crisp is super versatile. You can swap peaches for other fruits. Try using ripe berries like blueberries or raspberries. Apples and pears also work great. Each fruit gives a different flavor. You can even mix fruits for a unique taste. Just keep the same amount of sugar and spices. This way, your crisp stays sweet and tasty. Experimenting with fruits can lead to new favorites. If you need a gluten-free version, it’s easy to adapt. Replace all-purpose flour with almond or coconut flour. You can also use gluten-free oats. They work just as well in this recipe. Make sure to check labels on all products. This ensures they are truly gluten-free. With these swaps, everyone can enjoy your peach crisp without worry. It’s still delicious and satisfying! After you make the peach crisp, you might have some left. Store it in an airtight container. It will stay fresh for about three days in the fridge. Make sure to let it cool first. This way, the topping stays crispy. When you want to enjoy your leftovers, reheat them in the oven. Preheat your oven to 350°F (175°C). Place the peach crisp in a baking dish. Heat it for about 15 minutes. This warms it up and keeps the topping crunchy. You can also use the microwave if you're short on time. Heat it in short bursts, checking often. If you want to save some for later, freezing is a great option. First, let the peach crisp cool completely. Then, wrap it tightly in plastic wrap. Place it in a freezer-safe container or bag. It can last up to three months in the freezer. When you're ready to eat, thaw it in the fridge overnight. Reheat it as mentioned above. Enjoy your peach crisp whenever you want! You can find the full recipe in the earlier section. Yes, you can use frozen peaches. Just let them thaw first. Drain any excess juice. This will help keep your crisp from getting soggy. Frozen peaches work well, but fresh ones taste best. They offer a bright flavor and nice texture. To make the topping crunchier, add more oats. You can also mix in some chopped nuts. Almonds or walnuts add great flavor and crunch. Bake the crisp a little longer, too. Just watch it closely to avoid burning. You can use coconut oil or applesauce instead of butter. Coconut oil gives a nice flavor. Applesauce makes the topping moist but still tasty. Both options keep it dairy-free and healthy. This post covered how to make a tasty peach dish. We looked at choosing fresh peaches, sweeteners, and toppings. Next, I shared steps for prepping peaches and baking them perfectly. Tips on selecting ripe fruit and making a crunchy topping followed. You can try different fruits or add nuts for fun variations. Lastly, I provided storage and reheating advice. Enjoy your peach creation! It’s simple, fun, and so delicious. Let your creativity shine with every bite.

Peach Crisp with Oat Topping Easy and Tasty Recipe

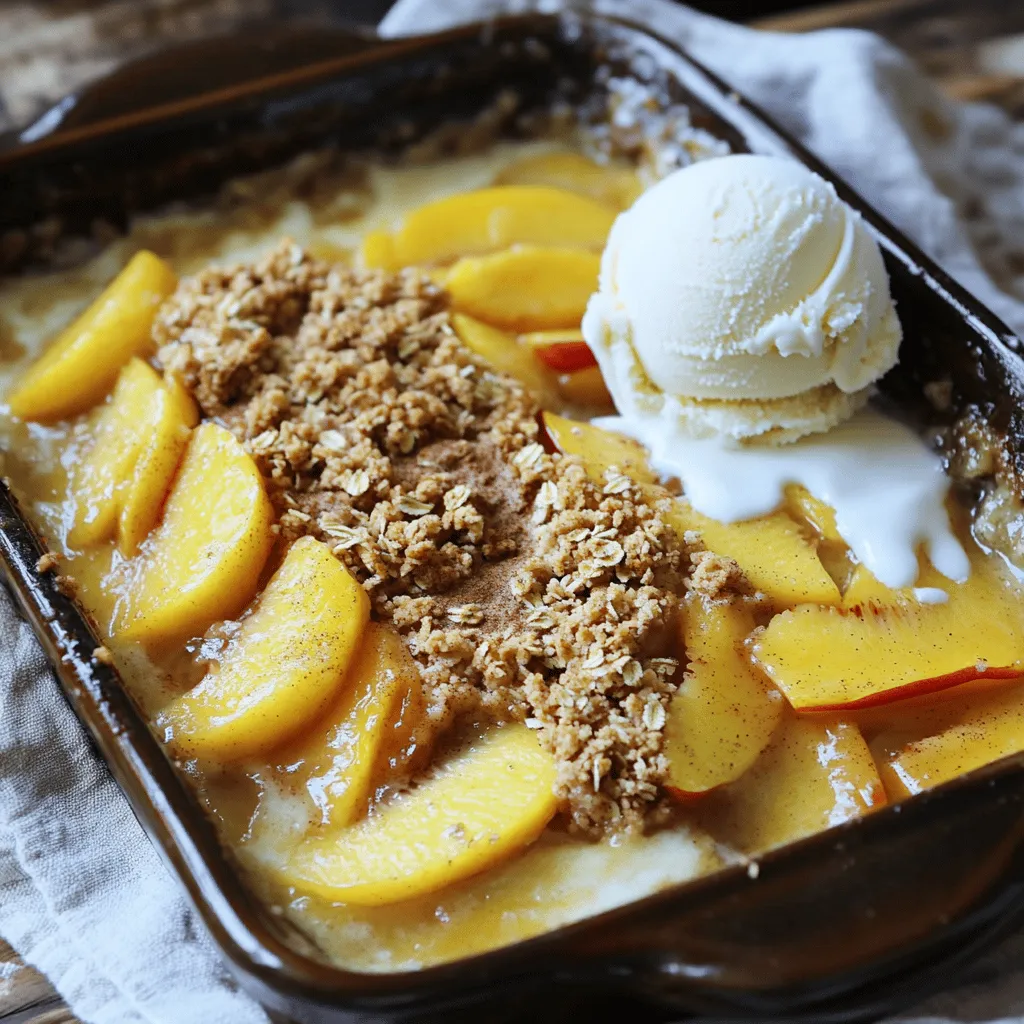
Get ready for a treat! This Peach Crisp with Oat Topping is simple and delicious. Juicy peaches meet a crunchy,

Let’s dive into what you need to make this Vegan Sweet Potato Chili. The ingredients are simple and fresh, making this dish healthy and delicious. - Sweet potatoes and legumes - 2 medium sweet potatoes, peeled and diced - 1 can (15 oz) black beans, rinsed and drained - 1 can (15 oz) kidney beans, rinsed and drained - 1 can (14 oz) diced tomatoes with green chilies - Vegetables and spices - 1 large onion, chopped - 3 cloves garlic, minced - 1 bell pepper (red or green), chopped - 1 cup corn kernels (fresh or frozen) - 2 cups vegetable broth - 2 tablespoons chili powder - 1 teaspoon ground cumin - 1 teaspoon smoked paprika - 1/2 teaspoon cayenne pepper (adjust to taste) - Salt and pepper to taste - 2 tablespoons olive oil - Optional toppings - Fresh cilantro, for garnish - Avocado slices, for serving (optional) These ingredients work together to create a cozy meal that warms you up from the inside. Sweet potatoes add a natural sweetness, while beans pack protein and fiber. The spices give it a kick, making each bite a delight. If you want to customize it, feel free to add your favorite toppings. You can find the Full Recipe for more details on preparation. Start by heating the olive oil in a large pot over medium heat. Add the chopped onion and bell pepper. Sauté them for about 5 minutes until they soften. This step builds a great base flavor. Next, stir in the minced garlic. Cook for another 1-2 minutes until it smells amazing. Now, it's time to add the diced sweet potatoes to the pot. Mix everything well and let it cook for about 5-7 minutes. Stir occasionally to keep them from sticking. After that, sprinkle in the chili powder, ground cumin, smoked paprika, cayenne pepper, salt, and pepper. This is where the magic happens—mix well to coat the sweet potatoes with the spices. Pour in the diced tomatoes, black beans, kidney beans, corn, and vegetable broth. Stir everything together so all the flavors combine. Bring the chili to a boil, then reduce the heat to low. Cover the pot and let it simmer for 25-30 minutes. This allows the sweet potatoes to become tender. Be sure to stir occasionally to prevent sticking. After cooking, taste your chili and adjust the seasoning if needed. You can add more salt, pepper, or cayenne if you like it spicier. Once it’s cooked, take it off the heat. Let it cool just a bit before serving. Serve the chili in bowls, garnished with fresh cilantro and avocado slices if you want. For the full recipe, check out the details above! To make your chili stand out, focus on seasoning. Start with the spices early. Cook them with the onions and peppers. This helps release their flavors. Use fresh herbs when possible. They add brightness and depth. For the right consistency, balance is key. You want a thick, hearty chili. If it feels too runny, let it simmer longer. The sweet potatoes also break down, helping to thicken the mix. If it’s too thick, add a splash of vegetable broth. Feel free to swap out beans and veggies. You can use pinto beans or chickpeas instead of black and kidney beans. For veggies, try adding zucchini or carrots. They will add texture and flavor. Adjust spice levels based on your taste. If you prefer milder chili, skip the cayenne pepper. You can also use mild diced tomatoes instead of spiced ones. For heat lovers, add jalapeños or more cayenne. Check out the Full Recipe for more details on making delicious vegan sweet potato chili! {{image_2}} You can make your chili spicier by adding fresh peppers. Try jalapeños or serranos for extra heat. Chop them finely and cook them with the onions. This way, the spice blends in well. Another option is to use spicy diced tomatoes. Look for varieties with added chili or jalapeño. This gives your chili a nice kick without much extra work. You can also switch up how you cook your chili. A slow cooker is great for a hands-off approach. Just add all your ingredients to the pot and let it cook on low for 6-8 hours. This method helps the flavors meld together well. If you’re short on time, try using an Instant Pot. Cook on high pressure for about 10 minutes, then let it naturally release for 10 minutes. This method saves time while still giving rich flavor. For the full recipe, check out the Spicy Vegan Sweet Potato Chili. Enjoy experimenting with these variations! To keep your Vegan Sweet Potato Chili fresh, store it in an airtight container. Place it in the fridge if you plan to eat it within a few days. For longer storage, freeze it in portions. Make sure to leave some space in the container for expansion. When reheating, you have a few options. You can microwave it in a bowl, stirring halfway through. If you prefer, you can warm it on the stove over medium heat. Just add a splash of water or broth if it looks too thick. Your chili will last about 4 to 5 days in the fridge. Make sure to eat it within this time frame for the best taste. Look for signs of spoilage. If it smells off or has a strange color, it’s best to toss it. Always trust your senses! Can I use fresh sweet potatoes instead of canned? Yes, you can use fresh sweet potatoes. Just peel and dice them. Fresh sweet potatoes give a wonderful texture and flavor. They will cook well in the chili and blend nicely with the spices. What can I serve with this chili? You can serve this chili with rice or quinoa for a filling meal. Cornbread or tortilla chips also pair well. Add a dollop of vegan sour cream or avocado for creaminess. Is this dish gluten-free? Yes, this chili is gluten-free. All the ingredients, like beans and sweet potatoes, do not contain gluten. Always check labels for any added ingredients if you buy canned products. Can I make this recipe ahead of time? Absolutely! This chili tastes even better the next day. Make it ahead and store it in the fridge. Just heat it when you're ready to eat. You can also freeze it for later. Check the Full Recipe for the steps! In this blog post, we explored how to make a delicious vegan sweet potato chili. We covered the key ingredients, step-by-step instructions, tips for perfecting your dish, and various cooking methods. I shared storage tips and answered common questions to help you along the way. Remember, this chili is flexible. You can easily adapt it to fit your tastes. Use this recipe as a base to create something special and enjoy. Happy cooking!

Vegan Sweet Potato Chili Packed with Flavor and Warmth

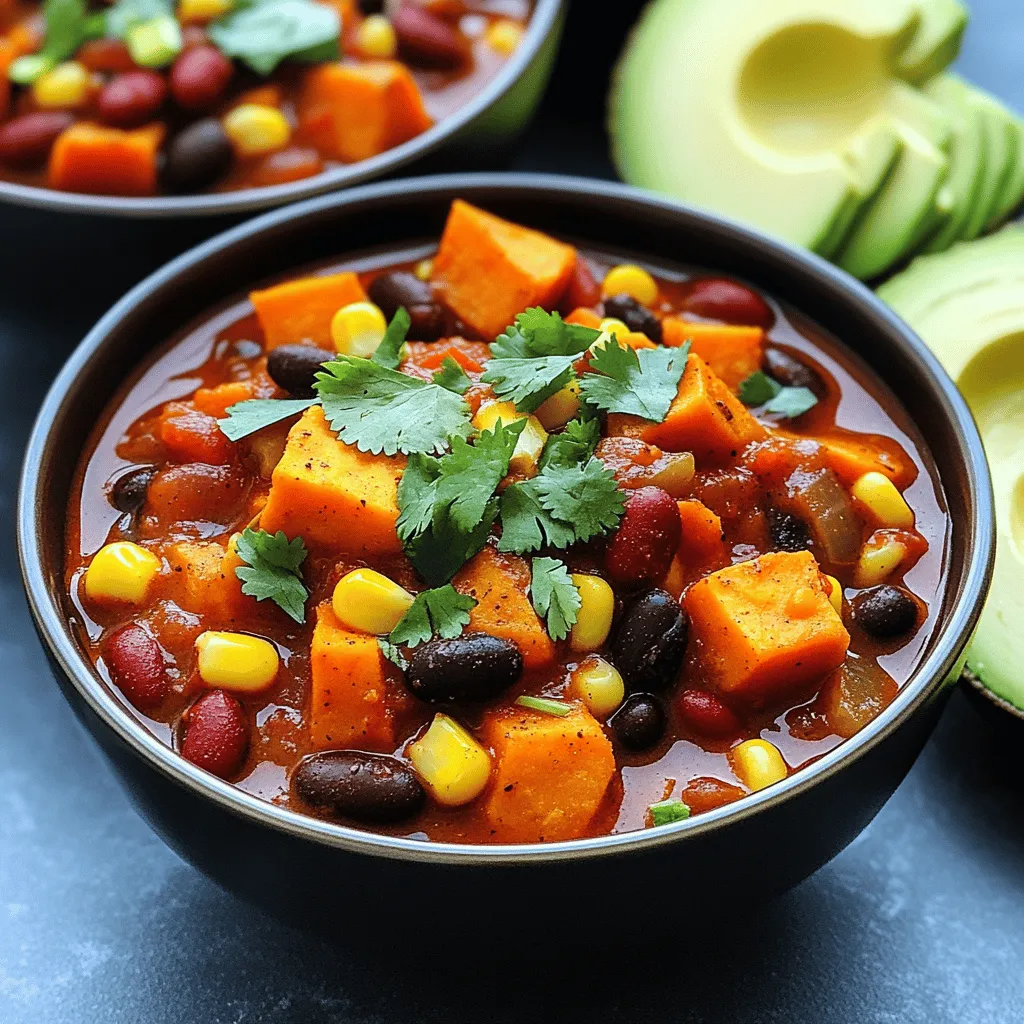
Warm up your dinner table with my Vegan Sweet Potato Chili! This hearty dish bursts with flavor and comfort, making

- 4 boneless, skinless chicken breasts - 1 cup balsamic vinegar - 2 tablespoons honey - Fresh basil leaves for garnish - 2 cups cherry tomatoes, halved - 1 large zucchini, sliced into half-moons - 1 red bell pepper, chopped - 1 cup broccoli florets - 3 tablespoons olive oil - 2 cloves garlic, minced - 1 teaspoon dried oregano - 1 teaspoon salt - 1/2 teaspoon black pepper Each ingredient plays a key role in this dish. The chicken provides a meaty base, while the balsamic vinegar adds a sweet and tangy kick. Honey brings out the glaze's natural sweetness. Fresh basil leaves brighten up the dish and add color. For vegetables, cherry tomatoes burst with flavor, and zucchini adds a nice crunch. Red bell pepper gives a sweet touch, and broccoli adds a healthy green color. The seasoning and marinade blend everything together. Olive oil keeps things moist, while garlic gives a strong flavor. Oregano adds an herbaceous note, and salt and pepper bring balance. You can find the full recipe in the article. With these ingredients, you can create a vibrant and tasty meal. To make the marinade, mix balsamic vinegar, honey, olive oil, garlic, oregano, salt, and pepper in a bowl. Make sure to coat the chicken well. Let the chicken marinate for at least 30 minutes in the fridge. For more flavor, you can marinate it for up to 2 hours. First, preheat your oven to 425°F (220°C). While the oven heats, prepare the veggies. In a large bowl, toss cherry tomatoes, zucchini, bell pepper, and broccoli with the remaining olive oil, salt, and pepper. This makes sure the veggies are well-seasoned. When the oven is hot, arrange the marinated chicken on a large baking sheet. Spread the seasoned veggies around the chicken. Pour any leftover marinade on top for extra flavor. Bake everything for 25 to 30 minutes. The chicken should reach 165°F (74°C) inside, and the veggies should be tender and a bit charred. For an added touch, drizzle some balsamic vinegar on top after baking. Let it sit for 5 minutes before serving. For the full recipe, check out the details above. To boost the flavor of your balsamic glazed chicken and veggies, I recommend adding a few herbs and spices. Consider using: - Thyme - Rosemary - Parsley Use fresh herbs when possible. They often bring more taste than dried ones. If you only have dried herbs, use less since they are stronger. Drizzling balsamic vinegar is key to a great glaze. To do this, pour it gently over the chicken and veggies right before serving. This extra layer of flavor makes a big difference. Be sure to let your dish rest for five minutes after baking. This allows the flavors to meld together nicely. Use a sturdy baking sheet for even cooking. A rimmed sheet helps catch any juices that may run off. You might also want to use parchment paper for easy cleanup. For convenience, have these kitchen tools ready: - Tongs - Mixing bowls - A whisk These will help you prepare and serve your meal with ease. For the full recipe, check out the section above! {{image_2}} You can switch up the protein in this dish. Instead of chicken, try turkey or pork. Both work well with balsamic glaze. If you want a vegetarian option, use firm tofu or tempeh. Marinate these options the same way for a tasty meal. The vegetables can change with the seasons. In spring, use asparagus or peas. In summer, try bell peppers or green beans. In fall, roasted sweet potatoes or Brussels sprouts are great. In winter, opt for root veggies like carrots or parsnips. All these veggies pair perfectly with balsamic. To add more flavor, think about sauces like pesto or a garlic yogurt sauce. Both add creaminess and depth to the dish. As for sides, I recommend serving it with quinoa or a fresh salad. Rice pilaf or crusty bread also makes a great addition. For the full recipe, check out the steps above. To store leftovers safely, let the chicken and veggies cool down first. Place them in airtight containers. This keeps air out and helps maintain taste. I recommend using glass or BPA-free plastic containers. They last longer and are better for the environment. The best methods for reheating chicken and veggies include using an oven or microwave. For the oven, preheat it to 350°F (175°C). Place the dish in the oven for about 15 minutes. This keeps everything moist and warm. If using a microwave, heat in short bursts of 1-2 minutes. Stir in between to avoid hot spots. To maintain flavor and texture, add a splash of balsamic vinegar before heating. This revives the taste and keeps it juicy. For freezing leftovers, let the dish cool completely. Place the chicken and veggies in freezer-safe bags or containers. Remove as much air as possible. This prevents freezer burn and keeps the meal fresh. When you want to eat it, thaw the dish in the fridge overnight. For reheating frozen portions, use the oven at 350°F (175°C) for 25-30 minutes or until heated through. Enjoy your meal with that fresh taste! I recommend marinating the chicken for at least 30 minutes. This time allows the chicken to soak in the rich flavors of the balsamic glaze. If you have more time, try marinating for up to 2 hours. Longer marination enhances the taste even more. Yes, you can use other types of vinegar. Apple cider vinegar adds a fruity note. Red wine vinegar gives a robust flavor. If you prefer a milder taste, white wine vinegar works well too. Each option brings a unique twist to the dish. The chicken should reach an internal temperature of 165°F (74°C). This ensures it is safe to eat. To check doneness without a thermometer, cut into the thickest part. If the juices run clear and the meat is no longer pink, it’s done. This recipe for balsamic chicken and veggies is simple and full of flavor. You learned about the key ingredients, the easy cooking steps, and helpful tips to enhance taste. Don't forget to experiment with different proteins and veggies to keep meals exciting. Proper storage will help you enjoy leftovers too. With practice, you will master this dish. Enjoy your cooking journey!

Balsamic Glazed Chicken and Veggies Delicious Meal

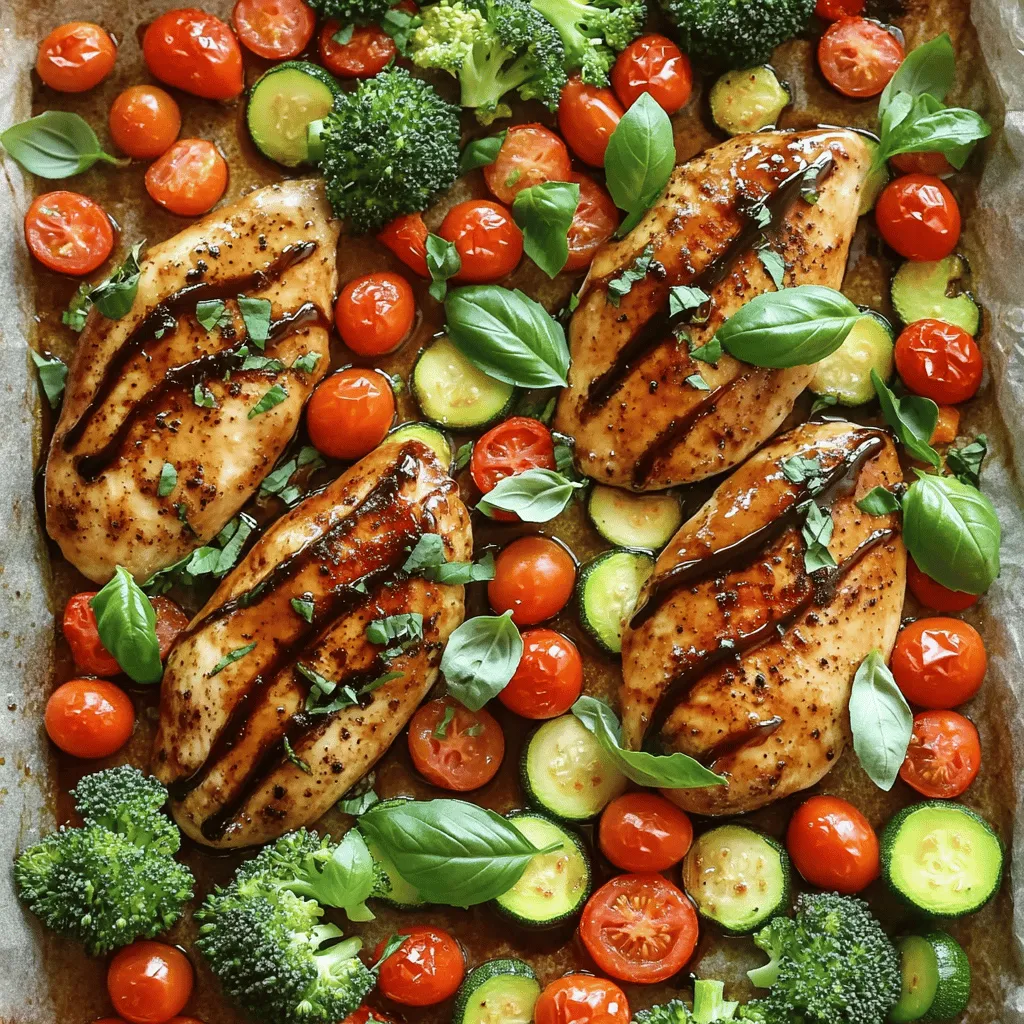
Looking for a meal that’s simple, tasty, and healthy? My Balsamic Glazed Chicken and Veggies will tick all the boxes!

- 1 cup silken tofu, drained - 1 cup dairy-free dark chocolate chips - 1/4 cup maple syrup - 1 teaspoon vanilla extract - A pinch of sea salt To make a rich and creamy mousse, you need some key ingredients that blend beautifully. Start with silken tofu. This ingredient acts as the base. It gives the mousse a smooth texture without any dairy. Next, grab dairy-free dark chocolate chips. They add that rich chocolate flavor we all love. Use maple syrup for sweetness. It gives a nice touch and balances the flavors. Vanilla extract adds depth. Just a little enhances the overall taste. Finally, a pinch of sea salt brings out the chocolate notes. - Fresh berries (for garnish) - Coconut whipped cream (for topping) For an extra touch, consider adding fresh berries. They not only look great but add freshness. You can also top the mousse with coconut whipped cream. This adds a light and fluffy element. It makes your dessert feel even more indulgent. These optional ingredients help elevate your mousse, making it a hit for any occasion. This recipe is simple yet delicious and can impress anyone. For more details, check the Full Recipe. To start, we need to melt the dairy-free dark chocolate chips. You can use a double boiler or a microwave. If you choose the microwave: - Heat the chocolate in 30-second bursts. - Stir well after each round until it becomes smooth. For a double boiler, place a heat-safe bowl over simmering water. Stir constantly until the chocolate melts. Tip: Avoid overheating the chocolate. It should be glossy and smooth, with no lumps. Next, we blend the mousse ingredients. In a blender or food processor, add: - 1 cup of drained silken tofu - The melted chocolate - 1/4 cup of maple syrup - 1 teaspoon of vanilla extract - A pinch of sea salt Blend until smooth and creamy. Stop to scrape down the sides if needed. This helps mix everything well. Texture Tip: The mousse should be airy and light. If it feels too thick, add a splash of water or more maple syrup for sweetness. Now, pour the blended mousse into serving dishes. You can use cups or bowls. Once filled, place them in the fridge. Let them chill for at least two hours. This helps the mousse set and become fluffy. Refrigeration Tip: Keep the mousse covered if you plan to store it for longer. This keeps it fresh and tasty. For a perfect finish, top the mousse with coconut whipped cream and fresh berries right before serving. Enjoy this rich and creamy delight! To make your mousse just right, start with sweetness. Maple syrup is the best choice. It adds a rich flavor and works well with chocolate. Taste as you mix. If you want it sweeter, add more syrup a little at a time. Using quality chocolate is key too. Look for dairy-free dark chocolate chips that have rich cocoa flavor. Good chocolate makes a huge difference in taste. It gives your mousse that deep, luscious flavor we all love. Presentation can elevate your mousse. Use decorative cups for serving. Clear cups show off the creamy layers. You can also use wine glasses for a fancy look. Garnishing adds visual appeal. Try fresh berries on top for color. A mint leaf can add a nice touch too. Drizzle melted chocolate over the mousse for an extra treat. Watch out for common mistakes. Overheating chocolate is a big one. If you heat it too much, it can burn. Use a double boiler or microwave in short bursts to keep it smooth. Another mistake is not blending enough. You want a silky texture. Blend until smooth and creamy. Scrape down the sides of your blender or processor to mix it all well. This ensures every bite is perfect. {{image_2}} You can easily change the taste of your mousse. Adding espresso gives a nice mocha flavor. Just mix in about one tablespoon of espresso powder with the melted chocolate. For a fresh twist, try adding a few drops of orange or peppermint extracts. Both flavors pair well with chocolate and make your mousse even more special. Want a creamier mousse? Mixing in avocado can help. Use one ripe avocado and blend it with the other ingredients. This adds healthy fats and smoothness without changing the flavor much. For some crunch, layer your mousse with crushed cookies. It adds a fun texture and makes each bite exciting. This recipe is great for vegans, but you can also make it nut-free. Use a nut-free chocolate option to keep it safe for those with allergies. Opt for a seed-based milk, like oat or rice milk, if you want to change the base. This way, everyone can enjoy your rich and creamy delight. For the full recipe, check the main section above. To keep your mousse fresh, use an airtight container. This prevents air from getting in. Store the mousse in the fridge for up to three days. Be sure to cover the mousse to keep it from drying out. The texture remains creamy if you follow this step. You can freeze the mousse for longer storage. Pour it into a freezer-safe container. Leave some space at the top for expansion. Cover it with plastic wrap before sealing the lid. This helps to prevent freezer burn. To enjoy your mousse, thaw it in the fridge overnight. This keeps the taste and texture just right. Yes, you can! Dairy-free milk chocolate works well in this mousse. It adds a sweet and creamy touch. Look for brands that are labeled dairy-free. You can also try dark chocolate with different cocoa percentages. Higher cocoa gives a richer flavor, while lower cocoa yields a milder taste. Experiment to find your favorite! The mousse can last about three to five days in the fridge. Store it in an airtight container to keep it fresh. If you notice any change in texture or smell, it’s best to toss it. Always check before serving. Enjoy it chilled for the best experience! Absolutely! To make this mousse nut-free, choose dairy-free chocolate that does not contain nuts. You can also use sunflower seed butter instead of nut-based options. This keeps the creamy texture while staying safe for nut allergies. Always read labels to ensure safety. Enjoy your delicious mousse! This blog post covered how to make a simple, dairy-free chocolate mousse. You learned about the main and optional ingredients, like silken tofu and dairy-free chocolate chips. I shared step-by-step instructions for melting, blending, and setting the mousse. You also got tips to perfect your dish and variations to try. In closing, making this mousse is fun and easy. With a little practice, you’ll create a dessert that impresses everyone. Enjoy experimenting and making this recipe your own!

Dairy-Free Chocolate Mousse Rich and Creamy Delight

Are you craving a rich and creamy dessert without the dairy? Look no further! This Dairy-Free Chocolate Mousse is smooth,

To create cheesy spinach stuffed shells, you will need the following ingredients: - 20 jumbo pasta shells - 2 cups ricotta cheese - 1 cup shredded mozzarella cheese - 1 cup grated Parmesan cheese - 2 cups fresh spinach, chopped - 1 egg, beaten - 2 cloves garlic, minced - 1 teaspoon dried oregano - 1 teaspoon salt - 1/2 teaspoon black pepper - 3 cups marinara sauce - Fresh basil leaves for garnish (optional) These ingredients blend together to make a delicious and satisfying dish. The jumbo shells serve as the perfect vessel for the creamy cheese and fresh spinach mix. Ricotta and mozzarella add rich flavors, while Parmesan brings a nice saltiness. Fresh spinach adds a healthy touch and great color. The egg helps bind the mixture, making it easier to stuff the shells. Garlic and oregano add depth to the flavor. Marinara sauce ties everything together, adding moisture and tang. Finally, fresh basil can enhance the presentation and taste. This recipe is not only simple but also versatile. You can customize it to suit your tastes while keeping the core flavors intact. For the full recipe, check out the complete cooking instructions. Start by preheating your oven to 375°F (190°C). This step is key as it gets your oven ready for baking. Next, bring a large pot of salted water to a boil. Add 20 jumbo pasta shells and cook them for 8-10 minutes. You want them to be al dente, so they hold their shape. After cooking, drain and rinse the shells under cold water. Set them aside for later. In a mixing bowl, combine 2 cups of ricotta cheese, half of the mozzarella cheese, 1 cup of grated Parmesan cheese, and 2 cups of chopped fresh spinach. Add 1 beaten egg, 2 minced garlic cloves, 1 teaspoon of dried oregano, 1 teaspoon of salt, and 1/2 teaspoon of black pepper. Mix well until everything is smooth and creamy. Now it’s time to fill those shells! Use a small spoon or a piping bag to scoop the cheese and spinach mixture into each shell. Don’t be shy; make sure each shell is packed full of stuffing. Grab a 9x13-inch baking dish and spread 1 cup of marinara sauce evenly on the bottom. Place the stuffed shells in a single layer on top of the sauce. Pour the rest of the marinara sauce over the shells, making sure they are fully covered. Next, sprinkle the remaining mozzarella cheese evenly over the top of the stuffed shells. This will create a delicious, gooey layer when baked. Cover the dish with aluminum foil and bake for 25 minutes. After that, carefully remove the foil and bake for another 10-15 minutes. Look for bubbly, golden-brown cheese on top. Once done, take the dish out of the oven and let it cool for a few minutes. If you like, add fresh basil leaves for a lovely garnish. Serve the stuffed shells warm and enjoy each cheesy bite. For the full recipe, check out the details provided. To stuff the shells well, use a small spoon or a piping bag. This makes filling easy and quick. Fill each shell generously, making sure not to overfill. A well-stuffed shell gives you the best taste and texture. To prevent the pasta from sticking, rinse the shells in cold water after cooking. This helps stop the cooking process. You can also add a drizzle of olive oil to the water while boiling. Stir the shells gently during cooking to keep them separated. Fresh herbs can boost the flavor of your dish. Try adding chopped basil or parsley to the cheese mix. This gives a fresh taste. You can also sprinkle fresh herbs on top before serving for a nice touch. One common mistake is not cooking the shells long enough. They should be al dente. If they are too soft, they might tear when you stuff them. Also, don’t skip the marinara sauce layer. It keeps the shells moist and adds flavor. {{image_2}} You can easily make Cheesy Spinach Stuffed Shells vegetarian. Focus on the cheese and spinach filling. Use more veggies like mushrooms, zucchini, or bell peppers. These add flavor and texture. You can also swap the marinara sauce for a rich tomato basil sauce. This keeps the dish hearty and plant-based. If you want extra protein, consider adding cooked chicken or sausage. Cook the meat first, then chop it small. Mix it into the cheese and spinach filling. This adds a nice bite to the shells. It also makes the dish more filling for a hungry crowd. For a gluten-free version, choose gluten-free pasta shells. Many brands offer this option now. You can still use the same filling recipe. Just check the sauce for hidden gluten. Marinara sauce is usually safe, but always read the label to be sure. Try different sauces to change the flavor of the dish. Instead of marinara, use Alfredo sauce. This makes a creamy, rich taste. Pesto is another great choice. It adds a fresh, herby flavor to the cheesy filling. Both options give you a chance to play with tastes. Get creative and enjoy! After you enjoy your cheesy spinach stuffed shells, you may have some left. To store them, let the dish cool completely. Then, place the leftovers in an airtight container. You can keep them in the fridge for about 3 to 5 days. Make sure to label the container with the date. This helps you stay organized and know when to eat them. When it's time to eat your leftovers, reheating is simple. You can use the oven or microwave. If using the oven, preheat to 350°F (175°C). Place the shells in a baking dish and cover with foil. Bake for about 20 minutes or until hot. If you prefer the microwave, put a few shells on a microwave-safe plate. Heat for 1 to 2 minutes, checking to make sure they are warm all the way through. Want to save some cheesy spinach stuffed shells for later? Freezing them is a great option. First, let the dish cool. Then, wrap each shell in plastic wrap and place them in a freezer bag. You can also freeze the whole dish. Use a freezer-safe container and cover it tightly. These can last for up to 3 months. When you're ready to eat, thaw in the fridge overnight, then reheat as mentioned above. Enjoy your tasty meal anytime! Yes, you can swap cheeses. Try using goat cheese or feta for a tangy twist. You can mix and match cheeses to suit your taste. Just keep in mind that the texture may change. Mozzarella melts well, while Parmesan adds a nice flavor kick. To prep in advance, assemble the shells but do not bake them. Cover the dish tightly with plastic wrap or foil. You can store it in the fridge for up to 24 hours. When you are ready, bake it directly from the fridge. You may need to add a few extra minutes to the cooking time. Cheesy Spinach Stuffed Shells pair well with a fresh green salad or garlic bread. A side of steamed veggies or a light soup also works great. These sides can add color and balance to your meal. Absolutely! Kids usually love cheesy dishes. The fun shape of the stuffed shells makes it more appealing. You can even let kids help stuff the shells. It’s a fun way to get them involved in cooking, which can spark their interest in food. This recipe for Cheesy Spinach Stuffed Shells offers a simple guide to a delicious dish. You learned the key ingredients, step-by-step instructions, and even tips for success. You can tweak it for different diets and store leftovers easily. Use your creativity to enhance flavor and mix in protein. This meal is not just tasty; it’s fun to make. Enjoy cooking, and share this dish with family and friends! You won’t regret it.

Cheesy Spinach Stuffed Shells Savory and Simple Dish

Welcome to the world of Cheesy Spinach Stuffed Shells! This dish is rich, creamy, and simple to make. You’ll love

- 1 lb (450g) chicken breast, cut into 1-inch cubes - 1/4 cup honey - 1/4 cup Dijon mustard - 2 tablespoons low-sodium soy sauce - 1 tablespoon apple cider vinegar - 1 teaspoon garlic powder - 1 teaspoon onion powder - Salt and pepper to taste - 1 red bell pepper, cut into chunks - 1 zucchini, sliced into thick round pieces - Skewers (wooden or metal) To make these honey mustard chicken skewers, you need simple ingredients. The chicken is the star. It’s juicy, tender, and goes well with a sweet and tangy sauce. You can use honey, Dijon mustard, soy sauce, and apple cider vinegar for flavor. Each ingredient plays a big role. Honey adds sweetness, while mustard brings a little kick. I like to add garlic and onion powder for depth. Salt and pepper help to bring out the taste. You can also mix in some veggies. Red bell peppers add crunch and color. Zucchini is great for that fresh taste. When using wooden skewers, remember to soak them in water first. This step helps prevent burning. You can find the full recipe at the end of this article. Enjoy making these delicious skewers! First, grab a medium bowl. Whisk together the honey, Dijon mustard, soy sauce, apple cider vinegar, garlic powder, onion powder, salt, and pepper. This mix will be your marinade. Next, cut the chicken into 1-inch cubes. Place these cubes in the marinade. Make sure each piece gets coated well. Cover the bowl and put it in the fridge. Let it sit for at least 30 minutes. For the best taste, try to marinate for 1-2 hours. If you use wooden skewers, soak them in water for about 30 minutes. This keeps them from burning on the grill. While they soak, preheat your grill or grill pan. Set it to medium-high heat. This step is key for getting that perfect sear. Now it’s time to assemble. Take the marinated chicken and thread it onto the skewers. If you want, add chunks of red bell pepper and zucchini between the chicken pieces. This adds color and flavor. Place the skewers on the grill. Cook them for about 5-7 minutes per side. You want the chicken to reach an internal temperature of 165°F (75°C). For extra flavor, baste the skewers with leftover marinade during the last few minutes. Once done, let them rest for a minute before you serve. Enjoy your Honey Mustard Chicken Skewers! Check the [Full Recipe] for more details. To get the best flavor, marinate your chicken for at least 30 minutes. If you have more time, one to two hours works wonders. The longer it sits, the better it tastes! You can add extra flavors, too. Try herbs like rosemary or thyme. A pinch of cayenne can give it a nice kick. For great grill marks, make sure your grill is hot. Place the skewers on one side and let them cook without moving them for a few minutes. This helps create those lovely lines. To check if the chicken is done, use a meat thermometer. It should read 165°F (75°C) in the thickest part. If you don’t have one, cut a piece open. The meat should be white, not pink. Serving your skewers on a wooden platter looks nice. You can add fresh herbs like parsley or cilantro for color. A side of grilled corn or a fresh green salad pairs well, too. These simple touches make your meal pop and look more inviting. Want to impress? Drizzle a bit of extra honey mustard sauce over the top before serving. {{image_2}} You can switch up the flavors in your honey mustard chicken skewers. Instead of honey, try maple syrup or agave. Both add sweetness with a unique twist. For mustard, you can use whole grain or spicy brown mustard. They will change the taste and texture. Herbs and spices can also enhance the marinade. Try adding fresh thyme or rosemary for an earthy flavor. You could even include a pinch of cayenne for a little heat. Experimenting with your marinade keeps every meal exciting. Not a fan of chicken? No problem! You can use tofu for a tasty plant-based option. Just press and cube the tofu before marinating. This helps it absorb all the flavors. You can also try shrimp or beef for a different taste. Shrimp cooks faster, so watch them closely on the grill. If using beef, choose lean cuts like sirloin. Cut them into bite-sized pieces for even cooking. Seasonal veggies can add color and flavor to your skewers. In summer, use zucchini, bell peppers, or cherry tomatoes. In fall, butternut squash or mushrooms work well. Fruits can also add a sweet touch. Try pineapple or peaches in summer. They caramelize beautifully on the grill. In the winter, you might add apples or pears for a cozy flavor. These seasonal swaps keep your dish fresh and fun. To keep your honey mustard chicken skewers fresh, refrigerate them right away. Place the cooled skewers in an airtight container. This helps maintain flavor and prevents spoilage. Store them in the fridge for up to three days. You can freeze the skewers for later use. Wrap each skewer in plastic wrap tightly. Then, place them in a freezer-safe bag or container. When ready to enjoy, thaw them in the fridge overnight. Reheat on a grill or in an oven until hot. These cooked skewers are safe for up to three days in the fridge. If they smell off or look discolored, throw them away. Always check for signs of spoilage before eating. Enjoy your honey mustard chicken skewers without worry! The best way to grill chicken skewers is to preheat your grill to medium-high heat. This helps cook the chicken evenly and gives it nice grill marks. I recommend soaking wooden skewers in water for 30 minutes to stop them from burning. Always keep an eye on your skewers while grilling. Turn them every few minutes for even cooking. Yes, you can use a marinade overnight! Marinating chicken overnight allows flavors to soak in deeply. Just remember to keep the chicken in the fridge while it marinates. For the best taste, aim for at least 1-2 hours, but overnight works wonders too. You can tell chicken skewers are fully cooked when they reach an internal temperature of 165°F (75°C). Use a meat thermometer for accuracy. The chicken should be white and no longer pink inside. Juices should run clear. Honey Mustard Chicken Skewers pair well with a variety of sides. Here are some great options: - Grilled corn on the cob - A fresh green salad - Roasted vegetables - Rice or quinoa - Garlic bread Yes, you can make vegetarian skewers using tofu or veggies. Firm tofu works best. Just cube it and marinate like chicken. You can also use a mix of vegetables like mushrooms, bell peppers, and zucchini for a colorful option. The nutritional values for Honey Mustard Chicken Skewers depend on the ingredients used. On average, one serving (about 1/4 of the recipe) has: - Calories: 220 - Protein: 30g - Carbohydrates: 10g - Fat: 7g - Fiber: 1g For precise numbers, check the specific brands of ingredients you use. Enjoy your cooking! - Prep Time: 35 minutes - Total Time: 45 minutes - Servings: 4 Making Honey Mustard Chicken Skewers is easy and fun. You will enjoy every step. First, the prep time is just 35 minutes. This includes making the marinade and cutting the chicken. The total cooking time is 45 minutes, so your meal is ready fast. You can serve four people with this recipe. To make your skewers pop, serve them on a wooden platter. Adding fresh herbs like parsley or cilantro can brighten the dish. I love pairing these skewers with grilled corn or a fresh green salad. They add color and crunch to your meal. You can also serve them with rice or a light dip like tzatziki for extra flavor. Enjoy your delicious creation! You now have everything you need to make delicious Honey Mustard Chicken Skewers. From the easy-to-follow ingredients list to helpful grilling tips, the process is simple. Remember to experiment with different marinades and vegetables for your skewers. Don’t shy away from personalizing your dish. Store leftovers properly to enjoy later. Your family and friends will love these skewers. Go ahead and make your grilling adventure fun and tasty!

Honey Mustard Chicken Skewers Easy Grilling Recipe

Are you ready to light up your grill? Honey Mustard Chicken Skewers are quick, easy, and loaded with flavor. With

For this dish, you need simple yet tasty ingredients: - 1 pound boneless, skinless chicken breasts, sliced into thin strips - 1 large red bell pepper, sliced - 1 large green bell pepper, sliced - 1 medium onion, thinly sliced These fresh ingredients give your fajitas a vibrant look and great flavor. The chicken provides protein, while the peppers and onion add crunch and sweetness. The right seasonings and oils make all the difference. You will need: - 3 tablespoons olive oil - 2 teaspoons chili powder - 1 teaspoon cumin - 1 teaspoon garlic powder - 1 teaspoon smoked paprika - Salt and pepper to taste These spices give your fajitas a smoky and spicy kick. Olive oil helps everything cook evenly and adds richness. You can serve your fajitas in many fun ways. Here are my favorites: - Flour or corn tortillas - Fresh cilantro, chopped (for garnish) - Lime wedges (for serving) Warm tortillas hold the filling well. A squeeze of lime adds a fresh touch, while cilantro brightens the dish. For the full experience, serve everything right in the skillet! To start, I like to season the chicken well. Take 1 pound of boneless, skinless chicken breasts and slice them into thin strips. In a mixing bowl, add 2 tablespoons of olive oil. Then, sprinkle in 2 teaspoons of chili powder, 1 teaspoon of cumin, 1 teaspoon of garlic powder, and 1 teaspoon of smoked paprika. Don’t forget salt and pepper! Toss the chicken strips in the mixture until they are nicely coated. Let it sit for a few minutes to soak up the flavors. Now, it’s time to heat the pan. Grab a large skillet or cast-iron pan and add the last tablespoon of olive oil. Turn the heat to medium-high. Once the oil is hot, carefully add the seasoned chicken strips. Cook them for about 5 to 6 minutes. Stir occasionally to ensure even cooking. Look for a nice golden color, which means they are cooked through. After the chicken is done, it’s time to add some color. Toss in the sliced bell peppers and onions. I like to use one large red and one large green bell pepper. Stir everything together and cook for another 5 to 7 minutes. You want the veggies to be tender and slightly charred. This adds a great texture and flavor to your fajitas. Now you're ready to enjoy a delicious, vibrant dish! You can find the full recipe above to guide you through the process. To make your fajitas pop, you can adjust the spices. If you like heat, add more chili powder. For a smoky taste, increase the smoked paprika. Remember, start small. You can always add more spice, but you can’t take it out once it’s in. Use medium-high heat for cooking. This temperature helps the chicken brown well. Stir the chicken often to prevent sticking and ensure even cooking. When you add the veggies, keep stirring. This keeps them crunchy and delicious. For a fun meal, serve the fajitas straight from the pan. Place warm tortillas, lime wedges, and chopped cilantro on the table. Let everyone build their own fajitas. This makes the meal more interactive and enjoyable. You can find the full recipe above to guide you through the steps. {{image_2}} You can switch up the protein in your fajitas. Try using beef or shrimp for a different taste. If you prefer plant-based options, use tofu or tempeh. Just make sure to adjust the cooking time. Beef will take longer to cook, while shrimp cooks faster. You’ll get a new flavor with each choice. Don’t feel limited to just bell peppers and onions. You can add zucchini, mushrooms, or corn for more texture. Even sweet potatoes can work well. Just slice them thinly so they cook evenly. Get creative and use what you have in your fridge. More veggies mean more flavor and color on your plate. Experimenting with spices can change the whole dish. Add cayenne pepper for heat or oregano for earthiness. You can also try different salsas. A mango salsa adds sweetness, while a tomatillo salsa gives a tangy kick. Mix and match to find your perfect blend. These tweaks make every meal unique and exciting. For the complete recipe, make sure to check the Full Recipe section. After making your One-Pan Chicken Fajitas, let them cool. Place the leftovers in an airtight container. This keeps them fresh and tasty. If you have more than you can eat, you can freeze them. Use freezer-safe bags for easy storage. Squeeze out all the air before sealing. This helps prevent freezer burn. When you're ready to enjoy your leftovers, reheating is key. The best way is to use a skillet. Heat it over medium heat. Add a splash of water or olive oil to keep things moist. Stir the fajitas gently until heated through. You can also use the microwave. Just cover the dish with a damp paper towel to keep moisture in. Heat in short bursts, stirring in between. Leftover fajitas can last in the fridge for about 3 to 4 days. If you freeze them, they are good for about 2 to 3 months. Make sure to label your containers with the date. This helps you keep track of freshness. Enjoy your meal knowing you can save it for later! For the full recipe, check out the detailed instructions above. Yes, you can make One-Pan Chicken Fajitas ahead of time. This dish is great for meal prep. Cook the chicken and veggies, then let them cool. Store them in an airtight container in the fridge for up to three days. Reheat them in a pan or microwave before serving. You can also freeze the cooked fajitas. Just thaw them in the fridge overnight before reheating. Chicken fajitas pair well with many sides. Here are some great ideas: - Mexican rice - Refried beans - Guacamole - Salsa - Corn on the cob - A simple green salad These sides add variety and make your meal more complete. You can mix and match to suit your taste. To make One-Pan Chicken Fajitas low-carb, swap out the tortillas. Use lettuce leaves for wraps instead. You can also add more non-starchy veggies. Think about zucchini, mushrooms, or spinach. These options keep the dish filling without the carbs. Enjoy the same great flavor while staying on track with your diet. For the full recipe, check out the details above! You now have all the tools to make fantastic one-pan chicken fajitas. We've covered the main ingredients, seasonings, and serving ideas. I walked you through preparation, cooking, and tips for the best flavor. You can even try different proteins and veggies for a unique touch. Remember to store leftovers correctly to enjoy them later. With these steps and tricks, you'll impress everyone at the table. Enjoy making and sharing this delicious meal!

One-Pan Chicken Fajitas Flavorful and Easy Dinner

Craving a tasty dinner that’s quick and easy? One-Pan Chicken Fajitas deliver bold flavors and minimal clean-up! With fresh chicken,

- 1 whole chicken (about 4-5 lbs) - 4 cloves garlic, minced - 2 lemons (1 zested and juiced, 1 sliced) - 1/4 cup olive oil - 2 tablespoons fresh rosemary, chopped (or 1 tablespoon dried) - 1 tablespoon fresh thyme leaves (or 1/2 tablespoon dried) - Salt and pepper to taste - 1 cup chicken broth (low sodium) - 1 tablespoon honey (optional, for glaze) You can swap some ingredients if needed. No fresh rosemary? Use dried rosemary instead. If you lack fresh thyme, dried thyme works well too. Want to reduce fat? Use less olive oil. For a stronger flavor, add more garlic. You can also use chicken thighs or breasts if you prefer. When buying a whole chicken, look for firm, pink skin with no blemishes. The meat should feel cold to the touch. For garlic, choose firm bulbs with tight skin. Fresh lemons should feel heavy and have a vibrant color. Their zest adds a bright flavor. Herbs should smell fragrant. If they look wilted, they are not fresh. 1. Preheat the Oven: Set your oven to 425°F (220°C). This high heat helps crisp the skin. 2. Prepare the Marinade: In a bowl, combine minced garlic, lemon zest, lemon juice, olive oil, rosemary, thyme, salt, and pepper. Mix until it looks smooth. 3. Marinate the Chicken: Take your whole chicken and place it in a large roasting pan. Rub the marinade all over the chicken. Make sure to get it under the skin and inside the cavity. This step gives the chicken a lot of flavor. 4. Add Lemon Slices: Stuff the chicken’s cavity with lemon slices and leftover herbs. For a sweet touch, drizzle honey inside if you want. 5. Add Broth: Pour chicken broth into the bottom of the pan. This keeps the chicken moist while it cooks. 6. Roast the Chicken: Put the chicken in the oven and roast for about 1 hour and 15 minutes. Check that the internal temperature is 165°F (75°C). Baste the chicken with pan juices every 20 to 30 minutes. This keeps the meat juicy and flavorful. 7. Let it Rest: After roasting, remove the chicken from the oven. Let it rest for 10 to 15 minutes before carving. This will help the juices stay inside the meat, making it juicy. 8. Serve: Carve the chicken and place it on a serving platter. Drizzle some pan juices on top for extra flavor. - Use Fresh Ingredients: Fresh garlic and herbs make a big difference in taste. - Baste Regularly: Basting keeps the chicken moist and adds flavor. - Check Temperature: Always use a meat thermometer to ensure it’s cooked properly. - Use a Roasting Rack: This helps the chicken cook evenly. For the complete recipe, refer to the [Full Recipe]. Enjoy this savory and juicy dish! To keep your chicken moist, I have a few tricks. First, use a good marinade. The lemon juice and olive oil in the marinade help tenderize the meat. Next, always baste your chicken. Basting adds moisture and flavor. I suggest basting every 20-30 minutes. Lastly, let the chicken rest after cooking. This step helps the juices stay in the meat. You can enhance the flavor of your chicken easily. Try adding herbs like sage or oregano for a twist. You can also use garlic powder for extra garlic taste. For a little heat, add red pepper flakes. If you want a sweet glaze, drizzle honey on top before cooking. These simple add-ins make your chicken even more tasty. To check if your chicken is done, use a meat thermometer. Insert it into the thickest part of the thigh. The internal temperature should reach 165°F (75°C). If you don’t have a thermometer, you can cut into the thigh. The juices should run clear, not pink. Remember, letting the chicken rest is key. This way, the juices stay inside for a juicy bite. {{image_2}} You can add fresh herbs for extra flavor. Try using sage or parsley. Mix them into your marinade. This adds depth and freshness to your dish. You can also sprinkle herbs on top before roasting. The herbs will crisp up and give a nice crunch. This version is great for special occasions. For a kick, add some red pepper flakes to your marinade. Just a teaspoon will do. This adds heat without overpowering the lemon and garlic. You can also add a bit of cayenne pepper for more spice. This version is perfect for those who love bold flavors. Serve it with cooling sides, like yogurt or cucumber salad. If you want a quicker option, use chicken thighs instead of a whole chicken. Thighs cook faster and stay juicy. Just follow the same marinade steps. Roast them in the oven for about 35-40 minutes. You’ll get crispy skin and tender meat. This recipe is great for busy weeknights. Feel free to check the [Full Recipe] for more details. After you enjoy your lemon garlic roasted chicken, let it cool first. Place it on a cutting board. Wait about 15 minutes. This helps keep the juices in the meat. Once it’s cool, carve the chicken into pieces. Store the pieces in an airtight container. Make sure to keep it in the fridge. It’s best to use the chicken within three days for the best taste. If you want to save some for later, freezing works great. First, let the chicken cool completely. Then, wrap each piece in plastic wrap. After that, place the wrapped pieces in a freezer-safe bag. Squeeze out as much air as you can. This helps prevent freezer burn. You can freeze the chicken for up to three months. When you’re ready to eat, just thaw it in the fridge overnight. To reheat your chicken, the oven is your best friend. Preheat it to 350°F (175°C). Place the chicken pieces in a baking dish. Add a splash of chicken broth or water to keep them moist. Cover the dish with foil to trap steam. Heat for about 20-25 minutes or until warm. If you want crispy skin, uncover the dish for the last 5 minutes. This way, the skin gets that nice crunch again. Enjoy your tasty leftovers! Roasting a chicken takes about 20 minutes per pound. If you have a 4-pound chicken, it will need around 1 hour and 20 minutes. Always check the thickest part of the meat, near the bone, for the right temperature. It should reach 165°F (75°C) for safe eating. Use a meat thermometer for the best results. Yes, you can make the marinade a day ahead. Just mix the garlic, lemon juice, zest, olive oil, and herbs. Store it in the fridge. This helps the flavors blend well. When you're ready to cook, just rub it on the chicken. The extra time helps the chicken taste even better. Lemon Garlic Roasted Chicken pairs well with many sides. Here are some great options: - Roasted potatoes - Steamed vegetables - Garden salad - Rice pilaf - Garlic bread You can also serve it with a light lemony sauce or gravy for extra flavor. Enjoy your meal with family or friends, and don’t forget to check the [Full Recipe] for detailed instructions! You learned how to make a tasty lemon garlic roasted chicken from scratch. We covered key ingredients, cooking steps, and tips for perfection. I shared easy substitutions and ways to keep your chicken moist. You also discovered food storage methods and helpful FAQs. Enjoy this dish with your favorite sides, and feel free to explore variations. Cooking can be fun and rewarding. Now, go ahead and make your own juicy lemon garlic roasted chicken!

Lemon Garlic Roasted Chicken Savory and Juicy Recipe

Are you ready to elevate your dinner game? In this post, I’ll share my Lemon Garlic Roasted Chicken recipe, a

Older posts
Newer posts
← Previous Page1 … Page53 Page54 Page55 … Page59 Next →

dsad

© 2025 Recipes Pursuit • Built with GeneratePress

Our Policies

  • Copyright Policy
  • Cookie Policy
  • GDPR Policy
  • Privacy Policy
  • Disclaimer
  • Terms Of Use

More Information

  • Home
  • About
  • Contact
  • Appetizers
  • Dessert
  • Dinner
  • Drinks
©2025, Recipes Pursuit About Back To Top