Skip to content
DisclaimerTerms Of UseGDPR PolicyCookie Policy

Recipes Pursuit

  • Home
  • Drinks
  • Appetizers
  • Dinner
  • Dessert
  • About
  • Contact
  • Privacy Policy
DisclaimerTerms Of UseGDPR PolicyCookie Policy

Emma Smith

To make chocolate covered banana pops, you will need: - 2 ripe bananas - 1 cup dark chocolate chips - 1 tablespoon coconut oil - Sea salt, for sprinkling These ingredients create a tasty and fun treat. The ripe bananas give sweetness and a soft bite. Dark chocolate adds rich flavor, while coconut oil helps the chocolate melt smoothly. A sprinkle of sea salt makes the taste pop! You can make your banana pops even more special with these toppings: - Crushed nuts - Sprinkles - Shredded coconut Feel free to mix and match these toppings. Crushed nuts add crunch, while sprinkles bring fun colors. Shredded coconut gives a tropical twist! Each serving contains: - Calories: 150 - Fat: 8g - Carbohydrates: 20g - Protein: 2g These banana pops are a sweet treat that packs nutrients. They are a great snack for kids and adults alike! Enjoy them as a dessert or a fun afternoon snack. {{ingredient_image_1}} Start by peeling two ripe bananas. Then, cut each banana in half. You will have four pieces of banana. Next, take a popsicle stick and insert it into each banana half. Make sure the stick goes in halfway. This will help you hold them later. Place the banana sticks on a baking sheet lined with parchment paper. Freeze them for at least one hour. While the bananas freeze, melt the chocolate. In a microwave-safe bowl, add one cup of dark chocolate chips and one tablespoon of coconut oil. The coconut oil helps the chocolate melt smoothly. Microwave the bowl for 30 seconds. Stir the chocolate, then microwave again for another 30 seconds. Repeat this until the chocolate is fully melted and smooth. Take the frozen bananas out of the freezer. Dip each banana pop into the melted chocolate. Let the extra chocolate drip off. If you like, roll the chocolate-covered bananas in toppings like crushed nuts or sprinkles. Place them back on the parchment-lined sheet. Sprinkle a pinch of sea salt over each pop for added flavor. Return the pops to the freezer for 30 more minutes. This helps the chocolate firm up nicely. When making chocolate covered banana pops, choose dark chocolate chips. They melt well and taste rich. You can also use milk chocolate for a sweeter flavor. White chocolate is fun, too! Each type adds a different twist to your banana pops. Try different types to find your favorite. To get a smooth chocolate coating, mix dark chocolate chips with a bit of coconut oil. The oil makes the chocolate runny and easy to dip. Microwave the mix in short bursts. Stir often to avoid burning. Once melted, dip each banana pop quickly. Let the excess drip off before placing them back on parchment. Serve your banana pops on a wooden board for fun. You can also place them in a tall glass with ice. Add a colorful garnish like crushed nuts or sprinkles. This makes the pops look even more tasty. Enjoy them on a hot day or at a party! Pro Tips Choose Ripe Bananas: Use ripe bananas for the best flavor and creaminess. They should have a few brown spots for optimal sweetness. Coating Techniques: For a smooth chocolate coating, ensure the bananas are completely frozen before dipping. This helps the chocolate adhere better. Experiment with Toppings: Get creative with your toppings! Try different nuts, seeds, or even crushed cookies for added texture and flavor. Storage Tips: Store any leftover banana pops in an airtight container in the freezer for up to a week. They make a great quick snack! {{image_2}} You can use many types of chocolate for your banana pops. Dark chocolate gives a rich taste. Milk chocolate offers a sweeter flavor. White chocolate adds creaminess and a fun look. Each type brings its own joy and taste. Feel free to mix and match different chocolates. You can even blend dark and milk chocolate for a unique twist. Toppings can make your banana pops even better. Crushed nuts add crunch and nutty flavor. You can use almonds, peanuts, or walnuts. Sprinkles add color and fun. Use rainbow sprinkles for a festive touch. Shredded coconut gives a tropical feel. You can also try crushed cookies for an extra crunch. Just roll the warm chocolate bananas in your chosen toppings. Mixing flavors is a fun way to change things up. Try adding a layer of peanut butter before dipping the banana. This adds creaminess and richness. Drizzling caramel on top gives a sweet contrast. You can also try a bit of honey or maple syrup. These flavors pair well with chocolate and make each bite tasty. Experiment with your favorite flavors to find your perfect combo. You can store your chocolate covered banana pops in the freezer. Wrap each pop in plastic wrap. Place them in a zip-top bag. This keeps them fresh and safe from freezer burn. Make sure to remove as much air as possible from the bag. This helps the pops stay tasty for longer. To keep the banana pops fresh, freeze them right after coating. Lay them flat on parchment paper. This way, they won't stick together. Once frozen, you can stack them in a container if needed. Just remember to separate layers with parchment paper. The pops should stay good for up to one month in the freezer. If you have leftover pops, you can eat them cold. They taste great straight from the freezer. If you want them soft, let them sit at room temperature for about 5 minutes. This makes the chocolate easier to bite into. Never microwave them, as this can make the chocolate melt too much. Yes, you can use other fruits! Strawberries, apples, and peaches work well too. Just make sure they are firm. Cut them into bite-sized pieces for easy dipping. Keep in mind that softer fruits may need a thicker chocolate coating to hold up. Have fun trying different fruits for varied flavors! Chocolate-covered banana pops last about one week in the freezer. To keep them fresh, store them in an airtight container. This helps prevent freezer burn. If you want longer storage, try wrapping them in plastic wrap before placing them in the container. Enjoy them as a sweet treat anytime! The best way is to use a microwave. Place chocolate chips in a microwave-safe bowl. Add a tablespoon of coconut oil for smoothness. Heat in 30-second intervals, stirring between each time. This method helps prevent burning. You can also use a double boiler if you prefer a stovetop method. Just be careful not to let water touch the chocolate. You learned how to make chocolate-covered banana pops step-by-step. We covered the key ingredients and the fun toppings you can add. I also shared tips for a smooth coating and how to store your treats. Don’t forget the different chocolate types and flavor combos for variety. Enjoy these easy snacks; they are tasty and fun to make. Try your own ideas, and share your results! Happy popping!

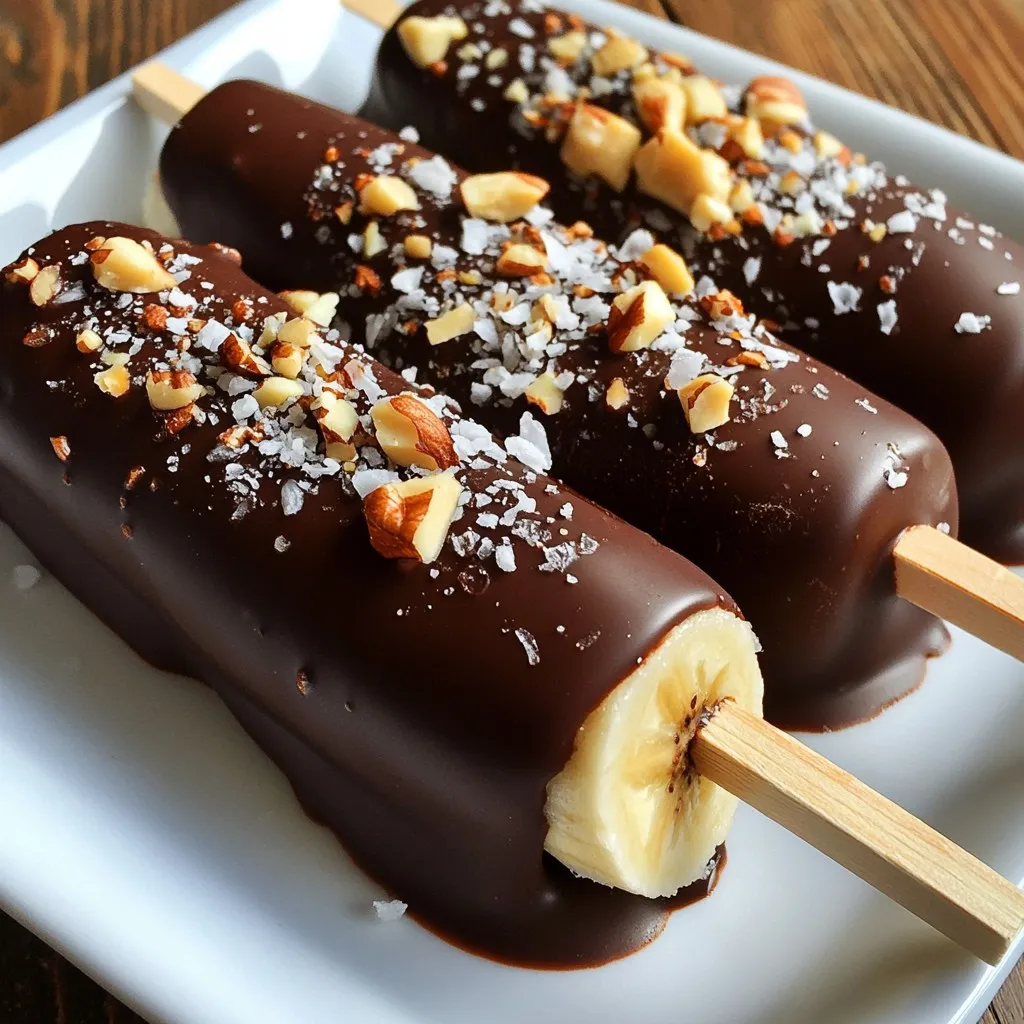
Chocolate Covered Banana Pops Fun and Easy Recipe

Looking for a fun treat that’s easy to make? Check out this Chocolate Covered Banana Pops recipe! You’ll love how

- 12 oz cheese tortellini (fresh or frozen) - 2 tablespoons olive oil - 3 cloves garlic, minced - 1 can (14 oz) diced tomatoes (with juices) - 1 cup heavy cream - 1 teaspoon dried oregano - Salt and pepper to taste - 1 cup fresh basil, torn - ½ cup grated Parmesan cheese - Red pepper flakes (optional) To create a creamy tomato basil tortellini dish, you need simple, fresh ingredients. The cheese tortellini serves as the star of your meal. You can choose fresh or frozen tortellini, depending on what you have on hand. I love the rich taste of fresh tortellini, but frozen works just as well. Next, olive oil and minced garlic add depth to the flavor. Heating the oil lets the garlic release its aroma, which is so inviting. You’ll also need diced tomatoes. I prefer using canned tomatoes with their juices, as they blend well into the sauce. The heavy cream brings the rich, creamy texture we all crave. Dried oregano adds a hint of warmth and earthiness to your dish. Don't forget the finishing touches: fresh basil, salt, pepper, and Parmesan cheese. The fresh basil adds a burst of color and flavor. The Parmesan cheese gives that nice umami kick. If you like a little heat, sprinkle some red pepper flakes on top. With these ingredients, you are ready to make a pasta dish that is both simple and rich. Each bite will be full of flavor and comfort. {{ingredient_image_1}} First, fill a large pot with water and add salt. Bring it to a boil. Add the cheese tortellini to the pot. Cook the tortellini according to the package instructions until they are al dente. This usually takes about 3-5 minutes. Once done, drain the tortellini and set them aside. Next, grab a large skillet and heat the olive oil over medium heat. Add the minced garlic to the pan. Sauté the garlic for about one minute. You want it to smell fragrant but not burn. This step adds a great flavor base to your dish. After the garlic is fragrant, stir in the diced tomatoes, along with their juices. Sprinkle in the dried oregano. Let this mixture cook for about 5-7 minutes. You want it to simmer and let the flavors mix well. Season with salt and pepper. If you like some heat, add red pepper flakes. Now, lower the heat and pour in the heavy cream. Stir the cream into the tomato mix until it blends well. Let it simmer gently for about 3-4 minutes. This will help the sauce thicken a bit. Finally, add the cooked tortellini to the skillet. Toss everything together so the tortellini gets coated in the creamy sauce. Cook for another 2-3 minutes. This allows the tortellini to absorb all the tasty flavors. Finish off by removing the skillet from the heat. Fold in the torn fresh basil and grated Parmesan cheese. Stir until the cheese melts and everything is well mixed. To make a smooth cream sauce, keep the heat low. High heat can cause the cream to curdle. Stir gently as you add the cream to the pan. This helps it blend well with the other ingredients. Always taste your sauce before serving. You can add more seasoning if it needs it. A pinch of salt or pepper can change the flavor. If you like heat, sprinkle in some red pepper flakes. This adds a nice kick! If you want a thicker sauce, add more cheese or cream. Parmesan cheese melts well and adds great flavor. You can also let the sauce simmer longer. It will thicken naturally as it cooks. Just stir occasionally to prevent sticking. Pro Tips Use Fresh Basil: For the best flavor, always opt for fresh basil instead of dried. Add it at the end of cooking to maintain its vibrant taste and aroma. Choose Quality Tomatoes: Using high-quality canned tomatoes can significantly enhance the taste of your sauce. Look for brands that use San Marzano tomatoes for a richer flavor. Adjust the Cream: If you prefer a lighter sauce, you can substitute half of the heavy cream with low-fat milk or even a plant-based cream alternative. Spice it Up: If you like a bit of heat, add red pepper flakes to taste, or consider incorporating some chopped jalapeños for a fresh kick. {{image_2}} You can make this dish even more vibrant. Simply swap out cheese tortellini for vegetable-based varieties. Look for options made from spinach, beet, or even whole wheat. These add fun colors and nutrients. Fresh vegetables also work well. Try adding zucchini, bell peppers, or spinach for extra crunch and flavor. Need a gluten-free option? You can find gluten-free tortellini made from rice or chickpeas. These are tasty and work well in this creamy sauce. Always check the package for cooking instructions. This way, you can enjoy the dish without worries about gluten. Want to take your dish to the next level? Mix in extra veggies or proteins. Chicken and shrimp are great choices. Cook them in the skillet before adding the tomatoes. You can also toss in mushrooms or peas for more texture. Feel free to adjust the spice with red pepper flakes for a kick. Store your leftovers in an airtight container. This keeps the creamy tomato basil tortellini fresh for up to 3 days. When you’re ready to enjoy it again, just remember to check for any signs of spoilage. To freeze this dish, let it cool completely. Then, transfer it into a freezer-safe container. Make sure to leave some space at the top, as the sauce may expand when it freezes. This dish can stay good in the freezer for about 2 months. When you're ready to eat, thaw it overnight in the fridge. For the best flavor, reheat the tortellini on the stove over low heat. Stir often until it’s hot. You can add a splash of cream or water to keep it creamy. If you're short on time, you can use the microwave, but be sure to cover it. Heat in short bursts and stir in between. Enjoy your tasty dish! To make tortellini from scratch, start with fresh pasta dough. Mix flour and eggs until smooth. Roll the dough thin and cut it into squares. Fill each square with cheese or meat. Fold and seal the edges tightly. Cook the tortellini in salted boiling water until they float. This process takes some time, but the taste is worth it. Yes, you can use non-dairy cream options! Coconut cream or cashew cream works well. They add a nice richness without dairy. Almond milk can also work, but it may be thinner. Adjust the seasoning to balance flavors. These options make the dish creamy and keep it dairy-free. This dish pairs well with many sides. A fresh green salad adds crunch and freshness. Garlic bread is always a favorite for dipping. You can also serve it with roasted vegetables for a healthy touch. For a heartier meal, try grilled chicken or shrimp on the side. These options enhance the flavors and make your meal complete. This article covered a simple recipe for Creamy Tomato Basil Tortellini. We explored the main and extra ingredients, plus helpful tips. You learned how to cook tortellini perfectly and create a delicious creamy sauce. I shared ways to customize this dish for various diets and preferences. In the end, this meal is quick, tasty, and easy to make. Enjoy cooking and share your creations!

Creamy Tomato Basil Tortellini Simple Rich Delight

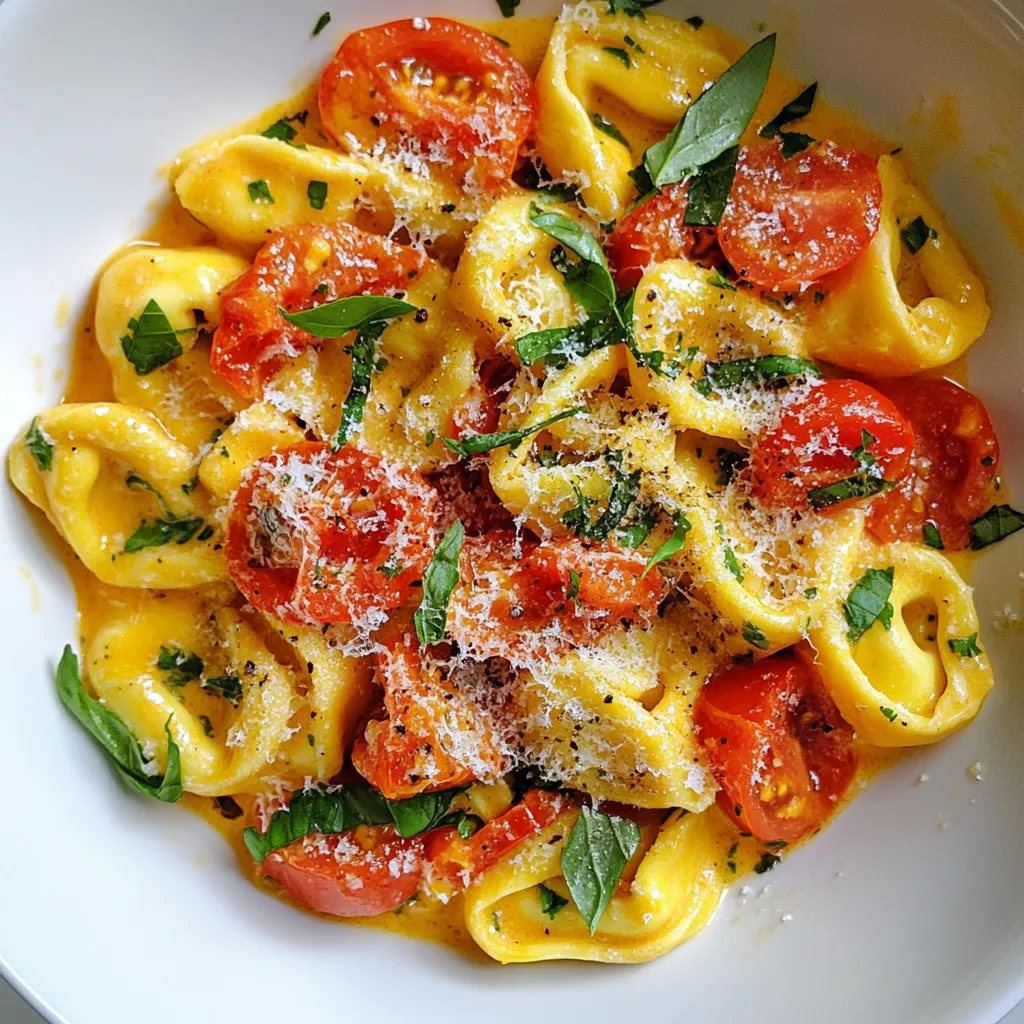
If you crave a rich and flavorful dish that’s easy to make, then you’ll love my Creamy Tomato Basil Tortellini.

- 200g pasta (penne or fusilli recommended) - 200g feta cheese block - 300g cherry tomatoes, halved - 3 cloves garlic, minced - 4 tablespoons olive oil - 1 teaspoon dried oregano - 1 teaspoon red pepper flakes (adjust to taste) - Fresh basil leaves for garnish - Salt and pepper to taste I love how simple yet flavorful this dish is. The pasta provides a great base. You can choose either penne or fusilli; both work wonderfully. The feta cheese is the star here. Its creamy texture brings everything together. Cherry tomatoes add sweetness and color. I prefer halving them for even roasting. Garlic gives a lovely aroma and depth of flavor, so don’t skip it! Olive oil is essential. It helps everything cook evenly and adds richness. Dried oregano gives that classic Italian vibe. If you like a little heat, red pepper flakes are perfect. You can adjust them based on your taste. Fresh basil is a must for garnish. It brightens up the dish and adds freshness. Lastly, salt and pepper balance the flavors. This combination creates a delightful dish that is hard to resist! {{ingredient_image_1}} - Preheat your oven to 200°C (400°F). - In a large baking dish, combine the halved cherry tomatoes, minced garlic, and dried oregano. First, you want to get the oven nice and hot. Preheating helps the tomatoes blister and the feta melt perfectly. After that, mix the cherry tomatoes with garlic and oregano in your baking dish. The sweet tomatoes and garlic will create a great flavor base. - Drizzle olive oil and season the mixture. - Place feta cheese in the center and drizzle with remaining olive oil. - Bake for about 25-30 minutes. Next, drizzle half of the olive oil over your mix. Add salt, pepper, and red pepper flakes to taste. The feta goes right in the middle. Drizzle the remaining olive oil on top. Bake it in the oven for about 25 to 30 minutes. You want the tomatoes to blister and the feta to turn golden. - Cook pasta until al dente and drain it. - Mash feta and tomatoes after baking. - Toss pasta with the creamy sauce. While the feta and tomatoes bake, cook your pasta according to the package instructions. Aim for al dente, so it has a little bite. Once your feta and tomatoes are out of the oven, use a fork to mash them together. This creates a creamy sauce. Toss the cooked pasta in the baking dish with the sauce. Make sure every piece of pasta is coated in that rich, creamy goodness. Adjust seasoning if needed. To get the best results, watch your bake time closely. Bake the feta and tomatoes for about 25 to 30 minutes. You want the tomatoes to blister. The feta should be golden and melting. Check on it halfway through. This way, you can avoid overcooking. Overcooked tomatoes can become mushy. Overcooked feta can lose its rich creamy texture. Adjust the spice level by adding red pepper flakes. If you like it spicy, add more. If not, use less. You can also try other spices. Consider using Italian herbs, like thyme or rosemary. These will add new flavors to your dish. Garnish your dish with fresh basil leaves. This adds color and a fresh taste. For plating, use a wide bowl. This allows the creamy sauce to spread nicely. You can sprinkle some extra red pepper flakes on top for an extra kick. Enjoy the beautiful colors and aroma of your dish! Pro Tips Use High-Quality Feta: Opt for Greek feta cheese for the best flavor and creaminess, as it melts beautifully and enhances the dish. Customize Your Veggies: Feel free to add other vegetables like bell peppers or zucchini to the mix for added color and nutrition. Adjust Spice Levels: If you enjoy heat, consider increasing the red pepper flakes or adding a dash of hot sauce to the dish before serving. Fresh Basil vs. Dried: Always use fresh basil for garnishing to elevate the flavor, but if unavailable, dried basil can be used during cooking. {{image_2}} You can switch up the cheese in this dish. Goat cheese or ricotta works great too. They add a different taste and texture. You can also try mixing in veggies. Zucchini and bell peppers bring fresh flavors. Cut them into small pieces and add them to the mix. If you need gluten-free options, use gluten-free pasta. Many good choices are available today. For vegans, there are plant-based cheeses that work well. You can even skip the cheese and add more veggies to keep it tasty. To brighten the dish, add lemon zest or juice. It lifts the flavors and adds a nice zing. You can also mix in fresh herbs like parsley or thyme. They give your dish a new twist and make it extra special. To keep your Baked Feta Pasta fresh, store it in an airtight container. Place it in the fridge right after it cools. This helps keep the flavors strong. If you want to freeze it, let it cool completely. Then, put it in a freezer-safe bag or container. Remove as much air as possible to avoid freezer burn. This makes it last longer. Baked Feta Pasta lasts about 3 to 5 days in the fridge. If you freeze it, it can last up to 3 months. Always check for signs of spoilage. If you see mold or an off smell, it’s best to toss it. Trust your senses to keep food safe. To reheat your pasta, the oven is best for texture. Preheat it to 180°C (350°F). Place the pasta in a baking dish, cover with foil, and heat for about 15-20 minutes. For a quick option, use the microwave. Heat it in short bursts, stirring in between. This helps it warm evenly. Always add a splash of water to keep it moist. If you cannot find feta, try goat cheese or ricotta. Both offer a creamy texture. You can also use vegan feta for a dairy-free option. Each choice brings its unique flavor. Yes, you can prepare the dish ahead. Bake the feta and tomatoes, then store them. Cook the pasta just before serving for the best taste. This recipe is already vegetarian! The feta cheese and vegetables make it hearty. Just ensure that any additional ingredients you add are also vegetarian. Penne or fusilli works best due to their shape. They hold the creamy sauce well. You can use other pasta shapes like rotini if you prefer. Absolutely! You can add grilled chicken, shrimp, or chickpeas for a protein boost. Just mix them in when you combine the pasta with the feta and tomatoes. This baked feta pasta is easy and fun to make. You learned the key ingredients, steps, and how to store leftovers. With simple swaps, you can make it your own. The options are endless, whether you prefer gluten-free or vegan. Remember to garnish with fresh basil for a great look. Enjoy this dish warm or as a cold salad. With just a few techniques, you can impress anyone who tries it. Try this recipe, and create a delicious meal for yourself or friends. Happy cooking!

Baked Feta Pasta with Cherry Tomatoes Delightful Dish

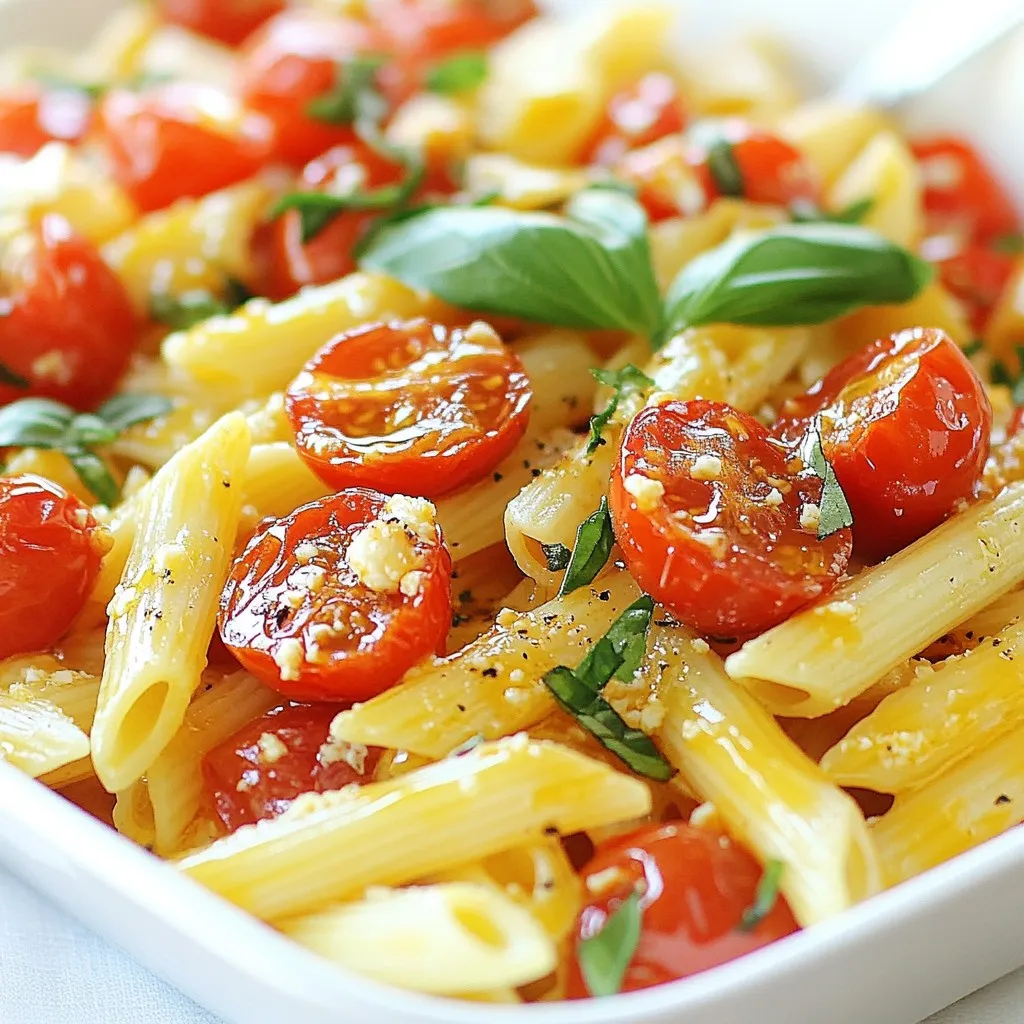
Are you ready to experience a dish that’s both simple and delicious? Baked Feta Pasta with Cherry Tomatoes is a

- 1 lb chicken breast, cut into bite-sized pieces - 1/4 cup honey - 1/4 cup low-sodium soy sauce - 3 cloves garlic, minced - 1 tablespoon fresh ginger, grated - 1 tablespoon cornstarch - 2 tablespoons vegetable oil - 1 tablespoon sesame seeds - 2 green onions, chopped (for garnish) - Salt and pepper to taste To make honey garlic chicken bites, you need some simple and tasty items. First, I use one pound of chicken breast. Cut it into small, bite-sized pieces. This helps the chicken cook evenly and makes it easy to eat. Next, gather the marinade ingredients. You will need one-fourth cup of honey. This adds sweetness and a nice glaze. Then, pour in one-fourth cup of low-sodium soy sauce. This will give the chicken a savory flavor. You also need three cloves of minced garlic. Garlic adds a strong flavor that pairs perfectly with honey. Don’t forget one tablespoon of fresh ginger, grated. Ginger adds warmth and brightness to the dish. Lastly, add one tablespoon of cornstarch. This helps thicken the sauce later. For cooking, you’ll need two tablespoons of vegetable oil. This oil will keep the chicken from sticking to the pan. You will also use one tablespoon of sesame seeds. These will add crunch and flavor when you serve the dish. Lastly, have two green onions chopped for garnish. They add color and freshness. Don’t forget salt and pepper to taste. With these ingredients, you can create a delicious meal that everyone will love. {{ingredient_image_1}} Start by making the marinade. In a medium bowl, whisk together these ingredients: - 1/4 cup honey - 1/4 cup low-sodium soy sauce - 3 cloves garlic, minced - 1 tablespoon fresh ginger, grated - 1 tablespoon cornstarch Mix them well until they blend smoothly. Next, add 1 pound of chicken breast pieces to the bowl. Make sure every piece gets coated with the marinade. This step is key for flavor. Let the chicken sit for 20 minutes. This allows the marinade to soak in. Now, heat 2 tablespoons of vegetable oil in a skillet over medium-high heat. Once the oil is hot, add the marinated chicken pieces. Do not stir for the first 4 to 5 minutes. This helps the chicken get a nice golden crust. After that, stir the chicken and let it cook for another 5 to 7 minutes. Keep stirring until the chicken is no longer pink inside. If the sauce seems thin, take the chicken out just before it finishes cooking. Let the sauce bubble for a minute. Then return the chicken to the pan. This will thicken the sauce and coat the chicken nicely. Season with salt and pepper to taste. Before serving, sprinkle sesame seeds and chopped green onions on top. Enjoy your delicious honey garlic chicken bites! Marinating your chicken is key for great flavor. Let it sit for at least 20 minutes. This time helps the chicken soak up all the tasty marinade. The honey, soy sauce, and garlic work best when the chicken has time to absorb them. The skillet's temperature matters too. Heat your oil on medium-high. This helps the chicken get a nice golden crust. If the skillet is too hot, the outside cooks fast, but the inside stays raw. Aim for even cooking for the best bites. When serving, presentation counts. Use a large bowl to display the honey garlic chicken bites. Garnish with extra green onions and sesame seeds for a pop of color. This makes your dish look as good as it tastes! Pair your chicken with steamed rice or a fresh salad. Rice soaks up the sauce well, and salad adds a crunchy texture. These sides create a well-rounded meal that everyone will love. Pro Tips Marinate Longer: For enhanced flavor, marinate the chicken for at least 1 hour or overnight in the refrigerator. Use Fresh Ingredients: Fresh garlic and ginger will provide a more vibrant flavor compared to powdered versions. Adjust Sauce Consistency: If the sauce is too thick, add a splash of water or chicken broth to reach your desired consistency. Serve with Sides: Pair with steamed vegetables or a fresh salad to make the meal complete and nutritious. {{image_2}} To bake these chicken bites, you will need to adjust the cooking method. First, preheat your oven to 400°F (200°C). Then, line a baking sheet with parchment paper. After marinating the chicken, spread the pieces evenly on the sheet. This will help them cook well. Bake for 15-20 minutes. Flip the chicken halfway through to ensure even cooking. The bites should be golden and cooked through when done. Use a meat thermometer to check that they reach 165°F (74°C). Frying the chicken gives it a crispy outside. It creates a rich flavor that many enjoy. Pan-searing is a healthier choice, using less oil. This method still gets a nice crust while keeping the chicken tender. The choice affects the taste and texture. Fried chicken bites are richer and crispier. Pan-seared bites taste lighter and keep more moisture. Each method can lead to delicious chicken bites, so pick what suits your taste! To keep your honey garlic chicken bites fresh, store them in an airtight container. Place them in the fridge within two hours of cooking. They will last up to three days. If you want to store them longer, freeze them in a freezer-safe bag. Remove as much air as possible before sealing. They can last up to three months in the freezer. When you’re ready to eat, just thaw them in the fridge overnight. To reheat honey garlic chicken bites, use the oven for the best texture. Preheat your oven to 350°F (175°C). Place the chicken bites on a baking sheet and cover them with foil. Heat for about 15-20 minutes. This method keeps them crispy. You can also use a microwave if you're in a hurry. Place the chicken on a microwave-safe plate and cover it with a damp paper towel. Heat in short bursts of 30 seconds until warm, but this may make them less crispy. Enjoy your delicious bites! Yes, you can use chicken thighs. Thighs add more flavor and stay juicy. They have more fat than breasts, which helps keep the meat tender. You can cut thighs into bite-sized pieces just like the breast. Cooking time may vary slightly, so check for doneness. Always ensure the meat is no longer pink inside. To add heat, try these simple tips: - Add red pepper flakes to the marinade. Start with a small amount. - Use spicy soy sauce instead of regular. - Mix in some sriracha or chili paste to your sauce. - Add minced jalapeño or other hot peppers to the pan while cooking. These options will give your honey garlic chicken bites a nice kick! Yes, there are great vegetarian options! You can use tofu or tempeh instead of chicken. Cut them into bite-sized pieces, just like the chicken. Marinate them in the same honey garlic sauce. Cook them in the skillet until they are golden brown. You can also use mushrooms for a different texture and flavor. Just remember to adjust the cooking time based on the ingredient you choose. This blog post covered a tasty honey garlic chicken recipe. You learned about the key ingredients and step-by-step cooking tips. Marinating the chicken boosts flavor, and presentation makes it special. Think about oven-baking or frying for different tastes. Don't forget to store leftovers properly to enjoy later. Experiment with variations based on your taste. Cooking can be fun and easy, so get started! Enjoy your meal!

Honey Garlic Chicken Bites Flavorful and Easy Recipe

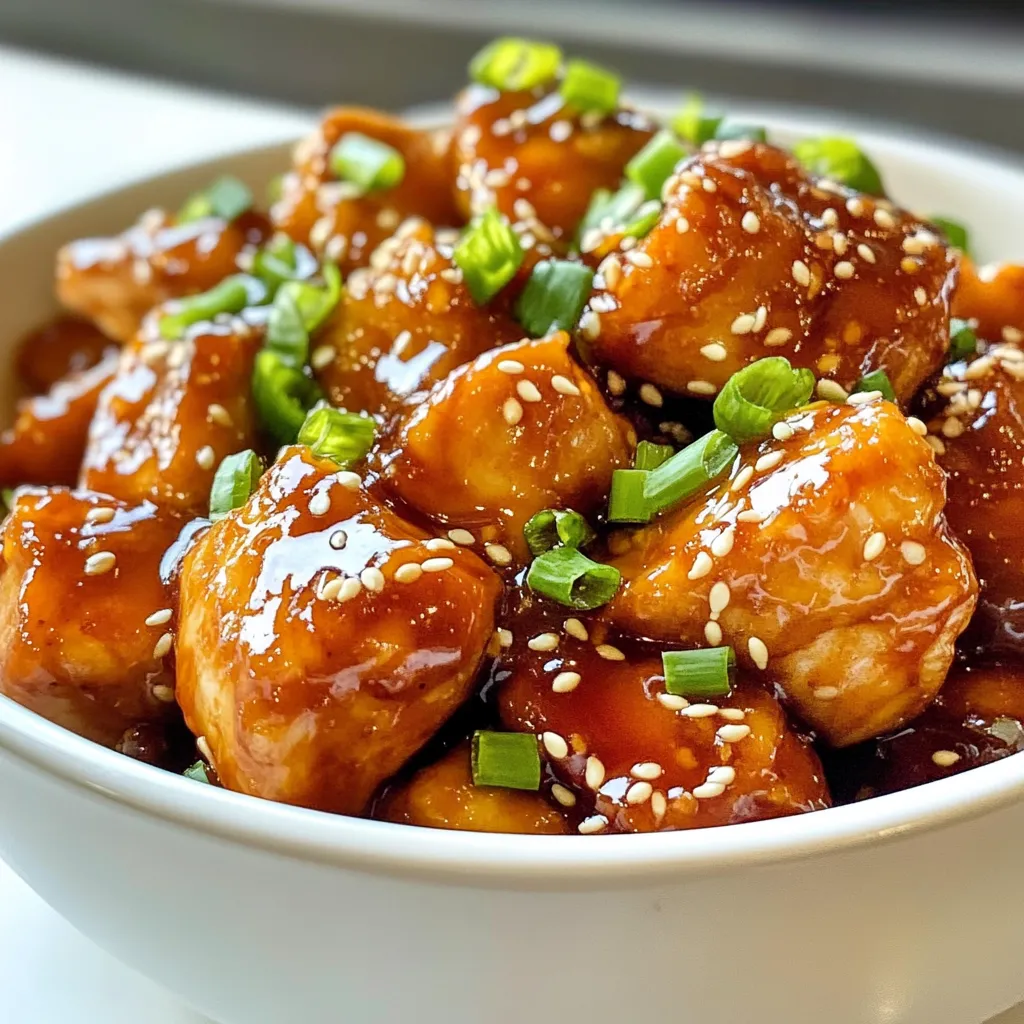
Looking for a quick and tasty meal? Try my Honey Garlic Chicken Bites! This easy recipe offers mouthwatering flavors and

- 3 cups Rice Krispies cereal - 1 cup creamy peanut butter - 1 cup chocolate chips (milk or dark) - ½ cup honey or maple syrup - 1 teaspoon vanilla extract - A pinch of salt - ½ cup mini marshmallows (for extra chewiness) When making Chocolate Peanut Butter Rice Krispie Squares, you need a few key ingredients. The Rice Krispies cereal gives the squares a crunchy texture. Creamy peanut butter adds a rich taste and helps bind everything together. Chocolate chips are a must for that sweet, chocolatey layer on top. Honey or maple syrup acts as a sweetener. You can choose one based on your taste. If you want to enhance the flavor, add vanilla extract. A pinch of salt can balance the sweetness, making each bite better. If you like chewiness, mini marshmallows are a fun option. These ingredients work together to create a treat that is both tasty and easy to make. You can find them in most grocery stores. Remember, quality matters! Use fresh ingredients for the best results. {{ingredient_image_1}} 1. Start by making the peanut butter mix. In a medium saucepan, add 1 cup of creamy peanut butter, ½ cup of honey or maple syrup, and a pinch of salt. Heat this over low heat. Stir it well until the mix is smooth and melted. This step gives the squares their rich flavor. 2. Once the mix is smooth, remove it from heat. Now, add 1 teaspoon of vanilla extract. Stir again until everything blends nicely. This adds a lovely aroma to your squares. 3. Grab a large mixing bowl. Pour in 3 cups of Rice Krispies cereal. If you like a little extra chewiness, add ½ cup of mini marshmallows to the cereal. Gently mix them together. The marshmallows add a fun texture. 4. Next, pour the warm peanut butter mixture over the Rice Krispies. Use a spatula to stir it all together. Make sure every piece of cereal is coated well. This helps keep the squares together. 5. Now, take a greased 9x9-inch baking pan. Press the mixture firmly into the pan. Spread it out evenly. Packing it tightly helps the squares hold their shape. 6. For the chocolate layer, melt 1 cup of chocolate chips in a microwave-safe bowl. Do this in 30-second bursts, stirring in between. Keep going until the chocolate is smooth. 7. Pour the melted chocolate over the Rice Krispie mixture. Use a spatula to spread it evenly. This chocolate layer adds sweetness and makes your squares look nice. 8. Let your squares cool for at least 30 minutes. You can also speed this up by placing them in the refrigerator. Once set, cut them into squares. Now they are ready to enjoy! To make your Chocolate Peanut Butter Rice Krispie Squares perfect, you need to press the mixture well. After you mix the Rice Krispies with the peanut butter, use a spatula or your hands to pack it tightly into the pan. This helps the squares hold their shape when cut. Choosing the right chocolate is also key. I like to use milk chocolate for a sweet touch or dark chocolate for a rich flavor. Melt it slowly in the microwave, stirring often. This way, it stays smooth and creamy. Presentation matters! I suggest placing the squares on a pretty plate. You can sprinkle extra chocolate chips or crushed peanuts on top. This adds a nice touch and makes them look fancy. Pair these treats with a cold glass of milk. They go well together! You can also serve them with coffee or tea. The sweet flavors balance really well. One big mistake is overheating the peanut butter. Heat it on low and stir constantly. If it gets too hot, it can separate and become oily. Another mistake is not cooling the squares long enough. Let them cool for at least 30 minutes. If you rush this step, they may fall apart when you cut them. Patience pays off! Pro Tips Use Fresh Ingredients: Ensure your peanut butter and chocolate chips are fresh for the best flavor and texture. Customize Your Mix-ins: Feel free to add nuts, dried fruit, or other mix-ins for added flavor and texture. Cooling Time Matters: Allow the squares to cool completely for the best cutting results; warm bars may crumble. Storage Tips: Store in an airtight container at room temperature or refrigerate for longer shelf life. {{image_2}} You can easily change the taste of your Chocolate Peanut Butter Rice Krispie Squares. One fun way is by adding nuts or seeds. Chopped almonds, walnuts, or sunflower seeds give great crunch and flavor. They also add healthy fats and protein. Try mixing in about ½ cup of your favorite nuts or seeds for a tasty twist. Another option is to use different flavored chocolate. You can swap out milk chocolate for dark or white chocolate. Each type brings its own unique taste. For a fun twist, try mint or orange-flavored chocolate. Just melt it the same way and pour it over your squares. If you're looking to make these squares gluten-free, simply check your Rice Krispies. Many brands are now gluten-free! Always read the label to be sure. You can also replace honey or maple syrup with agave syrup if you prefer. For vegan options, choose dairy-free chocolate chips. You can use almond butter or cashew butter instead of peanut butter. This keeps the flavor while making it vegan-friendly. You can serve these squares in fun ways! Cut them into mini bars or bites for a party. They are perfect for sharing! For a layered dessert, try adding a layer of whipped cream or ice cream on top. You can even stack them with other treats like brownies or cheesecake. These simple variations let you create a unique treat every time! To keep your Chocolate Peanut Butter Rice Krispie Squares fresh, store them in an airtight container. This helps keep them chewy and tasty. You can layer squares with parchment paper to prevent sticking. They will stay fresh for about 5 days at room temperature. If you want to extend their life, consider placing them in the fridge, where they can last up to 10 days. If you want to freeze these treats, first cut them into squares. Wrap each square tightly in plastic wrap. Then place them in a freezer-safe bag or container. They can stay in the freezer for about 3 months. When you're ready to enjoy them, take them out and let them thaw in the fridge or at room temperature. This keeps them soft and delicious. Making these squares is quick and fun! You need about 10 minutes to prep. The total time is around 40 minutes. This includes the time to let them cool. Most of the time is just waiting for the squares to set. Perfect for a sweet treat in no time! Yes, you can use crunchy peanut butter! It gives a nice texture. You will get little bits of peanuts in every bite. This adds a fun crunch to the squares. The flavor stays the same, but the texture changes. If you love that crunch, go for it! If you don’t have honey or maple syrup, don’t worry! You can use agave nectar or corn syrup. Both will work well in this recipe. They add sweetness and help bind the mixture. Just keep in mind that the flavor might change slightly. But the squares will still be tasty! We covered the key ingredients for Chocolate Peanut Butter Rice Krispie Squares and how to make them. The simple steps and handy tips can help you create a delicious treat with ease. Remember, you can mix up flavors or make dietary swaps to suit your needs. These bars are great for sharing or storing for later. Enjoy your tasty creations, and don’t forget to try new variations for fun!

Chocolate Peanut Butter Rice Krispie Squares Delight

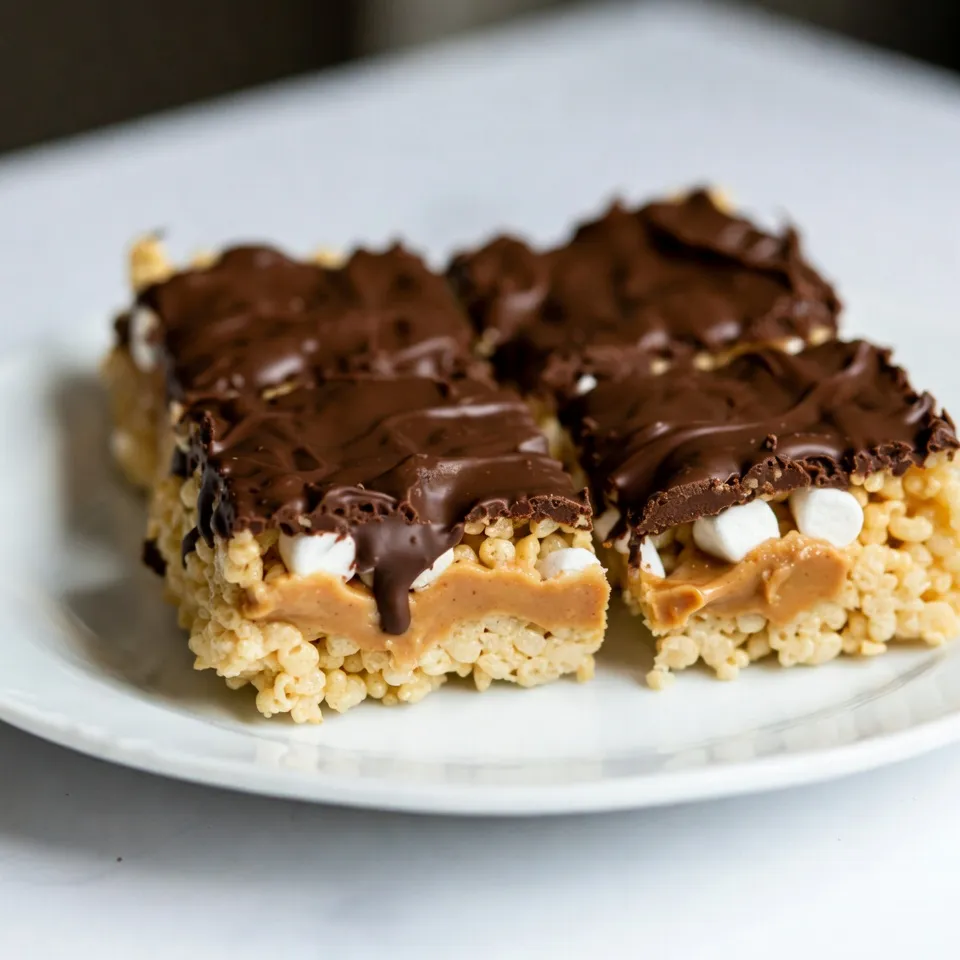
Welcome to the sweet world of Chocolate Peanut Butter Rice Krispie Squares Delight! If you love quick and tasty treats,

- 4 medium sweet potatoes, peeled and cubed - 3 tablespoons maple syrup - 2 tablespoons olive oil - 1 teaspoon ground cinnamon - 1/2 teaspoon nutmeg - Salt and pepper to taste - 1/4 cup chopped pecans (optional) - Fresh parsley for garnish (optional) You can add chopped pecans for a nutty crunch. Fresh parsley can brighten the dish. Both are not needed but enhance the meal. If you don’t have sweet potatoes, try butternut squash. It has a similar taste and texture. Honey can replace maple syrup if you want a different sweet flavor. Use coconut oil instead of olive oil for a unique twist. If you lack nutmeg, just increase the cinnamon. {{ingredient_image_1}} Start by peeling the sweet potatoes. Then, cut them into cubes. Aim for even pieces for even cooking. In a large bowl, mix the cubed sweet potatoes with maple syrup and olive oil. Add ground cinnamon, nutmeg, salt, and pepper. Toss well until every piece is coated. This step is key to getting that sweet flavor in each bite. Preheat your oven to 425°F (220°C). Line a baking sheet with parchment paper for easy cleanup. Spread the sweet potatoes on the sheet in a single layer. Make sure they have some space. If they are too close, they won’t roast well. Roast them for 25 to 30 minutes. Stir halfway through to help them cook evenly. They should be tender and caramelized when done. If you want a crunchy texture, add chopped pecans during the last 5 minutes of roasting. Let the sweet potatoes cool for a few minutes after roasting. You can sprinkle fresh parsley on top for a pop of color. Serve them warm as a side dish or a tasty snack. They pair well with roasted meats or can be enjoyed on their own. The maple and cinnamon flavors make them a hit at any meal. When picking sweet potatoes, look for firm ones with smooth skin. Avoid any with soft spots or blemishes. Medium-sized sweet potatoes work best for this recipe. They cook evenly and give you a great texture. To roast sweet potatoes evenly, cut them into uniform cubes. Aim for about 1-inch pieces. This size helps them cook at the same rate. Spread the cubes in a single layer on your baking sheet. If they are too close, they will steam instead of roast. Stir halfway through to ensure they brown nicely. Spices can take your sweet potatoes to the next level. Start with ground cinnamon and nutmeg, as they pair well with maple syrup. Add a pinch of salt to balance the sweetness. For a kick, try a dash of cayenne pepper. If you love nuts, sprinkle chopped pecans on top before the last few minutes of roasting. They add a nice crunch and extra flavor. Pro Tips Choose the Right Sweet Potatoes: Look for firm, smooth sweet potatoes without blemishes for the best texture and flavor. Don’t Skip the Parchment: Lining your baking sheet with parchment paper not only helps with cleanup but also prevents sticking. Experiment with Spices: Feel free to add other spices like ginger or cloves to enhance the flavor profile of your roasted sweet potatoes. Serve Immediately: For the best taste and texture, serve your roasted sweet potatoes right after they come out of the oven while they’re still warm. {{image_2}} You can easily make this dish vegan and gluten-free. The base ingredients are already vegan. Just use pure maple syrup and check your olive oil. Both options are gluten-free. If you want a nut-free option, skip the pecans. The sweet potatoes shine on their own or with herbs. Add fun toppings to change the flavor. Try adding apple slices or dried cranberries for a sweet twist. You can mix in chopped apples before roasting for added sweetness. For a savory kick, sprinkle some feta cheese once they are done. Fresh herbs like thyme or rosemary work great too. Want to switch up the flavors? You can use different syrups to change the taste. Try using honey instead of maple syrup. This will give a nice floral note. For a spicy kick, add a pinch of cayenne pepper. You can also swap cinnamon for pumpkin spice for a fall vibe. After making maple cinnamon roasted sweet potatoes, let them cool. Store them in an airtight container. They stay fresh in the fridge for up to four days. To keep them tasty, avoid adding toppings until ready to eat. You can freeze roasted sweet potatoes for later. Cool them completely, then spread them on a baking sheet. Freeze for about an hour until firm. Transfer the sweet potatoes to a freezer-safe bag. They last for up to three months in the freezer. When you're ready to enjoy your sweet potatoes, reheating is easy. For the best results, use the oven. Preheat it to 350°F (175°C). Spread the sweet potatoes on a baking sheet. Heat for about 10-15 minutes until warm. You can also use a microwave. Just heat them in short bursts, stirring in between. Enjoy them hot! Yes, you can make these sweet potatoes ahead of time. Cook them fully and let them cool. Store them in an airtight container in the fridge. To reheat, place them on a baking sheet and warm in the oven at 350°F until heated through. This keeps the flavors rich and the texture nice. Roasted sweet potatoes pair well with many dishes. You can serve them with grilled chicken or fish for a balanced meal. They also work great as a side for a hearty salad or a warm grain bowl. Try adding them to tacos or wraps for a fun twist. To change the sweetness, simply add more or less maple syrup. If you want a less sweet dish, cut the syrup by half. For a sweeter flavor, add a bit more syrup. You can also balance sweetness with a touch of salt or spices like cayenne. You now have a complete guide to making delicious maple cinnamon roasted sweet potatoes. We covered all the key ingredients, step-by-step instructions, and helpful tips. You learned about variations and storage options too. Use this knowledge to create your own tasty dishes. Don’t forget to explore ingredient substitutions and different serving styles. Enjoy cooking, and feel free to get creative with flavors. Happy roasting!

Maple Cinnamon Roasted Sweet Potatoes Flavor Boost

Looking for a tasty side dish that shines at every meal? Maple Cinnamon Roasted Sweet Potatoes offer a delightful mix

To make the creamy roasted garlic mashed potatoes, you need the following ingredients: - 2 pounds Yukon Gold potatoes, peeled and cut into cubes - 1 whole head of garlic - 1 cup heavy cream - 4 tablespoons unsalted butter - Salt and pepper to taste - 2 tablespoons fresh chives, chopped (for garnish) - 1 teaspoon olive oil These ingredients work together to create a rich and savory dish. Yukon Gold potatoes give a buttery taste and creamy texture. Roasted garlic adds a sweet and rich flavor. Heavy cream and butter create a smooth mouthfeel that makes every bite delightful. Don't forget to use fresh chives for a nice garnish and added taste. Make sure your garlic is whole and fresh to achieve the best flavor. Each ingredient plays a key role in making this dish a hit. The balance of flavors makes these mashed potatoes a perfect side dish for any meal. {{ingredient_image_1}} First, preheat your oven to 400°F (200°C). This warms up the oven for roasting. Next, take the whole head of garlic. Slice off the top to show the cloves. Drizzle a little olive oil on it. Wrap the garlic in aluminum foil. Place it in the oven. Roast it for about 30-35 minutes. The cloves will turn soft and sweet. While the garlic roasts, grab 2 pounds of Yukon Gold potatoes. Peel them and cut them into cubes. Place the cubes in a large pot. Cover them with cold water. Add a generous pinch of salt. Bring the water to a boil. Then, lower the heat to a simmer. Cook the potatoes until they are tender, about 15-20 minutes. Once the potatoes are soft, drain them. Return them to the pot. Now, squeeze the roasted garlic cloves into the pot. Add 1 cup of heavy cream and 4 tablespoons of unsalted butter. Mash everything together. You can use a potato masher or a hand mixer for a fluffier texture. Season with salt and pepper to taste. Mix well. Your creamy roasted garlic mashed potatoes are ready to serve! Garnish with fresh chives for color and flavor. To create the best mashed potatoes, start with Yukon Gold potatoes. They offer a creamy texture. Make sure to cut them into even cubes. This helps them cook evenly. After boiling, drain the potatoes well. Excess water can make them watery. Use a potato masher or a hand mixer. For fluffier potatoes, mix them gently. Avoid over-mixing to keep them light. Roasting garlic adds a sweet and nutty flavor. This enhances the taste of the potatoes. Don't skip the heavy cream and butter. They create a rich and smooth base. Adjust the salt and pepper to your liking. You can also add some grated cheese for extra creaminess. Fresh chives on top add a nice color and taste. If you're short on time, use a food processor. It can mash the potatoes quickly. You can roast the garlic ahead of time too. Store it in the fridge for a few days. Boil the potatoes while the garlic roasts. This cuts down the overall cooking time. Set a timer for each step to stay on track. Pro Tips Use Yukon Gold Potatoes: These potatoes have a buttery flavor and creamy texture, making them ideal for mashed potatoes. Don't Rush the Roasting: Roasting garlic slowly at a lower temperature enhances its sweetness and depth of flavor. Warm the Cream and Butter: Heating the cream and butter before adding them to the potatoes helps maintain the temperature and ensures a creamy consistency. Experiment with Add-ins: Try adding sour cream, cream cheese, or even roasted garlic for a different flavor twist. {{image_2}} You can use other potato types for your creamy roasted garlic mashed potatoes. Russet potatoes work well for a fluffier texture. They have a high starch content that makes them light. Red potatoes give a creamier taste but keep some texture. They have a smooth skin and cook quickly. Sweet potatoes are another fun twist. They add a touch of sweetness and a vibrant color. Just remember to adjust your cooking time based on the potato type. If you want a dairy-free version, you have great choices. Instead of heavy cream, use coconut milk or almond milk. They both add a nice flavor. You can also swap butter for a plant-based option like vegan butter. Another idea is to use olive oil for a lighter dish. This keeps your mashed potatoes creamy without any dairy. Be sure to check the labels for hidden dairy. Herbs and spices can make your mashed potatoes even better. Fresh herbs like rosemary or thyme add an earthy taste. Chives are a classic choice; they give a mild onion flavor. For a spicy kick, add a pinch of cayenne pepper or garlic powder. You can also mix in some cheese if you like. Parmesan or cheddar can add a rich, savory note. Just remember to mix them in gently to keep the creamy texture. You can store leftover creamy roasted garlic mashed potatoes in the fridge. Place them in an airtight container. They will stay fresh for up to three days. Make sure to let them cool completely before sealing. This helps keep them creamy. To freeze mashed potatoes, first cool them fully. Then, pack them in a freezer-safe container. They can last up to two months in the freezer. When you want to use them, defrost them overnight in the fridge before reheating. Reheating mashed potatoes is easy. You can use the microwave or stove. If using a microwave, heat in short bursts. Stir in between to warm evenly. On the stove, add a splash of heavy cream or milk to keep them creamy. Heat gently on low until warm. Yes, you can make these mashed potatoes ahead of time. Cook and mash them as usual. Then, store them in an airtight container. Keep them in the fridge for up to three days. When you are ready to serve, reheat them gently on the stove or in the microwave. Stir in a little extra cream or butter to keep them creamy. You can use milk or half-and-half as a lighter option. For a richer taste, try using sour cream or cream cheese. If you want a dairy-free choice, coconut milk works well. Just remember, these substitutes may change the flavor a bit, but they can still create a tasty dish. To make these mashed potatoes vegan, replace the heavy cream with almond milk or any plant-based milk. Use vegan butter instead of unsalted butter to keep the flavor rich. You can also add nutritional yeast for a cheesy taste. This way, you still enjoy creamy mashed potatoes without any animal products. This blog covered how to make creamy mashed potatoes. We listed key ingredients, such as Yukon Gold potatoes and garlic. I shared step-by-step instructions for preparing, cooking, and seasoning them. You learned useful tips to get the best texture and flavor. I also offered variations to suit your taste and storage advice. Now you can create delicious mashed potatoes anytime. Enjoy experimenting with flavors and making this classic dish your own.

Creamy Roasted Garlic Mashed Potatoes Delightful Recipe

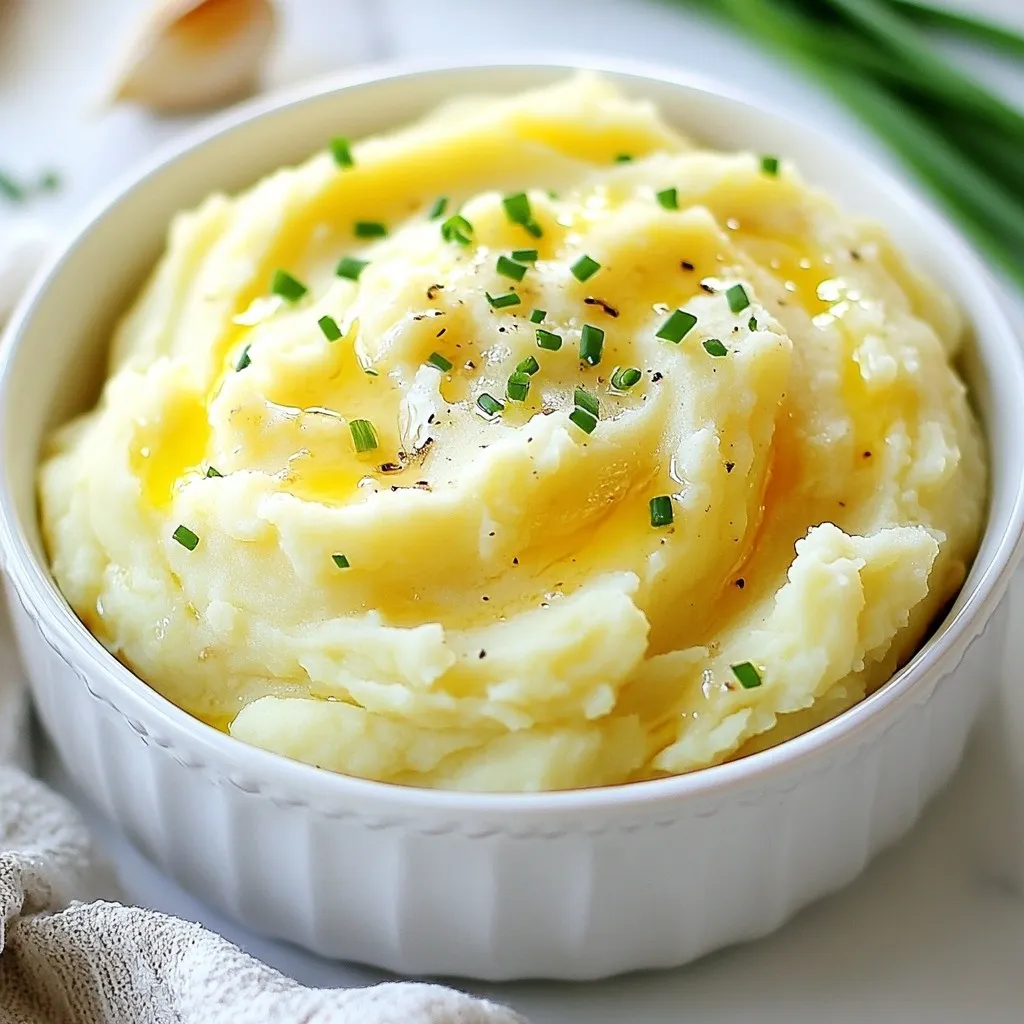
Get ready to elevate your comfort food game with my creamy roasted garlic mashed potatoes! This delightful recipe transforms simple

- 1 lb chicken breast, cut into 1-inch cubes - Salt and pepper to taste - 1/4 cup honey - 1/4 cup fresh lime juice - 2 tablespoons olive oil - 2 cloves garlic, minced - 1 teaspoon ground cumin - 1/2 teaspoon chili powder - Wooden or metal skewers (if using wooden skewers, soak in water for 30 minutes) - Grill or grill pan - Mixing bowl - Whisk The main ingredients form the base of the skewers. Fresh chicken is key for tenderness. Salt and pepper bring out the best flavors. The marinade adds a burst of taste. Honey gives sweetness, while lime juice adds zing. Olive oil keeps the chicken moist. Garlic brings depth, and spices enhance the flavor. For equipment, skewers hold everything together. Make sure to soak wooden skewers in water. This prevents them from burning on the grill. A grill or grill pan helps cook the chicken evenly. A mixing bowl and whisk make it easy to mix the marinade. {{ingredient_image_1}} To start, gather your ingredients for the marinade. You need: - 1/4 cup honey - 1/4 cup fresh lime juice - 2 tablespoons olive oil - 2 cloves garlic, minced - 1 teaspoon ground cumin - 1/2 teaspoon chili powder - Salt and pepper to taste In a mixing bowl, whisk these together. The honey adds sweetness, while lime brings a zesty kick. Olive oil keeps the chicken moist. Garlic adds a nice taste, and spices give it depth. Next, prepare your chicken. Cut 1 pound of chicken breast into 1-inch cubes. This size helps the chicken cook evenly. Add the chicken to the bowl with the marinade. Mix well to coat each piece. Cover the bowl and refrigerate it for at least 30 minutes. For more flavor, let it sit for up to 2 hours. When ready, preheat your grill to medium-high heat. Thread the marinated chicken pieces onto skewers. If you use wooden skewers, soak them in water for 30 minutes first. This step helps prevent burning. Place the skewers on the grill and cook for 10-12 minutes. Turn them occasionally. You want them golden brown with nice grill marks. Check that the chicken reaches 165°F (75°C) inside. After grilling, let them rest for a few minutes. Garnish with fresh cilantro before serving. Enjoy your tasty skewers! To grill chicken perfectly, start with even-sized pieces. This helps them cook at the same rate. Preheat your grill to medium-high heat for the best results. Use a meat thermometer to check doneness. Aim for an internal temperature of 165°F (75°C). This keeps the chicken juicy and tender. You can customize the marinade to suit your taste. Like it sweet? Add more honey. Prefer a kick? Increase the chili powder. Try adding fresh herbs like thyme or basil for a different flavor. Use lime zest for extra zing. Tasting the marinade before adding the chicken helps, too. For this recipe, you need a few key tools: - Mixing bowl - Whisk - Grill or grill pan - Meat thermometer - Skewers (wooden or metal) If using wooden skewers, soak them for 30 minutes. This prevents them from burning on the grill. A good quality grill brush can help keep the grill clean and ready for cooking. Pro Tips Marinate Longer for More Flavor: If time allows, marinate the chicken for up to 2 hours. This will enhance the flavor and tenderness of the meat. Use Fresh Lime Juice: Always opt for fresh lime juice instead of bottled for a brighter, more vibrant flavor in your marinade. Check for Doneness: Use a meat thermometer to ensure your chicken reaches an internal temperature of 165°F (75°C) for safe consumption. Soak Skewers: If using wooden skewers, soak them in water for at least 30 minutes before grilling to prevent them from burning. {{image_2}} You can add colorful veggies to your skewers for more flavor and nutrition. Bell peppers, red onions, and zucchini work well. Cut these veggies into pieces similar in size to the chicken cubes. Toss them in the same marinade for a tasty mix. Skewering chicken and veggies together makes a fun and healthy meal. The veggies soak up the honey-lime flavor, making every bite delicious. If grilling isn’t an option, you can use your oven or broiler. Preheat your oven to 400°F (200°C). Place the skewers on a baking sheet lined with foil. Cook for about 15-20 minutes, flipping them halfway through. If using a broiler, set the oven to broil and place the skewers close to the heat. Cook for 10-12 minutes, turning often for even cooking. Both methods still give you juicy and tasty chicken. Want to mix up the flavor? Try adding spices or herbs. Cumin and chili powder give a nice kick, but you can add paprika or smoked paprika for extra depth. Fresh herbs like cilantro or parsley can brighten the dish. For a kick, add a pinch of cayenne pepper. The more you experiment, the more unique your honey lime chicken skewers will be! After enjoying your Honey Lime Chicken Skewers, you may have some left. Store them in an airtight container. They will stay fresh in the fridge for up to three days. Make sure they cool down before you seal them up. This helps keep the texture nice. If you want to keep your skewers longer, freezing is a great option. Wrap each skewer tightly in plastic wrap. Then, place them in a freezer bag. Make sure to squeeze out the air. They can last in the freezer for up to three months. When you're ready to eat, just thaw them in the fridge overnight. To reheat your skewers, you have a few options. You can use the oven, grill, or microwave. For the oven, preheat it to 350°F (175°C). Place the skewers on a baking sheet and cover with foil. Heat for about 10-15 minutes, or until they are warm. If using a grill, heat it to medium-low and grill for 5-7 minutes. For the microwave, place them on a plate and heat in short bursts, checking often. Enjoy your tasty skewers! Marinate the chicken for at least 30 minutes. This allows the flavors to soak in. You can also marinate it up to 2 hours for a stronger taste. The longer you marinate, the more flavorful the chicken will be. Just remember not to go too long, or the acid from the lime juice might start to toughen the chicken. Yes, you can use different meats for skewers. Chicken is great, but beef or shrimp works well too. Just adjust the cooking time based on the meat you choose. For example, shrimp cooks faster than chicken. Make sure to cut the meat into even pieces for even cooking. You can serve many sides with these skewers. Some great options are: - Rice or quinoa - Grilled vegetables - A fresh salad - Corn on the cob These sides add color and flavor to your meal. They also balance the sweetness of the honey lime chicken. Check the chicken with a meat thermometer. The internal temperature should be 165°F (75°C). If you don’t have a thermometer, cut a piece open. The meat should be white, and the juices should run clear. Avoid undercooking, as raw chicken can be unsafe to eat. Always ensure your chicken is cooked just right for the best taste. To sum up, making Honey Lime Chicken Skewers is easy and fun. You learned about the main ingredients, how to prepare them, and the grilling process. I shared useful tips for great results and offered fun variations. Store leftovers well or freeze for later use. With these tips, you can serve a tasty dish to impress anyone. Enjoy your cooking and make these skewers a family favorite!

Honey Lime Chicken Skewers Tasty Grilled Delight

If you’re hungry for a delicious meal that’s easy to make, I have just the recipe for you! Honey Lime

To make the Tuscan White Bean Chicken Skillet, gather these items: - 4 boneless, skinless chicken thighs - 1 can (15 oz) white beans, drained and rinsed (cannellini or great northern) - 1 cup cherry tomatoes, halved - 3 cups spinach (fresh or baby spinach) - 3 cloves garlic, minced - 1 medium onion, diced - 1 teaspoon dried oregano - 1 teaspoon dried basil - ½ teaspoon red pepper flakes (optional, for spice) - 2 tablespoons olive oil - Salt and pepper to taste - Fresh basil leaves for garnish You can swap ingredients in this recipe easily: - Use chicken breast instead of thighs if you prefer. - Any white bean works, such as navy or pinto beans. - Try grape tomatoes instead of cherry tomatoes for a different taste. - If you lack fresh spinach, frozen spinach is a good choice. Just thaw and squeeze out water. - Use onion powder if you don’t have a fresh onion. Using fresh ingredients enhances flavor. Here are some tips: - Fresh garlic gives a strong taste. Always use fresh if you can. - Fresh herbs, like basil, add a burst of flavor. Dried herbs work too but use less. - Canned beans save time. Rinse them to cut sodium. - Fresh spinach has a crisp bite. Canned or frozen is softer but still tasty. - Always check for quality. Fresh items should look vibrant and firm. This dish comes together with simple, quality ingredients for a tasty meal. Enjoy the blend of flavors! {{ingredient_image_1}} Start by gathering your ingredients. You will need: - 4 boneless, skinless chicken thighs - 1 can (15 oz) white beans, drained and rinsed - 1 cup cherry tomatoes, halved - 3 cups spinach - 3 cloves garlic, minced - 1 medium onion, diced - 1 teaspoon dried oregano - 1 teaspoon dried basil - ½ teaspoon red pepper flakes (optional) - 2 tablespoons olive oil - Salt and pepper to taste - Fresh basil leaves for garnish Make sure to wash the spinach and tomatoes. Drain and rinse the white beans. Dicing the onion and mincing the garlic ahead of time will save you effort later. Heat the olive oil in a large skillet over medium heat. Season the chicken thighs with salt, pepper, half the dried oregano, and half the dried basil. Once the oil is hot, add the chicken. Cook each side for 6-7 minutes. Look for a golden brown color and ensure they are fully cooked. Remove the chicken and set it aside on a plate. In the same skillet, add the diced onion. Cook it for about 3-4 minutes until it turns translucent. Add the minced garlic, the remaining oregano, basil, and red pepper flakes if you like some heat. Sauté for a minute until it smells amazing. Next, toss in the halved cherry tomatoes. Cook them for 2-3 minutes. They should soften nicely. Now, stir in the white beans and spinach. Cook until the spinach wilts, which takes about 3-4 minutes. Finally, return the chicken to the skillet. Nestle it among the beans and veggies. Let everything cook for an additional 2-3 minutes to blend the flavors. Taste and adjust seasoning if needed. Garnish with fresh basil leaves before serving. Enjoy your dish! To get the best texture in your Tuscan white bean chicken skillet, focus on cooking the chicken right. Start by using boneless, skinless chicken thighs. They cook evenly and stay juicy. Sear them in hot olive oil until golden brown. This step adds flavor and makes the chicken tender. When adding the spinach, don't overcook it. Just let it wilt. This keeps the spinach vibrant and adds nice texture. You can easily boost flavor in this dish. Try adding a splash of lemon juice before serving. This adds brightness and cuts through the richness. You can also toss in fresh herbs like thyme or parsley. They give a fresh taste that pairs well with the beans and chicken. If you like spice, increase the red pepper flakes. You can also add a dash of balsamic vinegar for depth. Each tweak offers a new twist on this simple dish. Avoid cooking the chicken at too high a heat. This can cause burning, making it dry. Cook it medium heat to get that nice golden color without burning. Don't forget to taste your dish before serving. Adjust the salt and pepper to your liking. This small step can make a big difference in flavor. Lastly, don't skip the garnish! Fresh basil enhances the look and taste. It’s a simple step that elevates your meal. Pro Tips Use Fresh Herbs: Fresh basil can elevate the dish’s flavor. Add it at the end of cooking to preserve its vibrant taste. Perfectly Cooked Chicken: To ensure the chicken thighs remain juicy, avoid overcooking. Use a meat thermometer; they should reach an internal temperature of 165°F (75°C). Enhance Flavor: A splash of balsamic vinegar can add depth to the dish. Drizzle it in during the last few minutes of cooking for a sweet and tangy finish. Meal Prep Friendly: This dish stores well in an airtight container in the fridge for up to three days, making it perfect for meal prep! {{image_2}} You can easily make this dish vegetarian. Just swap the chicken for more beans or mushrooms. Use 1 can of chickpeas or add 8 ounces of sliced mushrooms. Both options give you protein and flavor. Cook the mushrooms until soft. This change keeps the dish hearty and satisfying. Feel free to mix up your beans and veggies. Instead of white beans, try black beans or kidney beans. Each type brings a different taste. For veggies, add zucchini or bell peppers. Just chop them up and toss them in with the other ingredients. This adds color and nutrition to the skillet. Herbs and spices can change the flavor of your dish. Instead of oregano and basil, try thyme or rosemary. A pinch of smoked paprika adds a nice smoky taste. If you like heat, increase the red pepper flakes. Experiment with flavors to find your favorite mix. Each change can make the dish uniquely yours. To keep your Tuscan White Bean Chicken Skillet fresh, let it cool first. Place the dish in an airtight container. Store it in the fridge for up to three days. It’s best to keep the chicken and beans together to keep flavors strong. When you're ready to enjoy your leftovers, heat them gently. Place the skillet over medium heat. Add a splash of water or broth to keep it moist. Stir often until heated through, about 5-7 minutes. This way, your meal stays tasty and does not dry out. If you want to save some for later, freezing is a great option. Use a freezer-safe container to store the dish. Make sure to leave some space for expansion. This dish can freeze well for up to three months. To reheat, thaw overnight in the fridge before warming it up. Enjoy your meal with the same great taste! You can enjoy this dish with several sides. A simple green salad pairs well. Garlic bread or crusty bread is also great for soaking up the sauce. You might like to serve it with roasted vegetables for added flavor. For a heartier meal, consider pairing it with rice or quinoa. Yes, you can make this dish in advance. Cook it and let it cool completely. Store it in an airtight container in the fridge. It stays fresh for about three days. When ready to eat, just reheat it on the stove or in the microwave. The flavors will blend better after sitting for a bit. To check if the chicken is done, use a meat thermometer. The internal temperature should reach 165°F (75°C). If you don’t have a thermometer, cut into the thickest part of the chicken. The meat should be white, not pink. Juices should run clear. Always ensure the chicken is cooked through for safety. This blog post covered key ingredients for your dish, including swaps and tips for freshness. We shared step-by-step instructions to ensure perfect cooking and flavor. Tips and tricks helped you avoid common mistakes and achieve great texture. We also explored variations for vegetarian options and flavor enhancements. Finally, proper storage and reheating methods were discussed to keep your dish fresh. By following these tips, you can make a tasty meal that everyone will love. Now, get cooking!

Tuscan White Bean Chicken Skillet Tasty and Simple Dish

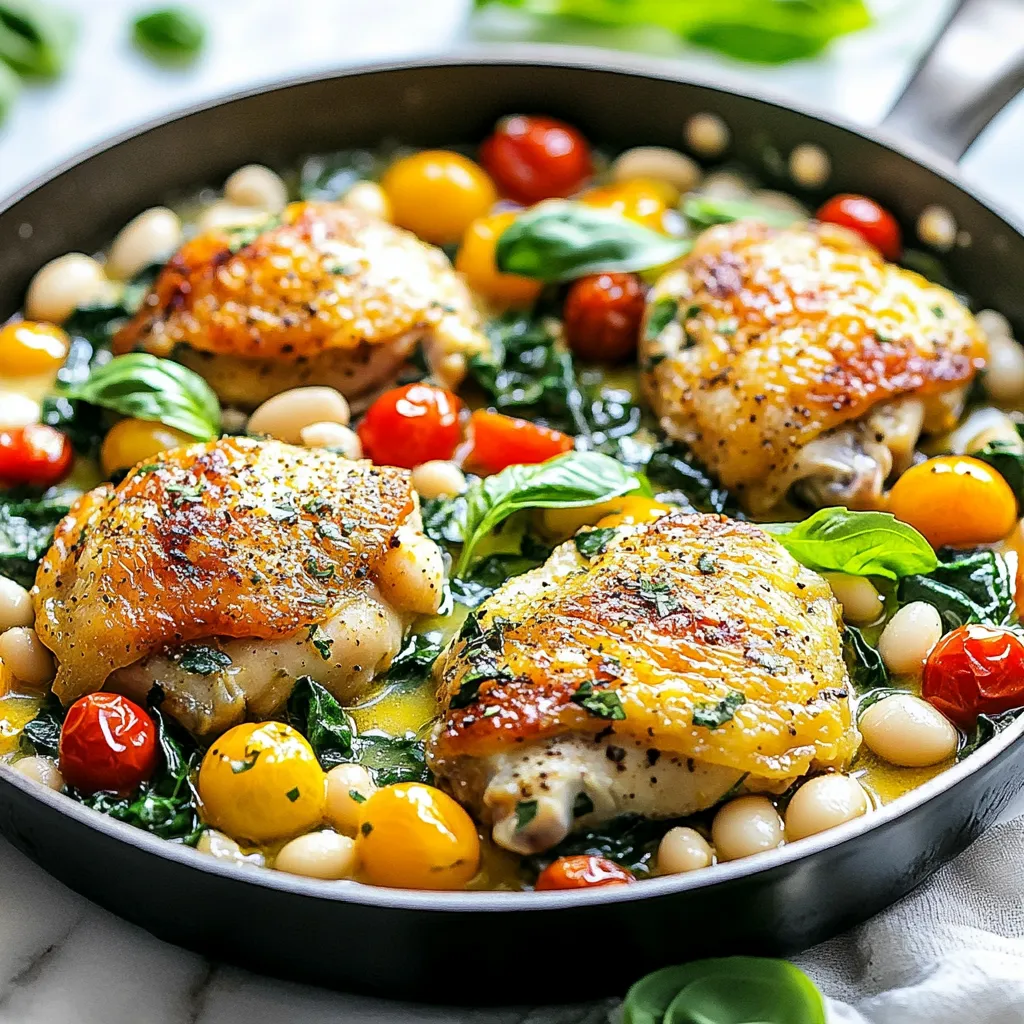
Looking for a quick yet satisfying meal? My Tuscan White Bean Chicken Skillet is just what you need! This dish

To make Spicy Buffalo Tofu Wraps, you will need: - 1 block (14 oz) firm tofu, pressed and sliced into strips - ½ cup buffalo sauce (store-bought or homemade) - 1 tablespoon olive oil - 1 teaspoon garlic powder - 1 teaspoon onion powder - ½ teaspoon smoked paprika - Salt and pepper to taste - 4 large whole wheat or spinach wraps - 1 cup shredded lettuce - 1 ripe avocado, sliced - ½ cup shredded carrots - ½ cup celery, thinly sliced - ¼ cup ranch dressing or vegan ranch dressing You can mix things up with simple swaps. If you want a different protein, try tempeh or seitan. For a dairy-free option, use vegan ranch dressing. If you don’t have smoked paprika, regular paprika works just fine. Whole wheat wraps can be replaced with gluten-free wraps. You can also use lettuce leaves for a low-carb version. Fresh ingredients make a big difference. When choosing tofu, look for firm or extra-firm varieties. Check the expiration date to ensure freshness. For veggies like lettuce, carrots, and celery, visit local farmers' markets if possible. They often have the best quality. Select ripe avocados that yield slightly when pressed. This shows they are ready to eat. Lastly, for buffalo sauce, a good quality brand will enhance the flavor of your wraps. {{ingredient_image_1}} To start, you need firm tofu. Press it to remove extra water. This step helps the tofu absorb flavors better. Slice the tofu into strips, about half an inch thick. In a bowl, mix olive oil, buffalo sauce, garlic powder, onion powder, smoked paprika, salt, and pepper. Add the tofu strips to the bowl. Toss gently until each piece is coated well. Preheat your oven to 400°F (200°C). Line a baking sheet with parchment paper. Spread the seasoned tofu strips on the baking sheet in a single layer. Make sure they don’t touch. Bake for 20 to 25 minutes. Flip the tofu halfway through. This helps them get crispy and golden all over. Once done, let them cool for a few minutes. Grab a large wrap and lay it flat. Spread a tablespoon of ranch dressing in the center. Layer the shredded lettuce, sliced avocado, shredded carrots, and thinly sliced celery on top. Add an even amount of the baked buffalo tofu strips on the veggies. Roll the wrap tightly, folding in the sides as you go. Cut the wrap in half diagonally. Repeat this for the remaining wraps. Serve them right away for the best taste! To get crispy tofu, start with firm tofu. Press it to remove extra water. This step helps the tofu absorb flavors and become crunchy. After pressing, slice the tofu into even strips. Toss the strips in olive oil and buffalo sauce. Add garlic powder, onion powder, smoked paprika, salt, and pepper for extra flavor. When baking, spread the tofu in a single layer on a lined baking sheet. Flip them halfway through cooking. Bake at 400°F for 20-25 minutes. This method gives you that delightful crunch. Want to add your spin? You can easily customize the flavor of your tofu. Try adding cayenne pepper for extra heat if you love spice. A dash of cumin can bring warmth and depth. You might also like a sprinkle of nutritional yeast for a cheesy taste. If you prefer a sweeter sauce, mix in a little maple syrup or honey. Each adjustment will make the wraps special. Feel free to experiment. The goal is to make it your own while still keeping that classic buffalo flavor. As you assemble your wraps, keep a few tips in mind. Start with a large wrap for easy rolling. Spread ranch dressing in the center to hold the ingredients. Layer your veggies first, then add the crispy tofu on top. This method keeps everything from spilling out. Roll the wrap tightly, folding in the sides as you go. This step is key for a secure wrap. After rolling, slice each wrap in half to show off the colorful layers. A beautiful presentation makes the meal even more inviting. Pro Tips Press Tofu Properly: Make sure to press the tofu for at least 30 minutes to remove excess moisture. This helps the tofu absorb more flavor and achieve a crispier texture when baked. Customize Your Heat Level: Adjust the amount of buffalo sauce according to your heat preference. For a milder version, mix in a bit of plain yogurt or mayo with the buffalo sauce. Fresh Ingredients Matter: Use fresh vegetables for maximum crunch and flavor in your wraps. Crisp lettuce, ripe avocados, and freshly shredded carrots will enhance your dish. Wrap It Right: When rolling your wraps, make sure to fold in the sides first to keep the filling secure. This technique prevents spills and makes for an easier eating experience. {{image_2}} You can easily boost your wraps with more veggies. Try adding bell peppers, spinach, or even cucumbers. These will add crunch and freshness. Just chop them into small pieces. Mix them in when you layer the wrap. More veggies mean more flavor and nutrition. If you need a vegan option, this recipe is already perfect! Use a gluten-free wrap to make it gluten-free. Many stores sell gluten-free wraps. Just check the label. You can also swap ranch dressing for a vegan version. This way, everyone can enjoy these tasty wraps. Want to change the taste? You can try different sauces! Instead of buffalo sauce, use barbecue sauce for a smoky flavor. Or try teriyaki sauce for a sweet and savory twist. Each sauce will create a unique wrap. Get creative and explore new flavors! To store leftover wraps, place them in an airtight container. This keeps them fresh. You can also wrap them in plastic wrap or foil. Make sure to refrigerate them. They will stay good for about 2-3 days. If you want to keep them longer, consider freezing. To reheat crispy tofu, use an oven or an air fryer. Preheat your oven to 350°F (175°C). Place the tofu on a baking sheet. Heat it for about 10-15 minutes. This helps keep the tofu crispy. If using an air fryer, set it to 350°F and cook for 5-7 minutes. Avoid using a microwave, as it makes the tofu soggy. You can freeze the wraps if you want to save them for later. First, wrap each one tightly in plastic wrap. Then place them in a freezer bag. Make sure to remove air before sealing. They can be frozen for up to 1 month. When ready to eat, thaw them in the fridge overnight. Reheat as described above for the best results. Yes, you can! Tempeh, seitan, or chicken work well. Tempeh has a nutty taste. Seitan mimics meat's texture. Chicken adds protein and pairs great with buffalo sauce. Adjust cooking times to ensure everything is cooked through. You have many options! Whole wheat wraps are healthy and sturdy. Spinach wraps add color and nutrients. You can also use corn tortillas for a gluten-free choice. If you want something different, try lettuce leaves for a low-carb option. Making buffalo sauce is easy! Combine ½ cup of hot sauce with ¼ cup of melted butter. For a vegan version, replace butter with olive oil or vegan butter. Add a splash of vinegar for tang. Mix until smooth, and adjust heat to your liking. Enjoy your homemade sauce on the wraps! This article covered all you need to make delicious Spicy Buffalo Tofu Wraps. We explored ingredients and substitutions, plus tips for sourcing fresh items. I shared step-by-step instructions for preparing and baking tofu and assembling the wraps. You learned tips for crispiness and flavor, along with tasty variations and storage info. These wraps are adaptable and fun. You can enjoy your time in the kitchen and impress friends with a yummy meal. Give these ideas a try!

Spicy Buffalo Tofu Wraps Bursting with Flavor

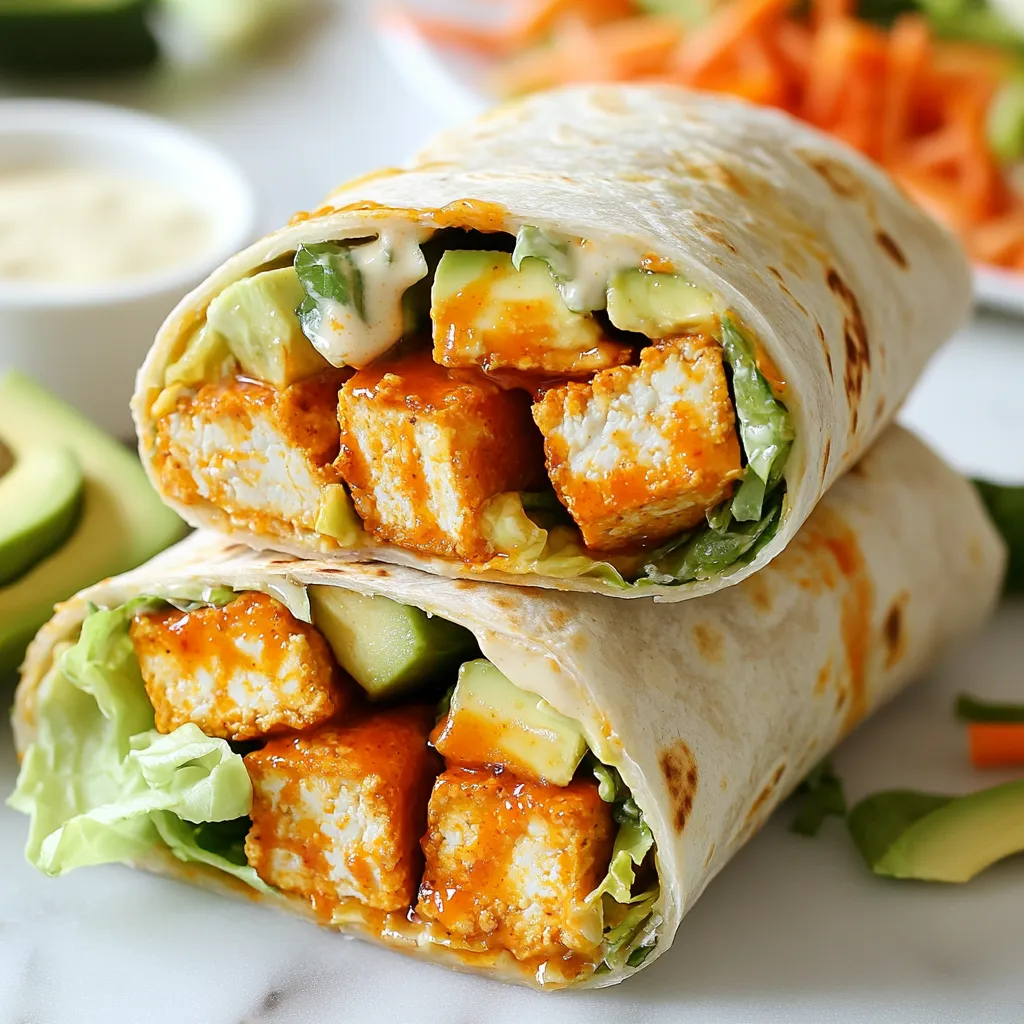
Are you ready to spice up your dinner routine? These Spicy Buffalo Tofu Wraps are packed with flavor and joy!

Older posts
Newer posts
← Previous Page1 … Page4 Page5 Page6 … Page158 Next →

dsad

© 2026 Recipes Pursuit • Built with GeneratePress

Our Policies

  • Copyright Policy
  • Cookie Policy
  • GDPR Policy
  • Privacy Policy
  • Disclaimer
  • Terms Of Use

More Information

  • Home
  • About
  • Contact
  • Appetizers
  • Dessert
  • Dinner
  • Drinks
©2026, Recipes Pursuit About Back To Top