Skip to content
DisclaimerTerms Of UseGDPR PolicyCookie Policy

Recipes Pursuit

  • Home
  • Drinks
  • Appetizers
  • Dinner
  • Dessert
  • About
  • Contact
  • Privacy Policy
DisclaimerTerms Of UseGDPR PolicyCookie Policy

Emma Smith

For a delicious Lemon Garlic Butter Shrimp, you need these key ingredients: - 1 pound large shrimp, peeled and deveined - 4 tablespoons unsalted butter - 4 cloves garlic, minced - Zest of 1 lemon - 1/4 cup fresh lemon juice - 1 tablespoon chopped fresh parsley - 1/2 teaspoon red pepper flakes (optional) - Salt and pepper to taste - Lemon wedges for serving You can add some extra ingredients to enhance the taste: - A splash of white wine for depth - A pinch of smoked paprika for warmth - Fresh basil or thyme for added herbal notes Choosing fresh shrimp is key for the best dish. Here are some tips: - Look for shrimp that smells like the ocean, not fishy. - Choose shrimp with a firm texture and a shiny appearance. - Check for a clean, bright color. Avoid any that look dull or discolored. - If possible, buy shrimp with the shell on. It helps keep them moist. Start by rinsing the shrimp under cold water. This helps remove any extra dirt. Then, use paper towels to pat them dry. Make sure they are nice and dry. Season the shrimp lightly with salt and pepper. This small step makes a big difference in flavor. Next, take a large skillet and place it over medium heat. Add the unsalted butter to the skillet. Watch it melt until it becomes a golden pool of goodness. Once melted, add in the minced garlic. Sauté this mix for about a minute. You want to smell that delicious garlic without burning it. Now, turn up the heat to medium-high. Add the seasoned shrimp into the hot skillet. Cook them for about 2-3 minutes on one side. You want them to turn bright pink. Flip them over and cook for another 2-3 minutes. The shrimp should be fully cooked and opaque. Once your shrimp are cooked, it is time to add some zing. Pour in the lemon juice and add the lemon zest. If you like a hint of heat, sprinkle in the red pepper flakes. Toss everything well in the skillet. Make sure each shrimp gets coated in that tasty lemon garlic butter sauce. Take the skillet off the heat. Stir in the chopped parsley for a fresh touch. Taste the sauce and add more salt or pepper if needed. To serve, plate the shrimp and drizzle the remaining sauce over the top. Garnish with extra parsley and lemon wedges. This makes a beautiful dish. For a great meal, serve it over rice or with crispy garlic bread. For the full recipe, check out the details above! When making lemon garlic butter shrimp, avoid overcooking the shrimp. They cook quickly, so stay alert. Too much heat can make them tough. Also, don’t skip the salt and pepper. A little seasoning enhances the dish. Lastly, be careful with garlic. If it burns, it will taste bitter. To get the best flavor, use fresh ingredients. Fresh shrimp taste better than frozen ones. Use fresh garlic for a stronger taste. The zest and juice of a lemon add brightness. If you like spice, add red pepper flakes. They give a nice kick without overpowering the dish. Lemon garlic butter shrimp pairs well with many sides. Serve it over fluffy rice or pasta. Crispy garlic bread is great for soaking up the sauce. For a fresh touch, add a simple salad. A glass of white wine also complements the meal well. For the full recipe, check the earlier section. {{image_2}} You can make Lemon Garlic Butter Shrimp even better by adding veggies. Try adding spinach, bell peppers, or snap peas. These colorful additions boost nutrition and flavor. To add them, sauté the vegetables in the butter before adding the shrimp. This way, they soak up all that tasty garlic and lemon goodness. You can also serve the shrimp over a bed of steamed broccoli or zucchini noodles for a fresh twist. If you like heat, make spicy Lemon Garlic Butter Shrimp. Simply add more red pepper flakes or diced jalapeños. For a different flavor, use chili oil instead of butter. This gives you a nice kick without losing that rich taste. Adjust the spice level to match your taste. Pair spicy shrimp with a cooling side, like a creamy avocado salad. This contrast makes each bite exciting. You don’t have to stick to the skillet for this recipe. Grilling adds a nice smoky flavor. Just toss the shrimp in the lemon garlic butter mixture before grilling. Cook them on skewers for easy handling. Baking is another option. Lay the shrimp on a baking sheet, drizzle with the sauce, and bake at 400°F for about 10 minutes. Both methods keep the shrimp juicy and flavorful. Explore these methods to find your favorite way to enjoy this dish. For the full recipe, check out the previous section. To keep your lemon garlic butter shrimp fresh, place it in an airtight container. Make sure to cool it first. Store it in the fridge for up to three days. If you plan to eat it later, this method will keep it tasty. When you are ready to enjoy the shrimp again, reheat it gently. Use a skillet over low heat. Add a splash of water or broth to keep it moist. Stir it often to heat evenly. Avoid using high heat, as it can make the shrimp tough. If you want to freeze the shrimp, do it right after cooking. Place it in a freezer-safe bag or container. Remove as much air as possible to prevent freezer burn. It can last up to three months. To thaw, put it in the fridge overnight before reheating. For a quick thaw, run it under cold water. For the full recipe, you can check the detailed instructions and ingredients to make this dish again whenever you want. Yes, you can use frozen shrimp! Just thaw them first. Place them in cold water for about 15 minutes. This helps them cook evenly. Pat them dry to remove extra water. This step is key for great flavor. If you want a swap for butter, olive oil works well. It adds a nice flavor too. You can also use vegan butter if you prefer a plant-based option. Both alternatives will still give you a tasty dish. Shrimp cook quickly. They turn pink and curl up when done. This usually takes about 2-3 minutes on each side. If they look opaque and firm, they are ready to eat. Don’t overcook them, or they can become tough. Lemon Garlic Butter Shrimp pairs well with many sides. Try serving it over fluffy rice or with garlic bread. You can also add a fresh salad or steamed veggies for balance. Each option enhances the meal and adds color. For the full recipe, check out the cooking instructions and tips above. In this blog post, we explored how to make delicious Lemon Garlic Butter Shrimp. We covered essential and optional ingredients to enhance the dish. You learned step-by-step instructions for perfect shrimp, including tips for fresh selection and flavor pairings. We highlighted common mistakes and shared serving ideas. For variations, you can add veggies or spice things up with heat. Finally, proper storage methods ensure your shrimp stays fresh. With these tips, you can enjoy a tasty meal anytime.

Lemon Garlic Butter Shrimp Recipe Quick and Easy Meal

Looking for a quick and easy meal that tastes amazing? This Lemon Garlic Butter Shrimp recipe is just what you

To create the Ultimate Greek Chicken Marinade, gather these simple ingredients: - 4 boneless, skinless chicken breasts - 1/4 cup olive oil - 3 tablespoons lemon juice (freshly squeezed) - 3 cloves garlic, minced - 1 tablespoon Dijon mustard - 1 tablespoon honey - 2 teaspoons dried oregano - 1 teaspoon dried thyme - 1 teaspoon paprika - Salt and pepper to taste - 1/4 teaspoon red pepper flakes (optional) - Fresh parsley or dill for garnish This marinade brings out the best in chicken. Each ingredient plays a key role in creating rich flavors. The olive oil keeps the chicken moist and tender. Lemon juice adds a bright tang. Garlic gives a bold taste, while Dijon mustard and honey balance each other perfectly. Herbs like oregano and thyme give a lovely aroma. Paprika adds color and a hint of warmth. Adjust the salt and pepper to your liking. If you want some heat, add the red pepper flakes. For the best flavor, use fresh ingredients whenever possible. Fresh chicken will soak up the marinade better. You can find the full recipe of the Ultimate Greek Chicken Marinade to follow along with these steps. Garnish your grilled chicken with fresh parsley or dill. This not only adds color but also enhances the taste. Now, let's get cooking! To start, you need to combine the marinade ingredients. In a mixing bowl, add the olive oil, lemon juice, minced garlic, Dijon mustard, and honey. Whisk these together until they blend well. Next, prepare the chicken for marination. Place the boneless, skinless chicken breasts in a large resealable plastic bag or a shallow dish. Pour the marinade over the chicken, ensuring each piece gets a good coating. Now, for the refrigeration time. Seal the bag or cover the dish and refrigerate for at least one hour. For the best flavor, let it marinate for four hours or even overnight. This time helps the chicken soak up all those delicious flavors. When you're ready to cook, preheat your grill or grill pan over medium-high heat. Remove the chicken from the marinade, letting the excess drip off. Grill the chicken for six to eight minutes on each side. You want it to be fully cooked. The internal temperature should reach 165°F (74°C). After grilling, take the chicken off the grill. Let it rest for a few minutes before slicing. This resting time helps keep the chicken juicy. For a nice finish, garnish with fresh parsley or dill. This adds a pop of color and extra flavor to your dish. Marinating chicken is key to great flavor. The best marinating time is at least one hour. For deeper flavors, aim for four hours or even overnight. This allows the chicken to soak up all the tasty goodness. To enhance your marinade, use fresh herbs and spices. Oregano and thyme bring out the Greek flavors. Adding garlic gives it a nice kick. You can also try fresh lemon zest for a brighter taste. Experiment with your favorite herbs to make it your own. Grilling chicken can be simple if you follow a few steps. First, preheat your grill on medium-high heat. This helps create those beautiful grill marks. Place the chicken on the grill, cooking for 6-8 minutes on each side. To avoid drying out the chicken, don’t flip it too often. Let it cook evenly. Use a meat thermometer to check doneness. The internal temperature should reach 165°F (74°C). Let the chicken rest after grilling. This helps keep it juicy. A few minutes of resting is worth the wait! {{image_2}} You can change some ingredients to make the marinade your own. For the oil, try avocado oil or even coconut oil. These oils give unique flavors that can enhance your dish. If you want more zing, swap lemon juice for lime juice. It adds a fun twist. For spice lovers, add more heat. You can increase the red pepper flakes or add cayenne pepper. If you want a sweeter taste, toss in a bit of brown sugar. This swap can balance the heat nicely. Serve your chicken with a fresh Greek salad. The cool veggies and creamy feta make a great match. Tzatziki sauce is another tasty side. It adds a nice, refreshing touch to each bite. For gatherings, slice the chicken and serve it in pita bread. Add some fresh veggies and tzatziki for a fun wrap. If you meal prep, pack the chicken with grains and roasted veggies. This makes for a healthy lunch or dinner option. Explore the full recipe for more tips and ideas on how to enjoy your Greek chicken! You can keep homemade marinade in the fridge for up to one week. Store it in an airtight container. If you want to use it later, you can freeze it. Transfer the marinade into freezer bags. Squeeze out the air before sealing. This way, you can store it for up to three months. When you are ready to use it, thaw it in the fridge overnight. For leftover cooked chicken, cool it down quickly. Place it in a shallow dish and cover it tightly. You can store it in the fridge for up to four days. When reheating, use low heat to keep the chicken juicy. A microwave is quick but can dry it out. Instead, reheat it in a skillet with a little olive oil. This adds flavor and moisture back into the chicken. Enjoy your tasty meal again! You can marinate chicken for at least 1 hour. For the best flavor, aim for 4 hours. If you want to take it further, you can marinate it overnight. This longer time allows the chicken to soak up all the tasty flavors from the marinade. Yes, you can use this marinade on other proteins. It works well with pork chops or fish like salmon. You can even use it for vegetables like zucchini or bell peppers. Just remember that cooking times will vary based on the type of protein. The safest way to check if chicken is cooked is to use a meat thermometer. Insert it into the thickest part of the chicken. The internal temperature should reach 165°F (74°C). If you don’t have a thermometer, cut into the chicken. The juices should run clear, not pink. This blog post guided you through a tasty chicken marinade recipe. We covered the key ingredients, marinating tips, and cooking steps. You learned how to adjust flavors and pair sides. Remember, marinating enhances taste, and using a meat thermometer ensures safety. With these skills, you can impress your family and friends at any meal. Enjoy creating delicious grilled chicken and exploring your flavor options!

Ultimate Greek Chicken Marinade Flavorful and Easy Recipe

Are you ready to elevate your chicken game? The Ultimate Greek Chicken Marinade is here to bring a burst of

To make Korean Gochujang Noodles, you need to gather the right ingredients. Here’s what you will need: - 200g noodles (preferably udon or soba) - 2 tablespoons gochujang (Korean chili paste) - 1 tablespoon soy sauce - 1 tablespoon sesame oil - 1 tablespoon honey or maple syrup - 2 cloves garlic, minced - 1 teaspoon ginger, grated - 1 bell pepper, thinly sliced (red or yellow) - 1 cup spinach leaves - 1 green onion, chopped - Sesame seeds for garnish - Optional protein: 100g tofu, chicken, or shrimp These ingredients create a perfect blend of flavors. The gochujang brings heat, while the honey adds sweetness. You can customize it with your choice of protein for extra nutrition. Remember, this recipe is about balance. Each ingredient plays a role in the final taste. If you want to dive deeper into the recipe, check out the Full Recipe. It will guide you through the cooking steps for this delicious dish. To start, bring a large pot of salted water to a boil. Add 200g of your favorite noodles, like udon or soba. Cook them until they are al dente, which usually takes around 5 to 7 minutes. Once cooked, drain the noodles and rinse them under cold water. This step stops the cooking process and keeps them firm. Set the noodles aside for later. Next, grab a small bowl. In this bowl, mix together 2 tablespoons of gochujang, 1 tablespoon of soy sauce, 1 tablespoon of sesame oil, and 1 tablespoon of honey or maple syrup. Add 2 cloves of minced garlic and 1 teaspoon of grated ginger. Whisk everything together until it’s well combined. The sauce should be thick and spicy but sweet. This is the heart of your dish. Now, take a large skillet or wok and heat a splash of oil over medium heat. Add 1 thinly sliced bell pepper. Stir-fry it for about 2 to 3 minutes. You want the pepper to soften a bit. Then, toss in 1 cup of spinach leaves and cook until they wilt, which should take about 1 minute. This step adds color and nutrition to your noodles. If you want to add protein, now is the time. You can use 100g of tofu, chicken, or shrimp. Add your chosen protein to the skillet with the veggies. Sauté until the protein is cooked through. If using chicken or shrimp, this will take about 5 to 7 minutes. For tofu, cook until it’s golden. This makes the meal more filling. Once your protein is cooked, add the reserved noodles to the skillet. Pour the prepared gochujang sauce over the noodles. Toss everything together until the noodles are coated well with the sauce. Heat the mixture through for a couple of minutes. This step makes sure every noodle is full of flavor. After combining, remove the skillet from heat. Fold in 1 chopped green onion for freshness. Taste your dish and adjust the seasoning if needed. If you want more spice, add more gochujang or soy sauce. To serve, divide the noodles into bowls. Sprinkle sesame seeds on top for a nice touch. Enjoy your Korean Gochujang Noodles! If you need more details, you can check the Full Recipe. I love using udon or soba noodles for this dish. Udon is thick and chewy, while soba is thin and nutty. Both hold the sauce well. You can also try rice noodles for a gluten-free option. Just follow the package instructions to cook them perfectly. Gochujang brings heat, but you can control it. Start with two tablespoons if you love spice. For less heat, use one tablespoon instead. Taste the sauce before mixing it with noodles. You can always add more gochujang later. This dish is easy to make vegetarian or vegan. Simply skip the meat and use tofu for protein. You can also add more veggies like mushrooms or carrots. Always check the honey you choose. Use maple syrup for a vegan option. For the full recipe, remember to check the details! {{image_2}} You can make Korean Gochujang Noodles gluten-free. Use rice noodles instead of udon or soba. Look for gochujang that has no wheat. This way, you can enjoy the dish without worrying about gluten. To boost nutrition, add more veggies to your noodles. Consider using carrots, zucchini, or broccoli. These add color and crunch. Sauté them with the bell pepper. This simple step brings more flavor and makes your meal heartier. You can switch up the protein based on your taste. Chicken, shrimp, or tofu work great. If you want a vegetarian option, stick with tofu. For a quick meal, use pre-cooked proteins. They save time and keep the dish easy. Check the Full Recipe for more tips on adding protein. To store your Korean Gochujang Noodles, let them cool first. Then, place the noodles in an airtight container. They can last in the fridge for up to three days. Make sure to separate any protein if you added it, as it may change texture. When you’re ready to eat, you can easily reheat your noodles. Use a microwave-safe dish and add a splash of water. Cover it with a lid or microwave-safe wrap. Heat in short bursts, about 30 seconds at a time, stirring in between. Check until they are hot throughout. You can freeze these noodles for later. First, cool them completely. Portion them into freezer-safe bags or containers. Squeeze out as much air as you can. They will keep well for up to three months. To eat, thaw them in the fridge overnight before reheating. For the best flavor, try to eat them fresh. For the full recipe, refer back to the earlier section. Gochujang is a red chili paste from Korea. It has a sweet, spicy, and savory flavor. The main ingredients are chili powder, glutinous rice, fermented soybeans, and salt. You can use it in many dishes, like marinades and stews. It adds a unique depth to your meals. Yes, you can! If you need a substitute, try mixing red pepper flakes with a bit of honey and soy sauce. This mix gives a similar sweet and spicy taste. However, it may not match gochujang's rich flavor completely. To amp up the heat in Korean Gochujang Noodles, add more gochujang to the sauce. You can also mix in some crushed red pepper flakes or sliced fresh chili peppers. Start small, then taste as you go. Adjust to your spice preference. Great side dishes include: - Kimchi - Korean pickled radish - Steamed dumplings - A light salad with sesame dressing These options balance the noodles' heat and add texture to your meal. To find authentic gochujang, visit an Asian grocery store. Many carry brands from Korea. Check the label for quality ingredients and no artificial additives. You can also shop online for trusted brands. You can find the Full Recipe for Korean Gochujang Noodles online. It includes details on ingredients, cooking time, and step-by-step instructions. Enjoy making this dish in your own kitchen! In this post, we explored how to make delicious Korean Gochujang noodles. We outlined the key ingredients, detailed cooking steps, and shared helpful tips. You can customize your dish and try various protein options or vegetables. Remember, adjusting the spice level keeps it fun for everyone. With simple storage and reheating tips, you can enjoy these noodles anytime. Making this meal will impress your family and friends, so give it a try!

Korean Gochujang Noodles Simple Spicy Dish Guide

Craving a quick, spicy meal? Let’s dive into making Korean Gochujang Noodles! This dish is simple and bursting with flavor.

To make a great Sausage Alfredo Pasta, you need some key ingredients. Here’s what you’ll need: - 8 oz fettuccine pasta - 2 sausages (Italian or chicken), casings removed - 2 tablespoons olive oil - 2 cloves garlic, minced - 1 cup heavy cream - 1/2 cup grated Parmesan cheese - 1/4 cup cream cheese, softened - 1 teaspoon dried oregano - 1 teaspoon dried basil - Salt and pepper to taste - Fresh parsley, chopped (for garnish) These ingredients create a creamy, rich sauce that pairs perfectly with pasta. You can add more flavor to your dish with some optional ingredients. Consider these: - Red pepper flakes for heat - Sliced mushrooms for extra texture - Spinach or kale for a nutrient boost - Lemon zest for brightness These ingredients can elevate your dish and make it unique. Having the right tools makes cooking easier. Here’s what I recommend: - Large pot for boiling pasta - Large skillet for cooking sausage and sauce - Wooden spoon for stirring - Measuring cups and spoons for accuracy - Colander for draining pasta Using these tools will help you make this dish efficiently. For the complete recipe, check out the Full Recipe. Start by gathering all the ingredients. You need fettuccine pasta, sausage, olive oil, and garlic. Don't forget the heavy cream and cheese. Grab some dried herbs and salt, too. These add great flavor. Next, boil a large pot of salted water. This water will cook the pasta. Once it boils, add the fettuccine. Cook it according to the package instructions until it's al dente. This usually takes around 8-10 minutes. After cooking, drain the pasta and set it aside. Remember to save 1/2 cup of the pasta water for later. Now, heat olive oil in a large skillet over medium heat. Add the sausage to the pan. Use a wooden spoon to break it apart. Cook until it turns brown and is fully cooked, about 7-8 minutes. Once the sausage is ready, add the minced garlic. Cook it for another 1-2 minutes. This will make your kitchen smell amazing! Next, lower the heat to medium-low. Pour in the heavy cream. Add the cream cheese, stirring until it melts and mixes well. Gradually add the grated Parmesan cheese. Keep stirring until the sauce is smooth. Now, season the sauce. Add dried oregano, dried basil, salt, and pepper. Taste it and adjust the seasoning. If the sauce is too thick, add a splash of the reserved pasta water. This helps get the right texture. It's time to combine everything. Add the cooked fettuccine to the skillet. Toss the pasta in the sauce until it's coated well. Make sure every noodle is covered in that creamy goodness. Now, you can serve the creamy sausage Alfredo pasta. Place it in bowls and garnish with fresh parsley and extra Parmesan if you like. This dish looks great and tastes even better! To make a smooth Alfredo sauce, use heavy cream. Heat it gently. Mix in cream cheese for a rich taste. Stir in grated Parmesan cheese slowly. This keeps the sauce creamy. If it gets too thick, add a splash of reserved pasta water. Taste it and adjust the seasoning. A pinch of salt and pepper can make all the difference. For extra flavor, add a hint of nutmeg. This small touch makes your sauce special. Fettuccine is the classic choice for Alfredo. Its wide shape holds the sauce well. You can also use penne or rigatoni. These shapes trap the sauce inside. If you like a lighter option, try whole wheat or gluten-free pasta. Each type adds its unique taste and texture. Choose high-quality sausage for the best flavor. Italian sausage adds a nice spice. Chicken sausage gives a lighter choice. Remove the casings before cooking. This helps the sausage cook evenly. Use a wooden spoon to break it up in the pan. Cook until it's browned and no longer pink. This step is key for flavor. Don’t rush it; give it time to caramelize. This adds a depth that everyone will love. {{image_2}} You can swap regular sausage for vegetarian options. Try plant-based sausage or lentils. Both add great taste and texture. These swaps keep the dish hearty and satisfying. Plus, they make the meal friendly for all eaters. Boost your meal's nutrition by adding veggies. Spinach, broccoli, or peas work well. Just toss them in when cooking the sausage. They cook quickly and add color. You can also add beans for more fiber. These additions make your dinner even healthier. Fettuccine is classic, but other pasta shapes shine too. Try penne, rigatoni, or even whole wheat pasta. Each brings a new twist to the dish. Different shapes hold sauce in unique ways, making each bite special. Experimenting with pasta styles can keep family dinner fun. You can find the full recipe for this delicious dish online. You can store leftover Sausage Alfredo Pasta in an airtight container. Make sure it cools down first. It keeps well in the fridge for up to three days. You can enjoy it warm or cold. If you want to eat it later, try not to add too much sauce initially. This way, it won't get soggy in the fridge. To freeze your pasta, place it in a freezer-safe container. Leave some space at the top for expansion. It can last up to three months in the freezer. When you are ready to eat, thaw it overnight in the fridge. Reheat it on the stove over low heat. Add a splash of cream or water to keep it creamy. Stir gently until heated through. To keep your Sausage Alfredo Pasta fresh, store it in the fridge right away. Avoid leaving it out for more than two hours. If you have extra sauce, store it separately. This method helps to keep the pasta from getting too soggy. When reheating, check the temperature. It should be at least 165°F (74°C) to ensure safety. For the best taste, consume it within a few days. Enjoy your delicious meal! For the full recipe, see the main article. Making Sausage Alfredo Pasta is quick. From start to finish, it takes about 30 minutes. You only need 10 minutes to prep and 20 minutes to cook. This makes it a great choice for busy weeknights or family dinners. Yes, you can use different cheeses. Mozzarella adds a nice stretch. Gouda offers a smoky flavor. You can even try a blend of cheeses for a richer taste. Just remember to keep some Parmesan for that classic Alfredo flavor. Absolutely! You can make this dish dairy-free. Use coconut cream instead of heavy cream. For cheese, look for dairy-free substitutes. Nutritional yeast can add a cheesy flavor too. Just ensure your sausage is also dairy-free. In this blog post, we covered making Sausage Alfredo Pasta from start to finish. We explored essential ingredients, cooking steps, and helpful tips to make your dish stand out. I shared how to adapt the recipe for different diets and how to store leftovers for later. Remember, cooking is fun, so feel free to experiment. Enjoy creating your own version of this classic dish, and don’t hesitate to share your results with others!

Sausage Alfredo Pasta Perfect for Family Dinner Night

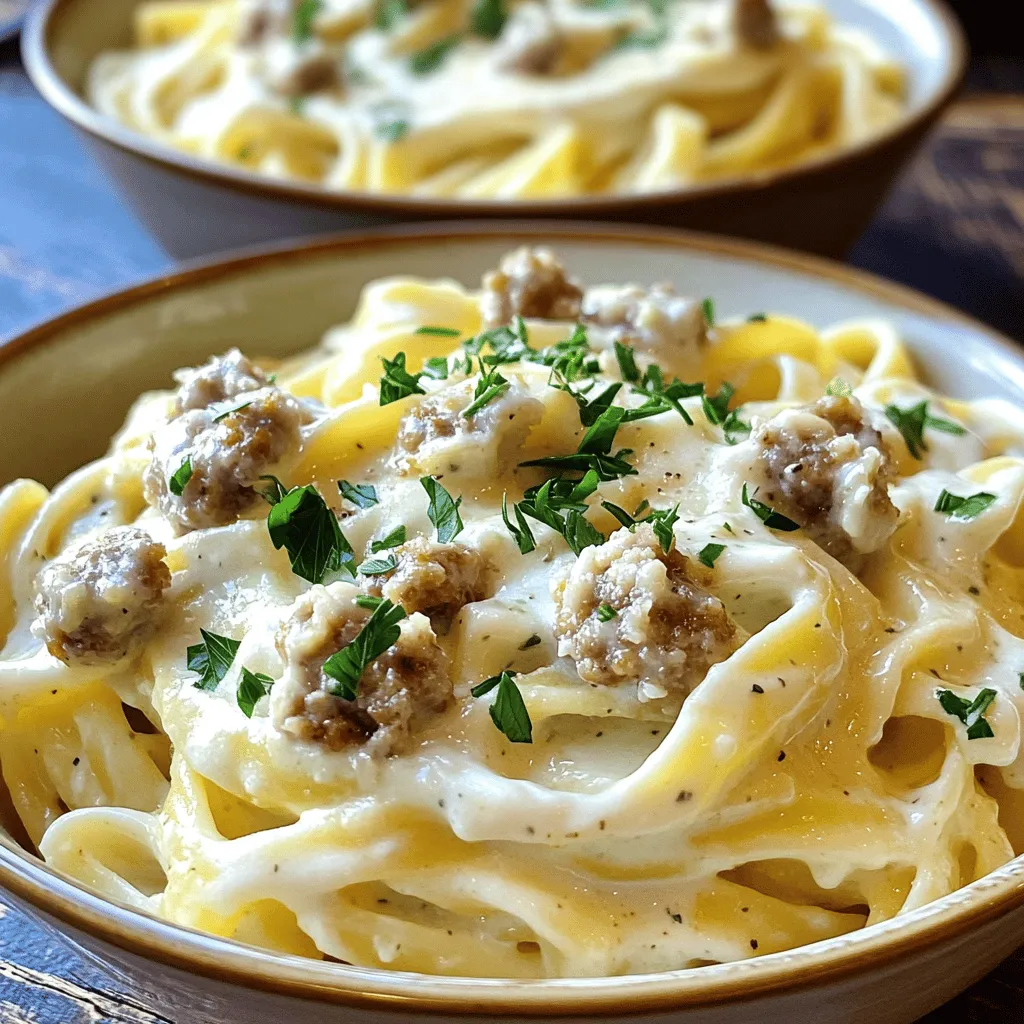
Looking for the perfect dish for family dinner night? You’ve come to the right place! Sausage Alfredo Pasta is creamy,

- 8 oz bowtie pasta - 1 lb ground beef - 1 medium onion, finely chopped - 3 cloves garlic, minced - 1 cup heavy cream - 1 cup beef broth - 1 teaspoon Italian seasoning - 1/2 teaspoon red pepper flakes (optional) - 1/2 cup grated Parmesan cheese - Salt and pepper to taste - Fresh parsley, chopped (for garnish) The main ingredients for creamy beef bowtie pasta are simple but key. You need bowtie pasta, ground beef, and a medium onion. These ingredients give the dish its heart and flavor. Then, you enhance the meal with a few additional ingredients. Minced garlic adds a nice aroma. Heavy cream makes the sauce rich and smooth. Beef broth adds depth to the flavor. Italian seasoning brings out the herbs. If you like heat, add red pepper flakes. Parmesan cheese gives it a savory finish. Finally, season with salt and pepper to your taste. Garnish with fresh parsley for a pop of color. This dish is a wonderful blend of flavors and textures. Each ingredient plays its part. You can find the full recipe to guide you through the cooking process. Enjoy crafting this delightful dinner! - Boil salted water in a large pot. - Add the bowtie pasta and cook until al dente. - This takes about 8 to 10 minutes. - Drain the pasta and save 1/2 cup of the water. - Heat a large skillet on medium heat. - Add the ground beef to the skillet. - Cook until the beef is browned, about 5 to 7 minutes. - Break the beef apart with a spatula while it cooks. - Drain any extra fat from the skillet. - Add the chopped onion to the beef. - Sauté until the onion is soft, about 3 to 4 minutes. - Stir in the minced garlic and cook for 1 to 2 minutes. - Pour the beef broth into the skillet. - Bring the broth to a simmer. - Stir in the heavy cream slowly. - Add 1 teaspoon of Italian seasoning. - If you like heat, add 1/2 teaspoon of red pepper flakes. - Season the sauce with salt and pepper to taste. - Let the sauce simmer for 5 minutes, stirring often. - The sauce should thicken slightly. Now, you can combine the cooked bowtie pasta with the creamy sauce. For the full recipe, check the earlier sections. Enjoy your cooking! To make your sauce truly creamy, always use whole heavy cream. It gives the best texture. You want that rich, velvety feel in each bite. If your sauce gets too thick, don’t worry! Gradually add some of the reserved pasta water. This water is starchy and helps loosen the sauce while keeping it creamy. To boost the flavor, try adding herbs like basil and oregano. They can brighten up the dish. You can also swap out heavy cream for half-and-half if you want a lighter sauce. This still gives a nice creaminess but cuts some calories. Experiment with these tips to find your perfect taste! If you want to check out the full recipe, click here. {{image_2}} When you want to change up your creamy beef bowtie pasta, there are many fun options. You can make this dish your own with simple swaps and additions. - Add spinach for a pop of color and nutrients. - Chopped bell peppers bring a sweet crunch and bright flavor. - If you want a leaner option, swap ground beef for ground turkey or chicken. This change keeps the meal healthy and tasty. - Bowtie pasta is great, but other shapes work too. Try penne or fusilli for a new texture. - If you have dietary needs, gluten-free pasta is available. Many brands offer tasty options that cook well. These easy variations let you mix things up while keeping the dish delicious. For the full recipe, check out the instructions above. Store any leftovers in an airtight container for up to 3 days. This keeps the flavors fresh and the pasta tasty. When you are ready to eat, simply reheat it on the stove or in the microwave. If you find the sauce too thick after refrigeration, just add a splash of water or milk to bring back the creaminess. You can freeze portions in freezer-safe containers for up to 2 months. Just let the pasta cool completely before you freeze it. When you are ready to enjoy, reheat gently. This helps maintain the creamy texture. To reheat, place it in a skillet over low heat. Stir often and add a bit of milk or broth to keep it smooth. You can prep the ingredients in advance. Cook the pasta and store it separately. You can also brown the beef and sauté the onion and garlic ahead of time. Mix them with the sauce before serving. Keep everything in the fridge. When ready to eat, just heat it up and mix! Yes, you can use half-and-half or sour cream. Both will change the texture. Half-and-half makes the sauce lighter, while sour cream adds a tangy taste. If you want a dairy-free option, use coconut cream or cashew cream. They will make the dish creamy, but with a different flavor. You can serve a fresh salad with greens and veggies. Garlic bread is a great side too. Roasted or steamed vegetables like broccoli or green beans also work well. These sides balance the creamy pasta and add some color to your meal. You learned how to make Creamy Beef Bowtie Pasta. We covered all ingredients, steps, and tips. Remember to play with flavors and try new ingredients. Store leftovers properly for future meals. You can even make this dish ahead of time for ease. Enjoy the creamy goodness and share this recipe with others. Cooking should be fun and tasty. Happy cooking!

Creamy Beef Bowtie Pasta Delightful Dinner Recipe

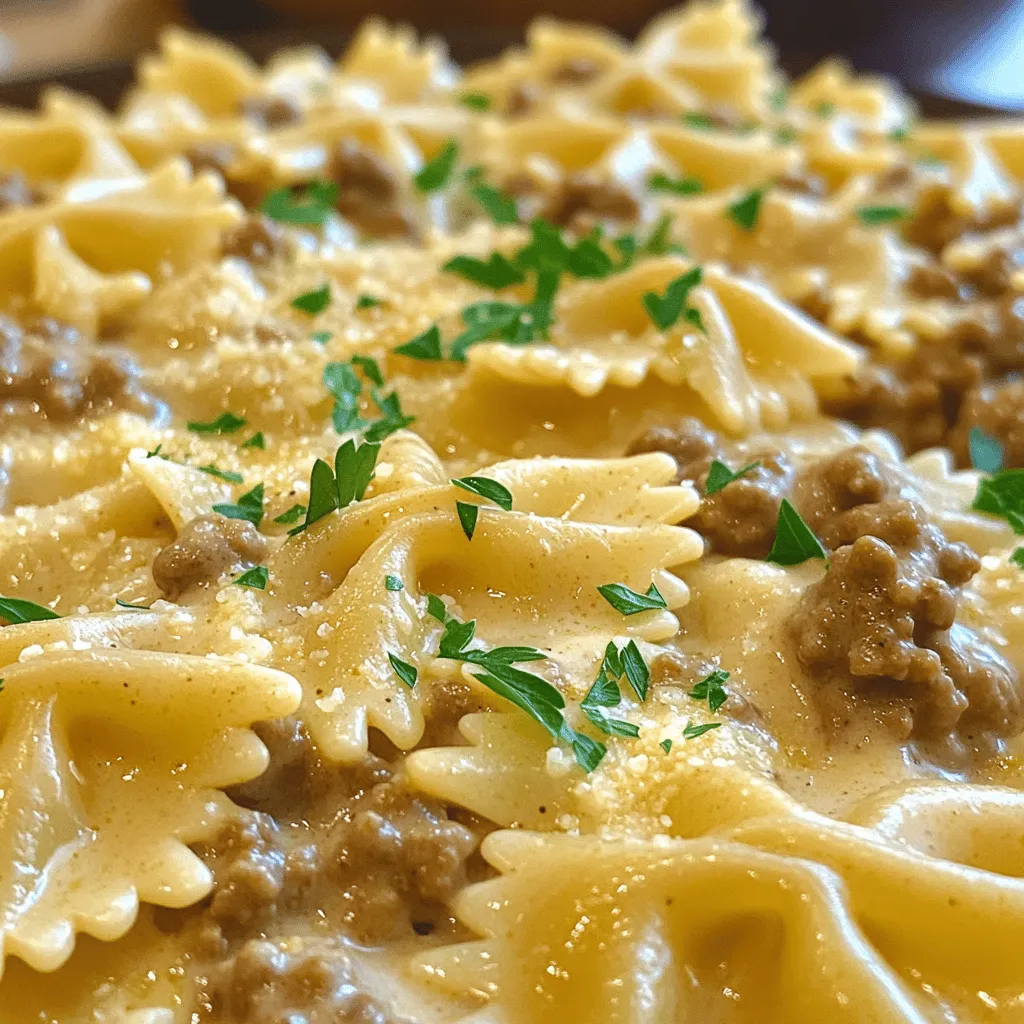
Looking for a cozy dinner that pleases the whole family? My Creamy Beef Bowtie Pasta recipe combines tender pasta with

To make Peach Cobbler Cheesecake Salad, gather these items: - 2 large ripe peaches, diced - 1 cup cream cheese, softened - 1 cup Greek yogurt (vanilla-flavored works well) - 1/2 cup powdered sugar - 1 teaspoon vanilla extract - 1 cup crushed graham crackers - 1 teaspoon cinnamon - 1/4 cup chopped pecans (optional) - Fresh mint leaves for garnish You can swap ingredients if needed. For cream cheese, use mascarpone for a richer taste. Plain yogurt can replace Greek yogurt, but the flavor will change. For powdered sugar, granulated sugar works too, but it may not dissolve as well. If you don’t have graham crackers, try crushed cookies or even granola. You can leave out pecans for a nut-free version, or use walnuts or almonds instead. Fresh peaches give the best flavor and texture. They add a nice crunch and juicy taste. Choose peaches that are ripe but firm. If you can’t find fresh ones, canned peaches work. Just make sure to drain them well and pat them dry to avoid extra moisture. Canned peaches may lack some flavor, but they can still make a tasty dish. For this recipe, I often prefer fresh peaches for that perfect, summery essence. For the full recipe, check out the details above. Start by washing your peaches well. Remove the pit and dice them into small pieces. Use ripe peaches for the best flavor. Set these aside while you mix the cream cheese base. The fresh peaches add a sweet and juicy taste to the salad. In a mixing bowl, add the softened cream cheese. Then, add the Greek yogurt. Next, sprinkle in the powdered sugar and pour in the vanilla extract. Beat everything together with an electric mixer until it is smooth and creamy. This base will hold the salad together and give it a rich taste. In a separate bowl, mix the crushed graham crackers with cinnamon and chopped pecans if you choose to use them. Start layering the salad in a large serving bowl. Begin with half of the peach mixture at the bottom. Then, add half of the graham cracker mixture on top. Repeat these layers with the remaining peaches and finish with the last bit of graham cracker topping. Chill this salad in the fridge for 30 minutes to an hour. This helps the flavors mix well. Serve in individual bowls or glasses. You can top each serving with extra graham cracker crumbs and fresh mint leaves for a lovely touch. For a complete guide, check out the Full Recipe. To get a smooth and creamy texture, use softened cream cheese. Cold cream cheese can cause lumps. Beat the cream cheese with Greek yogurt and powdered sugar. Mix until it is smooth. You want it light and fluffy. This step is key for a great salad. Adding spices can take your salad to the next level. I love using cinnamon for warmth. One teaspoon adds just the right touch. You can also try nutmeg or ginger. These spices give depth to the peach flavor. Always taste as you go. Adjust the spices to suit your taste. Presenting your salad can be fun and creative. Use clear cups or jars for individual servings. This shows off those beautiful layers. Top each serving with a sprinkle of graham crackers. Fresh mint leaves add a pop of color. You can even drizzle some honey on top. It makes each bowl look like a treat. For the complete recipe, check out the Full Recipe section. {{image_2}} You can change up the fruit in this salad. Try using ripe strawberries, juicy blueberries, or sweet cherries. Each fruit brings a new flavor. For a tropical twist, add diced mango or pineapple. Mix and match your favorite fruits for a fun surprise. Just make sure the fruit is fresh and ripe for the best taste. The topping can be fun to change, too. Instead of graham crackers, use crushed cookies like Oreos or Nilla Wafers. For a crunch, try nuts like almonds or walnuts. You can also drizzle honey or maple syrup on top for extra sweetness. Get creative with your toppings to suit your taste. If you need gluten-free options, use gluten-free graham crackers. You can also swap cream cheese and yogurt for dairy-free versions. Look for vegan cream cheese and coconut yogurt. These swaps keep the taste great while meeting your dietary needs. Enjoy this Peach Cobbler Cheesecake Salad in a way that fits your lifestyle. For the full recipe, check the link above. After enjoying your Peach Cobbler Cheesecake Salad, you may have some leftovers. To store them, use an airtight container. This keeps the salad fresh and tasty. Place it in the fridge right away. The salad can last for about three days in the fridge. If you wait too long, it may lose its flavor and texture. To keep your salad fresh, avoid mixing it all at once. Store the peach mixture and graham cracker topping separately. When you are ready to eat, layer them again. This keeps the texture crisp and the flavors bright. You can also add fresh mint just before serving for a burst of color and taste. You can freeze Peach Cobbler Cheesecake Salad, but it may change in texture. To freeze, place the salad in a freezer-safe container. Leave space at the top for expansion. When you want to eat it, thaw it in the fridge overnight. However, the graham cracker topping may not stay crispy. Consider serving it fresh for the best taste. For the full recipe, check out the link above. Yes, you can make Peach Cobbler Cheesecake Salad ahead of time. This makes it great for parties. I suggest you prepare it up to a day in advance. Just store it in the fridge. This allows the flavors to blend well. The longer it sits, the better it tastes! If you don't have Greek yogurt, use regular yogurt. You can also try sour cream. Both options work well. They keep the salad creamy and tasty. If you want a dairy-free choice, use a non-dairy yogurt. Just pick one that has a similar texture. Peach Cobbler Cheesecake Salad lasts for about three days in the fridge. Make sure to cover it well. This keeps it fresh and safe to eat. If you notice any changes in smell or texture, it’s best to toss it. Enjoy it while it’s still at its best! This blog post shared the key ingredients for a tasty Peach Cobbler Cheesecake Salad. We discussed substitutes and chose between fresh or canned peaches. You learned simple steps to prepare the salad, mix the cream cheese, and assemble everything nicely. I offered tips for creamy texture and flavor boosts, along with fun presentation ideas. We explored variations, storage tips, and answered common questions. Enjoy making this salad your own, and savor every delicious bite!

Peach Cobbler Cheesecake Salad Easy Delightful Treat

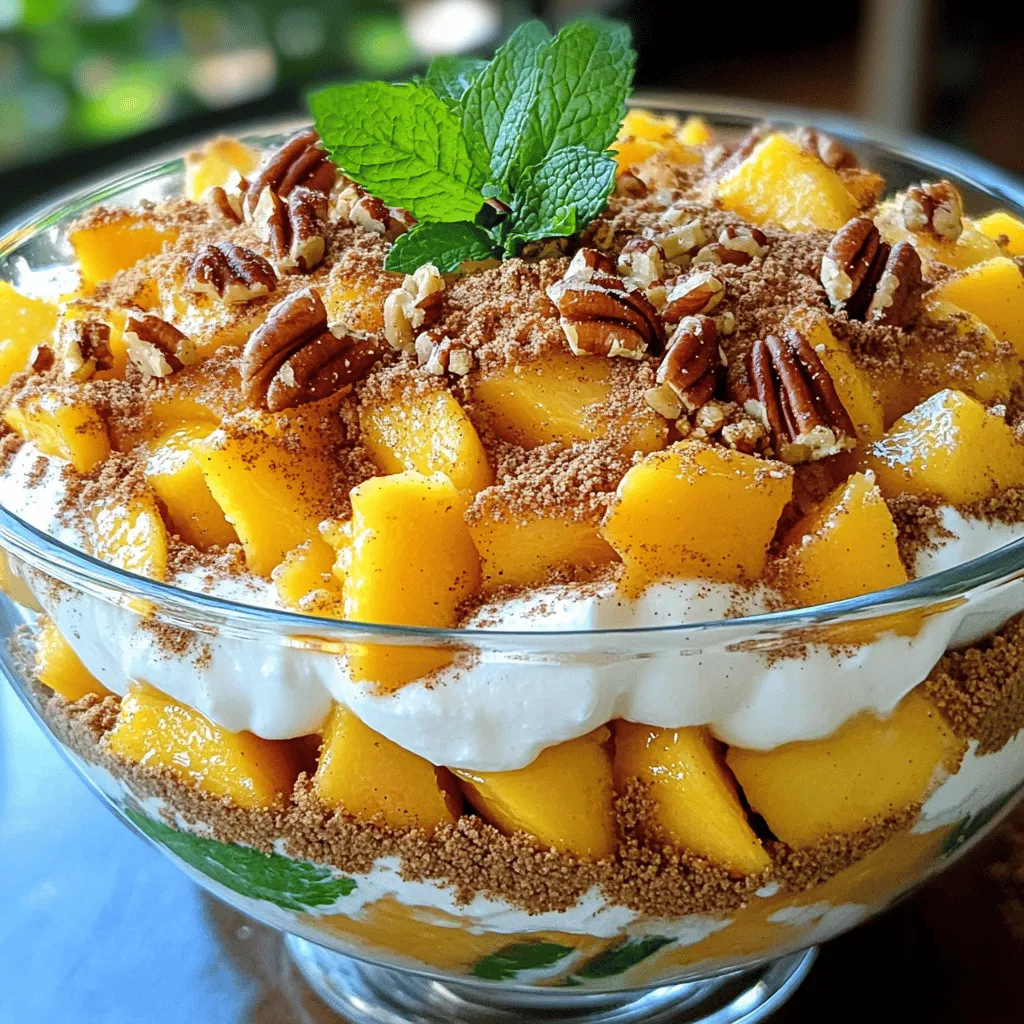
Are you ready to enjoy a sweet twist on a classic? Peach Cobbler Cheesecake Salad is an easy and delightful

To make a Tropical Pineapple Carrot Cake, you need fresh, simple ingredients. Here’s the list: - 2 cups all-purpose flour - 1 ½ cups granulated sugar - 1 cup vegetable oil - 4 large eggs - 2 teaspoons baking powder - 1 teaspoon baking soda - ½ teaspoon salt - 1 teaspoon ground cinnamon - ½ teaspoon ground nutmeg - 2 cups grated carrots (about 4 medium carrots) - 1 cup crushed pineapple, drained - 1 cup shredded coconut - ½ cup chopped walnuts (optional) - 1 teaspoon vanilla extract - Cream cheese frosting (for topping) Each ingredient plays a key role in making this cake moist and flavorful. The all-purpose flour provides structure. Granulated sugar adds sweetness and moisture. Vegetable oil keeps the cake tender. Eggs bind everything together and add richness. Baking powder and baking soda help the cake rise. Salt enhances the flavors, while cinnamon and nutmeg bring warmth. Grated carrots add moisture and sweetness, and crushed pineapple boosts the fruitiness. Shredded coconut adds a tropical twist. You can add walnuts for crunch or omit them for a nut-free cake. For a creamy finish, top the cake with cream cheese frosting. This frosting complements the flavors and adds a rich layer of sweetness. You can find the full recipe for more details on how to combine these ingredients. First, preheat your oven to 350°F (175°C). This step is key for even baking. While the oven warms up, grease and flour two 9-inch round cake pans. This helps the cakes come out easily after baking. In a large mixing bowl, combine 1 ½ cups of granulated sugar and 1 cup of vegetable oil. Use an electric mixer to beat these together until they blend well. Next, add 4 large eggs, one at a time. Mix well after each egg. Stir in 1 teaspoon of vanilla extract for that lovely flavor. In another bowl, whisk together 2 cups of all-purpose flour, 2 teaspoons of baking powder, 1 teaspoon of baking soda, ½ teaspoon of salt, 1 teaspoon of ground cinnamon, and ½ teaspoon of ground nutmeg. This mix gives your cake flavor and helps it rise. Gradually add this dry mix to your wet ingredients. Stir until just combined. Now, fold in 2 cups of grated carrots, 1 cup of crushed pineapple (drained), and 1 cup of shredded coconut. If you like, you can add ½ cup of chopped walnuts too. Make sure everything is evenly mixed. Divide the batter into the prepared cake pans. Bake in the preheated oven for 25-30 minutes. Use a toothpick to check for doneness; it should come out clean. After baking, remove the cakes from the oven. Let them cool in the pans for about 10 minutes. Then, transfer them to a wire rack to cool completely. You can find the complete instructions in the Full Recipe. Measuring your ingredients correctly is key. Use measuring cups and spoons for accuracy. Too much flour can make the cake dry. Too little sugar can affect the taste. Mix wet and dry ingredients separately before combining. This helps avoid overmixing. Fold in the carrots and pineapple gently. This keeps the cake light and fluffy. For the cream cheese frosting, let it sit at room temperature first. This makes it easier to spread. Use a spatula to apply the frosting in a thick layer. Start with the top and then move to the sides. To decorate, consider adding shredded coconut or chopped walnuts. Fresh pineapple slices can also add a fun touch. Check your oven’s temperature with a thermometer. An incorrect temperature can lead to undercooked or burnt cake. When baking, avoid opening the oven door too often. This can cause the cake to sink. Use a toothpick to check doneness. If it comes out clean, your cake is ready. {{image_2}} You can make this cake even more fun with different fruits. Try adding mango or banana for a twist. Each fruit brings a unique taste and texture. You can also use other nuts or seeds. Pecans or sunflower seeds add extra crunch. Mix and match to find your favorite combo! If you need a gluten-free option, substitute the all-purpose flour. You can use almond flour or coconut flour. Both work well in this recipe. For those who want a vegan cake, replace the eggs with applesauce or flaxseed meal. This keeps the cake moist and tasty. Pair your cake with a cup of tea or coffee. The flavors blend perfectly! If you have leftovers, store them in an airtight container. You can also slice and freeze the cake for later. Just thaw it in the fridge before serving. For a fun touch, serve slices with a scoop of vanilla ice cream. Enjoy the tropical goodness! To store leftover cake, cool it completely first. Wrap it tightly in plastic wrap. This helps keep moisture in and prevents it from drying out. You can also place it in an airtight container. I recommend using a cake dome or a container with a lid to protect it from air. Store it in the fridge for up to five days. If you want to save cake for later, freezing is a great option. To freeze, wrap each layer in plastic wrap. Then, add a layer of aluminum foil for extra protection. This will help prevent freezer burn. You can freeze the cake for up to three months. When you’re ready to enjoy it, thaw the cake in the fridge overnight. This keeps it moist and tasty. Fresh Tropical Pineapple Carrot Cake lasts about five days in the fridge. In the freezer, it remains good for three months. You can tell if the cake is spoiled by looking for mold or an off smell. If it feels dry or crumbly, it may not taste good. Always trust your senses when checking for freshness. For the full recipe, click here. To make this cake from scratch, you need to follow some simple steps. First, preheat your oven to 350°F (175°C). Grease and flour two 9-inch round cake pans. In a large bowl, mix sugar and vegetable oil until creamy. Add eggs one by one, mixing well. Stir in vanilla extract next. In another bowl, whisk flour, baking powder, baking soda, salt, cinnamon, and nutmeg. Slowly add this mix to the wet ingredients. Fold in grated carrots, crushed pineapple, shredded coconut, and walnuts if you like. Pour the batter evenly into the prepared pans. Bake for 25-30 minutes, until a toothpick comes out clean. Cool the cakes for 10 minutes, then transfer to a wire rack. Once cooled, frost with cream cheese frosting. For a detailed guide, check the Full Recipe. Yes, you can easily omit the nuts in this recipe. If you want a nut-free cake, just leave them out. You can also add seeds, like sunflower or pumpkin seeds, for a nice crunch. If you want more texture, try adding extra coconut or even some dried fruit. This way, you keep the flavor and fun without the nuts. To frost your cake smoothly, start with cream cheese frosting. Make sure your cake layers are fully cool. Use an offset spatula to spread frosting on the first layer. Place the second layer on top and frost the top and sides. For a clean finish, dip the spatula in hot water, then dry it before smoothing the frosting. Adding extra coconut or nuts on top can make it look even better! In this post, I walked you through making a delicious Tropical Pineapple Carrot Cake. We covered the key ingredients, detailed steps, and helpful tips to avoid mistakes. I also shared ways to modify the recipe for different diets and tastes. Remember, baking is about having fun and learning. Don't hesitate to experiment with flavors or decorations. A well-made cake can bring joy to any occasion. I hope you enjoy baking and sharing this tasty treat!

Tropical Pineapple Carrot Cake Easy and Delicious Recipe

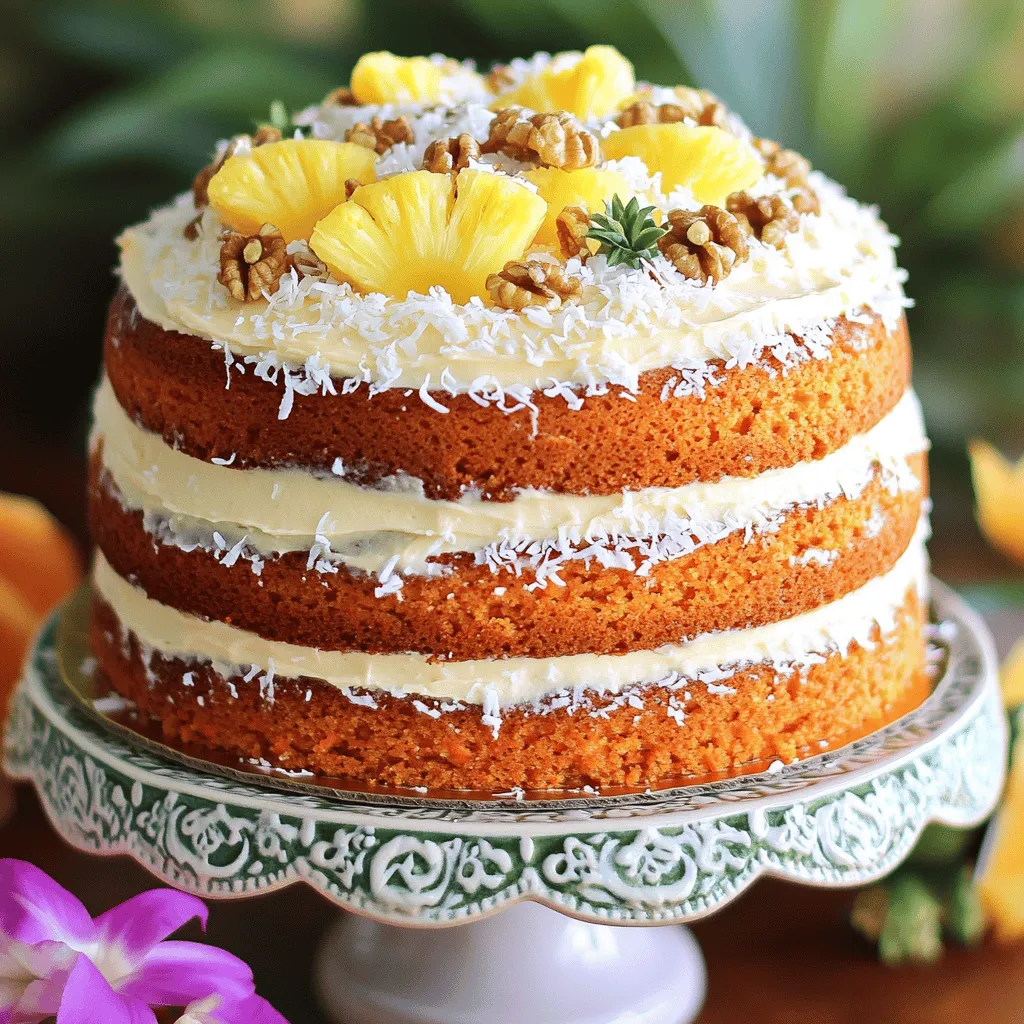
Are you ready to treat yourself to something special? This Tropical Pineapple Carrot Cake is easy to make and simply

- 1 whole chicken (about 4-5 lbs) - 1/2 cup unsalted butter, softened - 6 cloves garlic, minced - 2 tablespoons fresh rosemary, chopped - 2 tablespoons fresh thyme leaves - 1 tablespoon fresh parsley, chopped The main ingredients create a flavorful base for your chicken. The whole chicken is the star of the dish. The butter adds richness. Garlic brings in a strong, savory taste. Fresh herbs like rosemary and thyme add depth and freshness. The parsley brightens the dish. Each ingredient works together to make the chicken juicy and tasty. - 1 onion, quartered - 4 carrots, cut into chunks - 4 potatoes, diced - 1 lemon, zested and quartered Adding vegetables gives the meal more texture and flavor. The onion adds sweetness as it roasts. Carrots bring a nice crunch and color. Potatoes soak up the chicken's juices, making them extra tasty. The lemon adds a hint of brightness, cutting through the richness of the dish. This mix of veggies not only enhances flavor but also makes the meal more balanced. - Salt - Pepper - Cooking tools (roasting pan, basting brush, knife, cutting board) Salt and pepper are key for seasoning. They help bring out the flavors of the chicken and veggies. Good cooking tools make the process easier. A roasting pan holds everything together. A basting brush helps spread the garlic butter. A sharp knife and cutting board are necessary for prepping. Having the right tools makes cooking fun and smooth. For the full recipe, check out the details above. First, preheat your oven to 425°F (220°C). This helps cook the chicken evenly. While the oven warms up, gather your ingredients. You will need a whole chicken, butter, garlic, herbs, lemon, onion, carrots, and potatoes. Make sure everything is ready to go. Next, let’s make the garlic butter. In a bowl, mix softened butter with minced garlic and herbs. Add lemon zest, salt, and pepper until it is smooth. Now, take your chicken and pat it dry with paper towels. This step is key for crisp skin. Carefully loosen the skin around the breast and thighs. Use half of your garlic butter to spread under the skin. This adds flavor to the meat. After applying the garlic butter, rub the rest on the outside of the chicken. Stuff the cavity with lemon quarters and a few thyme sprigs. This adds great taste while it cooks. Place the chicken in a roasting pan. Surround it with quartered onion, carrots, and diced potatoes. Drizzle any leftover garlic butter over the veggies and sprinkle with salt and pepper. Roast in the oven for about 1 hour and 15 minutes. Aim for an internal temperature of 165°F (75°C) and a golden brown skin. Once done, take the chicken out and let it rest for 10 to 15 minutes. This resting time helps keep the juices inside. Serve your chicken with the roasted vegetables for a delightful meal. For the full recipe, refer back to the beginning. To make your Garlic Butter Herb Roasted Chicken shine, start with proper seasoning. Use salt and pepper generously. The key is to season both inside and outside of the chicken. This helps the flavor soak in. Marinate the chicken for a few hours or overnight if you can. This allows the herbs to work their magic. Fresh herbs like rosemary and thyme add great flavor, but dried herbs can work too. Always adjust the amount based on your taste. For crispy skin, pat the chicken dry before cooking. Moisture can make the skin soggy. After applying the garlic butter, let the chicken sit for a bit before roasting. This helps it dry out more. Use a high oven temperature of 425°F. This ensures that the skin gets that golden brown color. If you want extra crunch, you can broil it for the last few minutes. Just watch closely so it doesn’t burn! Resting your chicken is key for juicy meat. After roasting, let it sit for 10-15 minutes before carving. This allows the juices to spread back through the meat. If you skip this step, you may end up with dry chicken. Use this time to set the table or prepare side dishes. It’s a perfect way to add some calm to your cooking. The resting period truly makes a big difference in the final dish. {{image_2}} You can switch up the herbs for more flavor. Instead of rosemary, try sage or oregano. Each herb brings a unique taste. You might even mix herbs for a new twist. Fresh herbs are best but dried ones work too. Use about one-third of the amount if you use dried. Feel free to add or swap veggies in the dish. Sweet potatoes or parsnips can replace regular potatoes. You can also add bell peppers or zucchini for a colorful touch. Just make sure to cut them to similar sizes for even cooking. Roasting different vegetables adds variety and keeps things exciting. You can make this recipe in a slow cooker or air fryer. For the slow cooker, cook on low for 6-8 hours. The chicken will be very tender and juicy. If you prefer the air fryer, cook at 360°F for about 50 minutes. The skin will get crispy while the inside stays moist. Each method gives you a different, tasty result. For the full recipe, check the main article. To keep your Garlic Butter Herb Roasted Chicken fresh, follow these tips: - Cool the chicken to room temperature first. - Wrap it tightly in plastic wrap or aluminum foil. - Place it in an airtight container for best results. - Store it in the fridge for up to 3 days. For long-term storage, you can freeze the chicken. - Cut it into pieces for easier thawing. - Use freezer bags to save space. - It can last in the freezer for about 3 months. Reheating is simple, and I have a few methods: - Oven: Preheat your oven to 350°F (175°C). - Place the chicken in a baking dish. - Cover it with foil to keep it moist. - Heat for about 20-25 minutes, or until warm. - Microwave: Use a microwave-safe dish. - Cover it with a damp paper towel to trap steam. - Heat on medium power for about 2-3 minutes. - Check if it's warm all the way through. Knowing how long your chicken stays fresh helps you plan meals: - In the fridge, it lasts up to 3 days. - In the freezer, it can stay good for about 3 months. Always check for signs of spoilage before eating. Look for changes in smell or texture. Storing your chicken properly helps maintain its flavor and safety. For more details, check out the Full Recipe. To check if the chicken is fully cooked, use a meat thermometer. Insert it into the thickest part of the breast. The chicken should reach an internal temperature of 165°F (75°C). You can also look for visual cues. The skin must be golden brown and crispy. The juices should run clear when you cut into the thigh. If you see pink juices, cook it a bit longer. Yes, you can prepare this recipe in advance! You can mix the garlic butter and season the chicken a day before. Keep it covered in the fridge. This allows the flavors to soak in. Just remember to take it out 30 minutes before cooking. This helps the chicken cook evenly. Garlic Butter Herb Roasted Chicken pairs well with many side dishes. Here are some great options: - Roasted vegetables: Carrots, potatoes, and onions go well. - Salads: A fresh green salad adds crunch. - Rice or quinoa: These grains soak up the chicken juices. - Bread: A slice of crusty bread is perfect for dipping. Try these sides to make your meal even better! For the full recipe, check out the Garlic Butter Herb Roasted Chicken details. This blog post covered making Garlic Butter Herb Roasted Chicken. You learned about key ingredients, like whole chicken and herbs. We discussed cooking steps and tips for flavor. You also found variations for herbs and veggies. In my view, this dish is about simple ingredients and tasty results. With the right care, you can impress anyone at the table. Enjoy trying different methods and flavors to make it your own!

Garlic Butter Herb Roasted Chicken Savory Dinner Delight

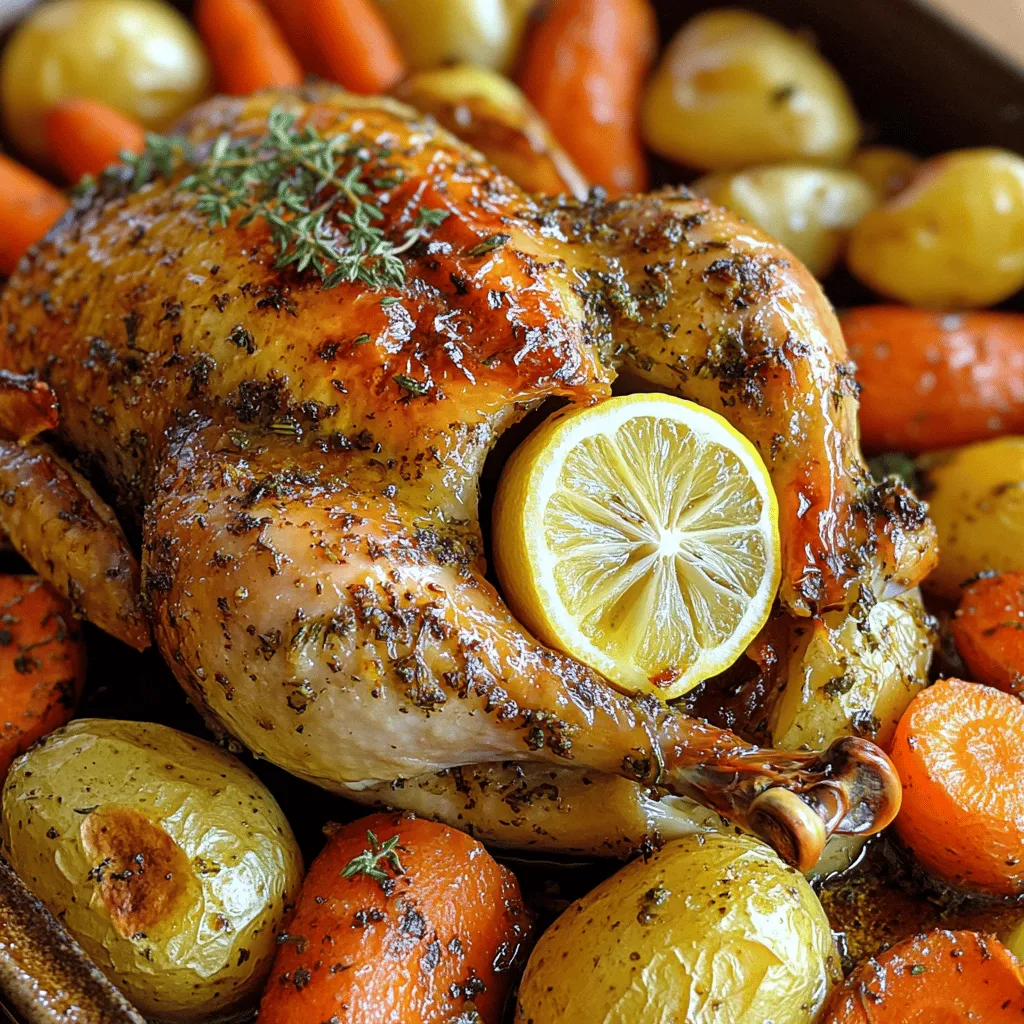
Are you ready to impress your family with a mouthwatering dinner? Garlic Butter Herb Roasted Chicken will bring joy to

- Thick Bread Options: Use brioche or challah for the best taste and texture. These breads soak up the egg mixture well and create a soft inside with a crisp outside. - Eggs and Dairy: You need two large eggs for richness. For milk, whole milk works best, but almond milk adds a nice twist if you prefer a dairy-free option. - Flavoring Agents: Add one teaspoon of vanilla extract for sweetness and one teaspoon of ground cinnamon for warmth. These flavors turn simple toast into a delightful treat. - Optional Add-ins: You can add one tablespoon of sugar for extra sweetness. A pinch of salt helps balance the flavors. - Cooking Essentials: Use butter for cooking. It gives your French toast a golden crust. Maple syrup is a must for serving. Pour it on generously for that classic sweetness. With these ingredients, you will make a dish that is both comforting and delicious. For the full recipe, check out the details above! To make the best French toast, start with the egg mixture. Whisk together: - 2 large eggs - 1 cup milk - 1 teaspoon vanilla extract - 1 teaspoon ground cinnamon - 1 tablespoon sugar (optional) - A pinch of salt Whisk until smooth. This helps blend the flavors. You want a light, fluffy batter. Mix the eggs and milk well. If you want extra fluff, beat the eggs a bit more. Preheating your skillet is very important. This ensures even cooking and helps achieve that golden-brown color. Now, let’s cook the French toast. Dip each bread slice into the egg mixture. Make sure to coat each side but don’t soak it. Tap off any extra batter. Heat your skillet over medium heat. Add a pat of butter. Let it melt completely. Place the coated bread on the hot skillet. Cook for about 3-4 minutes on each side. Look for that nice golden color. You might need to cook in batches. Once cooked, transfer the French toast to a warm plate. Keep it warm in the oven while you cook the rest. Now, it’s time to serve your French toast. Keep it warm on a low oven setting. Top each slice with maple syrup. Fresh berries add a nice touch, too. A light dusting of powdered sugar makes it look fancy. To plate, stack two or three slices. Add berries on the side for color. This makes your dish pop and taste even better. For the full recipe, check out the detailed instructions. Enjoy your delightful meal! - Choosing the Right Bread for Best Results The bread you pick makes a big difference. I love using thick brioche or challah. These breads soak up the egg mixture well. They also give a nice, fluffy texture when cooked. - Adjusting Sweetness with Sugar Options You can add sugar for sweetness. I suggest starting with one tablespoon. You can also use honey or agave syrup for a different flavor. - Infusing Flavors: Additional Spice Suggestions Want to change it up? Add a pinch of nutmeg or cardamom. These spices add warmth and depth to the dish. - Skillet vs. Griddle: Which is Better? I prefer a non-stick skillet for French toast. It heats evenly and gives a nice crust. A griddle works too, especially for larger batches. - Avoiding Soggy Bread: Key Techniques Avoid soaking the bread too long. Dip each slice quickly in the egg mix. Tap off any extra liquid before cooking. This helps keep the bread from getting soggy. - Batch Cooking for Larger Groups If you're cooking for many, keep cooked slices warm in the oven. Set it to low heat (around 200°F). This way, everyone enjoys warm French toast together. For the complete recipe, check out the [Full Recipe]. {{image_2}} To make classic French toast even better, you can add fun flavors. Here are some ideas: - Adding Nutmeg or Other Spices: A sprinkle of nutmeg gives a warm flavor. You can also try cardamom or ginger for a unique twist. - Stuffed French Toast Options: Stuff your bread with cream cheese, jam, or fruit. This adds a tasty surprise in every bite. - Savory Versions: Cheese and Veggies: For a savory twist, add cheese and veggies. Use sharp cheddar or spinach for a delicious change. You can serve French toast in many fun ways. Here are a few you might like: - Tropical French Toast with Pineapple: Top your toast with grilled pineapple and coconut. It gives a bright, sunny taste. - Chocolate Chip or Berry French Toast: Add chocolate chips or fresh berries to the batter. This makes a sweet treat everyone will love. - Vegan Alternatives for Egg and Dairy: Use almond milk and a banana instead of eggs. This keeps the taste but makes it vegan-friendly. For the full recipe, check out the Deliciously Classic French Toast section. To keep your French toast fresh, refrigerate it. Place the slices in an airtight container. This helps prevent them from drying out. Use parchment paper between layers to avoid sticking. For longer storage, you can freeze French toast. Wrap each slice in plastic wrap. Then, place them in a freezer bag. This keeps them tasty for up to three months. When it's time to eat, reheating is simple. Use a toaster oven or conventional oven. Heat at 350°F for about 10 minutes. You can also microwave it for quick reheating. Just cover it with a damp paper towel to keep it moist. How long does French toast last in the fridge? It stays fresh for about three to four days. Always check for signs of spoilage. Look for a few key signs. If the toast has an off smell, it may be bad. Any visible mold means you should throw it out. If it feels slimy, it's also time to toss it. Always trust your senses when it comes to food safety. Can I Use Egg Substitutes for a Vegan Version? Yes, you can use egg substitutes like flaxseed meal or silken tofu. Mix one tablespoon of flaxseed meal with three tablespoons of water for each egg. Let it sit until it thickens. This mix binds well and gives a nice texture. What is the Best Bread for French Toast? Thick bread is ideal. Brioche or challah works best. They soak up the egg mixture and become soft inside while crisp outside. You can also use sourdough or Texas toast for a different flavor. How can I make French Toast gluten-free? Use gluten-free bread. Many options are available now. Look for brands that have a good texture. You can follow the same steps as regular French toast for great results. Can I prepare the mixture in advance? Yes, you can mix the egg and milk a few hours ahead. Keep it covered in the fridge. This saves time on busy mornings and allows flavors to blend. How to prevent French toast from getting soggy? Avoid soaking the bread too long. A quick dip works best. Tap off excess mixture before cooking. Ensure your skillet is hot enough to create a nice crust. What's the nutritional value of classic French toast? A serving has about 300 calories, depending on the bread and toppings. It includes protein from eggs and calcium from milk. Add fresh fruit for more vitamins and fiber. For the complete recipe, check the Full Recipe section. In this post, I shared how to make classic French toast. We covered essential ingredients like thick bread, eggs, and flavorings. I provided step-by-step instructions for the perfect egg mixture and cooking methods. You also learned about tasty variations and storage tips. With these easy tips, you can create delicious French toast any time. Enjoy experimenting with flavors and serving styles!

Classic French Toast with Maple Syrup Delight

Wake up your mornings with the rich, warm flavors of Classic French Toast with Maple Syrup Delight! You’ll be amazed

To make a delicious Cinnamon Roll Casserole, you need these main ingredients: - 2 cans of refrigerated cinnamon rolls (each containing 8 rolls) - 4 large eggs - 1 cup milk - 1 teaspoon vanilla extract - 1 teaspoon ground cinnamon - ½ cup chopped pecans (optional) - ½ cup maple syrup - Icing from the cinnamon roll cans These ingredients create a warm, sweet dish that everyone will love. You can find most of them at any grocery store. If you want to switch things up, there are fun options you can try. Here are some ideas: - Use almond milk if you need a dairy-free option. - Swap out pecans for walnuts or almonds for a different crunch. - Add dried fruit like raisins or cranberries for a chewy texture. - Try coconut milk for a tropical twist. These changes let you make this dish your own! Gather these tools before you start cooking: - A 9x13-inch baking dish - Mixing bowls - Whisk - Knife for cutting the cinnamon rolls - Oven mitts Having these items ready will make your cooking easy and fun. First, you need to preheat your oven to 350°F (175°C). This step helps the casserole cook evenly. While the oven warms up, grab a 9x13-inch baking dish. Lightly grease the dish with cooking spray or butter. This will keep the casserole from sticking. Open both cans of refrigerated cinnamon rolls. Each can has eight rolls. Cut each roll into four pieces. I like to use kitchen scissors for this. It makes cutting easy. Once cut, place the pieces in the greased baking dish. Spread them out evenly so every piece bakes well. In a large mixing bowl, crack four large eggs. Add one cup of milk, one teaspoon of vanilla extract, and one teaspoon of ground cinnamon. Whisk the mixture until it is smooth and well combined. This egg custard will soak into the cinnamon rolls. Pour the egg mixture over the cinnamon roll pieces. Make sure to coat each piece well. If you want a crunchy texture, sprinkle half a cup of chopped pecans on top. Then, drizzle half a cup of maple syrup over everything. This adds sweetness and flavor. Now, your casserole is ready to bake! To get an even bake, make sure your oven is hot. Preheat it to 350°F (175°C). Use a 9x13-inch baking dish. Grease it well to stop sticking. Cut the cinnamon rolls into quarters. Spread them out evenly in the dish. This helps them cook evenly. Stir the egg mixture well to avoid lumps. Pour it slowly over the rolls. This creates a nice texture throughout. For more flavor, try adding vanilla extract. Just one teaspoon will do wonders. You can also add spices like nutmeg or cardamom for a twist. If you love nuts, sprinkle in some chopped pecans. They add a nice crunch. Drizzle a bit more maple syrup on top before baking. This boosts the sweet flavor and creates a caramelized top. One mistake is not cutting the rolls small enough. Bigger pieces may not cook well. Another error is rushing the mixing. Always whisk the egg mixture until smooth. If you forget to grease your dish, the casserole will stick. Don't skip the icing drizzle at the end. It adds that classic cinnamon roll taste. For the best results, always check for doneness. Look for a golden top and set edges. For the full recipe, check out the details above. Enjoy your baking! {{image_2}} You can mix up your cinnamon roll casserole with fun flavors. Try adding chocolate chips for a sweet twist. You can also add diced apples for a fruity flavor. Just mix them in with the cinnamon roll pieces before pouring the egg mixture over them. This adds extra taste and texture to your dish. You can even use peanut butter or Nutella for a rich, creamy treat. The options are endless! If you need gluten-free or dairy-free options, don’t worry! You can find gluten-free cinnamon rolls in many stores. Substitute regular milk with almond or coconut milk for a dairy-free version. You can also use flax eggs instead of regular eggs for a vegan option. These changes keep the dish delicious while meeting your dietary needs. Toppings can make your casserole stand out! Drizzle caramel sauce over the top for a sweet finish. You can also sprinkle chopped nuts for crunch. Try adding fresh berries or whipped cream for a fun touch. For a chocolate lover, add chocolate sauce as a topping. These simple changes can make your casserole feel new and exciting every time you make it. For the complete recipe, check out the Full Recipe section! To keep your cinnamon roll casserole fresh, let it cool first. Then, cover it tightly with plastic wrap or foil. You can also use an airtight container. This helps keep the moisture in and the casserole tasty. Store it in the fridge for up to three days. When you are ready to enjoy your leftovers, preheat your oven to 350°F (175°C). Place the casserole in an oven-safe dish and cover it with foil. Heat for about 15-20 minutes. This method keeps it soft and warm. You can also microwave individual portions for about 30-45 seconds. If you use the microwave, keep an eye on it so it doesn't dry out. If you want to save your casserole for later, freezing is a great choice. Cut the casserole into squares before freezing. Wrap each piece tightly in plastic wrap, then place them in a freezer-safe bag. This way, you can grab a slice anytime! It stays good in the freezer for up to three months. When you're ready to eat, thaw it in the fridge overnight and then reheat as mentioned above. Enjoy your cinnamon roll casserole delight anytime! Yes, you can prepare this casserole ahead of time. You can mix the egg custard and cut the cinnamon rolls the night before. Cover the dish and store it in the fridge. In the morning, simply bake it for a quick and easy breakfast. This saves time and allows the flavors to blend nicely. If you're out of maple syrup, don’t worry! You can use honey or agave syrup as a sweet alternative. Both will give your casserole a nice sweetness. You can also try brown sugar mixed with a bit of water for a similar taste. Adjust the amount based on how sweet you like it. To check if your casserole is ready, look for a golden brown top. The edges should be set, and a toothpick inserted in the center should come out clean. If it feels soft in the middle, give it a few more minutes. Always keep an eye on it to avoid overbaking. Enjoy your delicious creation! Cinnamon Roll Casserole combines comfort and flavor. We reviewed key ingredients, tools, and easy steps to prepare it. Tips help create a perfect dish every time. You learned about fun variations and smart storage. To enjoy this casserole, be creative with flavors and toppings. Remember, it’s all about having fun in the kitchen. Try new things and share your favorites! Enjoy your baking adventure!

Cinnamon Roll Casserole Delightful and Easy Recipe

Welcome to the delightful world of Cinnamon Roll Casserole! This easy recipe transforms classic cinnamon rolls into a warm, comforting

Older posts
Newer posts
← Previous Page1 … Page47 Page48 Page49 … Page59 Next →

dsad

© 2025 Recipes Pursuit • Built with GeneratePress

Our Policies

  • Copyright Policy
  • Cookie Policy
  • GDPR Policy
  • Privacy Policy
  • Disclaimer
  • Terms Of Use

More Information

  • Home
  • About
  • Contact
  • Appetizers
  • Dessert
  • Dinner
  • Drinks
©2025, Recipes Pursuit About Back To Top