Skip to content
DisclaimerTerms Of UseGDPR PolicyCookie Policy

Recipes Pursuit

  • Home
  • Drinks
  • Appetizers
  • Dinner
  • Dessert
  • About
  • Contact
  • Privacy Policy
DisclaimerTerms Of UseGDPR PolicyCookie Policy

Emma Smith

To make a delicious spaghetti squash primavera, you'll need these main ingredients: - 1 medium spaghetti squash - 1 tablespoon olive oil - 1 small onion, diced - 2 cloves garlic, minced - 1 red bell pepper, sliced - 1 zucchini, sliced - 1 cup cherry tomatoes, halved - 1 cup broccoli florets - 1 teaspoon dried Italian herbs - Salt and pepper to taste You can also add optional ingredients for extra flavor, like: - 1/4 cup grated Parmesan cheese - Fresh basil leaves for garnish Each serving of spaghetti squash primavera has about 150 calories. It’s low in carbs and high in fiber. This dish is rich in vitamins A and C, plus potassium and folate. These nutrients help support your immune system and keep your skin healthy. When picking a spaghetti squash, look for one that feels heavy for its size. The skin should be a pale yellow or golden color. Avoid any that have soft spots. For the vegetables, choose fresh and firm options. Sweet bell peppers and zucchini bring great flavor. Broccoli adds crunch and color. You can mix in seasonal veggies for variety. First, preheat your oven to 400°F (200°C). Take the medium spaghetti squash and cut it in half lengthwise. Use a spoon to scoop out the seeds. Drizzle olive oil inside each half and sprinkle with salt and pepper. Place the halves cut side down on a parchment-lined baking sheet. Roast them in the oven for 40 to 50 minutes. When finished, the flesh should be soft and easily scraped into strands with a fork. While the squash roasts, heat olive oil in a large skillet over medium heat. Add the diced onion and minced garlic. Sauté them until the onion turns clear, about 3 to 4 minutes. Next, toss in the sliced bell pepper, zucchini, cherry tomatoes, and broccoli. Add dried Italian herbs, and cook for another 5 to 7 minutes. The veggies should be tender, yet still crisp. Once the spaghetti squash is done, take it out of the oven and let it cool slightly. Use a fork to scrape the squash into strands. Add these strands to the skillet with your sautéed veggies. Gently mix everything together, adding salt and pepper to taste. Let it cook on low heat for 2 to 3 minutes to blend the flavors. Serve your spaghetti squash primavera hot. You can add Parmesan cheese and fresh basil leaves for a nice touch. For the complete guide, check the Full Recipe. To cook spaghetti squash, the best method is roasting. This brings out its natural sweetness. Preheat the oven to 400°F (200°C). Cut the squash in half and scoop out the seeds. Drizzle olive oil inside and season with salt and pepper. Place it cut side down on a baking sheet. Roast for 40-50 minutes until tender. If you're short on time, you can use a microwave. Cut the squash in half and place it in a microwave-safe dish with a bit of water. Cover it with plastic wrap and microwave for about 10-12 minutes. Check for doneness, and it should be soft enough to scrape into strands. For a complete meal, serve spaghetti squash primavera with garlic bread or a fresh salad. Garlic bread adds a nice crunch and flavor. A light salad can balance the dish and add freshness. When plating, use a large bowl or plate. Spoon the squash and veggies onto one side. Garnish with grated Parmesan and fresh basil leaves. This adds color and makes it look appetizing. One common mistake is overcooking the vegetables. They should be tender but still crisp. Keep an eye on them while sautéing. Another mistake is not seasoning properly. Taste your dish as you cook. Adjust salt and pepper as needed for the best flavor. A little seasoning can make a big difference. For the full recipe on how to prepare this delightful dish, refer to the [Full Recipe]. {{image_2}} You can switch up the veggies in spaghetti squash primavera based on what’s fresh. In spring, use asparagus and peas for a vibrant touch. In summer, cherry tomatoes and bell peppers shine. Fall brings squash and kale, while winter offers hearty root veggies. You can also add spices like cumin or paprika for an extra kick. A splash of soy sauce or balsamic vinegar can boost the flavor profile too. To make this dish vegan, simply omit the Parmesan cheese or replace it with a plant-based option. For a gluten-free version, this recipe is already safe. You can also make it low-carb by skipping the squash and using spiralized zucchini or cauliflower rice instead. These swaps keep the dish light while still being filling. If you have a crowd, double the recipe with ease. Just roast two spaghetti squashes and increase the veggie amounts. For meal prep, store the cooked squash and veggies separately. This way, you can enjoy fresh meals all week long. Leftovers can last in the fridge for up to four days. You can also freeze them for a quick meal later. For the full recipe, check out the cooking instructions above. To keep your spaghetti squash primavera fresh, use airtight containers. Store leftovers in the fridge within two hours of cooking. If you want to freeze it, let it cool first. Use freezer-safe bags or containers. Label them with the date. This will help you remember when you made it. When reheating spaghetti squash primavera, use a skillet over medium heat. Add a splash of olive oil to avoid dryness. Stir gently to warm it up evenly. If you use a microwave, place it in a microwave-safe dish. Cover it with a damp paper towel to keep moisture in. This prevents sogginess. In the fridge, spaghetti squash primavera lasts about three to four days. In the freezer, it can stay fresh for up to three months. Check for signs of spoilage, such as a sour smell or mold. If any appear, it's best to toss it out. Keeping an eye on these details helps you enjoy your dish longer. For the complete recipe, check out the Full Recipe. Spaghetti squash is a type of winter squash. When you cook it, the flesh turns into strands. These strands resemble spaghetti, making it a fun pasta substitute. You can use it in many dishes, just like you would with regular pasta. It has a mild flavor, so it takes on the taste of sauces well. This makes it a great base for dishes like spaghetti squash primavera. Yes, you can prepare spaghetti squash primavera ahead of time. First, cook the squash and veggies as usual. Let them cool, then store them in airtight containers. You can keep them in the fridge for up to three days. When you are ready to eat, simply reheat the dish. But be careful not to overcook the veggies again. This way, you enjoy a quick meal without losing taste. Spaghetti squash is very healthy. It has fewer calories than regular pasta, making it a great option for many diets. It is high in vitamins A and C, which help your immune system. Many people think it lacks fiber, but it actually has a good amount. This helps with digestion and keeps you full. So, if you swap out regular pasta for spaghetti squash, you still get a satisfying meal. In this article, we explored the delicious world of spaghetti squash primavera. We covered key ingredients, cooking techniques, and variations to fit any diet. I shared tips on selecting fresh produce and avoiding common cooking mistakes. Cooking with spaghetti squash is fun and healthy. It’s a great way to enjoy meals while keeping them light. I hope you feel inspired to try this dish and customize it to your taste. Enjoy your cooking adventure!

Spaghetti Squash Primavera Flavorful Veggie Dish

Looking for a light and tasty dish that’s easy to make? Spaghetti Squash Primavera is your answer! With roasted squash

To make fried green tomatoes, you will need: - 4 medium green tomatoes, sliced into ½-inch thick rounds - 1 cup buttermilk - 1 cup cornmeal - ½ cup all-purpose flour - 1 teaspoon paprika - ½ teaspoon garlic powder - ½ teaspoon cayenne pepper (adjust for heat preference) - Salt and pepper to taste - Vegetable oil for frying - Fresh parsley, chopped (for garnish) You can swap buttermilk with regular milk or a dairy-free option. Add a splash of vinegar for tang. Use gluten-free flour if needed. You can replace cornmeal with crushed crackers for a unique twist. If you want less heat, cut the cayenne pepper or leave it out. Choose firm, bright green tomatoes. They should feel heavy for their size. Avoid ones with blemishes or soft spots. The best green tomatoes are firm and unripe. They should have a nice shine, indicating freshness. Always pick tomatoes that are in season for the best flavor. Start with fresh, firm green tomatoes. I like to use medium-sized ones for the best bite. Wash them well under cold water. Slice each tomato into ½-inch thick rounds. Try to keep the slices even for a uniform cook. Set them aside on a plate lined with paper towels to absorb any moisture. Next, pour 1 cup of buttermilk into a shallow dish. Dip each tomato slice into the buttermilk, coating it well. Let the extra buttermilk drip off before moving to the next step. In another bowl, mix 1 cup of cornmeal, ½ cup of all-purpose flour, paprika, garlic powder, cayenne, salt, and pepper. This mixture gives the tomatoes a crunchy texture. Dredge each slice in the cornmeal mix, pressing gently to stick. Make sure each slice is fully covered. Heat about ½ inch of vegetable oil in a large skillet over medium heat. You want it hot, around 350°F or 175°C. Carefully add the coated tomato slices to the hot oil in batches. Avoid overcrowding the pan, or they won't fry evenly. Fry each side for about 3-4 minutes until they turn golden brown and crispy. Use a slotted spoon to remove them and drain on paper towels. Repeat until all slices are fried. Serve your fried green tomatoes right away, garnished with fresh parsley for a nice touch. Enjoy this crunchy and flavorful delight from the full recipe! To get that perfect crunch, use a mix of cornmeal and flour. The cornmeal gives a nice texture, while the flour helps it stick. Make sure your oil is hot enough, around 350°F. Test it by dropping in a small piece of batter. If it bubbles and sizzles, it’s ready. Fry in small batches so the oil stays hot, which keeps the crunch. You can change the flavor by adding spices to your mix. Try adding herbs like oregano or thyme for a fresh taste. If you love heat, add more cayenne pepper. For a cheesy twist, sprinkle some grated Parmesan cheese into the breading mix. This gives a great flavor kick and makes your fried green tomatoes unique! One common mistake is using ripe tomatoes. They can become mushy when fried. Always choose firm, green tomatoes for the best results. Another mistake is overcrowding the skillet. It lowers the oil temperature and makes your tomatoes soggy. Lastly, don’t skip the buttermilk step. It helps the breading stick and adds flavor. Follow these tips for a crispy, tasty treat every time. For a detailed guide, check out the Full Recipe. {{image_2}} Fried green tomatoes shine with Southern flavors. You can add a touch of heat with jalapeños. Slice them thin and mix into your batter for a spicy kick. Another great addition is cheese. Try crumbled feta or shredded cheddar mixed with the cornmeal. These additions bring new flavors to the classic dish. You can change the texture of your fried green tomatoes by altering the breading. Instead of cornmeal, use crushed crackers for a crunchier bite. For a gluten-free option, swap in almond flour. You can even try a two-step breading. Dip the tomatoes first in flour, then in buttermilk, and finally in breadcrumbs. This gives a unique texture and look. Fried green tomatoes are great alone but pair well with many sides. Serve them with a tangy remoulade or spicy aioli for dipping. They also taste amazing on a sandwich. Layer them with lettuce, bacon, and a spread of your choice. For a light meal, top a salad with crispy tomatoes and a vinaigrette. Each option elevates this dish into a new experience. Check out the Full Recipe for more ideas! After you fry your green tomatoes, you might have some left. To store them, let them cool down. Place them in an airtight container. Keep them in the fridge for up to three days. Make sure they are not stacked too high. This helps keep them from getting soggy. When you want to enjoy your leftovers, reheating is key. Preheat your oven to 350°F (175°C). Spread the fried tomatoes on a baking sheet. Bake for about 10-15 minutes. This helps them regain their crispiness. You can also use an air fryer for a quicker method. It only takes about 5 minutes in an air fryer. If you want to save fried green tomatoes for later, you can freeze them. First, let them cool completely. Then, spread them out on a baking sheet in a single layer. Freeze them for about an hour. After that, place them in a freezer bag. They can last for up to three months. When ready to eat, thaw in the fridge and reheat as mentioned above. Enjoy your crispy fried green tomato delight any time! Check the Full Recipe for more tips. Fried green tomatoes are slices of unripe tomatoes. They are coated in a mix of cornmeal and flour. Then, they are fried until golden and crispy. The taste is tangy and savory. This dish comes from the Southern United States. It is a popular appetizer or side dish. To make fried green tomatoes vegan, replace buttermilk with plant-based milk. Use almond or soy milk for a great flavor. Add a bit of vinegar for tang. The rest of the recipe stays the same. The coating will still be crispy and flavorful. You can use ripe tomatoes, but the texture changes. Ripe tomatoes are softer and may not hold up well. They will taste sweeter and less tangy. If you prefer a sweeter flavor, ripe tomatoes work, but they won't be as crunchy. Fried green tomatoes taste great with many dips. Here are some popular choices: - Ranch dressing - Remoulade sauce - Spicy aioli - Honey mustard - A simple squeeze of lemon juice Each sauce adds a unique touch to the dish. Try different dips to find your favorite! For a complete cooking guide, check the Full Recipe. In this post, we covered everything you need for fried green tomatoes. I shared required ingredients, substitutions, and tips on choosing the best tomatoes. You learned the steps for prep, frying, and serving. I also shared tricks for a perfect crunch and flavor tweaks. Plus, we explored storage options and common FAQs. Fried green tomatoes are tasty and fun to make. Use these tips to impress your family and friends! Happy cooking!

Fried Green Tomatoes Crunchy and Flavorful Delight

If you’re craving a tasty treat, look no further than fried green tomatoes. These crispy bites pack a punch of

- 1 cup semi-sweet chocolate chips - 1 cup mini marshmallows - 1/2 cup graham cracker crumbs - 2 tablespoons unsalted butter, melted - 1 teaspoon vanilla extract - A pinch of sea salt To make S'mores Dip, start with these essential ingredients. Semi-sweet chocolate chips give that rich, sweet flavor. Mini marshmallows add a soft, chewy texture. Graham cracker crumbs give a nice crunch on top. Melted butter makes everything stick together. Vanilla extract enhances the overall taste. Finally, a pinch of sea salt balances the sweetness. - Graham crackers - Fresh fruit slices Graham crackers are a classic dipper. Their crunch pairs well with the soft dip. Fresh fruit slices are a fun option too. Try strawberries or apple slices for a fruity twist. Both options provide great contrast to the warm dip. - Extra chocolate drizzle - Peanut butter or nut spread If you want to level up your dip, add a chocolate drizzle. It makes the dip look fancy and adds more chocolate goodness. Peanut butter or nut spread gives a nutty flavor. You can mix it in or use it as a dipper. These enhancements allow you to personalize your S'mores Dip. For the Full Recipe, follow the steps to create this warm and chewy delight. Enjoy the process! First, preheat your oven to 350°F (175°C). This step is key for a great dip. Next, gather all your materials. You need a medium mixing bowl, a small oven-safe dish, and measuring cups. Having everything ready makes the process smooth and fun. In the mixing bowl, combine 1 cup of semi-sweet chocolate chips and 2 tablespoons of melted butter. Stir well until the chocolate is fully coated in butter. This helps the flavors blend. Now, add 1 teaspoon of vanilla extract and a pinch of sea salt. Mix everything until it’s nice and smooth. This blend is the heart of your dip. Next, transfer the chocolate mixture to your baking dish. Spread it evenly across the bottom. This ensures every bite has that rich chocolate flavor. Now, sprinkle 1 cup of mini marshmallows over the chocolate layer. For an extra crunch, layer 1/2 cup of graham cracker crumbs on top of the marshmallows. This gives a nod to the classic s’mores experience. Now it’s time to bake! Place the dish in the oven and bake for about 10 minutes. Keep an eye on it. You want the marshmallows to puff up and turn a lovely golden brown. This step makes your dip look inviting and taste amazing. Once done, let it cool for a minute before serving. Enjoy your delicious S'mores Dip! For the full recipe, check the recipe card above. To make the best S'mores Dip, always use semi-sweet chocolate. This choice gives the dip a rich, balanced flavor. Dark chocolate can be too bitter, while milk chocolate is often too sweet. Each oven is unique, so check your dip a few minutes early. Some ovens run hot, and you don’t want burnt marshmallows. For a fun dipping experience, try using graham crackers and fresh fruit slices. Apples and bananas add a nice twist to the classic graham cracker. Present the dip in a colorful bowl and surround it with the dippers. This makes it look inviting and fun for guests. You can also drizzle some melted chocolate on top for a fancy touch. One common mistake is overbaking the marshmallows. Keep an eye on them. They should be golden brown, not black. Another mistake is using the wrong type of pan. A non-stick oven-safe dish works best. Avoid using glass pans, as they can break under high heat. Stick to sturdy metal or ceramic options for best results. {{image_2}} You can change the taste of your S'mores Dip easily. Adding fruit like strawberries or bananas gives a fresh twist. The sweet fruit pairs well with the rich chocolate and gooey marshmallows. You could also try different types of chocolate. Dark chocolate adds a rich, bold flavor. Milk chocolate brings a classic sweetness. White chocolate offers a creamy, dreamy vibe. Each choice changes the dip's taste and makes it fun to try new things. Want to make your S'mores Dip fit special diets? You can use gluten-free graham crackers. They taste great and keep the crunch you want. If you're dairy-free, look for dairy-free chocolate options. These chocolates melt well and still taste amazing. You can enjoy the same warm and chewy treat without worry. Get creative with themed versions of S'mores Dip. For Halloween, add candy corn on top. The colorful candy adds a fun look and a sweet taste. In fall, try a seasonal version using pumpkin spice. Just sprinkle a little pumpkin spice in the chocolate layer. It gives your dip a warm, cozy flavor perfect for chilly days. Each theme adds a festive touch to your S'mores Dip delight. To store your S'mores Dip, let it cool to room temperature first. Then, transfer it to an airtight container. You can use a glass or plastic container with a tight seal. This keeps the dip fresh and tasty. If you have leftover graham crackers, store them separately to prevent them from getting soggy. When it’s time to enjoy the dip again, you want to reheat it gently. The best way is to use your oven. Preheat it to 350°F (175°C) and place the dip in an oven-safe dish. Heat it for about 10 minutes. This method keeps the texture smooth and the marshmallows fluffy. You can also use the microwave. Heat it in short bursts of 15-20 seconds. Stir between each burst to avoid overheating. Your S'mores Dip can last up to three days in the fridge. After that, the flavor may change. Look for signs of spoilage before eating. If you see mold or if it smells off, it’s best to throw it away. Keeping it in a sealed container helps maintain its quality for longer. Yes, you can prep S'mores Dip ahead. Mix the chocolate and butter, then add the vanilla and salt. Store this mix in the fridge. When ready to bake, take it out, let it warm up, and add marshmallows and crumbs before baking. If you need a change, try different dippers. Pretzels, cookies, or even fruit slices work well. For a crust, use crushed Oreos or gluten-free cookies. These options add fun flavors and textures. Absolutely! For outdoor fun, use a portable oven-safe dish. Keep the dip covered to protect it from dirt and bugs. Bring along dippers in a separate container to keep everything fresh and clean. This recipe serves 4 to 6 people. Each person can enjoy a good portion. If you have a crowd, double the recipe. It’s a hit at parties and gatherings, so plan ahead! Yes, you can! In a microwave-safe dish, mix the chocolate and butter. Heat it in short bursts until melted, stirring often. Add the vanilla and salt, then top with marshmallows and crumbs. Microwave until the marshmallows puff up, about 30 seconds. Enjoy this quick version anytime! For the full recipe, check out the details above. This blog post covered how to make a delicious S'mores Dip. We outlined the ingredients and shared tips for perfecting your dip. Each step, from mixing to baking, is easy to follow and fun. You learned about variations to make it your own, along with storage tips. In the end, creating this treat brings joy. It’s perfect for parties or cozy nights. Enjoy experimenting and sharing this tasty dip with friends and family. You’ll love every sweet bite!

S’mores Dip Delightfully Warm and Chewy Treat

Craving a cozy treat that’s simple and delicious? I’ve got just the thing—S’mores Dip! This warm and chewy dessert brings

For this Mediterranean quinoa salad, you need fresh and vibrant items. Here’s what you'll need: - 1 cup quinoa, rinsed - 2 cups vegetable broth - 1 cup cherry tomatoes, halved - 1 cucumber, diced - 1 red bell pepper, diced - 1/2 red onion, finely chopped - 1 can (15 oz) chickpeas, drained and rinsed - 1/4 cup Kalamata olives, pitted and sliced - 1/4 cup feta cheese, crumbled (optional) - 1/4 cup fresh parsley, chopped These ingredients bring color and nutrition to the dish. They also create a mix of textures that makes each bite delightful. You can change up the salad by adding some optional ingredients. Some great choices include: - Avocado, diced - Spinach or arugula, chopped - Sun-dried tomatoes, chopped - Artichoke hearts, quartered These add-ins let you customize the salad to fit your taste. Feel free to mix and match based on what you have on hand! The dressing is key to making this salad shine. You need these simple ingredients: - 3 tablespoons olive oil - 2 tablespoons lemon juice - 1 teaspoon dried oregano - Salt and pepper to taste Whisk these together to get a zesty, fresh flavor. This dressing ties all the ingredients together, enhancing the salad's overall taste. You can find the full recipe to make this dish perfect! Start by rinsing 1 cup of quinoa under cold water. This removes any bitter taste. In a medium pot, mix the quinoa with 2 cups of vegetable broth. Bring it to a boil over high heat. Once boiling, lower the heat to low. Cover the pot and let it simmer for 15 minutes. The quinoa should become fluffy and absorb all the liquid. After cooking, remove it from heat and let it cool slightly. In a large mixing bowl, add the following ingredients: - 1 cup cherry tomatoes, halved - 1 cucumber, diced - 1 red bell pepper, diced - 1/2 red onion, finely chopped - 1 can (15 oz) chickpeas, drained and rinsed - 1/4 cup Kalamata olives, pitted and sliced - 1/4 cup feta cheese, crumbled (optional) - 1/4 cup fresh parsley, chopped Gently mix these ingredients together. This creates a colorful and tasty base for your salad. In a separate bowl, whisk together: - 3 tablespoons olive oil - 2 tablespoons lemon juice - 1 teaspoon dried oregano - Salt and pepper to taste This dressing will add brightness to your salad. Adjust the seasoning based on your taste. If you like it more tangy, add more lemon juice. Once the quinoa is cool, add it to the bowl with the chopped veggies and chickpeas. Drizzle the dressing over the salad. Toss everything gently to combine. Make sure all ingredients are well-coated. Taste the salad and adjust seasonings if needed. Cover the bowl and refrigerate for at least 30 minutes. This allows the flavors to meld beautifully. Enjoy your fresh Mediterranean Quinoa Salad! For the complete recipe, check the Full Recipe. To make your quinoa just right, rinse it well. Rinsing removes the bitter coating called saponin. Use two cups of vegetable broth for one cup of quinoa. This adds flavor and keeps it moist. Cook it on low heat for 15 minutes. When done, let it sit covered for five more minutes. Fluff it with a fork before mixing into the salad. This gives it a light and airy texture. Fresh herbs make a big difference in taste. I love using parsley, basil, or mint. They add freshness and brightness. Chop the herbs finely for even flavor. You can also try dried herbs like oregano or thyme. These add depth even when fresh herbs are not available. Mix them into the salad just before serving for the best flavor. Serve the Mediterranean quinoa salad in a big bowl or on individual plates. For a nice touch, add a lemon wedge on the side. This adds a pop of color and extra zing. You can also sprinkle more feta cheese on top if you like. Pair it with grilled chicken or fish for a full meal. This salad is great as a main dish or a side. For the full recipe, check the earlier section. {{image_2}} You can change your salad with seasonal veggies. Think about using fresh ingredients based on what’s in season. In spring, try adding peas or asparagus. In summer, add zucchini or bell peppers. Autumn favorites like roasted butternut squash can add warmth. Winter brings hearty greens like kale or spinach. These changes keep the dish fresh and exciting. If you want a vegan option, skip the feta cheese. You can use avocado for creaminess instead. Another choice is to add more chickpeas for protein and texture. You might also try adding nuts or seeds, like sunflower seeds or pumpkin seeds. This keeps the salad tasty and rich in nutrients while staying plant-based. For a heartier meal, consider adding protein. Grilled chicken works well and adds flavor. You can also cube cooked chicken and mix it in. If you prefer plant-based protein, try marinated tofu. Just press and cube it before adding to the salad. Both options make the dish filling and satisfying. For the full recipe, refer back to the earlier section. To keep your Mediterranean quinoa salad fresh, store it in an airtight container. This helps to lock in flavors and prevents it from drying out. Place it in the fridge right after you finish eating. It’s best to consume the salad within three days for optimal taste. If you want to enjoy your salad warm, you can lightly reheat it. Place it in a microwave-safe bowl. Heat it for about 30 seconds to one minute. Mix it well to ensure even heating. If you prefer it cold, add a splash of olive oil or lemon juice to refresh the flavors. This will make it taste bright again. The salad lasts about three days in the fridge. If you want to freeze it, keep in mind that some ingredients might change in texture. Quinoa can freeze well, but veggies may become mushy after thawing. For best results, freeze the salad without dressing. When ready to eat, let it thaw in the fridge overnight. You can then add fresh dressing before serving. For the full recipe, check out the Mediterranean Quinoa Salad details above! To make Mediterranean Quinoa Salad, start by cooking the quinoa. Combine 1 cup of rinsed quinoa and 2 cups of vegetable broth in a pot. Bring it to a boil, then lower the heat. Cover and let it simmer for 15 minutes. When done, let it cool. In a big bowl, mix halved cherry tomatoes, diced cucumber, diced red bell pepper, finely chopped red onion, and drained chickpeas. You can add Kalamata olives and crumbled feta cheese if you like. In a separate bowl, whisk olive oil, lemon juice, dried oregano, salt, and pepper. Add the cooled quinoa to the bowl with veggies. Drizzle the dressing over it and toss gently. Chill it for 30 minutes before serving. You can check the [Full Recipe] for detailed steps. You can swap out ingredients based on what you have. Instead of chickpeas, try black beans or lentils for protein. If you don’t have feta cheese, use goat cheese or skip it for a vegan option. For the dressing, swap lemon juice with vinegar, like red wine or apple cider. Change the veggies too! You can use zucchini, carrots, or even roasted red peppers. These swaps keep the salad fresh and fun. Yes, you can prepare this salad ahead of time! It actually tastes better after chilling in the fridge. Make it a few hours before serving, or even a day before. Just keep it covered in the fridge. Before serving, taste it again. You might need to add more salt or lemon juice for flavor. Yes, Mediterranean Quinoa Salad is gluten-free! Quinoa is a great gluten-free grain. If you use gluten-free broth and check your dressing, you’ll have a tasty dish safe for those avoiding gluten. Enjoy this colorful salad without worries! In this post, we explored making a tasty Mediterranean quinoa salad. We covered key ingredients, step-by-step instructions, and added tips for flavor. You learned how to store leftovers and even variations to try. Remember, you can adapt this salad to fit your taste. It’s easy to make and packed with nutrients. Enjoy your cooking and create your own perfect version of this delicious dish!

Mediterranean Quinoa Salad Fresh and Flavorful Dish

Looking for a fresh dish that bursts with flavor? You’ve found it! Mediterranean Quinoa Salad is a delightful mix of

To make chickpea flour pancakes, gather the following ingredients: - 1 cup chickpea flour (besan) - 1 cup water - 1/2 teaspoon turmeric powder - 1/2 teaspoon cumin powder - 1/4 teaspoon red chili powder (optional) - Salt to taste - 1/2 cup chopped spinach - 1/2 cup diced tomatoes - 1/4 cup finely chopped onion - 2 tablespoons chopped fresh cilantro - 2 tablespoons olive oil (for cooking) Chickpea flour is high in protein and fiber. It keeps you full. Turmeric has anti-inflammatory properties and adds bright color. Cumin boosts digestion. Spinach adds vitamins A and K. Tomatoes give you antioxidants. Onions provide flavor and vitamins. Cilantro offers freshness and helps detoxify. Olive oil is a healthy fat that improves heart health. When choosing chickpea flour, look for a fine texture. It should feel soft to the touch. Check the color; it should be a light yellow. Avoid any that look dark or have an off smell. Fresh flour is key to great pancakes. Store it in a cool, dry place to keep it fresh longer. Making chickpea flour pancakes is simple and fun. Here’s how you do it: 1. In a bowl, mix the chickpea flour, turmeric, cumin, red chili powder, and salt. 2. Gradually add water while whisking. Keep mixing until the batter is smooth. 3. Fold in the spinach, tomatoes, onion, and cilantro. Make sure they are well mixed. 4. Heat a non-stick skillet on medium heat. Add a tablespoon of olive oil. 5. Pour a ladle of batter onto the skillet. Spread it into a circle about 6 inches wide. 6. Cook for 2-3 minutes. Look for bubbles on the surface and lifted edges. 7. Flip the pancake carefully. Cook for another 2-3 minutes until golden brown. 8. Repeat this with the remaining batter, adding more oil as needed. 9. Serve hot with chutney, yogurt, or avocado slices. To get the best texture, here are a few tips: - Whisk well: Ensure there are no lumps in the batter. Smooth batter leads to soft pancakes. - Heat control: Keep your skillet on medium heat. Too hot can burn the pancakes. - Rest your batter: Let the batter sit for 5-10 minutes. This helps the flour absorb water well. - Cooking time: Don’t rush. Wait for bubbles to form before flipping. This shows it's ready. Chickpea flour pancakes are tasty any time. Here are some ideas for serving: - Pair them with fresh chutney for a zesty kick. - Use yogurt on the side for a creamy touch. - Add slices of avocado for healthy fats and creaminess. - Top with fresh herbs for added flavor and color. Enjoy your delicious chickpea flour pancakes! For the full recipe, check the above section. When making chickpea flour pancakes, avoid a few common pitfalls. First, don’t skip the whisking step. If you don’t whisk well, your batter may have lumps. Always add water slowly to get a smooth mix. This makes the pancakes light and fluffy. Another mistake is cooking at too high a heat. If your skillet is too hot, the outside may burn while the inside stays raw. Keep the heat at medium. This helps cook them evenly. Also, don’t forget to adjust the salt. Taste your batter before cooking. If it’s bland, add a bit more salt to enhance flavor. If you have leftover pancakes, storing them is easy. Let them cool completely first. Once cool, stack them with parchment paper between each pancake. This prevents sticking. Place the stack in an airtight container. You can store them in the fridge for up to three days. For longer storage, freeze them. Wrap each pancake in plastic wrap and place them in a freezer bag. They can last for up to two months in the freezer. Using the right tools makes cooking easier. A non-stick skillet is key for pancakes. It prevents sticking and makes flipping simple. A ladle helps pour the batter evenly. Invest in a good whisk. It makes mixing the batter smooth and quick. A spatula is also important for flipping the pancakes without breaking them. To spice things up, try using a mixing bowl with a lid. This helps you store leftover batter easily. For the best results, stick with quality kitchen tools. They can improve your cooking experience. For the complete recipe, check out the Full Recipe section above. {{image_2}} You can easily change the taste of your chickpea flour pancakes. Try adding garlic powder, onion powder, or herbs like oregano or basil. You can also mix in grated cheese for a rich flavor. For a spicy kick, add jalapeños or black pepper. These simple changes can make your pancakes exciting and new. Chickpea flour is naturally gluten-free, so it’s great for anyone with gluten issues. If you want to add more texture, try mixing in gluten-free oats or quinoa. You can also substitute some chickpea flour with almond flour for a nutty taste. Both options will keep your pancakes delicious and gluten-free. Toppings can change the way your pancakes taste. For a fresh touch, use avocado slices or a dollop of yogurt. You can also add fresh salsa or chopped herbs on top. If you want something sweet, drizzle maple syrup or honey over your pancakes. These toppings will make your meal more enjoyable and fun to eat. Check out the Full Recipe for more ideas! To keep your chickpea flour pancakes fresh, let them cool first. Then, stack the pancakes with parchment paper between each one. This method helps prevent sticking. Place the stack in an airtight container. Store it in the fridge for up to three days. If you want to save them for longer, consider freezing. When you are ready to enjoy your leftovers, reheat them properly. The best way is to use a skillet. Heat the skillet over medium heat and add a little oil. Place the pancake in the skillet and warm it for about two minutes on each side. This method keeps them crispy. You can also use a microwave if you're in a hurry. Just heat for about 30 seconds, but this may make them soft. For long-term storage, freezing is a great option. Place your cooled pancakes in a single layer on a baking sheet. Freeze them for about an hour. This step helps them stay separate. Once frozen, transfer them to a freezer-safe bag. They can last up to two months in the freezer. When you want to eat them, just reheat straight from frozen. Enjoy your chickpea flour pancakes anytime! Chickpea flour pancakes are thin, savory pancakes made from ground chickpeas. They are gluten-free and packed with protein. These pancakes use chickpea flour, also known as besan. I mix it with water and spices for flavor. You can add veggies like spinach or tomatoes for extra nutrition. Yes, you can easily make chickpea flour pancakes vegan. The main ingredients are chickpea flour and water. Since these are plant-based, they fit a vegan diet. Just avoid adding any animal products. You can also use plant-based oil for cooking. You can tell pancakes are done when bubbles form on the surface. The edges will start to lift, showing they are cooked. Flip them gently and cook the other side until golden brown. This usually takes about 2-3 minutes on each side. You can serve chickpea flour pancakes with many tasty options. Some favorites include yogurt, chutney, or avocado slices. Fresh herbs like cilantro add a nice touch too. Feel free to pair them with your favorite sauces or dips. Absolutely! Chickpea flour is versatile and can be used in many recipes. You can make fritters, bread, or even thickening sauces. It works well in gluten-free baking too. Explore your creativity and try chickpea flour in different dishes. Chickpea flour pancakes are fun to make and delicious to eat. You will need a few simple ingredients. Here is what you need: - 1 cup chickpea flour (besan) - 1 cup water - 1/2 teaspoon turmeric powder - 1/2 teaspoon cumin powder - 1/4 teaspoon red chili powder (optional) - Salt to taste - 1/2 cup chopped spinach - 1/2 cup diced tomatoes - 1/4 cup finely chopped onion - 2 tablespoons chopped fresh cilantro - 2 tablespoons olive oil (for cooking) Now, let's get cooking! First, mix your dry ingredients. In a bowl, combine the chickpea flour, turmeric, cumin, optional chili powder, and salt. Stir this well to blend the spices. Next, add the water slowly while whisking. You want to make a smooth batter, without lumps. If you see lumps, whisk harder. It's important for a nice texture. Once your batter is smooth, fold in your veggies. Add the chopped spinach, diced tomatoes, chopped onion, and cilantro. Mix gently so everything is evenly spread out. Now, heat a non-stick skillet over medium heat. Pour a tablespoon of olive oil into the skillet. When the oil is hot, pour a ladleful of batter into the skillet. Shape it into a circle about six inches wide. Cook for 2-3 minutes. You will see bubbles form on the pancake. The edges should start to lift. This means it’s time to flip it! Carefully turn the pancake and cook the other side for another 2-3 minutes until it is golden brown. Repeat this for the rest of the batter. Make sure to add more oil to the skillet as needed. Serve your pancakes hot. They taste great with chutney, yogurt, or avocado slices. Enjoy your meal! Chickpea flour pancakes are nutritious and easy to make. We’ve covered ingredients, preparation, and helpful tips. You can enjoy various flavors and creative toppings. Remember to avoid common mistakes for the best results. Store leftovers properly for later enjoyment. With this guide, you can master these tasty pancakes and impress anyone you share them with. Enjoy cooking, and have fun experimenting with your own ideas!

Chickpea Flour Pancakes Easy and Delicious Recipe

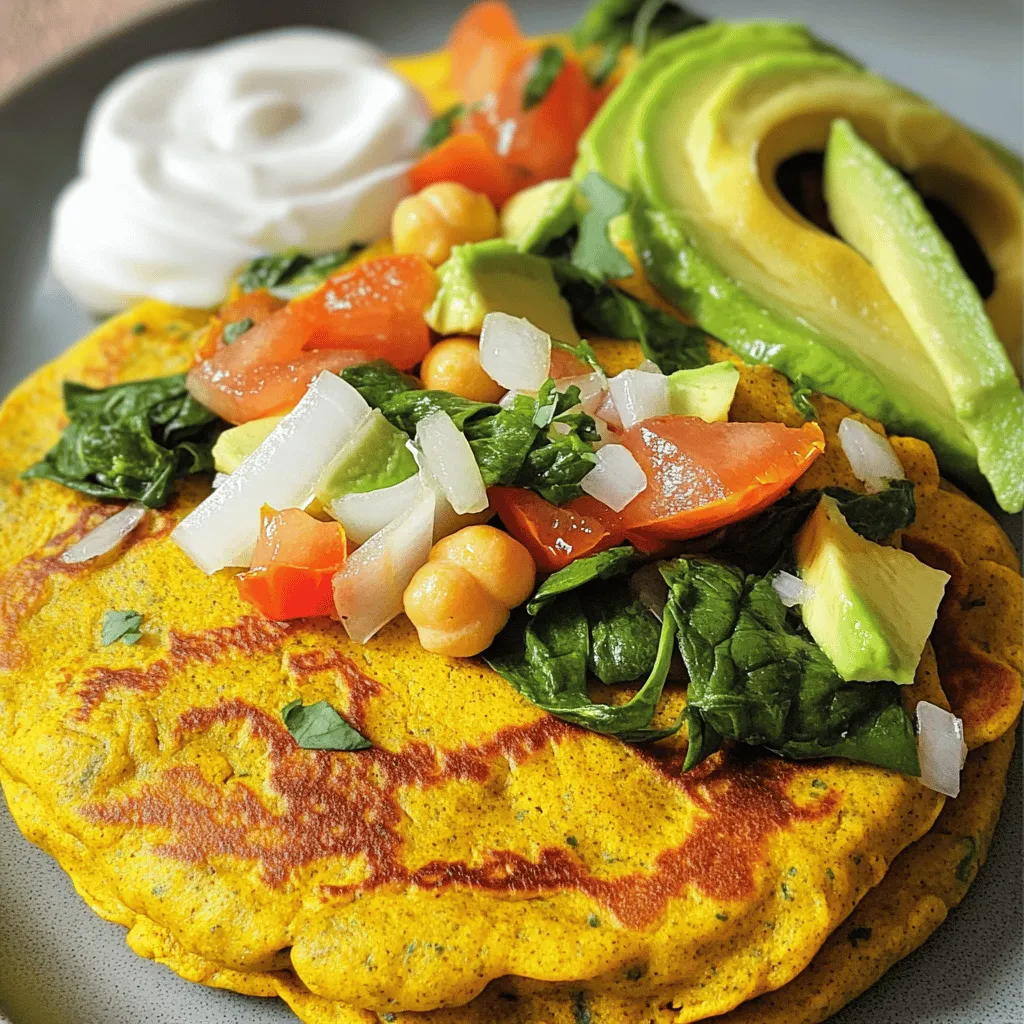
Looking for a tasty and simple pancake recipe? Chickpea flour pancakes are an excellent choice! They’re packed with nutrients and

- 1 cup red lentils, rinsed - 1 can (14 oz) coconut milk - 1 medium onion, chopped - 3 cloves garlic, minced - 1 tablespoon ginger, minced - 1 tablespoon curry powder - 1 teaspoon turmeric powder - 1 teaspoon cumin - 1 can (14 oz) diced tomatoes (with juice) - 2 cups vegetable broth - 2 cups fresh spinach, chopped - 1 tablespoon olive oil - Salt and pepper to taste - Fresh cilantro for garnish - Additional spices (e.g., coriander, cayenne) - Vegetables (e.g., bell peppers, carrots) - Protein options (e.g., tofu, chickpeas) To make Coconut Curry Lentils, gather these ingredients. I love using red lentils for their quick cooking time. They become soft and creamy. Coconut milk adds richness and a hint of sweetness. The onion, garlic, and ginger create a flavorful base. Spices like curry powder and turmeric bring warmth and color. Diced tomatoes add freshness and acidity. Vegetable broth ensures a rich flavor. Fresh spinach gives a nice pop of green and nutrients. Olive oil helps sauté the onions and spices. Feel free to experiment with optional ingredients. Adding bell peppers or carrots can give more texture. Tofu or chickpeas can boost your protein. Each choice brings a new depth to your dish. You can find the full recipe at the end of this section. By mixing and matching, you make this dish your own. Enjoy the cooking and the delicious results! - Heat 1 tablespoon of olive oil in a large pot over medium heat. - Add 1 medium chopped onion and sauté until it becomes soft and clear. - Stir in 3 minced garlic cloves and 1 tablespoon of minced ginger. Cook for one minute. - Add 1 tablespoon of curry powder, 1 teaspoon of turmeric, and 1 teaspoon of cumin. Stir for 1 to 2 minutes to boost the flavors. - Pour in 1 cup of rinsed red lentils, 1 can of diced tomatoes (with juice), and 2 cups of vegetable broth. Bring this mixture to a boil. - Once it boils, reduce the heat to low and let it simmer for about 20 minutes. Check until the lentils are tender. - Stir occasionally to stop sticking. After 20 minutes, add 1 can (14 oz) of coconut milk and 2 cups of chopped spinach. Cook for another 5 minutes until the spinach wilts. - Season your dish with salt and pepper to taste. - Serve hot, garnished with fresh cilantro. Enjoy your creamy and tasty Coconut Curry Lentils! For the full recipe, check the earlier section. - Rinse lentils properly to remove impurities. This step is key to clean flavor. - Adjust cooking time based on lentil type. Red lentils cook fast, while green ones take longer. - Toast spices for a deeper flavor profile. Just a minute can make a big difference. - Experiment with extra herbs or garnishes. Fresh cilantro adds brightness and flavor. - Pair with rice or naan for a complete meal. This combo brings balance and comfort. - Serve with a side salad for added freshness. A crisp salad enhances the dish’s warmth. For more details, check the Full Recipe. {{image_2}} Coconut curry lentils are easy to adapt. You can make them vegan and gluten-free. Just check the broth and spices used. If you want less heat, reduce the spices. For a spicier dish, add more curry powder or fresh chili. You can switch some ingredients to change the taste. For a richer texture, use coconut cream instead of coconut milk. If you don’t have lentils, try beans like chickpeas or black beans. Quinoa is also a great option for a different twist. You can give this dish a fun twist with global flavors. For a Thai touch, add lemongrass to the pot. It brings a bright, fresh flavor. If you prefer Indian flavors, toss in some cashews. They add a nice crunch and taste. Explore these variations to keep your meals exciting! Store leftover Coconut Curry Lentils in an airtight container. This keeps them fresh in the fridge. It’s best to use them within three to four days. Make sure to let them cool down before sealing the container. This helps avoid condensation that can make your lentils soggy. You can freeze Coconut Curry Lentils for up to three months. First, let the lentils cool completely. Then, place them in freezer-safe bags or containers. Remove as much air as possible. This helps keep the flavor and texture. When you’re ready to eat, thaw them overnight in the fridge. Reheat on the stove or in the microwave. Add a splash of vegetable broth to help restore creaminess. In the fridge, your Coconut Curry Lentils last for about four days. In the freezer, they stay good for about three months. Always check for any off smells or changes in texture before eating. Proper storage keeps your meal tasty and safe. Enjoy every last bite! Lentils are packed with fiber. They help you feel full and aid digestion. They also provide a great source of protein. This is key for muscle health and keeping energy levels steady. Coconut milk adds healthy fats to your meal. These fats can support heart health and give you energy. Together, lentils and coconut milk make a nutritious and tasty dish. Yes, you can make Coconut Curry Lentils ahead of time. Prepare the dish and cool it down. Store it in an airtight container in the fridge. It will stay fresh for up to four days. You can also freeze it for up to three months. Just reheat it slowly on the stove or in the microwave. Stir well to keep it creamy. Coconut Curry Lentils pair well with rice or naan. You can serve it with a simple side salad for freshness. Grilled vegetables also make a great complement. For a protein boost, consider adding tofu or a dollop of yogurt. These sides enhance the meal and add variety. To make your Coconut Curry Lentils creamier, try adding more coconut milk. You can also blend a portion of the lentils after cooking. This will create a smooth texture. Adding a bit of cashew cream can also help. Don’t forget to stir well for even creaminess. Yes, you can use different types of lentils. Red lentils cook quickly and become soft. Green or brown lentils take longer to cook but hold their shape. Adjust cooking times based on the type you use. Always rinse your lentils before cooking for the best results. For the full recipe, check out the details above. In this post, we explored how to make Coconut Curry Lentils. We started with key ingredients, like lentils and coconut milk, and detailed easy steps for cooking. I shared tips for perfect lentils and variations to suit your taste. You can store leftovers with ease and enjoy this dish later. Final thoughts: This recipe is flexible and packed with flavor. It’s a great way to enjoy healthy ingredients while having fun in the kitchen.

Coconut Curry Lentils Flavorful and Nourishing Meal

Are you ready to enjoy a meal that’s both hearty and flavorful? Coconut Curry Lentils are not just easy to

- 1 can (15 oz) chickpeas, drained and rinsed - 1 large roasted red pepper, peeled and chopped - 2 tablespoons tahini Chickpeas are the base of this hummus. They add creaminess and protein. Roasted red peppers bring a sweet, smoky flavor. You can use store-bought or homemade. Tahini adds a nutty taste and smooth texture. - 2 tablespoons olive oil - 2 tablespoons lemon juice - 1 garlic clove, minced Olive oil gives richness. It also helps the hummus blend smoothly. Lemon juice adds brightness and a bit of zing. Garlic gives a nice kick. Just one clove is enough for flavor without being overpowering. - 1/2 teaspoon cumin - Salt to taste - Fresh parsley for garnish - Paprika for sprinkling Cumin adds warmth and depth. Use salt to enhance all the flavors. Fresh parsley adds a pop of color. A sprinkle of paprika gives a nice touch. For the full recipe, check the details provided. Draining and Rinsing Chickpeas Start by opening the can of chickpeas. Pour them into a strainer and rinse them under cold water. This helps remove excess salt and makes the hummus smoother. Let them drain well for a few minutes. Preparing Roasted Red Pepper If using a store-bought roasted red pepper, simply take it out of the jar and chop it into pieces. If you prefer to roast your own, place a whole red pepper on a baking sheet. Roast it in the oven at 450°F for about 20-30 minutes. Once it cools, peel off the skin and chop it. Combining Ingredients in Food Processor In a food processor, add the drained chickpeas, chopped roasted red pepper, tahini, olive oil, lemon juice, minced garlic, cumin, and a pinch of salt. This mix gives our hummus a rich flavor. Achieving Desired Consistency Blend the mixture on high speed until it is smooth. If it feels too thick, you can add water. Do this slowly, one tablespoon at a time, until you find the perfect creamy texture. Adjusting Seasoning After blending, taste the hummus. You might want to add more salt or lemon juice to enhance the flavor. This step is key to making your hummus delicious. Garnishing and Serving Once it’s nice and creamy, transfer the hummus to a bowl. Drizzle a little olive oil on top. Sprinkle some paprika and chopped fresh parsley for a pop of color. Serve it with pita chips, fresh veggies, or use it as a spread in sandwiches. For the full recipe, check out Roasted Red Pepper Hummus Delight. To make great hummus, texture is key. First, drain your chickpeas well. If they are too wet, your hummus will be runny. I like to rinse them under cold water for a few seconds. This helps remove extra salt and any canning liquid. Next, add water slowly. Start with one tablespoon at a time. Blend the mixture until smooth. If it feels thick, keep adding water. You want a creamy dip, not a soup! Fresh roasted red peppers make a big difference. They add a sweet taste that store-bought peppers can’t match. If you use store-bought, look for ones packed in water. They should taste good and be bright in color. You can also spice things up! Try adding smoked paprika for a smoky flavor. Or, a pinch of cayenne if you like heat. Experiment with spices to find your favorite mix. Serve your hummus with pita chips or fresh veggies. Carrots, cucumbers, and bell peppers are great choices. They add crunch and color to your plate. For a nice touch, garnish the hummus. Drizzle olive oil on top and sprinkle smoked paprika. Add fresh parsley for a pop of green. This makes your dish look pretty and inviting. Try out these tips for the best Roasted Red Pepper Hummus. You can find the Full Recipe at the beginning of this article. Enjoy! {{image_2}} You can easily change up your roasted red pepper hummus to make it even tastier. Here are two fun options: - Spicy Roasted Red Pepper Hummus: Add one or two sliced jalapeños or a dash of cayenne pepper. This gives your hummus a nice kick. - Mediterranean Herb-Infused Hummus: Mix in fresh herbs like basil or oregano. This adds a fresh, vibrant taste that pairs well with the roasted pepper. Making hummus that fits different diets is simple. Here are some ideas to try: - Nut-Free Alternatives: If you want a nut-free version, skip the tahini. You can use sunflower seed butter instead. It keeps the creaminess without any nuts. - Vegan-Friendly Options: The recipe is already vegan, but you can add a splash of extra olive oil for richness. This keeps it creamy and satisfying. When hosting, you might need to adjust how much hummus you make. Here’s how to do that: - Scaling for Larger Gatherings: Double or triple the recipe for big parties. Just ensure you have enough chickpeas and peppers. - Individual Serving Ideas: For a fun twist, serve hummus in small cups with veggie sticks. This makes it easy for guests to grab and enjoy. For the full recipe, check out the Roasted Red Pepper Hummus Delight 🥙. To keep your roasted red pepper hummus fresh, store it in an airtight container. This helps lock in flavor and moisture. The hummus will stay good in the fridge for about 4 to 5 days. If you notice any change in smell or color, it’s best to toss it. You can freeze hummus, but there are some tips to follow. First, scoop it into a freezer-safe container. Leave some space at the top, as hummus can expand when frozen. It will keep well for about 3 months. To thaw, place the container in the fridge overnight. When ready to use, stir it well. If it seems dry, mix in a bit of water or olive oil to regain creaminess. For storing hummus, glass or plastic containers work well. Ensure they have tight-sealing lids. This keeps air out and prevents spoilage. If you want easy access, consider portioning your hummus into smaller containers. This way, you can take out just what you need without exposing the whole batch to air each time. Roasted red pepper hummus is a smooth dip made from chickpeas and roasted peppers. It has a vibrant color and rich flavor. This dish is popular for parties, snacks, and spreads. The roasted red pepper adds a sweet and smoky taste, making it a favorite among many. You can enjoy it with pita chips, fresh veggies, or use it in sandwiches. This easy-to-make dip brings joy to many meals. To add some heat to your hummus, consider these options: - Add a pinch of cayenne pepper. - Mix in some chopped jalapeños. - Use spicy roasted red peppers instead of the mild ones. - Stir in a dash of hot sauce for extra kick. These simple tweaks can boost the flavor and heat. Adjust to your taste and enjoy! Yes, you can use dried chickpeas! Here’s how: 1. Soak the dried chickpeas in water overnight. 2. Drain and rinse them. 3. Cook the chickpeas in boiling water for about 1 to 2 hours until tender. 4. Drain them again before using in your hummus. Using dried chickpeas may take longer, but it adds a lovely texture. You can find pre-made hummus at most grocery stores. Look in the refrigerated section. Popular brands often include: - Sabra - Tribe - Cedar’s Check the labels for quality. Look for options with simple ingredients for the best taste. Many stores also have organic or local brands to try. Yes, roasted red pepper hummus is healthy! It is packed with nutrients. Here are some benefits: - Chickpeas are high in protein and fiber. - Olive oil adds healthy fats. - Roasted red peppers provide vitamins A and C. This dip is low in calories and great for snacking. Just watch the portion sizes if you are mindful of your intake. Enjoy it guilt-free! To make roasted red pepper hummus, we covered key ingredients, from chickpeas to spices. I shared step-by-step instructions to ensure perfect texture and flavor. You can adapt this recipe to suit your taste and dietary needs, whether it's spicy or nut-free. For storage, remember how to keep it fresh and delicious. Overall, this hummus is not just tasty; it's healthy and easy to make. Enjoy your cooking and impress your guests with this flavorful dip!

Roasted Red Pepper Hummus Creamy and Flavorful Dip

Get ready to make the best Roasted Red Pepper Hummus you’ve ever tasted! This creamy, flavorful dip combines simple ingredients

To make a great cheesy cauliflower bake, you need these simple ingredients: - 1 large head of cauliflower, cut into florets - 1 cup shredded cheddar cheese - 1 cup mozzarella cheese, shredded - 1 cup cream cheese, softened - 1 cup milk - 2 cloves garlic, minced - 1 teaspoon onion powder - 1 teaspoon garlic powder - Salt and pepper to taste - 1/2 cup grated Parmesan cheese - 1/4 cup chopped fresh parsley (for garnish) You will need a few tools to make this dish: - A large pot for boiling - A large mixing bowl - A whisk for blending - A 9x13 inch baking dish - A knife and cutting board for chopping Choosing the right ingredients is key. Here’s how to pick the best: - Cauliflower: Look for a fresh head with tight, white florets. Avoid brown spots. - Cheese: Buy blocks of cheese and shred them yourself for better flavor. - Cream Cheese: Ensure it is softened to mix well with other ingredients. - Milk: Use whole milk for a creamier texture, but low-fat works too. - Garlic: Fresh garlic gives the best taste, but minced garlic from a jar works in a pinch. - Parsley: Fresh parsley adds color and a nice flavor. Dried parsley is not as good. Follow these tips and your cheesy cauliflower bake will shine. For the full recipe, check the details above. Start by boiling water in a large pot. Add a pinch of salt to the water. Once the water is bubbling, add the cauliflower florets. Blanch the cauliflower for about five minutes. You want it to be slightly tender but still firm. After five minutes, drain the cauliflower in a colander. Set it aside to cool for a moment. In a large bowl, mix the softened cream cheese and milk. Add the minced garlic, onion powder, garlic powder, salt, and pepper. Whisk until the mix is smooth and creamy. Next, fold in the shredded cheddar and mozzarella cheese. Save some cheese for the top. Stir gently to coat all the cheese in the creamy mix. Now, take a greased 9x13 inch baking dish. Pour the cheesy cauliflower mix into the dish and spread it out evenly. Sprinkle the reserved cheddar and mozzarella on top. Finish with grated Parmesan cheese for extra flavor. Place the dish in your preheated oven at 375°F (190°C). Bake for 25-30 minutes until the top is golden brown and bubbly. After baking, let it cool for a few minutes. Garnish with fresh chopped parsley before serving. Enjoy your delicious Cheesy Cauliflower Bake! For more details, check the Full Recipe. To get a great texture in your Cheesy Cauliflower Bake, focus on blanching. Blanch the cauliflower florets for about five minutes. This step softens them but keeps a nice crunch. After blanching, drain the florets well. If they hold too much water, the bake may become soggy. Then, mix the cauliflower with the cheese sauce gently. This will help each piece stay intact and coated. One common mistake is not salting the water when blanching. Salt adds flavor, and it helps the cauliflower taste better. Another mistake is overbaking. If you bake for too long, the dish can dry out. Watch for that golden, bubbly top. Finally, don't skip the fresh parsley. It adds a bright touch and a pop of color. To boost the flavor, try adding smoked paprika or cayenne pepper. Both will add a nice kick without being too spicy. You can also mix in cooked bacon for a smoky depth. Fresh herbs like thyme or rosemary can bring a new twist. Always taste the cheese sauce before mixing in the cauliflower. Adjust salt and pepper to your liking for the best flavor. For full instructions and a list of ingredients, refer to the Full Recipe. {{image_2}} To make a low-carb version, you can swap the cauliflower with broccoli. Broccoli has less sugar and keeps the dish healthy. You can also skip the cream and use almond milk instead. This option still tastes great and fits your diet. You can boost the dish by adding proteins or other veggies. Try cooked chicken, bacon, or even shrimp. For veggies, consider spinach or bell peppers. Mix them in with the cauliflower for extra flavor and nutrients. This makes your cheesy bake even more satisfying. Experimenting with cheese can change your dish's flavor. Swap cheddar or mozzarella with gouda or fontina. Each cheese brings a unique taste and texture. You can also mix in some blue cheese for a bold kick. The right cheese makes every bite delightful. For the complete recipe, check out the [Full Recipe]. After making the Cheesy Cauliflower Bake, let it cool. Once cooled, cover it tightly with plastic wrap or foil. It stays fresh in the fridge for up to three days. If you have leftovers, try to keep them in an airtight container. This helps to keep the flavors and moisture locked in. You can freeze Cheesy Cauliflower Bake for later. First, let it cool completely. Then, cut it into portions. Wrap each portion tightly in plastic wrap. Place them in a freezer-safe bag or container. This dish can last up to three months in the freezer. When you're ready to eat, just thaw it in the fridge overnight. Reheating is simple. For the best results, use the oven. Preheat your oven to 350°F (175°C). Place the dish in a baking pan and cover it with foil. Heat for about 20 minutes or until warmed through. You can also use the microwave. Just place a portion in a microwave-safe bowl and heat for 1-2 minutes. Stir halfway for even heating. Enjoy your cheesy comfort food! The cooking time for Cheesy Cauliflower Bake is about 25 to 30 minutes. You want the top to be golden and bubbly. Preheat your oven to 375°F (190°C) first. After baking, let it cool a bit before serving. This will help the dish set and make it easier to serve. Yes, you can make Cheesy Cauliflower Bake ahead of time. Prepare the dish and store it in the fridge. Just cover it well with plastic wrap or aluminum foil. When ready to bake, remove it from the fridge and let it sit for about 30 minutes. Then bake as directed. This makes it great for meal prep! Yes, Cheesy Cauliflower Bake is suitable for a gluten-free diet. All the ingredients used are gluten-free. Just ensure you check any processed items, like cheese, for gluten. This dish packs in flavor and comfort without any gluten worries. Enjoy it with confidence! In this blog post, we explored the key ingredients and step-by-step instructions for making a delicious Cheesy Cauliflower Bake. I shared tips for achieving the perfect texture and avoiding common mistakes. You can enhance the dish with various seasonings or opt for tasty variations. Remember to follow the storage tips for fresh leftovers. This dish is easy to make, full of flavor, and suits many dietary needs. Enjoy making your Cheesy Cauliflower Bake and share it with others! Your cooking skills will shine.

Cheesy Cauliflower Bake Savory and Comforting Dish

Are you ready to enjoy a tasty twist on a classic dish? My Cheesy Cauliflower Bake is a savory and

For this tasty dish, gather these key items: - 4 boneless, skinless chicken breasts - 1/4 cup olive oil - Juice of 2 lemons - Zest of 1 lemon - 3 cloves garlic, minced - 2 tablespoons fresh rosemary, chopped - 2 tablespoons fresh thyme, chopped - 1 tablespoon fresh parsley, chopped - Salt and pepper to taste These ingredients create a burst of flavor and make the chicken juicy. You can add extra flavors. Here are some ideas: - Red pepper flakes for heat - Honey for sweetness - Dijon mustard for tang - Other herbs like basil or oregano These add-ins can change the taste and make it your own. The marinade is key for flavor. It helps the chicken soak up taste. Here’s what makes it special: - Olive oil keeps the chicken moist. - Lemon juice adds brightness. - Garlic gives a strong, savory taste. - Fresh herbs bring earthiness and depth. Mix these components well to ensure every bite is full of flavor. Follow the [Full Recipe] for the complete guide. To make the marinade, start by gathering your ingredients. You will need olive oil, two lemons, garlic, and fresh herbs. In a mixing bowl, whisk together 1/4 cup of olive oil with the juice and zest of two lemons. Add three minced garlic cloves to the bowl. Then, include two tablespoons each of fresh rosemary and thyme. Finish with one tablespoon of chopped parsley. Mix everything well. This blend creates a bright and tangy flavor that makes the chicken shine. Now, it's time to marinate the chicken. Place four boneless, skinless chicken breasts in a resealable bag or a shallow dish. Pour the prepared marinade over the chicken. Make sure each piece is coated well. You want all the flavors to soak in. Seal the bag or cover the dish. Refrigerate for at least one hour. For deeper flavor, let it sit for up to four hours. Grilling the chicken is easy. First, preheat your grill to medium-high heat. Once hot, take the chicken out of the marinade and discard the leftover marinade. Place the chicken on the grill. Cook for about 6-7 minutes on each side. You want the chicken to reach an internal temperature of 165°F (75°C). This ensures it is safe to eat. When done, remove the chicken from the grill. Let it rest for five minutes before slicing. This helps keep the juices inside. Now, you are ready to serve a delicious meal. For the full recipe, check the link. To make the best lemon herb grilled chicken, focus on the marinade. Use fresh herbs for the best flavor. Combine olive oil, lemon juice, and zest in a bowl. Add minced garlic next. This mix adds depth to the chicken. Let the chicken soak in the marinade for at least one hour. For stronger taste, marinate for up to four hours. Preheat your grill to medium-high heat. This temperature helps to sear the chicken well. Remove the chicken from the marinade and discard the leftover liquid. Grill each breast for six to seven minutes on each side. Check the internal temperature; it needs to reach 165°F (75°C). This ensures the chicken is safe to eat and juicy. After grilling, let the chicken rest for five minutes. This step helps retain moisture. Slicing too soon can dry out your chicken. Use a sharp knife and cut against the grain. This keeps each piece tender. For a great look, arrange the sliced chicken on a platter with fresh herbs and lemon wedges. It makes the dish even more inviting. For the full recipe, check out the detailed steps above. {{image_2}} You can mix up the herbs for Lemon Herb Grilled Chicken. Try using basil or dill. These herbs add a fresh twist. You can also use spices like paprika or cumin. They bring warmth and depth to the dish. Want a kick? Add some red pepper flakes. This adds heat without overpowering the lemon. If you don’t have a grill, don’t worry. You can cook this chicken in the oven. Preheat your oven to 400°F (200°C). Place the marinated chicken on a baking sheet and cook for about 25-30 minutes. Check that the chicken reaches 165°F (75°C). You can also use a skillet. Heat some olive oil over medium heat, and cook the chicken for about 6-7 minutes on each side. Lemon Herb Grilled Chicken tastes great with many sides. Try serving it with a fresh salad or grilled veggies. It pairs well with rice or quinoa for a hearty meal. Add a slice of lemon on top for a bright look. You can also drizzle some extra olive oil for richness. Check out the Full Recipe for more ideas on how to serve this delicious dish! After enjoying your Lemon Herb Grilled Chicken, cool any leftovers. Place them in an airtight container. Store the container in the fridge. The chicken will stay fresh for about three to four days. Keep an eye on any changes in color or smell. You want to enjoy your meal at its best. To reheat, take the chicken out of the fridge. You can use an oven or a microwave. For the oven, set it to 350°F (175°C). Place the chicken on a baking sheet. Heat for about 10-15 minutes. If using a microwave, cover the chicken and heat in short bursts. Check every 30 seconds until warm. This keeps it juicy, not dry. If you have extra chicken, freezing is a great option. Wrap each piece tightly in plastic wrap. Then, place them in a freezer-safe bag. Squeeze out as much air as possible. Label the bag with the date. This chicken can last for up to three months in the freezer. When ready to eat, thaw it in the fridge overnight before reheating. Marinate the chicken for at least 1 hour. This helps the flavors soak in well. If you have more time, let it sit for up to 4 hours. The longer time gives the chicken a richer flavor. Just remember, don’t leave it too long, or it might get mushy. Yes, you can use bone-in chicken. It will take longer to cook, so plan for that. Bone-in pieces stay moist and flavorful. Just make sure to check the internal temperature with a meat thermometer. It should reach 165°F (75°C) for safe eating. Lemon Herb Grilled Chicken goes well with many sides. Here are some ideas: - Grilled vegetables - Garlic mashed potatoes - Quinoa salad - Steamed broccoli - Fresh green salad These sides balance the chicken's bright flavors. You can mix and match to suit your taste. Try different sides for variety! For the full recipe, check out the details above. In this post, we covered how to make Lemon Herb Grilled Chicken. You learned about key ingredients, marinades, and grilling techniques. I shared tips for perfecting the dish and suggested fun variations. You also got storage and reheating advice, plus answers to common questions. Lemon Herb Grilled Chicken can impress anyone at the table. With practice, you can create a meal that excites the taste buds. Enjoy cooking and experimenting with flavors to make this dish your own!

Lemon Herb Grilled Chicken Delightful and Simple Meal

Are you ready to impress your family with a simple yet tasty meal? This Lemon Herb Grilled Chicken is just

- 1 cup polenta (cornmeal) - 4 cups vegetable broth - 1 cup heavy cream - 8 oz mixed mushrooms (such as cremini, shiitake, and oyster), sliced - 1 onion, finely chopped - 3 cloves garlic, minced - 2 tablespoons olive oil - 1 teaspoon dried thyme - Salt and pepper to taste - Fresh parsley, chopped (for garnish) In this dish, polenta serves as a warm and creamy base. For the best result, use high-quality polenta. Vegetable broth adds depth and flavor. Heavy cream brings a rich texture that makes the polenta irresistible. The mushroom ragu is the star here. I love using a mix of mushrooms for diverse flavors. Choose any mushrooms you enjoy. The onion and garlic give a sweet aroma, enhancing the ragu. Olive oil is essential for sautéing, while thyme adds an earthy note. Don’t forget to season with salt and pepper for balance. For the full recipe, refer to the cooking instructions. Enjoy the process and the delicious meal you will create! First, I boil the vegetable broth in a medium saucepan. You want it to be hot but not boiling over. Once it bubbles, I gradually whisk in the polenta. Stir continuously to keep it smooth. This step helps prevent lumps from forming. After adding the polenta, I lower the heat to a simmer. I keep stirring until it thickens and pulls from the pot's sides, about 20 to 25 minutes. Next, I mix in the heavy cream, butter, and grated Parmesan cheese. This makes the polenta rich and creamy. I season it with salt and pepper to taste. While the polenta cooks, I start on the mushroom ragu. First, I heat olive oil in a large skillet over medium heat. I add the chopped onion and sauté it until it turns translucent, which takes about 5 minutes. Then, I toss in the minced garlic and sliced mushrooms. I cook them until the mushrooms are tender and golden brown, about 8 to 10 minutes. This step adds a nice depth of flavor. After that, I stir in dried thyme, salt, and pepper. I let it cook for another 2 minutes to blend the flavors. Once both the creamy polenta and mushroom ragu are ready, I serve the polenta in bowls. I top it with the warm ragu and garnish with fresh parsley. This dish brings warmth and comfort to any table. You can find the full recipe for this delicious meal below. - Stirring techniques: Stir the polenta slowly and steadily. This helps avoid lumps. Use a whisk for smooth results. Keep mixing as it cooks. - Cooking time adjustments: Cook polenta on low heat for about 20-25 minutes. The time may vary based on the brand. Check the package for specific times. - Choosing the right polenta: Use coarse or medium-ground polenta for a hearty texture. Instant polenta cooks faster but may lack depth. - Recommended herbs and spices: Add dried thyme for earthiness. Fresh herbs like basil or parsley can brighten the dish. Experiment with flavors to find what you like best. - Quality of ingredients matters: Use high-quality broth and mushrooms for richer taste. Fresh ingredients boost the overall flavor. Don't skimp on quality, as it makes a big difference. - Suggestions for creaminess: For extra creaminess, add more heavy cream or butter. You can also mix in cream cheese for a unique twist. This adds a rich texture you will love. For more details, refer to the Full Recipe. {{image_2}} You can easily adjust this recipe to fit your needs. - Vegan-friendly options: Replace the heavy cream with coconut milk or cashew cream. Use olive oil instead of butter. For cheese, try a vegan option or skip it entirely. - Gluten-free suggestions: Polenta is naturally gluten-free, but always check if the broth is certified gluten-free. - Low-fat alternatives: Use low-fat milk instead of heavy cream. You can also reduce the amount of cheese or use a lighter cheese. Adding extra ingredients can make your dish unique and exciting. - Adding proteins like chicken or sausage: Cook diced chicken or sausage in the skillet before adding onions. This adds depth to your ragu. - Utilizing different vegetables: Try adding spinach, bell peppers, or zucchini. These can boost nutrition and flavor. - Experimenting with cheese varieties: Instead of Parmesan, try feta or goat cheese for a different taste. Mix in blue cheese for a bold flavor twist. Feel free to get creative with these variations. You can find the full recipe above to explore all its delicious possibilities! To store leftover polenta, let it cool completely. Then, place it in an airtight container. Polenta can last in the fridge for about three days. You might notice it hardens when cold. To revive it, add a splash of broth or cream when reheating. For mushroom ragu, allow it to cool as well. Transfer it to a separate airtight container. This ragu stays fresh for around four days in the fridge. Always check for any signs of spoilage before using. The best way to reheat polenta is on the stove. Place it in a saucepan over low heat. Add a little broth or cream to keep it creamy. Stir often to avoid burning. For the mushroom ragu, you can also use the stovetop. Heat it gently in a skillet. Stir occasionally until it’s warmed through. This keeps the texture smooth and the flavors bright. When you reheat, be careful not to cook it too long. Overheating can make both the polenta and ragu dry. Enjoy your creamy polenta with mushroom ragu warm and fresh. For the full recipe, check out the detailed instructions above. How to avoid lumps in polenta? To avoid lumps, whisk the polenta slowly into boiling broth. Stir constantly as you add it. This helps keep the polenta smooth. If lumps form, use a whisk to break them up. Can I make polenta ahead of time? Yes, you can make polenta ahead of time. Cook it, let it cool, and store it in the fridge. Reheat it with a splash of broth or cream before serving. What mushrooms are best for ragu? A mix of mushrooms works best for ragu. I love using cremini, shiitake, and oyster mushrooms. Each type adds its own flavor and texture. How to add more flavor to the mushroom ragu? To boost flavor, try adding fresh herbs like thyme or rosemary. A splash of wine can also enhance taste. Sautéing the mushrooms until golden brown deepens the flavor too. Is this recipe suitable for meal prep? Absolutely! Creamy polenta and mushroom ragu store well. You can make them in advance and reheat when ready to serve. How to serve creamy polenta and ragu? Serve creamy polenta in bowls topped with warm mushroom ragu. Garnish with fresh parsley for a bright touch. This dish looks and tastes amazing! For the full recipe, check out the recipe section above. To wrap up, making creamy polenta with mushroom ragu is simple and fun. We explored key ingredients, step-by-step cooking, and tips to perfect your dish. Don't forget about variations and storage tips for leftovers. This dish offers warmth and delicious flavor. You can easily adapt it to fit your needs. Enjoy a tasty meal that's perfect for any occasion. I'm excited for you to try this recipe!

Creamy Polenta with Mushroom Ragu Flavorful Delight

If you’re craving comfort food that warms the soul, you’re in the right place! Creamy Polenta with Mushroom Ragu is

Older posts
Newer posts
← Previous Page1 … Page40 Page41 Page42 … Page61 Next →

dsad

© 2025 Recipes Pursuit • Built with GeneratePress

Our Policies

  • Copyright Policy
  • Cookie Policy
  • GDPR Policy
  • Privacy Policy
  • Disclaimer
  • Terms Of Use

More Information

  • Home
  • About
  • Contact
  • Appetizers
  • Dessert
  • Dinner
  • Drinks
©2025, Recipes Pursuit About Back To Top