Skip to content
DisclaimerTerms Of UseGDPR PolicyCookie Policy

Recipes Pursuit

  • Home
  • Drinks
  • Appetizers
  • Dinner
  • Dessert
  • About
  • Contact
  • Privacy Policy
DisclaimerTerms Of UseGDPR PolicyCookie Policy

Emma Smith

- Fresh cherries - Granulated sugar - Vanilla extract - Heavy cream - Whole milk - Chocolate chips - Lemon juice To make this tasty cherry chocolate chip ice cream, you need fresh cherries. I love using ripe, sweet cherries for the best flavor. You will also need granulated sugar to sweeten the mix. Next, grab some vanilla extract. It adds a lovely touch to the ice cream. Heavy cream is key for a rich, creamy texture. Whole milk helps balance everything out and keeps it smooth. For the chocolate lovers, chocolate chips are a must. You can use semi-sweet or dark chocolate chips, based on your taste. Finally, a splash of lemon juice brightens the cherry flavor. - Alternatives for heavy cream - Sugar substitutes for a healthier option - Different types of chocolate chips If you want a lighter version, you can swap heavy cream for coconut cream or Greek yogurt. Both options keep the creaminess while reducing fat. For a healthier option, consider using honey or maple syrup instead of granulated sugar. This change can add a nice flavor twist too. When it comes to chocolate chips, feel free to experiment. Use milk chocolate for a sweeter taste or dark chocolate for a rich flavor. You could even try white chocolate for a fun twist! {{ingredient_image_1}} 1. Cook the Cherries: Start by placing 2 cups of fresh, pitted, and halved cherries in a medium saucepan. Add 1/2 cup of granulated sugar. 2. Heat and Stir: Cook this mixture over medium heat. Stir occasionally for about 5-7 minutes. You want the cherries to soften and release their juices. 3. Add Flavor: Remove the pan from heat. Stir in 1 tablespoon of lemon juice and 1 teaspoon of vanilla extract. These add great flavor! 4. Cool Down: Let the cherry mixture cool to room temperature. This is important before mixing with the cream. 1. Mix the Cream: In a large mixing bowl, whisk together 2 cups of heavy cream, 1 cup of whole milk, and the remaining 1/2 cup of sugar. Ensure the sugar dissolves completely. 2. Fold in the Cherries: Once the cherry mixture is cool, gently fold it into the cream mixture. Mix thoroughly but be careful not to over-stir. 1. Use an Ice Cream Maker: Pour the combined mixture into your ice cream maker. Churn according to the manufacturer's instructions. This usually takes about 20-25 minutes. 2. Add Chocolate Chips: In the last few minutes of churning, slowly add 1 cup of chocolate chips. They will mix in nicely. 3. Transfer to Container: After churning, transfer the ice cream to an airtight container. Freeze for at least 4 hours, or until it is firm. These steps will lead you to a delicious cherry chocolate chip ice cream that is hard to resist! To get the best texture, follow these tips: - Churning time: Aim to churn for 20-25 minutes. This time gives the ice cream a nice, soft texture. - Avoiding ice crystals: Use cold ingredients and chill your mixture before churning. This helps stop ice from forming. Serving your cherry chocolate chip ice cream can be fun! Here are some ideas: - Presentation ideas: Use chilled bowls for a nice touch. Top with extra chocolate chips or a sprig of mint. - Pairing with toppings: Try drizzling chocolate sauce or adding chopped nuts for crunch. Watch out for these common errors: - Over-churning tips: Don’t churn too long; this can make the ice cream hard. Stop once it reaches a soft-serve consistency. - Ingredient measurement errors: Measure carefully. Too much sugar or cream can change the taste and texture. Pro Tips Use Fresh Cherries: For the best flavor and texture, choose ripe, fresh cherries when making this ice cream. Chill Your Ingredients: Ensure that your cream and milk are well chilled before mixing to help the ice cream churn more effectively. Fold Gently: When incorporating the cherry mixture into the cream, fold gently to maintain the airiness of the mixture. Adjust Sweetness: Taste the cherry mixture before adding it to the cream; you can add more sugar if you prefer a sweeter ice cream. {{image_2}} You can change the flavor of your cherry chocolate chip ice cream. Try adding different fruits like raspberries or strawberries. These berries mix well with cherries and add a new twist. You can also use white chocolate chips instead of regular chocolate chips. This will give your ice cream a sweeter taste. If you want a vegan version, swap heavy cream and milk for coconut cream and almond milk. Use agave syrup instead of sugar for a sweeter flavor. For those who are lactose-free, almond milk or oat milk works great. You can still enjoy the cherry flavor without dairy. You can make your ice cream fit the seasons. In summer, add fresh peaches or blueberries. These fruits add a bright taste to your ice cream. For winter, try adding spices like cinnamon or nutmeg. These spices can warm up the flavors and make it cozy. - Use an airtight container to keep ice cream fresh. - Choose a container that fits the amount well. - Leave some space at the top to allow for expansion. - Avoid freezer burn by sealing the container tightly. - You can store the ice cream for about 2-3 weeks. - After that, it may lose flavor and texture. - Signs of spoilage include ice crystals on the surface. - If it smells off or tastes bad, toss it out. - To restore the texture, let the ice cream sit out for a bit. - Once it softens, churn it again briefly in the ice cream maker. - This helps break up ice crystals and smooths it out. - Serve it right after re-churning for the best taste. To make cherry chocolate chip ice cream, start with fresh cherries. Cook them with sugar to release their juice. Add lemon juice and vanilla for flavor. Mix heavy cream, whole milk, and more sugar in a bowl. Combine the cherry mix with the cream mix. Pour into an ice cream maker and churn until soft. Add chocolate chips in the last few minutes. Freeze the ice cream for a few hours until firm. It’s a simple process that brings joy! The best cherries for ice cream are sweet varieties. Bing cherries are popular for their rich flavor. Rainier cherries are also great; they add sweetness and color. Both types create a lovely base for the ice cream. Using fresh, ripe cherries makes a big difference in taste. Aim for cherries that are firm and juicy when selecting. Yes, you can make cherry chocolate chip ice cream without an ice cream maker. Use a large bowl to mix your ingredients. Pour the mix into a shallow dish. Place it in the freezer. Every 30 minutes, stir it with a fork for a creamy texture. This method may take longer, but it still works well. Enjoy your homemade ice cream in a fun way! Making cherry chocolate chip ice cream is easy and fun. You learned about choosing fresh cherries, using sugar, and mixing creamy ingredients. I shared tips for perfect texture and serving ideas. You also discovered variations like vegan options and seasonal twists. Follow these steps and tips to create a tasty treat. Enjoy every bite, and share it with family and friends! Your homemade ice cream will impress everyone. Remember, practice makes perfect, so keep trying different flavors.

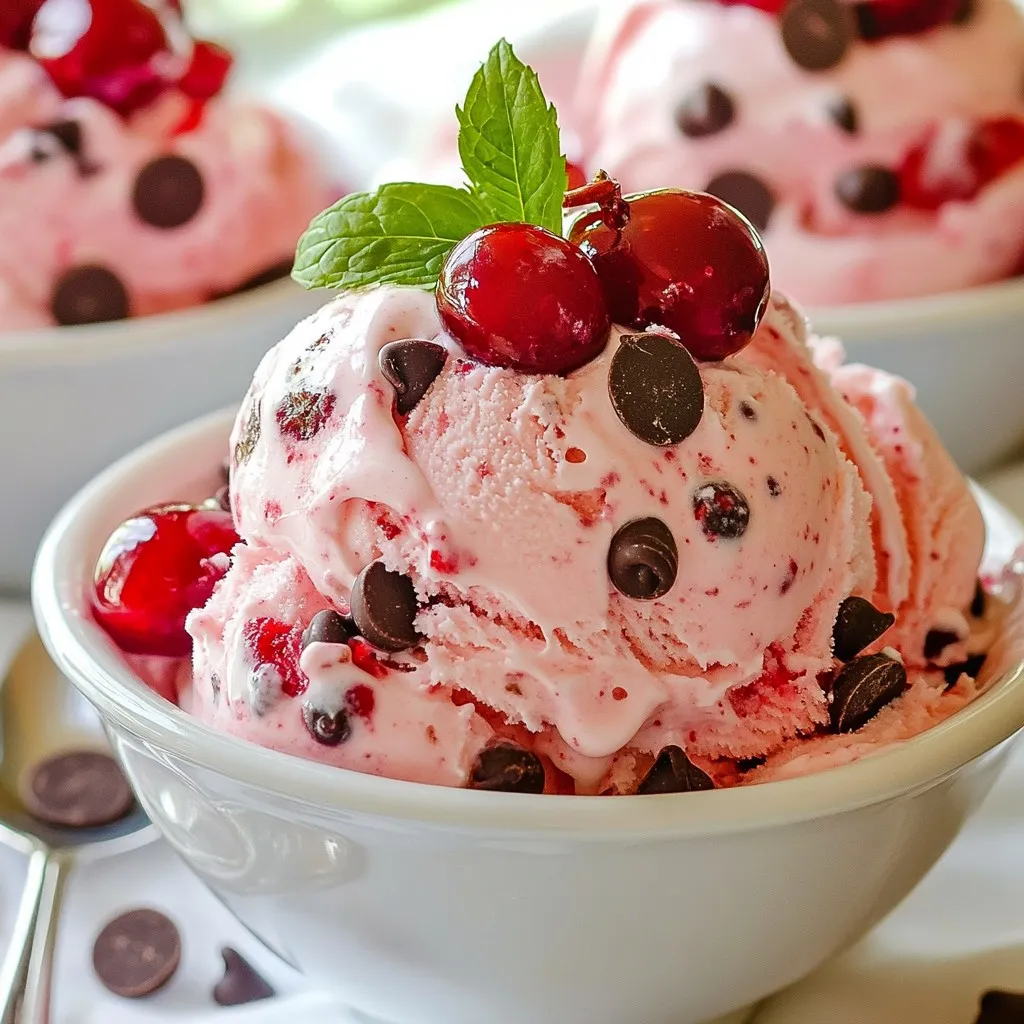
Cherry Chocolate Chip Ice Cream Delightful Homemade Treat

Get ready to indulge in a rich and creamy Cherry Chocolate Chip Ice Cream that you can make at home!

- 12 pretzel rods - 1 cup semi-sweet chocolate chips - 1/2 cup white chocolate chips - 1/4 cup crushed nuts (almonds, peanuts, or hazelnuts) - 1/4 cup rainbow sprinkles - Sea salt (optional) To make delicious chocolate-covered pretzel rods, gather your ingredients first. Start with pretzel rods, which give a nice crunch. You will need semi-sweet chocolate chips for the main coating. The white chocolate chips add a sweet drizzle later. Choose your toppings wisely. Crushed nuts add texture and flavor. Rainbow sprinkles bring fun and color to your treats. You can also use sea salt if you want a sweet and salty mix. Having all these ingredients ready makes the process smooth. It keeps your kitchen organized, and it helps you focus on creating. Now, let's get ready to dip and decorate! {{ingredient_image_1}} 1. Line the baking sheet with parchment paper. This helps the pretzel rods release easily. 2. Prepare your workspace. Make sure everything you need is within reach. - To melt semi-sweet chocolate, place the chips in a microwave-safe bowl. Heat in 30-second bursts. Stir in between until smooth. - For white chocolate, use a separate bowl. Follow the same heating method. Stir until it melts completely. - Dip a pretzel rod in the melted semi-sweet chocolate. Cover about two-thirds of the rod. Let excess chocolate drip back. - Immediately add toppings like crushed nuts or rainbow sprinkles. A light sprinkle of sea salt adds a nice touch. - After dipping all rods, drizzle melted white chocolate over them. Use a fork or piping bag for a pretty design. To dip pretzel rods well, you need smooth chocolate. Make sure you microwave in short bursts, stirring often. This helps melt the chocolate evenly. When you dip, coat two-thirds of the rod. Let excess chocolate drip back into the bowl. This keeps the coating even and thin. Avoid clumps by stirring the chocolate as it melts. If you see lumps, microwave for a few more seconds. You want a silky, smooth texture. Get creative with toppings! Use crushed nuts, sprinkles, or even crushed cookies. You can also dip them in colored chocolate for fun looks. For themes, think seasonally. Use orange and black for Halloween or red and green for Christmas. You can also personalize them for birthdays with favorite colors or toppings. Pair these pretzel rods with drinks for a fun snack. They go well with milk, hot cocoa, or even a sweet tea. For presentation, arrange them in a mason jar or a decorative box. You can also wrap them in clear bags with ribbons for gifts. Make your snack table pop with different styles and colors! Pro Tips Choose Quality Chocolate: Using high-quality chocolate chips will enhance the flavor of your pretzel rods, making them richer and more delicious. Experiment with Toppings: Don't limit yourself to just nuts and sprinkles; try adding crushed cookies, coconut flakes, or even dried fruits for a unique twist. Control the Drizzle: For a more controlled drizzle of white chocolate, use a piping bag or squeeze bottle, which allows for more precise decoration. Store Properly: To keep your pretzel rods fresh, store them in an airtight container at room temperature away from sunlight. Avoid refrigeration as it may cause the chocolate to bloom. {{image_2}} You can make your chocolate-covered pretzel rods even tastier with fun flavors. - Peanut butter chocolate-covered pretzel rods: Just spread some peanut butter on the rod before dipping it in chocolate. This adds a creamy and nutty flavor that pairs well with the crunchy pretzel. - Caramel-dipped pretzel rods: Dip your pretzel rods in warm caramel before covering them in chocolate. The sweet caramel gives a rich taste that kids and adults love. Sometimes, we need to change recipes to fit our diets. Here are some ideas for you. - Gluten-free alternatives: You can use gluten-free pretzel rods instead of regular ones. They taste just as good and keep your snack safe for everyone. - Vegan chocolate options: Look for dairy-free chocolate chips for a vegan version. There are many tasty brands that melt well and taste amazing. Making themed pretzel rods can add fun to any event. Here are some ideas to try. - Holiday-themed variations: For Christmas, use red and green sprinkles. For Halloween, add orange and black colors. These themed pretzel rods look festive and taste great. - Birthday party pretzel rods: Decorate with colorful sprinkles and add a birthday candle on top. They not only taste good but also make perfect party treats. To keep your chocolate covered pretzel rods fresh, use airtight containers. This helps keep moisture out. Glass jars or plastic containers with tight lids work well. If you stack the rods, place parchment paper between layers. This way, they won’t stick to each other. For the best taste, store them in a cool, dry place. Avoid direct sunlight, as it can make the chocolate melt. If you live in a warm area, the fridge is a good option. Just make sure the container is sealed properly. You can freeze chocolate covered pretzel rods to enjoy later. To freeze, first let them cool completely. Then, place them in a single layer in a freezer-safe container. Make sure to leave some space between each rod to prevent sticking. When you want to eat them, take the rods out of the freezer. Let them thaw in the fridge for a few hours. This helps keep the chocolate from sweating. You can also leave them at room temperature for about 30 minutes. Chocolate covered pretzel rods last about two weeks at room temperature. If stored in the fridge, they can last up to a month. Freezing them can extend their life to about three months. Watch for signs of spoilage. If the chocolate looks dull or the pretzel feels soft, it’s best to toss them. Mold or bad smells are also clear signs that they are no longer good to eat. How do I get the chocolate to stick better? To help chocolate stick, dip the pretzel rods while the chocolate is warm. Warming the pretzel rods slightly can also help. Make sure to let the excess chocolate drip off before placing them on the parchment paper. Can I use chocolate bars instead of chips? Yes, you can use chocolate bars. Just chop them into small pieces. This will help them melt evenly in the microwave. What’s the best chocolate to use? The best chocolate is semi-sweet chocolate. It has a great balance between sweet and rich flavors. Use high-quality chocolate for better taste and texture. Can I use white chocolate chips instead of melts? Yes, white chocolate chips work well. They melt nicely and taste great too. Just remember to stir them often to avoid burning. How to package for gifts? To package, use a clear cellophane bag. Tie it with a colorful ribbon. You can also place the rods in a decorative box for a nicer touch. Best way to serve at parties? Serve on a large platter. Arrange them in a fun pattern. You can also offer different dips, like caramel or peanut butter, for added fun. In this article, we covered how to make chocolate-covered pretzel rods. I shared the ingredients, step-by-step instructions, and helpful tips to ensure tasty treats. You can explore flavor variations, storage ideas, and serving suggestions. Finally, remember that these treats are fun for any occasion. Making them can spark creativity, and sharing them can bring joy to others. Enjoy crafting your pretzel rods, and let your imagination lead the way!

Chocolate Covered Pretzel Rods Delicious Snack Guide

Craving a snack that’s sweet, salty, and oh-so-fun? Chocolate covered pretzel rods are the perfect treat! With a quick dip

- 1 cup unsalted butter, melted - 1 cup brown sugar, packed - 1/2 cup granulated sugar - 2 large eggs - 2 teaspoons vanilla extract - 2 cups all-purpose flour - 1/2 teaspoon baking powder - 1/4 teaspoon salt - 1 cup white chocolate chips - 1 cup fresh raspberries (or frozen, thawed) To make delicious raspberry white chocolate blondies, you need simple and fresh ingredients. Start with unsalted butter. It gives a rich taste. The butter should be melted, which helps mix it well with the sugars. The sugars add sweetness and moisture. Use both brown and granulated sugar. Brown sugar gives a soft texture and caramel flavor. Granulated sugar adds a bit of crunch. You will also need two large eggs. They help bind everything together. Vanilla extract adds a lovely flavor. Use pure vanilla for the best taste. The flour is the base of the blondies, so all-purpose flour works great. Baking powder helps the blondies rise. Salt balances the sweetness. Now for the fun part: the mix-ins! White chocolate chips add creamy sweetness. Fresh raspberries bring a bright and tart flavor, making each bite special. You can also use frozen raspberries if fresh ones aren't available. - Chopped nuts (such as walnuts or pecans) - Coconut flakes - Additional chocolate chips (dark or milk) You can mix in chopped nuts for a nice crunch. Coconut flakes add a tropical twist. If you love chocolate, try adding more chocolate chips. Each of these options makes the blondies even better. {{ingredient_image_1}} First, preheat your oven to 350°F (175°C). This step is key for even baking. Prepare a 9x13 inch baking pan by greasing it or lining it with parchment paper. This makes removal easy later. Next, in a large mixing bowl, combine 1 cup of melted butter, 1 cup of brown sugar, and 1/2 cup of granulated sugar. Whisk these together until smooth. Then, add in 2 large eggs, one at a time. Make sure each egg mixes well before adding the next. Finally, stir in 2 teaspoons of vanilla extract for flavor. In a separate bowl, whisk together 2 cups of all-purpose flour, 1/2 teaspoon of baking powder, and 1/4 teaspoon of salt. Whisking helps to mix the dry ingredients well and adds air. Now, gradually fold the dry mixture into the wet ingredients. Use a spatula or wooden spoon. Fold gently until just combined. Be careful not to overmix, as this can make the blondies tough. Gently fold in 1 cup of white chocolate chips and 1 cup of fresh (or thawed frozen) raspberries. Make sure they are evenly distributed but avoid crushing the raspberries too much. Pour the batter into the prepared baking pan. Spread it out evenly with a spatula. Bake in your preheated oven for 25-30 minutes. The edges should look golden brown. A toothpick inserted in the center should come out with a few moist crumbs. Let the blondies cool in the pan for at least 15 minutes. If you used parchment paper, lift them out to cool completely on a wire rack. Once cool, cut into squares and enjoy! To make the best blondies, focus on texture and flavor. Start with melted butter, as it makes the blondies soft and chewy. Mix the sugars well for a smooth batter. Be gentle when adding the flour. Overmixing can lead to dense blondies. Bake until the edges are golden and the center has a few moist crumbs. This ensures a perfect balance of gooey and firm. You can customize this recipe easily. If you need a dairy-free option, use coconut oil instead of butter. For a lower sugar option, try coconut sugar. If you cannot find white chocolate chips, use dark chocolate chips; they will still taste great. For gluten-free blondies, swap the all-purpose flour with a gluten-free blend. These swaps keep the flavors intact while meeting your dietary needs. A beautiful presentation makes your blondies even more appealing. Dust the top with powdered sugar for a sweet touch. Serve them on a nice platter. Add fresh raspberries on top or around the sides for color. You can also drizzle melted white chocolate over them for flair. A simple, elegant look will impress your guests! Pro Tips Use Room Temperature Eggs: This helps the ingredients blend together more smoothly, resulting in a better texture for your blondies. Don't Overmix the Batter: Gently fold the ingredients together to avoid dense blondies. Overmixing can lead to a tough texture. Cool Before Cutting: Let the blondies cool completely before cutting to ensure clean edges and prevent them from falling apart. Add a Pinch of Lemon Juice: Incorporating a small amount of lemon juice can enhance the tartness of the raspberries, balancing the sweetness of the white chocolate. {{image_2}} You can change up the fruit in your blondies. Try using strawberries or blueberries. Both add great flavor. You can even mix different fruits. For a tropical twist, add pineapple or mango. Each fruit brings its own taste and color. This keeps the recipe fun and fresh. You can also try nuts for crunch. Chopped pecans or walnuts work well too. If you want gluten-free blondies, swap the all-purpose flour. Use a gluten-free blend instead. Make sure it has a good binding agent. For vegan blondies, replace the eggs. Use flax eggs or applesauce. You can also find vegan white chocolate chips. This way, everyone can enjoy these treats! Seasonal changes can inspire your blondies. In fall, add pumpkin spice and pumpkin puree. This gives a cozy flavor. Winter can feature peppermint extract and crushed candy canes. In summer, use fresh peaches or cherries. Each season makes your blondies unique and exciting. Enjoy exploring these variations! To keep your raspberry white chocolate blondies fresh, store them in an airtight container. Make sure the blondies are completely cool before sealing them. This step prevents moisture buildup. You can keep them at room temperature for up to three days. If you want to extend their life, refrigerate them for about a week. Freezing blondies is simple! First, let them cool completely. Then, cut them into squares. Wrap each square in plastic wrap tightly. Place the wrapped squares in a freezer-safe bag. Label the bag with the date. You can freeze them for up to three months. When you want to enjoy a blondie, just take one out and let it thaw at room temperature. To reheat your blondies without losing texture, preheat your oven to 350°F (175°C). Place the blondies on a baking sheet. Heat them for about 5 to 10 minutes. This method keeps them soft and warm. You can also use the microwave. Heat each square for 10-15 seconds. Just be careful not to overheat them, or they may become tough. How to tell when blondies are done baking? You can check if blondies are done by looking for golden edges. Insert a toothpick in the center. If it comes out with a few moist crumbs, your blondies are ready. They should not be wet but also not dry. Keep an eye on them during baking. Start checking at 25 minutes. Can I use frozen raspberries in this recipe? Yes, you can use frozen raspberries. Just make sure to thaw them first. Drain any extra juice. This helps keep your blondies from becoming too wet. The frozen raspberries work well and still taste great in your blondies. What’s the difference between blondies and brownies? Blondies and brownies are both delicious treats but have key differences. Blondies are made with brown sugar and no cocoa powder. They have a sweet, buttery flavor. Brownies use cocoa powder and are chocolatey. This gives them a darker color and richer taste. Both treats are chewy and can have nuts or chips. You learned how to make delicious blondies with sweet raspberries and rich white chocolate. We covered the key ingredients, the step-by-step process, and handy tips for great results. Remember to experiment with flavors and adjust for your dietary needs. Proper storage will keep your treats fresh longer. Enjoy your baking adventure, and don’t hesitate to share these tasty blondies with friends and family. Happy baking!

Raspberry White Chocolate Blondies Easy and Delicious Treat

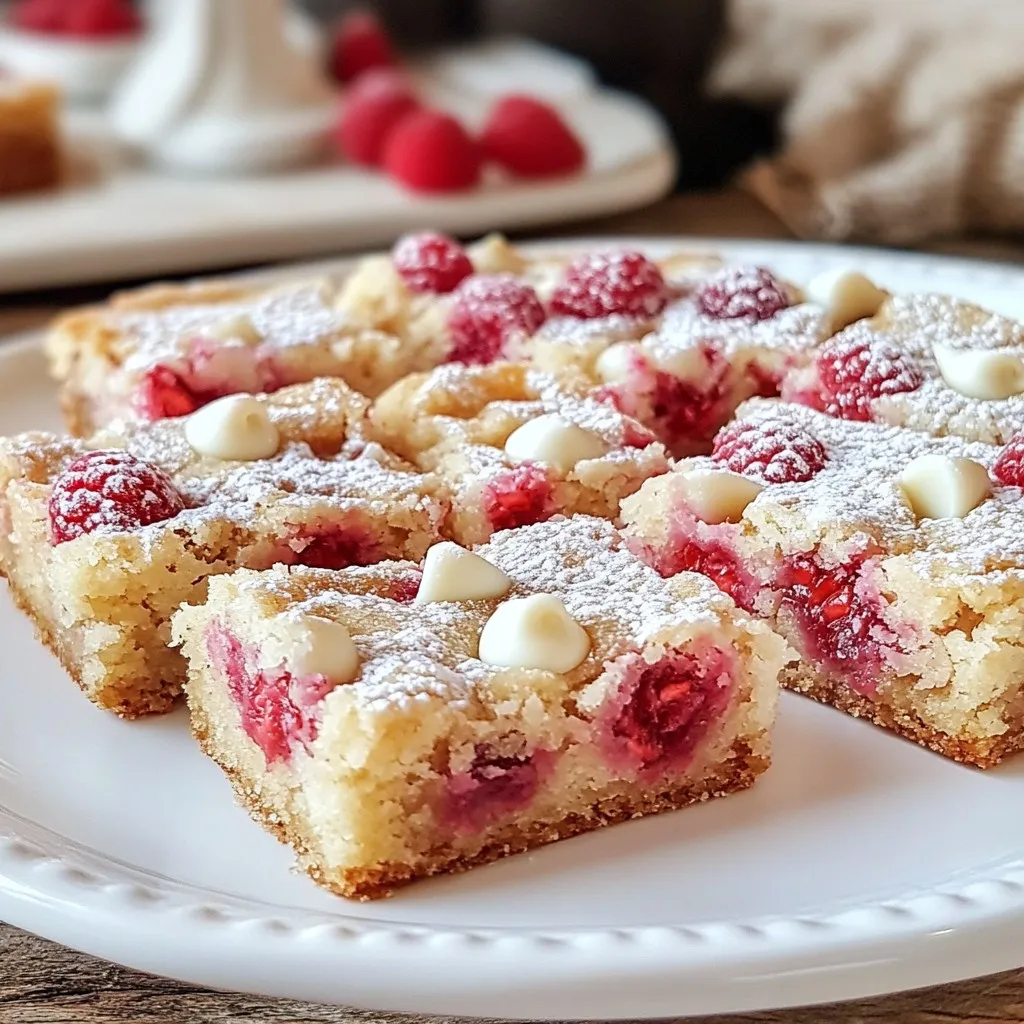
Are you ready to make a treat that’s both easy and delicious? These Raspberry White Chocolate Blondies are the perfect

To make Spicy Thai Coconut Noodle Soup, gather these ingredients: - 200g rice noodles - 1 can (400ml) coconut milk - 4 cups vegetable broth - 2 tablespoons red curry paste - 1 tablespoon tamari or soy sauce - 1 tablespoon brown sugar - 1 tablespoon fresh lime juice - 1 cup broccoli florets - 1 bell pepper, sliced (red or yellow for color) - 1 cup mushrooms, sliced - 1 cup baby spinach - 2 green onions, chopped - Fresh cilantro, for garnish - Optional: sliced red chili and lime wedges for serving Each ingredient plays a role in the flavor. If you can't find something, don't worry! Here are some easy swaps: - Rice noodles: Use any noodle you have, like egg noodles or udon. - Coconut milk: You can try almond milk for a lighter taste. - Red curry paste: Green curry paste works too, but it will change the flavor. - Tamari or soy sauce: Use liquid aminos if you want a gluten-free option. - Brown sugar: Honey or maple syrup can be used for sweetness. - Fresh lime juice: Lemon juice can substitute if you don't have lime. Using fresh ingredients makes a big difference in taste and texture. Here’s what I recommend: - Fresh vegetables: Fresh broccoli, bell peppers, and mushrooms bring crunch and flavor. - Fresh herbs: Fresh cilantro adds a bright touch. Dried herbs won’t give the same effect. - Dried noodles: You can use dried rice noodles, but they need to cook longer than fresh ones. Fresh ingredients create a vibrant and tasty soup. If you only have dried items, it’s okay, but the soup may lack that bright flavor. Always aim for fresh when you can! {{ingredient_image_1}} First, you need to cook the rice noodles. Follow the package instructions closely. This usually takes about 5 to 7 minutes. Once cooked, drain them and set them aside. You want them soft but not mushy. This step is key for a great texture in the soup. Next, grab a large pot and heat a little oil over medium heat. Add the red curry paste and sauté it for about 1 minute. This helps to release the flavors. Then, pour in the vegetable broth and coconut milk, stirring well. Bring the mixture to a gentle simmer. After that, stir in the tamari, brown sugar, and lime juice. This creates a balance of sweet and savory. Now it's time to add the fun part—vegetables! Add the broccoli florets, sliced bell pepper, and mushrooms to the pot. Cook them for about 5 to 7 minutes until they are tender. Stir in the baby spinach for the last 1 to 2 minutes until it wilts. This adds a lovely green color and extra nutrients. To serve, divide the cooked rice noodles into bowls. Ladle the hot soup over the noodles. Finish by topping with chopped green onions and fresh cilantro. If you like it spicy, add sliced red chili and lime wedges on the side. Enjoy your comforting bowl of Spicy Thai Coconut Noodle Soup! To get the best flavor, always use fresh ingredients. Fresh lime juice brightens the soup. Red curry paste adds depth and spice. Sauté it before adding liquids. This step brings out its rich aroma. Don't skip the brown sugar; it balances the heat. You want a mix of sweet, salty, and spicy. For perfect rice noodles, follow the package instructions closely. Soak them until just al dente. This keeps them from getting too soft in the soup. Drain and rinse under cold water to stop cooking. This also helps them stay separate. When you add them to the soup, they will soak up all the lovely flavors. If you like it hot, add more red curry paste. For less heat, start with less. You can also top your bowl with sliced red chili for an extra kick. If you prefer a milder taste, skip the chili and focus on the sweet and savory notes. Lime wedges on the side let you adjust the sourness as you eat. Pro Tips Adjust the Spice Level: If you prefer a milder soup, start with half the amount of red curry paste and add more to taste as it cooks. Fresh Ingredients: Use fresh vegetables for the best flavor and texture. You can also substitute or add other veggies like snap peas or carrots. Make it Heartier: Add protein to the soup by including tofu, chicken, or shrimp. Just cook them in the broth until fully cooked through. Storage Tips: Store any leftovers in an airtight container in the fridge for up to 3 days. Reheat gently on the stove, adding a splash of broth if it thickens too much. {{image_2}} You can add protein to your Spicy Thai Coconut Noodle Soup. Tofu is great for a plant-based meal. It takes on the soup's flavor well. Just cut the tofu into cubes and sauté it before adding it to the soup. Chicken is another option. Cook bite-sized pieces until golden, then add them to the broth. Shrimp cooks quickly and adds a nice touch. Toss them in the soup when the veggies are almost done. They need just a few minutes to cook. This soup is easy to make vegan. Use vegetable broth and coconut milk, as listed. Swap brown sugar with maple syrup for a sweet touch. Make sure to use tamari instead of soy sauce if you want it gluten-free. You can also add more vegetables for extra flavor and nutrients. Try adding sweet potatoes or zucchini for a hearty twist. Feel free to change the vegetables based on what you have. In spring, add snap peas or asparagus for a fresh crunch. In summer, use corn or ripe tomatoes. In fall, swap in carrots or pumpkin for warmth. Winter veggies like kale or Brussels sprouts also work well. Just remember to adjust the cooking time based on the veggies you choose. This way, your soup stays vibrant and full of flavor. After enjoying this delicious soup, store any leftovers. Let the soup cool to room temperature. Use airtight containers for the best results. Refrigerate the soup for up to three days. Keep the noodles separate to maintain their texture. To reheat the soup, pour it into a pot. Heat gently over medium-low heat. Stir often to ensure it heats evenly. If the soup thickens, add a splash of vegetable broth. You can also use a microwave if you prefer. Heat in short intervals, stirring in between. For long-term storage, you can freeze the soup. Use freezer-safe containers or bags. Leave some space at the top for expansion. The soup can stay fresh for up to three months. When ready to use, thaw it in the fridge overnight. Reheat it on the stove as mentioned above. Yes, you can make Spicy Thai Coconut Noodle Soup ahead of time. I often prepare it a day before. Just follow the recipe and store the soup in a sealed container. When you reheat it, add fresh noodles to keep them from getting mushy. The soup tastes even better after resting, as flavors meld together. This soup pairs well with many sides. I enjoy serving it with crusty bread or rice. You can also offer a fresh salad for a crunchy contrast. For a more filling meal, try adding grilled shrimp or chicken on the side. Fresh lime wedges and sliced chili can enhance the soup’s flavor. Yes, you can definitely make this soup gluten-free. Use tamari instead of soy sauce. Opt for gluten-free rice noodles, which are easy to find. Always check labels to ensure all ingredients are gluten-free. With these simple swaps, you can enjoy this comforting dish without worries. In this post, we explored a delicious recipe for Spicy Thai Coconut Noodle Soup. We covered key ingredients, preparation steps, and tips for flavor and texture. You can customize the soup with different proteins or vegan options. Remember to store leftovers properly for future meals. This soup is easy to make and perfect for variety. Enjoy trying it out, and let your taste buds guide your choices. Happy cooking!

Spicy Thai Coconut Noodle Soup Comforting and Flavorful

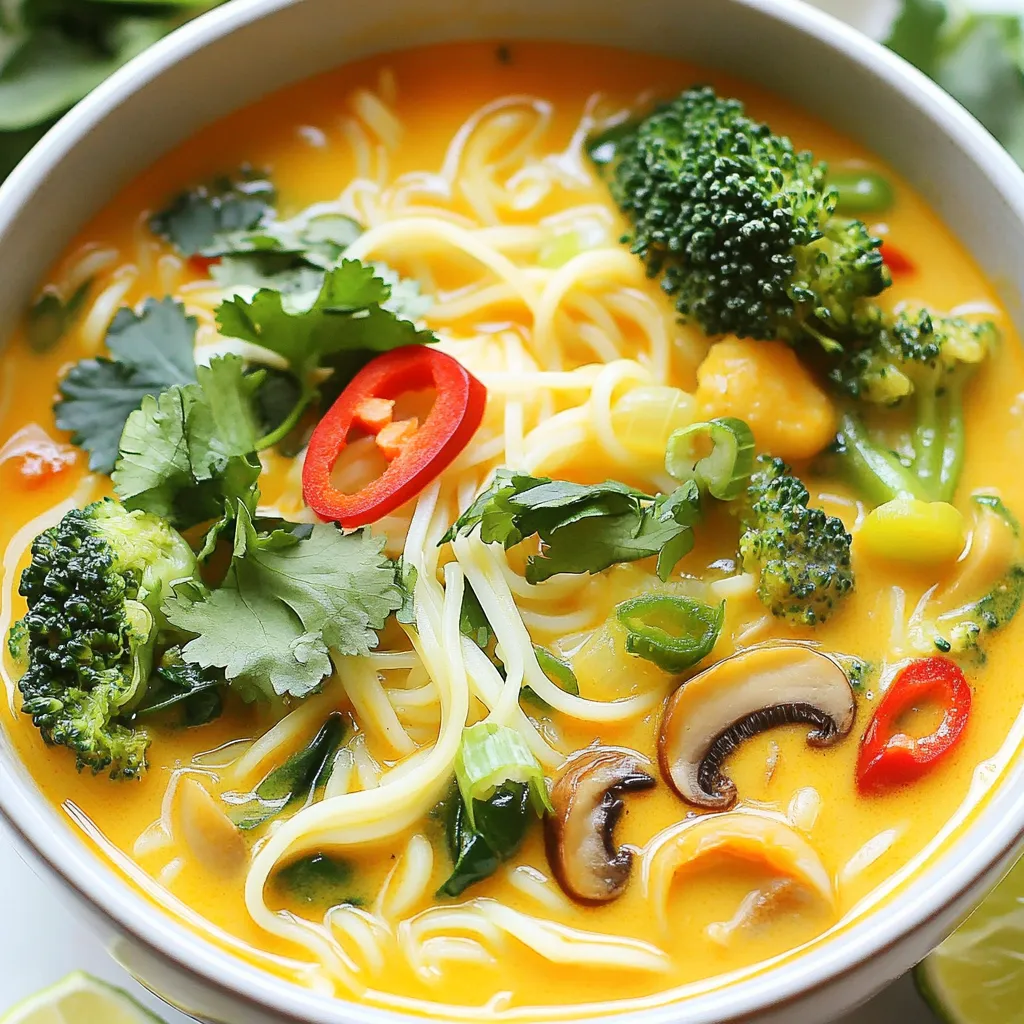
Welcome to the world of Spicy Thai Coconut Noodle Soup! This dish warms your soul with its bold flavors and

To make Caramelized Banana French Toast, gather these simple ingredients: - 4 slices of thick brioche bread - 2 ripe bananas, sliced - 2 tablespoons unsalted butter - 2 tablespoons brown sugar - 2 large eggs - 1/2 cup milk (or a dairy-free alternative) - 1 teaspoon vanilla extract - 1/2 teaspoon ground cinnamon - Pinch of salt - Maple syrup and powdered sugar for serving These ingredients create a sweet and creamy breakfast treat. The thick brioche bread gives a soft base. Ripe bananas add natural sweetness. Butter and brown sugar create a lovely caramel. The eggs and milk mix for a fluffy texture. Vanilla and cinnamon add warmth and depth. Maple syrup and powdered sugar are perfect toppings. With these items, you can craft a delightful meal. The combination will impress anyone at your table. {{ingredient_image_1}} To caramelize bananas, start with ripe ones. Ripe bananas are sweeter and will caramelize better. 1. Melt 1 tablespoon of unsalted butter in a medium skillet over medium heat. 2. Add the sliced bananas. 3. Sprinkle 2 tablespoons of brown sugar over the bananas. 4. Cook for 2-3 minutes. Stir gently. You want the bananas to turn golden and soft. This step gives them a lovely flavor. Tip: Watch closely to avoid burning. The bananas should look shiny and brown. Now, let's make the egg mixture. It binds the bread and adds flavor. 1. In a bowl, crack 2 large eggs. 2. Pour in 1/2 cup of milk. You can use a dairy-free milk if you prefer. 3. Add 1 teaspoon of vanilla extract, 1/2 teaspoon of ground cinnamon, and a pinch of salt. Technique: Whisk the mixture well with a fork. Make sure the eggs and milk blend completely. This will help create a smooth texture for the French toast. Cooking the French toast is the fun part. You get to see it come to life! 1. Heat a skillet or griddle over medium-low heat. 2. Add the remaining tablespoon of butter and let it melt. 3. Dip a slice of brioche into the egg mixture. Let it soak for a few seconds on each side. 4. Place the soaked brioche into the skillet. Cooking Time: Cook for 3-4 minutes on each side. Look for a golden brown color. Pro Tip: Flip the bread gently. A spatula works well here. This keeps the toast from breaking. After cooking, top the toast with the caramelized bananas. Enjoy your tasty breakfast treat! To get that sweet, golden look, cook the bananas for about 2-3 minutes. Use medium heat and stir gently. Make sure the bananas are ripe. Ripe bananas are sweeter and softer. They will caramelize better and add more flavor. Plating is key for a beautiful dish. Stack the French toast and spoon the caramelized bananas on top. Dust with powdered sugar for a touch of elegance. You can add a sprig of mint for color. Drizzle with maple syrup to enhance the sweetness. If you want, add chopped nuts for extra crunch. Soaking the bread too long can make it soggy. Just dip it quickly in the egg mixture. Also, watch your cooking time. Overcooking makes the French toast dry. Under-cooking leaves it raw inside. Cook for about 3-4 minutes on each side until golden brown. Pro Tips Choose the Right Bread: Opt for thick-cut brioche or challah for a richer flavor and a fluffier texture that holds up well to soaking. Perfect Caramelization: Cook the bananas on medium heat and be patient; allow them to develop a deep golden color for the best flavor. Soak Time Matters: Don’t rush the soaking process; let the brioche absorb the egg mixture for a few seconds on each side for a custardy inside. Garnish for Appeal: A sprinkle of powdered sugar and a sprig of mint not only enhance presentation but also add a refreshing contrast to the sweetness. {{image_2}} You can switch up the bread in your caramelized banana French toast. Here are some tasty choices: - Challah: This bread is soft and sweet. It soaks up the egg mixture well. - Sourdough: This has a nice tang. It gives a unique flavor and texture. - Whole Wheat Bread: This option is healthier and adds fiber. It still tastes great with bananas. - Gluten-Free Bread: If you need a gluten-free option, choose a good quality gluten-free bread. It works well in this recipe. To make your French toast even better, try these flavor boosts: - Nutmeg: Just a pinch adds warmth and depth. It pairs nicely with cinnamon. - Almond Extract: A small splash gives a nutty taste. It complements bananas well. - Cocoa Powder: Mix in a little for a chocolate twist. It makes the dish richer and more fun. - Coconut Flakes: Add some for a tropical vibe. It gives a nice crunch too. You can easily make this dish fit your diet: - Dairy-Free: Use almond milk or coconut milk instead of regular milk. It keeps the flavor good. - Gluten-Free: As mentioned, use gluten-free bread. This allows everyone to enjoy it. - Egg-Free: For a vegan option, try a banana or flaxseed mixture in place of eggs. It binds the bread while adding flavor. With these variations, you can enjoy your caramelized banana French toast in many ways! To keep your Caramelized Banana French Toast fresh, store it well. Place any leftovers in an airtight container. This helps prevent the bread from drying out. You can refrigerate it for up to three days. If you have more than you can eat, freeze it. Wrap each slice in plastic wrap and then place them in a freezer bag. This way, they can last for up to two months. When you're ready to enjoy leftovers, reheating is key. For the best texture, use a skillet. Heat it over medium-low heat and add a little butter. Place the French toast slices in the skillet. Cook each side for about two to three minutes until warm. You can also use a toaster oven. This method keeps the outside crispy while warming the inside. Avoid using a microwave, as it can make the bread soggy. Yes, you can prep some parts in advance. You can slice the bananas and mix the egg mixture the night before. Store the egg mixture in the fridge. This saves time in the morning. You can also cook the French toast and keep it warm in the oven. Set the oven to a low heat, about 200°F. I love serving this dish with fresh berries. Blueberries, strawberries, or raspberries add color and flavor. You can also try crispy bacon or sausage for a savory touch. Yogurt on the side adds creaminess too. A sprinkle of nuts like walnuts or pecans gives a nice crunch. To make this recipe vegan, swap the eggs with flaxseed meal. Mix one tablespoon of flaxseed meal with three tablespoons of water. Let it sit for a few minutes until it thickens. Use a plant-based milk like almond or oat milk instead of regular milk. For butter, use a vegan alternative. This way, everyone can enjoy this tasty treat! Caramelized Banana French Toast is a treat you can create with simple steps. You learned how to caramelize bananas, whip up the egg mixture, and cook the perfect toast. Remember to avoid common mistakes to ensure the best result. With tips on variations and storage, you can enjoy this dish anytime. Final thoughts: this recipe is great for breakfast or brunch. Use the ideas shared to make this dish your own and impress your family and friends. Enjoy your cooking!

Caramelized Banana French Toast Tasty Breakfast Treat

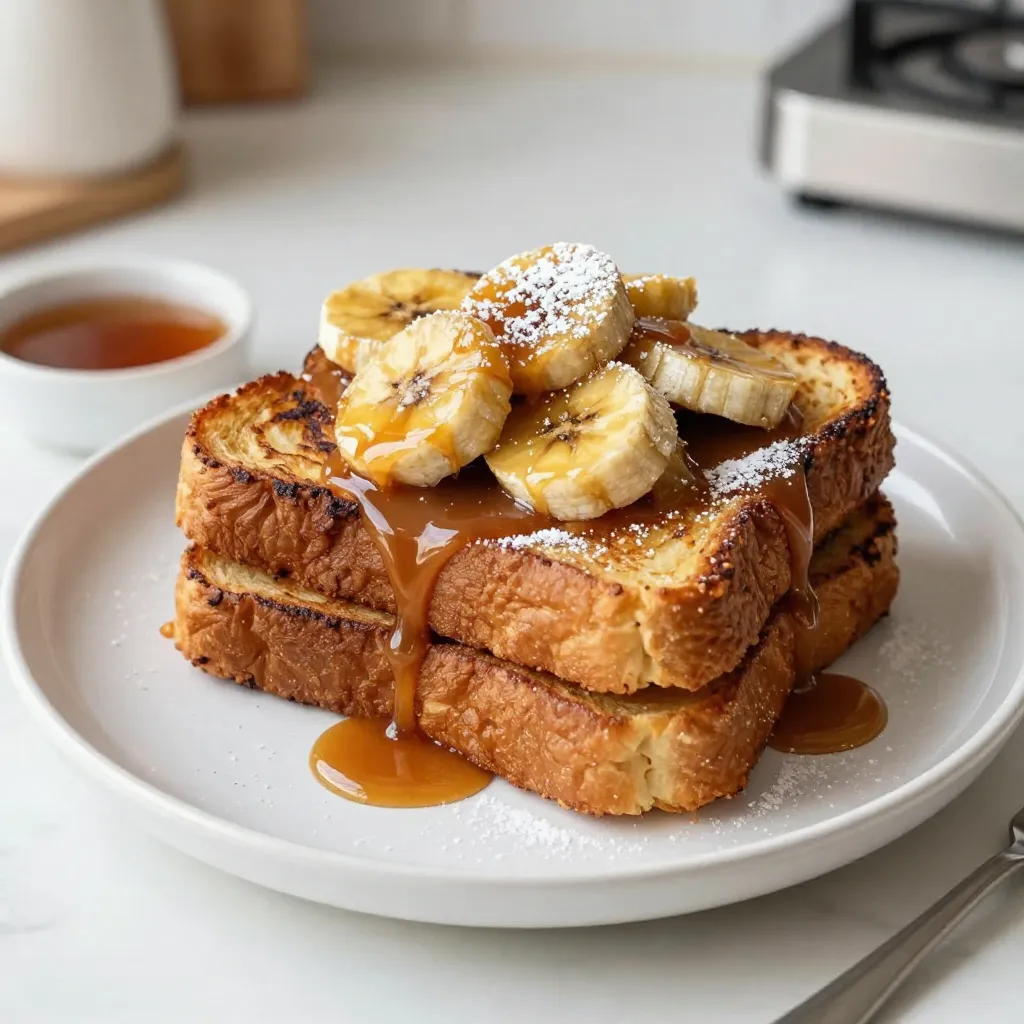
Start your day with a sweet twist! Caramelized Banana French Toast is the perfect treat for breakfast lovers. Imagine thick

- 2 cups Brussels sprouts, halved - 2 cups carrots, sliced into thick rounds - 1 zucchini, sliced into half-moons - 1 bell pepper, chopped (any color) - 1 red onion, cut into wedges - 4 cloves garlic, minced - 2 teaspoons dried thyme - 1 teaspoon dried rosemary - 1 teaspoon paprika - Salt and pepper to taste - 1/4 cup unsalted butter, melted - Fresh parsley, chopped (for garnish) When making garlic herb butter roasted vegetables, the right ingredients make all the difference. I choose a mix of vibrant vegetables to ensure a colorful and tasty dish. Brussels sprouts add a nice crunch. Carrots bring sweetness, while zucchini offers a soft texture. A bell pepper brightens the dish with its color and flavor. Finally, red onion adds depth. For herbs and seasonings, garlic is a must for rich flavor. Dried thyme and rosemary infuse the dish with warmth. Paprika adds a hint of spice, while salt and pepper balance the flavors perfectly. I use unsalted butter to control the saltiness. It also helps to make the vegetables tender and enhances their natural flavors. To finish, I sprinkle fresh parsley on top for a vibrant touch and added freshness. This combination creates a simple delight that you will love! {{ingredient_image_1}} First, preheat your oven to 425°F (220°C). This step is key for crispy veggies. While the oven heats, wash and prepare your vegetables. You need: - 2 cups Brussels sprouts, halved - 2 cups carrots, sliced into thick rounds - 1 zucchini, sliced into half-moons - 1 bell pepper, chopped (any color) - 1 red onion, cut into wedges Make sure to cut your vegetables into similar sizes. This helps them cook evenly. In a separate bowl, melt 1/4 cup of unsalted butter. Once melted, add: - 4 cloves garlic, minced - 2 teaspoons dried thyme - 1 teaspoon dried rosemary - 1 teaspoon paprika - Salt and pepper to taste Whisk these ingredients together until well combined. The warm butter helps the flavors mix better. Next, pour the herb butter over your prepared vegetables. Toss them gently to coat every piece. Spread the vegetables evenly on a large baking sheet lined with parchment paper. Roast them in the preheated oven for 25-30 minutes. Stir halfway through to ensure even cooking. Look for a tender texture and a nice caramelized color. After roasting, take them out and let them cool for a few minutes. Garnish with freshly chopped parsley before you serve. Enjoy your tasty garlic herb butter roasted vegetables! To get that perfect roast, set your oven to 425°F (220°C). This high heat helps to caramelize the veggies. Roast them for 25-30 minutes. Check them halfway through. Stir the veggies to get an even brown all over. Feel free to mix in your favorite herbs or spices. Oregano, basil, or even chili flakes bring a new twist. You can also swap out unsalted butter for olive oil or ghee. Each option changes the flavor and adds richness. Cut all your vegetables into uniform sizes. This helps them cook at the same rate. For variety, try using seasonal veggies like asparagus or squash. Mixing different textures makes each bite more fun. Pro Tips Choose Fresh Vegetables: Opt for seasonal and fresh vegetables for the best flavor and texture. Look for Brussels sprouts that are firm and tightly closed, and carrots that are vibrant and crisp. Customize Your Herbs: Feel free to experiment with different herbs! Fresh herbs like basil or oregano can add a unique twist to the roasted flavor profile. Check for Doneness: Every oven is different; check your vegetables at the 20-minute mark. If they are tender and have a caramelized exterior, they are ready to be taken out! Serve with a Dip: Enhance your roasted veggies with a delicious dip such as hummus or a yogurt-based sauce for an extra layer of flavor. {{image_2}} You can change your vegetables with the seasons. In spring, use fresh asparagus and snap peas. They add bright flavors and great colors. Try mixing in radishes for a peppery kick. For fall, sweet potatoes and butternut squash work well. Their sweetness pairs nicely with garlic herb butter. You can also add Brussels sprouts for extra crunch and flavor. If you want a vegan dish, swap butter for olive oil or vegan butter. This keeps the dish rich and tasty. For those on a low-carb diet, focus on non-starchy veggies. Broccoli, cauliflower, and bell peppers are great choices. They roast well and absorb all those lovely herbs. Want to make it cheesy? Add grated Parmesan or feta cheese before roasting. Cheese melts and adds a nice salty kick. You can also switch up your broths. Use vegetable broth for a lighter taste or chicken broth for richness. Each option brings a new twist to your garlic herb butter roasted vegetables. To keep your Garlic Herb Butter Roasted Vegetables fresh, use airtight containers. Glass containers are great for storage. They do not stain or hold odors. You can also use plastic containers. Just make sure they are BPA-free. Store in the fridge for up to three days. When reheating, you can use the microwave or the oven. The microwave is faster but may make the veggies soft. The oven keeps them crispy. To do this, preheat the oven to 350°F (175°C). Place the vegetables on a baking sheet. Heat for about 10 minutes. This method helps retain texture and flavor. You can freeze these roasted vegetables too! Allow them to cool completely. Place them in a freezer-safe bag or container. Remove as much air as possible. They can last up to three months in the freezer. To thaw, place them in the fridge overnight. For a quick thaw, use the microwave. Reheat as mentioned above for the best taste. You can roast many types of vegetables. Some popular choices are: - Brussels sprouts - Carrots - Zucchini - Bell peppers - Red onions Brussels sprouts become sweet and tender, while carrots gain a lovely caramel flavor. Zucchini adds a nice softness, and bell peppers provide a sweet crunch. Red onions turn sweet and add depth to your dish. Yes, you can use fresh herbs! Fresh herbs bring a bright taste. However, they also need more time to cook. Use three times the amount of fresh herbs compared to dried. For example, if a recipe calls for one teaspoon of dried thyme, use three teaspoons of fresh thyme. Roasted vegetables are done when they are tender and golden brown. Look for a slight char on the edges. You can poke them with a fork to check for tenderness. If they are soft but not mushy, they are ready to come out of the oven. Roasting vegetables brings out their best flavors. We covered key ingredients like fresh veggies, herbs, and butter. Following clear steps, you can create a tasty dish. I shared tips to personalize your roast and storage advice for leftovers. Remember, cooking is about fun and creativity. Explore different flavors and enjoy your meals! Make this a go-to method for healthy eating. You’ll love the results each time you roast.

Garlic Herb Butter Roasted Vegetables Simple Delight

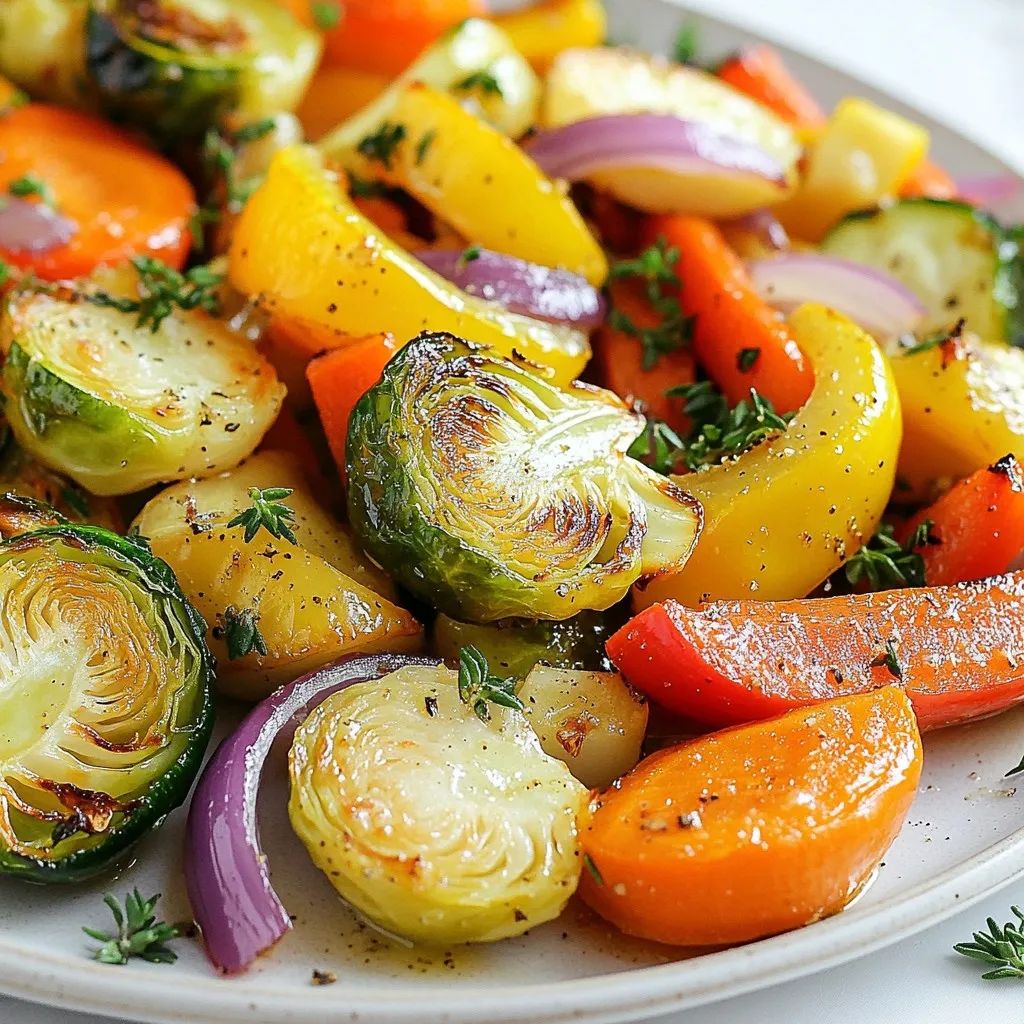
If you’re looking for a simple and tasty side dish, look no further! Garlic Herb Butter Roasted Vegetables are packed

To make Oreo Peppermint Bark, you need a few simple ingredients. Here’s what you will need: - 12 Oreo cookies, crushed - 2 cups white chocolate chips - 1 teaspoon peppermint extract - 1/2 cup crushed peppermint candies (or candy canes) - 1 tablespoon coconut oil (optional) Each item plays a key role. The Oreo cookies give a rich, chocolatey taste. The white chocolate chips melt into a creamy layer. Peppermint extract adds fresh flavor, making it feel like the holidays. Crushed peppermint candies add crunch and color. Coconut oil helps the chocolate stay smooth and shiny, but it’s not a must. You can find all these ingredients at your local store. Gather them together, and you are ready to start making this festive treat! {{ingredient_image_1}} First, get your baking sheet ready. Line it with parchment paper or a silicone mat. This step stops the bark from sticking. Make sure it covers the whole sheet. Next, you will melt the white chocolate. In a microwave-safe bowl, add the white chocolate chips. If you want, add coconut oil for smoothness. Microwave it in 30-second bursts. Stir the mix each time. Keep going until it is smooth and melted. Now, it’s time to add flavor! Stir in the peppermint extract. Mix well until it is all combined. You want that fresh peppermint taste in every bite. Gently fold in the crushed Oreo cookies. Make sure to save about 1/4 cup of them for later. This will add a nice crunch on top of your bark. Pour the chocolate-Oreo mix onto the baking sheet. Use a spatula to spread it out evenly. Aim for about 1/4 inch thick. This thickness helps it set nicely. Sprinkle the crushed peppermint candies over the chocolate layer. Add the reserved Oreo crumbs too. Press them down slightly. This helps them stick to the bark. Place the baking sheet in the fridge. Let it chill for 1 to 2 hours. You want the bark to be firm and set completely. Once it is set, take it out of the fridge. Break the bark into pieces. You can make them as big or small as you like. Enjoy your homemade Oreo Peppermint Bark! To melt chocolate well, use a microwave-safe bowl. Combine chocolate chips and coconut oil. Heat in short bursts, like 30 seconds. Stir between each interval. This keeps the chocolate from burning. When melted, it should be smooth and shiny. If it gets too thick, add a little coconut oil. This helps it stay creamy. To get the best texture, make sure the chocolate is fully melted. Stir it well to mix in the peppermint. When you fold in the Oreos, do it gently. This keeps the cookies from breaking too much. You want nice chunks of Oreo in the bark. Press the toppings lightly into the chocolate. This helps them stick better when it sets. For a beautiful presentation, cut the bark into even pieces. Place the pieces on a festive platter. You can drizzle melted white chocolate over them for flair. Another fun idea is to package them in clear bags. Tie them with a ribbon for gifts. This adds a personal touch and makes them look special. Enjoy sharing your Oreo Peppermint Bark! Pro Tips Use Quality Chocolate: Opt for high-quality white chocolate chips for the best flavor and smooth melting. Avoid generic brands that may not melt well. Chill Between Layers: If you're adding multiple layers or toppings, chill the bark briefly in the refrigerator to help them adhere better and prevent mixing. Customize Your Toppings: Feel free to experiment with different toppings such as crushed nuts, sprinkles, or even drizzles of dark chocolate for added flavor and texture. Store Properly: Keep your Oreo Peppermint Bark in an airtight container at room temperature for up to two weeks to maintain its freshness and crunch. {{image_2}} You can change the chocolate in your Oreo Peppermint Bark. While white chocolate is sweet and creamy, you might enjoy dark chocolate too. Dark chocolate adds a rich taste that balances the sweetness. You can also use milk chocolate for a classic twist. Each type of chocolate brings a new flavor to the bark. Add different flavors to your bark for fun. For example, try orange zest for a citrus kick. Almond extract could give your bark a nutty flavor. You can also add a pinch of sea salt for a sweet-salty mix. These flavors will make your bark stand out at any holiday party. Mix in seasonal treats for extra fun. In the fall, add crushed candy corn or pumpkin spice. For spring, try adding pastel sprinkles or mini eggs. You can also use dried fruits like cranberries or cherries for a burst of color and taste. These mix-ins will make your Oreo Peppermint Bark a treat for all seasons. To keep your Oreo Peppermint Bark fresh, store it in an airtight container. This helps keep moisture out. You can layer the bark pieces with parchment paper. This prevents them from sticking together. If you have many pieces, consider using a larger container. Oreo Peppermint Bark lasts about two weeks at room temperature. If you store it in the fridge, it can last up to three weeks. You can also freeze the bark. Wrap it tightly in plastic wrap, then place it in a freezer bag. It can last up to three months in the freezer. To enjoy later, thaw it in the fridge overnight. To keep the bark fresh, always use a clean, dry utensil when taking pieces. Avoid leaving it out in warm areas, as heat can cause it to melt. If you notice any moisture, dry the container before placing the bark inside. This helps maintain its texture and flavor. Yes, you can use dark or milk chocolate. Each type gives a different taste. Dark chocolate adds rich flavor, while milk chocolate is sweeter. Adjust the amount of peppermint extract for balance. Start with the same amount and taste it. You can always add more if needed. Oreo Peppermint Bark can last up to two weeks if stored properly. Keep it in an airtight container. This keeps moisture out and preserves the taste. If you want to store it longer, you can freeze it. Just wrap it well to prevent freezer burn. Absolutely! Oreo Peppermint Bark is great to make ahead. You can prepare it days or even weeks in advance. Store it in an airtight container. It will stay fresh and tasty. This makes it easy to enjoy during the busy holiday season. This blog post covered how to make Oreo Peppermint Bark. We talked about the ingredients, like Oreos and white chocolate. I shared step-by-step instructions for easy baking and tips for the best results. You learned fun variations and how to store your tasty treat. Enjoy making this easy and festive dessert. It will surely wow your friends and family!

Oreo Peppermint Bark Delicious Holiday Treat Recipe

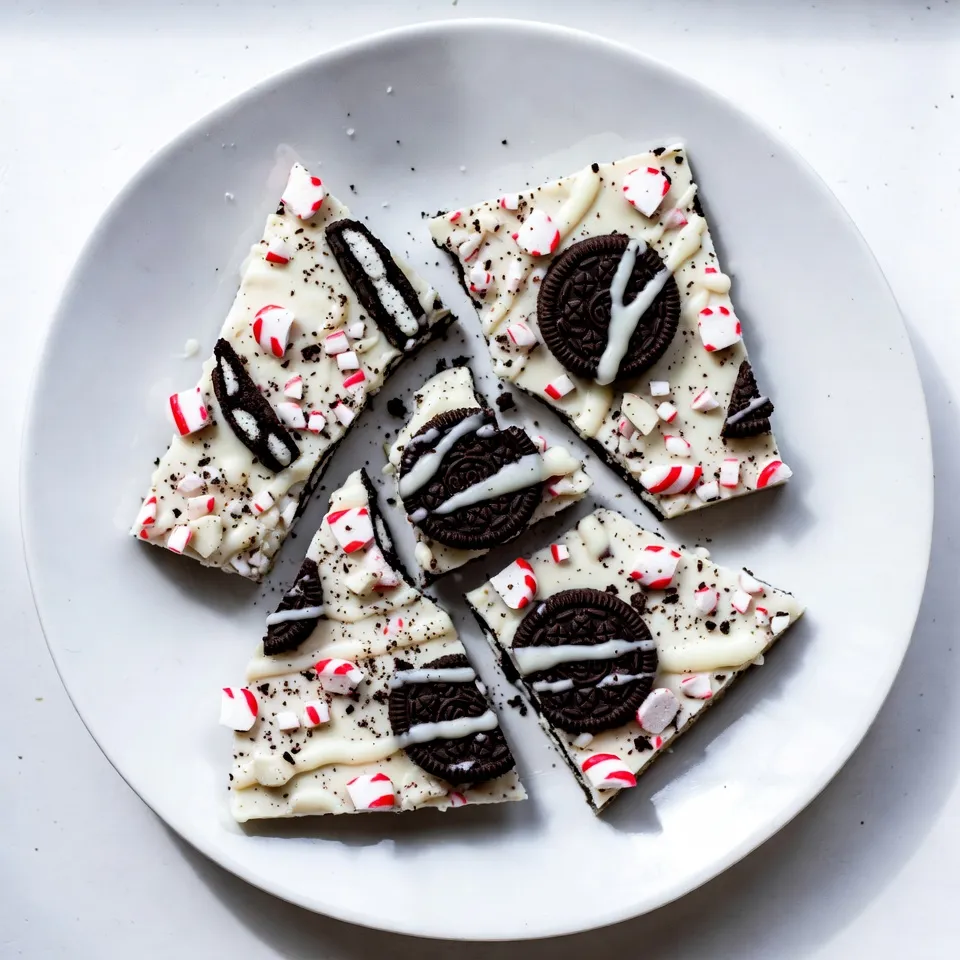
Get ready to spread some holiday cheer with this easy Oreo Peppermint Bark recipe! It’s sweet, crunchy, and bursting with

To make a tasty spicy black bean soup, you need these key ingredients: - 2 cans (15 oz each) black beans, rinsed and drained - 1 medium onion, diced - 3 cloves garlic, minced - 1 red bell pepper, diced - 1 green bell pepper, diced - 1 jalapeño pepper, finely chopped (seeds removed for less heat) - 4 cups vegetable broth - 1 teaspoon cumin - 1 teaspoon smoked paprika - ½ teaspoon cayenne pepper (adjust to taste) - Salt and pepper to taste - 2 tablespoons olive oil - Juice of 1 lime These ingredients blend well to create a rich, flavorful base. Black beans add protein and fiber. The bell peppers and onion provide sweetness, while the spices bring heat and depth. Garnishing can elevate your soup. Consider these options: - Fresh cilantro, chopped - Avocado slices These garnishes add freshness and creaminess. They also make the soup look beautiful. Having the right tools makes cooking easier. For this soup, I recommend: - Large pot - Wooden spoon - Immersion blender or regular blender - Measuring spoons and cups These tools help you mix and blend the flavors smoothly. You can create a delicious and satisfying meal with just a few essentials. {{ingredient_image_1}} Start by gathering your fresh ingredients. Dice the onion, red bell pepper, and green bell pepper into small pieces. Mince the garlic cloves and chop the jalapeño pepper. If you want less heat, make sure to remove the seeds from the jalapeño. This step adds a nice kick without being too spicy. In a large pot, heat 2 tablespoons of olive oil over medium heat. Once the oil is hot, add the diced onion and garlic. Sauté for about 5-7 minutes until they soften and smell great. Next, toss in the red and green bell peppers along with the jalapeño. Stir the mix well and let it cook for a few more minutes. After your vegetables are nicely softened, it’s time to add flavor. Sprinkle in 1 teaspoon of cumin, 1 teaspoon of smoked paprika, and ½ teaspoon of cayenne pepper. Stir everything together and let it cook for another minute. This helps the spices release their flavors, making your soup even tastier. Next, pour in 2 cans of rinsed black beans and 4 cups of vegetable broth. Bring the soup to a gentle boil. Once it starts boiling, lower the heat and let it simmer for 15-20 minutes. This simmering time helps the flavors blend together beautifully. For a creamier soup, you can blend part of it. Use an immersion blender and blend some of the soup right in the pot. If you don’t have one, transfer about half of the soup to a regular blender. Be careful with hot liquids! Blend until smooth, then return it to the pot. Now, add the juice of 1 lime and season with salt and pepper to taste. Stir well and check the flavors. Adjust as needed. Your soup is now ready to serve! Ladle it into bowls and garnish with chopped cilantro and avocado slices. Enjoy your warm, spicy black bean soup! To boost the flavor of your soup, always start with fresh, high-quality ingredients. Use ripe bell peppers and firm onions. Sauté these veggies well to bring out their sweetness. The secret to deep flavor lies in your spices. Always cook your cumin and smoked paprika briefly before adding liquid. This helps release their rich aromas. Don't forget to add lime juice at the end. It brightens the dish and adds a fresh touch. The spiciness of this soup can be adjusted easily. For a mild soup, remove the seeds from the jalapeño pepper before chopping. If you love heat, add more cayenne pepper. Start with a half teaspoon and taste as you go. Remember, you can always add more spice, but it’s hard to take it out. Keep a little lime juice handy. It helps balance the heat if your soup becomes too spicy. When serving your soup, use rustic bowls for a cozy feel. Top each bowl with fresh cilantro and creamy avocado slices. For extra richness, drizzle some olive oil or add a dollop of sour cream. Pair the soup with crusty bread for dipping. You can also serve it with a side salad for a balanced meal. A light, zesty salad works well to complement the bold flavors of the soup. Enjoy this hearty dish with friends or family for a warm gathering. Pro Tips Adjust the Heat: If you prefer a milder soup, remove the seeds from the jalapeño and use less cayenne pepper. You can always add more heat later if desired. Fresh Ingredients: For the best flavor, use fresh garlic and spices. This can significantly enhance the overall aroma and taste of your soup. Make it Creamy: Blending part of the soup creates a creamier texture. If you like it even creamier, consider adding a bit of coconut milk or cream after blending. Garnish Creatively: Besides cilantro and avocado, try adding a dollop of Greek yogurt or a sprinkle of queso fresco for an extra layer of flavor and creaminess. {{image_2}} You can easily make this soup vegetarian or vegan. The base of black beans and veggies already fits these diets well. Just use vegetable broth as you do in the recipe. If you want added creaminess, try coconut milk instead of sour cream. This keeps the soup rich and tasty while staying true to vegan ideals. While black beans shine in this soup, feel free to switch things up. You can use pinto beans or kidney beans for a change. Each type has its unique flavor but will still work well in the soup. If you want a mix, combine different beans for a fun twist. Just make sure you rinse and drain them well before adding them to the pot. This soup is a blank canvas for your creativity. Add corn for sweetness, or diced tomatoes for a fresh bite. You can toss in chopped carrots or zucchini for extra veggies. If you love protein, try adding cooked chicken or turkey. For more heat, add more jalapeños or sprinkle some hot sauce before serving. The options are endless, so have fun and make this soup your own! To store your spicy black bean soup, let it cool first. Pour it into an airtight container. Make sure to keep it in the fridge. It will stay fresh for about 3 to 4 days. If you want to save it for longer, freezing is a great option. To freeze the soup, use freezer-safe containers or bags. Leave some space at the top, as soup expands when frozen. Label the containers with the date. The soup can last up to 3 months in the freezer. When you are ready to eat it, just take it out and enjoy! For reheating, you can use the stovetop or microwave. If using the stovetop, heat it in a pot over medium heat. Stir it often to prevent sticking. If using the microwave, place it in a microwave-safe bowl. Heat in short bursts, stirring in between. Always check the temperature before serving. Black beans are packed with nutrients. They are high in protein and fiber. This helps you feel full and satisfied. They support digestive health and may lower cholesterol. Black beans also have antioxidants that protect your cells. They are rich in iron, which is good for your blood. Eating black beans can help keep your heart healthy too. Yes, you can use dried black beans! Just soak them overnight before cooking. After soaking, boil them for about an hour until soft. This method takes longer than canned beans but adds great flavor. You may need to adjust the broth amount. Dried beans require more liquid as they cook. This soup is already gluten-free! All the ingredients are safe for a gluten-free diet. Just check the vegetable broth to ensure it’s gluten-free. If you want to add bread or crackers, choose gluten-free options. Enjoy this soup without worry! In this post, I covered how to make spicy black bean soup. You learned about key ingredients, helpful kitchen tools, and steps to cook it. I shared tips for perfecting flavor and adjusting heat. We explored variations to suit your taste and discussed storage options. Now, get creative with your soup. Use your favorite ingredients and enjoy a healthy meal. You can adapt this recipe to fit your needs, making it fun and unique. Happy cooking!

Spicy Black Bean Soup Flavorful and Nourishing Meal

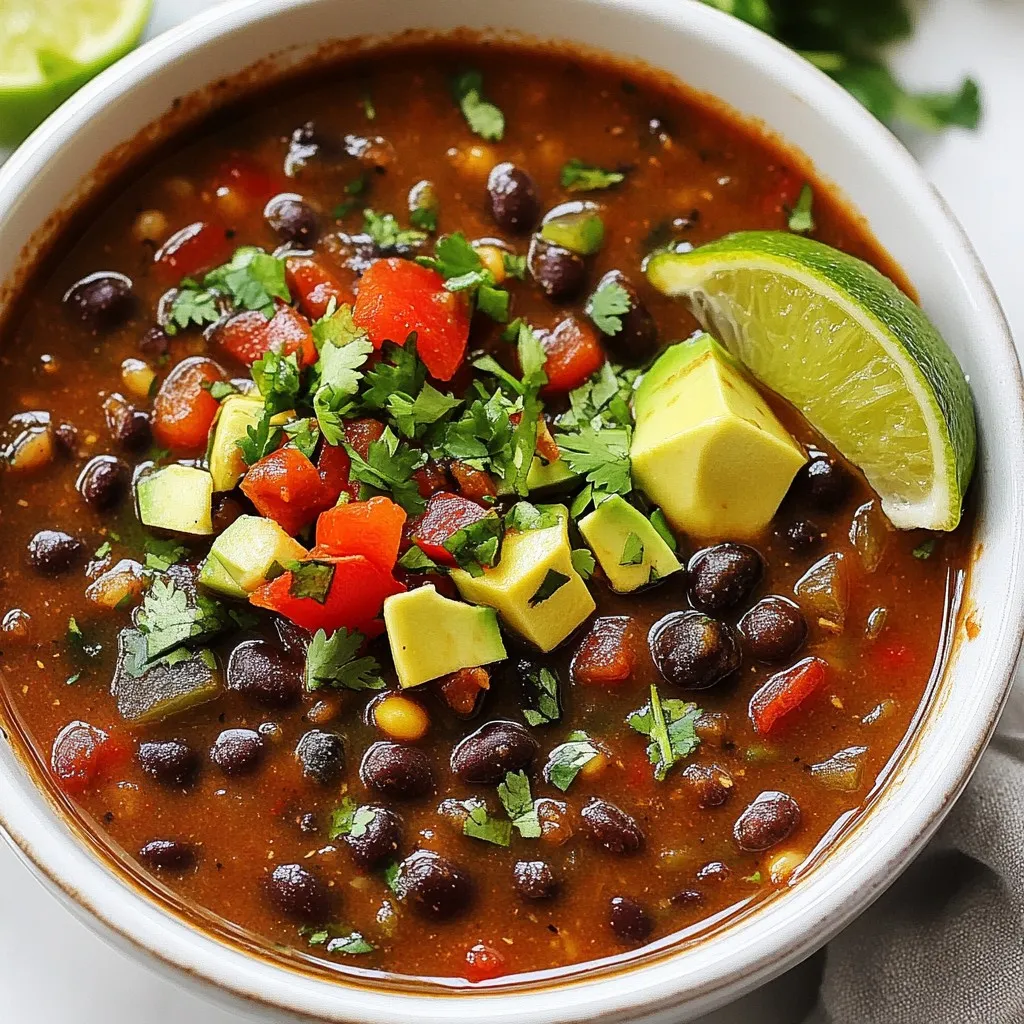
Are you ready to warm your soul and tickle your taste buds? This Spicy Black Bean Soup is not just

- 1 pound large shrimp, peeled and deveined - 3 tablespoons olive oil - 4 cloves garlic, minced - 1 teaspoon red pepper flakes (adjust to taste) - 1 tablespoon smoked paprika - 1 tablespoon lemon juice - Salt and pepper to taste - Wooden or metal skewers (if using wooden, soak them in water for 30 minutes) - Fresh parsley, chopped (for garnish) You can add other ingredients to boost flavor. Consider using fresh herbs like cilantro or basil. A splash of lime juice can add brightness. For more heat, include sliced jalapeños or a hot sauce of your choice. A bit of honey gives a nice sweet contrast to the spice. If you can’t find large shrimp, medium shrimp work too. Use avocado oil if you prefer a different oil. For a smoky flavor, you can swap smoked paprika with regular paprika. If you want to avoid garlic, try shallots or onions for a different taste. For a gluten-free option, ensure your skewers are safe for your diet. {{ingredient_image_1}} To start, gather your ingredients. You’ll need olive oil, garlic, red pepper flakes, smoked paprika, lemon juice, salt, and pepper. In a medium bowl, mix the olive oil, minced garlic, red pepper flakes, smoked paprika, lemon juice, salt, and pepper. Stir well to blend the flavors. This marinade brings heat and depth to the shrimp. Now, add the shrimp to the marinade. Make sure each shrimp is coated well. This step is key for flavor. Cover the bowl and place it in the fridge for at least 30 minutes. If you have time, let it marinate for up to 2 hours. The longer it sits, the more tasty flavors seep into the shrimp. Next, preheat your grill or grill pan to medium-high heat. While it heats, thread the marinated shrimp onto the skewers. Aim for about 5 to 6 shrimp per skewer, spacing them evenly. Once your grill is hot, place the skewers on it. Grill for about 2 to 3 minutes on each side. Look for the shrimp to turn pink and opaque. Be careful not to overcook them; this keeps them tender and juicy. After grilling, take the skewers off the grill and let them rest for a minute. This lets the juices settle. Serve your shrimp skewers on a platter. Garnish them with fresh parsley and a drizzle of olive oil or a squeeze of lemon. For an added kick, you can serve them with a spicy dipping sauce or zesty garlic aioli. Enjoy your delicious creation! To keep shrimp tender, cook them for just a few minutes. Shrimp turn pink and opaque when done. If they curl tightly, they are likely overcooked. Watch them closely. Remove them from the grill as soon as they are ready. The key is to check them often. Use medium-high heat for grilling. This heat cooks the shrimp evenly. Keep the skewers spaced out on the grill. This helps them cook well without steaming. If using wooden skewers, soak them in water first. This step prevents them from burning. Turn the skewers once during cooking for even grilling. You can change the marinade for different tastes. Try adding lime juice or fresh herbs for a twist. A splash of soy sauce can give a savory kick. For a sweeter touch, mix in honey or brown sugar. You can also swap the red pepper flakes for a milder spice. Experiment with flavors to find your favorite! Pro Tips Marinate for Flavor: The longer you marinate the shrimp, the more flavorful they become. Aim for at least 30 minutes, but 2 hours will yield the best results. Perfect Skewering: Thread shrimp through the tail and body to keep them secure on the skewer and ensure even cooking. Watch the Heat: Cooking shrimp too long can make them tough. Keep an eye on them and remove from the grill as soon as they turn pink and opaque. Garnish for Appeal: Fresh parsley not only adds color but also enhances the flavor. Consider adding lemon wedges for a zesty touch when serving. {{image_2}} You can swap shrimp for chicken or tofu. Chicken will need more time to cook. Aim for boneless, skinless pieces. For tofu, use firm or extra-firm. Cut it into cubes, and follow the same marinating steps. This gives you tasty skewers with different textures. For a veggie twist, try mushrooms or zucchini. Both soak up flavors well. Use portobello mushrooms for a meaty bite. Cut zucchini into thick rounds. Marinate just like the shrimp. Grill them for 2-3 minutes on each side. You'll enjoy a smoky and spicy taste. Changing the marinade can create new tastes. Try a coconut curry mix or a lemon herb blend. For the coconut curry, mix coconut milk with curry powder and garlic. For lemon herb, use lemon zest, thyme, and oregano. Marinate your shrimp or veggies in these for at least 30 minutes. This adds exciting flavors to your skewers. To store leftovers, let the shrimp skewers cool down first. Place them in an airtight container. You can keep them in the fridge for up to three days. Make sure to label the container with the date. This helps you remember when you made them. When you are ready to enjoy leftovers, reheat them gently. The best way is to use a skillet over low heat. This warms them without drying them out. You can also use a microwave, but watch the time. Heat in short bursts to keep them juicy. If you want to freeze the skewers, wrap them tightly in plastic wrap. Then, place them in a freezer bag. They can last up to three months in the freezer. When you are ready to eat, thaw them in the fridge overnight. Grill or reheat them as usual for a tasty meal. Yes, you can use frozen shrimp. Just make sure to thaw them first. Place them in cold water for about 15-20 minutes. This helps them cook evenly. Once thawed, peel and devein them if needed. Using frozen shrimp is a great way to save time. Shrimp cook fast. They turn pink and opaque when done. Cook them for about 2-3 minutes on each side. You can also check by cutting one in half. If it’s white and firm, it’s ready. Avoid cooking them too long to keep them tender. There are many tasty options. You can serve them with rice or a fresh salad. Grilled veggies also pair well. For a fun twist, try a zesty garlic aioli or a spicy dipping sauce. Lemon wedges add a nice touch, too! In this post, we explored the key ingredients for shrimp skewers and how to prepare them. I shared tips for marinating, grilling, and serving. You can swap ingredients to suit your taste, try different flavors, or even use other proteins. To keep your shrimp fresh, I provided storage and reheating methods. Remember, shrimp cook quickly, so watch them closely. Use this guide to create a great meal that everyone will enjoy. Cooking should be fun and tasty!

Spicy Garlic Shrimp Skewers Flavorful Grilling Recipe

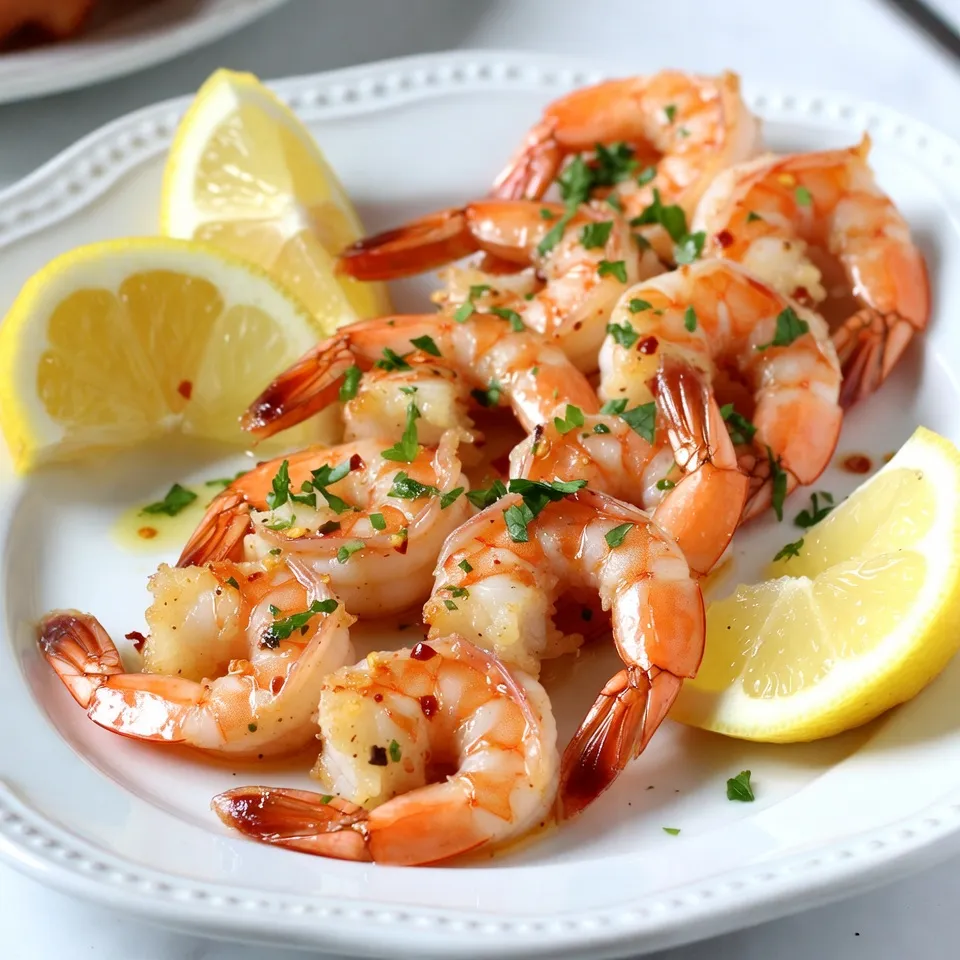
Get ready to ignite your taste buds with my Spicy Garlic Shrimp Skewers! This easy grilling recipe gives juicy shrimp

- 2 cups brussels sprouts - 1 large sweet potato - 1 red bell pepper - 1 yellow onion - 3 cloves garlic - 3 tablespoons honey - 2 tablespoons olive oil - 1 teaspoon dried thyme - Salt and pepper - Fresh parsley for garnish For this honey garlic roasted vegetables recipe, you need fresh ingredients. Start with brussels sprouts, sweet potato, bell pepper, and onion. The brussels sprouts should be halved. Cut the sweet potato into cubes. Chop the bell pepper and quarter the onion. The garlic gives a strong flavor. Use three cloves, minced well. Honey adds a sweet touch. You will need three tablespoons. For richness, use two tablespoons of olive oil. Dried thyme adds an herby note. Season with salt and pepper to taste. Finally, fresh parsley will make your dish look nice and bright. Using fresh ingredients ensures the best flavor. This dish is colorful and healthy. It’s perfect for any meal. You can even serve it as a side dish for dinner. {{ingredient_image_1}} First, preheat your oven to 425°F (220°C). This high heat helps the veggies get nice and crispy. Next, line a large baking sheet with parchment paper. This makes cleanup easy and helps the veggies roast evenly. In a large mixing bowl, combine the halved brussels sprouts, cubed sweet potato, chopped red bell pepper, and quartered onion. Make sure to mix them well. This way, every veggie gets coated with flavor later on. Now, let’s make the honey garlic sauce. In a small bowl, whisk together three cloves of minced garlic, three tablespoons of honey, and two tablespoons of olive oil. Add one teaspoon of dried thyme, salt, and pepper to taste. Mix until it’s all combined. This sauce will add a sweet and savory punch to your roasted vegetables. Pour the honey garlic mixture over the veggies in the bowl. Toss the vegetables well until they are evenly coated with the sauce. Spread the coated veggies out in a single layer on your prepared baking sheet. Roast the vegetables in the preheated oven for about 25-30 minutes. Stir them halfway through cooking. This helps them cook evenly and caramelize nicely. Once they are tender and golden, take them out and let them cool slightly. Enjoy the wonderful aroma filling your kitchen! Roasting vegetables can be simple and fun. Here are some tips to help you succeed: - Choose Fresh Veggies: Start with fresh brussels sprouts, sweet potatoes, bell peppers, and onions. Fresh produce tastes best. - Cut Evenly: Make sure all your veggies are cut to the same size. This helps them cook evenly. - Use Parchment Paper: Lining your baking sheet with parchment paper makes cleanup easier and helps prevent sticking. - Toss Well: After adding the honey garlic sauce, toss the veggies well. This ensures every bite is full of flavor. - Stir Midway: Stir the veggies halfway through cooking. This helps them roast evenly and prevents burning. Presentation can make your dish shine. Here are some ideas: - Use a Platter: Serve the roasted veggies on a large platter. This allows guests to see the colorful mix. - Drizzle Sauce: Pour any leftover honey garlic sauce over the veggies. This adds extra flavor and makes it more appealing. - Garnish with Parsley: Sprinkle fresh parsley on top for a pop of color. It also adds a fresh taste. - Pair with Proteins: These veggies work well with grilled chicken, fish, or tofu. Serve them alongside your favorite protein for a complete meal. - Add a Grain: Consider serving these veggies with rice or quinoa. This brings more texture and nutrition to your plate. Pro Tips Use Fresh Vegetables: For the best flavor and texture, use fresh, seasonal vegetables. This enhances the overall taste of the dish. Adjust Sweetness: Feel free to adjust the amount of honey based on your preference for sweetness. You can also substitute with maple syrup for a different flavor. Mix and Match: Experiment with different vegetables such as carrots, zucchini, or cauliflower based on what you have on hand or your personal taste. Store Leftovers Properly: If you have leftovers, store them in an airtight container in the refrigerator for up to 3 days. Reheat in the oven for the best texture. {{image_2}} If you want to switch things up, try different veggies. Instead of brussels sprouts, use broccoli or cauliflower. Carrots or zucchini can add color and taste, too. You can also swap the sweet potato for butternut squash for a sweet twist. When it comes to sweeteners, honey is great, but maple syrup works well, too. Agave nectar or brown sugar can add a unique flavor. Just remember to adjust the amount, as some sweeteners are sweeter than honey. To make your dish pop, consider adding spices. A pinch of cayenne pepper can add heat. Smoked paprika gives a nice, deep flavor. You can also use fresh herbs like rosemary or basil for a fragrant touch. Adding nuts or seeds can give your vegetables a nice crunch. Try tossing in some toasted almonds or sunflower seeds. They add texture and make the dish more filling. You can also sprinkle some sesame seeds before serving for extra flavor and flair. To store your honey garlic roasted vegetables, let them cool first. Place them in an airtight container. Make sure to cover the container tightly. This keeps the veggies fresh and tasty. In the fridge, they can last for about 3 to 5 days. If you want to keep them longer, consider freezing. Just make sure to use a freezer-safe container. When you are ready to enjoy the leftovers, reheating them is easy. The best way is to use the oven. Preheat your oven to 350°F (175°C). Spread the vegetables on a baking sheet. Heat for about 10-15 minutes until they are warm. You can also use a microwave if you're in a hurry. Place them in a microwave-safe dish and cover. Heat for 1-2 minutes, stirring halfway. This method works well, but the oven gives better texture. Honey garlic roasted vegetables can last for about 3 to 5 days in the fridge. Make sure to store them in an airtight container. This keeps them fresh and tasty. If you want to enjoy them later, let them cool first before putting them away. Yes, you can use fresh garlic instead of minced. Just chop the fresh garlic into small pieces. Fresh garlic has a strong flavor. You may want to adjust the amount to suit your taste. Usually, one clove of fresh garlic is about one teaspoon of minced. You can use many different vegetables in this recipe. Some great choices include carrots, zucchini, and cauliflower. These vegetables roast well and soak up the honey garlic flavor nicely. Feel free to mix and match based on what you have at home or what is in season. This blog post covered a tasty recipe for honey garlic roasted vegetables. We listed all the ingredients, provided step-by-step instructions, and shared valuable tips. Each part helps you create a delicious dish that is fun to make and share. Remember to play with different veggies and flavors to make it your own. Enjoy your cooking journey and savor every bite!

Honey Garlic Roasted Vegetables Flavorful and Easy Recipe

Are you ready to enjoy a delicious and healthy dish that’s easy to make? Honey Garlic Roasted Vegetables are packed

Older posts
Newer posts
← Previous Page1 … Page3 Page4 Page5 … Page158 Next →

dsad

© 2026 Recipes Pursuit • Built with GeneratePress

Our Policies

  • Copyright Policy
  • Cookie Policy
  • GDPR Policy
  • Privacy Policy
  • Disclaimer
  • Terms Of Use

More Information

  • Home
  • About
  • Contact
  • Appetizers
  • Dessert
  • Dinner
  • Drinks
©2026, Recipes Pursuit About Back To Top