![- 2 cans (15 oz each) chickpeas, drained and rinsed - 1 can (14 oz) coconut milk - 1 medium onion, finely chopped - 3 cloves garlic, minced - 1 inch ginger, grated - 1 red bell pepper, diced - 1 cup spinach (fresh or frozen) - 2 tablespoons olive oil - Salt and pepper to taste Chickpeas form the base of this dish. They add protein and fiber. I use two cans for a hearty texture. Coconut milk brings creaminess and a hint of sweetness. It balances all the spices well. Aromatics like onion, garlic, and ginger add depth. They create a strong flavor foundation. - 2 tablespoons curry powder - 1 teaspoon ground cumin - 1 teaspoon turmeric Spices turn this dish into a flavor bomb. Curry powder gives warmth and a rich taste. Ground cumin adds earthiness. Turmeric brings a vibrant color and has health benefits. Combining these spices makes every bite exciting. - Fresh cilantro - Lime wedges Garnishes elevate your dish. Fresh cilantro adds brightness and a pop of color. Lime wedges bring acidity, balancing the creaminess. These finishes make your meal look and taste gourmet. For a full experience, I suggest trying the Full Recipe. First, gather all your ingredients. This makes cooking easy. Chop the onion, garlic, and ginger into small pieces. Rinse the chickpeas in a strainer. Drain them well. Wash your spinach if it's fresh. If you use frozen spinach, no need to wash. Next, clean your cooking space. Make sure your skillet and utensils are ready. Having everything in place helps you cook smoothly. Heat two tablespoons of olive oil in a large skillet over medium heat. Add the chopped onion. Sauté it until golden and soft. This should take about five minutes. Now, stir in the minced garlic and grated ginger. Cook for one to two minutes. This makes your kitchen smell great! Add two tablespoons of curry powder, one teaspoon of ground cumin, and one teaspoon of turmeric. Stir well to coat the onions. Let the spices cook for about one minute. Next, toss in the diced red bell pepper. Sauté it for another two minutes. The pepper adds color and sweetness. Pour in one can of coconut milk and add the drained chickpeas. Stir until well mixed. Bring the mixture to a gentle simmer. Let it cook for around ten to fifteen minutes. Stir occasionally to avoid sticking. Now it's time to add the greens. Stir in one cup of spinach. If you use fresh spinach, cook until it wilts. If you use frozen, heat it through for two to three minutes. Season with salt and pepper to taste. Adjust the seasoning as needed. You can now serve this dish hot. Garnish with fresh cilantro and lime wedges for a burst of flavor. For the full recipe, feel free to explore the detailed steps! To make your chickpea curry shine, focus on spice levels. Add more curry powder if you like heat. A pinch of red pepper flakes adds a nice kick too. Balancing acidity and creaminess is key. Use fresh lime juice to brighten the dish. This lifts the rich coconut milk and makes each bite pop. For simmering, use a heavy skillet or Dutch oven. These help distribute heat evenly. Stir regularly to avoid sticking and burning. If the curry thickens too fast, add a splash of water. This keeps the texture just right. Plating matters! Use a wide bowl to show off the vibrant colors. Top with fresh cilantro for a pop of green. Lime wedges add a fresh touch. Serve with fluffy rice or warm naan on the side. This makes your meal feel complete and inviting. {{image_2}} To make this chickpea curry even more exciting, try adding tofu or tempeh. Both are great sources of protein and soak up flavors well. Just cube the tofu or tempeh and sauté them in olive oil before adding them to the curry. This gives a nice texture and a boost in protein. You can also use lentils instead of chickpeas. Lentils cook faster and are just as healthy. They add a different taste and texture. Use about 1 cup of cooked lentils for each can of chickpeas. This swap keeps the dish hearty and satisfying. Incorporating seasonal vegetables can brighten up your curry. Think about adding zucchini, carrots, or bell peppers. These veggies add color and nutrients. Just chop them into small pieces and add them with the chickpeas. Using sweet potatoes or pumpkin is another great option. They add natural sweetness and make the curry creamy. Peel and cube the sweet potatoes or pumpkin, then cook them until soft before mixing them in. To explore different flavors, try adding regional spices. For example, garam masala can give your curry a warm, aromatic touch. You can also add a pinch of cinnamon or star anise for depth. If you like heat, create a spicy version by adding chili powder or diced jalapeños. Start with a small amount, then taste and adjust as needed. This adds excitement and makes the dish even more memorable. For the full recipe, refer to the Chickpea Curry in Coconut Milk section above. To keep your chickpea curry fresh, use an airtight container. Glass containers work best, but plastic ones are fine too. Make sure to cool the dish before sealing. It can last in the fridge for up to five days. To reheat chickpea curry, use a pot on the stove or a microwave. If you use the stove, heat it on low, stirring often. In the microwave, use short bursts of heat and stir in between. This will help avoid mushiness and keep the texture nice. Yes, you can freeze chickpea curry. Pour it into a freezer-safe container, leaving some space at the top for expansion. It can last for three months in the freezer. When ready to eat, defrost it overnight in the fridge. To warm it up, use the stove or microwave, just like before. Yes, you can make this chickpea curry ahead of time. Preparing meals in advance saves time on busy days. It also allows the flavors to mix and deepen. Store the curry in an airtight container in the fridge. It stays fresh for up to three days. When you are ready to eat, just reheat it on the stove. Absolutely! Chickpea curry is vegan-friendly. It uses plant-based ingredients like chickpeas and coconut milk. This dish is perfect for anyone who follows a vegan diet. It is also great for those who want a healthy meal. You can enjoy this curry without worrying about animal products. You can serve a variety of dishes with chickpea curry. Here are some great options: - Rice: Steamed basmati or jasmine rice works well. - Naan: Warm naan bread is perfect for scooping up curry. - Quinoa: This nutty grain adds a healthy twist. - Salad: A fresh cucumber or tomato salad adds crunch. - Yogurt: A dollop of yogurt can cool the spice. For the complete recipe, check out the [Full Recipe]. In this post, we explored the key ingredients for a delicious chickpea curry, from main elements to spices and garnishes. The step-by-step instructions guide you through preparation, cooking, and final touches. I shared tips for perfect flavor and cooking techniques to help you shine in the kitchen. You can also experiment with variations and know how to store leftovers. Chickpea curry is tasty, healthy, and easy to make. Enjoy your cooking journey and make it your own!](https://recipespursuit.com/wp-content/uploads/2025/05/11681a0a-1e4f-4b43-a396-77c1ab699cf3.webp)
Chickpea Curry in Coconut Milk Flavorful and Easy Dish
Are you ready to spice up your dinner routine? This Chickpea Curry in Coconut Milk is not only flavorful but
Are you ready to spice up your dinner routine? This Chickpea Curry in Coconut Milk is not only flavorful but
![- 2 large cucumbers, thinly sliced - 3 medium ripe tomatoes, chopped - 1/4 red onion, thinly sliced - 1 cup feta cheese, crumbled - 1/4 cup fresh parsley, chopped - 1 teaspoon dried oregano - Salt and black pepper to taste - 2 tablespoons olive oil - 1 tablespoon balsamic vinegar Gathering fresh ingredients is key. Start with cucumbers, ripe tomatoes, and red onion. Slice cucumbers thin for crunch. Chop tomatoes into bite-sized pieces for sweetness. The red onion adds a nice bite to the dish. Next, crumbled feta cheese gives a creamy texture. It also adds a salty flavor that balances the salad. For herbs, fresh parsley is a must. It adds color and freshness. Dried oregano works well too. Don't forget salt and black pepper to enhance all the flavors. Lastly, we need a simple dressing. Olive oil adds smoothness, while balsamic vinegar brings a tangy kick. Mix these with the herbs, salt, and pepper for a bright finish. For the full recipe, refer to the recipe section above. First, grab a large mixing bowl. Combine the sliced cucumbers and chopped tomatoes in it. This is where the magic begins. The colors and textures blend well together. Cucumbers bring a juicy crunch, while tomatoes add a sweet and tangy flavor. This mix forms the base of your salad. Next, incorporate the crumbled feta cheese and thinly sliced red onion into the bowl. Feta adds a creamy, salty taste that enhances the salad. Red onion gives a sharp bite, balancing the flavors. Make sure to mix these ingredients gently. You want to keep the feta intact for that perfect creamy bite. Now, let’s make the dressing. In a small bowl, whisk together the olive oil, balsamic vinegar, dried oregano, salt, and black pepper. This dressing adds a zesty kick. The olive oil smooths everything out, while the vinegar brightens the flavors. Dried oregano brings an earthy note that ties everything together. Pour the dressing over your salad ingredients. Gently toss everything to combine. Be careful with the feta; you don’t want it to crumble too much. This step helps each piece of cucumber and tomato get that tasty dressing. It’s important for the flavors to meld, creating a delicious bite in every spoonful. Finally, sprinkle chopped parsley on top. This adds a burst of color and freshness. Let the salad sit for 10 minutes before serving. This resting time allows the flavors to blend beautifully. Serve it in a clear bowl to showcase its vibrant colors. You can also add a drizzle of olive oil for an appealing shine. Enjoy your fresh and zesty Cucumber Tomato Salad with Feta! For a full recipe, check out the [Full Recipe]. Serve this salad in a clear bowl. This makes the colors pop and looks great. You want your friends to see the fresh green cucumbers and red tomatoes. A sprinkle of parsley on top adds a nice touch. Let the salad sit for about 10 minutes before serving. This helps the flavors blend nicely. You can also drizzle a bit of olive oil just before you serve it. This adds a hint of richness that makes every bite better. Feel free to switch up the onions. Red onions are sweet, but white or yellow can add a sharp bite. You can also add diced bell peppers for extra crunch. This gives the salad more texture and a fun twist. {{image_2}} When you want to mix things up, there are great ways to change this salad. Here are some fun ideas. You can add grilled chicken, shrimp, or chickpeas for added protein. Each option gives the salad a new flavor and makes it heartier. Grilled chicken pairs well with the fresh veggies. Shrimp adds a nice touch, especially if you grill or sauté it. Chickpeas are great if you want a vegetarian option. They add a nice texture and plenty of protein. Try substituting feta with goat cheese or mozzarella for a flavor twist. Goat cheese has a creamy texture and a tangy taste. It will change the salad’s vibe while keeping it fresh. Mozzarella is milder and gives a nice chew. Both options can make your salad interesting and tasty. Incorporate seasonal vegetables like bell peppers or zucchini for a unique touch. Bell peppers add a crunchy texture and sweetness. Zucchini is mild but adds a nice bite when sliced thinly. Using what’s in season can change the flavor and keep the salad exciting. You can experiment with other veggies too, like radishes or corn, to find your favorite mix. For the full recipe, check out the detailed instructions above! Store leftovers in an airtight container in the refrigerator for up to 2 days. This keeps the salad fresh and crisp. Make sure to seal the container well to lock in flavors and moisture. Separate the dressing from the salad until you are ready to serve. This simple step helps keep the vegetables crunchy. When you mix it all together right before serving, the salad will taste fresh and bright. Avoid freezing this salad. The textures of the vegetables and cheese may degrade in the freezer. Freezing can turn cucumbers mushy and make feta crumbly. Enjoy it fresh for the best taste and texture. For more details on making this salad, check the Full Recipe. Yes, you can prepare the salad up to 2 hours ahead. Just remember to add the dressing right before serving. This way, the salad stays fresh and crispy. I recommend using English cucumbers. They have thin skin and fewer seeds, which makes them perfect for salads. Their crunchy texture adds a nice bite to the dish. If you're looking for alternatives, crumbled goat cheese works well. You can also try a dairy-free cheese. Each option offers a unique flavor, making your salad special. This salad combines fresh cucumbers, tomatoes, and feta cheese. Adding parsley, oregano, and olive oil brings out great flavors. Remember to let the salad sit for ten minutes for the best taste. You can also customize it with protein or seasonal vegetables. Store any leftovers in an airtight container and keep the dressing separate. Enjoy the crisp, healthy flavors of this dish. It’s a versatile recipe that you can tweak to fit your taste.](https://recipespursuit.com/wp-content/uploads/2025/05/7fe42779-45b5-461d-b719-4d34f68302ff.webp)
Looking for a fresh and zesty dish? This Cucumber Tomato Salad with Feta hits the spot! It combines crisp cucumbers,
![- 1 pound large shrimp, peeled and deveined Choose large shrimp for a juicy bite. You can find them frozen or fresh at the store. Ensure they are peeled and deveined for easy cooking. - 1 bunch asparagus, trimmed and cut into 2-inch pieces Look for bright green asparagus with firm stalks. Snap the ends to remove the tough part. Cut them into 2-inch pieces for even cooking. - 4 tablespoons unsalted butter Unsalted butter allows you to control the saltiness in your dish. It adds rich flavor and helps the garlic infuse beautifully. - 4 cloves garlic, minced Fresh garlic packs a punch! Mince it fine for a strong flavor that blends well with the butter. Avoid using pre-minced garlic for the best taste. - 1 teaspoon red pepper flakes (optional, for a kick) This adds heat. Start with a small amount. You can always add more if you'd like it spicier. - 2 tablespoons fresh lemon juice Fresh lemon juice brightens the dish. It cuts through the richness of the butter and shrimp. - Salt and pepper to taste Simple seasonings enhance the dish. Taste as you go to get the right balance. - 2 tablespoons chopped fresh parsley (for garnish) Fresh parsley adds color and freshness. Chop it right before serving to keep it vibrant. Using fresh and quality ingredients makes a big difference. For the full recipe, check my detailed cooking instructions. To cook the shrimp, heat 2 tablespoons of butter in a large skillet over medium-high heat. Make sure the butter is melted before adding the shrimp. This keeps the shrimp from sticking. Season them with salt, pepper, and red pepper flakes if you want some heat. Cook the shrimp for about 2-3 minutes on each side. They should turn pink and opaque. This shows they are fully cooked. Once done, remove the shrimp from the skillet and set them aside. When cooking asparagus, timing is key. You want it tender but still bright green. In the same skillet, add the remaining 2 tablespoons of butter. Once melted, toss in the asparagus pieces. Sauté for about 4-5 minutes. You can tell the asparagus is done when it is bright green and tender. This makes it taste fresh and crisp. After the asparagus is ready, add minced garlic to the skillet. Cook it for about 1 minute until it smells good. This is when you return the shrimp to the skillet. Add fresh lemon juice for a bright flavor. Toss everything together well. This helps mix the shrimp and asparagus in the garlic butter sauce. For a nice touch, garnish the dish with chopped fresh parsley before serving. The colors and flavors will shine in your bowl. You can find the full recipe for Garlic Butter Shrimp and Asparagus above. - Overcooking shrimp: Shrimp cook quickly. If you cook them too long, they become tough. Aim for 2-3 minutes per side until they turn pink and opaque. - Undercooking asparagus: Asparagus should remain bright green and tender. Cook it for about 4-5 minutes. Test a piece with a fork to check for doneness. - Recommended spices and herbs: I love to add red pepper flakes for a touch of heat. Fresh parsley gives a pop of color and flavor. You can also try thyme or basil for more depth. - Tips for balancing acidity: Lemon juice brightens the dish. It cuts through the richness of the butter. Add it during the last minute of cooking for the best effect. - Recommended skillet types: Use a large, heavy skillet. Non-stick pans work well for easy cleanup. A cast-iron skillet can add great flavor. - Importance of using a good spatula: A sturdy spatula helps you mix the shrimp and asparagus without breaking them. Choose a spatula that can handle heat and is easy to grip. For the full recipe, check out Garlic Butter Shrimp & Asparagus Delight. {{image_2}} You can easily swap shrimp for chicken or tofu. If you choose chicken, cut it into small pieces. Cook the chicken until it’s golden and fully cooked. For tofu, use firm or extra-firm. Press it to remove excess water, then cube it. Sauté it until crispy for great texture. If you want alternatives for asparagus, green beans or broccoli work well. For green beans, trim the ends and use them just like asparagus. For broccoli, cut it into bite-sized florets. Sauté until bright and tender. You can prepare this dish on the grill for a smoky flavor. Skewer shrimp and asparagus, then brush with garlic butter. Grill for about 2-3 minutes per side. This method adds a nice char and enhances the taste. For an oven-baked version, preheat your oven to 400°F. Spread the shrimp and asparagus on a baking sheet. Drizzle with garlic butter and bake for about 10-12 minutes. This method makes cleanup easy and keeps the shrimp juicy. Adding cheese can make this dish richer. A sprinkle of grated Parmesan or crumbled feta adds a creamy touch. Mix it in right before serving for a delightful twist. Incorporating other vegetables can boost flavor and nutrition. Try bell peppers, zucchini, or cherry tomatoes. Cut them into small pieces and add them to the skillet with asparagus. This adds color and variety to your meal. For the complete recipe, refer to the [Full Recipe]. To store leftovers, place them in a sealed container. Make sure the shrimp and asparagus cool down first. Store in the fridge for up to three days. After that, the shrimp may lose flavor and texture. Always check for any off smells before eating. To freeze leftovers, first, cool them completely. Then, place the shrimp and asparagus in an airtight container or freezer bag. Remove as much air as possible. You can freeze them for up to three months. When ready to eat, thaw overnight in the fridge for best results. For reheating, use a skillet over low heat. Add a bit of butter to keep it moist. Stir often to heat evenly. Avoid using the microwave, as it can make shrimp rubbery. The goal is to bring back that fresh flavor and texture, just like from the Full Recipe! You can tell shrimp are done when they turn pink and opaque. They should curl into a "C" shape. If they look grey or are still translucent, they need more time. Cook them for about 2-3 minutes on each side. This way, you will get juicy shrimp every time. Yes, you can prepare the shrimp and asparagus ahead of time. However, it is best to cook them fresh for the best taste. If you make it in advance, store it in the fridge. Reheat gently on the stove or in the microwave. This helps keep the texture nice. A chilled Sauvignon Blanc works great with this dish. This wine has a crisp taste that matches the bright flavors of the shrimp and asparagus. You could also try a light Pinot Grigio. Both wines enhance the garlic and lemon notes. Yes, it is safe to eat previously frozen shrimp. Freezing shrimp helps keep them fresh. Just make sure to thaw them properly in the fridge or under cold water. This keeps them safe and tasty. To add spice, use more red pepper flakes. You can also add diced jalapeños or a dash of hot sauce. Start with a little, then taste as you go. This way, you can find the right heat level for your liking. Many sides pair well with this dish. Consider serving it over rice or pasta for a filling meal. A fresh salad or crusty bread also works nicely. These sides soak up the tasty garlic butter sauce and make the meal even better. For the full recipe, check out the main article. In this blog post, we explored key ingredients, tips, and step-by-step instructions for making Garlic Butter Shrimp and Asparagus. You learned about selecting fresh shrimp, asparagus, and herbs. I shared cooking tips to get the best texture and taste. Remember to avoid common mistakes like overcooking shrimp. You can also customize the dish with different proteins and spices. Whether you’re enjoying leftovers or trying a new twist, this dish is sure to impress. Happy cooking!](https://recipespursuit.com/wp-content/uploads/2025/05/baf7fe05-dbdb-40a1-a3d9-8e5a0372b4ad.webp)
Looking for a quick and delicious dinner idea? Garlic Butter Shrimp and Asparagus is your answer. This dish combines juicy
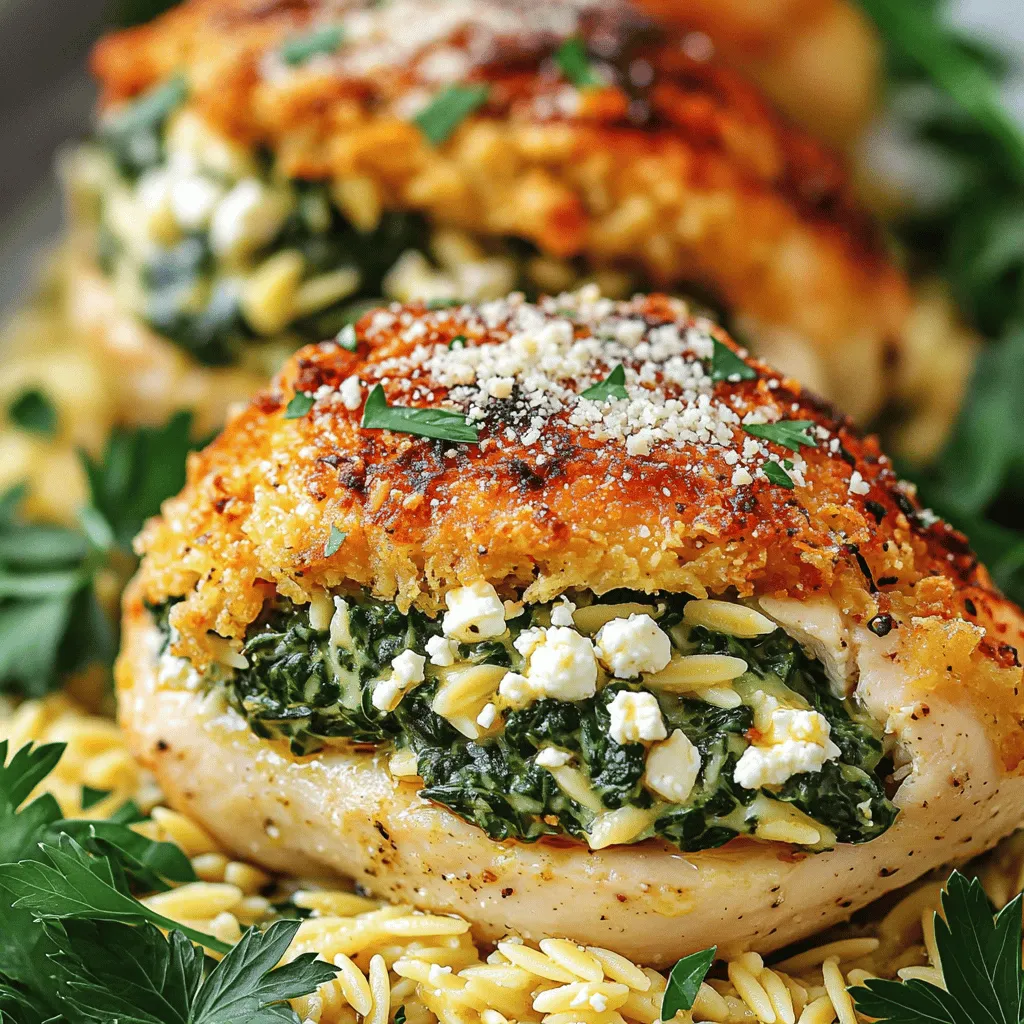
Looking for a quick, tasty dinner idea? Spinach Feta Stuffed Chicken Breast can be your go-to dish! With juicy chicken,
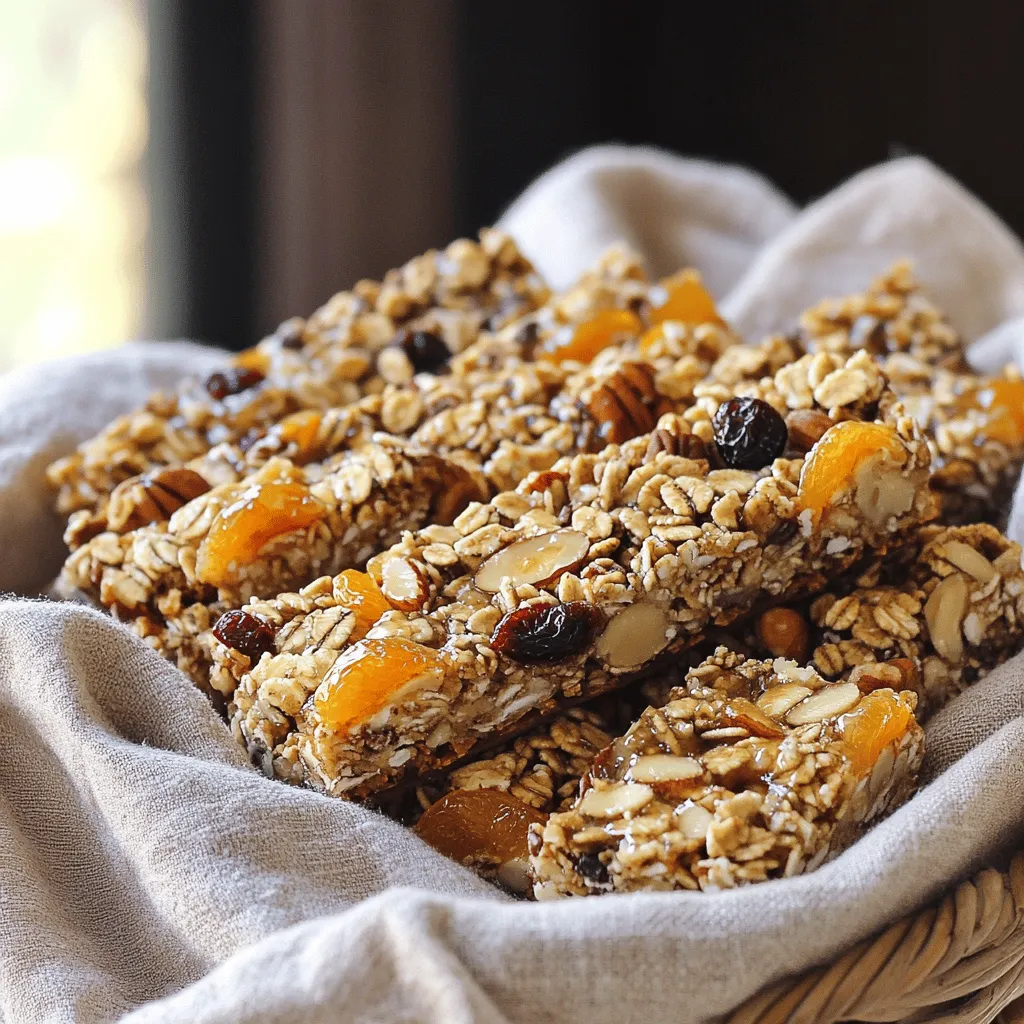
Looking for a quick, healthy snack? Homemade granola bars are the perfect solution! They are easy to make and packed
![To make these mocha chocolate chip cookies, you need the following ingredients: - 1 cup unsalted butter, softened - 1 cup brown sugar, packed - 1/2 cup granulated sugar - 2 large eggs - 2 teaspoons vanilla extract - 2 1/4 cups all-purpose flour - 1/2 cup cocoa powder - 1 teaspoon baking soda - 1/2 teaspoon salt - 2 tablespoons instant coffee granules - 1 cup semi-sweet chocolate chips - 1/2 cup milk chocolate chips - 1/4 teaspoon espresso powder (optional) These ingredients create a cookie that is rich and full of flavor. The butter gives a nice texture, while the sugars add sweetness. The cocoa powder and coffee granules bring that mocha taste. If you prefer using grams, here are some helpful conversions: - Butter: 227 grams - Brown sugar: 220 grams - Granulated sugar: 100 grams - All-purpose flour: 280 grams - Cocoa powder: 50 grams - Instant coffee granules: 14 grams - Semi-sweet chocolate chips: 175 grams - Milk chocolate chips: 90 grams Using grams can improve accuracy in your baking. This precision helps create the best texture and flavor. You can make some easy swaps if you need to. Here are a few ideas: - Butter: Use coconut oil for a dairy-free option. - Brown sugar: White sugar can work, but it will change the taste. - Eggs: Try unsweetened applesauce or a flax egg for a vegan option. - Cocoa powder: Carob powder can replace cocoa if you want a different flavor. - Chocolate chips: You can use dark chocolate or white chocolate for a twist. These substitutions still keep the cookies tasty. Don’t be afraid to get creative with your ingredients! For the full recipe, check the earlier sections. Making mocha chocolate chip cookies is simple and fun. You will mix, bake, and cool. The process ensures you get soft, chewy cookies every time. Follow these steps closely for the best treat. 1. Mixing: Start by preheating your oven to 350°F (175°C). Line your baking sheet with parchment paper. In a large bowl, cream 1 cup of softened butter, 1 cup of brown sugar, and 1/2 cup of granulated sugar until fluffy. Add 2 large eggs, one at a time. Mix well after each. Stir in 2 teaspoons of vanilla extract. In another bowl, whisk together 2 1/4 cups of all-purpose flour, 1/2 cup of cocoa powder, 1 teaspoon of baking soda, 1/2 teaspoon of salt, and 2 tablespoons of instant coffee granules. If you want, add 1/4 teaspoon of espresso powder. Gradually mix the dry ingredients into the wet ingredients. Fold in 1 cup of semi-sweet chocolate chips and 1/2 cup of milk chocolate chips. 2. Baking: Scoop tablespoon-sized balls of dough onto your prepared baking sheet. Space them about 2 inches apart. Bake for 10-12 minutes. The edges should be set, and the centers should look soft. 3. Cooling: Once baked, remove the cookies from the oven. Let them cool on the baking sheet for about 5 minutes. After that, transfer them to a wire rack to cool completely. - Mixing: Ensure your butter is soft. This helps create a light texture. Avoid overmixing the dough. This keeps cookies soft. - Baking: Keep an eye on the cookies. Ovens can vary, so check them a minute early if needed. - Cooling: Wait the full 5 minutes before moving cookies. This helps them set without breaking. These steps will help you create the perfect mocha chocolate chip cookies. For more detailed instructions, refer to the Full Recipe. To get the best cookies, start with room-temperature butter. This helps mix the butter and sugars better. Cream them until light and fluffy. This step adds air, making your cookies soft. Use fresh ingredients, especially the instant coffee. Fresh coffee gives a stronger taste. Don't overmix the dough. Mix until just combined for a tender cookie. Many people forget to measure ingredients correctly. Use proper measuring cups for dry and wet ingredients. Too much flour will make cookies dry. Another mistake is baking at the wrong temperature. Always preheat your oven. Check your cookies early. They should look set but soft in the middle when done. If you have leftover chocolate chips, toss them into pancakes or oatmeal. You can also add extra cocoa powder to smoothies for a chocolate boost. Any remaining coffee granules can enhance your morning brew. Don’t waste any ingredients; they can add flavor to other dishes! Check the Full Recipe for more ideas and fun ways to enjoy these cookies. {{image_2}} You can play with flavors in your mocha chocolate chip cookies! Try adding nuts for a crunchy bite. Chopped walnuts or pecans work great. You can also mix in spices. A pinch of cinnamon or nutmeg can add warmth. For a little heat, add a dash of cayenne pepper. Each twist creates a new cookie experience. Want to make gluten-free cookies? Swap all-purpose flour for a gluten-free blend. Check that the blend includes xanthan gum for the best texture. For a vegan version, use plant-based butter and flax eggs. Mix 1 tablespoon of ground flaxseed with 2.5 tablespoons of water. Let it sit until it turns gel-like, then add it to your dough. These simple swaps let everyone enjoy your cookies! You can change your cookies with the seasons. For winter, add peppermint extract or crushed candy canes. This gives a festive touch for the holidays. In the fall, try adding pumpkin spice or even a bit of maple syrup. These flavors keep your mocha chocolate chip cookies exciting all year round. For the full recipe, check out [Full Recipe]. To keep your mocha chocolate chip cookies fresh, store them in an airtight container. This helps keep them soft and chewy. Place parchment paper between layers if stacking cookies. Avoid direct sunlight and heat, as they can dry out your treats. You can freeze these cookies for up to three months. First, let them cool completely. Then, wrap each cookie tightly in plastic wrap or foil. Place the wrapped cookies in a freezer bag. When ready to enjoy, just thaw them at room temperature. To reheat cookies for a fresh taste, preheat your oven to 300°F (150°C). Place cookies on a baking sheet and heat for about five minutes. This warms them up without making them hard. You can also microwave for about ten seconds for a quick fix. To keep your cookies soft, store them in an airtight container. You can also add a slice of bread to the container. The bread will keep the cookies moist. If you want to enjoy warm cookies, reheat them briefly in the microwave. Just 10 seconds will do! Yes, you can use dark chocolate instead of semi-sweet. Dark chocolate adds a richer flavor. It can make the cookies taste more intense. Just make sure to adjust the sweetness if you prefer. Dark chocolate has less sugar than semi-sweet. You can make the dough ahead of time and chill it. Wrap the dough in plastic wrap and refrigerate for up to 3 days. When you're ready, scoop and bake the cookies straight from the fridge. You can also freeze the dough for up to 3 months. Just thaw it in the fridge before baking. Yes, mocha chocolate chip cookies are safe to eat if slightly underbaked. They will firm up as they cool. However, make sure they are not raw in the center. If you're unsure, bake them a little longer to be safe. Mocha chocolate chip cookies pair well with coffee or milk. A scoop of vanilla ice cream can also be a great treat. For a fun twist, try them with a glass of cold brew coffee. The flavors blend perfectly, making every bite delicious. You learned how to make delicious mocha chocolate chip cookies. We covered ingredients, step-by-step instructions, and tips to avoid mistakes. Variations let you customize the flavor to your taste. Storing and reheating options keep your cookies fresh and soft. You can bake these cookies with confidence now. Enjoy your treats, share them, and impress your friends with your skills! Happy baking!](https://recipespursuit.com/wp-content/uploads/2025/05/c76ea64e-2179-4a3a-b38b-7edc46d3c150.webp)
Get ready to fall in love with mocha chocolate chip cookies! These treats blend rich coffee flavor with sweet, gooey
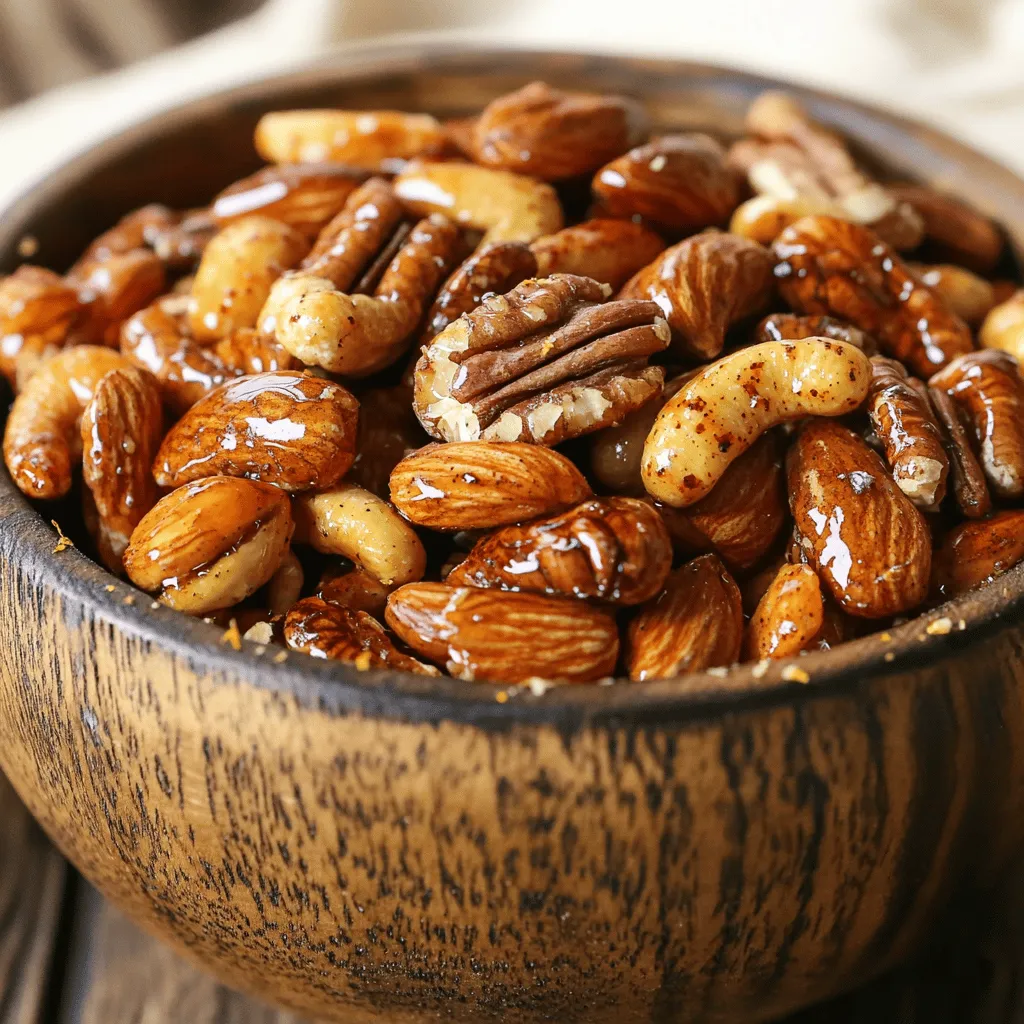
If you’re craving a snack that’s both sweet and spicy, you’re in the right place! Sweet and spicy roasted nuts
![- 2 cups fresh raspberries - 2 tablespoons chia seeds - 1/4 cup honey or maple syrup - 1 tablespoon lemon juice - A pinch of salt When you make raspberry chia seed jam, fresh raspberries are key. Look for bright, plump berries. They should smell sweet and fragrant. Avoid any that are mushy or have mold. For sweetening, you can use honey or maple syrup. Honey adds a rich flavor while maple syrup gives a unique taste. Adjust the amount based on how sweet you want your jam. Chia seeds are special. They expand and thicken the jam. This gives it a nice texture. The lemon juice adds brightness and balance to the sweetness. A pinch of salt enhances all the flavors. With these simple ingredients, you can create a jam that is both delicious and nutritious. Check out the [Full Recipe] for more details! - Choose berries that are firm and bright. - Smell them; they should have a sweet scent. - Avoid any that are soft or have dark spots. If you want to change the sweetness, you can try agave nectar. It's a vegan option with a mild taste. You can also use stevia for a low-calorie choice. Just remember to adjust the amount, as these sweeteners can be stronger. Start by gathering all your ingredients. You need fresh raspberries, chia seeds, honey (or maple syrup), lemon juice, and a pinch of salt. Measure everything out to make cooking easier. This jam takes about 10 minutes to prep. It’s quick and fun! In a medium saucepan, combine the fresh raspberries and honey over low heat. Stir gently as the raspberries heat up. After about 5 minutes, they will start to break down. Use a fork or potato masher to mash the berries to your liking. You can keep it smooth or leave some chunks. Next, add the chia seeds, lemon juice, and salt to the mashed berries. Mix everything well. Remove the pan from heat and let it sit for 5 minutes. This is when the chia seeds will expand and thicken the jam. If it’s too thick after 5 minutes, add a little water. Stir again, then transfer the jam to a clean jar. Allow it to cool before refrigerating. This jam will thicken more as it cools. You can find the full recipe in the earlier section. Enjoy your homemade raspberry chia seed jam! To get the best texture for your raspberry chia seed jam, you must mash the raspberries well. Use a fork or potato masher. This helps break them down and release their juices. If you like a smooth jam, mash more. If you want some chunks, mash less. After mixing in the chia seeds, let the jam sit for five minutes. This allows the seeds to soak in liquid and thicken the jam. If it seems too thick, add a little water to reach your perfect texture. Store your jam in a clean, airtight jar. This will keep it fresh longer. Always let the jam cool to room temperature before sealing the jar. Once sealed, put it in the fridge. It can last up to two weeks. For longer storage, consider freezing it. Use freezer-safe containers and leave some space at the top for expansion. Your jam can last for up to six months in the freezer. There are many fun ways to enjoy your raspberry chia seed jam. Spread it on warm toast or bagels for breakfast. Mix it into your morning yogurt or oatmeal for added flavor. Use it as a topping for pancakes or waffles. You can even swirl it into desserts like cheesecake or brownies. The possibilities are endless! For a charming touch, serve it in a small jar with twine around the neck. Enjoy your creation! {{image_2}} You can change the fruit in this recipe to make your jam unique. Try strawberries, blueberries, or peaches. Each fruit brings a new flavor. Use the same amount of fruit as the raspberries. Just follow the same steps in the recipe. Mixing fruits can also be fun. A berry mix can add depth to your jam. Sweetness is key in jam. You can adjust it easily. If you like it sweeter, add more honey or syrup. If you want it less sweet, use less. You can also use stevia or agave nectar for a lighter option. Taste as you go to find your perfect balance. This recipe fits many diets. It’s already vegan if you use maple syrup. For a sugar-free option, try a sugar substitute. Make sure to check the conversion rates. You can also make it low-carb by using berries with lower sugar content. This jam can fit into many healthy eating plans. To keep your Raspberry Chia Seed Jam fresh, store it in a clean jar. Use a jar with a tight lid to seal in flavor. Place the jar in the fridge as soon as it cools. This helps keep the jam safe and tasty. When stored properly, your jam will last about two weeks in the refrigerator. After two weeks, check for any changes in smell or color. If it looks or smells off, it’s best to toss it. You can freeze Raspberry Chia Seed Jam for longer storage. Use freezer-safe jars and leave some space at the top. The jam can last for up to six months in the freezer. When ready to use, just thaw it in the fridge overnight. Enjoy this sweet treat any time! Chia seeds are tiny but packed with nutrients. They are rich in fiber, which helps digestion. These seeds also have protein, making them a great snack. Chia seeds have omega-3 fatty acids, good for heart health. Plus, they can help you feel full longer. This can aid in weight loss. They also contain antioxidants, which protect your body from damage. Overall, chia seeds are a smart addition to your diet. Yes, you can use frozen raspberries! They work well in this recipe. Just remember to thaw them first. This helps them break down easier when you cook them. The flavor may be slightly different, but still delicious. Using frozen raspberries is a great way to enjoy this jam year-round. To check if your jam is set, spoon a bit onto a plate. Let it sit for a moment, then run your finger through it. If it holds its shape, it's ready! If it’s too runny, let it cook a bit longer. The chia seeds help thicken the jam, so don’t rush this step. Trust your taste buds, and adjust as needed! In this blog post, we explored how to make Raspberry Chia Seed Jam. We covered ingredients, tips for picking raspberries, and alternatives to sweeteners. I provided step-by-step instructions for perfecting your jam, as well as tips on texture and storage. You learned about flavor variations and health benefits, too. Making your own jam is fun and rewarding. Enjoy this simple recipe and get creative!](https://recipespursuit.com/wp-content/uploads/2025/05/8d72c6ba-34df-42e8-a44d-69165f274e79.webp)
Are you ready to make a healthy, tasty treat? This Raspberry Chia Seed Jam is both easy and nutritious. With
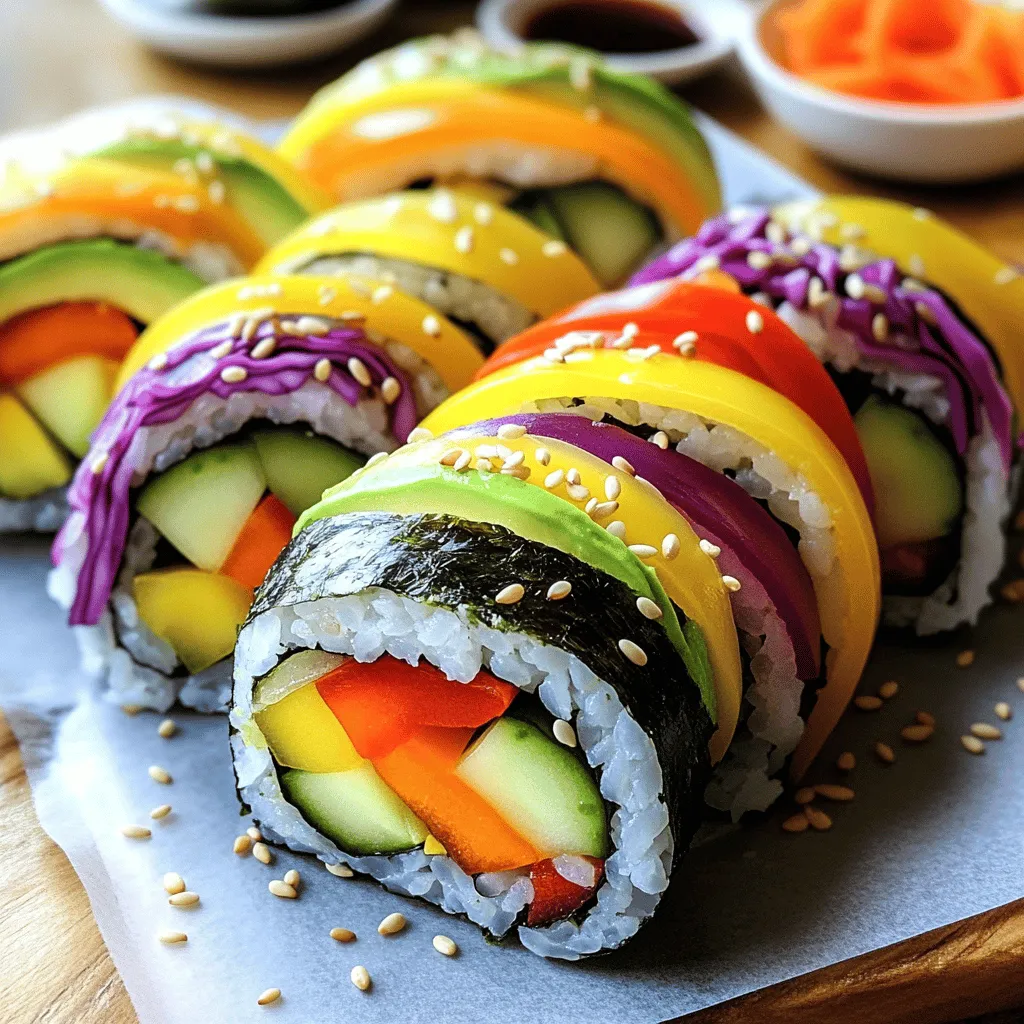
Are you ready to roll? Rainbow Veggie Sushi Rolls are a fun and tasty way to enjoy fresh veggies. Packed
![- 1 pound large shrimp, peeled and deveined - 3 tablespoons olive oil - 4 cloves garlic, minced You start with fresh, large shrimp. They should be peeled and deveined to keep the dish clean. The shrimp soak up all the flavors and cook quickly. Olive oil gives a nice base and helps the garlic cook well. Garlic is a must for this dish. It adds a strong, rich flavor that pairs perfectly with shrimp. - Juice and zest of 1 lemon - 1 teaspoon red pepper flakes (optional) - Fresh herbs: parsley and basil Lemon brings a bright taste. The juice adds acidity, and the zest gives a deeper lemon flavor. Red pepper flakes add heat. You can skip them if you prefer a milder dish. Fresh parsley and basil are key herbs. They add freshness and color to your meal. - Salt and pepper to taste Salt and pepper are simple yet important. They enhance all the flavors in your dish. Use them to your liking. Start light, and you can always add more. For the full recipe, check out the detailed steps to create this delicious dish. To start, take your pound of large shrimp, which should be peeled and deveined. In a large bowl, mix the shrimp with 3 tablespoons of olive oil and 4 minced garlic cloves. This blend gives the shrimp a rich flavor. Squeeze the juice of one lemon and add its zest to the bowl. If you enjoy a bit of heat, sprinkle in 1 teaspoon of red pepper flakes. Mix everything well to coat the shrimp evenly. It is important to season with salt and pepper to taste. Cover the bowl with plastic wrap. Let the shrimp marinate in the fridge for about 15 to 20 minutes. This step allows all the flavors to meld together nicely. Now, heat a large skillet over medium-high heat. Once your skillet is hot, add the marinated shrimp. Spread them out in a single layer. Cook the shrimp for about 2 to 3 minutes on one side. You will see them turn pink and opaque. This shift means they are cooking well. After that, flip each shrimp carefully. Continue cooking for an additional 1 to 2 minutes. You want them fully cooked but not overdone, so keep an eye on them. Once the shrimp are done cooking, take the skillet off the heat. Stir in 1 tablespoon each of fresh chopped parsley and basil. This adds a fresh burst of flavor to the dish. Serve your Lemon Garlic Herb Shrimp right away. Drizzle any remaining marinade from the skillet over the top for that extra flavor kick. If you follow this [Full Recipe], your dish will be a hit! To cook shrimp perfectly, aim for 2-3 minutes on one side. Flip the shrimp and cook for another 1-2 minutes. The shrimp will turn pink and opaque when done. An easy way to tell if shrimp are cooked is to look for their curled shape and firm texture. To boost flavor, consider adding spices like paprika or cumin. You can also use fresh herbs such as thyme or dill. To balance the acidity of lemon, pair it with a little honey or maple syrup. This small addition will cut the tartness and make the dish more complex. For a beautiful dish, garnish with lemon slices or fresh herbs. A sprinkle of paprika can add color too. To make it a full meal, serve the shrimp over rice or pasta. You can also pair it with a fresh salad or roasted vegetables for a healthy touch. For the full recipe, check out the [Full Recipe]. {{image_2}} You can add some heat to this dish. Just include more red pepper flakes. If you like it really spicy, add hot sauce. This twist gives you a bold flavor. It wakes up your taste buds. For a creamy version, you can make a sauce. Use heavy cream for a rich taste or coconut milk for a lighter feel. Add the cream to the shrimp while cooking. This makes the dish smooth and delicious. Pair the shrimp with pasta for a hearty meal. Spaghetti or fettuccine work well here. Cook the pasta as you prepare the shrimp. Once the shrimp are done, toss them with the pasta. This creates a filling and flavorful dish. You can find the full recipe for Lemon Garlic Herb Shrimp to get all the details. To store cooked shrimp, let it cool to room temperature. Place shrimp in an airtight container. This helps keep the shrimp fresh and tasty. You can use glass or plastic containers for storage. Make sure the lid fits tightly. Store it in the fridge for up to three days. When reheating shrimp, avoid using high heat. This can make shrimp tough. The best way is to use low heat on the stove. Add a splash of water or broth to keep moisture. You can also use the microwave. Heat in short bursts to prevent overcooking. Make sure to check for warmth throughout. This keeps the flavor and texture just right. If you want to freeze cooked shrimp, place it in a freezer-safe bag. Remove as much air as possible before sealing. Label the bag with the date. You can freeze shrimp for up to three months. When ready to use, thaw shrimp in the fridge overnight. You can also run it under cold water. Once thawed, use it in your favorite dishes like the Lemon Garlic Herb Shrimp. Yes, you can use frozen shrimp for this recipe. Frozen shrimp are convenient and still taste great. To prepare them, first, thaw the shrimp. You can do this by placing them in a bowl of cold water for about 15-20 minutes. After they are thawed, drain and pat them dry. This helps the shrimp absorb the marinade better. Remember, the key to great flavor is marinating them properly, even if they are frozen. Lemon Garlic Herb Shrimp pairs well with many sides. Here are some great options: - Rice: White or brown rice soaks up the shrimp's juices. - Pasta: Toss the shrimp with spaghetti or linguine for a tasty dish. - Salad: A fresh green salad adds crunch and balance. - Vegetables: Roasted or steamed veggies complement the shrimp's flavors. - Bread: A crusty bread is perfect for dipping in leftover sauce. Cooking shrimp is quick and easy. Here are some general times: - Large shrimp: 2-3 minutes per side. - Medium shrimp: About 1-2 minutes per side. - Small shrimp: 1 minute per side. Always look for the shrimp to turn pink and opaque. This shows they are done. Overcooking can make shrimp tough, so keep an eye on them. This blog post covered the essential steps for preparing Lemon Garlic Herb Shrimp. We explored key ingredients, cooking instructions, tips, and fun variations. With simple techniques, you can impress anyone with this dish. Remember, fresh herbs and the right seasonings matter. Enjoy experimenting with spices and pairings. Whether you choose to make it spicy or creamy, there’s a version for everyone. Finally, follow the storage tips to keep leftovers fresh. You’re now ready to create a delightful meal that’s both tasty and satisfying.](https://recipespursuit.com/wp-content/uploads/2025/05/144264bd-c488-416c-bdd4-8c8d03d32288.webp)
Are you ready to elevate your dinner game with a burst of flavor? Lemon Garlic Herb Shrimp is the easy
