Skip to content
DisclaimerTerms Of UseGDPR PolicyCookie Policy

Recipes Pursuit

  • Home
  • Drinks
  • Appetizers
  • Dinner
  • Dessert
  • About
  • Contact
  • Privacy Policy
DisclaimerTerms Of UseGDPR PolicyCookie Policy

Emma Smith

- 2 medium eggplants - 1 cup quinoa, rinsed - 2 cups vegetable broth - 1 small onion, diced - 2 cloves garlic, minced - 1 red bell pepper, finely chopped - 1 zucchini, diced - 1 can (15 oz) black beans, drained and rinsed - 1 teaspoon ground cumin - 1 teaspoon smoked paprika - Salt and pepper to taste - 1/2 cup chopped fresh parsley - 1/4 cup crumbled feta cheese (optional) - 2 tablespoons olive oil - Juice of 1 lemon In this stuffed eggplant recipe, we use fresh, wholesome ingredients. The eggplants form a great base. They soak in all the flavors. Quinoa brings a nice crunch and protein. You can use any vegetable broth you like. I prefer a low-sodium variety. For the filling, I love adding diced onion, garlic, and bell pepper. These add depth and sweetness. Zucchini keeps the mixture moist. Don’t forget about the black beans for added texture and protein. They make each bite hearty. Seasonings like cumin and smoked paprika give a warm flavor. Adjust salt and pepper to fit your taste. Fresh parsley brightens the dish. If you like cheese, sprinkle feta on top for a creamy finish. You can find the full recipe above, which will guide you step-by-step. Enjoy creating this flavorful and hearty dish! - Preheat the oven to 375°F (190°C). - Cut the eggplants in half lengthwise and scoop out the flesh. Start by slicing the eggplants in half. Use a spoon to remove the insides, leaving a thin wall. This will make a sturdy boat for the filling. Keep the scooped-out flesh for later; it adds flavor to the dish. - Combine rinsed quinoa and vegetable broth in a medium saucepan. - Bring to a boil, then simmer until fluffy. Rinse the quinoa under cold water to remove any bitter taste. In a saucepan, combine the quinoa with vegetable broth. Bring it to a boil, then lower the heat. Cover and simmer for about 15 minutes. The quinoa will become fluffy and absorb all the broth. - Heat olive oil and add diced onion, cooking until translucent. - Stir in garlic, red bell pepper, and zucchini, cooking until tender. In a large skillet, heat olive oil over medium heat. Add the diced onion and cook until it becomes soft and see-through. Then add minced garlic, chopped bell pepper, and diced zucchini. Stir this mix until the veggies are tender and bright in color. - Incorporate chopped eggplant flesh, black beans, and spices into the skillet. - Fold in cooked quinoa, parsley, and lemon juice. Now, add the reserved eggplant flesh to the skillet along with black beans, ground cumin, and smoked paprika. Stir well and let it cook for a few more minutes. Once everything is heated, fold in the fluffy quinoa, fresh parsley, and a squeeze of lemon juice. This combo brings in great flavor and texture. - Spoon the filling into hollowed-out eggplant halves. - Bake covered for 25 minutes, then remove foil and bake until golden. Spoon the filling into each eggplant half, packing it in tightly. Place the stuffed eggplants in a baking dish and cover with foil. Bake these in the oven for 25 minutes. After that, remove the foil and bake until the tops are golden and the eggplants are soft. Enjoy this burst of flavors! For the full recipe, check out the details provided above. - Rinse quinoa thoroughly before cooking to remove bitterness. - Allow quinoa to rest covered for 5 minutes after cooking. When you rinse quinoa, it gets rid of a coating called saponin. This makes the quinoa taste better. After cooking, letting it rest helps it become fluffy. This is key for great texture in your stuffed eggplant. - Use fresh herbs for a brighter flavor. - Experiment with spices like chili powder or oregano. Fresh herbs like parsley or basil can bring life to your dish. They add a fresh taste that can make a big difference. You can also try spices like chili powder or oregano. They add warmth and depth, making your meal even better. - Garnish with extra parsley or a sprinkle of lemon zest. - Serve alongside a salad for a complete meal. For a beautiful dish, sprinkle some fresh parsley on top. A little lemon zest adds brightness and color. Serving stuffed eggplant with a crisp salad makes it a full meal. It creates a nice balance on your plate and excites the eyes. Check out the Full Recipe for all the details on making this dish! {{image_2}} You can make this dish heartier with meat. - Add ground turkey or beef to the vegetable filling. - Substitute black beans with cooked chicken for extra protein. If you want a different taste, try these swaps. - Use chickpeas instead of black beans for a different texture. - Experiment with different vegetables like spinach or mushrooms. To make a vegan version, follow these tips. - Omit feta cheese for a completely vegan dish. - Use tahini or nutritional yeast for a cheesy flavor without dairy. These variations let you customize your stuffed eggplant with quinoa. The Full Recipe gives you a solid base to start. Enjoy changing it up to fit your taste! Refrigerate leftovers in an airtight container for up to 3 days. This keeps the flavors fresh and the quinoa fluffy. Avoid letting the dish sit out at room temperature for long. Enjoy it as a quick lunch or dinner! Freeze uncooked stuffed eggplants for up to 2 months. This option is great for meal prep. Just place them in a freezer-safe container. When you’re ready to eat, thaw and bake them as needed for a quick meal. Reheat in the oven at 350°F until heated through. This method keeps the eggplant tender and the filling warm. If you're in a rush, you can microwave for quick reheating, but it may affect texture. Enjoy your delicious stuffed eggplant with quinoa, ready in minutes! For the full recipe, check out the details above. Yes, you can substitute with rice, farro, or couscous. Each grain offers a unique taste and texture. Rice is soft and mild. Farro has a nutty flavor and a chewy bite. Couscous cooks fast and soaks up flavors well. Try them to find your favorite! They should be tender when pierced with a fork and slightly caramelized on top. This means they are soft enough to eat and have a nice, rich flavor. If they feel firm, give them more time in the oven. Yes, they are low in calories, high in fiber, and packed with nutrients. The quinoa and vegetables provide protein and vitamins. Eggplants are also full of antioxidants. This dish is good for your body and your taste buds. Absolutely! You can prepare and refrigerate them before baking. Just assemble the eggplants and place them in the fridge. When you're ready, bake them as directed. This makes meal prep easy and convenient. Pair it with a fresh salad or your favorite grain side for a complete meal. A crisp salad adds color and crunch. Quinoa or rice can make the meal more filling. Enjoy experimenting with different sides! Stuffed eggplants offer a fun and tasty way to eat healthy. You learned about the main ingredients, how to prepare and bake them, and some variations to suit your tastes. Use fresh herbs and spices for extra flavor. You can even make these ahead of time for easy meals. With simple steps, you can create a delicious dish that's both nutritious and satisfying. Enjoy experimenting with flavors and sharing this meal with friends and family.

Stuffed Eggplant with Quinoa Flavorful and Hearty Dish

Are you ready for a dish that’s both hearty and flavorful? Stuffed eggplant with quinoa is here to impress! This

To make Zesty Lemon Herb Quinoa, gather these fresh ingredients. Each one adds flavor and health. - 1 cup quinoa - 2 cups vegetable broth - 1 medium cucumber, diced - 1 bell pepper, diced - 1 cup cherry tomatoes, halved - 1/4 cup red onion, finely chopped - 1/4 cup fresh parsley, chopped - 1/4 cup fresh mint, chopped - Zest of 1 lemon - 2 tablespoons lemon juice - 3 tablespoons olive oil - Salt and pepper to taste - Optional: Feta cheese for topping This mix of ingredients creates a bright and tasty dish. The lemon zest and juice give it a fresh zing. The veggies add crunch and color. Quinoa, a super grain, adds protein and fiber. If you want, sprinkle feta cheese on top for extra flavor. You can find the Full Recipe above for more details on how to prepare it. To make Zesty Lemon Herb Quinoa, follow these steps carefully. - Rinse quinoa under cold water. This step helps remove any bitterness. - Combine quinoa with vegetable broth in a medium saucepan. - Bring the mixture to a boil over medium-high heat. - Once boiling, reduce heat to low. Cover and let it simmer for 15 minutes. - After 15 minutes, the quinoa should be fluffy, and the broth will be absorbed. - Remove the saucepan from heat. Let it sit covered for another 5 minutes. - Fluff the quinoa with a fork before letting it cool slightly. - In a large bowl, mix diced cucumber, bell pepper, cherry tomatoes, red onion, parsley, and mint. - Add the cooled quinoa to the vegetable mixture. - In a small bowl, whisk together lemon zest, lemon juice, olive oil, salt, and pepper. - Pour the lemon dressing over the quinoa and vegetable mixture. Toss gently to combine. - Taste and adjust seasoning if needed. Add more lemon juice or salt as desired. - If you like, sprinkle feta cheese on top before serving. This recipe is easy and fun! You can find the full recipe to explore all the details. Enjoy your flavorful and healthy dish! To get the best taste from your Zesty Lemon Herb Quinoa, adjust the seasoning as needed. Start with salt and pepper, but don’t hold back on the lemon juice. If you want more acidity, add extra lemon juice or zest. This brightens the dish and makes flavors pop. You can also mix in a splash of vinegar for a different twist. To avoid mushy quinoa, rinse it well before cooking. This removes the bitter coating called saponin. Use a fine mesh strainer for this step. Cook your quinoa in vegetable broth to add flavor. Make sure to keep the heat low once it boils. Cover the pot to let it steam evenly. This will give you fluffy quinoa every time. This quinoa pairs well with many proteins. Try it with grilled chicken, shrimp, or even chickpeas for a vegetarian option. For garnishing, sprinkle some feta cheese on top for a creamy touch. Fresh herbs like parsley and mint also add color and flavor. You can serve it warm or cold, depending on your preference. If you want the full recipe, check the earlier section. {{image_2}} You can easily switch up your veggies in this dish. Try using broccoli, zucchini, or carrots instead. Each choice adds a unique flavor and texture. You can also mix in beans for added protein. If you want to change the herbs, go for basil, cilantro, or even dill. Each herb brings a new taste that can brighten up the quinoa. This recipe suits many diets. It is vegan and gluten-free, making it great for everyone. If you need a nut-free option, you can skip any nuts or seeds in your mix. Just check your broth to ensure it is free from any allergens. You can enjoy this dish without worries! You can serve this dish cold or warm. A cold salad is refreshing on hot days. A warm dish is comforting during cooler months. For meal-prepping, pack portions in airtight containers. This quinoa keeps well in the fridge and makes a great lunch or dinner option. Check out the Full Recipe for more ideas! Store leftovers of Zesty Lemon Herb Quinoa in an airtight container. This keeps it fresh and tasty. I recommend glass containers for easy storage. They do not stain and are safe for the microwave. Make sure to cool the quinoa to room temperature before sealing it. This helps prevent moisture buildup inside the container. You can freeze cooked quinoa if you want to save it for later. First, let the quinoa cool completely. Then, place it in a freezer-safe bag or container. Squeeze out any extra air before sealing. When you are ready to eat it, thaw it in the fridge overnight. To reheat, you can microwave it or heat it in a pan with a splash of water. The quinoa lasts about 5 days in the fridge. After this time, it may start to lose its flavor and freshness. Always check for signs of spoilage. If you see any mold or off smells, it is best to throw it away. Freshness is key to enjoying this dish! What is quinoa and its health benefits? Quinoa is a small, round grain. It is high in protein and fiber. This grain contains all nine essential amino acids. It helps keep you full and satisfied. Quinoa is also gluten-free, making it great for many diets. It offers vitamins and minerals like magnesium and iron, too. Eating quinoa can boost your energy and support heart health. How to tell when quinoa is fully cooked? You’ll know quinoa is done when it looks fluffy. The grains will have a little tail that pops out. This tail is called the germ. If you taste it, it should be soft, not crunchy. If there’s still liquid left, let it cook a bit more. Just be careful not to overcook it, as it can get mushy. Can I use chicken broth instead of vegetable broth? Yes, you can use chicken broth! It will add a richer flavor. Just make sure to adjust the salt if your broth is salty. The taste will change but still be delicious. How can I make this more filling? To make this dish more filling, add protein. You can include chickpeas, black beans, or grilled chicken. You can also mix in nuts or seeds for a crunchy texture. Adding these will turn your quinoa into a complete meal. Can I add fruits to this recipe? Absolutely! Fruits add a nice twist. Try diced apples, oranges, or even cranberries. These will add sweetness and a fun crunch. Just keep the flavors balanced. What are some other herbs that work well? You can use herbs like basil, cilantro, or dill. They will give your quinoa a fresh taste. You can even mix different herbs for more flavor. Just be creative and taste as you go! This blog post covered a tasty quinoa recipe, from ingredients to cooking tips. You learned how to prepare quinoa, mix fresh veggies, and add flavor. Variations let you customize this dish for all diets. Proper storage keeps it fresh longer. Quinoa is versatile and healthy, making it a great meal choice. Experiment with your favorite veggies and herbs. Enjoy the process and make this recipe your own!

Zesty Lemon Herb Quinoa Flavorful and Healthy Dish

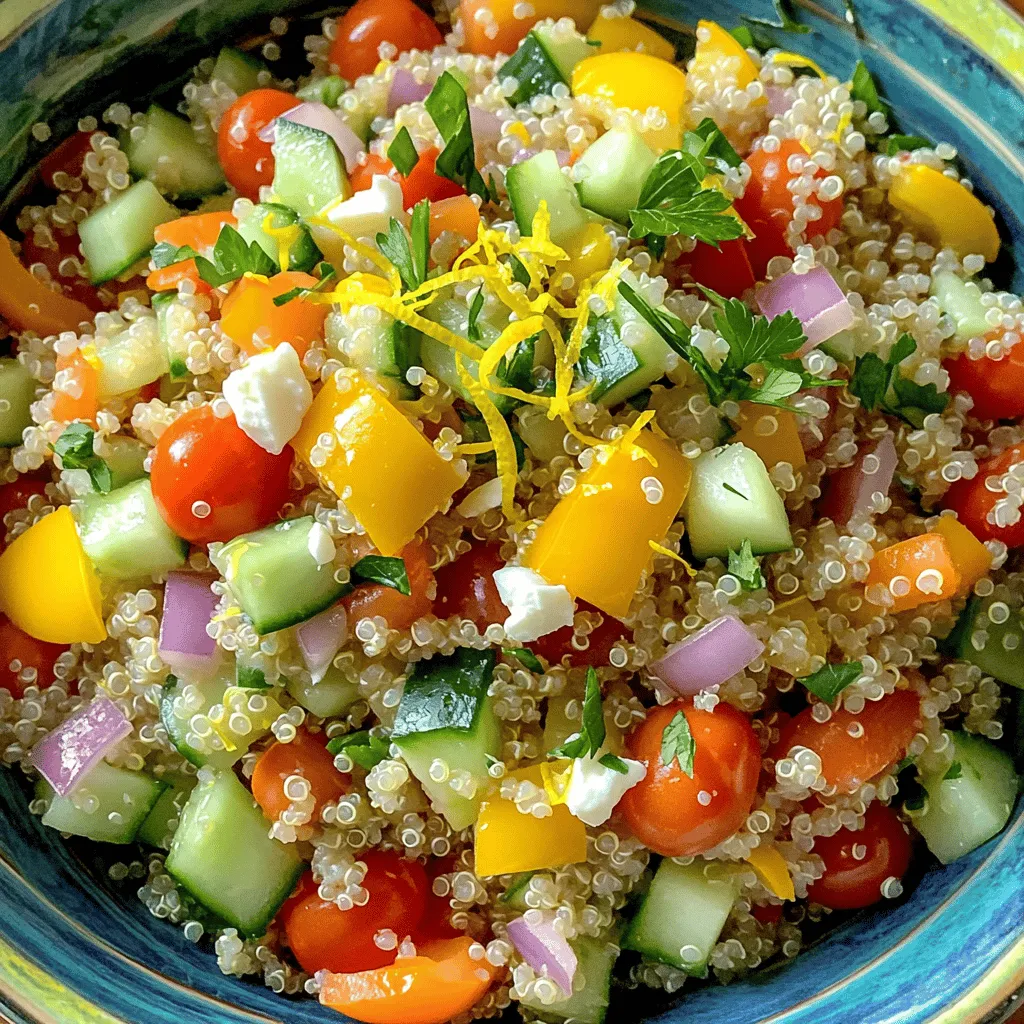
Looking for a healthy, tasty meal that’s easy to make? Zesty Lemon Herb Quinoa is the perfect dish! Packed with

- 1 cup heavy cream - 1/2 cup unsalted butter - 3 cloves garlic, minced - 1 cup grated Parmesan cheese - 1/2 teaspoon salt - 1/4 teaspoon black pepper - 1/4 teaspoon nutmeg - Fresh parsley, chopped (for garnish) You can swap heavy cream for half-and-half or whole milk. This will make the sauce lighter. For a vegan twist, use coconut cream instead. You can also try vegan butter and nutritional yeast in place of cheese. Fresh garlic has a strong flavor. It makes your sauce taste great. I recommend using whole cloves instead of pre-minced garlic. Always choose good Parmesan cheese. A block of cheese is best, as it melts smoothly. Melting the butter Start by placing a medium saucepan over medium heat. Add 1/2 cup of unsalted butter. As it melts, keep an eye on it. You want it to melt fully but not brown. This step gives the sauce a rich base. Sautéing garlic Once the butter is melted, add 3 minced garlic cloves. Stir them in the butter for about 1-2 minutes. You want the garlic to become fragrant, but be careful. If it browns, it will taste bitter. Adding and simmering the cream Now, pour in 1 cup of heavy cream. Stir the mixture and bring it to a gentle simmer. This should only take a couple of minutes. Keep stirring occasionally to prevent the cream from sticking to the bottom. Incorporating Parmesan cheese After the cream simmers, reduce the heat to low. Slowly whisk in 1 cup of grated Parmesan cheese. Keep whisking until the cheese melts completely. The sauce should become smooth and creamy. Seasoning the sauce Now it’s time to add flavor. Season the sauce with 1/2 teaspoon of salt, 1/4 teaspoon of black pepper, and 1/4 teaspoon of nutmeg. Stir well to combine everything. This will enhance the taste of the sauce. Adjusting consistency Let the sauce thicken for a few more minutes. If it’s too thick, add a little more cream. If it’s too thin, let it simmer longer. Taste the sauce and adjust the seasoning if needed. Your creamy garlic Alfredo sauce is ready to enjoy! To thicken your creamy garlic Alfredo sauce, you can use a few easy tricks. First, allow the sauce to simmer longer. This helps it reduce and thicken. If you want a thicker sauce, add more cheese. Parmesan melts nicely and will enhance the flavor. If you want a creamier sauce, use more heavy cream. You can also mix in a bit of cream cheese. This adds richness without changing the flavor too much. Want to boost the taste? Try adding a pinch of red pepper flakes. This gives a nice kick. You can also mix in fresh herbs like basil or thyme for freshness. When it comes to pasta, fettuccine is a classic choice. Its wide noodles hold the sauce well. You could also use linguine or even penne. Each type of pasta brings a unique texture. The best pasta to use is long and flat, like fettuccine. This allows the sauce to cling to each bite. You can also serve it over short pasta like penne for a fun twist. Pair your creamy garlic Alfredo with proteins like grilled chicken or shrimp. Both options work well. You can also add veggies like broccoli or peas for added color and nutrients. For the full recipe, check out the detailed instructions above. {{image_2}} You can make your creamy garlic Alfredo sauce even better with simple changes. Adding fresh herbs like basil or thyme can enhance the flavor. Chop them finely and stir them in at the end. You can also try using different cheeses. Pecorino Romano brings a sharp taste that mixes well with the cream. Just replace some of the Parmesan cheese with it for a unique twist. If you need a gluten-free Alfredo sauce, just use gluten-free pasta. The sauce itself is already gluten-free. For those on a low-carb or keto diet, you can swap the heavy cream for a low-carb cream. Use a keto-friendly pasta or even zucchini noodles to keep it healthy. Don't just use this sauce for pasta. You can make Alfredo pizza! Spread the sauce over pizza dough as a base. Top it with your favorite veggies or meats, and bake until golden. Another fun idea is to turn it into a creamy garlic Alfredo dip. Serve it with fresh veggies or breadsticks. Just heat the sauce and enjoy it as a tasty appetizer. For the full recipe, check the complete instructions and ingredients. To keep your creamy garlic Alfredo sauce fresh, store it in an airtight container. This helps prevent it from absorbing other flavors in the fridge. Place the sauce in the refrigerator as soon as it cools. It can last for about three to four days. If you see any signs of spoilage, like a change in color or smell, it's best to discard it. When you reheat the sauce, do it gently. Use low heat on the stovetop for the best results. Stir it often to keep it smooth. If you use a microwave, heat it in short bursts. Stir after each burst to avoid hot spots that can cause separation. Both methods work, but stovetop gives you more control. You can freeze creamy garlic Alfredo sauce if you want to save some for later. Pour it into a freezer-safe container and leave some space at the top. The sauce will expand as it freezes. It can last for up to three months in the freezer. When you’re ready to use it, thaw it in the fridge overnight. Avoid thawing in the microwave, as it may change the texture. After thawing, reheat it gently on the stovetop, stirring well to bring it back to life. How to make Alfredo sauce without garlic? You can make Alfredo sauce without garlic by skipping it entirely. Use butter, heavy cream, and Parmesan cheese. This will still give you a rich and creamy sauce. Can I use milk instead of heavy cream? Yes, you can use milk, but the sauce will be thinner. To make it creamier, add some flour or cornstarch to thicken it. Why is my Alfredo sauce grainy? Grainy sauce often happens when cheese is added too quickly. Ensure the heat is low when adding cheese. Stir slowly and let it melt fully for a smooth texture. How can I fix a sauce that is too thin? If your sauce is too thin, mix a little cornstarch with cold water. Stir this mix into the sauce and heat until it thickens. What goes well with creamy garlic Alfredo sauce? This sauce pairs well with fettuccine or linguine. You can also serve it with roasted veggies or garlic bread for a tasty meal. Can I add protein to the sauce? Yes! You can add grilled chicken, shrimp, or even sautéed mushrooms. This adds flavor and makes the dish more filling. Where to find the Full Recipe? You can find the Full Recipe for creamy garlic Alfredo sauce in the earlier section of this article. This blog post shared a simple way to make creamy garlic Alfredo sauce. We covered key ingredients, cooking steps, and tips for perfect flavor and texture. You learned about ingredient swaps and variations to fit different diets. Storing and reheating tips ensure you enjoy every last bite. With this knowledge, you can now create a delicious sauce for pasta or other dishes. Enjoy experimenting with flavors and recipes!

Creamy Garlic Alfredo Sauce Delicious and Simple Recipe

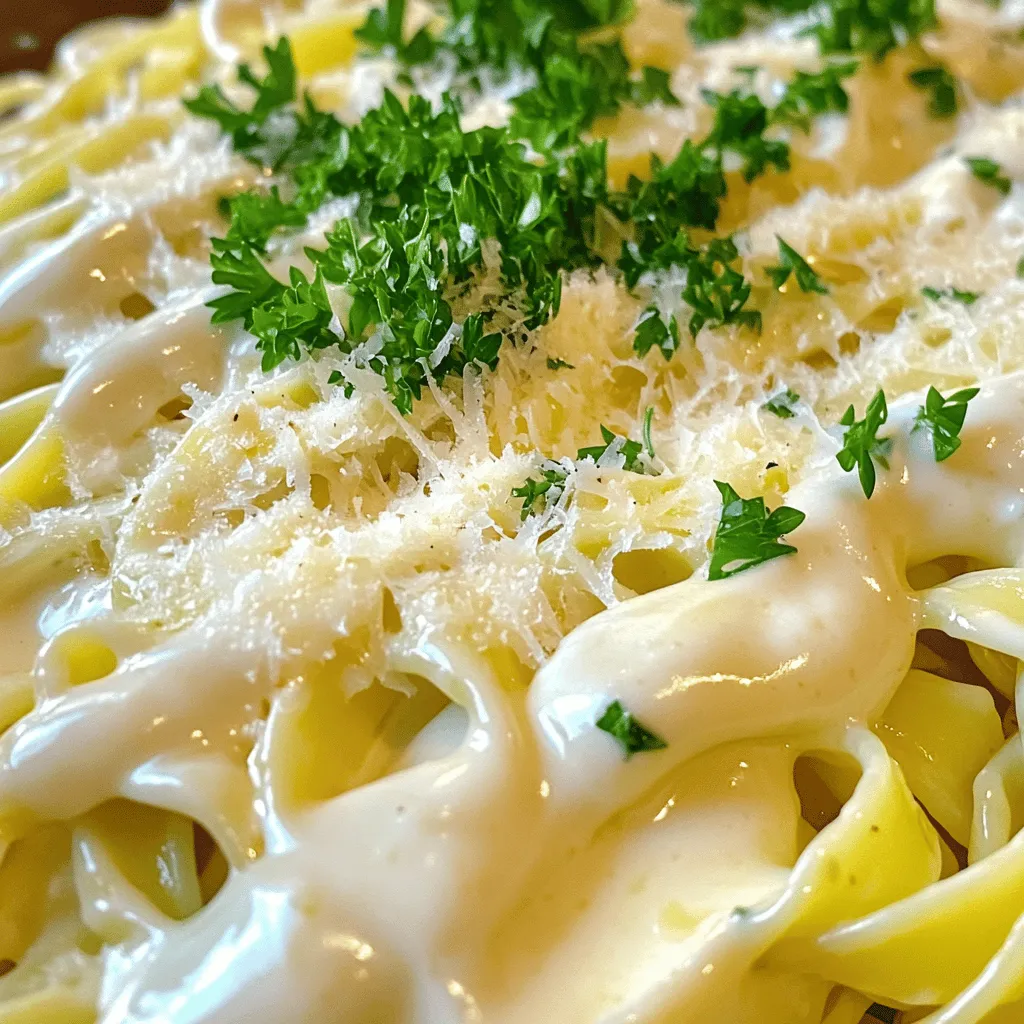
If you’re craving a rich, creamy dish, my Creamy Garlic Alfredo Sauce is just what you need! This easy recipe

To make Buffalo Cauliflower Tacos, gather these ingredients: - 1 medium cauliflower, chopped into florets - 1 cup all-purpose flour - 1 cup water - 1 teaspoon garlic powder - 1 teaspoon onion powder - 1 teaspoon smoked paprika - 1/2 cup buffalo sauce (adjust to taste) - 8 small corn tortillas - 1 cup red cabbage, finely shredded - 1 avocado, sliced - 1/4 cup fresh cilantro, chopped - Optional toppings: lime wedges, ranch or blue cheese dressing Each ingredient plays a role in creating bold flavors. Cauliflower serves as a great base. It absorbs the buffalo sauce well and gives a nice crunch. The flour and spices create a tasty batter that coats the cauliflower. This adds texture and flavor. Corn tortillas add a soft, warm base for the tacos. You can adjust the buffalo sauce to fit your spice level. If you like it spicy, add more! For a milder taste, use less sauce. Toppings like avocado and cilantro add freshness. They balance the bold flavors of the sauce. You can find the full recipe for more details on how to prepare these delicious tacos. Enjoy the blend of flavors in every bite! Preheat your oven to 450°F (232°C). Line a baking sheet with parchment paper to prevent sticking. In a bowl, combine 1 cup of flour, 1 cup of water, 1 teaspoon of garlic powder, 1 teaspoon of onion powder, and 1 teaspoon of smoked paprika. Whisk until smooth. The batter should be thick enough to coat your cauliflower. Take each cauliflower floret and dip it into the batter. Let the extra batter drip off before placing it on the baking sheet. Arrange the florets so they do not touch. Bake for 25-30 minutes until golden brown. In the last 5 minutes, drizzle 1/2 cup of buffalo sauce over the cauliflower. Toss gently and return to the oven for 5 more minutes. While the cauliflower bakes, warm 8 small corn tortillas on a skillet. Heat them for about 15 seconds on each side until they are soft and pliable. To assemble each taco, take a tortilla and fill it with buffalo cauliflower. Add toppings like 1 cup of shredded red cabbage, slices of 1 avocado, and 1/4 cup of chopped fresh cilantro. Drizzle with ranch or blue cheese dressing if you like. Serve with lime wedges on the side. For the full recipe, refer to the instructions above. For crispy cauliflower, an even coating of batter is key. Dip each floret fully in your batter mix. Let extra batter drip off before placing them on the baking sheet. This helps the cauliflower crisp up nicely. Flip the cauliflower halfway through baking. This ensures every side gets that golden, crunchy texture we crave. If you prefer a milder kick, try using a different sauce. Look for a mild buffalo sauce or even a barbecue sauce. You can also balance the heat with extra toppings. Fresh avocado or creamy ranch can cool down the spice while adding great flavor. Serve your tacos on a colorful platter. Bright colors make the dish pop and look more inviting. Garnish with lime wedges and fresh cilantro. This adds color and fragrance, making your meal even more appealing. A well-presented dish not only tastes good but also looks great on your table. For the full recipe, check out the cooking instructions above. {{image_2}} You can make these tacos gluten-free by changing the flour. Try using almond flour or rice flour instead of regular flour. Both options work well for a tasty batter. Just mix them the same way as the all-purpose flour. This keeps your dish crisp and light. If you want to skip dairy, you can use plant-based dressings. Look for dairy-free ranch or blue cheese dressing. Many brands offer delicious options that taste great with the tacos. You can also make your own using cashews or tofu blended with herbs and spices for a creamy texture. Feel free to add more veggies to your tacos! Bell peppers and onions add great flavor and nutrition. You can roast or sauté them before adding to the tacos. This extra step gives your dish more color and taste. Experiment with your favorite veggies to find the best mix. For more ideas, check the Full Recipe. To store your Buffalo Cauliflower Tacos, let them cool first. Place the tacos in an airtight container. Stack them with parchment paper between layers to keep them from sticking. Store the container in the fridge. They will stay fresh for up to three days. Reheating is key to keeping the tacos crisp. I suggest using an oven or an air fryer. Preheat the oven to 350°F (175°C). Place the tacos on a baking sheet. Heat them for about 10 minutes or until they are warm and crispy. If using an air fryer, set it to 350°F and heat for 5-7 minutes. You can freeze the buffalo cauliflower for later use. Cool it to room temperature, then place it in a freezer-safe bag. Remove as much air as possible before sealing. It can last for up to three months. However, freezing may change its texture. The cauliflower might become softer when reheated. For best results, enjoy it fresh! For the full recipe, check out the detailed instructions above. Yes, you can prepare parts in advance. You can chop the cauliflower and mix the batter earlier in the day. Store them in the fridge. Just bake the cauliflower and warm the tortillas close to serving time. This keeps everything fresh and tasty. These tacos pair well with many sides. Consider serving them with: - Black bean salad - Mexican rice - Guacamole - Fresh corn on the cob - Chips and salsa These sides add more flavor and texture to your meal. To boost the heat, try these tips: - Use extra buffalo sauce when baking. - Add diced jalapeños to the taco filling. - Top with spicy salsa or chipotle mayo. These options will enhance the spice and flavor. Absolutely! You can portion the cauliflower and toppings separately. Store them in airtight containers in the fridge. This makes it easy to grab a quick meal. Just reheat the cauliflower and warm the tortillas when you're ready to eat. To keep your cauliflower crispy: - Make sure to coat each floret evenly with batter. - Flip them halfway through baking for even crispiness. - Serve immediately after baking. These steps help maintain that perfect crunch. For the full recipe, check out Buffalo Cauliflower Tacos! This blog post guides you through making delicious Buffalo Cauliflower Tacos. You learned to prepare crispy cauliflower and coat it with spicy buffalo sauce. We covered assembly, storage, and tips for making these tacos even better. Try adding extra toppings or veggies to tailor them to your taste. With simple steps and variations, you'll impress your friends and family. Enjoy your cooking journey!

Buffalo Cauliflower Tacos Flavorful and Crisp Delight

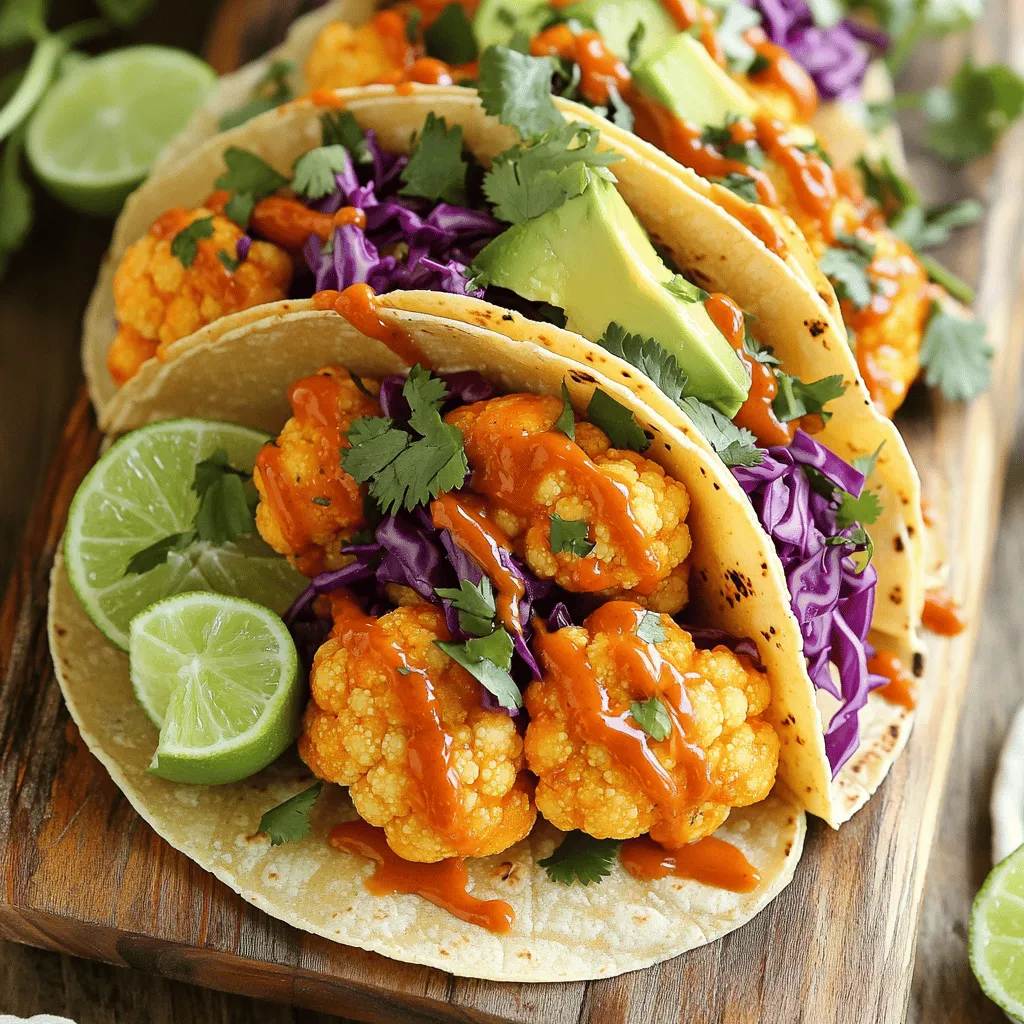
If you’re craving a fun twist on taco night, try Buffalo Cauliflower Tacos! These tacos pack a punch with spicy,

For delicious honey garlic chicken meatballs, you will need: - 1 lb ground chicken - 1/2 cup breadcrumbs (preferably panko) - 3 cloves garlic, minced - 1 large egg - 1 teaspoon salt - 1/2 teaspoon black pepper - 1 teaspoon ginger powder (or freshly grated ginger) These main ingredients create a tasty base for your meatballs. Ground chicken gives a lean, juicy texture, while breadcrumbs keep them light. Garlic adds flavor that pairs well with honey. To enhance your meatballs, consider these optional ingredients: - 1/4 cup grated Parmesan cheese - 1/4 cup chopped fresh parsley - 2 tablespoons sesame seeds (for garnish) Parmesan adds a savory kick. Fresh parsley brightens the dish with color and taste. Sesame seeds are great for a crunchy finish. You will also need these cooking essentials: - 2 tablespoons olive oil (for cooking) - 2 tablespoons honey - 1 tablespoon soy sauce Olive oil helps cook the meatballs evenly. Honey brings sweetness, while soy sauce adds depth to the flavor. These ingredients work together to create a rich glaze. For the full recipe, check out the section above. First, gather your ingredients. You need ground chicken, breadcrumbs, Parmesan cheese, parsley, egg, garlic, honey, soy sauce, black pepper, salt, and ginger powder. In a large bowl, mix them all together. Use your hands to combine until it feels smooth. This step is key to great flavor. Next, preheat your oven to 400°F (200°C). This ensures your meatballs cook evenly. Line a baking sheet with parchment paper to help with easy cleanup later. Now it's time to shape your meatballs. Scoop about 1.5 tablespoons of the mixture and roll it into a ball. Place each meatball on the baking sheet. Make sure they have space in between, so they bake well. Bake the meatballs for 20 minutes. Look for a golden color and make sure they are cooked through. You can use a meat thermometer to check if they hit 165°F (74°C). While your meatballs bake, heat olive oil in a large skillet over medium heat. Once it's hot, carefully add your baked meatballs. Pour in any leftover honey and soy sauce mix. This adds a nice glaze. Sauté the meatballs for 3-4 minutes. Gently shake the skillet to coat the meatballs in the honey garlic glaze. This step makes them stickier and full of flavor. When done, remove them from heat. Garnish with sesame seeds before serving. For more detailed instructions, check the Full Recipe. Enjoy your delicious honey garlic chicken meatballs! To make juicy meatballs, keep a few things in mind. First, don’t overmix the meat. Mix until just combined. This keeps the texture light. Second, add moisture with breadcrumbs and egg. They help hold the meat together. If you want even juicier meatballs, you can mix in some grated zucchini or carrot. They add moisture without changing the flavor. Prevent sticking by using parchment paper on your baking sheet. This helps meatballs lift easily. You can also lightly grease the paper with olive oil. Another trick is to wet your hands before rolling meatballs. This prevents the mixture from sticking to your hands. For a fun presentation, serve meatballs on skewers with toothpicks. Drizzle extra honey glaze over them for shine. You can also arrange them in a bowl, topped with sesame seeds and chopped parsley. This makes them look great on any table! As for sides, honey garlic chicken meatballs pair well with steamed rice or stir-fried veggies. Try serving them with a simple green salad for a fresh touch. You could also make them a part of a larger meal with noodles or quinoa. If you want a low-carb option, swap breadcrumbs with almond flour or crushed pork rinds. These alternatives work well and keep the meatballs tasty. For vegan or vegetarian choices, use plant-based ground meat. You can also mash chickpeas and mix them with the other ingredients. This gives a similar texture while keeping it plant-based. Adding flaxseed meal instead of egg helps bind everything together. Check the Full Recipe for more tips and ingredient details! {{image_2}} You can spice up your honey garlic chicken meatballs with simple changes. For a spicy kick, add red pepper flakes or sriracha to the mix. Start with a teaspoon and adjust to your taste. This will give your meatballs a warm, zesty flavor. You can also try herb-infused variations. Fresh herbs like basil, cilantro, or thyme can add depth. Just chop them finely and mix them in with the other ingredients. These herbs can brighten the dish and make it even more delicious. There are many ways to cook these meatballs. If you prefer a slow cooker, place the shaped meatballs in the cooker. Pour the honey garlic sauce over them. Cook on low for 4 to 6 hours. This method makes the meatballs very tender. If you have an air fryer, use it for a quick option. Preheat the air fryer to 380°F (193°C). Arrange the meatballs in a single layer. Cook for 12-15 minutes, shaking the basket halfway through. This will give you crispy meatballs with less oil. You can easily make this recipe gluten-free. Use gluten-free breadcrumbs instead of regular ones. This small change keeps the meatballs tasty without gluten. You can also change the type of meat you use. Ground turkey or pork works well in this recipe. Each type gives a different flavor and texture. Just make sure to adjust cooking times as needed. For the full recipe, check out the detailed steps. Enjoy your cooking! After you make Honey Garlic Chicken Meatballs, store any leftovers in an airtight container. This keeps them fresh and tasty. You can put them in the fridge right after they cool down. They will stay good for about 3 to 4 days. If you want to keep them longer, consider freezing them instead. To freeze meatballs, let them cool completely first. Then, place them in a single layer on a baking sheet. Freeze them for about 1 to 2 hours until firm. After that, transfer the meatballs to a freezer-safe bag. They can last up to 3 months in the freezer. When you want to eat them, thaw them in the fridge overnight. This keeps them safe and helps maintain their flavor. When it's time to reheat your meatballs, the best method is using the oven. Preheat it to 350°F (175°C). Place the meatballs on a baking sheet and cover them with foil. Bake for about 10 to 15 minutes until they are warm. You can also reheat them in a skillet over medium heat. Add a splash of water or broth to keep them moist. This way, you ensure that the honey garlic flavor stays strong and delicious. For a quick option, you can use the microwave, but be careful not to overheat. To make honey garlic chicken meatballs, start with a big bowl. Mix ground chicken, breadcrumbs, and grated Parmesan cheese. Add chopped parsley, a large egg, minced garlic, honey, soy sauce, black pepper, salt, and ginger powder. Mix well until it’s smooth. Next, preheat your oven to 400°F (200°C). Line a baking sheet with parchment paper. Scoop about 1.5 tablespoons of the mixture and roll it into balls. Place them on the sheet. Bake for 20 minutes until they turn golden and are cooked through. While baking, heat olive oil in a skillet. Add the cooked meatballs into the hot skillet. Pour any leftover honey and soy sauce mix over them. Sauté for 3-4 minutes. This helps coat them in the glaze. Yes, you can use chicken thighs. Just make sure to chop them finely or grind them. Thighs have more fat, which makes meatballs juicier. If you choose thighs, keep the same recipe. The flavor will be rich and delicious. You can serve them in many ways! Try skewering them with toothpicks for a fun appetizer. Place them in a bowl, drizzled with extra honey glaze. You can also serve them over steamed rice or stir-fried vegetables. Garnish with parsley and sesame seeds for a nice touch. Honey garlic chicken meatballs last for about 3-4 days in the fridge. Store them in an airtight container. For longer storage, freeze them. They can last up to 3 months in the freezer. Just make sure to thaw them before reheating. Enjoy them fresh for the best taste! In this post, we explored how to make delicious honey garlic chicken meatballs. We covered key ingredients like ground chicken and garlic, as well as optional treats like parmesan. You learned step-by-step instructions for preparing and cooking, plus tips for juicy meatballs. Remember, you can customize this dish with various flavors and cooking methods. Whether you stick to the basics or get creative, these meatballs can fit any meal or occasion. Enjoy your cooking!

Honey Garlic Chicken Meatballs Easy and Tasty Recipe

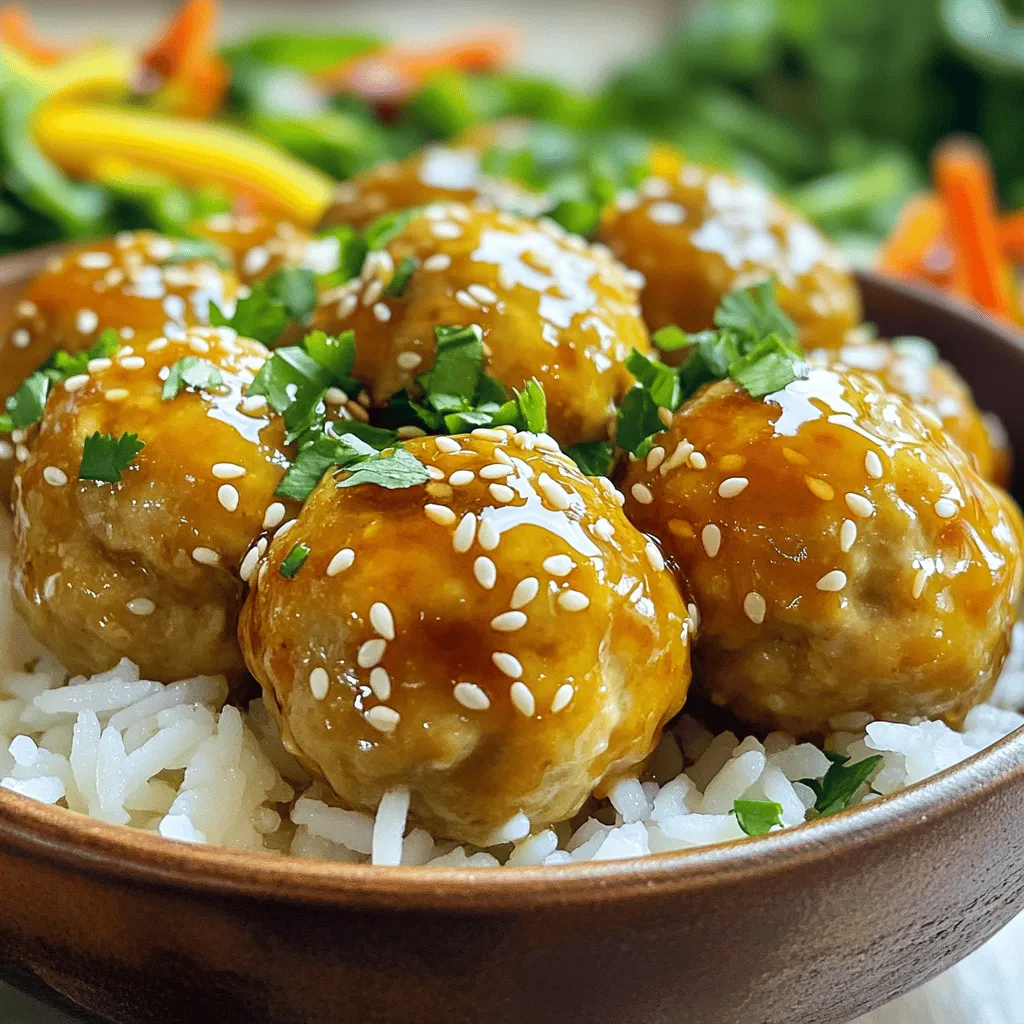
Craving something sweet and savory? You’ll love these Honey Garlic Chicken Meatballs! This easy recipe combines juicy ground chicken with

To make pulled chicken tacos, you will need: - 2 large chicken breasts - 1 tablespoon olive oil - 1 teaspoon smoked paprika - 1 teaspoon cumin - 1 teaspoon garlic powder - 1 teaspoon onion powder - Salt and pepper to taste - 1 cup chicken broth - 8 small corn tortillas - 1 cup purple cabbage, finely shredded - 1 medium carrot, grated - 1/4 cup cilantro, chopped - 1 lime, juiced - 2 tablespoons mayonnaise - 1 teaspoon apple cider vinegar - Sliced jalapeños (optional, for topping) You can add more fun with these extras: - Avocado slices for creaminess - Fresh radishes for crunch - A drizzle of hot sauce for spice - Crumbled queso cheese for richness Each serving of these tacos offers: - Calories: 320 - Protein: 25g - Carbohydrates: 30g - Fat: 12g - Fiber: 4g - Sugars: 3g This recipe gives you a balanced meal. It's tasty and healthy! You can find the full recipe above. To start, you need to season the chicken breasts. Use olive oil, smoked paprika, cumin, garlic powder, onion powder, salt, and pepper. Rub these spices all over the chicken. Next, place the chicken in a slow cooker. Pour the chicken broth on top. Cover the slow cooker and choose a cooking time. Cook on low for 6-8 hours or on high for 3-4 hours. You want the chicken to be tender and easy to shred. Once cooked, use two forks to shred the chicken inside the slow cooker. Mix the meat with the broth for extra flavor. Set the shredded chicken aside for later. Now, let’s make the crunchy slaw. In a mixing bowl, combine the shredded purple cabbage, grated carrot, and chopped cilantro. Squeeze in the lime juice. Add mayonnaise and apple cider vinegar. Sprinkle in a pinch of salt. Toss everything together until the slaw is well coated. This slaw will add a nice crunch and bright flavor to your tacos. It’s time to put the tacos together! First, heat the corn tortillas in a dry skillet. Do this over medium heat for about 30 seconds on each side. You want them warm and soft. Once the tortillas are ready, place a generous amount of pulled chicken on each one. Then, add a handful of the crunchy slaw on top. If you like some spice, feel free to add sliced jalapeños as a topping. You can find the full recipe for these delicious pulled chicken tacos with slaw above. Enjoy your tasty meal! For juicy pulled chicken, I recommend using skinless chicken breasts. Season them well with olive oil and spices. Smoked paprika, cumin, garlic powder, and onion powder add great flavor. Always check the internal temperature; it should reach 165°F. Slow cooking works best for tenderness. Cooking on low for 6-8 hours guarantees juicy results. If you're short on time, cook on high for 3-4 hours. After cooking, shred the chicken in the broth for extra flavor. Warm tortillas are key to great tacos. To warm corn tortillas, heat a dry skillet over medium heat. Place the tortillas in the skillet for about 30 seconds on each side. This method makes them soft and pliable. You can also wrap them in a clean kitchen towel and microwave them for 20-30 seconds. Keep them warm in a tortilla warmer or covered with a towel until ready to serve. To elevate your tacos, consider adding fresh ingredients. Lime wedges add zest and brightness. Sliced jalapeños provide a spicy kick. You can also try adding avocado or guacamole for creaminess. For a refreshing twist, add mango or pineapple salsa. These toppings complement the pulled chicken and slaw perfectly. If you're feeling adventurous, a drizzle of hot sauce can add an extra layer of flavor. Enjoy creating your own unique combinations! Don't forget to check out the Full Recipe for more details. {{image_2}} You can make pulled tacos without meat. Use jackfruit instead. It has a similar texture. Drain and rinse canned jackfruit. Sauté it in a pan with olive oil. Add smoked paprika and cumin for flavor. Shred the jackfruit with two forks. Mix it with your slaw. You can enjoy a tasty meal this way. If you love heat, add more spices! Mix cayenne pepper into your spice blend. Use chipotle peppers in adobo sauce for a smoky flavor. Add sliced jalapeños to the tacos for extra kick. You can also drizzle hot sauce on top. Adjust the heat to match your taste. Slaw can be fun and creative! Swap purple cabbage for green cabbage or kale. Try adding diced apples or mango for a sweet twist. You can include radishes for a crunchy bite. A touch of honey in the dressing adds sweetness too. Get creative with colors and flavors in your slaw. For the full recipe, check out Pulled Chicken Tacos with Crunchy Slaw. To store leftover pulled chicken, let it cool first. Place it in an airtight container. Keep the chicken in the fridge for up to four days. If you want to save it longer, freeze it. In the freezer, it lasts for up to three months. When you need it, just thaw it in the fridge overnight. To keep slaw fresh, store it separately from the chicken. Use a sealed container to prevent air from getting in. Slaw can stay fresh in the fridge for about two days. If it gets too soggy, add a little fresh lime juice and mix it again. This helps restore some crunch. To reheat pulled chicken, place it in a skillet over medium heat. Add a splash of chicken broth to keep it moist. Stir it often until it is hot. You can also use the microwave for quick reheating. Place the chicken in a microwave-safe bowl, cover it, and heat in short bursts. Stir between each burst until it is warm. Enjoy your tasty tacos again! For the complete recipe, check the Full Recipe section. You can use chicken breasts or thighs for these tacos. Thighs have more fat, making them juicy. Breasts are leaner but still work well. Both options shred easily after cooking. Choose what you like best for flavor and texture. Yes, you can prepare the pulled chicken ahead of time. Cook it in the slow cooker and store it in the fridge. You can also make the slaw in advance. Just keep it in a sealed container. Assemble your tacos right before serving for the best taste. Toppings can add fun and flavor. Here are some ideas to try: - Sliced jalapeños for spice - Diced avocado for creaminess - Fresh cilantro for brightness - Crumbled queso for a salty kick - Sour cream for richness These simple toppings can elevate your tacos. Enjoy experimenting with your favorites! For the full recipe, check the section above. This blog post covers how to make delicious pulled chicken tacos. We discussed all the essential ingredients and offered tips for extra flavor. The step-by-step instructions made it easy to prepare the chicken and crunchy slaw, ensuring tasty tacos. Remember to store leftovers properly for later enjoyment. I hope you feel ready to try these ideas at home. With practice, you will create amazing tacos that friends and family will love. Enjoy your cooking adventure!

Pulled Chicken Tacos with Slaw Quick and Tasty Meal

Craving a simple yet delicious meal? You will love these Pulled Chicken Tacos with Slaw! They are quick to make

To make Raspberry Lemonade Bars, you need a few simple ingredients. Here’s the list: - 1 cup all-purpose flour - 1/2 cup powdered sugar - 1/2 cup unsalted butter, softened - 1/4 teaspoon salt - 2 large eggs - 1 cup granulated sugar - 1/4 cup fresh lemon juice - 1 tablespoon lemon zest - 1 cup fresh raspberries (or frozen, thawed) - 1/4 teaspoon baking powder - Additional powdered sugar for dusting For gluten-free options, you can swap the all-purpose flour with a gluten-free blend. Make sure the blend has a 1:1 ratio for best results. This works well and keeps the taste fresh. When selecting fresh raspberries, look for bright red color and plumpness. Avoid any that are mushy or have mold. For lemons, choose ones that feel heavy for their size. A firm lemon often has more juice. This recipe combines these ingredients to create a sweet and tangy treat. You can find the full recipe to guide you through the steps. 1. Preheat your oven to 350°F (175°C). Grab an 8x8-inch baking pan. Grease it well and line it with parchment paper. Leave some paper hanging over the sides. This helps you lift out the bars later. 2. Make the crust: In a medium bowl, combine 1 cup of all-purpose flour, 1/2 cup of powdered sugar, 1/2 cup of softened unsalted butter, and 1/4 teaspoon of salt. Mix until the dough looks crumbly. Press this mixture firmly into the bottom of your prepared pan. 3. Bake the crust for about 15-18 minutes. It should be lightly golden when done. Once baked, take it out of the oven and let it cool a bit while you prepare the filling. 4. Prepare the filling: In a large bowl, whisk together 2 large eggs, 1 cup of granulated sugar, 1/4 cup of fresh lemon juice, 1 tablespoon of lemon zest, and 1/4 teaspoon of baking powder. Make sure everything mixes well. 5. Folding in raspberries: Gently add 1 cup of fresh raspberries to the egg mixture. Be careful not to squish them too much. You want to keep some of their shape for the best look and taste. 6. Pour the filling over the pre-baked crust. Spread it evenly across the top. 7. Bake again for another 20-25 minutes. The filling should be set and feel slightly firm when you touch it lightly. 8. Cool completely: After baking, let the bars cool in the pan on a wire rack. This step is key to getting the right texture. 9. Cut and serve: Once the bars are cool, lift them out using the parchment paper. Cut into squares and dust with extra powdered sugar before serving. For a complete guide, check the Full Recipe. To make the best raspberry lemonade bars, aim for a smooth filling. Here are key tips to help you succeed: - Use fresh ingredients: Fresh raspberries and lemons give the best flavor. Look for bright-colored, firm raspberries and juicy lemons. - Mix well: Whisk the eggs and sugar until light and fluffy. This helps the bars rise well. - Don’t overmix: When adding raspberries, fold them gently. This keeps them intact and adds texture. Common mistakes can ruin your bars. Here are some to watch out for: - Skipping the crust: The crust is key for texture. Don’t rush this step; press it firmly into the pan. - Not cooling the crust: Let the crust cool slightly before adding the filling. This helps keep layers separate. - Overbaking: Bake until the filling is set but still slightly jiggly in the middle. It will firm up as it cools. For even baking, follow these tips: - Preheat the oven: Always preheat your oven. This ensures that your bars bake evenly. - Use the right pan: An 8x8-inch pan works best for even thickness. Avoid using a larger pan. - Check on them: Rotate the pan halfway through baking. This helps all sides cook evenly. For the full recipe, be sure to check out the detailed steps. Enjoy making your delicious raspberry lemonade bars! {{image_2}} Raspberry lemonade bars are so fun to change up! You can swap out raspberries for other fruit. Try using blueberries or strawberries for a different taste. Both fruits pair well with lemon and add a nice color. You can also add more flavors to your bars. A hint of coconut can give a tropical feel. You might also enjoy fresh mint leaves for a refreshing twist. Just chop the mint finely and mix it in the filling. If you want to make these bars vegan or dairy-free, it’s easy! Use a plant-based butter in place of regular butter. You can replace eggs with flaxseed meal or applesauce. This keeps the texture and flavor nice and yummy. For a complete guide on making these delicious treats, check the Full Recipe. To keep your Raspberry Lemonade Bars fresh, start by cooling them completely. Once cooled, I recommend cutting them into squares. This makes it easy to grab one when you want a treat. Use an airtight container to store the bars. You can line the container with parchment paper. This helps prevent sticking. A glass or plastic container works well. If you want to keep them longer, freezing is a great option. Wrap each square tightly in plastic wrap. Then place them in a freezer-safe bag or container. This keeps them fresh for up to three months. When you’re ready to enjoy, simply take out a square and let it thaw at room temperature. If you're in a hurry, you can microwave it for a few seconds. Just be careful not to overheat it. For a complete guide on making these delicious bars, check the Full Recipe. How long do Raspberry Lemonade Bars last? Raspberry Lemonade Bars stay fresh for about four days. Store them in an airtight container. Keep them in the fridge to help them last longer. The flavor only gets better as the bars chill. Can I make Raspberry Lemonade Bars ahead of time? Yes, you can make these bars a day or two ahead. This makes them great for parties or gatherings. Just bake them, cool, and store them in the fridge until you serve them. What should I serve with Raspberry Lemonade Bars? These bars pair well with a simple scoop of vanilla ice cream. You can also serve them with fresh berries on the side. A dollop of whipped cream adds a nice touch. For a complete guide, check out the Full Recipe for all the details! Raspberry Lemonade Bars are simple to make and offer bright, refreshing tastes. The post covers ingredients, steps, and tips to craft the perfect treat. You can customize the bars to fit your tastes or dietary needs. Proper storage keeps them fresh for longer. Remember, the full recipe gives you all the details you need. Enjoy making and sharing these delicious bars that will impress your friends and family.

Raspberry Lemonade Bars Flavorful and Fresh Dessert

If you’re craving a sweet and tart treat, look no further than Raspberry Lemonade Bars. These delightful bars burst with

- Chicken breast: Use 1 pound, sliced thinly for quick cooking. - Thai basil: Add 2 cups of fresh leaves; it gives a fragrant touch. - Vegetables: Include 1 red bell pepper, sliced, and 1 cup of snap peas for crunch. - Soy sauce: Use 2 tablespoons for saltiness and umami flavor. - Oyster sauce: Add 1 tablespoon; it brings a rich depth to the dish. - Fish sauce: Use 1 tablespoon or substitute with more soy sauce for extra flavor. - Red chili: Slice some for heat and vibrant color on top. - Additional basil: Sprinkle more fresh basil leaves for a fragrant finish. These ingredients come together to create a delightful meal. Feel free to mix and match vegetables based on what you have. Each element plays a role in making this dish a standout. For the full recipe, check the detailed instructions to create this Thai Basil Chicken Stir-Fry. - Preparing the chicken Start with 1 lb of chicken breast. Slice it thinly against the grain. This helps the chicken cook evenly and stay tender. - Chopping vegetables Next, chop your veggies. Slice 1 red bell pepper and measure out 1 cup of snap peas. Fresh vegetables add color and crunch. - Cooking garlic Heat 2 tablespoons of vegetable oil in a large skillet over medium-high heat. Once hot, add 4 minced garlic cloves. Stir-fry for about 30 seconds. Be careful not to burn the garlic; it should smell fragrant. - Stir-frying chicken and vegetables Now, add the sliced chicken to the skillet. Stir frequently until it’s cooked through and lightly browned, about 5 minutes. Toss in the bell pepper and snap peas. Cook for 2-3 minutes until they are tender but still crisp. - Adding sauces In a small bowl, mix 2 tablespoons of soy sauce, 1 tablespoon of oyster sauce, 1 tablespoon of fish sauce, 1 teaspoon of sugar, and 1 teaspoon of chili flakes. Pour this mixture over the chicken and veggies in the skillet. - Mixing with Thai basil Finally, add 2 cups of fresh Thai basil leaves. Stir everything well to combine. Cook for another minute so the basil wilts and releases its flavor. For more details, you can check the Full Recipe. Serve this dish over jasmine rice for a complete meal! - Choosing the right pan: A large skillet or wok works best for stir-frying. It allows for even heat and space to toss the ingredients. A non-stick surface can help prevent sticking. - Controlling heat levels: Start with medium-high heat to sear the chicken. This gives it a nice color. If things cook too fast, lower the heat. You want a balance between fast cooking and not burning the garlic. - Adjusting spiciness: You can control the spice by changing the chili flakes. Start with less if you prefer mild. You can always add more later for heat. - Adding more vegetables: Feel free to add your favorite veggies. Bell peppers, carrots, or broccoli can make the dish colorful and add nutrition. Just remember to cut them thin for even cooking. - Serving suggestions: Serve your stir-fry over jasmine rice. The rice soaks up the sauce well. You could also use rice noodles for a fun twist. - Garnishing ideas: Fresh basil leaves on top adds a bright touch. A sprinkle of chopped red chili gives color and a bit of extra heat. A lime wedge on the side can add a fresh zing when served. {{image_2}} You can switch the chicken for shrimp or tofu. Shrimp cooks fast and adds a nice taste. Just stir-fry it for about 3-4 minutes until pink. Tofu is a great choice for a vegetarian option. Use firm tofu, and make sure to press it to remove extra water. Cut it into cubes and stir-fry until golden brown. If you prefer beef, you can substitute chicken with thinly sliced beef. Use flank steak or sirloin for the best flavor. Cooking time will be similar, around 5 minutes. Just make sure it's cooked through. Feel free to mix in seasonal vegetables. Bell peppers and snap peas are great, but you can add what you love. Think about using zucchini or mushrooms. They cook quickly and add flavor. Carrots and broccoli are also good choices. Slice the carrots thinly so they cook fast. Broccoli adds a nice crunch and color. You can easily make this dish gluten-free. Use tamari instead of soy sauce. It has a similar taste and works well. For a lower sodium option, look for low-sodium soy sauce. This way, you can control the salt level without losing flavor. You can also skip the fish sauce or use a bit more soy sauce for a tasty twist. For the full recipe, check the detailed instructions. To store your Thai Basil Chicken Stir-Fry, first, let it cool down. Place leftovers in an airtight container. This helps keep the flavors fresh. In the fridge, it can last up to three days. If you notice any strange smells or colors, throw it away. You can freeze this stir-fry for later. First, let it cool completely. Then, transfer it to freezer-safe bags or containers. Squeeze out as much air as possible. It can stay good in the freezer for about three months. When you’re ready to eat, thaw it overnight in the fridge. Reheat it in a skillet over medium heat. Stir it often until it is hot. If you like to meal prep, you can make this dish in advance. Cook the stir-fry and let it cool. Divide it into individual portions in containers. This way, you have quick meals ready for busy days. Use clear containers to see what’s inside. Make sure to label them with dates. Thai Basil Chicken Stir-Fry is a quick, flavorful dish. It features chicken, fresh Thai basil, and vibrant veggies. The key flavors come from garlic, soy sauce, and fish sauce. This dish is simple to make and perfect for a weeknight dinner. Yes, you can easily adjust the heat level. Start with the chili flakes in the recipe. If you want more heat, add extra flakes or fresh chili. Taste as you go to find your perfect balance. To make a meat-free version, swap chicken for tofu or tempeh. Use the same cooking method for a tasty dish. You can also add more vegetables like bell peppers or mushrooms for extra flavor. This dish hails from Thailand, where basil is a key herb. Thai basil has a sweet, slightly spicy flavor. It is a popular ingredient in many Thai dishes, adding depth and aroma. The stir-fry showcases the blend of fresh herbs and savory sauces, making it a beloved meal. You can find the full recipe for Thai Basil Chicken Stir-Fry [here](#). You learned how to make Thai Basil Chicken Stir-Fry from fresh ingredients. The main elements include chicken, Thai basil, and colorful veggies. We discussed various sauces that boost flavor, like soy and fish sauce. I shared tips on cooking, flavor tweaks, and smart ways to present your dish. You also saw great variations and storage tips to help keep food fresh. Try this dish tonight and make it your own! Cooking should be fun and tasty. Enjoy!

Thai Basil Chicken Stir-Fry Flavorful Dinner Delight

If you’re craving a quick and tasty meal, look no further! Thai Basil Chicken Stir-Fry is a vibrant dish that

To make Almond Joy Energy Bites, you need these simple ingredients: - 1 cup pitted medjool dates - 1 cup almond flour - 1/2 cup unsweetened shredded coconut - 1/3 cup dark chocolate chips - 1/4 cup almonds, roughly chopped - 1 tablespoon coconut oil, melted - 1 teaspoon vanilla extract - 1/2 teaspoon sea salt These ingredients create a tasty treat that packs a punch. The dates provide natural sweetness and a chewy texture. Almond flour adds a nutty flavor and makes the bites filling. The shredded coconut gives a lovely crunch, while dark chocolate chips add richness. Chopped almonds enhance the texture and offer extra nutrients. Each ingredient plays a vital role in the health of these bites. Medjool dates are rich in fiber, which helps digestion. Almond flour is low in carbs and high in protein. This means it keeps you full longer. Shredded coconut contains healthy fats, which are good for energy. Dark chocolate is full of antioxidants, making it a smart choice for a treat. Almonds bring vitamin E and magnesium, which are great for your heart. You can easily change these bites to fit your tastes. For a nut-free option, use sunflower seed butter instead of almond flour. If you want more sweetness, add a bit of honey or maple syrup. For a fun twist, try adding dried cherries or cranberries instead of chocolate chips. This way, you can enjoy different flavors while keeping it healthy. Check out the Full Recipe for more ideas! To make Almond Joy Energy Bites, start with pitted medjool dates. Place them in a food processor. Pulse them until they turn into a sticky paste. This step is key for the base of your bites. Next, add in the almond flour, shredded coconut, melted coconut oil, vanilla extract, and sea salt. Process the mix until it becomes a sticky dough. If it feels too dry, add a few drops of water. This helps all the ingredients blend well. Then, gently fold in the dark chocolate chips and chopped almonds. This adds a nice crunch and sweetness. The best texture comes from balancing moist and dry ingredients. If your mix feels too dry, add more coconut oil or dates. For a firmer bite, make sure to chill them long enough. Refrigerate for at least 30 minutes. This helps them hold their shape. If you want a softer bite, skip the fridge and enjoy right away. You can also adjust the almond flour amount for a thicker texture. Feel free to get creative! You can add protein powder for extra nutrition. Try using different nuts like walnuts or pecans for variety. If you like a twist, mix in dried fruits like cranberries. You can swap dark chocolate chips for white chocolate for a sweeter taste. Each add-in changes the flavor, so have fun experimenting! For the full recipe, refer to the earlier section. To make the energy bites stick well, start with soft medjool dates. They help bind ingredients together. If your mixture feels dry, add a bit of water. This moisture helps the dough stick. You can also add a touch more coconut oil for extra binding power. When mixing, use a food processor for best results. It ensures even blending of all ingredients. Pulse the dates first to create a paste. Then add the dry ingredients slowly. This ensures everything combines well. Be careful not to over-process. The mixture should remain a bit chunky for texture. Serve your Almond Joy Energy Bites in a cute bowl. A sprinkle of shredded coconut on top adds flair. You can also add whole almonds for extra crunch. These bites make a great snack any time. Enjoy them after a workout or as a sweet treat. For more ideas, check out the Full Recipe. {{image_2}} You can change up the flavor of these energy bites easily. Try adding peanut butter instead of almond flour for a peanut joy twist. You could also use almond butter for a richer almond taste. For a fruity spin, add dried cranberries or raisins. This mix gives a nice pop of flavor. For a vegan version, check that your chocolate chips are dairy-free. You can swap almond flour with coconut flour for a keto-friendly bite. Just remember, coconut flour absorbs more moisture. So, you may need to add a bit more coconut oil to keep your bites soft. Seasons bring fun flavors! In fall, add pumpkin spice to your bites for warmth. Around winter holidays, toss in some peppermint extract for a festive touch. During summer, mix in fresh berries for a burst of color and flavor. With these ideas, your Almond Joy Energy Bites can match any season or occasion. For the full recipe, check the section above. Enjoy making these delightful snacks! To keep your Almond Joy Energy Bites fresh, store them in an airtight container. This will lock in moisture and keep them from drying out. Place a sheet of parchment paper between layers if you stack them. This prevents sticking and keeps them intact. Store them in the fridge for the best taste and texture. When stored properly, these bites last about one week in the fridge. If you notice any changes in texture or smell, it's best to toss them. Always check for freshness before enjoying. You can also freeze these energy bites for longer storage. Place them in a single layer on a baking sheet first. Freeze them for about an hour until firm. Then, transfer them to a freezer-safe bag or container. They can last up to three months in the freezer. To thaw, simply move them to the fridge for a few hours before serving. Enjoy them fresh and tasty! Yes, you can use dried fruit. Dried apricots or figs work well. They add natural sweetness. Just chop them small. The texture might change a bit, but it will still taste good. To make these nut-free, swap almond flour for sunflower seed flour. You can also use pumpkin seeds instead of almonds. These changes keep the bites tasty and safe for those with nut allergies. Almond Joy Energy Bites are quite healthy. They have natural sugars from dates and healthy fats from almonds. The dark chocolate adds antioxidants, making them a smart snack choice. They are great for energy and taste. Yes, you can definitely make these ahead of time. Store them in an airtight container. They last up to a week in the fridge. This makes them perfect for meal prep or quick snacks. Serve them in a small bowl. You can sprinkle some shredded coconut on top. This makes them look nice and adds flavor. Enjoy them as a snack anytime or share with friends! For the complete recipe, check the Full Recipe. You learned how to make Almond Joy Energy Bites with simple steps. The right mix of ingredients makes them tasty and healthy. You can customize them to fit your diet, too. Remember to store them well to keep them fresh. These snacks are great for a quick energy boost. Enjoy experimenting with flavors and sharing them with friends. Making energy bites is fun and easy. You’ll love how they taste and how good they make you feel.

Almond Joy Energy Bites Nutritious and Tasty Snack

Looking for a snack that’s both tasty and good for you? You’re in the right place! My Almond Joy Energy

- Ripe pineapple (1) - Mango (1) - Papaya (1) - Kiwi (1 cup) - Banana (1) - Strawberries (1 cup) - Blueberries (1/2 cup) - Lime (1) - Honey (2 tablespoons) - Fresh mint (1 tablespoon for garnish) To create a vibrant tropical fruit salad, you need fresh, ripe fruits. The first group includes pineapple, mango, and papaya. Each fruit adds a unique taste. Pineapple offers a sweet and tangy zing. Mango brings a smooth sweetness. Papaya adds a mild flavor that balances the mix. Next, we have additional ingredients. Kiwi adds a bright green color and tartness. Banana provides creaminess and natural sweetness. Strawberries bring a juicy burst of flavor. Blueberries add a pop of color and a hint of sweetness. You will also need a lime for its zesty juice and fragrant zest. Honey acts as a natural sweetener that ties everything together. Finally, fresh mint adds a refreshing touch and a beautiful garnish. By gathering these ingredients, you set the stage for a delicious tropical paradise fruit salad. For the full recipe, check out the details above. First, gather all your fresh fruits. You will need pineapple, mango, papaya, kiwi, banana, strawberries, and blueberries. Dice the pineapple, mango, and papaya into small pieces. Slice the kiwi and banana. Halve the strawberries. Place all the fruit into a large mixing bowl. This colorful mix will make your salad pop. Next, let’s make the dressing. In a small bowl, whisk together the juice and zest of one lime with two tablespoons of honey. Whisk until it is well mixed. This dressing adds a sweet and tangy flavor to the fruit. Now, it’s time to bring it all together. Drizzle the honey-lime dressing over the mixed fruits. Gently toss the fruits to coat them evenly. Cover the bowl with plastic wrap and chill it in the fridge for at least 30 minutes. This step allows the flavors to blend. Before serving, give the salad another gentle toss. You can sprinkle fresh mint on top for a nice touch. For a complete guide, check the Full Recipe. When choosing ripe fruits, look for specific signs. For a pineapple, check for a sweet smell at the base. The skin should be golden, not green. A ripe mango feels slightly soft when you press it. It should also have a fruity scent near the stem. Both fruits should look vibrant and fresh. Picking ripe fruits ensures your salad tastes amazing. You can boost the flavor of your fruit salad with a few extra touches. Adding a pinch of sea salt can bring out the sweetness. Try a dash of cinnamon for warmth or a bit of chili powder for heat. Fresh lime zest adds zing, while a splash of coconut milk gives creaminess. Experiment with these ideas to make your salad even better. Serve this tropical fruit salad in a big bowl for sharing. You can also use small cups for individual servings. Garnish each cup with fresh mint for color and flavor. Pair it with grilled chicken or fish for a fun meal. This salad also works well as a snack or dessert on its own. Enjoy it chilled for the best taste! For the full recipe, see the section above. {{image_2}} You can make your tropical fruit salad even more exciting! Consider adding fruits like passion fruit or dragon fruit. - Passion fruit adds a tart and sweet flavor. It has a unique texture with its seeds. - Dragon fruit brings a pop of color. Its mild taste pairs well with other fruits. Adding these fruits can change the taste and look of your salad. If you want to switch up the flavor, try different dressings. A coconut dressing can add a creamy, tropical twist. Just mix coconut milk with lime juice for a tasty change. A yogurt-based dressing is another option. Use plain yogurt, lime juice, and honey for a tangy touch. This option also makes your salad creamier. This tropical fruit salad can fit various diets. For a vegan option, use maple syrup instead of honey. It gives a sweet flavor without any animal products. If you need a gluten-free salad, you’re in luck! All the fruits and dressings mentioned are naturally gluten-free. Just ensure any added ingredients, like yogurt, are also gluten-free. For the full recipe, check out the Tropical Paradise Fruit Salad! To keep your Tropical Fruit Salad fresh, store it in an airtight container. This will help prevent air from drying out the fruits. Make sure to cover the salad tightly to keep it crisp. You can also add a layer of plastic wrap over the top before sealing the lid. This extra step helps to lock in moisture and flavor. Your fruit salad lasts about 3 days in the refrigerator. After that, the fruits may start to lose their texture and taste. Always check for any signs of spoilage, like mushy fruit or an off smell. If you notice any, it's best to toss the salad. Freezing fruit salad is not ideal, but you can do it. If you decide to freeze it, choose fruits that freeze well, like bananas and blueberries. Cut the fruits into smaller pieces. Place them in a freezer-safe bag. Remove as much air as you can to avoid freezer burn. When ready to eat, thaw the salad in the fridge overnight. Keep in mind that the texture may change, but it will still taste great. For the full recipe, check out the Tropical Paradise Fruit Salad. Yes, you can make this salad ahead of time. To prep, cut the fruits and store them in an airtight container. Mix the dressing separately. When you're ready to serve, drizzle the dressing on the fruit. This keeps the fruit fresh and prevents it from getting soggy. Chill both the fruits and dressing in the fridge. Combine them just before serving for the best taste. Tropical fruits are those that grow in warm climates. Here are some you might use: - Pineapple - Mango - Papaya - Kiwi - Bananas - Strawberries - Blueberries These fruits add vibrant color and flavor to your salad. You can easily adjust the sweetness of the dressing. Add more honey to make it sweeter. If you want a different flavor, try agave syrup or maple syrup. Taste as you go. This way, you find the right sweetness for your liking. If you need a honey substitute, here are some options: - Agave nectar for a vegan option - Maple syrup for a different taste - Coconut sugar for a natural sweetener These substitutes work well in the honey lime dressing. Choose what fits your diet best. This blog post covered how to create a delicious tropical fruit salad. We talked about ripe fruits and added ingredients like kiwi and lime for taste. You learned step-by-step instructions to make the salad and tips to select fresh fruit. We also discussed variations, storage tips, and answers to common questions. With these ideas, you can enjoy a tasty, healthy dish. So, gather your fruits, have fun, and create your own perfect blend!

Tropical Fruit Salad with Honey Lime Dressing Delight

If you’re looking for a vibrant burst of flavor, my Tropical Fruit Salad with Honey Lime Dressing is a must-try!

Older posts
Newer posts
← Previous Page1 … Page33 Page34 Page35 … Page63 Next →

dsad

© 2025 Recipes Pursuit • Built with GeneratePress

Our Policies

  • Copyright Policy
  • Cookie Policy
  • GDPR Policy
  • Privacy Policy
  • Disclaimer
  • Terms Of Use

More Information

  • Home
  • About
  • Contact
  • Appetizers
  • Dessert
  • Dinner
  • Drinks
©2025, Recipes Pursuit About Back To Top