![To make tasty Chicken Fajita Quesadillas, gather these simple ingredients: - 2 chicken breasts, sliced - 1 bell pepper (red or green), sliced - 1 medium onion, sliced - 2 tablespoons fajita seasoning (store-bought or homemade) - 4 large flour tortillas - 2 cups shredded cheddar cheese - 2 tablespoons olive oil - Salt and pepper to taste - Fresh cilantro, chopped (for garnish) - Sour cream, for serving Using the right amounts makes a big difference. Each ingredient serves a purpose and adds flavor. For example, the chicken gives protein, while the cheese adds creaminess. The bell pepper and onion bring sweetness and crunch. The fajita seasoning ties it all together with spices. Follow the measurements closely for the best taste. Fresh ingredients always taste better, but frozen can work too. Fresh chicken, peppers, and onions will give you the best flavor. They also have a nice texture. If you use frozen chicken or veggies, make sure to thaw them first. This helps them cook evenly. I recommend fresh for a quick meal that feels special. However, if you are short on time, frozen can save the day. Just remember to adjust cooking times for frozen ingredients. Start by slicing the chicken breasts into thin strips. This helps them cook evenly. Heat one tablespoon of olive oil in a large skillet over medium heat. Add the chicken and sprinkle on two tablespoons of fajita seasoning, salt, and pepper. Cook for about five to seven minutes until the chicken is no longer pink. Remove the chicken and set it aside. In the same skillet, add another tablespoon of olive oil. Toss in the sliced bell pepper and onion. Sauté for about four to five minutes. You want them to be tender and slightly caramelized. Once done, return the chicken to the skillet. Mix it well with the veggies and cook for another one to two minutes. This step blends the flavors beautifully. Now, it's time to cook the quesadillas. Preheat a separate non-stick skillet over medium heat. Place one flour tortilla in the skillet. Sprinkle half of the shredded cheese evenly over the tortilla. Next, spoon half of your chicken and veggie mix on top. Add the remaining cheese to ensure a gooey finish. Cover with another tortilla. Cook for three to four minutes until the bottom tortilla turns golden. You’ll see the cheese starting to melt. Carefully flip the quesadilla and cook the other side for another three to four minutes. Keep an eye on it to avoid burning. Once cooked, remove the quesadilla from the skillet. Allow it to cool for a moment before cutting it into wedges. Repeat this with the other tortillas and filling until you have a tasty stack. To get perfectly melty cheese, use a good quality shredded cheddar cheese. It melts better than block cheese. Layer the cheese on both sides of the filling. This creates a cheesy barrier that holds everything together. Cooking on medium heat is key. Too high, and the tortillas burn before the cheese melts. If needed, cover the skillet with a lid. This traps heat and helps the cheese melt evenly. For an extra flavor twist, try mixing cheeses. A blend of mozzarella and cheddar can add a nice stretch and creaminess. Enjoy your Chicken Fajita Quesadillas with some sour cream and fresh cilantro for garnish. For the full recipe, check out the Full Recipe section. To make your chicken fajita quesadillas burst with flavor, use fresh ingredients. Fresh chicken, sweet peppers, and onions enhance taste. - Seasoning: Use fajita seasoning wisely. It adds depth. Try adding lime juice for a zesty touch. - Marinate: Marinate the chicken for 30 minutes. This step allows the flavors to soak in well. - Cheese Blend: Mix different cheeses. Monterey Jack and pepper jack add creaminess and a bit of heat. Many people rush the cooking process. This mistake can lead to bland quesadillas. - Overcrowding the Pan: Don’t put too much filling. This makes flipping hard and can lead to soggy quesadillas. - Skipping the Sauté: Don’t skip sautéing the veggies. This step caramelizes them, enhancing their sweetness. - Wrong Heat Setting: Cook on medium heat. Too high can burn the tortillas before the cheese melts. Personalize your chicken fajita quesadillas to suit your taste buds. - Vegetables: Add mushrooms, zucchini, or corn for extra texture and flavor. - Spice Level: For a kick, add jalapeños or use spicy seasoning. - Sour Cream: Swap sour cream for guacamole or a spicy salsa for a twist. Feel free to explore and create your own unique version. For the full recipe, check the details in the earlier sections. {{image_2}} If you prefer a meatless meal, try a vegetarian fajita quesadilla. You can use a mix of colorful bell peppers, onions, and even mushrooms. Simply sauté the veggies in olive oil with fajita seasoning. They add great flavor! For protein, consider adding black beans or pinto beans. They pair well with the veggies and make your quesadilla filling. Use the same steps from the full recipe to prepare and cook your veggie quesadilla. For those who love heat, consider adding jalapeños or hot sauce to your spicy chicken fajita quesadilla. When you cook the chicken, toss in sliced jalapeños for extra spice. You can also use spicy fajita seasoning instead of the regular kind. Another option is to add crushed red pepper flakes to the filling. This kick will make your quesadilla stand out and satisfy any heat lover's cravings. Cheese is key in quesadillas, and you can get creative here! While cheddar is a classic choice, try pepper jack for a spicy twist. It melts beautifully and adds heat. For a richer flavor, consider using gouda or Monterey Jack cheese. These options give a different taste and texture. You can mix cheeses, too. Blend cheddar with mozzarella for a gooey delight. No matter what cheese you choose, make sure it melts well for a perfect quesadilla experience. To keep leftover quesadillas fresh, place them in an airtight container. You can also wrap them in plastic wrap or foil. Make sure to let them cool to room temperature first. This helps prevent sogginess. Store them in the fridge for up to three days. If you want to eat them later, freezing is a good option. When you’re ready to enjoy your leftover quesadillas, you can reheat them easily. The best way is to use a skillet. Heat the skillet over medium heat. Place the quesadilla in the skillet and cook for about 3-4 minutes on each side. This warms them up and keeps them crispy. You can also use the microwave, but it may make them soft. Heat them for 30 seconds to 1 minute, checking to ensure they are warm throughout. You can freeze quesadillas for a quick meal later. First, let them cool completely. Then, wrap each one in plastic wrap or foil. Place them in a freezer-safe bag or container. Write the date on the bag so you remember when you made them. They can stay in the freezer for up to three months. To reheat, thaw them in the fridge overnight before using the skillet method. This makes for a quick and easy meal anytime. For the full recipe, check out the details above. Yes, you can use other meats. Steak, shrimp, or pork work well. Each meat adds its own taste. You may need to adjust the cooking time. Ground meat can also be a tasty choice. Just remember to season well for great flavor. These quesadillas pair well with many sides. Try black beans or Mexican rice for balance. Fresh guacamole adds creaminess and flavor. A light salad with lime dressing is also great. You can serve tortilla chips and salsa for extra crunch. Don’t forget sour cream for dipping! Making your own seasoning is easy and fun. Here’s a simple recipe: - 1 tablespoon chili powder - 1 teaspoon paprika - 1 teaspoon cumin - 1 teaspoon garlic powder - 1 teaspoon onion powder - ½ teaspoon salt - ½ teaspoon pepper - ½ teaspoon oregano Mix these herbs and spices in a bowl. You can store it in an airtight jar. Use it to season chicken or veggies. It’s a quick way to add flavor to any dish! For the full recipe, check out [Full Recipe]. We explored how to make Chicken Fajita Quesadillas, starting with the right ingredients. Fresh or frozen, your choices matter. We went step-by-step through prepping chicken and veggies, cooking the quesadillas, and getting that cheese just right. I shared tips to boost flavor and avoid common mistakes. You can even customize your quesadillas or try tasty variations. Lastly, I covered storage and reheating to keep leftovers fresh. Enjoy your cooking adventure and share these delicious quesadillas with friends!](https://recipespursuit.com/wp-content/uploads/2025/06/baaa4825-fdd1-4b3b-864f-cf5b07e79eb3.webp)
71. Chicken Fajita Quesadillas Flavorful and Easy Meal
Are you ready to elevate your weeknight dinners? Chicken Fajita Quesadillas are a fun and easy meal that packs a
Are you ready to elevate your weeknight dinners? Chicken Fajita Quesadillas are a fun and easy meal that packs a
![- Salmon fillets - Olive oil - Fresh dill - Lemon - Garlic - Salt and pepper - Lemon slices To make Lemon Dill Salmon, you need just a few simple ingredients. First, get four salmon fillets, each about six ounces. Salmon is rich in flavor and healthy fats. Next, you will need two tablespoons of olive oil. This adds moisture and helps the fish cook well. Fresh dill is key for this dish. You’ll want about two tablespoons, chopped. Dill gives a bright, fresh taste that pairs well with salmon. One lemon will provide both zest and juice. The zest adds a strong lemon flavor while the juice brings brightness. Garlic is another important ingredient. Use three cloves, minced, for a savory kick. Don’t forget salt and pepper to taste. These will enhance all the flavors in your dish. Lastly, have some lemon slices ready for garnish. They make your dish look pretty and add extra flavor. Once you gather these ingredients, you are ready to make a delicious Lemon Dill Salmon. For the full recipe, check out the detailed instructions above. 1. Preheat oven and prepare baking sheet Start by preheating your oven to 400°F (200°C). This step is key for even cooking. Next, line a baking sheet with parchment paper. This makes clean-up easy and helps prevent sticking. 2. Create the marinade In a small bowl, mix together your olive oil, chopped dill, lemon zest, lemon juice, minced garlic, salt, and pepper. This blend brings bright flavors to the salmon. Whisk it well to ensure all the ingredients combine nicely. 3. Marinate the salmon Take your salmon fillets and place them in a shallow dish. Pour half of the marinade over the salmon, making sure each piece is well-coated. This step infuses the salmon with flavor. Let the salmon sit for about 15-20 minutes. This will enhance the taste and make it more delicious. 1. Place salmon on the baking sheet After marinating, place the salmon fillets skin-side down on your prepared baking sheet. This ensures the skin crisps up while the salmon cooks. 2. Drizzle remaining marinade Drizzle the remaining marinade over the top of the salmon fillets. This adds moisture and flavor, making every bite delightful. 3. Bake and check for doneness Bake the salmon in your preheated oven for 12-15 minutes. Keep an eye on it. The salmon is done when it flakes easily with a fork. If you want to be sure, use a meat thermometer; it should read 145°F (63°C) at the thickest part. Enjoy your Lemon Dill Salmon! For the full recipe, refer to the section above. When cooking salmon, timing is key. Bake your salmon fillets for 12 to 15 minutes. This time ensures the fish cooks through without drying out. The salmon should flake easily when done. To check, use a fork at the thickest part. To balance flavors, combine lemon's brightness with dill's freshness. The marinade mixes lemon juice, zest, garlic, and dill. This combo enhances the salmon’s natural taste. Marinade your fish for 15-20 minutes for the best flavor. Pair your Lemon Dill Salmon with fresh sides. Roasted asparagus, garlic mashed potatoes, or a crisp salad are great choices. These sides complement the fish's flavor nicely. For a restaurant-style dish, focus on presentation. Use a large white plate to highlight your salmon. Add a few lemon slices and sprigs of dill on top. This simple touch makes your meal look gourmet. For the complete recipe, check out the [Full Recipe]. {{image_2}} You can switch up the herbs and spices in this recipe. If you want a different flavor, try using fresh parsley or tarragon instead of dill. Both herbs add a nice touch to the salmon. You can also use spices like paprika or cumin for a bolder taste. For the fish, salmon is great, but you can use other options too. Trout or halibut work well in this recipe. They have a similar texture and cook in about the same time. Just keep an eye on them while cooking. You can grill or bake the salmon for this dish. Grilling gives the fish a smoky flavor. It also creates nice grill marks. To grill, preheat your grill and oil the grates. Cook each side for about four to five minutes. Baking is easy and great for busy days. You can put the salmon in the oven and walk away. Baking at 400°F for 12-15 minutes lets the fish cook evenly. It also keeps the salmon moist and flavorful. If you want a crispy outer layer, try pan-searing. Heat some olive oil in a pan over medium-high heat. Cook the salmon skin-side down for about six minutes. Flip it and cook for another four to five minutes. This method gives you a golden crust while keeping the inside tender. For the complete recipe, check out the Full Recipe. To keep your cooked salmon fresh, let it cool first. Wrap it tightly in plastic wrap or foil. You can also use an airtight container. Store it in the fridge for up to three days. This way, it stays tasty and safe to eat. You can freeze both cooked and uncooked salmon. For cooked salmon, let it cool completely. Wrap it tightly and place it in a freezer bag. It stays good for about two months. For uncooked salmon, do the same, but use it within three months for the best taste. When you are ready to eat, thaw salmon in the fridge overnight. This keeps it safe and moist. Avoid thawing at room temperature to prevent bacteria growth. For the best results, use the salmon soon after it thaws. Enjoy your Lemon Dill Salmon from the Full Recipe! Bake Lemon Dill Salmon for 12 to 15 minutes. The time may change based on your oven. I always check for flakiness to ensure it’s done. The salmon should look opaque and easily flake with a fork. Yes, you can use dried dill if fresh is not available. Use about one teaspoon of dried dill for every tablespoon of fresh. Dried herbs have a stronger flavor, so adjust to your taste. Keep in mind that fresh dill adds a brighter flavor. Lemon Dill Salmon pairs well with several sides. I love serving it with steamed vegetables or a light salad. Rice or quinoa can also complement the dish. You can add some crusty bread to soak up the delicious juices. To check if salmon is fully cooked, look for its color and texture. It should be opaque and flake easily when you press it with a fork. You can also use a food thermometer. The internal temperature should reach 145°F (63°C). Enjoy your perfectly cooked salmon! For the full recipe, make sure to check the main section. In this blog post, we covered how to make Lemon Dill Salmon. We looked at key ingredients, clear steps for cooking, and tips for great flavor and presentation. You now know how to store salmon, freeze it, and even swap ingredients. Remember, cooking is fun and you can try new things. Keep experimenting to find your favorite version of this dish. Enjoy your Lemon Dill Salmon and impress your family and friends!](https://recipespursuit.com/wp-content/uploads/2025/06/3019017f-b36b-454f-be81-59a34c0e4d6a.webp)
Are you ready to make a dish that’s both tasty and simple? This Lemon Dill Salmon recipe brings bright flavors
. To start, choose two ripe avocados. They should feel soft but not mushy. Cut each avocado in half and remove the pit. Use a spoon to scoop the green flesh into a bowl. Discard the skin and pit. Ripe avocados blend well, giving the mousse its creamy texture. Next, put the avocado flesh into a food processor. Add the cocoa powder, maple syrup, almond milk, vanilla extract, and salt. Blend everything on high speed. Stop to scrape down the sides as you go. Blend until the mix is smooth and creamy. Taste it. If you want more sweetness, add extra maple syrup and blend again. Once blended, spoon the mousse into small cups or bowls. Chill them in the fridge for about 30 minutes. This helps the mousse firm up. When you're ready to serve, you can add fresh berries and mint leaves on top. These make the mousse look pretty and add a fresh taste. Enjoy your delicious dessert! For the full recipe, check out the reference section above. To make a smooth mousse, start with ripe avocados. Ripe avocados blend well and add creaminess. If your mousse is too thick, add more almond milk. Blend again until it is silky. Scrape down the sides of the bowl to mix evenly. This helps avoid lumps. Taste your mousse after blending. If it needs more sweetness, add more maple syrup. Blend again to mix well. You can also try honey or agave syrup for a different taste. If you want it less sweet, use less syrup. It’s all about your taste. Fresh ingredients make a big difference. Choose ripe avocados for the best flavor and texture. Check for small dark spots, which can indicate overripeness. When using berries for garnish, pick ones that look bright and firm. Fresh mint leaves should be green and crisp. Using fresh ingredients will elevate your mousse. For the full recipe, check out the other sections. {{image_2}} You can make chocolate avocado mousse even more fun with different flavors. Mint adds a fresh twist. Just add a few drops of mint extract. For espresso lovers, mix in a shot of espresso. This makes the mousse rich and bold. Coconut gives a tropical vibe. You can use coconut cream or shredded coconut. Each flavor will give your mousse a new taste adventure. If you want a vegan mousse, there are easy swaps. Use agave nectar instead of maple syrup or honey. This keeps it sweet and plant-based. For milk, try oat milk or soy milk. They blend well and keep the mousse creamy. These changes let everyone enjoy this dessert without worry. Parfaits are a fun way to serve chocolate avocado mousse. Layer mousse with toppings like granola or fresh fruit. Start with a layer of mousse in a glass. Then add a layer of granola for crunch. Top with berries for color and taste. This not only looks great but also makes each bite exciting. You can find the full recipe to get started on this treat. To store leftover mousse, first cover it tightly. Use plastic wrap or a lid. This keeps air out and prevents drying. Place the mousse in the fridge. It will stay fresh for about three days. If you plan to keep it longer, consider freezing it. Glass jars work well for storing mousse. They seal tightly and show off the layers. You can also use plastic containers with lids. Make sure they are food-safe. Small cups are great for single servings, too. Just ensure they have a good seal. Keep your mousse in the coldest part of the fridge. Avoid the door, as it can be warmer. Add a layer of plastic wrap on top of the mousse. This helps keep moisture in and air out. If you want to serve it later, don’t garnish until just before serving. This keeps the mousse looking fresh and tasty. For best results, always check for any change in smell or texture before eating. Yes, chocolate avocado mousse is healthy. It uses avocados, which are full of good fats. These fats help your heart. Plus, cocoa powder has antioxidants. This dessert is tasty and nutritious. Absolutely! You can make this mousse a day in advance. Just store it in the fridge. Cover it well to keep it fresh. This way, it’s ready when you are. If you don’t have maple syrup, honey works well. You can also use agave syrup or date syrup. Each adds a unique taste but keeps it sweet. Just swap it in the same amount. Serve the mousse in small cups or bowls. A fun idea is to layer it with fresh fruit. You can top it with berries or mint leaves for color. This makes it look fancy and inviting. For the full recipe, check out the section earlier. It has all the details you need to make this delicious dessert. Enjoy making it! Making chocolate avocado mousse is easy and fun. We covered key ingredients, helpful tips, and tasty variations. This dessert is not only creamy but also healthy. You learned how to make it, store it, and even serve it with style. Don’t hesitate to try your own flavors or garnishes. Enjoy experimenting with this delicious recipe and share it with friends. Your journey to a tasty and healthy dessert starts now. Dive in and savor every bite!](https://recipespursuit.com/wp-content/uploads/2025/06/487ebf86-b2e3-4c24-8e75-b25de946ab9c.webp)
Are you ready for a dessert that’s delicious and healthy? This Chocolate Avocado Mousse is your answer! With just a
![When you want to make Savory Chicken and Rice Bake, you need the right ingredients. Here’s the complete list: - 2 cups uncooked brown rice - 4 cups chicken broth - 1 lb boneless, skinless chicken thighs, cut into bite-sized pieces - 1 medium onion, diced - 2 cloves garlic, minced - 1 bell pepper (any color), diced - 1 cup frozen peas - 1 teaspoon paprika - 1 teaspoon dried thyme - 2 teaspoons olive oil - Salt and pepper to taste - 1 cup shredded cheddar cheese These ingredients create a hearty dish full of flavor. Using brown rice adds a nutty taste and a nice texture. Chicken thighs stay juicy and tender during cooking. The onion, garlic, and bell pepper bring sweetness and depth to each bite. Don’t forget the cheese! It melts beautifully on top. This dish not only fills you up but also warms your heart. For the full recipe, check out the details above. 1. Preheat the oven and gather ingredients: First, set your oven to 375°F (190°C). Gather all your ingredients to make cooking easier. You’ll need uncooked brown rice, chicken broth, chicken thighs, onion, garlic, bell pepper, frozen peas, spices, and cheese. 2. Sauté onions, garlic, and bell pepper: In a large skillet, heat 2 teaspoons of olive oil over medium heat. Add the diced onion and cook until it looks clear, about 5 minutes. Then, stir in the minced garlic and diced bell pepper. Cook for another 3 minutes until they soften. 3. Combine all ingredients in a mixing bowl: In a large mixing bowl, mix the uncooked brown rice, chicken broth, the sautéed onion mix, chicken pieces, peas, paprika, thyme, salt, and pepper. Stir the mix well to spread the rice evenly. 1. Transfer mixture to baking dish: Pour the mixture into a greased 9x13-inch baking dish. Spread it out so it cooks evenly. 2. Cover and bake for initial cooking time: Cover the dish tightly with aluminum foil. Place it in the preheated oven and bake for 30 minutes. This helps the rice absorb the broth and flavors. 3. Uncover, add cheese, and complete baking: After 30 minutes, remove the foil. Stir the mixture gently to combine. Then, sprinkle 1 cup of shredded cheddar cheese on top. Return the dish to the oven without the foil and bake for another 15-20 minutes, until the chicken is cooked and the rice is tender. 1. Let it rest before serving: Once it is done, take the dish from the oven. Let it sit for 5 minutes to cool and set. 2. Suggested serving suggestions: You can serve the bake right from the dish. For a nice touch, transfer portions to warm bowls. Add fresh parsley on top for color. This makes your meal look and taste great. If you want the full recipe, check out the Full Recipe section above. To ensure perfectly cooked rice, use the right ratio of liquid to rice. For this recipe, mix 2 cups of uncooked brown rice with 4 cups of chicken broth. This gives the rice enough moisture to cook well. Always check the rice for doneness before serving. If it seems undercooked, add a splash of broth and bake a bit longer. Best practices for seasoning include tasting as you cook. Add salt and pepper in small amounts. You can always add more, but you can't take it out once it's in. Use fresh herbs like thyme or parsley for vibrant flavor. Paprika adds a nice touch; it brings warmth without too much heat. Pair your chicken and rice bake with sides like a fresh green salad. A simple cucumber and tomato salad works great. You can also serve it with steamed broccoli for a healthy touch. This meal looks great served right from the dish. For a special touch, spoon servings into warm bowls. Garnish with fresh parsley for color. For this recipe, you need a large skillet for sautéing. A good mixing bowl is also essential for combining your ingredients. A 9x13-inch baking dish is perfect for even cooking. You might want to use a glass dish for easy monitoring. It helps to see how the food is cooking. A spatula is handy for stirring and serving, too. {{image_2}} You can change the protein in this dish easily. Instead of chicken thighs, try using chicken breast, turkey, or even shrimp. For a meat-free option, tofu or tempeh works well. Adding vegetables can boost flavor and nutrition. Consider using broccoli, carrots, or zucchini. They add color and crunch to the bake. You can also toss in spinach or kale for a nutrient kick. Herbs and spices can change this dish's taste. Try rosemary or oregano for a different twist. You can also mix in some cumin or chili powder for a warm, earthy flavor. If you want some heat, add a pinch of red pepper flakes or diced jalapeños. For a touch of sweetness, consider mixing in some corn or a drizzle of honey. For a gluten-free version, swap the brown rice with quinoa or use gluten-free rice. Check the chicken broth for gluten-free labels or make your own. If you want a vegan or vegetarian dish, use vegetable broth and replace the chicken with chickpeas or lentils. This keeps the meal filling and satisfying while aligning with plant-based diets. For the full recipe and detailed instructions, check out the Full Recipe section. After enjoying your Savory Chicken and Rice Bake, you might have some leftovers. It’s best to store them properly to keep the flavors fresh. - Refrigeration: Allow the dish to cool down first. Then, place it in an airtight container. Store it in the fridge for up to 3 days. Make sure to label the container with the date. - Freezing: For longer storage, you can freeze the leftovers. Use a freezer-safe container or heavy-duty freezer bags. Make sure to remove as much air as possible. This way, the bake can last for up to 3 months in the freezer. When it's time to enjoy your leftovers, proper reheating is key to keeping it tasty. - Reheating without drying out: Always add a splash of water or chicken broth before reheating. This helps keep the dish moist. - Microwave vs. Oven: For quick reheating, use the microwave. Heat in 1-minute intervals, stirring in between. If you prefer the oven, preheat it to 350°F (175°C). Cover the dish with foil and heat for about 20 minutes. This method will keep it crispy on top while warming it through. For the full recipe, check out the [Full Recipe] section. Can I use white rice instead of brown rice? Yes, you can use white rice. It cooks faster than brown rice. To adjust, use the same volume of white rice but reduce the chicken broth to 3 cups. Check the rice halfway through cooking to avoid overcooking. How can I make this dish in a slow cooker? To make this in a slow cooker, add all ingredients to the pot. Cook on low for 4 to 6 hours or high for 2 to 3 hours. Stir occasionally and check the chicken for doneness. What to do if the rice is undercooked? If the rice is undercooked, add a little more chicken broth. Cover and bake for an additional 10 to 15 minutes. This will help soften the rice without drying it out. Can I double the recipe for larger gatherings? Yes, you can double the recipe. Use a larger baking dish to fit all the ingredients. You might need to increase the cooking time by 10 to 15 minutes, so check for doneness. What can I substitute for chicken broth? If you don’t have chicken broth, use vegetable broth or water. You can also make a quick broth with bouillon cubes. Just mix the cubes with hot water. How to modify the recipe for a different dietary need? For gluten-free needs, use gluten-free broth and ensure your rice is certified gluten-free. For a vegetarian version, replace the chicken with mushrooms or tofu and use vegetable broth instead. This blog post covered a delicious chicken and rice dish. You learned the ingredients, step-by-step instructions, and cooking tips. We also explored variations and storage info, plus answered common questions. I hope you feel ready to try this recipe. It's tasty and flexible for your needs. Enjoy cooking and sharing this meal with your loved ones!](https://recipespursuit.com/wp-content/uploads/2025/05/eba327f2-2c01-492f-89fe-e944d70f0764.webp)
Looking for a cozy meal that pleases the whole family? My Savory Chicken and Rice Bake hits the mark! This
![To make this dish, you need fresh and simple ingredients. Here’s what you will use: - 2 cups fresh basil leaves - 1/4 cup walnuts (or pine nuts) - 1/4 cup grated Parmesan cheese - 2 cloves garlic, minced - 1/2 cup extra virgin olive oil - Zest and juice of 1 lemon - Salt and pepper to taste - 12 oz pasta of your choice (spaghetti or fettuccine works well) Each ingredient plays a role in creating bright and bold flavors. The fresh basil brings a nice herbal taste. The walnuts add a lovely crunch and nuttiness. The lemon gives a bright zing that makes the dish pop. You can add some extra touches to make your dish even better. Consider these options: - Cherry tomatoes, halved (for garnish) - Additional Parmesan cheese (for serving) - A sprinkle of fresh basil for color These garnishes not only look pretty but also enhance the flavor. Cherry tomatoes add sweetness and freshness, while extra cheese brings creaminess to each bite. If you or someone else has allergies or preferences, you can easily swap some ingredients. Here are a few ideas: - Use sunflower seeds instead of walnuts or pine nuts for a nut-free option. - Replace Parmesan cheese with nutritional yeast for a vegan choice. - Swap olive oil with avocado oil if you prefer a different taste. These substitutions keep the spirit of the dish while making it safe and enjoyable for everyone. Adjust the recipe to fit your needs and taste! For the complete recipe, check out the Full Recipe section. First, bring a large pot of water to a boil. Add a generous amount of salt. This helps flavor the pasta. Once the water is boiling, add 12 ounces of your favorite pasta. Spaghetti and fettuccine are both great choices. Cook the pasta according to the package directions until it is al dente. This usually takes about 8 to 10 minutes. After cooking, reserve 1/2 cup of the pasta water. This water has starch that helps bind the sauce. Then, drain the pasta in a colander. Set it aside while you make the pesto. Next, grab your food processor. Add 2 cups of fresh basil leaves, 1/4 cup of walnuts or pine nuts, and 1/4 cup of grated Parmesan cheese. Toss in 2 cloves of minced garlic, the zest, and juice of one lemon. Pulse these ingredients until they are coarsely chopped. Now, slowly drizzle in 1/2 cup of extra virgin olive oil while the processor runs. This will make the pesto smooth and creamy. If it feels too thick, add a little reserved pasta water until you reach the right consistency. Taste it and add salt and pepper as needed. In a large bowl, combine the drained pasta with the lemon basil pesto. Use tongs to toss them together until the pasta is well-coated. This is where the magic happens! The pasta absorbs the fresh flavors of the pesto. Once mixed, transfer the pasta to serving plates. Add halved cherry tomatoes for a pop of color and extra flavor. You can sprinkle more Parmesan cheese on top for a cheesy finish. Enjoy your quick and flavorful Lemon Basil Pesto Pasta! For the complete recipe, check the Full Recipe section. To get the best pesto, start with fresh basil. This makes a big difference. When blending your ingredients, add olive oil slowly. This helps the pesto blend smoothly. If your pesto feels thick, add a bit of reserved pasta water. This water has starch and helps thin it out. You want a creamy texture, not too runny. You can boost the flavor of your pesto in many ways. Try adding a handful of spinach for extra nutrition. If you like heat, toss in some red pepper flakes. For a nutty twist, use roasted nuts instead of raw. A squeeze of lemon juice can brighten the taste. If you want a cheesy kick, add more Parmesan cheese. These simple tweaks can really elevate your dish. Presentation matters! Serve your Lemon Basil Pesto Pasta in a large bowl for sharing. This feels warm and inviting. For individual servings, use white plates to make colors pop. Top each plate with halved cherry tomatoes. They add a splash of color and freshness. Finish with a sprinkle of fresh basil and extra Parmesan. A drizzle of olive oil gives a nice sheen. This makes your dish look as good as it tastes! For the complete recipe, check the [Full Recipe] section. {{image_2}} You can use many types of pasta with lemon basil pesto. Spaghetti is a classic choice. Fettuccine makes a nice, flat base for the sauce. You can also try penne for a fun twist. If you want a lighter dish, use zucchini noodles or whole wheat pasta. These options add different textures and flavors to your meal. For a vegan version, skip the Parmesan cheese. You can use nutritional yeast instead. It gives a cheesy flavor without dairy. Also, replace the walnuts with sunflower seeds for a nut-free option. This keeps the pesto rich and creamy while being plant-based. You won't miss the cheese at all! If you want to make your pasta more filling, add protein. Grilled chicken or shrimp pairs well with the lemon basil pesto. Tofu is a great choice for a vegan meal. Simply cube and sauté it until golden. Beans or lentils can also boost the protein content and add fiber. These additions create a complete meal that satisfies your hunger. For the full recipe, check out the detailed steps above! Store leftover pesto and pasta in airtight containers. This keeps them fresh. If you made a lot of pesto, you can also store it in smaller jars. Make sure to seal them well to avoid air. Place the pasta in the fridge for up to three days. Pesto can last about a week if stored correctly. Always label your containers with dates. This helps you keep track of freshness. To reheat pasta, place it in a pot. Add a splash of water or olive oil. Heat on low until warm. Stir gently to avoid breaking the pasta. For pesto, you can warm it in a small pan. Use low heat and stir often. This helps keep the flavor bright. Avoid overheating to keep the taste fresh. You can freeze both pesto and cooked pasta. For pesto, place it in ice cube trays. Once frozen, transfer the cubes to a freezer bag. This makes it easy to use just what you need. Cooked pasta can also be frozen. Place it in a container with a little olive oil to prevent sticking. Freeze for up to three months. When ready to use, thaw it in the fridge overnight before reheating. For a full recipe of Lemon Basil Pesto Pasta, check this out! The best pasta for lemon basil pesto is spaghetti or fettuccine. These shapes hold the sauce well. You can also use penne or fusilli. Both options bring a nice texture. The key is to choose a pasta that can catch the pesto. Yes, you can make lemon basil pesto ahead of time. Store it in an airtight container in the fridge. It stays fresh for about a week. To prevent browning, drizzle a thin layer of olive oil on top. You can also freeze it. Just place it in ice cube trays. This way, you have single servings ready to go. Leftover pesto is great in many dishes. You can mix it into scrambled eggs for breakfast. It works well as a sandwich spread. Try using it on pizza instead of sauce. You can also toss it with roasted veggies for a tasty side. The options are endless! In this article, we explored how to create delicious Lemon Basil Pesto Pasta. We covered key ingredients, cooking steps, and tips to make your dish shine. You learned about variations and storage to keep leftovers fresh. This dish is simple and fun to make. Experiment with ingredients and enjoy your meal. Trust your taste, and don't hesitate to try new things. Enjoy every bite and impress your friends with your cooking skills!](https://recipespursuit.com/wp-content/uploads/2025/05/a7344841-83b3-49c1-947f-7329b573e16a.webp)
Ready to elevate your pasta game? My Lemon Basil Pesto Pasta recipe is quick, easy, and packed with vibrant flavors.
![- 2 medium acorn squashes - 1 cup quinoa, rinsed - 2 cups vegetable broth - 1 cup black beans, drained and rinsed - 1 cup corn, frozen or fresh - 1 red bell pepper, diced - 1 small red onion, diced - 2 cloves garlic, minced - 1 teaspoon cumin - 1 teaspoon smoked paprika - ½ teaspoon chili powder - Salt and pepper to taste - 2 tablespoons olive oil - Fresh cilantro, chopped (for garnish) - Lime wedges (for serving) These ingredients create a delicious and filling dish. Each item adds flavor and nutrition. The acorn squash serves as a tasty bowl. Quinoa is rich in protein and fiber. Black beans and corn add a nice texture. The spices bring warmth and depth. Fresh cilantro and lime finish the dish with brightness. This meal is packed with nutrients. It is low in calories and high in fiber. Here’s a quick breakdown: - Calories: About 350 per serving - Protein: 12 grams - Fiber: 8 grams - Vitamins: A, C, and several B vitamins - Minerals: Iron, magnesium, and potassium Quinoa is a complete protein, meaning it has all nine essential amino acids. It supports muscle health and keeps you full. Black beans are high in fiber and help with digestion. They also keep your heart healthy. Corn adds vitamins and minerals, while acorn squash provides antioxidants. Enjoying this dish supports your health in many ways! For the full recipe, check out the [Full Recipe] link. First, you need to preheat your oven to 400°F (200°C). While it heats, grab the acorn squashes. Cut them in half and scoop out the seeds. Place them cut-side down on a baking sheet. Roast them in the oven for about 25-30 minutes. They should become tender while cooking. Next, let's make the quinoa. In a saucepan, bring the vegetable broth to a boil. Add 1 cup of rinsed quinoa to the boiling broth. Reduce the heat to low and cover the pan. Let it simmer for about 15 minutes until all the liquid is absorbed. Fluff the quinoa with a fork when done. Now, it’s time to make the filling. In a large skillet, heat 2 tablespoons of olive oil over medium heat. Add the diced red onion and bell pepper. Sauté them for about 3-4 minutes until they soften. Then, add 2 minced garlic cloves and cook for another minute. Stir in 1 cup of black beans, 1 cup of corn, and the cooked quinoa. Add 1 teaspoon of cumin, 1 teaspoon of smoked paprika, and ½ teaspoon of chili powder. Season with salt and pepper to taste. Cook for an additional 5-7 minutes, stirring occasionally, until everything is nice and hot. Once your squashes are done roasting, carefully flip them cut-side up. Fill each half generously with the quinoa mixture. You can pack it in well. Return the stuffed squashes to the oven and bake for another 10-15 minutes. They should be hot and ready to serve. After baking, let the squashes cool slightly. Garnish with fresh cilantro and serve with lime wedges for added flavor. You can find the full recipe above to guide you through every step! When picking acorn squash, look for ones that are firm and heavy. The skin should be dark green with a few orange spots. These signs show that the squash is ripe. Avoid squash with soft spots or blemishes. Generally, acorn squash is best in the fall and winter months. During this time, you will find it fresh and tasty at local markets. To cook fluffy quinoa, rinse it well under cold water first. This step removes bitterness. Use two cups of vegetable broth for every cup of quinoa. Bring the broth to a boil, then add the quinoa. Cover and reduce the heat. Cook for about 15 minutes until all the liquid is gone. You can also use farro or brown rice if you want a change. Both grains work well in this dish. Add more depth to your dish with spices or herbs. Try adding oregano, thyme, or even a dash of cinnamon. Each of these can bring a new twist to the flavor. For a nice touch, top the stuffed squash with avocado or pumpkin seeds. These will add creaminess and crunch to your meal. You can also drizzle some balsamic glaze for an extra burst of flavor. {{image_2}} You can make this dish gluten-free easily. Instead of quinoa, try using rice or millet. Both grains cook well and add a nice texture. You can also use gluten-free breadcrumbs for added crunch. Just check the labels of your ingredients to be sure they are safe. Want to add more protein? Consider using tofu or tempeh. Tofu is soft and absorbs flavors well. You can cube it and sauté it with your veggies. Tempeh has a nutty taste and provides a hearty bite. Crumble it into your filling for extra protein. Incorporate seasonal vegetables for unique flavors. In fall, add roasted Brussels sprouts or sweet potatoes. In spring, try peas or asparagus. For holidays, think about adding cranberries for a sweet twist. These changes keep the dish fresh and fun throughout the year. To keep your stuffed acorn squash fresh, store leftovers in the fridge. Use an airtight container. This way, they stay tasty for up to four days. If you want to keep them longer, freezing is a great option. Wrap each stuffed squash in plastic wrap. Then place them in a freezer-safe bag. They can last for up to three months in the freezer. When you want to enjoy the leftovers, reheating is key. The best way is to use an oven. Preheat the oven to 350°F (175°C). Place the stuffed squash on a baking tray. Cover with foil to hold in moisture. Heat for about 20 minutes or until warmed through. This helps to keep the texture nice and the flavors intact. You can also use a microwave for quicker results. Just make sure to cover them to avoid drying out. For busy days, meal prep can save you time. You can cook the quinoa and chop the veggies ahead of time. Store each in separate containers in the fridge. When you are ready, just stuff the acorn squash and bake. This method makes it easy to enjoy this healthy meal without all the fuss. You can also prepare the filling a day before. Just mix it up and store it until you are ready to use it. Yes, you can use different squashes. Try butternut or spaghetti squash. Both have great flavors. They also roast well and hold the filling nicely. Just adjust cooking times as needed. Butternut squash may take longer to cook. Spaghetti squash will need a different cutting method. Slice it in half lengthwise for easy roasting. Each squash will give a unique taste to the dish. Yes, this recipe is vegan. It has no animal products. The filling is packed with plant-based protein from quinoa and black beans. You can easily adapt it for other diets. If you want to add cheese, feel free to sprinkle some on top. Just remember, it won't be vegan anymore. If you like heat, add more chili powder. You can also mix in diced jalapeños or red pepper flakes. If you want to keep it fresh, try adding hot sauce after cooking. A squeeze of lime with spicy sauce can brighten the dish too. Just remember to taste as you go to find the right heat for you. You can serve this as both a main dish or a side. For a main dish, serve with a salad or bread. It makes a hearty meal that fills you up. As a side, pair it with grilled vegetables or a protein. It complements many meals and adds color to your plate. Try it with roasted chicken or a veggie burger for a delicious combo. For the full recipe, check out the details above! This blog post shared a simple way to cook stuffed acorn squash with quinoa and beans. We discussed the needed ingredients, including fresh vegetables and spices, and how to prepare them. I included tips to select the best squash and variations to enhance your dish. You can enjoy a tasty, healthy meal while getting creative. Try different spices or add seasonal veggies. Cooking can be fun and rewarding. Now, gather your ingredients and start making this vibrant dish!](https://recipespursuit.com/wp-content/uploads/2025/05/6d061b47-349d-4b1e-9022-e8712b9268cf.webp)
If you’re looking for a simple and tasty meal, try my vegetarian stuffed acorn squash! This dish is not just
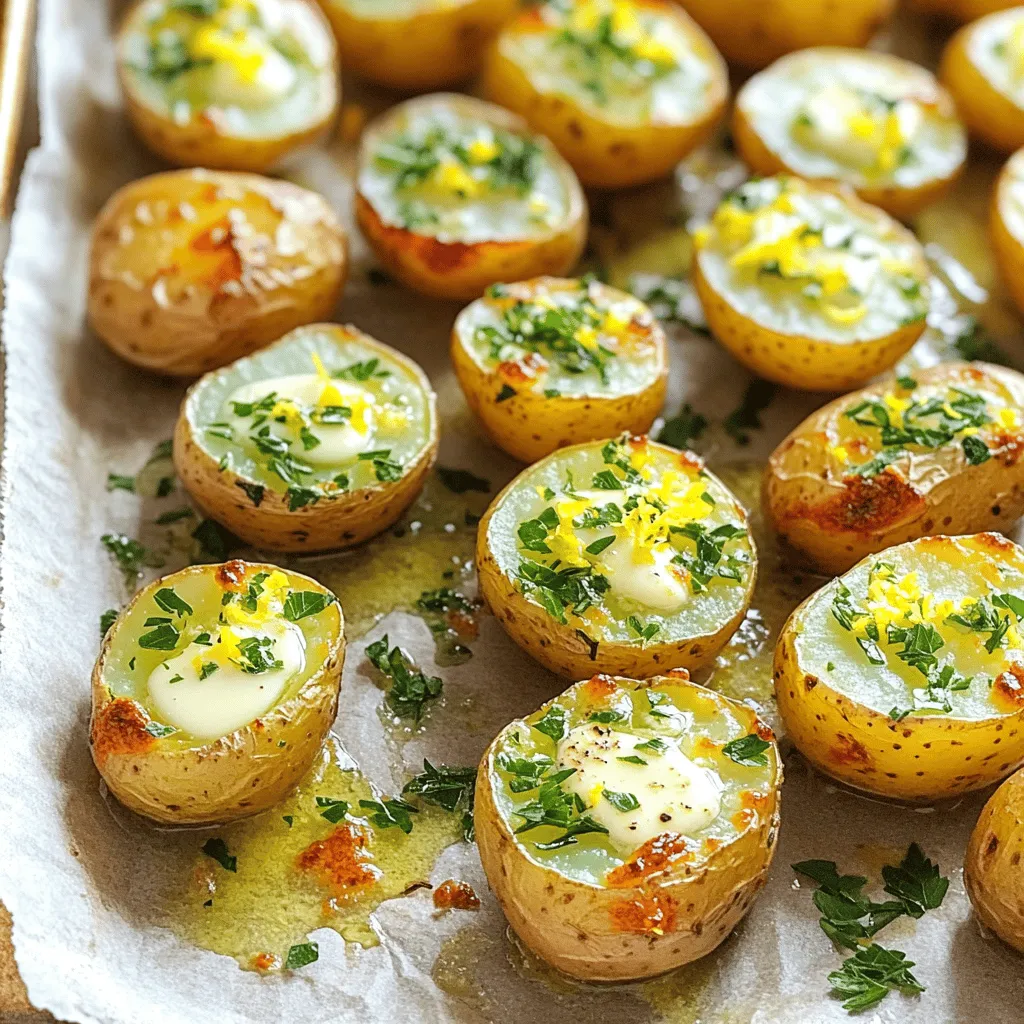
Are you ready to elevate your potato game? These Garlic Butter Herb Potatoes are golden, crispy, and packed with flavor.
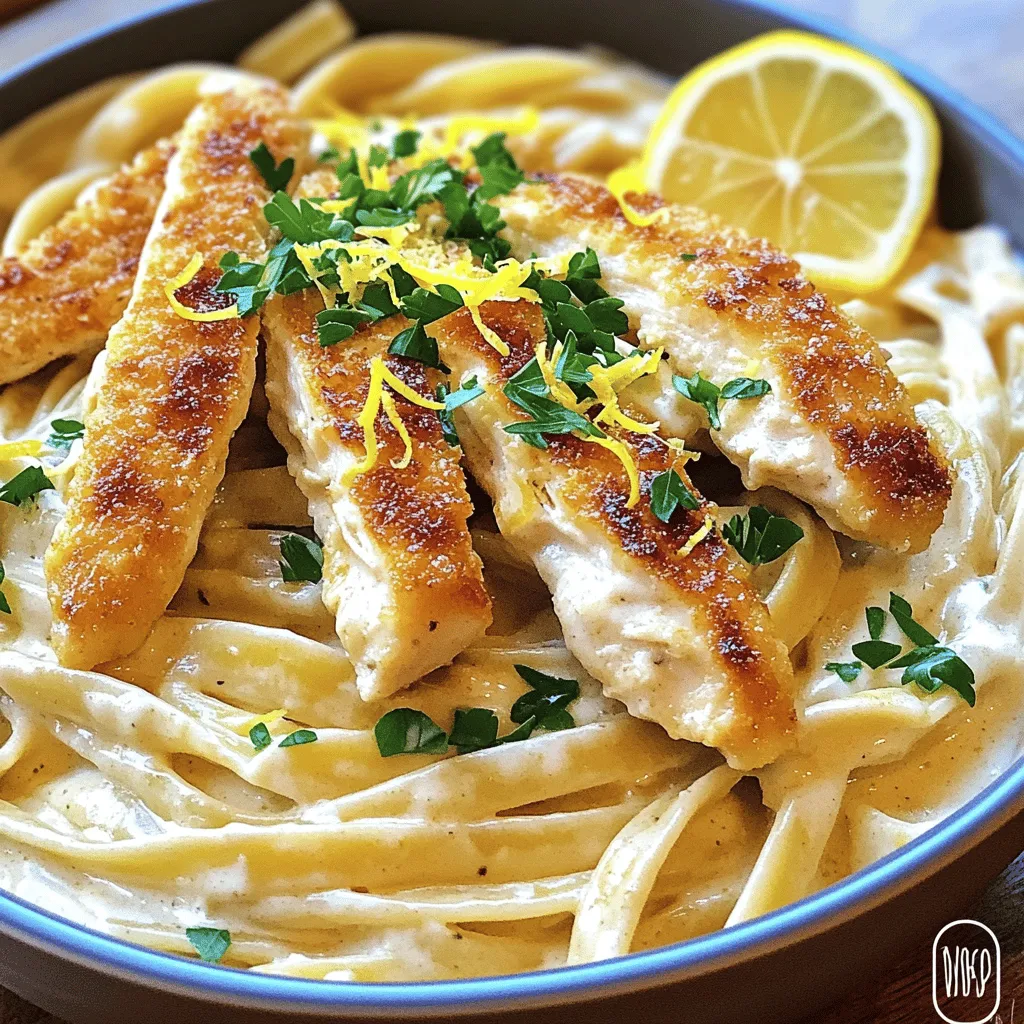
Are you craving a rich, creamy dish that’s easy to make? Look no further! In this Classic Chicken Alfredo recipe,
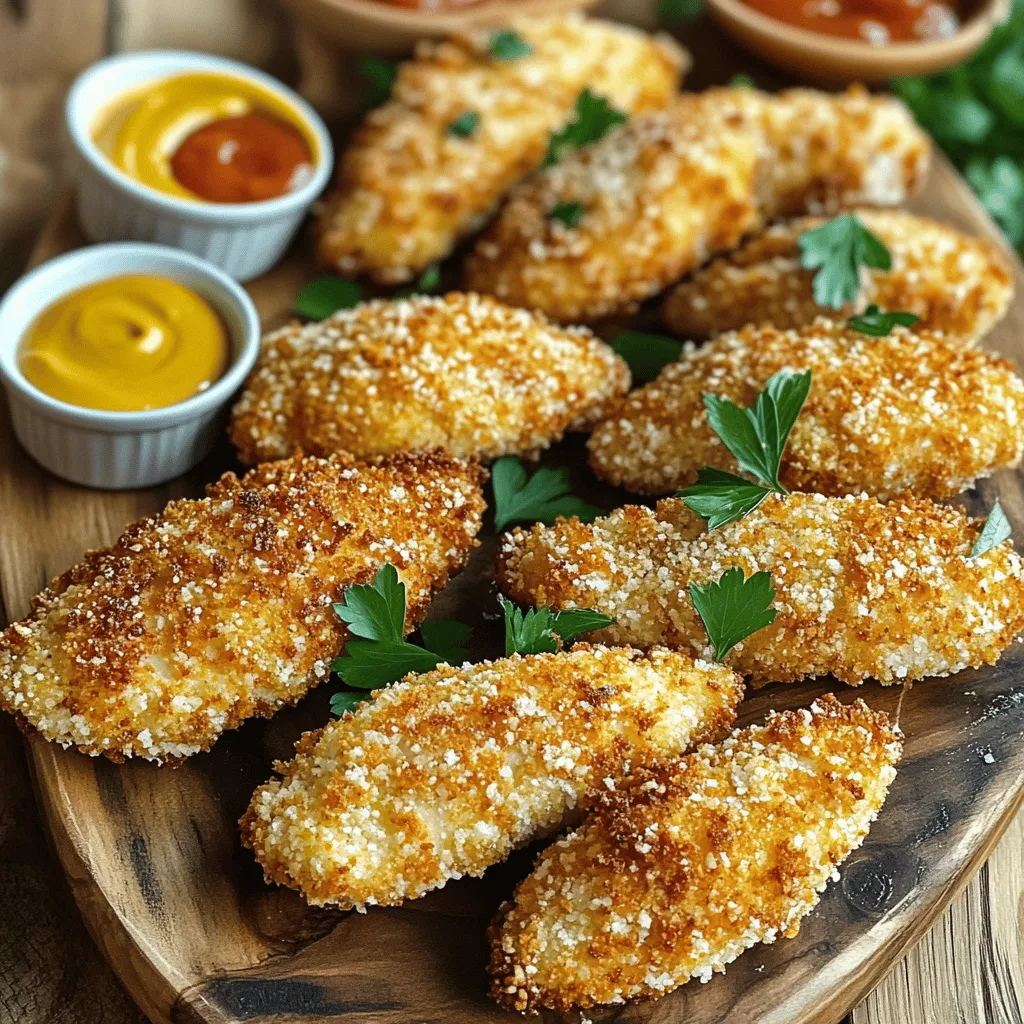
Ready to elevate your weeknight dinners? I’ll show you how to make Crispy Parmesan Chicken Tenders that are both tasty
![- 2 chicken breasts, sliced thinly - 1 ripe mango, peeled and diced - 1 red bell pepper, sliced - 1 green bell pepper, sliced - 1 medium onion, thinly sliced - 2 cloves garlic, minced - 1 tablespoon ginger, grated - Fresh cilantro, for garnish - 3 tablespoons soy sauce - 1 tablespoon honey - 1 tablespoon sesame oil - 1 tablespoon vegetable oil - Salt and pepper to taste When I make Mango Chicken Stir Fry, I love using fresh, bright ingredients. The chicken is key. Slice it thinly to help it cook fast. You want it tender and juicy. The ripe mango adds sweetness. Dicing it gives nice bites of flavor. The bell peppers add color and crunch. I use both red and green for a mix of flavors. Onions bring a sweet touch when they cook down. Next, the aromatics. Garlic and ginger make everything taste amazing. They add warmth and depth to the dish. For the marinade, I mix soy sauce, honey, and sesame oil. This combo gives the chicken a rich taste. Don't forget to season with salt and pepper. It makes a big difference! Gather all these ingredients, and you're ready to create a tasty meal. Check the Full Recipe for more details! - Marinate the chicken: First, mix soy sauce, honey, and sesame oil in a bowl. This creates a tasty marinade. Add the sliced chicken to the bowl. Let it marinate for 15 minutes. The longer it sits, the better it tastes. - Cook the marinated chicken: Heat vegetable oil in a large skillet. Use medium-high heat. Add the marinated chicken. Cook for 5-7 minutes. You want it cooked through and slightly caramelized. Once done, remove the chicken and set it aside. - Add onions and bell peppers: In the same pan, toss in the thinly sliced onion and bell peppers. Stir-fry them for about 3-4 minutes. You want them tender but still crisp. - Include garlic and ginger: Next, add minced garlic and grated ginger to the pan. This adds a nice flavor punch. Stir everything together and cook for another minute. - Return chicken to skillet: Place the cooked chicken back into the skillet. Mix it well with the veggies. - Add diced mango and adjust seasoning: Finally, add the diced mango. Stir gently to combine. Let it warm through for about 2 minutes. Taste and adjust seasoning with salt and pepper if needed. This method will lead you to a delicious Mango Chicken Stir Fry, bursting with flavors. For the complete recipe, refer to the [Full Recipe]. To get tender chicken, start with thin slices. Thin pieces cook quicker and stay juicy. Marinate the chicken for at least 15 minutes. The marinade adds flavor and keeps it moist. When stir-frying, use high heat. This cooks the food fast and gives it a nice color. Keep everything moving in the pan. Stir frequently to avoid burning. For extra flavor, consider adding spices like paprika or cayenne. These spices can bring a nice kick to the dish. You can also add a splash of lime juice for a zesty touch. If you want to adjust sweetness, add more honey or use agave syrup. You can balance the sweet taste by adding a bit of vinegar. This contrast can enhance all the flavors. This dish pairs well with rice or noodles. The grains soak up the sauce and add texture. Serve it over steamed jasmine rice for a fragrant touch. Garnish with fresh cilantro for a pop of color. You can also add chopped green onions for a nice crunch. A sprinkle of sesame seeds adds a lovely finish. For the full recipe, check out the complete guide. {{image_2}} You can change the chicken if you want. Try using shrimp or tofu instead. Both work great in this dish. If you want to switch up the fruit, consider using pineapple or peaches. They add a nice sweetness, too. If you need a gluten-free option, look for gluten-free soy sauce. It tastes just as good! For vegetarians, use tofu or tempeh instead of chicken. You can still enjoy this dish while keeping it meat-free. Want some heat? Add chili flakes to your stir fry. Start with a pinch and taste as you go. If you like more veggies, toss in broccoli or snap peas. They add crunch and color to your meal. To store leftovers, let the dish cool. Place it in an airtight container. Make sure to cover it tightly. You can keep it in the fridge for about 3-4 days. This way, you can enjoy your mango chicken stir fry later. If you want to freeze the dish, use a freezer-safe container. Leave some space at the top for expansion. The mango and chicken stir fry can last up to 3 months in the freezer. When you're ready to eat, thaw it in the fridge overnight. To reheat, warm it in a pan over medium heat until hot. For meal prep, slice the chicken and veggies in advance. Store them separately in the fridge. This saves time on busy days. When you’re set to cook, just stir-fry everything together. It will be quick, easy, and delicious! To make Mango Chicken Stir Fry, follow these basic steps: 1. First, marinate sliced chicken in soy sauce, honey, and sesame oil for 15 minutes. 2. Next, heat vegetable oil in a skillet over medium-high heat. 3. Cook the marinated chicken for 5-7 minutes until it's cooked through. 4. Remove the chicken and add sliced onion and bell peppers to the skillet. 5. Stir-fry the veggies for 3-4 minutes until they are tender-crisp. 6. Return the chicken to the skillet, add diced mango, and mix well. 7. Season with salt and pepper, garnish with cilantro, and serve over rice or noodles. For the complete instructions, check the Full Recipe. Yes, you can use frozen mango. However, it may change the dish's taste and texture. Frozen mango can be softer and less sweet than fresh mango. It might release extra moisture when cooking. This can make the stir fry a bit watery. If you use frozen mango, add it towards the end of cooking to keep it from overcooking. Mango Chicken Stir Fry pairs well with various side dishes: - Steamed jasmine or basmati rice - Noodles, such as rice noodles or egg noodles - A crisp green salad with a light dressing - Stir-fried vegetables for extra crunch These sides enhance the meal and add balance to the flavors. This blog post guides you through making a tasty Mango Chicken Stir Fry. We covered ingredients like chicken, mango, and vegetables, plus a flavorful marinade. The steps of marinating, cooking, and combining ingredients ensure a great dish. To enhance your meal, I shared tips, variations, and storage methods. In conclusion, this stir fry is easy, delicious, and adaptable. You can customize it to suit your taste or dietary needs. Enjoy experimenting with flavors and serving it your way!](https://recipespursuit.com/wp-content/uploads/2025/05/0a139bc6-a7e2-49b9-b938-d6124bd4f582.webp)
Looking for a fast, delicious meal? My Mango Chicken Stir Fry is the answer! This dish combines tender chicken, fresh
