Skip to content
DisclaimerTerms Of UseGDPR PolicyCookie Policy

Recipes Pursuit

  • Home
  • Drinks
  • Appetizers
  • Dinner
  • Dessert
  • About
  • Contact
  • Privacy Policy
DisclaimerTerms Of UseGDPR PolicyCookie Policy

Emma Smith

- 1 pound large shrimp, peeled and deveined - 1/4 cup fresh cilantro, chopped - 2 tablespoons olive oil - Juice of 2 limes - Zest of 1 lime - 2 garlic cloves, minced - 1 teaspoon red pepper flakes (adjust for heat preference) - Salt and pepper to taste - Lime wedges for serving In this dish, shrimp take center stage. You want large shrimp for the best bite. They should be peeled and deveined for easy eating. Fresh cilantro adds a bright pop of flavor. Olive oil keeps everything moist. The juice and zest from limes bring a zesty kick. For seasoning, minced garlic adds depth. Red pepper flakes give heat, but you can adjust this to your liking. Just a pinch of salt and pepper will enhance all the flavors. And if you want, lime wedges are a great touch for serving. They add even more citrusy goodness. When you gather these ingredients, you set the stage for a tasty meal. Check out the Full Recipe for more details! - In a bowl, combine olive oil, lime juice, lime zest, minced garlic, and red pepper flakes. - Season with salt and pepper to taste. This marinade is the base for great flavor. - Add the shrimp to the marinade, ensuring they are well-coated. - Let them marinate for 15-20 minutes. This lets the shrimp soak up the tasty flavors. - Heat a skillet over medium-high heat. - Cook the shrimp for 2-3 minutes on one side. Flip them and cook for an additional 2 minutes. - Stir in chopped cilantro before serving. The cilantro adds freshness that brightens the dish. For the full recipe, check the earlier section. Enjoy the vibrant flavors of this dish! To make the marinade just right, you can adjust the spice level. Use red pepper flakes for heat. If you like it hot, add more flakes. For a milder taste, use less. Letting the shrimp marinate is key. I recommend marinating for 15 to 20 minutes. This time helps the shrimp soak up the flavors. You will taste the lime and cilantro in every bite. Cooking shrimp can be tricky. You want them tender, not rubbery. Heat your skillet over medium-high heat before adding the shrimp. Cook for 2 to 3 minutes on one side. When they turn pink, flip them. Cook for another 2 minutes. Keep an eye on them to avoid overcooking. Choosing the right skillet matters. A large, flat skillet helps cook shrimp evenly. It allows space for each shrimp to get that perfect sear. For plating, I like to keep it simple. Place the shrimp on a nice plate. Garnish with fresh lime wedges for a pop of color. The lime adds a fresh taste and makes the dish look great. Pair the shrimp with sides like rice or a fresh salad. These sides balance the bold flavors. You can also try serving with warm tortillas for a fun twist. For the full recipe, check out the [Full Recipe]. {{image_2}} If you want to switch things up, you can use chicken or tofu instead of shrimp. Chicken works well, and it absorbs flavors nicely. Tofu is a great choice for a plant-based option. You can also use different herbs. Parsley or basil can replace cilantro. They will give the dish a new taste while keeping the fresh feel. To boost the flavor, try adding more spices. Cumin adds a warm, earthy taste, while smoked paprika gives a nice smoky flavor. You can also incorporate vegetables. Bell peppers and onions add crunch and color. They make the dish even more appealing and nutritious. You can easily make this dish gluten-free. Just check your red pepper flakes and other seasonings for gluten. For a vegan twist, swap the shrimp marinade. Use a mixture of lime juice, olive oil, garlic, and a touch of maple syrup. This will keep the dish flavorful and satisfying without the shrimp. For the full recipe, check out the complete guide! To store leftover spicy cilantro lime shrimp, first cool it down. Place it in an airtight container. This helps keep it fresh. You can store it in the fridge for up to three days. Make sure to label your container with the date for easy tracking. If you want to save shrimp for later, freezing is a great option. Portion shrimp into freezer-safe bags. Squeeze out all the air before sealing them. This helps prevent freezer burn. You can freeze shrimp for up to three months. When ready to use, move shrimp to the fridge to thaw overnight. For quicker thawing, you can place the bag in cold water. To reheat shrimp without losing its texture, use a skillet over low heat. Add a splash of water or broth to keep it moist. Stir gently until the shrimp is heated through. You can also microwave shrimp, but do it in short bursts. This method helps avoid rubbery shrimp. Always check that it is warmed evenly for the best taste. You can tell shrimp are cooked when they turn pink and opaque. They will curl into a C shape. If they stay gray or look slimy, they need more time. Cook them for about 2-3 minutes on each side. Watch closely to avoid overcooking, which can make them tough. Yes, you can make this dish ahead of time. Marinate the shrimp in the fridge for up to 2 hours before cooking. This adds flavor and saves time. Cook the shrimp just before serving for the best taste. You can also prepare the marinade a day ahead. This shrimp dish pairs well with many sides. Try serving it with rice, quinoa, or a fresh salad. You can also add grilled veggies or corn on the cob. The lime and cilantro flavors work great with light and fresh sides. Yes, Spicy Cilantro Lime Shrimp is great for meal prep. Store leftovers in an airtight container in the fridge for up to 3 days. To reheat, use a skillet over low heat. This keeps the shrimp tender and tasty, so they don't dry out. Shrimp is a low-calorie, high-protein food. It is rich in omega-3 fatty acids, which are good for heart health. Shrimp also contains vitamins and minerals like vitamin B12, iodine, and selenium. These nutrients help support your immune system and overall health. Enjoy this dish for a tasty boost! In this post, we covered the key ingredients and steps to make Spicy Cilantro Lime Shrimp. You learned how to marinate shrimp, cook it just right, and explore helpful tips. We also discussed variations and storage options. I hope you feel ready to try this recipe, whether it's a quick weeknight meal or a fun dish to share. Enjoy the bright flavors and healthy benefits of this tasty shrimp dish!

115. Spicy Cilantro Lime Shrimp Flavorful and Simple Dish

Are you ready to tantalize your taste buds? In this post, I’ll show you how to make Spicy Cilantro Lime

To make this dish, you need a few key items. Here’s what you’ll need: - 1 whole chicken (about 4-5 lbs) - 2 lemons (one juiced, one sliced) - 4 tablespoons fresh thyme leaves - 4 cloves garlic (minced) - 1/4 cup olive oil - Salt and pepper to taste - 1 onion (quartered) - 4-5 medium carrots (cut into large chunks) - 1 cup chicken broth These ingredients blend together to create a delicious and juicy chicken full of flavor. While the main ingredients work perfectly, you can boost the taste with some extras. Consider adding: - 1 tablespoon honey for sweetness - A pinch of red pepper flakes for heat - 1/2 cup white wine for depth - Fresh rosemary or parsley for extra herbs These options can add layers of flavor to your dish. Don’t have everything on hand? No worries! Here are some swaps: - Use chicken thighs or drumsticks if you prefer dark meat. - Swap lemons with limes for a different citrus zing. - Olive oil can be replaced with melted butter for a richer taste. - If you lack fresh thyme, dried thyme works but use less. These substitutions allow you to adapt the recipe to what you have at home. For the full recipe, check out the [Full Recipe]. To make Lemon Thyme Roasted Chicken, start by gathering all your ingredients. You will need: - 1 whole chicken (about 4-5 lbs) - 2 lemons, one juiced and one sliced - 4 tablespoons fresh thyme leaves, plus extra for garnish - 4 cloves garlic, minced - 1/4 cup olive oil - Salt and pepper to taste - 1 onion, quartered - 4-5 medium carrots, cut into large chunks - 1 cup chicken broth First, preheat your oven to 425°F (220°C). Then, in a small bowl, mix the lemon juice, minced garlic, thyme leaves, olive oil, salt, and pepper. This mix will be your marinade. Next, pat the chicken dry with paper towels. Lift the skin over the breast and thighs gently. Rub some marinade underneath the skin, then coat the rest of the chicken. This step ensures great flavor. Stuff the chicken cavity with the quartered onion and lemon slices. Arrange the carrot chunks around the chicken in a roasting pan. Pour chicken broth into the pan to keep veggies moist while cooking. Roast the chicken in the preheated oven for about 1 hour and 15 minutes. You’ll know it’s ready when the internal temperature hits 165°F (74°C). Baste the chicken with its juices every 20 minutes. This gives it extra flavor and helps keep it juicy. Once the chicken is cooked, remove it from the oven. Let it rest for about 10-15 minutes before carving. This step helps the juices redistribute, making the meat tender and juicy. Garnish with extra fresh thyme before serving. Enjoy your meal! For the full recipe, click here. To get a perfect roast, start with a dry chicken. Pat it with paper towels before seasoning. This helps the skin get crispy. Use a mix of lemon juice, garlic, and thyme for flavor. Rub this mixture under the skin. This step locks in moisture and flavor. Roast the chicken on a rack. This allows heat to circulate evenly. Baste it every 20 minutes for extra juiciness. Aim for an internal temperature of 165°F. Add more herbs like rosemary or oregano for depth. Try mixing in some honey for sweetness. You can also add a splash of white wine to the broth. This adds richness and a touch of acidity. Stuff the chicken with fresh herbs and citrus. This brings more flavor to the meat. Don’t forget to season the veggies too. They will soak up the chicken's juices as they cook. You will need a roasting pan and a rack. This setup helps cook the chicken evenly. Use a sharp knife for carving. A meat thermometer is crucial to check doneness. Have some kitchen twine handy to tie the legs. This helps the chicken cook evenly. Finally, keep a basting brush close. It’s great for applying juices while roasting. For the full recipe, be sure to check the instructions above. {{image_2}} You can change the taste of your Lemon Thyme Roasted Chicken by using different herbs. Fresh rosemary adds a piney flavor. Oregano gives a warm, earthy note. You can also mix in parsley for a fresh touch. Just remember, fresh herbs usually pack more flavor than dried ones. Try to use what you have on hand! You can roast this chicken in many ways. The oven method is classic, giving you crispy skin. If you prefer a smoky flavor, use the grill. Just make sure to keep the heat low so the chicken cooks evenly. A slow cooker is also a great option. It keeps the chicken moist and tender. Cooking it on low for 6-8 hours works well. Pair your Lemon Thyme Roasted Chicken with simple sides. Roasted vegetables like carrots and potatoes work well. A fresh salad adds a nice crunch. You can also serve it with rice or quinoa for a wholesome meal. For a little zing, drizzle some lemon juice over your sides. These combinations make the dish even better! After enjoying your lemon thyme roasted chicken, store leftovers in an airtight container. Let the chicken cool down first. This keeps it fresh and moist. You can keep it in the fridge for up to three days. For longer storage, move to the freezer. To reheat, you want to keep the chicken juicy. Preheat your oven to 350°F (175°C). Place the chicken in a baking dish, cover it with foil, and heat for about 20 minutes. Check the internal temp. It should reach 165°F (74°C). This method keeps the skin crispy and the meat tender. If you want to save chicken for later, freezing works well. Wrap individual pieces in plastic wrap, then place them in a freezer bag. This helps to avoid freezer burn. You can freeze the chicken for up to three months. When ready to eat, thaw it in the fridge overnight before reheating. Remember, always check the chicken before you eat. Enjoy your delicious meals! Roasting a whole chicken takes about 1 hour and 15 minutes. You can check the time based on the weight of the chicken. For a 4-5 lb chicken, this time works best. Keep an eye on it as it roasts. The skin should turn golden brown. The chicken must reach an internal temperature of 165°F (74°C). You can check this with a meat thermometer. Insert it into the thickest part of the thigh. This ensures it is safe to eat. Yes, you can use dried thyme instead of fresh. Use about one-third of the amount called for fresh thyme. Dried herbs are stronger, so adjust as needed. Just keep in mind that fresh thyme has a brighter flavor. To keep your chicken juicy, brine it before cooking. You can soak it in saltwater for a few hours. Another tip is to let it rest after roasting. This helps the juices stay inside when you carve it. To get crispy chicken skin, dry the chicken well before cooking. Pat it with paper towels. Make sure the oven is hot enough at 425°F (220°C). Basting the chicken with its own juices also helps. Following these tips will give you that nice crunch. For detailed steps on making this dish, check out the Full Recipe. We covered making lemon thyme roasted chicken from start to finish. You learned key ingredients, step-by-step cooking methods, and tips for perfect results. Explore variations to keep meals exciting and discover the best ways to store and reheat leftovers. Remember, cooking should be fun and tasty! This dish is a great way to impress friends and family. Enjoy your cooking journey and savor every bite!

Lemon Thyme Roasted Chicken Delicious and Simple Dish

Are you looking for a dish that’s both easy and tasty? Lemon Thyme Roasted Chicken is the answer! This simple

To make creamy mushroom soup, gather these ingredients: - 500g fresh mushrooms, sliced (button and cremini are great) - 1 medium onion, diced - 2 cloves garlic, minced - 3 tablespoons olive oil - 4 cups vegetable broth - 1 cup heavy cream (coconut cream works for a dairy-free option) - 1 teaspoon dried thyme - 1 teaspoon salt - ½ teaspoon black pepper - Fresh parsley for garnish Using fresh mushrooms gives your soup a rich flavor. They hold moisture and add texture. I recommend a mix of button and cremini mushrooms. This blend creates depth in taste. Dried mushrooms can work too, but they need soaking. If you choose dried mushrooms, use about 1 ounce. Soak them in warm water for at least 20 minutes. Then, chop them and add them to your soup. You can easily adjust this recipe. For a vegan soup, swap heavy cream with coconut cream or cashew cream. If you want a lower-sodium option, use low-sodium vegetable broth. You can also add spices like smoked paprika to enhance the flavor without salt. If you have a mushroom allergy, try using cooked cauliflower or white beans as a base for creaminess. This way, everyone can enjoy a warm bowl of soup. For more details, check the Full Recipe. To make creamy mushroom soup, start by gathering your ingredients. You will need fresh mushrooms, onions, garlic, olive oil, vegetable broth, heavy cream, thyme, salt, and pepper. 1. Heat 3 tablespoons of olive oil in a large pot over medium heat. 2. Add 1 medium diced onion. Cook it for about 5 minutes until it is soft and clear. 3. Next, stir in 2 cloves of minced garlic. Cook for 1 more minute until it smells good. 4. Now, add 500g of sliced mushrooms to the pot. Cook them for 8 to 10 minutes. They should turn brown and let out their juices. 5. Sprinkle in 1 teaspoon of dried thyme, 1 teaspoon of salt, and ½ teaspoon of black pepper. Mix everything well. 6. Pour in 4 cups of vegetable broth. Bring the soup to a simmer. Let it cook for 15 minutes to let all the flavors mix. 7. After simmering, use an immersion blender to puree the soup until it is smooth. If you don’t have one, carefully blend it in small batches in a regular blender. 8. Return the soup to the pot and stir in 1 cup of heavy cream or coconut cream. Heat it gently on low but do not boil. 9. Taste the soup and add more seasoning if needed. 10. Serve it hot, topped with fresh parsley. Using the right techniques makes a big difference in your soup. Sautéing the onions and garlic first builds a strong flavor base. It helps to bring out their natural sweetness. Cooking the mushrooms until they are browned adds a rich, deep taste. Simmering the soup allows all the ingredients to mingle. This step is important for a well-rounded flavor. Pureeing the soup creates a velvety texture. The immersion blender is easy to use and keeps the soup in one pot, avoiding extra cleanup. To achieve the best creaminess, blend the soup well. If using a regular blender, fill it halfway and leave space for steam. Blend in small batches to avoid spills. If you want a thicker soup, blend more of it. If you like some chunkiness, leave some mushrooms unblended. Stir in the cream slowly. This keeps it rich without curdling. For the full recipe, check out the instructions above. Enjoy your cooking! To take your creamy mushroom soup to the next level, consider these tips: - Use fresh herbs: Fresh thyme or rosemary can add a bright touch. - Add umami: A splash of soy sauce or a sprinkle of nutritional yeast deepens the taste. - Finish with acidity: A squeeze of lemon juice can brighten the flavors. These small changes can transform your soup from good to great! Avoid these errors to ensure a perfect soup: - Don’t rush the sauté: Allow mushrooms to brown properly for richer flavor. - Skip the blending: Blending creates that creamy texture. Don’t skip this step! - Over-seasoning: Start with less salt and pepper; you can adjust later. Being mindful of these points will make your cooking process smoother. Serve your creamy mushroom soup in a few delightful ways: - With crusty bread: This pairs perfectly and adds a nice crunch. - Add a drizzle: A little truffle oil or cream on top looks fancy. - Include toppings: Try crispy fried mushrooms or toasted nuts for texture. These ideas can elevate your dining experience. For more details, check the Full Recipe! {{image_2}} You can make creamy mushroom soup vegan easily. Instead of heavy cream, use coconut cream. This option keeps the soup rich. For a lighter touch, use cashew cream or blended silken tofu. Both options add creaminess without dairy. Always check the labels on broth to ensure it’s vegan-friendly. To make your soup festive, consider adding roasted garlic for depth. Truffle oil can also elevate the flavor. For a hearty twist, stir in cooked wild rice or barley. You can also add sautéed leeks for a sweet touch. These add-ins give your soup a unique flair and make it special. You can customize flavors in creamy mushroom soup to suit your taste. Fresh herbs like thyme or rosemary bring freshness. For a kick, add a pinch of cayenne or crushed red pepper. If you prefer a smoky flavor, try adding smoked paprika. These simple changes can transform the soup into something new and exciting. For more detailed instructions on making this soup, check the Full Recipe. After making creamy mushroom soup, let it cool first. Then, place it in an airtight container. You can keep it in the fridge for up to three days. To enjoy it longer, refrigerate in smaller portions. This way, it’s easy to heat up later. You can freeze creamy mushroom soup for up to three months. First, let the soup cool completely. Pour it into freezer-safe containers. Leave some space at the top as the soup will expand when frozen. Label the containers with the date. When ready to eat, thaw it in the fridge overnight. Reheat the soup gently on the stove over low heat. Stir it often to avoid sticking. If the soup seems too thick after thawing or reheating, add a splash of broth or water. This helps restore the creamy texture. Enjoy your soup warm and flavorful! You can find the full recipe for more details. You can serve creamy mushroom soup with many sides. A fresh salad pairs well. Crunchy bread or warm rolls add a nice touch. Grilled cheese sandwiches make it even better. You can also try a light pasta dish. Each option complements the rich flavors of the soup. Creamy mushroom soup lasts about 3 to 5 days in the fridge. Make sure to store it in an airtight container. This keeps it fresh and tasty. Before serving, check for any signs of spoilage. If it smells off or looks strange, throw it out. Yes, you can use frozen mushrooms. They work well in soup, but the texture may change. Fresh mushrooms have a firmer bite. If you use frozen ones, add them directly to the pot. There’s no need to thaw them first. This saves time and keeps the soup easy. Absolutely! This soup tastes better the next day. You can make it ahead of time and store it in the fridge. The flavors blend nicely overnight. Just reheat it gently before serving. Yes, creamy mushroom soup can be gluten-free. Just ensure your vegetable broth is gluten-free. The ingredients listed are naturally gluten-free. This makes it a great choice for those with gluten sensitivity. Definitely! You can add carrots, celery, or spinach for more nutrition. These veggies add flavor and color. Just sauté them with the onions for a few minutes. This will enhance the taste of your soup. If you like heat, add some red pepper flakes. You can also stir in a dash of hot sauce. Start with a small amount and taste as you go. This way, you can control the heat level. Yes, you can use chicken broth instead of vegetable broth. This adds a different flavor profile. Just be aware that it will not be vegetarian. You can also use homemade broth for a richer taste. If you don’t have heavy cream, you can use coconut cream. It gives a nice creamy texture and adds a hint of sweetness. You can also use milk or half-and-half, but it may not be as rich. Yes, you can use a potato masher instead of a blender. It will give a chunkier texture. If you prefer a smooth soup, it may take longer. Just mash until you reach your desired consistency. For the complete recipe, check out the Full Recipe section. This blog post covered essential ingredients, preparation steps, and cooking techniques for creamy mushroom soup. You learned about fresh versus dried ingredients, plus substitutions for dietary needs. I also shared tips to enhance flavors and avoid common mistakes. Variations offered ideas for vegan and festive options. Lastly, I provided storage guidelines and answers to frequently asked questions. Remember, cooking is about enjoying the process. Experiment with flavors and make this dish your own!

Creamy Mushroom Soup Rich and Flavorful Recipe

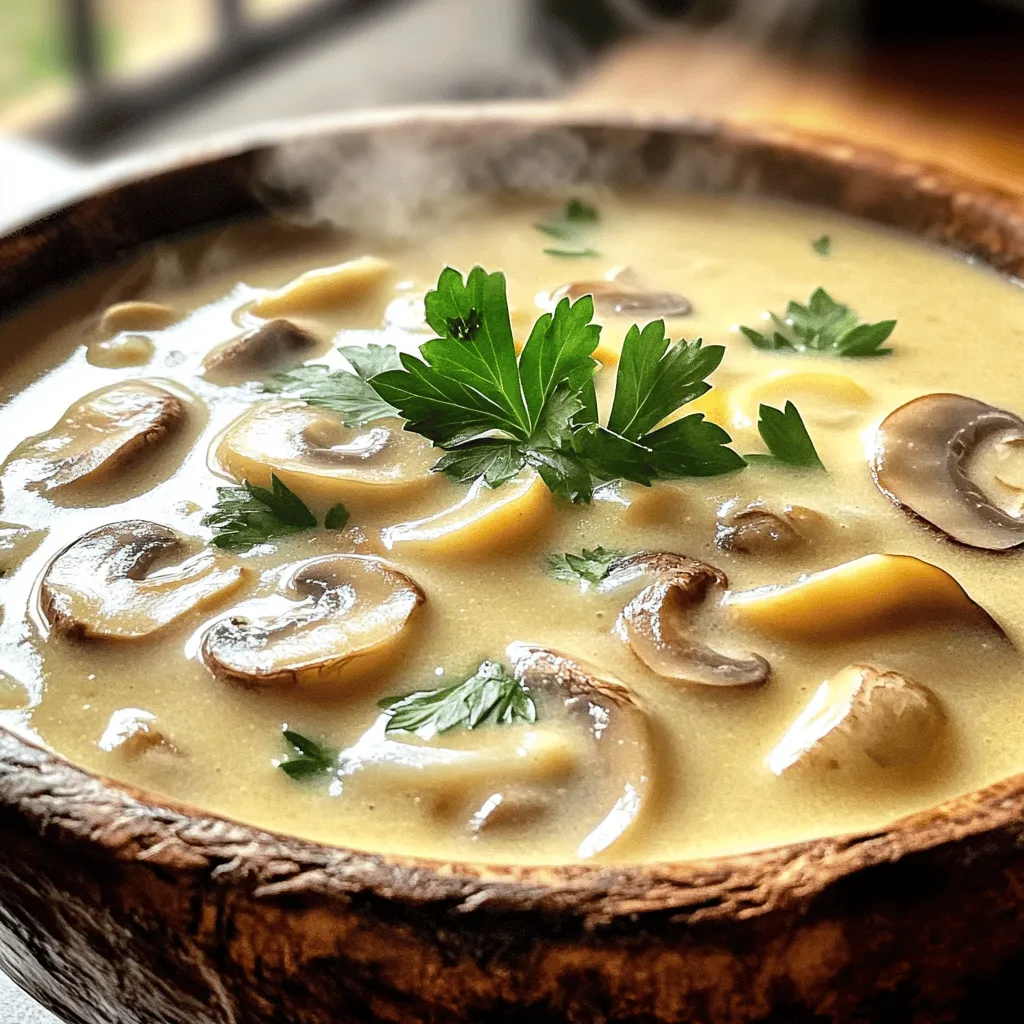
Get ready to fall in love with creamy mushroom soup! This rich and flavorful recipe is all about making a

When making grilled chicken chimichurri, you need simple yet fresh ingredients. Here’s what you will need: - Chicken - 4 boneless, skinless chicken breasts - Chimichurri Sauce Ingredients - 1 cup fresh parsley, chopped - 1/2 cup fresh cilantro, chopped - 4 cloves garlic, minced - 1/2 cup olive oil - 2 tablespoons red wine vinegar (or apple cider vinegar) - 1 teaspoon dried oregano - 1/2 teaspoon red pepper flakes - Zest and juice of 1 lime - Seasoning - Salt and pepper to taste These ingredients come together to create a bright and flavorful dish. The chimichurri adds a fresh taste that enhances the grilled chicken. You can find the full recipe at the end of this section. To start, gather all your chimichurri ingredients. You will need: - 1 cup fresh parsley, chopped - 1/2 cup fresh cilantro, chopped - 4 cloves garlic, minced - 1/2 cup olive oil - 2 tablespoons red wine vinegar (or apple cider vinegar) - 1 teaspoon dried oregano - 1/2 teaspoon red pepper flakes - Salt and pepper to taste - Zest and juice of 1 lime In a bowl, combine the parsley, cilantro, garlic, olive oil, vinegar, oregano, red pepper flakes, lime zest, and lime juice. Mix them well. This blend gives the sauce a fresh taste. Add salt and pepper to your liking. Let the sauce marinate for at least 30 minutes. This waiting time helps the flavors mix well. While the chimichurri sauce is resting, it’s time to prepare the chicken. First, preheat your grill to medium-high heat. This step is key for great grill marks. Pat the chicken breasts dry with paper towels. This helps the seasoning stick better. Season both sides with salt and pepper. This simple step adds flavor. Now, it’s time to grill the chicken! Place the chicken breasts on the grill. Cook them for about 6-7 minutes on one side. Don’t move them around; let them get those nice grill marks. After that, flip the chicken over. Grill for another 6-7 minutes. Use a meat thermometer to check the temperature. It should reach 165°F (75°C) for safety. During the last minute of cooking, brush some chimichurri sauce on top of each chicken breast. This adds even more flavor. Once cooked, remove the chicken from the grill. Let it rest for 5 minutes before slicing. This resting time keeps the chicken juicy. Now you have a tasty grilled chicken chimichurri ready to serve! For the full recipe, check the link. To keep your chicken juicy, use a meat thermometer. Cook until it reaches 165°F (75°C). Also, let the chicken rest for a few minutes after grilling. This helps the juices stay inside. For perfect grill marks, place the chicken on the grill without moving it for the first few minutes. This creates those nice lines and adds flavor. To boost the flavor of your chimichurri, try adding fresh herbs like mint or basil. You can also mix in spices like cumin or smoked paprika for a twist. Marinate your chicken in the chimichurri for at least 30 minutes. This allows the flavors to meld and makes the chicken taste amazing. Pair your grilled chicken chimichurri with sides like rice, grilled veggies, or a fresh salad. These add color and balance to your meal. For presentation, slice the chicken and arrange it on a platter. Drizzle extra chimichurri on top and garnish with lime wedges for a pop of color. If you want the full details on how to make this dish, check out the Full Recipe. {{image_2}} You can swap chicken for steak or fish in this dish. Steak adds a rich flavor. Try grilling ribeye or flank steak. Fish like salmon or swordfish works well too. Just adjust cooking times. For a vegetarian twist, use grilled vegetables. Bell peppers, zucchini, and eggplant taste great. Marinate the veggies in chimichurri for extra flavor. Chimichurri isn't just green! Red chimichurri uses tomatoes or red peppers. Blend these with the usual herbs for a bold flavor. Want some heat? Add spicy peppers like jalapeños or serranos. This gives your chimichurri a kick. You can also mix in different herbs, like mint or basil, for unique tastes. These variations keep your meals exciting and new. For the full recipe, check out Grilled Chicken Chimichurri. To keep your leftover chicken fresh, store it in an airtight container. Make sure to let it cool down first. This helps to avoid moisture build-up. You can keep it in the fridge for up to three days. If you want to store it longer, consider freezing it. Wrap each piece in plastic wrap and place it in a freezer bag. This way, it stays safe for about three months. For reheating, you can use the oven or microwave. If using the oven, preheat it to 350°F (175°C) and heat chicken for about 15-20 minutes. If you use a microwave, heat it in short bursts, checking every minute. This way, the chicken won’t dry out. Chimichurri sauce can last in the fridge for up to one week. Store it in a glass jar with a tight lid. To keep it fresh, pour a thin layer of olive oil on top before sealing. This helps to prevent oxidation. If you want to keep it longer, you can freeze it. Pour the chimichurri sauce into ice cube trays. Once frozen, pop the cubes out and store them in a freezer bag. This method allows you to use small amounts at a time. You can defrost the sauce by placing it in the fridge overnight or warming it in a pan over low heat. Yes, you can use dried herbs, but fresh herbs taste better. Dried herbs have less flavor. If you use dried herbs, use less. Try one tablespoon of dried instead of a quarter cup of fresh. You can marinate the chicken for 30 minutes to 4 hours. This gives the chicken time to soak up the flavors. Longer marination can make the chicken very tasty. Avoid marinating for more than 24 hours. Chimichurri comes from Argentina. It is a popular sauce served with grilled meats. The sauce is a mix of herbs, garlic, vinegar, and oil. It adds a fresh and zesty taste to dishes. Yes, you can make chimichurri in advance. It stores well in the fridge for up to one week. The flavors even improve over time. Just cover it tightly in a jar or bowl. Yes, chimichurri sauce is gluten-free. It contains no wheat or gluten products. This makes it a great choice for people with gluten allergies. Enjoy it on grilled chicken or other dishes without worry. For the full recipe, check out the complete details on how to make grilled chicken chimichurri. In this post, we explored how to grill chicken with chimichurri sauce. We covered key ingredients, from chicken to chimichurri components. You learned step-by-step instructions for preparation, grilling, and serving. We shared tips to keep your chicken juicy and how to enhance chimichurri flavor. Lastly, we discussed variations and storage options for leftovers. Grilling with chimichurri is fun and tasty. You'll impress everyone with your skills and flavor choices. Enjoy your cooking and happy grilling!

112. Grilled Chicken Chimichurri Flavorful and Easy Meal

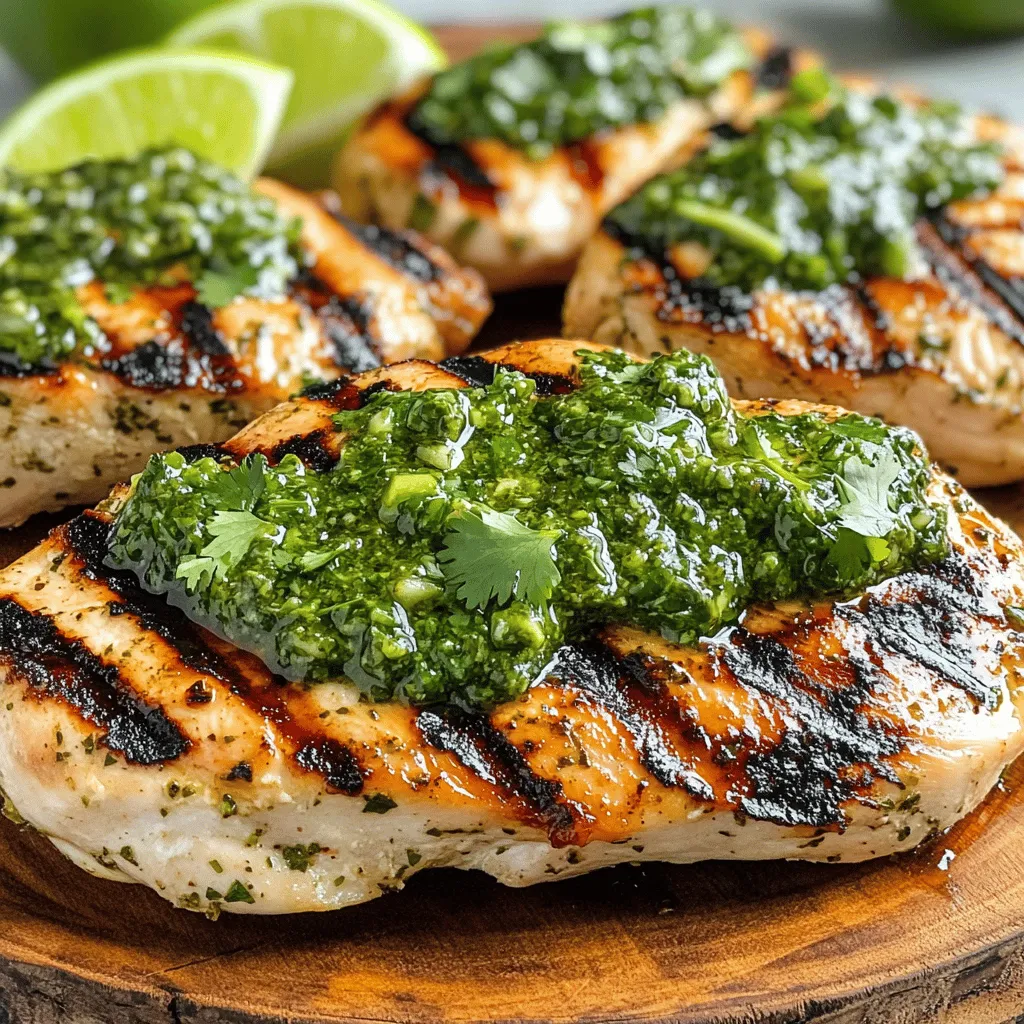
Are you ready to spice up your dinner? My Grilled Chicken Chimichurri is both flavorful and easy to make. This

- 1 lb Brussels sprouts, trimmed and halved - 4 tablespoons unsalted butter - 4 cloves garlic, minced - 1 teaspoon red chili flakes (optional) - 2 tablespoons lemon juice - Salt and pepper to taste - 2 tablespoons grated Parmesan cheese (optional) - Fresh parsley, chopped for garnish - Additional spices (e.g., garlic powder, onion powder) - Balsamic glaze for drizzling - Alternative cheeses (e.g., feta, blue cheese) When you cook Garlic Butter Brussels Sprouts, fresh ingredients make a huge difference. Start with firm, bright Brussels sprouts. Look for ones that are all green with no browning. The butter adds richness, while garlic gives a nice kick. If you like heat, red chili flakes work well. Lemon juice helps balance the flavors. It adds a bright, fresh taste. Salt and pepper are key to enhancing your dish. If you want extra flavor, sprinkle some Parmesan cheese on top. Fresh parsley not only adds color but also a fresh taste. You can choose optional ingredients to customize your dish. Garlic powder or onion powder can boost the flavor. A drizzle of balsamic glaze adds sweetness and depth. If you want a twist, try different cheeses like feta or blue cheese. Using these ingredients, you can create a flavorful side dish that stands out. Check out the Full Recipe for more details on how to prepare this delicious dish! - Preheat your oven to 400°F (200°C). - Trim and halve the Brussels sprouts. This helps them cook evenly. - Toss the Brussels sprouts with melted butter. Make sure they are well coated. - Add minced garlic, red chili flakes, lemon juice, salt, and pepper. Mix well to combine all the flavors. - Spread the Brussels sprouts on a baking sheet in a single layer. This ensures they roast properly. - Roast them in the oven for 20-25 minutes. Stir halfway through for even cooking. - In the last 5 minutes, sprinkle grated Parmesan cheese over the sprouts if you want. It adds a nice touch. For more detailed instructions, check the Full Recipe. To get the best out of your Brussels sprouts, always roast them in a single layer. This helps them cook evenly. If you stack them, some may steam instead of roast, and you won’t get that nice crisp. Stir the sprouts halfway through cooking. This ensures all sides brown nicely and gives you a great texture. You can adjust the seasoning to fit your taste. If you like it spicy, add more red chili flakes. For the best flavor, use fresh garlic. It really makes a difference compared to dried garlic. Fresh ingredients always shine in simple dishes like this one. When serving, garnish your Brussels sprouts with fresh parsley and a touch of lemon zest. This adds a bright flavor and makes the dish look more appealing. Pair them with proteins like chicken or fish for a complete meal. They also work well as a side dish at any dinner party. For the full recipe, check out the details above. {{image_2}} You can make Garlic Butter Brussels Sprouts in different ways. For a crispy texture, try the air fryer. It cooks them quickly while making them crunchy. Just toss the halved sprouts with the garlic butter, and air fry at 375°F for about 15 minutes. Shake the basket halfway through for even cooking. If you prefer a stovetop option, sautéing is quick and easy. Start by melting the butter in a pan. Add the sprouts and cook over medium heat for about 10-12 minutes. Stir often until they are golden and tender. To change up the flavor, adding bacon is a great idea. The smoky taste pairs well with the garlic and butter. Cook the bacon until crispy, then toss it in with the Brussels sprouts. You can also add nuts like walnuts or pecans for crunch. Just chop them and mix in during the last few minutes of cooking. This adds a lovely texture and extra flavor. Using seasonal veggies can enhance your dish. Try adding carrots or squash for a colorful touch. They cook well with the Brussels sprouts and add sweetness. For a zestier dish, experiment with citrus. A splash of orange or lime juice can brighten the flavors. Just mix it in with the lemon juice before cooking. For the full recipe, check out the [Full Recipe]. Keep your leftover Garlic Butter Brussels Sprouts in an airtight container. This helps them stay fresh. They taste best when you eat them within 3 days. To keep them crispy, use your oven to reheat. Set it to 350°F (175°C) and heat for about 10 minutes. If you need a quick option, you can use the microwave. Heat for 30 seconds to 1 minute until warm. You can freeze cooked Brussels sprouts for up to 2 months. Make sure they are cool before freezing. To thaw, place them in the fridge overnight. Then, reheat them using the oven or microwave for best results. For the full recipe, check the earlier section! Look for firm, bright green sprouts with no yellow leaves. Fresh sprouts should feel heavy and have tightly closed leaves. If you find any that are soft or shriveled, avoid those. Yes, you can prep and store them before roasting. Just trim and halve the sprouts, then toss them with the garlic and butter. Keep them in the fridge for up to a day. When you’re ready, roast them for that fresh taste. They pair well with meats, fish, or as part of a vegetarian meal. Try serving them with roasted chicken, grilled salmon, or a hearty grain dish. Their rich flavor makes them a great side for many main courses. Substitute butter with olive oil and omit cheese. You can still enjoy great flavor. Add nutritional yeast for a cheesy taste without dairy. This keeps the dish light and healthy while still being delicious. In this blog post, we've explored how to make delicious Garlic Butter Brussels Sprouts. We covered the key ingredients, step-by-step preparation, and creative variations to enhance flavor. Remember to store leftovers properly and reheat them for the best taste. These versatile sprouts can accompany many dishes or shine on their own. Whether you're a novice or experienced cook, these tips will help you create a tasty side. Enjoy experimenting with your own twists and savor the crispy, buttery goodness!

111. Garlic Butter Brussels Sprouts Flavorful Side Dish

If you want a side dish that impresses and delights, try Garlic Butter Brussels Sprouts. These little veggies transform into

- 1 cup red lentils, rinsed - 1 can (400ml) coconut milk - 1 large onion, finely chopped - 2 cloves garlic, minced - 1 tablespoon fresh ginger, grated - 2 tablespoons curry powder - 1 teaspoon turmeric powder - 1 teaspoon cumin - Fresh cilantro for garnish - Lime wedges for serving This recipe shines because of its simple yet bold flavors. The red lentils form a hearty base. They cook quickly and soak up all the spices. Coconut milk adds a rich creaminess. It balances the warmth from the spices perfectly. Fresh vegetables like onion, garlic, and ginger bring depth to the dish. They create a savory aroma that fills your kitchen. The spices enhance each bite. Curry powder gives warmth, turmeric adds earthiness, and cumin offers a hint of sweetness. For garnishing, fresh cilantro adds brightness. It elevates the dish visually and flavor-wise. Lime wedges provide a refreshing zing at the end. You can squeeze them over the lentils just before eating. This combination of ingredients is not just tasty; it is also healthy. Lentils are a great source of protein and fiber. Coconut milk brings healthy fats into the mix. This dish is a great option for a quick weeknight meal. For the full recipe, check out the detailed instructions to bring this Coconut Curry Lentils dish to life. - Sautéing the onion: Start by heating vegetable oil in a large pot over medium heat. Add the finely chopped onion. Cook it for about five minutes. The onion should turn soft and translucent. This step lays a great flavor base for your dish. - Adding garlic and ginger: When the onion is ready, stir in the minced garlic and grated ginger. Cook them for one minute. You want to smell their fragrant aroma. This adds depth to the curry. - Combining ingredients and bringing to a boil: Next, add the rinsed red lentils, coconut milk, and vegetable broth to the pot. Stir everything well. Bring this mixture to a boil. The boiling helps to combine all the flavors. - Simmering for tenderness: Once it boils, reduce the heat to a simmer and cover the pot. Let it cook for about 20 minutes. Stir occasionally to keep the lentils from sticking. This makes them tender and creamy. - Adding cherry tomatoes and spinach: After 20 minutes, it's time to add the halved cherry tomatoes and chopped spinach. Stir them in and cook for an additional five minutes. This step adds freshness and color to your dish. - Seasoning to taste: Finally, season your coconut curry lentils with salt and pepper. Taste and adjust as needed. This last step brings all the flavors together. Serve hot and enjoy your savory dish! For the full recipe, check the earlier section. To avoid overcooking lentils, keep a close eye on the time. Red lentils cook fast, usually around 20 minutes. Stir them often to check for doneness. They should be tender but not mushy. If you want a firmer texture, reduce the cooking time by a few minutes. Adjusting spice levels is easy. Start with less curry powder if you prefer mild flavors. You can always add more as it cooks. Taste the dish during cooking. This way, you can find the perfect spice balance for you and your family. Serve your coconut curry lentils in deep bowls. This adds a nice touch to the meal. Drizzle a bit of coconut milk on top. It enhances the look and adds creaminess. Garnish with fresh cilantro for a pop of color. Add lime wedges on the side. The lime juice brightens the dish and adds a zesty kick. These small touches make your meal feel special. Lentils are packed with nutrition. They are high in protein and fiber. This helps keep you full and satisfied. Lentils also provide essential vitamins and minerals. They support heart health and digestion. Coconut milk adds healthy fats. It contains medium-chain triglycerides, which are good for your body. These fats can provide energy and help with weight management. Enjoy the rich flavor while getting these benefits in your meal. {{image_2}} You can use green or black lentils instead of red lentils. Green lentils hold their shape well. They add a nice texture. Black lentils give a richer flavor. Adjust your cooking times if you switch. Green lentils take about 30 minutes to cook. Black lentils need around 25 minutes. Keep an eye on them to avoid mushiness. Adding protein sources can make this dish heartier. Tofu is a great vegan option. It soaks up the curry flavor well. If you prefer meat, chicken works nicely too. You can add it in step four of the recipe. Experiment with spices to find your perfect taste. Try adding cinnamon for warmth or chili powder for heat. Each spice can change the dish a lot. You can easily make this dish vegan by using plant-based ingredients. It already uses coconut milk, which is dairy-free. For gluten-free options, check the broth. Most vegetable broths are gluten-free, but it's good to double-check. If you want a lighter dish, try low-fat coconut milk. It will still taste creamy without the extra fat. Coconut curry lentils last up to four days in the fridge. Store them in an airtight container. Make sure the dish cools down before sealing to avoid moisture buildup. This keeps the lentils fresh and tasty. You can freeze coconut curry lentils for up to three months. To freeze, first let the dish cool completely. Then, place it in freezer-safe bags or containers. When you're ready to eat, thaw in the fridge overnight. Reheat in a pot over low heat, adding a splash of water if needed to restore creaminess. Batch cooking is a great way to enjoy coconut curry lentils all week. You can make a large batch and store it in portions. Pair the lentils with grains like rice or quinoa for easy meals. This adds variety and makes your meals filling and nutritious. You can use several dairy-free options. Almond milk gives a light flavor. Soy milk adds creaminess. Oat milk is also a good choice. For a richer taste, try cashew cream. Other creamy substitutes include heavy cream for non-vegan diets. You can also use Greek yogurt, but it will change the flavor. Cooking times vary by type. Red lentils cook fast, about 20 minutes. Brown and green lentils take about 30 to 40 minutes. Black lentils need about 25 to 30 minutes. Always check for tenderness before serving. Yes, you can make this dish ahead. Cook the lentils and let them cool. Store them in an airtight container in the fridge. They will stay fresh for up to five days. To enhance flavor after storing, reheat and add a splash of coconut milk. This keeps it creamy and fresh. Absolutely! You can portion the lentils into meal prep containers. Store them in the fridge for up to five days. For longer storage, freeze them. Make sure to cool the lentils before freezing. When ready to eat, thaw them overnight in the fridge and reheat. This dish stays delicious even after freezing! For the full recipe, check out the detailed instructions above. This blog post covered a delicious coconut curry lentils recipe. You learned about key ingredients like red lentils, coconut milk, and fresh vegetables. We explored the steps to prepare, cook, and serve this dish. I shared tips on cooking, presentation, and health benefits. You can also try variations to fit your diet. In summary, this recipe is tasty, easy, and healthy. With the right ingredients and steps, you can whip up a perfect meal. Enjoy the creativity of cooking and make it your own!

110. Coconut Curry Lentils Savory and Simple Dish

Are you looking for a dish that’s both easy and delicious? Look no further! My Coconut Curry Lentils blend the

- 1 pound carrots, peeled and chopped - 1 medium onion, chopped - 3 cloves garlic, minced - 4 cups vegetable broth - 1 tablespoon olive oil - 2 tablespoons pure maple syrup - 1 teaspoon ground ginger - 1 teaspoon ground cinnamon - Salt and pepper to taste - ½ cup coconut milk (for creaminess) - Fresh parsley or chives for garnish To make Maple Glazed Carrot Soup, you need fresh, vibrant ingredients. Start with 1 pound of carrots. Peel and chop them into small pieces. This helps the carrots cook evenly. Next, use 1 medium onion. Chop it finely for a tasty base. Garlic adds great flavor, so use 3 cloves, minced. You’ll also need 4 cups of vegetable broth. This gives your soup a rich taste. Add 1 tablespoon of olive oil for sautéing. For sweetness, use 2 tablespoons of pure maple syrup. This will give the soup a nice glaze. Add 1 teaspoon of ground ginger and 1 teaspoon of ground cinnamon for warmth. Don’t forget salt and pepper to suit your taste. If you want a creamy texture, consider adding ½ cup of coconut milk. Lastly, fresh parsley or chives make a lovely garnish. These ingredients combine to create a comforting and delicious soup. You can find the full recipe to guide you through each step. - Heat 1 tablespoon of olive oil in a large pot over medium heat. - Add 1 chopped onion and sauté it for 5 minutes until it turns soft and clear. - Stir in 3 minced garlic cloves for the last minute to bring out the flavor. - Next, add 1 pound of chopped carrots to the pot and sauté for another 5 minutes. - Pour in 4 cups of vegetable broth and bring the mixture to a boil. - Once boiling, lower the heat and let it simmer for about 20 minutes. This step helps cook the carrots until they are tender. - Now, add 2 tablespoons of pure maple syrup, 1 teaspoon of ground ginger, and 1 teaspoon of ground cinnamon. Stir well and season with salt and pepper. - Use an immersion blender or a countertop blender to blend the soup until smooth. If using a countertop blender, be careful with the hot liquid. - If you want a creamier texture, stir in ½ cup of coconut milk before serving. - Finally, taste the soup and adjust the seasoning if needed. Let it simmer for an extra 5 minutes to meld the flavors. For the full recipe, check out the details provided earlier! Using an immersion blender is easy and safe. You can blend the soup right in the pot. This method avoids spills. A countertop blender requires care with hot liquids. Always allow the soup to cool slightly before blending. If it’s too hot, steam can build up and cause splatters. Blend in small batches to stay safe. You can add spices to boost flavor. Nutmeg or cayenne pepper adds warmth. Fresh herbs like cilantro or dill give a bright taste. They also add a lovely color to the soup. Try adding a squeeze of lemon juice for a zesty finish. Maple Glazed Carrot Soup pairs well with warm bread. A crusty baguette or soft rolls work great. You can also serve it with a fresh salad. For garnish, add chopped parsley or chives. This adds color and freshness. You can also drizzle a bit of olive oil on top for a touch of richness. Enjoy your delicious comfort meal! For the full recipe, check out the details above. {{image_2}} You can make this soup vegan and gluten-free easily. The original recipe is already vegan. Just ensure your vegetable broth is gluten-free. For a low-carb option, swap carrots for cauliflower. Cauliflower gives a creamy texture without the carbs. Feel free to mix up the veggies. Sweet potatoes, parsnips, or butternut squash work well. You can use chicken broth instead of vegetable broth for a richer taste. For sweeteners, honey or agave syrup can replace maple syrup. Adding a touch of nutmeg can give a new flavor twist. Serve this soup as a starter or a main dish with crusty bread. You can also transform it into a creamy dip. Just add more coconut milk and serve with fresh veggies or crackers. This soup offers great flexibility for meals and gatherings. Store your Maple Glazed Carrot Soup in an airtight container. Glass or plastic containers work best. Make sure the soup cools before sealing. In the fridge, it lasts about 3 to 5 days. For longer storage, freeze the soup in freezer-safe bags or containers. It will stay fresh for up to 3 months. Remember to leave some space in the container. Soup expands when frozen. When reheating, I suggest using the stove. Pour the soup into a pot over low heat. Stir it often to keep it smooth. You can also use a microwave, but be careful. Heat it in short bursts and stir frequently. This way, you preserve its rich flavor. If the texture changes after freezing, add a splash of water or coconut milk to restore creaminess. Making this soup ahead is a great idea for busy weeknights. You can prepare a large batch and store it. Pour individual servings into containers for easy grab-and-go meals. For meal prep, let the soup cool completely before storage. This method helps it stay fresh longer. Enjoy a bowl of homemade comfort anytime you want! Check the Full Recipe for more details on making this delicious soup. Can I make Maple Glazed Carrot Soup ahead of time? Yes, you can make this soup ahead. It tastes even better after resting. Store it in the fridge for up to four days. You can also freeze it for longer storage. Just let it cool before you freeze it. Reheat it slowly when you're ready to enjoy. What can I use instead of vegetable broth? If you need a substitute, use chicken broth or water. You can also make your own broth by boiling vegetable scraps with water. This can add great flavor and nutrition to the soup. How do I make this soup spicier? To spice things up, add a pinch of cayenne pepper or red pepper flakes. You can also use fresh chili peppers. Stir them in while cooking the carrots for a warm kick. Caloric content per serving Each serving of Maple Glazed Carrot Soup has about 180 calories. It's a comforting meal that won't weigh you down. Key vitamins and minerals in ingredients This soup is rich in vitamins A and C. Carrots provide beta-carotene, which is great for your eyes. Onions and garlic add antioxidants. Coconut milk gives you healthy fats, too. What goes well with Maple Glazed Carrot Soup? This soup pairs well with a simple salad. A fresh green salad with lemon dressing can balance the sweetness. Best bread or side dishes to accompany the soup Crusty bread is perfect for dipping. Try a slice of sourdough or whole grain bread. A warm bread roll also works well to soak up the soup. Enjoy your meal! This post covered everything you need for Maple Glazed Carrot Soup. You learned about the key ingredients, step-by-step cooking methods, and useful tips. I shared variations for dietary needs and suggestions for storage and reheating. Embrace your creativity with this recipe. Whether you keep it simple or customize it, this soup will delight your taste buds. Enjoy cooking and sharing this comforting dish with friends and family. Your kitchen adventure starts now!

109. Maple Glazed Carrot Soup Irresistible Comfort Meal

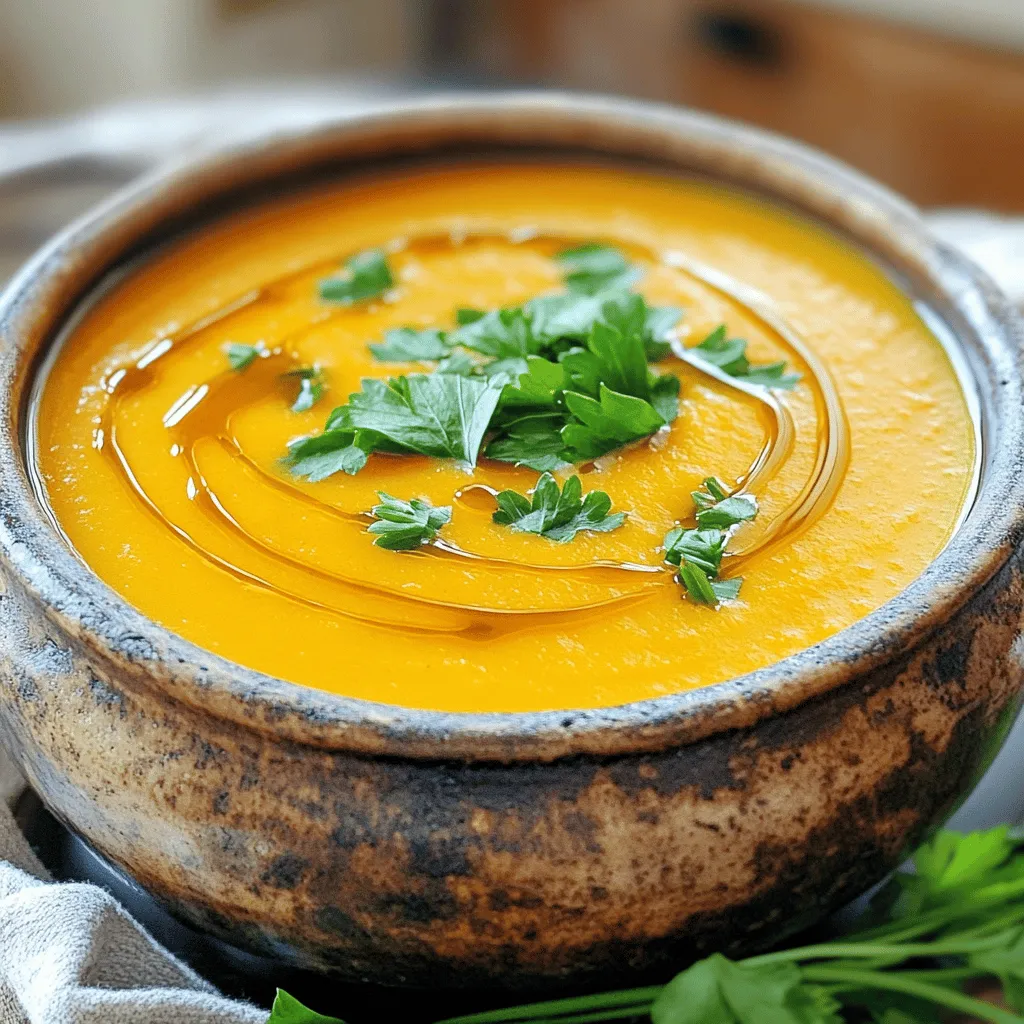
Cozy up with a bowl of Maple Glazed Carrot Soup, the ultimate comfort meal! This vibrant dish blends sweet maple

- 1 cup quinoa, rinsed - 2 cups vegetable broth or water - 1 medium zucchini, diced - 1 red bell pepper, diced - 1 cup cherry tomatoes, halved - 1 cup broccoli florets - 2 carrots, sliced - 3 tablespoons olive oil - 2 teaspoons smoked paprika - 1 teaspoon garlic powder - Salt and pepper to taste - Fresh parsley or cilantro for garnish - 1 avocado, sliced (optional) - 1 lemon, juiced (for serving) This roasted vegetable quinoa bowl shines with flavor and color. Quinoa is a great base. It holds all the goodness of the veggies. I love using fresh, seasonal produce. It makes a big difference in taste. For this bowl, I rinse the quinoa first. Rinsing helps remove a bitter coating called saponin. Next, I prepare my vegetables. I dice zucchini and red bell pepper. I also halve cherry tomatoes. Broccoli florets and sliced carrots add crunch and color. I drizzle the veggies with olive oil. Then, I sprinkle smoked paprika and garlic powder. These add depth and warmth to the dish. Salt and pepper enhance the flavors too. Fresh herbs like parsley or cilantro provide a bright finish. An avocado slice on top is a creamy option. Lastly, a squeeze of lemon juice brightens the whole dish. For the full recipe, check out the steps that follow. Each ingredient plays a role in making this bowl a tasty, healthy meal. - Preheat your oven to 400°F (200°C). Line a baking sheet with parchment paper. - In a large mixing bowl, combine the zucchini, red bell pepper, cherry tomatoes, broccoli, and carrots. This mix creates a vibrant and colorful dish. - Drizzle the vegetables with olive oil. Season with smoked paprika, garlic powder, salt, and pepper. Toss to coat them well. - Spread the vegetables in a single layer on the baking sheet. Roast them for about 25-30 minutes. Stir halfway through for even cooking. They should be tender and lightly browned when done. - While the veggies roast, bring vegetable broth to a boil in a medium saucepan. - Add the rinsed quinoa. Reduce the heat to low, cover, and simmer for about 15 minutes. The liquid should absorb fully. Let it sit, covered, for 5 minutes. Fluff the quinoa with a fork. - Once the veggies are ready, mix them with the cooked quinoa in a large bowl. Toss gently to combine. Adjust seasoning if needed. - Divide the quinoa and roasted vegetable mix into bowls. Top with avocado slices, fresh parsley or cilantro, and a squeeze of lemon juice. Enjoy the fresh flavors and colors. For the full recipe, check out the details above! Cut your vegetables evenly. This helps them cook at the same rate. If they are uneven, some will burn while others stay raw. Aim for pieces that are about the same size. This will ensure all parts get that nice, roasted flavor. To get optimal browning, use a hot oven. Preheat to 400°F. This heat will help your veggies caramelize. Place them in a single layer on the baking sheet. If they overlap, they will steam instead of roast. Stir halfway through cooking to promote even browning. You can add more flavor with spices and herbs. Try adding thyme or rosemary for a fresh taste. You might also like cumin or curry powder for a warm touch. Don't be afraid to experiment! Different oils can change the flavor too. Olive oil gives a fruity taste. Avocado oil has a light flavor that lets the veggies shine. Use what you like best to match your mood. Serve your Roasted Vegetable Quinoa Bowl in colorful bowls. This makes it look more appealing. Try garnishing with fresh herbs like parsley or cilantro. A sprinkle of these on top adds color and freshness. For a fun twist, use a wedge of lemon on the side. This not only looks nice but adds brightness. Place the bowl on a wooden board for a rustic touch. You can even add a few edible flowers for extra flair. For the full recipe, check out the details above. {{image_2}} You can boost your Roasted Vegetable Quinoa Bowl with protein. Adding beans is an easy choice. Black beans or chickpeas give a tasty texture. Tofu is another great option. Just cube it, season, and roast with the veggies. If you prefer meat, grilled chicken works well too. You can also try other protein-rich grains. Quinoa is not the only one! Bulgur or farro can add more flavor and nutrients. Using fresh, seasonal vegetables makes this bowl even better. In spring, asparagus and peas are great picks. Summer vegetables like corn and squash add sweetness. In fall, consider sweet potatoes and brussels sprouts. Winter brings root vegetables like beets and parsnips. Adjusting your recipe with these choices keeps it fresh and exciting. Feel free to swap in your favorites for a personal touch. This dish fits many diets. To keep it vegan, just avoid adding chicken or cheese. For a gluten-free option, quinoa is already a safe grain. Always check labels on ingredients like vegetable broth and spices. If you have allergies, you can use other oils or replace garlic powder. Make this bowl work for your needs without losing flavor. To keep your roasted vegetable quinoa bowl fresh, store it in the fridge. Use an airtight container to keep moisture in and bacteria out. When you reheat, use a microwave or stove. Add a splash of water to keep it moist. Heat until warm, stirring halfway. When storing, you can keep the quinoa and roasted vegetables together. However, for the best taste, keep the ingredients separate. This way, you can enjoy fresher flavors when you are ready to eat. You can freeze cooked quinoa and roasted vegetables easily. First, let them cool to room temperature. Then, place them in freezer bags or containers. Remove as much air as possible before sealing. Label the bags with the date. To thaw, move the containers to the fridge overnight. For quick thawing, you can use the microwave. When you reheat, make sure to heat them gently. This will help keep their texture nice. In the fridge, your roasted vegetable quinoa bowl lasts about 3 to 5 days. If you freeze it, it can last for 2 to 3 months. Just remember, the sooner you eat it, the better it will taste! Yes, you can prepare this dish in advance. Make the quinoa and roast the veggies. Store them in containers in the fridge. Keep the quinoa and vegetables separate to maintain texture. When you're ready to eat, just combine and warm them up. This makes meal prep easy and quick! You can serve this bowl with many tasty sides. Here are some ideas: - A simple green salad - Grilled chicken or tofu - A dollop of hummus - Fresh bread or pita These sides add variety and make your meal even more filling. You can easily change this recipe to fit your taste. Here are some tips: - Swap in your favorite vegetables such as sweet potatoes or asparagus. - Try different spices like cumin or chili powder. - Add protein like black beans or chickpeas. This lets you enjoy a new flavor each time you make it! Yes, quinoa is a complete protein. This means it has all nine essential amino acids. It’s great for a plant-based diet. Quinoa also has fiber, vitamins, and minerals. It fills you up and keeps you healthy. Enjoy it often as part of your meals! For the full recipe, check out the complete details above! This article covered how to make a tasty roasted vegetable quinoa bowl. We reviewed the ingredients you'll need and the easy steps to follow. You learned tips to enhance flavors and got ideas for different variations. Proper storage methods help you keep leftovers fresh. In conclusion, this dish is simple, nutritious, and adaptable. Enjoy it your way, and let the flavors shine. Your meal can be both healthy and delicious!

108. Roasted Vegetable Quinoa Bowl Flavorful and Simple

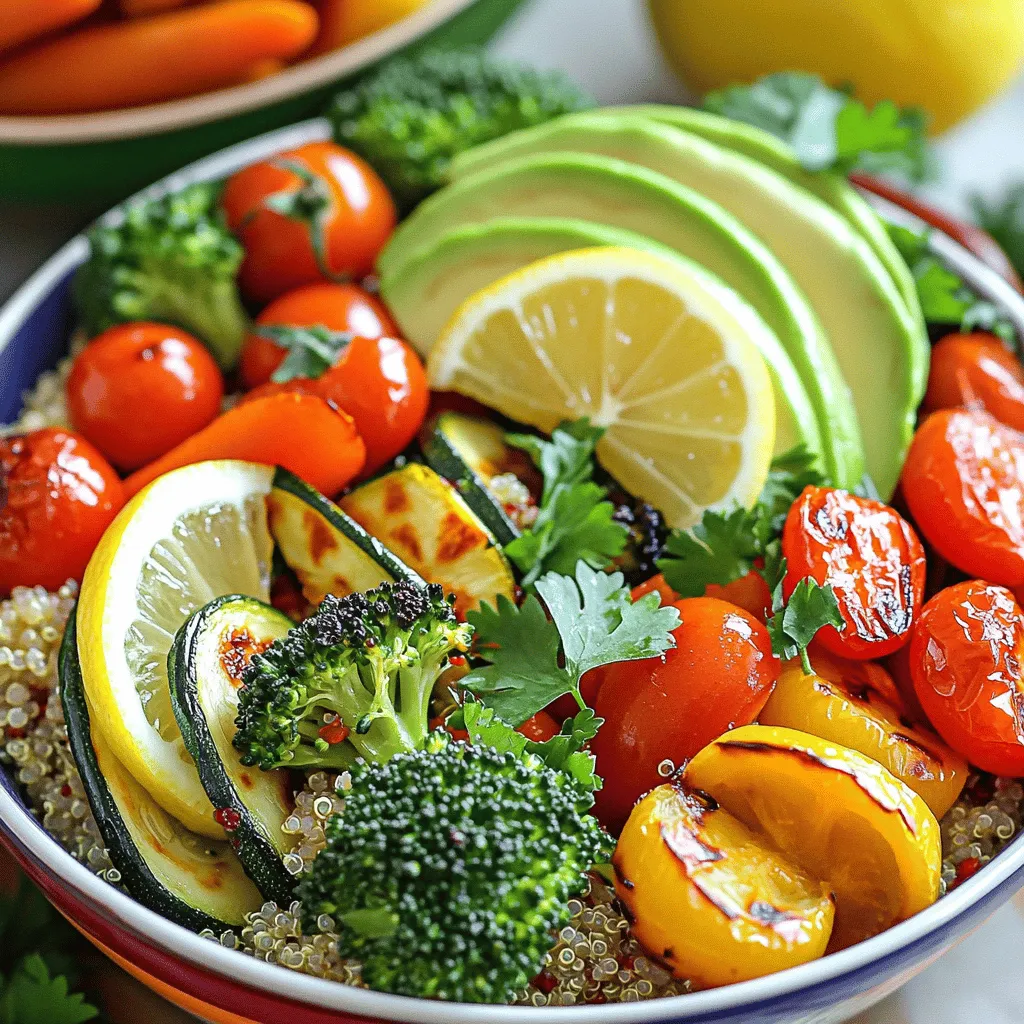
Are you ready to enjoy a colorful, nutritious dish that’s packed with flavor? My Roasted Vegetable Quinoa Bowl is not

- 2 ripe avocados - 1 can (15 oz) white beans (cannellini or navy), drained and rinsed - 2 tablespoons tahini - 2 tablespoons lemon juice - 1 garlic clove, minced - 1/4 teaspoon ground cumin - Salt and pepper to taste - 2 tablespoons fresh cilantro, chopped (for garnish) - Olive oil (for drizzling) Selecting ripe avocados When choosing avocados, look for ones that yield slightly when you press them. They should feel soft but not mushy. Dark green skin often means they are ripe. Choosing high-quality tahini For tahini, pick one that is smooth and creamy. Check for natural ingredients, like just sesame seeds. It should not have added oils or preservatives. This dip combines creamy avocados and white beans for a smooth texture. You can enjoy it with veggies or chips. For the full recipe, check out the instructions in the sections below! - Cut the avocados in half. - Remove the pit and scoop the flesh into a bowl. - Rinse the white beans under cold water. - Drain them well to avoid extra moisture. - Use a food processor for a smooth, creamy dip. - Add the avocados and white beans to the processor. - Include tahini, lemon juice, minced garlic, and cumin. - Blend until everything is mixed well. - If the dip is thick, add a tablespoon of water. - Blend again until you reach your desired creaminess. - Transfer the dip to a serving bowl. - Smooth the top with a spatula for a nice finish. - Drizzle some olive oil over the dip. - Garnish with fresh cilantro for color. - Serve with carrot sticks, cucumber slices, and pita chips. - This dip pairs well with crunchy veggies for a fun snack. For the full recipe, you can refer back to the ingredients and steps mentioned above. To boost the taste, you can add spices or fresh herbs. A pinch of smoked paprika or cayenne pepper adds a nice kick. Fresh herbs like basil or parsley can brighten the dip. Adjusting the garlic can change the flavor too. If you love garlic, add more. If you prefer a milder dip, use less. For a smooth texture, blending is key. Use a food processor for the best results. If you don’t have one, a hand blender works too. If your dip turns out too thick, add a bit of water. Blend until it reaches the creaminess you want. If it’s chunky, blend longer. For a fun presentation, serve the dip in a colorful bowl. Drizzle olive oil on top for a shiny look. You can garnish with fresh cilantro for a pop of green. Serve it with colorful veggies like carrots, cucumbers, and bell peppers. Pita chips add a nice crunch. If you have leftovers, store them in an airtight container. Keep it in the fridge for up to three days. You can also use leftover dip in a sandwich or wrap. This way, nothing goes to waste! For the full recipe, check out the recipe section! {{image_2}} You can make this dip even more fun! Try a spicy avocado and white bean dip. Add chopped jalapeños or a dash of cayenne pepper. This will give your dip a nice kick. If you want to add more color and flavor, mix in roasted vegetables. Roasted red peppers or zucchini work well. These add a sweet touch and make the dip even creamier. Want to make the dip vegan-friendly? It already is! All the ingredients are plant-based. You can enjoy it without any worries. If you need gluten-free options, serve it with fresh veggies or gluten-free chips. This way, everyone can enjoy the dip, no matter their diet. If you have a big party, you can easily scale the recipe. Just double or triple the ingredients. This means more dip for everyone! For smaller gatherings, make individual servings. Use small cups or jars for fun packaging. People love having their own little dips to enjoy! To keep your creamy avocado and white bean dip fresh, store it in an airtight container. This prevents air from getting in and causing browning. You can also press plastic wrap directly onto the dip's surface before sealing the container. If you want to save some for later, freezing is a great option. Use a freezer-safe container, leaving some space for expansion as it freezes. In the fridge, this dip lasts about 3 to 5 days. Always keep an eye out for signs of spoilage. If you see brown spots or notice a sour smell, it’s time to toss it. Fresh ingredients like avocado can spoil quickly, so enjoy it while it’s fresh! If your dip thickens after storage, just blend in a bit of water or lemon juice to refresh it. You can also use leftovers in other meals. Try spreading it on sandwiches or mixing it into salads for a creamy twist. It’s a tasty way to add flavor without wasting any food! For the full recipe, check back on how to make this delicious dip. - Can I use other beans instead of white beans? Yes, you can use other beans. Black beans or chickpeas work well too. They add different flavors and textures. Just remember to drain and rinse them, just like the white beans. - What can I substitute for tahini? If you need a tahini substitute, try peanut butter or sunflower seed butter. Both options give a nice creaminess. You can also use Greek yogurt for a tangy twist. - How do I make the dip spicier? To add heat, mix in diced jalapeños or a pinch of cayenne pepper. Start with a small amount. You can always add more if you want more spice. - Is this dip suitable for meal prep? Yes, this dip is great for meal prep. Store it in an airtight container in the fridge. It stays fresh for about three days. Just stir it well before serving. - What are the best foods to serve with this dip? Pair this dip with fresh veggies like carrot sticks, cucumber slices, and bell pepper strips. Pita chips add a nice crunch too. You can even spread it on toast for a tasty snack. - Can this dip be served warm? This dip tastes best cold, but you can warm it slightly if you prefer. Just be careful not to overheat it. Enjoy it as a warm spread on sandwiches or wraps. For the full recipe, check out the details above! This blog post covered making a creamy avocado and white bean dip. We went through ingredients, step-by-step instructions, and storage tips. I shared ways to enhance flavor and variations for different diets. This dip is easy to make, delicious, and versatile. You can enjoy it as a snack or a party dish. Experimenting with ingredients will make it even more fun. Try it out and enjoy your creation!

Creamy Avocado and White Bean Dip Delight

Are you ready to dip into a creamy, delicious treat? My Creamy Avocado and White Bean Dip Delight is sure

- 1 lb ground beef - 1/2 cup breadcrumbs - 1/4 cup finely chopped onion - 1 cup sweet and sour sauce - 2 tablespoons soy sauce - 1 tablespoon cornstarch (for thickening) - 2 tablespoons vegetable oil This list makes sweet and sour meatballs a fun dish. You start with ground beef, which adds flavor and protein. Breadcrumbs help give the meatballs a nice texture. The chopped onion adds sweetness and depth to the flavor. For the sauce, sweet and sour sauce shines. It balances taste with a mix of sweetness and tang. Soy sauce adds umami, enhancing the overall flavor. If you want a thicker sauce, you can use cornstarch. It makes the sauce cling better to the meatballs. Vegetable oil is needed for cooking the meatballs. It helps brown them evenly, creating a delicious crust. You can find the Full Recipe to guide you step by step. Enjoy crafting this delightful dish! 1. Mixing the meatball ingredients: In a large bowl, combine the ground beef, breadcrumbs, finely chopped onion, grated Parmesan cheese, egg, salt, and pepper. Use your hands to mix until everything is well blended. This step is important for flavor and texture. 2. Forming meatballs: Next, take small portions of the mixture and roll them into balls about 1 inch in diameter. Make sure they are evenly sized for even cooking. Place them on a plate as you form them. 1. Browning in the skillet: Heat vegetable oil in a large skillet over medium heat. Carefully add the meatballs in batches. Cook them for about 3-4 minutes on each side until they turn a nice brown color. This step adds flavor and keeps them juicy. 2. Removing and setting aside: Once browned, remove the meatballs from the skillet. Set them aside on a plate. Be gentle to avoid breaking them apart. 1. Sautéing bell pepper and pineapple: In the same skillet, add the chopped bell pepper and pineapple chunks. Sauté for 3-4 minutes until the vegetables are tender. This adds a sweet crunch to your dish. 2. Adding sauce and meatballs to skillet: Pour the sweet and sour sauce and soy sauce into the skillet. Stir to mix well. If you want a thicker sauce, dissolve cornstarch in a tablespoon of water and add it. Finally, return the meatballs to the skillet. Gently mix everything and let it simmer on low heat for 10 minutes. The flavors will meld beautifully. For the complete guide, refer to the Full Recipe. To get perfect sweet and sour meatballs, even browning is key. Start by heating your skillet on medium. If you crowd the pan, the meatballs will steam instead of brown. Cook them in batches. This way, they get that nice golden crust. Adjusting seasoning is also important. After cooking the meatballs, taste the sauce. If it needs more flavor, add a pinch of salt or a dash of soy sauce. Small changes make a big difference! When serving sweet and sour meatballs, rice or noodles are great bases. The sauce pairs well with both. Place a scoop of rice on each plate, then add a generous helping of meatballs on top. For a pop of color, use garnishes. Chopped green onions or sesame seeds add beauty and flavor. You can also sprinkle some fresh herbs for an extra touch. If you want to change the meat, use ground turkey or chicken. Both options are leaner but still tasty. They cook well with the sweet and sour sauce. For sauce variations, you can make your own sweet and sour sauce at home. Mix vinegar, sugar, and ketchup for a quick recipe. This allows you to control the sweetness and tanginess. You can also try adding different fruits like mango or peach for a unique twist. For the full recipe, check out Sweet & Sour Meatballs . {{image_2}} You can use turkey or chicken instead of beef for meatballs. These options make the dish leaner and lighter. They still taste great with sweet and sour sauce. If you prefer plant-based meals, try using plant-based meat alternatives. These options are tasty and can fit into many diets. You can choose between homemade or store-bought sauces. Homemade sauce often tastes fresher and allows for more control over flavors. If you want to adjust the sauce, you can change the sweetness or tanginess. Add more sugar for sweetness or vinegar for tang. This way, you can tailor the dish to your taste. Adding vegetables is a fun way to enhance the dish. Carrots or snap peas add color and crunch. You can also mix in different flavor profiles by using spices like ginger or garlic. Experimenting with these ingredients can create a unique twist on the classic recipe. For the full recipe, check out the [Full Recipe]. To keep your sweet and sour meatballs fresh, refrigeration is key. Place your leftovers in an airtight container. This helps keep them moist and tasty. For best results, eat them within three to four days. After that, they might lose flavor and texture. Freezing cooked meatballs is simple and great for meal prep. First, let the meatballs cool completely. Then, place them in a single layer on a baking sheet. Freeze for about one hour. Once frozen, transfer them to a freezer-safe bag or container. This way, you can grab what you need later. To thaw, move them to the fridge overnight. For reheating, place them in a skillet over low heat or microwave them until warm. Making sweet and sour meatballs ahead saves time on busy days. You can prepare the meatballs and sauce in advance. Store each in separate containers. This keeps the meatballs from getting soggy. When ready to serve, heat them up and combine. For portioning, consider using a muffin tin. This helps you make even servings. Each meatball is a perfect bite-sized treat! Check the Full Recipe for more details. It takes about 30 minutes to cook sweet and sour meatballs. You spend 15 minutes prepping and 15 minutes cooking. The meatballs brown in just 3-4 minutes per side. Let them simmer in the sauce for 10 minutes. This gives them time to soak up the flavors. Yes, you can make sweet and sour meatballs ahead of time. Prepare the meatballs and cook them. Allow them to cool and store in the fridge for up to three days. You can also freeze them for up to three months. When ready to serve, simply reheat in the sauce on the stove. Sweet and sour meatballs pair well with many sides. Here are a few ideas: - Steamed rice - Egg noodles - Quinoa - Stir-fried vegetables - A fresh salad These sides balance the sweet flavor of the meatballs. To thicken sweet and sour sauce, you can use cornstarch. Mix one tablespoon of cornstarch with a tablespoon of water. Add this mixture to the sauce while cooking. Stir well and let it simmer for a few minutes. This will give your sauce a nice thickness. You can also reduce the sauce by simmering it longer. In this blog post, we explored making sweet and sour meatballs. We covered key ingredients like ground beef, breadcrumbs, and a tasty sauce blend. I shared step-by-step cooking instructions and helpful tips for a great meal. You also learned about different meat options, sauce variations, and storage tips. With this guide, you can easily create a delicious dish. Experiment with flavors and share them with friends or family. Enjoy every bite of your homemade sweet and sour meatballs!

106. Sweet and Sour Meatballs Flavorful Dinner Option

Looking for a dinner that combines sweet and savory in every bite? You’ve found it with these Sweet and Sour

Older posts
Newer posts
← Previous Page1 … Page30 Page31 Page32 … Page63 Next →

dsad

© 2025 Recipes Pursuit • Built with GeneratePress

Our Policies

  • Copyright Policy
  • Cookie Policy
  • GDPR Policy
  • Privacy Policy
  • Disclaimer
  • Terms Of Use

More Information

  • Home
  • About
  • Contact
  • Appetizers
  • Dessert
  • Dinner
  • Drinks
©2025, Recipes Pursuit About Back To Top