Skip to content
DisclaimerTerms Of UseGDPR PolicyCookie Policy

Recipes Pursuit

  • Home
  • Drinks
  • Appetizers
  • Dinner
  • Dessert
  • About
  • Contact
  • Privacy Policy
DisclaimerTerms Of UseGDPR PolicyCookie Policy

Emma Smith

- 1 cup blueberries - 1 cup strawberries, hulled and sliced - 1 cup pineapple, diced - 1 cup kiwi, peeled and sliced - 1 cup orange segments - 3 tablespoons honey - 2 tablespoons fresh lime juice - Zest of 1 lime - Fresh mint leaves for garnish (optional) This salad shines because of its bright, fresh fruits. Each fruit adds its own flavor and texture. Blueberries burst with sweetness. Strawberries bring a slight tartness. Pineapple offers a tropical twist, while kiwi adds a fun, tangy bite. Orange segments add juiciness and zest. To make this dish, you need simple ingredients. You can find them easily at local markets or grocery stores. Fresh, ripe fruits work best, bringing out their natural sweetness. Honey and lime juice blend smoothly, making a delightful dressing. The lime zest adds an extra kick, enhancing the taste. If you like mint, use it as a garnish. It gives a fresh aroma and looks pretty. This fruit salad is easy to make and perfect for any meal. You can serve it at brunch, a picnic, or as a dessert. The bright colors and flavors will impress your guests. For the full recipe, follow the steps ahead! Start with the fruit prep. First, rinse the blueberries under cold water. This removes dirt and keeps them fresh. Next, hull and slice the strawberries. Cut off the green tops, then slice them into thin pieces. Dice the pineapple into small cubes. For the kiwi, peel the skin and slice it into rounds. Finally, segment the oranges by cutting away the peel and pith, leaving the juicy fruit. This gives a bright pop of color to your salad. In a small bowl, it's time to make the dressing. Whisk together three tablespoons of honey, two tablespoons of fresh lime juice, and the zest of one lime. Mix until the honey dissolves completely. This honey-lime dressing adds sweetness and tang to the fruit. Now, let’s combine everything. Toss all the prepared fruits in a large bowl. Drizzle the honey-lime mixture over the fruit. Gently toss everything together, making sure every piece of fruit gets some dressing. This step is key for flavor. Allow the salad to sit for about 10-15 minutes. This lets the flavors meld together, making each bite burst with taste. Enjoy your refreshing and simple delight! For the full recipe, check [Full Recipe]. - Use ripe fruits for optimal flavor: Ripe fruits taste better and add natural sweetness. Check the color and feel of each fruit. A soft touch means it’s ready to eat. - Adjust honey based on sweetness preference: If you like your fruit salad sweeter, add more honey. If you prefer less sugar, use less honey. This lets you control the taste. - Pre-cut fruits ahead of time: Save time by cutting your fruits the night before. Store them in the fridge for easy assembly. This makes preparing the salad a breeze. - Use a serrated knife for strawberries: A serrated knife makes cutting strawberries easy. It prevents squishing and keeps your fruit looking nice. This simple trick helps you get clean cuts with less mess. For the full recipe, check out the detailed steps to create this delicious dish! {{image_2}} You can easily change the honey lime fruit salad to fit your taste. Here are some fun ideas: - Adding other seasonal fruits: Try using peaches, cherries, or watermelon! These fruits bring their own sweet flavors. You can mix and match based on what you have. The salad will still taste great with your choices. - Incorporating nuts for crunch: Adding nuts can give your salad a nice texture. Almonds, walnuts, or pecans work well. Chop them up and sprinkle them on top before serving. This adds a tasty crunch to each bite. You can also turn this fruit salad into a full meal. Here are some easy additions: - Adding yogurt for creaminess: A dollop of yogurt can make your salad creamy. Use Greek yogurt for extra protein. Just mix it in or serve it on the side for a nice touch. - Pairing with granola for a breakfast option: Granola adds a crunchy bite and helps fill you up. Just sprinkle some on top. This makes a great breakfast or snack that is both tasty and healthy. Feel free to explore these variations to find your perfect blend. You can always refer to the Full Recipe for guidance on the base salad. To keep your Honey Lime Fruit Salad fresh, you should store leftovers in an airtight container. This helps prevent moisture loss and keeps the flavors intact. Always keep it refrigerated to maintain its taste and texture. If you have extra mint leaves, add them just before serving to keep them fresh. For the best taste, consume your fruit salad within 2-3 days. After this time, the fruits may lose their crispness and flavor. You want to enjoy the salad at its peak freshness, so make sure to eat it within this window. If you notice any changes in color or texture, it's best to toss it out. Yes, you can use many fruits in this salad. Try mango, grapes, or peaches. Each fruit adds its own flavor. You can mix and match based on what you like. Seasonal fruits taste best. Feel free to get creative! To keep fruits fresh, use lemon juice. A little lemon juice on cut fruit helps slow browning. Store fruits in airtight containers to keep them fresh. Keeping them cool also helps. Remember to add the dressing right before serving. Yes, you can make this salad ahead of time. Prepare the fruits and dressing separately. Mix them just before you eat. This keeps the salad fresh and crisp. It’s great for lunch or a snack later. For the full recipe, check out the link above! This blog post shares how to make a delicious fruit salad. We covered the best ingredients, from berries to citrus. You learned how to prepare each fruit and mix in a tasty dressing. We also explored tips for easy prep and ways to customize your salad. Don’t forget to store leftovers properly for the best taste. Whether adding yogurt or nuts, feel free to make it your own. Dive in and enjoy this fresh, healthy treat!

81 Honey Lime Fruit Salad Refreshing and Simple Delight

Welcome to a delightful taste adventure with my Honey Lime Fruit Salad! This refreshing dish brings together a colorful mix

- 1 can (15 oz) chickpeas, drained and rinsed - 1 tablespoon coconut oil - 1 medium onion, chopped - 2 cloves garlic, minced - 1 tablespoon ginger, grated - 1 red bell pepper, chopped - 1 teaspoon ground cumin - 1 teaspoon coriander powder - 1/2 teaspoon turmeric powder - 1 teaspoon garam masala - 1 can (14 oz) coconut milk - 1 cup vegetable broth - 1 cup spinach, fresh or frozen - Salt and pepper to taste - Fresh cilantro, for garnish - Cooked rice or quinoa, for serving To get the best flavors, choose fresh ingredients. Look for firm, vibrant bell peppers and onions. Good garlic should be dry and firm. When you pick the coconut milk, choose the one with a high coconut content for creaminess. This coconut chickpea curry is both vegan and gluten-free. It's a great choice for many diets. Chickpeas offer protein and fiber. Coconut milk gives healthy fats and a creamy texture. Spinach adds vitamins and minerals, making this dish rich in nutrients. Enjoy a bowl of comfort while knowing you are eating well! Making coconut chickpea curry is simple and quick. First, sauté the onions, garlic, and ginger. Add spices and veggies next. Then, mix in coconut milk and chickpeas. Finally, let it simmer until thick. 1. Heat coconut oil in a large pot over medium heat. 2. Add chopped onion and sauté for about 5 minutes until it turns translucent. 3. Stir in minced garlic and grated ginger, cooking for another minute until fragrant. 4. Add red bell pepper and sauté for 3-4 minutes until slightly softened. 5. Sprinkle in ground cumin, coriander, turmeric, and garam masala. Stir to coat the veggies and cook for 1 minute. 6. Pour in coconut milk and vegetable broth. Stir to combine well. 7. Add drained chickpeas to the pot, then bring the mixture to a gentle simmer. 8. Allow the curry to simmer for 15-20 minutes, stirring occasionally until slightly thickened. 9. If using fresh spinach, stir it in during the last 5 minutes of cooking. If using frozen, add it towards the end to heat through. 10. Season with salt and pepper to taste. The prep time for this dish is about 10 minutes. The total cooking time is around 25 minutes. This recipe serves four people. For a complete meal, serve the curry over cooked rice or quinoa, and garnish with fresh cilantro. A wedge of lime adds a bright touch! For the full recipe, check the ingredients listed above. To enhance the flavors in your coconut chickpea curry, always start with fresh spices. Fresh spices boost taste more than old ones. When measuring spices, level off the spoon for accuracy. Adjusting spice levels is easy. If you like it mild, use less cumin and garam masala. For more heat, add crushed red pepper or fresh chili. Taste as you go, and add spices slowly. For this recipe, a large pot works best. A thick-bottomed pot helps heat evenly and prevents burning. A wooden spoon is ideal for stirring. It won’t scratch your pot and gives you better control. Using a sharp knife makes chopping easier. A cutting board with grips helps keep it stable. These tools make cooking safe and fun. You can find the full recipe at the end of this article to guide you through the cooking process. Enjoy your culinary adventure! {{image_2}} You can swap out ingredients based on what you have. If you don’t have coconut oil, use olive oil or vegetable oil. Instead of chickpeas, you can try lentils or black beans. For a heartier dish, add diced sweet potatoes or carrots. These will add more texture and flavor. If you want a healthier version, use less coconut milk. You can replace it with low-fat coconut milk or even almond milk. You can also add more veggies, like zucchini or kale, to boost nutrition. These changes keep the dish tasty and satisfying. To give your coconut chickpea curry a twist, try adding spices like cardamom or chili powder. These will enhance the flavor and add warmth. You might also consider adding protein. Tofu or chicken can make the meal more filling. If you want to change the base recipe, try adding a splash of lime juice for brightness. Fresh herbs like basil or mint can also elevate the dish. You can experiment with different ingredients to create your unique version of this curry. For the full recipe, check out the details above. To keep your coconut chickpea curry fresh, store it in an airtight container. Allow it to cool completely before sealing. This will help avoid moisture buildup. In the refrigerator, it lasts well for about 4 to 5 days. If you want to keep it longer, freeze it. It stays good in the freezer for about 3 months. Just remember to label your container with the date. When you're ready to enjoy your leftover curry, use gentle heat to rewarm it. The best methods are on the stove or in the microwave. If using the stove, heat it in a pot over low heat. Stir often to prevent sticking. If you're using a microwave, heat in short bursts. This helps keep the texture smooth. To maintain its flavor, add a splash of vegetable broth or coconut milk as you reheat. This will keep it creamy and delicious. Enjoy your comforting meal again! For the full recipe, make sure to check back. What can I serve with coconut chickpea curry? You can serve coconut chickpea curry with cooked rice or quinoa. Both soak up the sauce well. You can also add naan bread for dipping. A side salad or steamed veggies works nicely too. Can I make this curry in advance? Yes, you can make this curry ahead of time. It tastes even better the next day! Just store it in the fridge. Reheat it on low heat before serving. Can I use dried chickpeas instead of canned? Yes, you can use dried chickpeas. Just soak and cook them before adding to the curry. This takes extra time but gives great texture. What type of coconut milk is best for this recipe? Full-fat coconut milk gives the best flavor and creaminess. Light coconut milk works too, but it may be less rich. How spicy is this coconut chickpea curry? This curry is mild in spice. You can adjust the heat by adding more spices or fresh chilies. Is this recipe nut-free? Yes, this recipe is nut-free. It uses coconut, which is a fruit, not a nut. Enjoy it without worry! For more details, you can check the Full Recipe. In this blog post, we covered the essential ingredients for coconut chickpea curry, including selection tips for freshness. We discussed dietary considerations, cooking instructions, and the best practices for perfecting flavors. I shared variations and storage info to help you adapt the recipe. As you explore this dish, remember it’s all about personalizing the flavors and enjoying the cooking process. With a few tweaks, you can make this curry your own. Happy cooking!

80. Coconut Chickpea Curry Flavorful Comfort Food

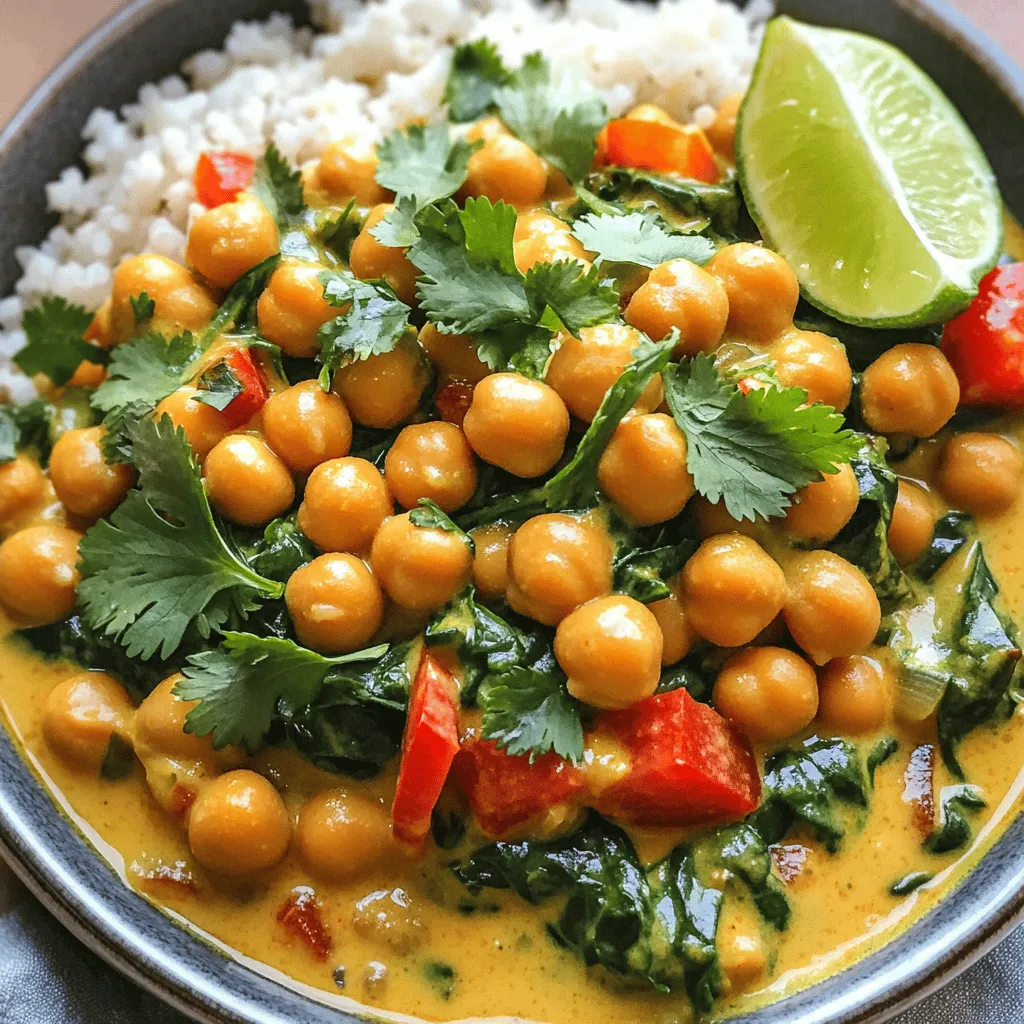
Welcome to the world of Coconut Chickpea Curry, a dish that brings comfort and joy! This vegan, gluten-free meal is

- 12 oz pasta (your choice, such as fettuccine or penne) - 2 tablespoons olive oil - 3 cloves garlic, minced - 6 cups fresh spinach, roughly chopped - Salt and pepper to taste - 1 cup ricotta cheese - ½ cup grated Parmesan cheese - ½ teaspoon nutmeg - ½ cup heavy cream (or a plant-based substitute for a lighter version) - Zest of 1 lemon - Fresh basil leaves, for garnish The ingredients in this creamy spinach and ricotta pasta make it a delight. I love using fresh spinach for its bright color and taste. The ricotta cheese adds creaminess and body to the sauce. You can choose any pasta you like, but I find fettuccine works well. When you prepare this dish, the garlic brings a warm aroma to the kitchen. I always chop it finely to release its full flavor. The nutmeg gives a unique depth to the creamy sauce. It may seem small, but it makes a big difference. Don't forget the lemon zest! It adds a fresh kick that balances the creaminess. For a touch of elegance, I like to garnish with fresh basil. The herbs not only look pretty but also add a burst of flavor. You can find the full recipe linked above. Make sure to gather all these ingredients before you start cooking. It makes the process smoother and more enjoyable. - Bring salted water to a boil. - Add pasta and cook until al dente. - Reserve one cup of pasta water, then drain the pasta. Cooking pasta is easy. You want it firm yet tender. Remember to salt your water; this adds flavor. Once it’s done, save some water. It helps later with the sauce. - Heat olive oil in a skillet. - Sauté minced garlic until fragrant. Next, heat olive oil in a large skillet. Add the minced garlic and sauté for about one minute. You want it fragrant but not burnt. The aroma fills your kitchen with warmth. - Add spinach and cook until wilted. - Mix in ricotta, Parmesan, nutmeg, and cream. Now, add the chopped spinach to the skillet. Cook for about three to four minutes. It should wilt nicely. After that, lower the heat and add ricotta, Parmesan, nutmeg, and cream. Stir until smooth. If the sauce feels thick, add some reserved pasta water. - Toss cooked pasta in the creamy mixture. - Add reserved pasta water as needed. - Stir in lemon zest for flavor. Add the drained pasta to your creamy mixture. Toss it gently to coat the pasta. This step is key for flavor. Finally, stir in the lemon zest for a bright touch. - Plate the creamy spinach pasta. - Garnish with fresh basil and more Parmesan if desired. When serving, use a nice plate. Garnish with fresh basil and extra Parmesan, if you like. This adds color and taste. Enjoy your creamy spinach and ricotta pasta! For the full recipe, check out the details above. For creamy sauces, certain pasta types work best. I suggest using: - Fettuccine - Penne - Farfalle These shapes hold sauce well. If you seek gluten-free options, try: - Gluten-free penne - Rice pasta - Quinoa pasta These alternatives offer great texture. To boost the taste of your creamy spinach and ricotta pasta, add fresh herbs. Consider: - Basil - Oregano - Thyme These herbs brighten the dish. For a twist, try different cheeses like: - Mozzarella - Goat cheese - Cream cheese Each cheese brings a unique flavor. You can adjust the creaminess based on your taste. If you want it thicker, add more ricotta or Parmesan. If it’s too thick, simply mix in some reserved pasta water to reach your desired texture. This keeps the dish smooth and easy to enjoy. {{image_2}} You can make creamy spinach and ricotta pasta even better by adding in more flavors. - Incorporating proteins: You can include grilled chicken or sautéed shrimp. Both options add great taste and make the meal heartier. Cook them separately and mix them in at the end. - Adding veggies: Try sun-dried tomatoes for a sweet touch or mushrooms for an earthy flavor. Add them when you cook the spinach. This way, they blend well with the creamy sauce. You can easily adjust this recipe to fit vegetarian or vegan diets. - Making it vegetarian-friendly: The dish is already vegetarian since it uses cheese. Just ensure your pasta is egg-free. - Substituting vegan cheese and cream: Use plant-based ricotta and cream to make it vegan. Nutritional yeast can replace Parmesan for a cheesy flavor without dairy. Using seasonal produce can change the dish's taste and feel. - Adjusting with seasonal produce: In spring, add asparagus or peas. In summer, fresh tomatoes or zucchini work well. In autumn, try butternut squash. Each season brings new flavors to explore. - How to prepare for colder months: In winter, use hearty greens like kale or Swiss chard. These add warmth and richness to your meal, perfect for colder days. For all the details on making this dish, check the Full Recipe. To keep your creamy spinach and ricotta pasta fresh, store it properly. Use an airtight container. This helps prevent air from drying out the pasta. Make sure to cool the dish before sealing it. Leftovers can last in the fridge for up to three days. When it’s time to enjoy your leftovers, reheat them gently. Use a skillet over low heat. Add a splash of water or cream to help restore the creaminess. Stir often to heat evenly. Avoid high heat, as it can dry out the pasta. Can you freeze creamy pasta? Yes, but it’s not always the best choice. Freezing can change the texture of the sauce. If you want to freeze it, keep the pasta and sauce separate. This helps maintain quality. To thaw, place it in the fridge overnight. Reheat gently as mentioned above. The best pasta for creamy sauces includes fettuccine, penne, and rigatoni. These shapes hold sauce well. Fettuccine's flat surface catches the creamy blend nicely. Penne's tubular shape allows sauce to fill each piece. Rigatoni offers a similar benefit with its ridges. Choose any of these for a rich taste in your creamy spinach and ricotta pasta. Yes, you can make this dish ahead. Cook the pasta and sauce separately. Store them in the fridge in airtight containers. Mix them just before serving. This keeps the pasta from getting mushy. Reheat the pasta and sauce in a skillet on low heat. Add a splash of reserved pasta water to bring back creaminess. To lighten up this dish, swap heavy cream for a plant-based alternative. Use almond milk or coconut cream instead. You can also reduce the cheese amount. Try low-fat ricotta for fewer calories. Add more veggies, like zucchini or bell peppers, to boost nutrition without adding lots of calories. You can use frozen spinach in this recipe. Frozen spinach is convenient and saves time. It is often pre-washed and chopped. However, thaw and drain it well first. This prevents excess water in your sauce. Fresh spinach has a brighter taste and texture. Choose based on your preference and what you have on hand. To add protein, try these ideas: - Add cooked chicken or shrimp for a hearty meal. - Mix in white beans or chickpeas for plant-based protein. - Include diced tofu for a vegetarian option. - Top with grilled chicken slices for extra flavor and texture. These options boost your meal while keeping it delicious. This blog post showed you how to make creamy spinach pasta step by step. You learned about key ingredients, from pasta to spices, and how to cook them just right. I shared tips for choosing pasta and adding flavor while keeping it creamy. You can even switch up the dish with proteins or veggies and learn how to store leftovers. Now, get cooking, share your dish with friends, and enjoy every bite!

Creamy Spinach and Ricotta Pasta Easy Delightful Meal

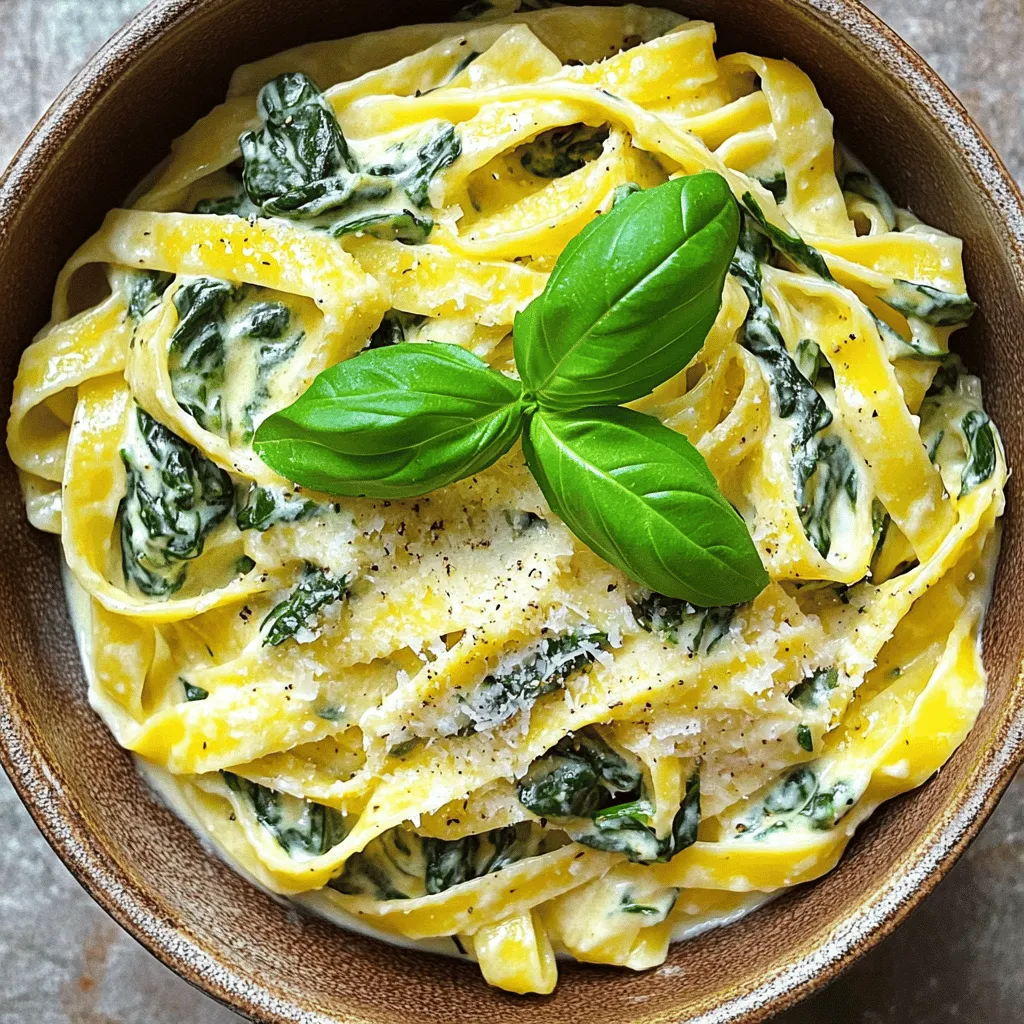
Do you crave a comforting meal that is both easy and delightful? Look no further! This Creamy Spinach and Ricotta

- 1 lb ground beef - 1 cup chopped onion - 2 cloves garlic, minced - 1 tablespoon chili powder - 1 teaspoon cumin - 1 teaspoon salt - 1/2 teaspoon black pepper - 8 large corn tortillas - 2 cups shredded cheese (cheddar and Monterey Jack mix) - 2 cups red enchilada sauce (store-bought or homemade) - Fresh cilantro, for garnish Using quality ingredients is key. Fresh ground beef brings rich flavor. Fresh onions and garlic add depth. Spices like chili powder and cumin give warmth. Corn tortillas should be soft and pliable. Cheese should melt perfectly, making each bite creamy. The enchilada sauce ties it all together. Store-bought is easy, but homemade can be more flavorful. For extra flavor, consider these popular toppings: - Sour cream - Sliced jalapeños - Fresh cilantro Sour cream adds creaminess. Jalapeños bring heat, perfect for spice lovers. Fresh cilantro gives a bright finish. Feel free to mix and match toppings. They can take your beef enchiladas to the next level! First, preheat your oven to 375°F (190°C). This step is key for even baking. Next, clear and clean your cooking space. It helps to have everything ready before you start. When cooking ground beef, use medium heat. Break the meat apart with a spatula. Cook it until it turns brown and crumbly. Drain any extra fat to keep the dish light. Start by adding chopped onion and minced garlic to the skillet. Cook them until the onion turns clear, about five minutes. This adds great flavor to your beef. Next, mix in chili powder, cumin, salt, and black pepper. These spices give your filling a nice kick. Let the mixture simmer for two to three minutes. This lets the flavors blend well together. Now it's time to work with the tortillas. Warm them in a dry pan for about 30 seconds on each side. This makes them soft and easy to roll. Lay a tortilla flat and place about 1/4 cup of the beef mixture in the center. Sprinkle some cheese on top. Roll the tortilla tightly and place it seam-side down in a greased baking dish. Repeat this for all the tortillas. After all your enchiladas are in the dish, pour the red enchilada sauce evenly over the top. Make sure to cover each one. Then, sprinkle the remaining cheese over the sauce. Cover the dish with aluminum foil and bake for 20 minutes. Remove the foil and bake for another 10 to 15 minutes. You want the cheese to be bubbly and slightly golden. Your delicious meal is now ready to enjoy. For the full recipe, check out the instructions above! To get the best flavor in your beef enchiladas, adjust the spice levels to your taste. If you want more heat, add more chili powder or some diced jalapeños to the filling. For a milder dish, reduce the chili powder or use sweet paprika. Making homemade enchilada sauce is a great way to enhance your dish. Start with canned tomatoes, garlic, and spices. Blend them together until smooth. Simmer it on low heat to deepen the flavors. This sauce can add a personal touch to your enchiladas. One common mistake is using soggy tortillas. To avoid this, warm your corn tortillas before filling them. This makes them soft and easy to roll without breaking. You can heat them in a dry pan for about 30 seconds per side. Another mistake is overfilling the tortillas. Use about 1/4 cup of filling per tortilla. If you add too much, they can burst while baking. Keep them snug but not stuffed. This will help your enchiladas hold their shape and bake evenly. {{image_2}} You can switch the ground beef for other proteins. Chicken works great in enchiladas. Simply cook shredded chicken with the same spices. For a meatless option, use beans. Black beans or pinto beans add protein and fiber. Mix cooked beans with spices for an easy filling. These options allow everyone to enjoy this dish. Red sauce gives enchiladas a classic taste. But green sauce is a fun twist. Green sauce is made from tomatillos and can be zesty. If you want a creamier sauce, try adding sour cream. Mix it into your red or green sauce for a richer flavor. This adds a nice texture and taste. Enchiladas pair well with many side dishes. Mexican rice and refried beans are popular choices. A fresh salad with lime dressing adds brightness. For drinks, try serving with a light beer. A margarita also complements the flavors nicely. These pairings enhance your meal and make it special. For the complete cooking experience, check out the Full Recipe. To keep your beef enchiladas fresh, store them in an airtight container. Place a layer of plastic wrap over the top to prevent air from getting in. Beef enchiladas stay fresh in the fridge for about 3 to 4 days. If you want them to last longer, consider freezing them. For the best taste and texture, reheat your enchiladas in the oven. Preheat the oven to 350°F (175°C). Place the enchiladas in a baking dish and cover them with foil. Heat for about 15-20 minutes. This keeps the tortillas soft. If you use the microwave, add a splash of water on top. Cover with a damp paper towel. This helps keep them moist and prevents drying out. Enjoy your tasty leftovers! You can use several alternatives for ground beef. Here are some options: - Ground turkey: A leaner choice that still tastes great. - Ground chicken: Another lean option with a mild flavor. - Black beans: For a vegetarian twist, mash or blend them. - Lentils: Cooked lentils add protein and texture. - Tofu: Crumbled firm tofu can absorb flavors well. Each substitute gives a different taste and texture. Find what you love! Yes, you can freeze beef enchiladas! Here’s how: 1. Prepare enchiladas: Follow the recipe but do not bake. 2. Cool down: Let them cool completely. 3. Wrap: Use plastic wrap or foil to cover tightly. 4. Store: Place in an airtight container or freezer bag. To reheat: - Thaw in the fridge overnight. - Bake at 350°F (175°C) for about 25-30 minutes until hot. To spice up your enchiladas, try these tips: - Add jalapeños: Mix fresh or pickled jalapeños into the filling. - Use hot sauce: Drizzle your favorite hot sauce into the meat mixture. - Choose spicy cheese: Opt for pepper jack cheese instead of mild cheese. - Increase chili powder: Add more chili powder or crushed red pepper. Experiment to find your perfect level of heat! Beef enchiladas are a great dish when you use top-notch ingredients. Make your filling with care, and don’t skip the simmering step. Avoid common mistakes like soggy tortillas to keep your dish delicious. Experiment with proteins and sauces for fun variations. Store leftovers properly, and you can enjoy them later. Remember, cooking should be joyful and creative. Follow these tips, and you’ll make enchiladas your family will love. Enjoy each bite and share the joy with others!

Savory 78. Beef Enchiladas with Red Sauce Recipe

Craving a delicious meal that’s both satisfying and easy to make? Look no further! My Savory 78. Beef Enchiladas with

To make delicious cranberry orange muffins, you need simple ingredients. Here’s what you’ll need: - 2 cups all-purpose flour - 1 cup fresh or frozen cranberries, chopped - 1 teaspoon baking powder - 1/2 teaspoon baking soda - 1/2 teaspoon salt - 1/2 cup unsalted butter, melted - 1 cup granulated sugar - 2 large eggs - 1 teaspoon vanilla extract - Zest of 1 large orange - 3/4 cup freshly squeezed orange juice - 1/2 teaspoon cinnamon (optional) You can switch some ingredients if needed. Here are some ideas: - Use whole wheat flour for a nuttier taste. - Swap cranberries with blueberries or raspberries for a different flavor. - Replace butter with coconut oil for a dairy-free option. - For a lower sugar version, use a sugar substitute like stevia. - If you don’t have fresh orange juice, bottled juice works too. When picking cranberries, focus on quality. Here are some tips: - Look for bright, firm berries. They should be round and smooth. - Avoid any berries with blemishes or soft spots. These may be old or bad. - Check the color. Fresh cranberries should be deep red or vibrant in color. - If buying frozen, ensure they are stored at a cold temperature. This keeps them fresh and tasty. These details help you gather the best ingredients for your cranberry orange muffins. For the complete recipe, check the [Full Recipe]. To start, gather all your ingredients. You will need: - 2 cups all-purpose flour - 1 cup fresh or frozen cranberries, chopped - 1 teaspoon baking powder - 1/2 teaspoon baking soda - 1/2 teaspoon salt - 1/2 cup unsalted butter, melted - 1 cup granulated sugar - 2 large eggs - 1 teaspoon vanilla extract - Zest of 1 large orange - 3/4 cup freshly squeezed orange juice - 1/2 teaspoon cinnamon (optional) Next, preheat your oven to 375°F (190°C). This ensures even cooking. Line a muffin tin with paper liners or grease it lightly with cooking spray. In a medium bowl, mix the flour, baking powder, baking soda, salt, and cinnamon if you choose to use it. Stir until everything blends well. Set this bowl aside. In a large bowl, whisk together the melted butter and sugar until smooth. This mixture should look creamy. Add the eggs one at a time. Make sure to beat well after each addition. Then, stir in the vanilla, orange zest, and orange juice. Mix until it is all combined. Gradually fold the dry ingredients into the wet mixture. Use a spatula and be careful not to overmix. It’s fine if the batter is a little lumpy. Gently fold in the cranberries until they are evenly spread throughout the batter. Now, fill each muffin cup about three-quarters full with the batter. This will give them room to rise. Place the muffin tin in the preheated oven. Bake for 18-22 minutes. To check for doneness, insert a toothpick into the center of a muffin. If it comes out clean, they are done! Once baked, allow the muffins to cool in the pan for about 10 minutes. After that, transfer them to a wire rack to cool completely. To check if your muffins are done, look for a few signs: - The tops should be golden brown. - The muffins should spring back when lightly touched. - A toothpick should come out clean when inserted. These tips can help you avoid undercooked or overcooked muffins. Enjoy your delicious cranberry orange muffins! For more details, check out the Full Recipe. To make your muffins fluffy, use fresh ingredients. Make sure your baking powder and baking soda are active. Mix the wet and dry ingredients gently. Overmixing can lead to dense muffins. The batter should be a bit lumpy. This helps keep them light. A common mistake is not measuring ingredients correctly. Too much flour can make your muffins tough. Not enough liquid can dry them out. Another mistake is opening the oven door too soon. This can cause the muffins to sink. Wait until they bake for at least 15 minutes before checking. Using the right tools makes baking easier. Here are some must-haves: - Muffin tin - Paper liners or cooking spray - Mixing bowls (one large, one medium) - Whisk for blending - Spatula for folding These tools help you mix and bake your cranberry orange muffins perfectly. For the full recipe, check out the detailed steps above. {{image_2}} You can make cranberry orange muffins even better with tasty add-ins. Here are some ideas: - Nuts: Walnuts or pecans add crunch and flavor. - Chocolate chips: Dark chocolate pairs well with the tart cranberries. - Coconut flakes: This gives a sweet tropical twist. Feel free to mix and match these options. Just keep the total amount around one cup. Want to change things up? You can try new flavors for your muffins. Here are some fun ideas: - Lemon-lime: Use lemon juice and zest instead of orange. This gives a bright, fresh taste. - Almond: Add almond extract in place of vanilla. This adds a lovely nutty flavor. - Spices: Try adding nutmeg or cardamom for a warm, cozy taste. These changes can create a brand-new muffin experience. You can easily make these muffins gluten-free or vegan. Here’s how: - Gluten-free: Replace all-purpose flour with a gluten-free blend. Be sure it has xanthan gum for texture. - Vegan: Use plant-based butter and replace eggs with flax eggs. Mix one tablespoon of flaxseed meal with two and a half tablespoons of water. Let it sit until it thickens. These swaps keep the muffins tasty while meeting different diets. For more ideas, check out the Full Recipe. To keep your cranberry orange muffins fresh, store them in an airtight container. This helps keep them moist and soft. You can also wrap them in plastic wrap for extra protection. If you plan to eat them within two days, leave them at room temperature. For longer storage, move them to the fridge. This keeps them good for about a week. Freezing muffins is easy and smart. First, let them cool completely. Then, wrap each muffin in plastic wrap. You can also use freezer bags. This way, they won’t stick together. Label the bags with the date. You can freeze these muffins for up to three months. When you’re ready to eat one, just take it out and let it thaw at room temperature. To enjoy your muffins warm, reheat them in the oven or microwave. For the oven, preheat it to 350°F (175°C) and heat the muffins for about 10 minutes. If you use the microwave, warm them for 15 to 30 seconds. This keeps the muffins soft and tasty. Enjoy the fresh flavors as if they were just baked! For the full recipe, check out the details above. To keep your muffins moist, use fresh ingredients. Make sure your butter is melted but not too hot. Room temperature eggs work best. Adding orange juice adds moisture and flavor. Don’t overmix the batter; lumps are okay. Bake them just until a toothpick comes out clean. This helps keep them soft and tender. Yes! You can swap cranberries for other fruits. Blueberries, raspberries, or chopped apples can work well. Each fruit gives a unique taste and texture. Adjust the sugar if using sweeter fruits. This makes your muffins fun and customizable. Cranberry orange muffins can last for about three days at room temperature. Store them in an airtight container to keep them fresh. If you want them to last longer, freeze them. They freeze well for up to three months. Just thaw them overnight in the fridge when you're ready to enjoy. This guide covered all you need for cranberry orange muffins. We explored fresh ingredients, baking steps, and tips for fluffiness. I shared variations like adding nuts or making them gluten-free. Storing and reheating muffins also helps keep them fresh. Now you're ready to bake delicious muffins that impress. Remember, practice makes perfect! Enjoy creating these treats and share them with loved ones. Happy baking!

77. Cranberry Orange Muffins Delicious and Easy Treat

Get ready to fill your kitchen with the sweet and tangy aroma of cranberry orange muffins! You’ll love how easy

- 1 large zucchini, sliced - 1 bell pepper (red or yellow), sliced - 1 small eggplant, sliced - 1 cup mushrooms, sliced - 1 medium red onion, sliced - 4 slices of whole-grain or ciabatta bread - 4 ounces fresh mozzarella cheese, sliced The main ingredients are colorful and packed with flavor. Zucchini brings a nice crunch, while bell peppers add sweetness. Eggplant gives a creamy texture, and mushrooms add a savory touch. Red onion enhances the taste with its mild bite. You can use whole-grain or ciabatta bread for a hearty base. Fresh mozzarella melts beautifully, making your panini gooey and delicious. - 2 tablespoons olive oil - 1 teaspoon balsamic vinegar - Salt and pepper to taste Dressings and seasonings are key to boosting flavor. Olive oil adds richness, while balsamic vinegar brings a tangy note. Salt and pepper balance everything out. Together, these create a tasty marinade for your veggies. - Fresh basil leaves - Other cheese options Fresh basil leaves are a great addition. They add a burst of freshness that complements the grilled veggies. If you want to mix it up, try other cheese options like goat cheese or aged cheddar. Each will give your panini a different flavor twist. For the full recipe, follow the steps to create this amazing grilled vegetable panini! 1. Start by preheating your grill or grill pan over medium-high heat. This step is key for great grill marks. 2. In a large bowl, take your sliced vegetables: zucchini, bell pepper, eggplant, mushrooms, and red onion. Toss them with olive oil, balsamic vinegar, salt, and pepper. Make sure each piece gets coated well. - Grill your veggies in batches. Each type cooks at a similar pace, about 4-5 minutes on each side. Look for them to be tender and have nice grill marks. - For zucchini and bell pepper, they tend to cook quickly. Eggplant and mushrooms may need a bit longer for a soft texture. 1. On two slices of your chosen bread, layer the grilled vegetables. Add fresh mozzarella slices and a few basil leaves on top. 2. Place the other slices of bread on top to form your sandwiches. 3. Clean your grill or grill pan and set it to low heat. 4. Place the panini on the grill. Press down gently with a spatula or a panini press. Cook for about 3-4 minutes on each side. You want the bread golden brown and the cheese melted. 5. Carefully take the panini off the grill. Let them cool for a minute before slicing in half. This process creates a delicious and colorful grilled vegetable panini that you'll love. For more details, check the Full Recipe! To grill your vegetables right, control the heat. Keep the grill at medium-high. This helps the veggies cook evenly and get nice marks. A grill pan works well, but a panini press gives a great crunch. Pressing helps the bread toast and the cheese melt just right. Layer cheese for the best melt. Place mozzarella on both sides of the veggies. This way, it melts evenly. You can use a lid to trap heat or press down on the sandwich with a spatula. This helps the cheese become gooey and yummy. Pair your panini with fresh salad or chips. A light vinaigrette adds brightness. For a nice look, serve with mixed greens and a sprinkle of basil. This makes your meal pop with color and taste. {{image_2}} You can swap out vegetables based on what’s in season. Try using asparagus in spring or butternut squash in fall. This keeps your panini fresh and exciting. If you can’t find a specific vegetable, feel free to use what you have. Carrots or spinach can work well too. Each combination brings new flavors. If you need gluten-free options, try using gluten-free bread. There are many tasty brands out there. You can also use flavor-infused breads. For example, rosemary or garlic bread adds a nice twist. These options can elevate your meal and add unique tastes. To make your panini heartier, consider adding grilled chicken or tofu. Both options bring protein and flavor. If you prefer vegetarian choices, try black beans or chickpeas. These add texture and keep the dish filling. Adding protein makes your grilled vegetable panini a complete meal. To keep your leftover panini fresh, wrap each sandwich in foil or parchment paper. This method helps maintain moisture and flavor. Place the wrapped panini in an airtight container or a resealable plastic bag. Store them in the fridge. Leftovers will stay good for about 3 days. You can freeze cooked panini without losing taste. Wrap each sandwich tightly in plastic wrap, then place them in a freezer-safe bag. This prevents freezer burn. When you want to eat one, take it out and let it thaw in the fridge overnight. To reheat, use a grill pan or a toaster oven. Heat until the bread is warm and crispy. Prepping grilled vegetables for the week makes cooking easy. Slice your zucchini, bell pepper, eggplant, mushrooms, and red onion ahead of time. Toss them with olive oil and seasonings, then store them in a container. You can assemble your panini in advance, too. Layer the grilled veggies and cheese between slices of bread. Wrap them and keep them in the fridge for quick meals. If you don’t have a grill, you can use an oven or a stovetop. For the oven, preheat it to 400°F (200°C). Place the veggies on a baking sheet with olive oil, salt, and pepper. Bake for 20 minutes, flipping halfway. On the stovetop, use a skillet over medium heat. Add olive oil, then cook the veggies for about 5-7 minutes per side until tender. Both methods work great! Yes, you can make it vegan! Replace the fresh mozzarella with vegan cheese or use avocado slices for creaminess. Olive oil and balsamic vinegar are already vegan, so no need to change those. This way, you keep all the flavors while making it plant-based. You can add many snacks and toppings. Try spinach or arugula for a fresh crunch. Sun-dried tomatoes add a nice tang. Hummus can also serve as a tasty spread. Finally, consider adding roasted red peppers or olives for extra flavor. Grilling times vary by vegetable. Here’s a quick guide: - Zucchini: 4-5 minutes per side - Bell pepper: 4-5 minutes per side - Eggplant: 5-6 minutes per side - Mushrooms: 4-5 minutes per side - Red onion: 5-6 minutes per side These times ensure your veggies are tender and full of flavor. Grilled vegetable paninis are simple yet delicious. We covered the key ingredients, like fresh veggies and cheese. I shared step-by-step instructions for grilling and assembling your sandwich. Plus, I offered tips for that perfect melt and serving ideas. For variations, you can try new vegetables or add proteins. Remember, leftover paninis can be stored and enjoyed later. Enjoy experimenting and making your own unique panini at home!

76. Grilled Vegetable Panini Flavorful and Easy Recipe

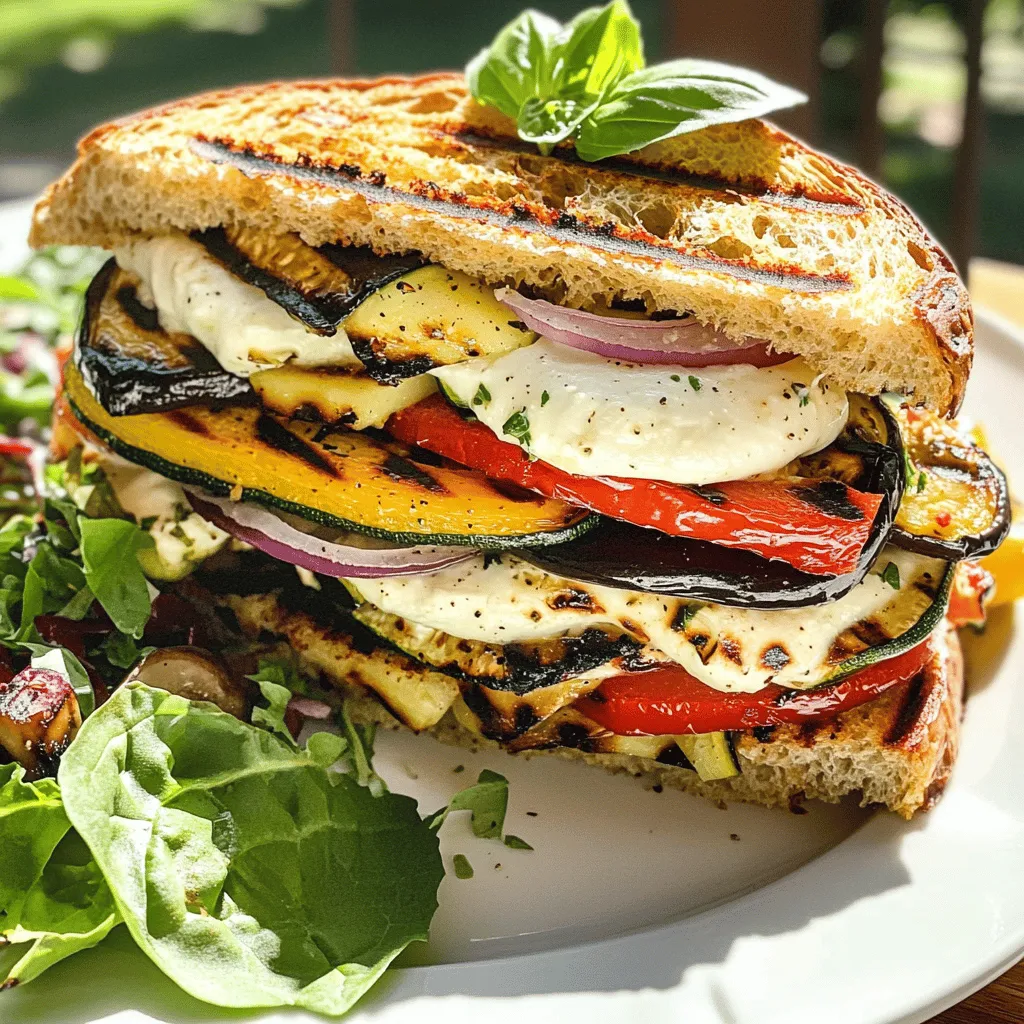
Are you ready to enjoy a delicious, grilled vegetable panini? This simple recipe bursts with flavor and colors. Perfect for

- 1 medium head of cauliflower - 1 cup mixed vegetables - 2 eggs - 2 cloves garlic - 3 tablespoons soy sauce - 1 tablespoon sesame oil - Salt and pepper - Optional: chili flakes and fresh cilantro Cauliflower fried rice is a quick and tasty meal. The main ingredient is cauliflower. I love using a medium head of cauliflower because it gives the dish a great texture. You can rice the cauliflower using a box grater or a food processor. This step makes it easy to mix with other ingredients. Next, you need mixed vegetables. I suggest using peas, carrots, and corn. They add color and flavor. This dish is also a great way to use any leftover veggies you have. Two eggs bring extra protein and richness. Scrambling them in the pan adds a nice touch. For flavor, garlic is a must! It gives the dish a wonderful aroma. I use two cloves to keep it balanced. Soy sauce ties everything together with savory notes. Three tablespoons is the perfect amount. Lastly, a tablespoon of sesame oil adds a warm, nutty flavor. You can season your dish with salt and pepper. If you like heat, add chili flakes. Fresh cilantro gives a fresh finish. You can find the full recipe in the earlier section. Enjoy making this easy and healthy meal! - Grate or rice the cauliflower. - Choose your method: food processor or box grater. To start, you need to prepare the cauliflower. Take one medium head of cauliflower. You can either use a food processor or a box grater. If using a food processor, pulse it until it looks like rice. If you prefer the box grater, just grate it down to size. This step is key as it forms the base of your dish. - Sauté onions and garlic. - Scramble the eggs in the pan. Next, heat a large pan or wok over medium heat. Add one tablespoon of sesame oil, then toss in the chopped onion and minced garlic. Sauté them for about 2 to 3 minutes until they smell great and look soft. Then, move the onion and garlic to one side of the pan. Pour in the beaten eggs on the other side. Scramble them until fully cooked, then mix everything together. - Add mixed vegetables. - Incorporate the riced cauliflower. Now it’s time to add flavor. Toss in one cup of mixed vegetables like peas, carrots, and corn. Stir them around for another 2 to 3 minutes until they are warm. Then, add the riced cauliflower to the pan. Mix everything well and stir-fry for 5 to 7 minutes. The goal is to make the cauliflower tender but not mushy. - Season with soy sauce and spices. - Stir in green onions. Finally, drizzle in 3 tablespoons of soy sauce. Mix it in well to coat all the ingredients. Season with salt, pepper, and optional chili flakes for some heat. Lastly, add sliced green onions and cook for one more minute. This gives the dish a fresh crunch. For the full experience, check out the Full Recipe. Enjoy your tasty cauliflower fried rice! To get cauliflower fried rice just right, avoid overcooking the cauliflower. Cook it until tender but still firm. Using high heat for stir-frying is key. High heat helps achieve that nice, slightly crispy texture. You can change up the veggies in this dish. Use any mixed vegetables you like, such as bell peppers, broccoli, or snap peas. For added flavor, consider adding protein. Chicken, shrimp, or even tofu work well. Just cook the protein first, then mix it with the veggies and cauliflower. Pair your cauliflower fried rice with a simple salad or steamed veggies. This adds color and nutrition to your meal. For portion sizes, I suggest about one cup per person. This way, you get a filling meal without overdoing it. {{image_2}} If you want a vegetarian version, just omit the eggs. This keeps the dish light and plant-based. You can use tofu instead. Tofu adds protein and a nice texture. Try pressing the tofu first to remove excess water. Then cube it and sauté it with the onions. This gives you a hearty meal. For more low-carb options, you can add vegetables like zucchini or bell peppers. These veggies blend well in the dish and keep it fresh. Using cauliflower rice instead of traditional rice cuts down on carbs. It also keeps the dish light while still being filling. Spice things up by adding flavors from different cuisines. For an Asian twist, try adding ginger or sesame seeds. If you prefer a Mexican vibe, add cumin and diced tomatoes. This makes your cauliflower fried rice unique and fun. Explore different spices to match your mood and taste. To keep your cauliflower fried rice fresh, store it in the fridge. Place it in an airtight container. This helps to lock in flavor. Make sure it cools down before sealing. You can use glass or plastic containers. They both work well for storage. If you want to freeze cauliflower fried rice, let it cool first. Once cool, portion it into freezer bags. Flatten the bags to save space. Squeeze out as much air as possible. This helps prevent freezer burn. It can last up to three months in the freezer. When you’re ready to eat, simply thaw it in the fridge overnight. When reheating, I recommend using the stovetop. This method keeps the texture nice. Heat a bit of oil in a pan and add the rice. Stir it often to heat evenly. If you prefer the microwave, use a microwave-safe dish. Cover it with a damp paper towel to retain moisture. Heat in short bursts, stirring in between, until hot. This keeps the cauliflower from getting too mushy. Yes, you can make this dish ahead. Meal prepping works well for cauliflower fried rice. Make your batch and store it in the fridge. Use airtight containers to keep it fresh. I suggest using it within three days for the best taste. Cauliflower fried rice is great for meal prep. In the fridge, it lasts about three days. You can freeze it too, which keeps it good for up to three months. Freezing helps preserve flavor and texture. Just make sure to cool it before freezing. To add spice, consider using chili flakes or hot sauce. Start with a small amount and taste as you go. You can also add fresh jalapeños or sriracha for extra heat. Adjust it to your spice level for a perfect kick. Yes, frozen cauliflower rice works well too. It saves time and is easy to use. Cook it straight from the freezer. Just add it to the pan with your other ingredients. Stir-fry it until heated through, about five to seven minutes. Cauliflower fried rice is a tasty dish. You learned how to make it with simple ingredients. We covered the key steps to create a delicious meal. Remember to adjust flavors to fit your taste. You can modify the recipe for different diets too. Keep leftovers stored well, and freeze what you won't eat. This dish is easy to enjoy anytime. Try all the variations to find your favorite. With these tips, you can create a quick, healthy meal that impresses.

75. Cauliflower Fried Rice Flavorful and Quick Meal

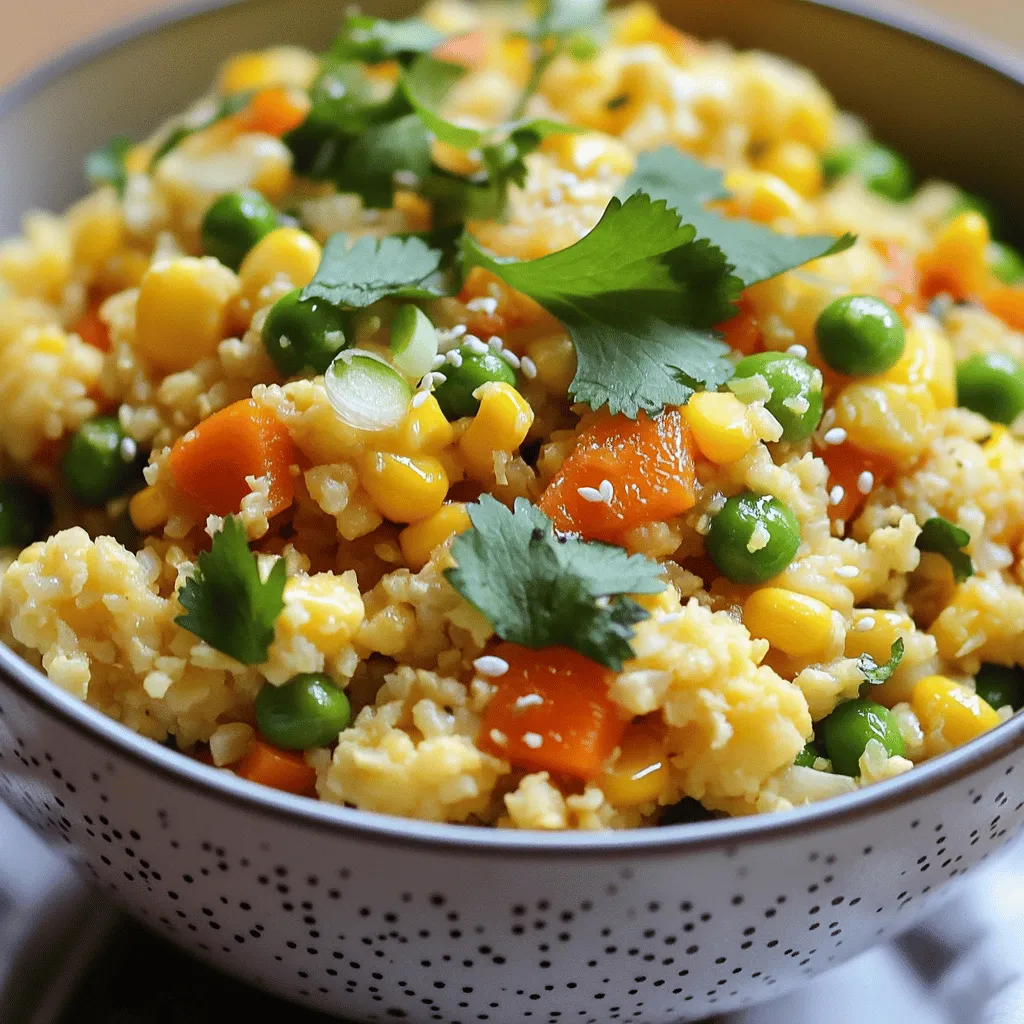
Looking for a quick and tasty meal? You’ve come to the right place! This cauliflower fried rice recipe is healthy,

Cooking garlic honey roasted chicken is simple and fun. Gather these ingredients to make a tasty meal. - 4 chicken thighs (bone-in, skin-on) - 4 tablespoons honey - 5 cloves garlic, minced - 2 tablespoons olive oil - 1 teaspoon smoked paprika - 1 teaspoon dried thyme - Salt and pepper to taste - Juice of 1 lemon - Fresh parsley for garnish These fresh ingredients create a rich flavor. The chicken thighs give you tender meat. Honey adds sweetness, while garlic gives a strong, tasty punch. Olive oil keeps the chicken moist. Smoked paprika and thyme bring warmth and earthiness. Lemon juice brightens the dish. Add salt and pepper to enhance all the flavors. Make sure to check that your ingredients are fresh. This will help your dish shine. For the full recipe, visit the [Full Recipe]. Optimal marinating time For the best flavor, marinate the chicken for at least 30 minutes. If you have time, let it sit in the fridge for up to 2 hours. This allows the flavors to soak in deeply. Prepping the chicken Start with bone-in, skin-on chicken thighs. They stay juicier and have more flavor. Rinse the chicken under cold water, then pat it dry with paper towels. Dry skin helps it get crispy in the oven. Oven settings and timing Preheat your oven to 400°F (200°C). This high heat helps the skin get golden and crispy. Place the marinated chicken on a baking dish, skin side up. Roast for 35-40 minutes. Use a meat thermometer to check for doneness; it should read 165°F (75°C) inside. Basting for maximum flavor Halfway through roasting, baste the chicken with its own juices. This extra step keeps it moist and adds more flavor. The skin will turn crispy and delicious. Be sure to pour any leftover marinade over the chicken before it goes into the oven. For the full recipe, you can refer to the Garlic Honey Roasted Chicken section. Enjoy the cooking process! - Ensuring crispy skin: To get that golden, crispy skin, dry the chicken thighs well. Pat them down with paper towels before marinating. This step helps the skin crisp up nicely in the oven. - Checking for doneness: Use a meat thermometer to check if the chicken is done. The internal temperature should reach 165°F (75°C). This ensures the chicken is safe to eat and juicy. - Enhancing flavor with additional ingredients: You can add more flavor with fresh herbs like rosemary or oregano. A splash of soy sauce or balsamic vinegar can also deepen the taste of the marinade. - Best side dishes: Serve your garlic honey roasted chicken with roasted vegetables or mashed potatoes. A fresh salad with a light vinaigrette pairs well too. These sides balance the rich flavors of the chicken. - Garnish ideas: Fresh parsley adds color and freshness to your dish. You can also sprinkle some lemon zest for a bright touch. This makes your plate look appealing and enhances the flavor. For the complete recipe, refer to the [Full Recipe]. {{image_2}} You can customize Garlic Honey Roasted Chicken to fit your taste. Here are some fun ideas: - Alternative sweeteners: If you don't have honey, try maple syrup or agave. Both add a nice sweetness. - Different herbs and spices: Mix it up with rosemary, oregano, or basil. Each herb brings a unique flavor to the dish. You can also add a pinch of cayenne for heat. - Chicken cut alternatives: Use chicken breasts or drumsticks instead of thighs. Just adjust the cooking time. Breasts cook faster, while drumsticks may need more time. You can make this dish using various cooking methods. Here’s how: - Air fryer instructions: Preheat your air fryer to 380°F (193°C). Marinate the chicken as stated in the Full Recipe. Cook the chicken for about 25-30 minutes, turning halfway through. Check the internal temperature to ensure it reaches 165°F (75°C). - Slow cooker adaptations: Place the marinated chicken in a slow cooker. Cook on low for 4-6 hours or on high for 2-3 hours. The chicken will be tender and full of flavor. After you enjoy your garlic honey roasted chicken, store the leftovers right. Place the chicken in an airtight container. This keeps it fresh and tasty. You can store it in the fridge for up to three days. Make sure it cools to room temperature first. If you want to keep it longer, freezing is a great option. Wrap each piece in plastic wrap. Then, place the wrapped chicken in a freezer bag. This helps prevent freezer burn. You can freeze the chicken for up to three months. Just label the bag with the date to keep track. When it's time to enjoy your leftovers, you want to keep them moist and flavorful. The best way to reheat chicken is in the oven. Preheat your oven to 350°F (175°C). Place the chicken in a baking dish and cover it with foil. This keeps the moisture in. Heat for about 15-20 minutes, or until warm. You can also use the microwave for quick reheating. Place the chicken on a microwave-safe plate. Cover it with a damp paper towel to help retain moisture. Heat in short bursts of 30 seconds until warm. Remember to check the temperature. It should be hot throughout for safe eating. For more delicious ideas, check out the [Full Recipe]. How long to marinate chicken for best results? Marinating for at least 30 minutes gives great flavor. For best taste, aim for 2 hours. This lets the juices soak deep into the meat. Can I use chicken breasts instead of thighs? Yes, you can use chicken breasts. They will cook faster, so check them earlier. Breasts can dry out, so watch the time closely. What to do if I don't have smoked paprika? If you lack smoked paprika, regular paprika works too. For a smoky taste, add a bit of liquid smoke. It gives a nice flavor without the smoke. How to tell if chicken is cooked through? Use a meat thermometer. Chicken should reach 165°F (75°C) inside. Cut into it; the juices should run clear, not pink. Is this recipe suitable for meal prep? Yes! Garlic honey roasted chicken is great for meal prep. It keeps well in the fridge and tastes even better the next day. Can I make the marinade ahead of time? Absolutely! You can mix the marinade a day before. Just store it in the fridge. This saves time and boosts flavor when you’re ready to cook. This blog covered making delicious chicken thighs. We explored key ingredients, marinade tips, and cooking methods. You learned to ensure crispy skin and flavorful bites. We also discussed variations like different spices and cooking gadgets. In conclusion, follow these tips and enjoy tasty, juicy chicken every time. Your meals will shine with the right ingredients and techniques. Happy cooking!

74. Garlic Honey Roasted Chicken Tasty Dinner Idea

Looking for a flavorful and easy dinner idea? Look no further than Garlic Honey Roasted Chicken. This dish combines sweet

You can use fresh or frozen blueberries for this jam. Fresh berries taste great and are juicy. If you use frozen blueberries, thaw them first. This choice makes the jam easy and quick. Both options work well for a tasty treat. You can sweeten your jam with honey or maple syrup. Honey gives a floral taste, while maple syrup adds a rich flavor. Adjust the amount based on your taste. Start with 1/4 cup and taste as you go. You can always add more if you want it sweeter. Chia seeds thicken the jam and add fiber. Use 2 tablespoons for the right texture. Lemon juice brightens the flavor and balances sweetness. Just 1 tablespoon does the trick. A dash of vanilla extract gives it warmth and depth. This simple addition makes the jam special. Check out the Full Recipe for more details! Start by adding 2 cups of fresh blueberries to a medium saucepan. If you use frozen blueberries, make sure they are thawed. Pour in 1/4 cup of honey or maple syrup. This adds a sweet touch. Turn the heat to medium. Stir gently. You will see the blueberries soften and their juices start to flow. This usually takes about 5 minutes. Once the blueberries are soft, grab a fork or a potato masher. Use it to mash the blueberries to your liking. You can leave it chunky or make it smooth. The choice is yours! Just remember, the more you mash, the smoother your jam will be. Now it’s time to add the magic. Stir in 2 tablespoons of chia seeds. They help the jam thicken. Next, add 1 tablespoon of lemon juice and 1/2 teaspoon of vanilla extract. Finally, sprinkle in a pinch of salt. This brings out all the flavors. Bring the mixture to a gentle boil, then lower the heat. Let it simmer for about 10 minutes. Stir occasionally. When it cools, it will thicken more. You can find the full recipe and more tips on making this jam at the end of the article! To get the best texture in your jam, use ripe blueberries. Ripe fruits break down easier. Start cooking them gently to release their juices. You can mash them with a fork for chunkiness or leave them whole for a smoother jam. Adding chia seeds is key. They soak up liquid and help thicken the jam as it cools. Make sure to let it simmer to the right thickness. Avoid using unripe fruit. It won't break down well and will taste sour. Don't skip the simmering step; this helps the flavors blend. If your jam is too runny, it needs more chia seeds or longer cooking time. Another mistake is not letting it cool properly. The jam thickens as it cools, so be patient. You can use this jam in many ways. Spread it on toast for breakfast. It’s great on pancakes or waffles. Try adding it to yogurt bowls for extra flavor. You can also use it in desserts like cheesecakes or as a topping for ice cream. Garnish your dishes with fresh blueberries or mint for a nice touch. For the full recipe, check the recipe section above! {{image_2}} You can switch blueberries for other fruits. Strawberries, raspberries, or blackberries work well. Each fruit brings a unique flavor. You can mix fruits too. Try a berry blend for a colorful jam. Just keep the same measurements for the recipe. If you want a sugar-free jam, use ripe fruits. They can sweeten your jam naturally. You can also use stevia or monk fruit as sweeteners. Adjust the amount to your taste. These options let you enjoy the jam without added sugars. Spices can add warmth and depth to your jam. Try cinnamon or nutmeg for a cozy flavor. You can also add a bit of ginger for a kick. Experiment with herbs like mint or basil for fresh notes. A little zest from an orange or lime can brighten the taste too. You can make your jam special with these simple tweaks. For the complete recipe, check out the Full Recipe section. Store your blueberry chia seed jam in a clean jar. Make sure to seal it tightly. Keep it in the fridge right after it cools down. This helps keep it fresh and tasty. Always use a clean spoon when you scoop out some jam. This way, you avoid adding any germs to the jar. Your jam can last up to 2 weeks in the fridge. After that, it may lose flavor or spoil. If you notice any strange smell or color, throw it away. To ensure you enjoy every bite, try to finish it within that time. You can freeze blueberry chia seed jam if you want to keep it longer. Use an airtight container or freezer bag. Leave some space at the top. The jam will expand as it freezes. Label the container with the date. It should stay good for about 3 months in the freezer. When ready to use, thaw the jam in the fridge overnight. Enjoy it on toast, pancakes, or yogurt bowls! Homemade blueberry chia seed jam lasts about two weeks in the fridge. Store it in a clean jar with a tight lid. The jam will continue to thicken as it cools. You can tell it’s good if it smells fruity and looks vibrant. If it changes color or smells off, it’s best to toss it. Yes, you can use other sweeteners in this recipe. Maple syrup works great if you want a vegan option. You can also try agave syrup or coconut sugar. Just remember to taste as you go. Adjust the sweetness to your liking. This way, you can create a jam that is just right for you. Chia seed jam is versatile. You can use it in many ways! Try it as a topping for yogurt or oatmeal. It also makes a great filling for pastries or pancakes. You can even swirl it into smoothies for added flavor. The options are endless! In this post, we explored how to make blueberry chia seed jam. We discussed fresh versus frozen blueberries, sweetening options, and essential add-ins like chia seeds and lemon juice. I provided step-by-step instructions for cooking, mashing, and incorporating ingredients. We also covered tips for consistency, common mistakes, and serving suggestions. You can create tasty variations and learn about storage methods. Homemade jam is easy and fun. Enjoy your jam on toast or in yogurt, and try new flavors for a twist!

73. Blueberry Chia Seed Jam Simple and Delicious Recipe

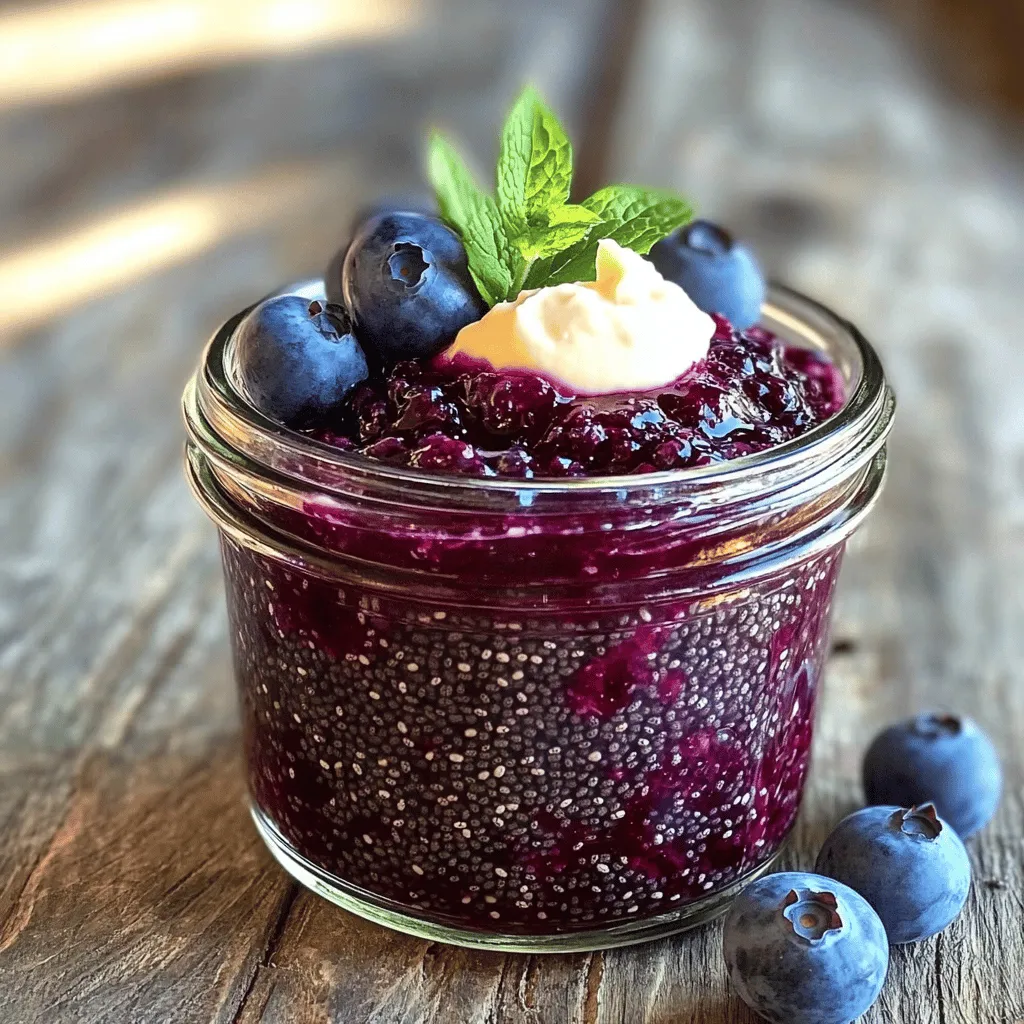
If you’re craving a tasty and healthy spread, you’ve come to the right place! Making Blueberry Chia Seed Jam is

For this dish, you need fresh vegetables. I like to use: - 1 zucchini, sliced into half-moons - 1 yellow bell pepper, sliced into strips - 1 red bell pepper, sliced into strips - 1 red onion, cut into wedges - 1 cup cherry tomatoes, halved These vegetables add color and taste. They grill well and become sweet when cooked. The right seasonings make the flavors pop. Here are the key ingredients: - 3 tablespoons olive oil - Zest and juice of 1 lemon - 2 tablespoons fresh thyme leaves (or 1 tablespoon dried thyme) - Salt and black pepper to taste Olive oil helps the veggies cook evenly. Lemon adds brightness, and thyme gives a fresh herbal note. To get the best flavor, use these specific amounts: - 1 zucchini - 1 yellow bell pepper - 1 red bell pepper - 1 red onion - 1 cup cherry tomatoes - 3 tablespoons olive oil - Zest and juice of 1 lemon - 2 tablespoons fresh thyme leaves - Salt and black pepper to taste These measurements ensure your lemon thyme grilled vegetables turn out delicious every time. For the full recipe, check out the complete details. To start, wash all your vegetables well. Then, cut the zucchini into half-moons. Slice the yellow and red bell peppers into strips. For the red onion, cut it into wedges. Finally, halve the cherry tomatoes. This mix of shapes and colors makes the dish more fun. In a large bowl, combine all the chopped vegetables. In a separate small bowl, whisk together olive oil, lemon zest, lemon juice, thyme, salt, and pepper. This flavorful mixture is key. Pour it over the vegetables and toss them well. Cover the bowl and let it sit for about 15 minutes. This marination time helps the flavors blend and enhances the taste. Preheat your grill to medium-high heat. To keep the veggies from falling through, use a grill basket or aluminum foil. Spread the marinated vegetables in the basket evenly. Grill them for about 8 to 10 minutes. Turn them occasionally until they are tender and have nice grill marks. Once done, remove them from the grill and serve warm. For the full recipe, check out the entire guide. To get those perfect grill marks, start with a hot grill. Preheat it to medium-high heat. Use a grill basket or aluminum foil to hold your veggies. This will stop them from falling through. Spread them out in one layer. Don't overcrowd the basket. Grill the veggies for 8-10 minutes. Turn them often for even cooking and good marks. Want to boost the taste? Try adding garlic or balsamic vinegar to the marinade. You can also add a splash of soy sauce for a savory kick. Mix in some crushed red pepper for heat. Or, sprinkle some feta cheese over the veggies after grilling. These additions will make your dish pop with flavor. Serve your grilled veggies on a bright platter. Layer them in a colorful pattern for a beautiful look. Drizzle some extra lemon juice on top for freshness. For a fancy touch, garnish with fresh thyme sprigs or thin lemon slices. This adds both color and aroma to your dish. You can also pair them with grilled meats or grains for a complete meal. Check out the full recipe for more inspiration! {{image_2}} You can mix in many seasonal vegetables for more color and flavor. Try adding: - Asparagus - Eggplant - Mushrooms - Carrots - Cauliflower These veggies grill well and soak up the lemon thyme goodness. Each one adds its own taste and texture. When you use seasonal produce, you enjoy the best flavors nature offers. Feel free to experiment with different herbs or spices. You can use: - Basil - Oregano - Rosemary - Cumin These options can change the dish’s flavor profile. Just remember, each herb has a unique taste. Start with small amounts and adjust as needed. Mixing flavors can lead to exciting new dishes! Grilling offers a smoky taste, but you can also roast your veggies. To roast, preheat your oven to 425°F (220°C). Spread the marinated veggies on a baking sheet in a single layer. Roast for 20-25 minutes until tender and slightly browned. This method gives them a different texture and enhances their sweetness. You can enjoy them hot or even cold in salads. For the complete recipe, check out the [Full Recipe]. To keep your lemon thyme grilled vegetables fresh, store them in an airtight container. This helps maintain their flavor and texture. You can refrigerate them for up to three days. Make sure to let them cool to room temperature before sealing them. This prevents condensation, which can make them soggy. When you want to enjoy your leftovers, reheating gently is key. I recommend using a skillet over medium heat. Add a splash of olive oil to keep them moist and flavorful. Stir them often to heat evenly. You can also use the microwave, but cover the dish with a damp paper towel to keep the moisture in. Heat them for short intervals, stirring in between. You can freeze grilled vegetables, but they may lose some texture. To freeze, first, let them cool completely. Then, spread them on a baking sheet in a single layer. Once they are frozen solid, transfer them to freezer bags. Remove as much air as possible to prevent freezer burn. They can last for up to three months. When you're ready to use them, thaw in the fridge overnight and reheat as mentioned above. For the full recipe, check out the complete details. Yes, you can use dried thyme. Dried thyme has a stronger taste than fresh. Use one-third of the amount if substituting. For example, if the recipe calls for two tablespoons of fresh thyme, use one tablespoon of dried thyme. This way, you get a great flavor without being too strong. Fresh thyme adds a bright touch to the dish. It’s best for a fresh taste. You can store grilled vegetables in the fridge for about three to five days. Keep them in an airtight container to keep them fresh. Make sure the vegetables cool down before you store them. This helps to prevent moisture build-up and sogginess. Always check for signs of spoilage before eating. If they smell off or look slimy, it’s best to toss them. Lemon thyme grilled vegetables go well with many dishes. They make a great side with grilled chicken or fish. You can also serve them on top of pasta or in a salad. Add them to grain bowls for a healthy meal. For a complete dinner, try them with quinoa or couscous. They add a burst of flavor and color to any meal. For the full recipe, check here. Grilling fresh vegetables enhances their flavors and adds a healthy touch to meals. You learned about choosing the best produce, seasoning it right, and mastering grilling techniques. Remember to marinate for optimal taste and serve creatively. Don't hesitate to try different vegetables and cooking methods to keep things exciting. Proper storage helps you enjoy leftovers, too. Embrace these tips to get the most out of your grilled veggies, and you’ll impress everyone at your next cookout. Happy grilling!

72. Lemon Thyme Grilled Vegetables Flavorful and Simple

Are you ready to take your grilling game to the next level? My Lemon Thyme Grilled Vegetables are not only

Older posts
Newer posts
← Previous Page1 … Page29 Page30 Page31 … Page63 Next →

dsad

© 2025 Recipes Pursuit • Built with GeneratePress

Our Policies

  • Copyright Policy
  • Cookie Policy
  • GDPR Policy
  • Privacy Policy
  • Disclaimer
  • Terms Of Use

More Information

  • Home
  • About
  • Contact
  • Appetizers
  • Dessert
  • Dinner
  • Drinks
©2025, Recipes Pursuit About Back To Top