Skip to content
DisclaimerTerms Of UseGDPR PolicyCookie Policy

Recipes Pursuit

  • Home
  • Drinks
  • Appetizers
  • Dinner
  • Dessert
  • About
  • Contact
  • Privacy Policy
DisclaimerTerms Of UseGDPR PolicyCookie Policy

Emma Smith

To make Garlic Herb Roasted Potatoes, you will need: - 1.5 lbs baby potatoes, halved - 4 cloves garlic, minced - 3 tablespoons olive oil - 2 teaspoons dried rosemary - 2 teaspoons dried thyme - Salt and pepper to taste These simple ingredients create a dish packed with flavor. Baby potatoes have a creamy texture. Garlic adds depth, while olive oil helps everything brown nicely. The dried herbs bring an aromatic quality to the dish. You can also add: - 1 teaspoon smoked paprika - Fresh parsley, chopped (for garnish) Smoked paprika adds a hint of warmth. Fresh parsley not only brightens the dish but also adds color and freshness. Garlic Herb Roasted Potatoes go well with many meals. They pair nicely with roasted meats like chicken or beef. You can also serve them with dips. Try them with a creamy ranch or a tangy yogurt sauce. These potatoes are a versatile side that enhances any meal. For the full recipe, check the section above. Prepping the potatoes Start by washing 1.5 lbs of baby potatoes. Halve them so they cook evenly. This size helps them brown nicely and get crispy. Mixing the seasoning In a large bowl, combine the halved potatoes with 3 tablespoons of olive oil. Add 4 cloves of minced garlic, 2 teaspoons of dried rosemary, and 2 teaspoons of dried thyme. Sprinkle in 1 teaspoon of smoked paprika, plus salt and pepper to taste. Toss everything well, ensuring each potato is coated. Preheating the oven Preheat your oven to 425°F (220°C). This high temperature helps create a crispy crust on your potatoes. Spreading potatoes on the baking sheet Spread the seasoned potatoes in a single layer on a large baking sheet. Avoid overcrowding, as this can cause steaming instead of roasting. Cooking time and temperature Roast the potatoes for 25-30 minutes. This allows them to become golden and fork-tender. Flipping potatoes for even browning Halfway through cooking, flip the potatoes with a spatula. This ensures they brown evenly on all sides. For more details, check out the [Full Recipe]. Enjoy your flavorful garlic herb roasted potatoes! Spacing on the baking sheet is key. If potatoes are too close, they steam instead of roast. Give them room to breathe. This helps them turn golden and crispy. Fresh herbs bring bright flavors, but dried herbs work well too. If you use dried herbs, crush them slightly to release more flavor. Want more heat? Add a pinch of cayenne pepper or red pepper flakes. You can also switch herbs based on what you like. Basil or oregano can give a different twist. Feel free to play around with spices to find your favorite mix. Check the potatoes for doneness by poking them with a fork. They should feel soft inside. Let them cool for a few minutes after roasting. This helps the flavors settle. Serve them warm for the best taste. For the full recipe, check out the details above. Enjoy your garlic herb roasted potatoes! {{image_2}} You can make garlic herb roasted potatoes even more exciting. Here are two great twists: - Lemon garlic herb roasted potatoes: Add zest and juice from one lemon. This brightens the dish and adds a fresh taste. Mix the lemon with garlic and herbs before tossing with the potatoes. - Spicy garlic herb potatoes: If you like heat, try adding red pepper flakes. Just a pinch can make a big difference. Mix them in with the garlic and herbs. Changing up your ingredients can give you new flavors. Here’s how: - Using different types of potatoes: While baby potatoes are great, you can use red or Yukon Gold potatoes. They will also roast well and offer a different taste and texture. - Substituting herbs based on availability: If you don’t have dried rosemary or thyme, use oregano or basil instead. Fresh herbs work too! Just chop them finely and add them near the end of cooking for the best flavor. You can cook garlic herb roasted potatoes in various ways: - Air fryer method: This method is quick and gives crisp results. Toss the potatoes with oil and seasonings, then air fry at 400°F for about 20 minutes. Shake the basket halfway through for even cooking. - Grilling variations: For a smoky flavor, try grilling the potatoes. Parboil them first, then toss with oil and seasonings. Place them in a grill basket and cook on medium heat for about 15-20 minutes, turning often. These variations keep your garlic herb roasted potatoes fresh and fun. For the full recipe, check out the complete details in the earlier section. To keep your garlic herb roasted potatoes fresh, place them in the fridge. Use an airtight container for best results. This helps prevent moisture loss and keeps them tasty. Store them for up to three days. If you want them to last longer, freezing is a great option. To enjoy that crispy texture again, use the oven. Preheat it to 400°F (200°C). Spread the potatoes on a baking sheet and heat for about 10-15 minutes. This method brings back their crunch. If you're in a hurry, the microwave works too. Heat them for 30 seconds to one minute. Just be aware that they may not stay as crispy. If you want to freeze your garlic herb roasted potatoes, let them cool first. Then, place them in a freezer-safe bag. Remove as much air as you can before sealing. They can be frozen for up to two months. When you're ready to eat them, thaw in the fridge overnight. Reheat in the oven for best results. Enjoy your garlic herb roasted potatoes anytime! For the full recipe, check out the detailed instructions above. Roasting garlic herb potatoes usually takes about 25 to 30 minutes. First, you preheat your oven to 425°F (220°C). Then, toss the halved baby potatoes with olive oil and your spices. Spread them on a baking sheet. Roast them for 25 to 30 minutes. Flip them halfway through for even cooking. You want them golden brown and tender when done. Yes, you can make garlic herb roasted potatoes ahead of time. Once cooked, let them cool completely. Store your leftovers in an airtight container in the fridge. They will last for about 3 to 5 days. When you're ready to eat, you can reheat them. For best results, use the oven to keep them crispy. You can also use the microwave if short on time. Many herbs work great with roasted potatoes. Here are some ideas: - Rosemary - Thyme - Oregano - Basil - Sage - Dill Each herb brings a unique flavor. Mix and match to find your favorite combination. Experimenting can lead to tasty surprises! Garlic herb roasted potatoes are an easy, tasty side dish. We covered key ingredients like baby potatoes, garlic, and dried herbs. I shared step-by-step prep and cooking techniques for the best roast. Tips helped ensure tender potatoes, while variations keep it fresh. Proper storage and reheating maintain crispiness for leftovers. Experiment with spices and herbs, and enjoy customizing this dish to fit your taste! With all these details, you can make delicious roasted potatoes every time. Happy cooking!

Garlic Herb Roasted Potatoes Easy and Flavorful Dish

If you crave a dish that’s easy to make and full of flavor, Garlic Herb Roasted Potatoes are a must-try!

- 2 boneless, skinless chicken breasts - 1 head romaine lettuce, chopped - 1/2 cup Caesar dressing (store-bought or homemade) - 1 tablespoon olive oil - 1/2 cup croutons - 1/4 cup grated Parmesan cheese - 1 tablespoon fresh lemon juice - 1 tablespoon capers (optional) - Salt and pepper, to taste When I prepare a Classic Caesar Salad with Grilled Chicken, I focus on fresh, high-quality ingredients. The chicken is key. Use boneless, skinless chicken breasts for tender bites. I always use romaine lettuce; it adds a nice crunch. For the Caesar dressing, you can buy it or make one at home. I like to make my own to control flavors. Croutons give a great crunch, while Parmesan cheese adds richness. Lemon juice brightens the dish. Capers? They add a fun twist if you like a briny flavor. These ingredients come together to create a bright, tasty salad. You can find the Full Recipe to guide you through the cooking process. - Preheat your grill or grill pan over medium-high heat. - Brush the chicken breasts with olive oil and season with salt and pepper. - Grill the chicken for about 6-7 minutes on each side, or until fully cooked. The internal temperature should reach 165°F. Remove the chicken from the grill and let it rest for 5 minutes. Then, slice into strips. - In a large salad bowl, add the chopped romaine lettuce. - Drizzle the Caesar dressing over the lettuce and toss gently to combine. Ensure all the leaves are coated well. - Add the sliced grilled chicken on top of the salad. - Garnish with lemon wedges for a bright touch. - Serve with optional dressing on the side, so guests can customize their salad. This classic Caesar salad with grilled chicken is not just tasty; it’s also a feast for the eyes. You can find the full recipe above. Enjoy each bite! To get the best grilled chicken, aim for an internal temperature of 165°F. This ensures your chicken is juicy and safe to eat. Use a meat thermometer for accuracy. To achieve those beautiful grill marks, preheat your grill well. Place the chicken on the grill and don’t move it for the first 3-4 minutes. This lets the grill do its magic. Using homemade Caesar dressing can take your salad to the next level. A simple blend of garlic, anchovies, lemon juice, and olive oil creates a fresh taste. If you want a twist, try using feta or pecorino cheese instead of Parmesan. Both add unique flavors and textures to your salad. Serve your salad on chilled plates. This keeps your salad crisp and fresh. For a pop of color, garnish with extra lemon wedges or fresh herbs. These touches make your dish more inviting and fun to eat. {{image_2}} You can switch things up with proteins. If you want a change from chicken, try shrimp or salmon. Both add a nice touch of flavor. Grilled shrimp adds a sweet and smoky taste. Salmon, on the other hand, gives a rich, buttery flavor. For a vegetarian option, use chickpeas. They are packed with protein and keep you full. Just toss them in with the salad for a hearty bite. While a classic Caesar dressing is great, you can make it your own. I love making a homemade Caesar dressing with simple ingredients. Mix garlic, anchovies, lemon juice, and Parmesan with olive oil for a fresh taste. If you want something different, try a yogurt-based dressing or a creamy ranch. These can add a fun twist to your salad and keep it fresh. Seasonal vegetables are a great way to enhance your salad. In spring, add fresh asparagus or radishes for crunch. In summer, sweet cherry tomatoes or bell peppers add color. Fall is perfect for roasted squash or beets. You can even add fruit like strawberries or apples. These sweet additions create a lovely balance with the savory flavors. Mixing seasonal produce keeps your salad exciting all year round. If you want to master this dish, check out the Full Recipe. To keep your Caesar salad fresh, store it in an airtight container. This way, it stays crisp. If you have leftover grilled chicken, place it in a separate container. Chicken lasts 3 to 4 days in the fridge. When you reheat grilled chicken, use the oven or a skillet. Preheat your oven to 350°F. Heat the chicken for about 10 minutes. Avoid the microwave if you can; it can make the chicken dry. For leftover salad, it’s best to eat it cold. If it feels wilted, add a bit more dressing to refresh it. You can freeze grilled chicken. Wrap it well in plastic wrap or foil, then place it in a freezer bag. It stays good for about 3 months. However, do not freeze the Caesar salad. The lettuce will become mushy when thawed. Enjoy the salad fresh for the best taste. For the full recipe, check the earlier section! A classic Caesar salad has a few key parts. You need fresh romaine lettuce, crunchy croutons, and a rich dressing. The dressing is often made with garlic, anchovies, lemon juice, and Parmesan cheese. Some people like to add grilled chicken for protein. This adds heartiness and makes the salad a full meal. You can also sprinkle extra cheese on top for more flavor. Yes, you can make Caesar dressing at home! Here’s a simple recipe: - 1 clove garlic, minced - 2 anchovy fillets, minced (optional) - 1 tablespoon Dijon mustard - 1 tablespoon lemon juice - 1/4 cup olive oil - 1/4 cup grated Parmesan cheese - Salt and pepper, to taste Combine all the ingredients in a bowl. Whisk until smooth. This homemade dressing tastes great and is easy to make. The salad stays fresh for about 2 days in the fridge. Keep it covered to prevent wilting. If you add dressing, it may sog up quicker. To keep it crisp, store the dressing separately. Just mix it in when you are ready to eat. Boneless, skinless chicken breasts work best for Caesar salad. They grill well and are easy to slice. You can also use thighs for more flavor. Make sure to season them well before grilling. This adds a tasty touch to your salad. To sum up, this blog post explored how to create a delicious Caesar salad with grilled chicken. We covered the main and additional ingredients needed, as well as spices. You learned step-by-step instructions for grilling chicken and assembling the salad. Tips for flavor, presentation, and variations helped enhance your dish. Finally, we discussed storage and reheating options for leftovers. Now, you have all the tools to make this salad a hit at your table. Enjoy creating your own tasty version!

26. Classic Caesar Salad with Grilled Chicken Delight

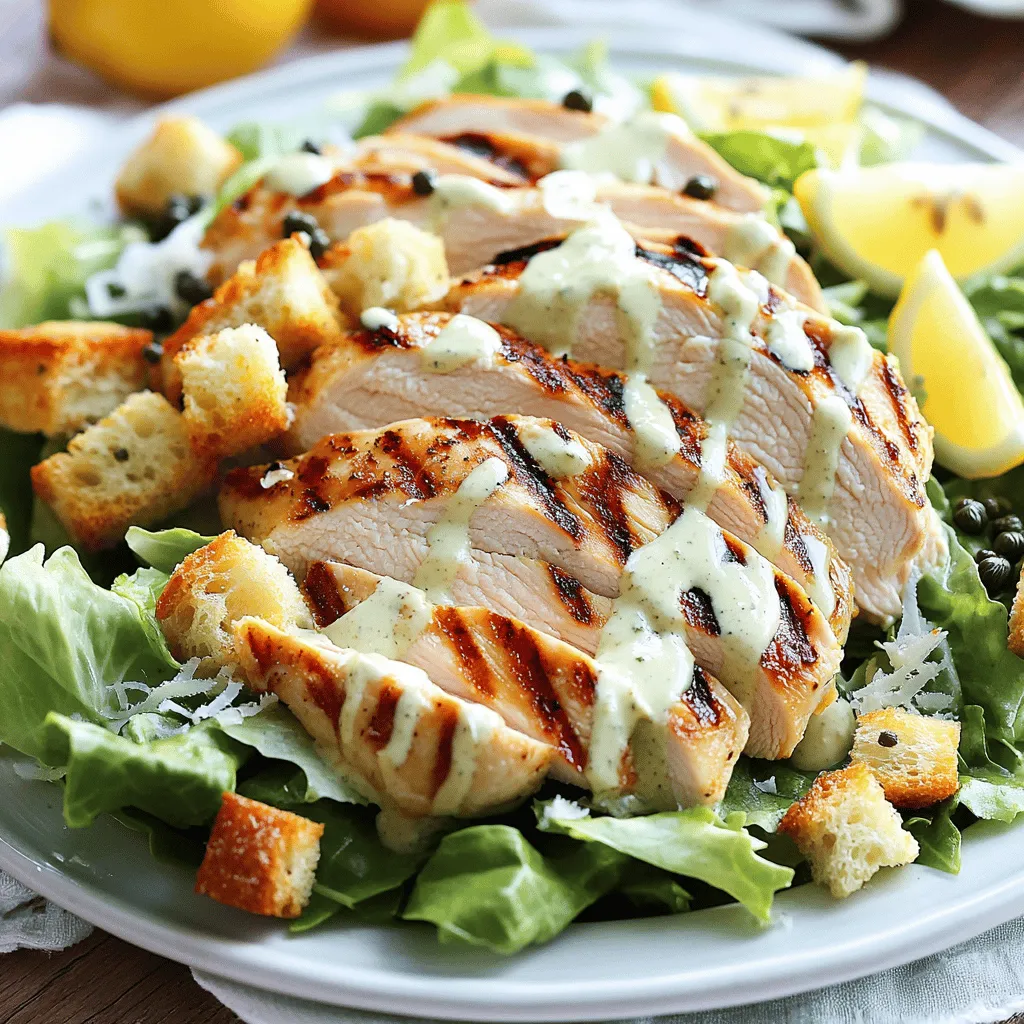
Are you ready to elevate your dinner game? This Classic Caesar Salad with Grilled Chicken will do just that! With

Pumpkin spice pancakes are fun to make and taste amazing. Here’s what you need: - 1 cup all-purpose flour - 1 tablespoon brown sugar - 1 teaspoon baking powder - 1/2 teaspoon baking soda - 1/2 teaspoon salt - 1 teaspoon pumpkin pie spice - 1 cup buttermilk (or milk with 1 tablespoon vinegar added) - 1/2 cup canned pumpkin puree - 1 large egg - 2 tablespoons melted butter - Maple syrup for serving Each ingredient plays a role in making these pancakes fluffy and flavorful. The flour gives the pancakes structure. The brown sugar adds sweetness and a hint of caramel flavor. Baking powder and baking soda help the pancakes rise. Salt brings out all the flavors. Pumpkin pie spice adds warmth and a hint of fall. Buttermilk makes them tender, while pumpkin puree keeps them moist. The egg binds everything together, and melted butter adds richness. For the best results, use fresh ingredients. They make a big difference in flavor. You can find canned pumpkin puree in any grocery store. If you want to make your own, just steam fresh pumpkin until soft, then mash it. With these ingredients ready, you're set to create delicious pumpkin spice pancakes. Don’t forget to check the full recipe for step-by-step instructions! In a large bowl, whisk together the following: - 1 cup all-purpose flour - 1 tablespoon brown sugar - 1 teaspoon baking powder - 1/2 teaspoon baking soda - 1/2 teaspoon salt - 1 teaspoon pumpkin pie spice This mix brings together sweet and warm flavors. The spices make the pancakes smell amazing. In another bowl, combine: - 1 cup buttermilk (or milk with 1 tablespoon vinegar added) - 1/2 cup canned pumpkin puree - 1 large egg - 2 tablespoons melted butter Mix until smooth. This step helps the pancakes stay moist and rich. Pour the wet mix into the dry mix. Gently stir until just combined. It's okay to see a few lumps. Overmixing can lead to tough pancakes. Preheat a non-stick skillet over medium heat. Lightly grease it with a bit of butter or oil. Pour about 1/4 cup of batter for each pancake onto the skillet. Cook for 2–3 minutes. Look for bubbles forming on the top. The edges should look set. Flip the pancakes and cook for another 2–3 minutes. They should be golden brown when done. Repeat with the remaining batter, keeping the cooked pancakes warm in a low oven if desired. Serve them warm with a generous drizzle of maple syrup. For the full recipe, check the above section. Enjoy these tasty treats! To get fluffy pancakes, do not overmix the batter. When you combine the wet and dry ingredients, stir gently. A few lumps are okay! If you mix too much, the pancakes might turn out tough. The key is to keep the batter light and airy. This helps each pancake rise well and stay soft. Cooking temperature matters a lot. I recommend a medium heat on your skillet or griddle. Too hot, and the outside burns before the inside cooks. Too low, and you’ll end up with soggy pancakes. A good test is to sprinkle a few drops of water on the skillet. If they dance and evaporate, the heat is just right. Presentation makes a big difference. Stack your pancakes high on a plate for a fun look. Drizzle warm maple syrup over the top to make them shine. For a final touch, sprinkle a little pumpkin pie spice on top. You can also add some chopped pecans or walnuts for extra crunch. This will make your pumpkin spice pancakes a feast for the eyes! {{image_2}} You can easily change up the flavor of your pumpkin spice pancakes. Adding chocolate chips makes them sweet and fun. Just fold in half a cup of chocolate chips into your batter. You can also add nuts for some crunch. Try walnuts or pecans for a great texture. This small change can turn your pancakes into a whole new treat. If you need gluten-free pancakes, you can swap out the all-purpose flour. Use a gluten-free flour blend instead. Look for blends that include xanthan gum for the best results. Almond flour or oat flour can also work. Each will give your pancakes a unique taste and texture that is still delicious. To make these pancakes vegan, you can replace the egg and milk easily. Use a flax egg instead. Mix one tablespoon of ground flaxseed with two and a half tablespoons of water. Let it sit for five minutes to thicken. For milk, almond milk or soy milk works well. These swaps keep the pancakes fluffy and tasty while being plant-based. For the full recipe, check out the [Full Recipe]. To keep your pumpkin spice pancakes fresh, store them in an airtight container. You can place parchment paper between pancakes to prevent sticking. If you want to keep them longer, freezing is a great option. Just wrap them in plastic wrap and then place them in a freezer bag. This way, they stay tasty for up to two months. When it's time to enjoy your leftovers, reheating is simple. The microwave is quick; just heat pancakes for about 20-30 seconds. If you want them crispy, use a skillet. Heat the skillet over medium heat and warm each pancake for about a minute on each side. This method keeps the texture nice and soft. Enjoy with warm maple syrup from the Full Recipe for the best taste! Yes, you can use fresh pumpkin. Just cook and puree it. Make sure to remove excess water. Fresh pumpkin adds great flavor. I love using it for a rich taste. To make fluffier pancakes, use baking powder and baking soda. Make sure your baking powder is fresh. Gently mix the batter; lumps are okay. Let the batter rest for a few minutes. This helps create air pockets for fluffiness. You can serve pumpkin spice pancakes with many sides. Try crispy bacon or sausage links. Fresh fruit like bananas or apples adds color and taste. Whipped cream or yogurt makes a great topping too. Maple syrup is a must, of course! Yes, pumpkin spice pancakes are great for meal prep. You can make a big batch and store them. Place them in an airtight container in the fridge. Reheat them in the toaster or microwave later. Enjoy a tasty breakfast any day! For the full recipe, check out the details above. You can create amazing pumpkin spice pancakes with simple ingredients and steps. We covered the right mix of dry and wet ingredients, cooking tips, and how to store leftovers. Remember, not overmixing is key to fluffy pancakes. Try some fun variations, like adding chocolate or making them vegan. Keep these tips in mind, and you’ll enjoy perfect pancakes every time. Get cooking and have fun with this delicious recipe!

25. Pumpkin Spice Pancakes with Maple Syrup Delight

Get ready to thrill your taste buds with my Pumpkin Spice Pancakes topped with rich maple syrup! These fluffy delights

- 4 large bell peppers (any color) - 1 lb ground turkey - 1 cup cooked quinoa (or rice) - 1 small onion, finely chopped - 2 cloves garlic, minced - 1 cup diced tomatoes (canned or fresh) - 1 teaspoon Italian seasoning - 1 teaspoon smoked paprika - 1 cup corn kernels (fresh or frozen) - 1 cup shredded cheese (mozzarella or cheddar) - 2 tablespoons olive oil - Salt and pepper to taste - Fresh parsley, chopped (for garnish) Gathering the right ingredients makes all the difference. Start with fresh, colorful bell peppers. These add flavor and a nice crunch. Ground turkey is lean and helps keep this dish healthy. Quinoa or rice gives a nice base, so choose what you like. Onions and garlic give the dish depth. Use freshly chopped ingredients for the best taste. Diced tomatoes provide moisture and sweetness. Italian seasoning and smoked paprika add warmth and flavor. Corn can be fresh or frozen, adding a burst of sweetness. Don't forget the cheese! It makes the top golden and melty. Olive oil brings everything together and adds richness. Use salt and pepper to enhance the flavors. Finally, fresh parsley gives a nice touch when serving. For the complete recipe, check out the Full Recipe section. 1. Preheat your oven to 375°F (190°C). This sets the stage for baking. 2. Grab the bell peppers and cut off their tops. Remove the seeds and membranes. This helps the peppers cook evenly. 3. Lightly brush the outside of the peppers with olive oil. This adds flavor and helps them brown nicely. Place them upside down on a baking sheet. 1. In a large skillet, heat 2 tablespoons of olive oil over medium heat. This is where the magic starts. 2. Add the chopped onion and garlic. Sauté until they turn translucent, about 3-4 minutes. This will create a nice aroma in your kitchen. 3. Now, add the ground turkey to the skillet. Cook until it browns, breaking it apart as it cooks. This should take about 5-7 minutes. 4. Stir in the diced tomatoes, cooked quinoa, corn, Italian seasoning, smoked paprika, salt, and pepper. Cook for another 5 minutes. Everything should be well combined and heated through. 5. Remove from heat and stir in half of the shredded cheese. This makes the filling creamy and cheesy. 1. Carefully turn the prepared bell peppers upright. Fill each one with the turkey mixture, pressing down gently to pack them in. 2. Top each filled pepper with the remaining shredded cheese. This will give a nice cheesy crust. 3. Cover the baking sheet with aluminum foil. Bake for 25 minutes. 4. After 25 minutes, remove the foil. Bake for an additional 10-15 minutes, until the cheese is bubbly and golden. 5. Once done, take them out and let cool slightly before serving. Garnish with freshly chopped parsley for a pop of color. Enjoy preparing these stuffed bell peppers with ground turkey delight! For the full recipe, check the details above. Selecting the right bell peppers is key. Choose peppers that are firm, shiny, and heavy for their size. Look for vibrant colors, which usually mean better flavor. Avoid any with soft spots or blemishes. To prevent soggy peppers, a few simple steps help. Brush the outside with olive oil before cooking. Bake them upside down for the first part of cooking. This allows moisture to escape. Filling them with the turkey mixture while they’re upright also helps keep them firm. For side dishes, think fresh and light. A simple green salad or roasted vegetables works well. You could also serve them with a side of crusty bread. This adds a nice crunch to your meal. Garnishing can elevate your dish. Sprinkle fresh parsley on top for color and freshness. You can also use a drizzle of balsamic glaze for a touch of sweetness. This makes the peppers look more appealing and adds an extra layer of flavor. For the full recipe, check out the recipe section. {{image_2}} You can easily switch up the protein in these stuffed peppers. Ground beef is a classic choice. It offers a richer flavor and works well in this recipe. Ground chicken is another great option. It is lean and light, making it a nice substitute. For a vegetarian twist, you can use black beans or lentils. These options add protein and fiber, making the dish hearty. It’s fun to play with flavors in stuffed peppers. Different seasonings can change the taste a lot. Try taco seasoning for a spicy kick. You can also use curry powder for a unique twist. Adding extras like beans or chopped veggies gives more texture. Chopped mushrooms or spinach blend well with the turkey. You can even add olives or jalapeños for extra zing. Get creative and find your favorite mix! For the full recipe, check out the Colorful Turkey Delight Stuffed Peppers ! To keep your stuffed peppers fresh, store them in the fridge. Place them in an airtight container. They can stay good for about 3 to 4 days. If you want to keep them longer, freezing is a great option. Wrap each stuffed pepper tightly in plastic wrap. Then, place them in a freezer-safe bag or container. They can last up to 3 months in the freezer. Just label the bag with the date. This way, you will know when to use them. When it's time to enjoy your leftovers, you can reheat them easily. The best way is to use the oven. Preheat it to 350°F (175°C). Place the stuffed peppers in an oven-safe dish. Cover them with foil to keep them moist. Bake for about 20 minutes or until heated through. If you want to keep the cheese melty, remove the foil for the last 5 minutes. You can also use the microwave, but this may change the texture. Place your pepper on a microwave-safe plate. Cover it with a damp paper towel to keep it from drying out. Heat for about 2 to 3 minutes, checking frequently. Enjoy the great flavors and textures just like they were fresh out of the oven! Can I make stuffed peppers ahead of time? Yes, you can make stuffed peppers ahead. Prepare them up to a day before. Keep them in the fridge. When ready, just bake them. This saves time and makes dinner easy. How do I know when the stuffed peppers are done? Stuffed peppers are done when the cheese is bubbly and golden. The peppers should be tender but still hold their shape. You can check the filling with a fork. It should be hot all the way through. Are stuffed peppers healthy? Stuffed peppers are quite healthy. They are low in carbs and high in protein. Ground turkey adds lean protein, while peppers have vitamins. The dish is colorful and packed with nutrients. How many calories are in stuffed bell peppers with ground turkey? Each stuffed pepper has about 300-400 calories. This can change based on ingredients. Using less cheese or more veggies can lower the calories. Check the Full Recipe for specific details. Can I use different grains instead of quinoa/rice? Absolutely! You can use barley, couscous, or farro. Each grain brings a unique flavor. Choose one that you like best or have on hand. What cheese options work best for stuffed peppers? Mozzarella and cheddar are popular choices. You can also try feta or pepper jack for extra flavor. Experiment with different cheeses to find your favorite. Stuffed bell peppers are a fun and healthy meal. We covered ingredients needed, from bell peppers to cheese. I shared step-by-step instructions, including prep, cooking, and baking tips. We also looked at storage methods and tasty variations. Try new flavors and proteins to find your favorite mix. Enjoy these peppers as a tasty meal or snack! They are easy to make and tasty to eat.

24 Stuffed Bell Peppers with Ground Turkey Delight

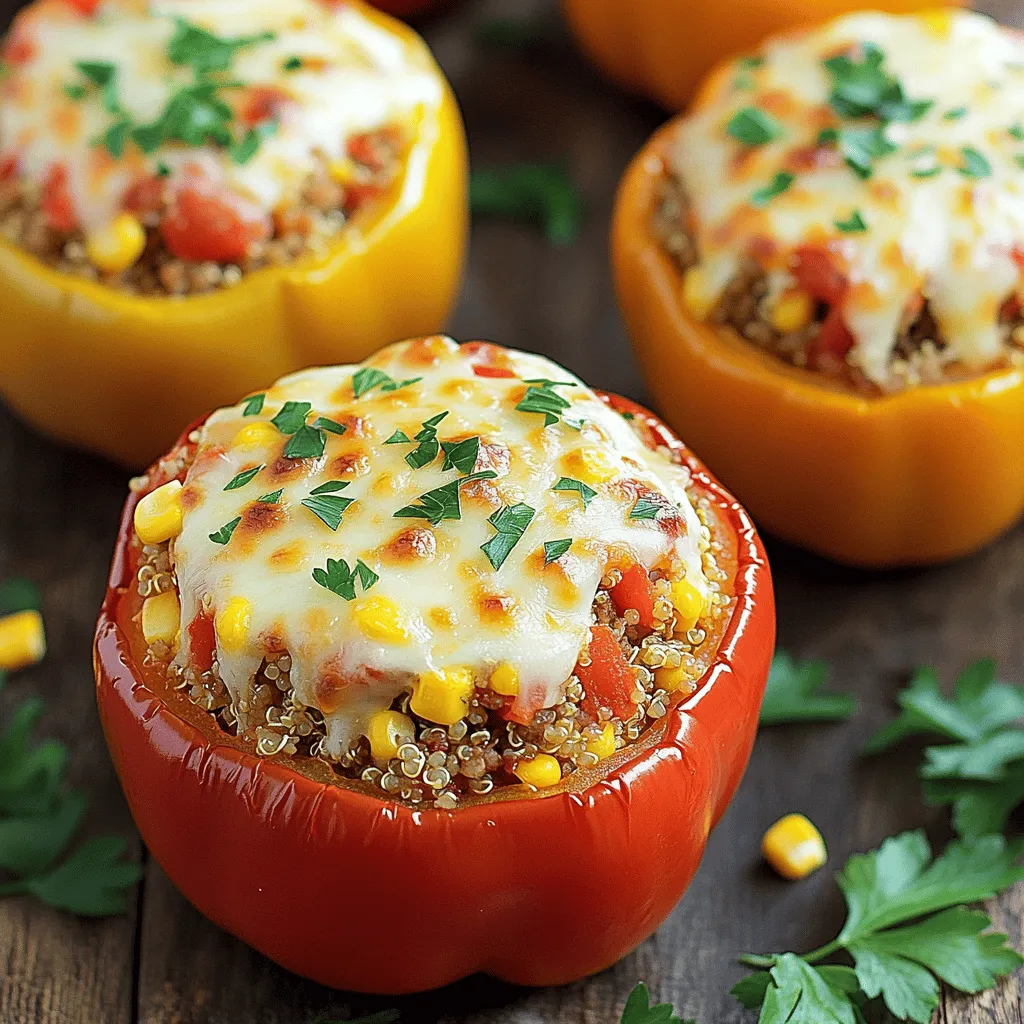
Are you ready to savor a dish that’s both healthy and delicious? My 24 Stuffed Bell Peppers with Ground Turkey

- 4 tilapia fillets - 1 bunch of fresh asparagus, trimmed - 2 tablespoons olive oil - 2 lemons (1 for slicing, 1 for juice) - 3 cloves garlic, minced - 1 teaspoon dried oregano - 1 teaspoon dried thyme - Salt and pepper to taste - Fresh parsley for garnish Gathering the right ingredients makes cooking easier and more fun. You'll need fresh tilapia fillets. This fish is mild and flaky, making it perfect for baking. Asparagus adds a bright crunch and is packed with nutrients. Olive oil brings richness and helps the herbs stick to the fish. Lemons add a zesty brightness. You’ll squeeze one for juice and slice the other for topping. Minced garlic gives a punch of flavor. Dried oregano and thyme enhance the dish with earthy notes. Lastly, salt and pepper balance everything out. A sprinkle of fresh parsley on top gives a lovely pop of color. You can find all these ingredients easily at your local grocery store. For the full recipe, check out the provided link. 1. Preheat your oven Start by setting your oven to 400°F (200°C). This temperature helps the fish cook evenly. 2. Arrange asparagus on the baking sheet Take a large baking sheet and spread the trimmed asparagus in a single layer. Drizzle 1 tablespoon of olive oil over the asparagus. Season with salt and pepper. Toss them around to coat well. 3. Prepare the herb mixture In a small bowl, mix the remaining olive oil, lemon juice, minced garlic, dried oregano, dried thyme, salt, and pepper. Whisk it together until you combine all the flavors. 1. Position tilapia on the baking sheet Next, place the tilapia fillets on the baking sheet among the asparagus. Make sure they have space to cook properly. 2. Drizzle the herb mixture over the fish Generously drizzle the herb mixture over each fillet. This will add flavor and keep the fish moist. 3. Add lemon slices before baking Slice the remaining lemon into thin rounds. Place a few slices on top of each tilapia fillet. The lemon will brighten the dish. 1. Bake duration and temperature Bake the dish in the preheated oven for 15-20 minutes. You want the fish to become flaky and the asparagus to be tender. 2. Checking for doneness To check if the tilapia is done, use a fork. If it flakes easily, it is ready. The asparagus should also be bright green and tender. This simple recipe, which you can follow in the Full Recipe, provides a tasty and healthy dish that showcases the lovely balance of lemon and herbs. For the best flakiness, bake tilapia for 15 to 20 minutes. Check it with a fork. The fish is done when it flakes easily. To make tender asparagus, don't overcook it. Bake it alongside the tilapia. It will cook just right in the same time. When serving, use a large platter. Layer the tilapia over the asparagus. This makes the dish look inviting. Add lemon slices and parsley on top for color. For side dishes, consider a light salad or some rice. Both go well with the fish and veggies. You can swap herbs for a new twist. Try basil or dill instead of oregano and thyme. Each herb brings its own flavor. If you like spice, add red pepper flakes. They give a nice kick to the dish. You can also use a bit of paprika for warmth. For the full recipe, check out the earlier section. Enjoy your cooking adventure! {{image_2}} You can switch the tilapia for other fish, like salmon or cod. Salmon adds a rich flavor. Cod is milder and flaky. Both work well with lemon and herbs. If you want a vegetarian option, consider using tofu or portobello mushrooms. They absorb flavors nicely and are satisfying. Asparagus pairs well with many veggies. Try adding bell peppers, zucchini, or cherry tomatoes. These veggies add color and nutrients. Adjust cooking time to ensure even cooking. For softer veggies, you might bake for less time. For heartier options, add a few extra minutes. You can play with the flavors in this dish. For a sweet twist, add honey or maple syrup to the herb mix. This balance of sweet and savory adds depth. You can also use different citrus fruits. Try lime or orange for a new taste. Each fruit changes the dish's character. To keep your Baked Lemon Herb Tilapia fresh, store leftovers in the fridge. Place the fish and asparagus in an airtight container. This helps to lock in moisture and flavor. Enjoy your meal within three days for the best taste. If using a shallow dish, cover it tightly with plastic wrap or foil. This method is easy and effective for keeping your food fresh. You can freeze Baked Lemon Herb Tilapia if you want to save it for later. First, let the dish cool completely. Then, wrap each fillet tightly in plastic wrap. Place them in a freezer-safe bag or container. Squeeze out as much air as you can before sealing. This helps prevent freezer burn. You can freeze it for up to three months. To thaw, move the tilapia to the fridge overnight. For quick thawing, place the sealed bag in cold water. Once thawed, reheat it in the oven at 350°F (175°C) for about 10-15 minutes. Ensure it reaches an internal temperature of 145°F (63°C) before serving. Enjoy your delicious meal again! How long do you bake tilapia? You should bake tilapia for 15 to 20 minutes. The fish should flake easily with a fork. This ensures it cooks through without drying out. Can I use frozen tilapia fillets? Yes, you can use frozen tilapia fillets. Just thaw them first. You can place them in the fridge overnight or run them under cold water. This helps them cook evenly and keeps them moist. Calorie count and macronutrient breakdown A serving of Baked Lemon Herb Tilapia has about 200 calories. It contains 25 grams of protein, 10 grams of fat, and 0 grams of carbs. This dish is light and packed with nutrients. Health benefits of tilapia and asparagus Tilapia is a great source of lean protein and omega-3 fatty acids. Asparagus is rich in vitamins A, C, E, and K. It also provides fiber, which helps with digestion. Together, they make a healthy meal. What to serve with Baked Lemon Herb Tilapia? You can serve this dish with rice or a fresh salad. Quinoa also pairs well. These sides add texture and keep the meal light. Can I make this recipe ahead of time? Yes, you can prep the tilapia and asparagus a day before. Just keep them in the fridge. When ready to cook, just follow the baking steps from the Full Recipe. This blog post covered a simple and tasty way to make Baked Lemon Herb Tilapia. You learned about the key ingredients, step-by-step instructions, and helpful tips. I shared variations and storage methods, ensuring you have all the details to succeed. Cooking should be fun and rewarding. Try this dish for a healthy meal. You’ll impress your family and friends with this easy recipe. Enjoy every bite!

23. Baked Lemon Herb Tilapia with Asparagus Delight

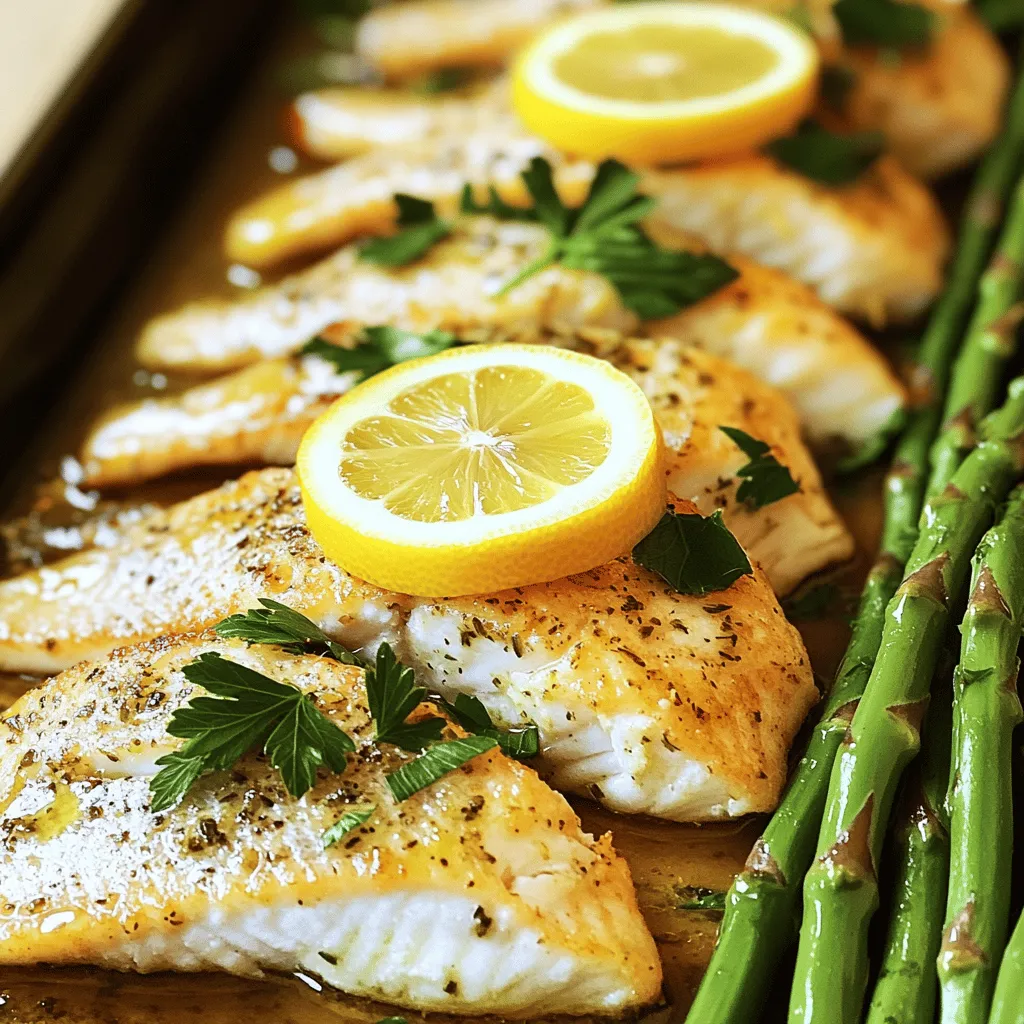
Looking for a quick, healthy meal that bursts with flavor? Try my Baked Lemon Herb Tilapia with Asparagus! This dish

- 400g spaghetti - 6 cloves of garlic, thinly sliced - 1/2 cup extra virgin olive oil - 1 teaspoon red chili flakes (adjust to taste) - 1/2 cup fresh parsley, chopped - Zest of 1 lemon - Grated Parmesan cheese - Salt and pepper Spaghetti Aglio e Olio is simple yet full of flavor. You only need a few main ingredients. The spaghetti serves as a tasty base. Garlic gives the dish its rich aroma. Extra virgin olive oil adds a silky texture. Red chili flakes bring heat and excitement. Fresh parsley brightens the dish, while lemon zest adds a zing. Feel free to adjust the chili flakes to your liking. If you want it spicier, add more. For those who love cheese, grated Parmesan is a great choice. A sprinkle of salt and pepper will enhance every bite. For the full recipe, check out the complete guide above. Enjoy making this classic dish! To start, fill a large pot with water. Add a good amount of salt. This will help flavor the pasta. Bring the water to a boil over high heat. Once boiling, add your spaghetti. Cook it according to the package instructions until it is al dente. This means it should still have a little bite. Reserve one cup of the pasta water. Then, drain the spaghetti in a colander. Next, grab a large skillet. Pour in the extra virgin olive oil and heat it over medium heat. Once hot, add the thinly sliced garlic. Stir it gently. Keep an eye on it as it cooks. You want the garlic to turn golden brown, about three to four minutes. Be careful here! If the garlic burns, it will taste bitter. Now, it’s time to add some heat. Stir in the red chili flakes and sauté for about thirty seconds. This helps to release the chili flavor. After that, add your drained spaghetti to the skillet. Toss the pasta in the garlic oil to coat it well. If the pasta looks dry, add some of that reserved pasta water. This will help create a nice sauce. Once everything is combined, take the skillet off the heat. Stir in the chopped parsley and lemon zest. These add freshness. Finally, season your dish with salt and freshly cracked black pepper to taste. If you like cheese, feel free to sprinkle some grated Parmesan on top before serving. Enjoy your delicious dish! For a complete guide, check out the Full Recipe. To make great garlic oil, watch the heat. Start with medium heat. Too high can burn the garlic. Burnt garlic tastes bad. Stir the garlic often. Cook it until golden brown, which takes about 3-4 minutes. The smell will be amazing! If you burn it, start over; it’s not worth it. Want more heat? Adjust the chili flakes in the recipe. Start with 1 teaspoon. If you like it spicy, add more! You can also try other heat sources. Fresh chili, jalapeños, or hot sauce can add fun flavors. Just remember to balance the heat with the garlic oil. Want to make this dish vegan? Skip the cheese, and it’s still tasty! You can add more veggies, like spinach or broccoli, to boost flavor and nutrition. If you need a gluten-free option, try gluten-free spaghetti. It cooks a bit differently, so check the package for directions. For the full recipe, check out the details above. {{image_2}} You can enhance your Spaghetti Aglio e Olio in simple ways. Adding sun-dried tomatoes gives a sweet, tangy taste. These dried tomatoes add a chewy texture and rich flavor. You can chop them and toss them in with the garlic. Olives or capers also bring a new layer of taste. Their briny flavor contrasts well with the garlic and oil. Just chop them up and mix them in for a salty surprise. While parsley shines in this dish, you can try other herbs too. Fresh basil adds a sweet, aromatic note. Just tear the leaves and sprinkle them before serving. Oregano offers a warm, earthy flavor. It works well with the garlic and oil. You can use fresh or dried oregano, depending on what you have. Seasonal greens like spinach or arugula can also add a fresh twist. Just toss them in right before serving for a vibrant touch. If you want protein in your pasta, grilled chicken is a great choice. Slice it thin and mix it in after you toss the spaghetti. The chicken absorbs the flavors nicely. Shrimp is another tasty option. Cook it in the garlic oil for a quick, seafood twist. The shrimp will soak up that garlic goodness. For a plant-based option, try chickpeas or lentils. They add protein and a hearty feel. Just heat them up in the pan and mix them in with the pasta. For the full recipe, check out the details above! When you have leftovers of Spaghetti Aglio e Olio, store them right. Let the pasta cool before putting it in the fridge. Use an airtight container to keep it fresh. This way, it won’t dry out or absorb other smells. The pasta lasts about three to four days in the fridge. To reheat, you have two good options: the stovetop or the microwave. For the stovetop, add a splash of olive oil to a skillet. Heat it on low, then add the pasta. Stir gently until it's warm. This helps keep the pasta moist and tasty. If you choose the microwave, put the pasta in a microwave-safe bowl. Add a little water or olive oil, cover it, and heat in 30-second bursts. Stir in between to avoid hot spots. You can freeze Spaghetti Aglio e Olio, but it’s best to skip the garlic. Cook the pasta, cool it, and place it in a freezer bag. Remember to squeeze out the air before sealing. It can last up to three months in the freezer. When ready to eat, thaw it in the fridge overnight. Reheat it as described above. This way, you can enjoy a quick meal later without losing flavor. Spaghetti Aglio e Olio is a classic Italian dish. It comes from Naples and means "spaghetti with garlic and oil." The dish is simple, using just a few ingredients. You mainly need spaghetti, garlic, and olive oil. Many Italians enjoy it as a quick meal. Variations exist, like adding anchovies or parsley. To add heat, simply increase the red chili flakes. Start with one teaspoon and adjust to your taste. You can also use fresh red chilies or chili oil for more flavor. Sauté them in the olive oil with the garlic. This step brings out their heat and makes the dish more exciting. Yes, you can make a vegan version. Just leave out the cheese and use extra herbs for flavor. Nutritional yeast is a great substitute for a cheesy taste. It adds a nice umami flavor without dairy. This way, everyone can enjoy this tasty dish. Spaghetti Aglio e Olio pairs well with many dishes. A light salad with lemon dressing is a great choice. Crusty bread also complements it nicely. For wine, a crisp white like Sauvignon Blanc works well. It balances the spice and richness of the oil. Spaghetti Aglio e Olio is simple yet full of flavor. We covered the key ingredients, like garlic and olive oil. Cooking steps help you create the dish perfectly. You learned tips for spice and storage, plus variations to try. Remember, this dish is versatile and fun. Don’t shy away from customizing it to your taste. Enjoy making your own version of this classic dish!

22. Spaghetti Aglio e Olio with Chili Flakes Delight

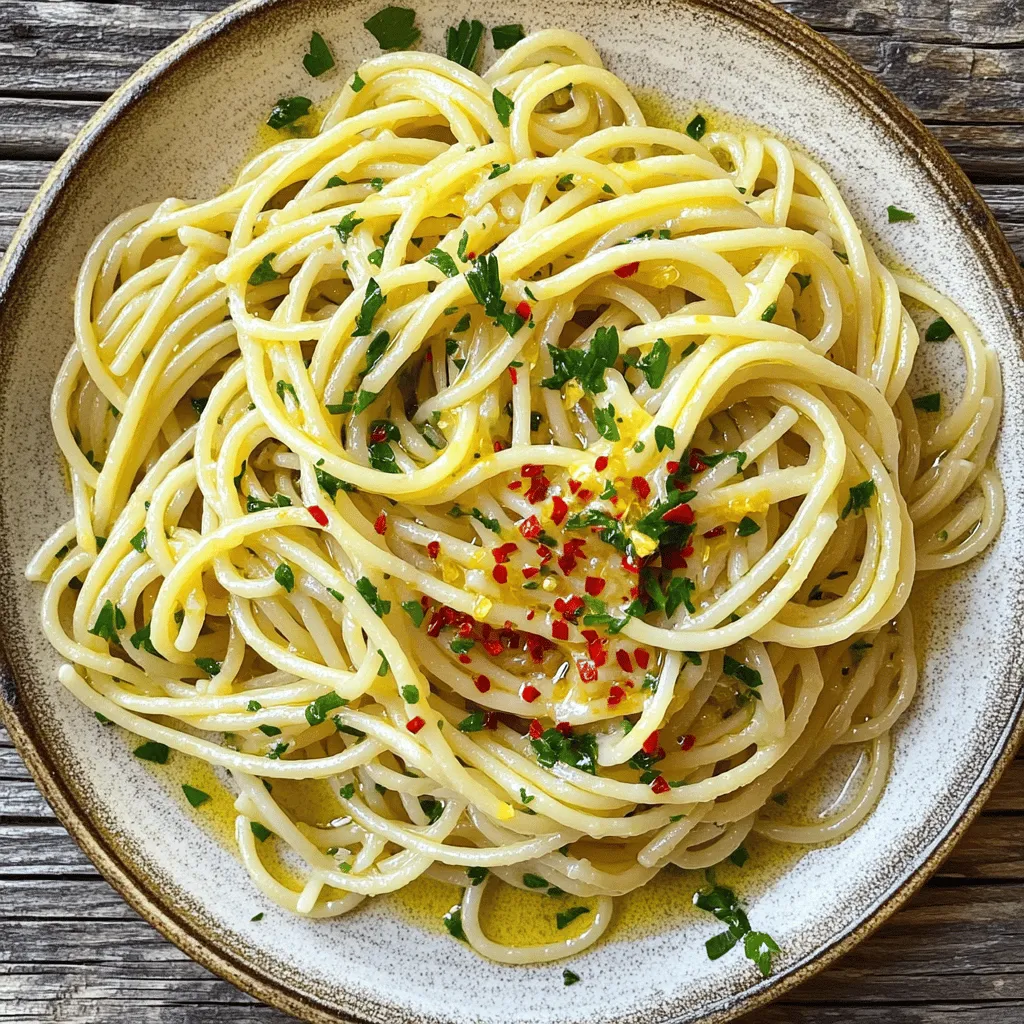
Are you ready to elevate your pasta game? Spaghetti Aglio e Olio with Chili Flakes is a quick, satisfying dish

- 1 cup quinoa, rinsed - 2 cups vegetable broth (or water) - 1 cup chickpeas, cooked (or canned, drained and rinsed) - 1 medium sweet potato, diced - 1 cup kale, chopped - 1 small cucumber, thinly sliced - 1 medium carrot, grated - ¼ cup cherry tomatoes, halved - ¼ avocado, sliced - 2 tablespoons sesame seeds The main ingredients create a balanced meal. Quinoa serves as a great base. It is rich in protein and fiber. Sweet potatoes add natural sweetness and nutrients. Kale brings in vitamins and minerals. Chickpeas give extra texture and protein. You can mix these ingredients in any order. - 3 tablespoons tahini - 2 tablespoons lemon juice - 1 tablespoon maple syrup - 1 garlic clove, minced - Water to thin (as needed) - Salt to taste The tahini dressing is creamy and tangy. Tahini is made from sesame seeds and adds depth. Lemon juice brightens the flavors, while maple syrup adds sweetness. Garlic gives it a nice kick. Adjust the water until you reach your desired thickness. This dressing ties all the flavors together. To see the full recipe, check out the details above. To start, rinse your quinoa well under cold water. This step removes any bitter taste. After rinsing, add 1 cup of quinoa and 2 cups of vegetable broth to a medium saucepan. Bring the mixture to a boil, then reduce the heat to low. Cover the pan and let it simmer for about 15 minutes. Once the liquid absorbs, fluff the quinoa with a fork. This gives it a light texture. Next, preheat your oven to 400°F (200°C). While it heats, take 1 medium sweet potato and dice it into small cubes. Toss the cubes in a bowl with olive oil, salt, and pepper. Spread them out on a baking sheet. Roast for 20-25 minutes, checking them often. You want them tender and slightly caramelized for the best flavor. Now, let’s sauté the kale. In a medium skillet, heat a splash of water or olive oil over medium heat. Add 1 cup of chopped kale to the skillet. Sauté for about 3-5 minutes until it wilts down. For flavor, season it with a pinch of salt. This will make your kale tasty and vibrant. This step-by-step process ensures that your Vegan Buddha Bowl with Tahini Dressing is packed with flavor and texture. Follow these simple instructions, and you’ll create a satisfying meal. For more details, check the Full Recipe! To make your Buddha bowl look great, layer your ingredients with care. Start with the quinoa at the bottom. Add the roasted sweet potato next, then the sautéed kale. Place the chickpeas, cucumber, and grated carrot in separate sections. Finally, top with cherry tomatoes and avocado slices. This method shows off the colors and textures. Don’t forget to sprinkle sesame seeds on top for a nice touch. They add crunch and flavor. If you're short on time, you can make some easy changes. Use pre-cooked quinoa or microwaveable packs to save time. For the sweet potato, you can steam it instead of roasting. This method cooks it faster but still keeps it tasty. You can also buy pre-chopped veggies to make prep quicker. These swaps help you enjoy your meal without the wait. To add more flavor, consider using spices like cumin or paprika. You can sprinkle these on the sweet potato before roasting. Fresh herbs like cilantro or parsley can also boost the taste. For more depth in your tahini dressing, try adding a splash of soy sauce or a pinch of red pepper flakes. These small changes can make a big difference in your bowl. For the full recipe, check the earlier section. {{image_2}} You can swap grains to change up your Buddha bowl. Instead of quinoa, try brown rice or farro. They each add a unique taste and texture. You can also use barley for a chewier bite. For vegetables, feel free to mix things up. Add roasted broccoli or bell peppers for more color. You might also like to include spinach or beets. Each of these choices adds new flavors and nutrients. If you want a creamy twist, try using almond butter or sunflower seed butter instead of tahini. Both add a rich flavor and creamy texture. You can also use a yogurt-based dressing for a tangy kick. For something zesty, make a lemon vinaigrette with olive oil and Dijon mustard. Each dressing brings its own unique taste to the bowl. To make your meal heartier, add some protein. Grilled tofu, tempeh, or edamame work well. You can also serve the bowl with a side of warm pita or flatbread. This adds more texture and fills you up. If you meal prep, consider making a big batch of quinoa and roasted veggies. Store them in the fridge to use throughout the week. This way, you’ll have a quick and easy meal ready to go. For the full recipe, check out the detailed steps earlier. To keep your Vegan Buddha Bowl fresh, store leftovers in an airtight container. Place it in the fridge within two hours of making it. This helps keep the flavors intact. You can enjoy your Buddha bowl for up to three days. Just remember to separate the tahini dressing if you want it to stay fresh longer. You can freeze cooked quinoa and roasted vegetables. Just let them cool first. Use airtight containers or freezer bags to prevent freezer burn. When you’re ready to eat, thaw in the fridge overnight. Reheat quinoa in the microwave or on the stove, adding a splash of water for moisture. Roasted veggies can be warmed in the oven for best texture and flavor. For meal prep, glass containers work great. They are safe, durable, and help you see your food. Use smaller containers for on-the-go servings. Look for containers with compartments to keep your ingredients separate until you're ready to eat. This way, your Buddha bowl stays fresh and tasty! To make a vegan Buddha bowl, follow these quick steps: 1. Cook quinoa in vegetable broth. 2. Roast diced sweet potatoes in the oven. 3. Sauté chopped kale in a skillet. 4. Prepare the tahini dressing. 5. Layer quinoa, sweet potato, kale, chickpeas, cucumber, carrot, tomatoes, and avocado in a bowl. 6. Drizzle with tahini dressing and sprinkle sesame seeds on top. These steps create a balanced and colorful meal that is both tasty and nourishing. Yes, you can make the tahini dressing ahead of time. - Prepare it and store it in an airtight container. - Keep it in the fridge for up to one week. - If it thickens, add a little water to thin it out before use. Making the dressing in advance saves time and adds flavor to your bowls. This vegan Buddha bowl is packed with nutrients. - It contains about 450 calories per serving. - You get around 15 grams of protein. - The healthy fats from tahini and avocado add about 20 grams of fat. This bowl provides a good balance of macronutrients, making it a healthy choice. Yes, this recipe is gluten-free. - Quinoa and all the vegetables are naturally gluten-free. - Ensure any packaged ingredients, like chickpeas, are labeled gluten-free. You can enjoy this bowl without worrying about gluten. Making a Buddha bowl is simple and fun. You learned about key ingredients like quinoa and vegetables. We covered cooking tips for perfect quinoa and roasted sweet potatoes. Presentation is key for a great look. Don't forget the variations for flavor and nutrition. Finally, proper storage keeps your meal fresh. By using these tips and recipes, you can enjoy tasty, healthy bowls every time.

21. Vegan Buddha Bowl with Tahini Dressing Easy Meal

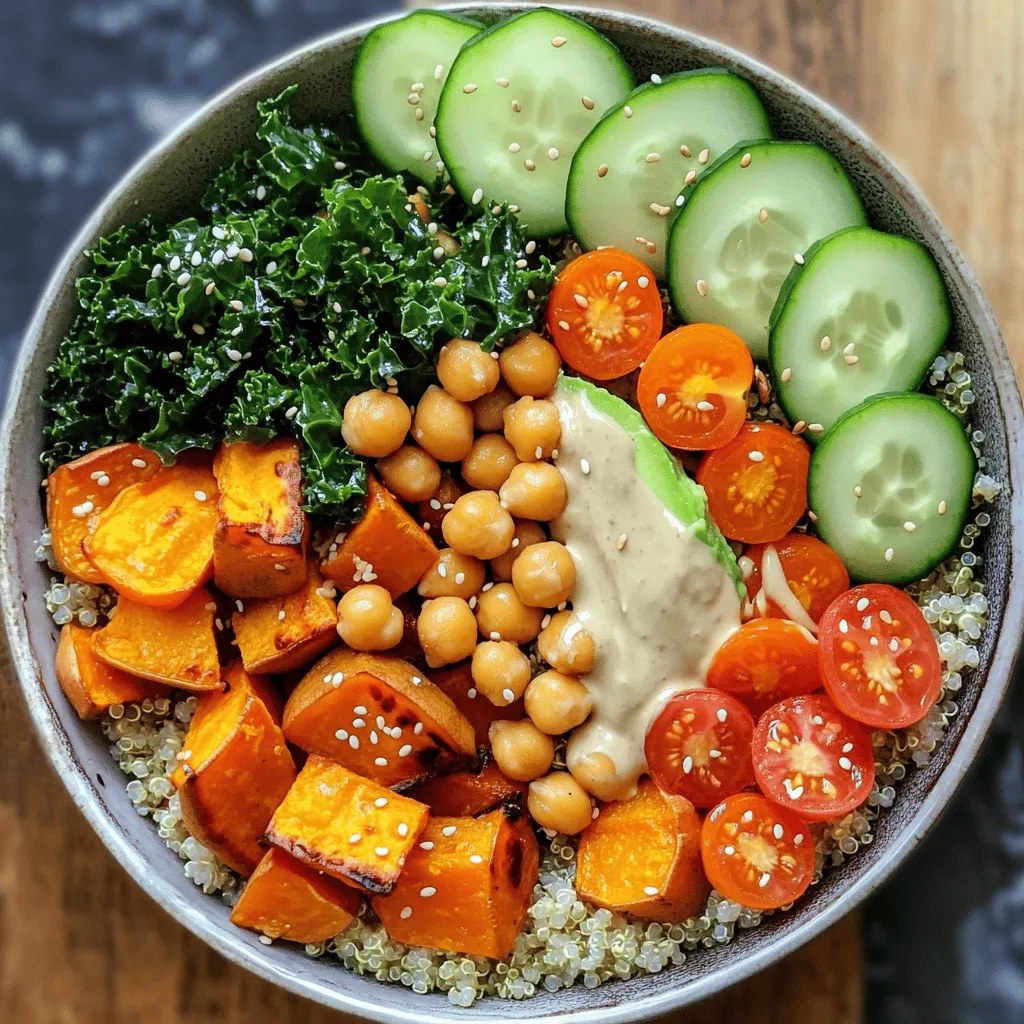
Looking for a quick and tasty meal? You’ve found it! This Vegan Buddha Bowl with Tahini Dressing is packed with

When preparing Chicken Alfredo with Broccoli, you want to gather fresh, quality ingredients. Here’s what you need for 20 servings: - Chicken Breasts - Fettuccine Pasta - Broccoli Florets - Butter - Garlic - Heavy Cream - Parmesan Cheese - Italian Seasoning - Salt and Pepper - Fresh Parsley Each ingredient plays a key role in creating this creamy, comforting dish. Chicken breasts give protein and a hearty flavor. Fettuccine pasta serves as a perfect base, soaking up the rich sauce. Broccoli florets add color and crunch, making the dish more vibrant. Butter and garlic create a fragrant start for your sauce. Heavy cream and Parmesan cheese make the sauce creamy and cheesy. Italian seasoning, salt, and pepper enhance all the flavors. Finally, fresh parsley adds a bright finish when serving. With these ingredients, you will create a meal that’s both delicious and satisfying. For the full recipe, don’t forget to check out the details! - Seasoning and Cooking Chicken: First, season the chicken breasts with salt, pepper, and Italian seasoning. This gives great flavor. In a large skillet, melt 2 tablespoons of butter over medium heat. Add the seasoned chicken. Cook for about 6-7 minutes on each side. The chicken should be cooked through and golden brown. Remove it from the skillet and let it rest for a few minutes. - Slicing Chicken: Once the chicken has rested, slice it into strips. This makes it easy to mix into the pasta later. - Sautéing Garlic: In the same skillet, add the remaining butter and minced garlic. Sauté for about a minute. The garlic should smell nice and fragrant. - Steaming Broccoli Florets: Next, add the broccoli florets and a splash of water. Cover the skillet and let the broccoli steam for 3-4 minutes. It should turn bright green and be tender, but still crisp. - Boiling Fettuccine: In a large pot, boil salted water. Add the fettuccine and cook according to package instructions. Usually, this takes 8-10 minutes until the pasta is al dente. - Draining and Setting Aside: Once cooked, drain the pasta in a colander. Set it aside for now. - Combining Cream and Cheese: In the skillet with the broccoli and garlic, pour in the heavy cream. Let it come to a gentle simmer. Then, stir in the grated Parmesan cheese. Mix until the sauce thickens a bit. - Seasoning the Sauce: Taste the sauce and add more salt and pepper if needed. This step makes sure the flavors are just right. - Adding Pasta and Chicken to Sauce: Now, it’s time to combine everything! Add the cooked fettuccine and sliced chicken to the skillet with the sauce. - Tossing Everything Together: Toss everything gently until all the pasta and chicken are well coated in the creamy sauce. - Plating the Dish: Use shallow bowls to plate the Chicken Alfredo with Broccoli. This makes it look nice. - Garnishing with Parsley: Finally, sprinkle chopped fresh parsley on top. This adds a lovely color and fresh taste. For the full recipe, check out the details above. Enjoy your delicious meal! To get that rich and creamy texture in your Alfredo sauce, you need to focus on two main areas: thickening and seasoning. - Thickening the Sauce: Start with heavy cream. This is crucial for a thick sauce. Heat it gently, then add grated Parmesan cheese. Stir constantly until it melts and combines. If the sauce seems too thin, let it simmer a little longer. The cheese will help to thicken it more. - Adjusting Seasoning: Taste is key! After adding cheese, try the sauce. If it needs more flavor, add salt or pepper. You can also sprinkle in some Italian seasoning to enhance the taste. Just remember to add a little at a time. When cooking for more people, you can easily adjust your recipe. - Scaling Ingredients: For larger servings, simply multiply your ingredients. If you want to serve 20, double the chicken and pasta. Make sure you have enough sauce too. It ties everything together. - Timing Your Cooking Process: Timing is crucial. Start with the chicken, then the broccoli, and finally the pasta. This way, everything will be hot and fresh when you serve it. Keep a close eye on each step so nothing overcooks. Presentation makes a meal special. - Pairing with Sides: Think about a light salad or some garlic bread. They balance the creaminess of the Alfredo. You can also serve it with a glass of white wine for a nice touch. - Presentation Ideas: Use shallow bowls for a nice look. After plating, sprinkle fresh parsley on top for color. This not only looks great but adds a fresh flavor too. These tips will elevate your Chicken Alfredo with Broccoli and make it a hit! For the complete details, refer to the Full Recipe. {{image_2}} You can change Chicken Alfredo with Broccoli in many fun ways. Let’s explore some variations that make this dish even better. Adding more veggies boosts nutrition and flavor. - Peas: Toss in some sweet peas. They add a pop of color and taste. Just stir them in with the broccoli for a few minutes. - Spinach: Add fresh spinach for a vibrant twist. It wilts down nicely. Mix in the spinach right before serving for a fresh touch. Switching proteins can change the whole dish. - Shrimp: Use shrimp instead of chicken. Shrimp cooks fast. Sauté them until pink and tender, then add them to your Alfredo sauce. - Tofu: For a meat-free option, use tofu. Press and cube it, then sauté until golden. This adds a nice texture while keeping it plant-based. Different flavors can take your dish to the next level. - Different Cheese: Try using different cheeses like mozzarella or gouda. Each cheese brings its unique taste and creaminess. Mix and match for fun results! - Spices and Herbs: Add spices like red pepper flakes for heat or fresh basil for freshness. These small changes can elevate your dish and surprise your taste buds. These variations allow you to make Chicken Alfredo with Broccoli your own. Enjoy experimenting with flavors and textures, and don’t forget to check out the Full Recipe for more details! - Refrigeration Guidelines: Place any leftover Chicken Alfredo with Broccoli in an airtight container. It will stay fresh in the fridge for about 3 to 4 days. Make sure to cool it down to room temperature before sealing it. - Freezing for Later Use: If you want to keep it longer, freeze the leftovers. Use freezer-safe containers or bags. It will last for about 2 to 3 months in the freezer. Just remember to label it with the date! - Best Methods: The best way to reheat this dish is on the stove. Heat it in a pan over low heat, stirring often. You can also use the microwave but do it in short bursts, stirring in between. - Maintaining Creaminess: To keep the sauce creamy, add a splash of milk or cream while reheating. This will help restore its smooth texture. Stir well to combine everything before serving. You can prepare Chicken Alfredo with Broccoli ahead of time. Just follow these steps for best results. First, cook the chicken and broccoli as described in the recipe. After cooling, store them in airtight containers. Keep the pasta separate to avoid sogginess. When ready to serve, reheat the chicken and broccoli. Cook the pasta fresh for the best taste and texture. Combine everything, then add the sauce. This keeps each part fresh and tasty. If you want a lighter option, you can substitute heavy cream. Here are a few choices: - Milk and butter: Mix ¾ cup of milk with ¼ cup of melted butter. - Greek yogurt: Use it for a creamy texture but reduce the heat to avoid curdling. - Coconut milk: This adds a unique flavor and is dairy-free. These alternatives change the taste slightly but still give a creamy texture. To check if the chicken is cooked, use a meat thermometer. Insert it into the thickest part of the chicken. The safe internal temperature is 165°F (75°C). If you don’t have a thermometer, cut into the chicken. The meat should be white, not pink. The juices should run clear. This ensures the chicken is safe to eat. Yes, you can use whole grain pasta instead of fettuccine. Whole grain pasta adds more fiber and nutrients. Just cook it according to the package instructions. Adjust the cooking time, as whole grain pasta may take longer. The taste and texture will be different, but it will still pair well with the creamy sauce. This blog post provided a full guide to making Chicken Alfredo with Broccoli for 20 servings. You learned about the key ingredients, step-by-step instructions, and helpful tips for perfecting the dish. Remember, you can customize it with different proteins or veggies to suit your taste. Storing leftovers is easy, too! Enjoy your creamy, savory meal and impress your friends or family when you serve it. Cooking doesn’t have to be hard. With these tips, you’ll shine in the kitchen!

20. Chicken Alfredo with Broccoli Savory Dinner Idea

Looking for a simple yet delicious dinner idea? My Chicken Alfredo with Broccoli is your answer! This comforting dish blends

- 1 block firm tofu, pressed and cubed - 1 cup bell peppers (red, yellow, green), sliced - 1 cup pineapple chunks (fresh or canned) - 1 small onion, sliced - 2 cloves garlic, minced - 1-inch piece ginger, grated - 3 tablespoons soy sauce - 3 tablespoons rice vinegar - 2 tablespoons honey or maple syrup - 1 tablespoon cornstarch mixed with 2 tablespoons water (slurry) - 2 tablespoons vegetable oil - Sesame seeds for garnish - Fresh cilantro for garnish - Cooked jasmine rice for serving When I prepare Sweet and Sour Pork Stir-Fry, I focus on fresh ingredients. The tofu gives a nice texture and absorbs the sauce well. I love using bell peppers for their sweet crunch. Pineapple adds a juicy burst, making every bite exciting. The soy sauce and rice vinegar create a tangy base. Honey or maple syrup brings in sweetness, balancing flavors perfectly. The cornstarch slurry thickens the sauce, giving it a glossy finish. Using sesame seeds and cilantro at the end adds color and flavor. Serve this over fluffy jasmine rice. It makes a complete meal that's as tasty as it is beautiful. For the full recipe, check out the details above. - Press and cube the tofu. - Slice the vegetables (bell peppers, onion). - Mince garlic and grate ginger. First, you need to press the tofu to remove excess moisture. This step is key. It helps the tofu become crispy when cooked. After pressing, cube the tofu into 1-inch pieces. Pat them dry with a paper towel to soak up any remaining moisture. Next, slice the bell peppers and onion. You can use red, yellow, or green bell peppers for color and flavor. The onion adds sweetness and depth to the dish. Finally, mince the garlic and grate the ginger. These two ingredients bring bold flavors and warmth to your stir-fry. - Heat vegetable oil and fry tofu until golden brown. - Sauté vegetables until softened. - Add pineapple and cook briefly. In a large skillet or wok, heat vegetable oil over medium-high heat. Add the tofu cubes in a single layer. Fry them until they are golden brown and crispy. This takes about 3 to 4 minutes on each side. Once done, remove the tofu and set it aside. In the same skillet, add more oil if needed. Sauté the sliced onion and bell peppers for about 3 to 4 minutes. You want them to soften but still have a little crunch. Then add the minced garlic and grated ginger. Stir for about a minute to bring out their aroma. Now, add the pineapple chunks. Cook them for another 2 minutes. This step helps release their sweet juices and adds a nice contrast to the savory tofu. - Mix soy sauce, rice vinegar, and honey. - Thicken sauce with cornstarch slurry. - Combine tofu and sauce until evenly coated. In a small bowl, mix the soy sauce, rice vinegar, and honey. This blend creates the sweet and tangy base for your dish. Next, make a cornstarch slurry by mixing cornstarch with water. Add this to the skillet to thicken the sauce. Stir constantly until the sauce becomes glossy and slightly thickened, about 2 minutes. Finally, add the fried tofu back into the pan. Gently fold it into the sauce until it is well coated. Cook for another minute to warm the tofu. Your sweet and sour pork stir-fry is almost ready! For the full recipe, check the details above. To make your sweet and sour pork stir-fry perfect, here are some simple tips: - Ensure tofu is patted dry for better frying. This helps it crisp up nicely. - Adjust cooking time based on stovetop variations. Some stoves heat faster than others. A beautiful dish makes the meal even better. Here’s how to present your stir-fry: - Serve over fluffy jasmine rice. This adds a nice base and absorbs the sauce. - Utilize garnishes for enhanced visual appeal. A sprinkle of sesame seeds and fresh cilantro adds color. Want to kick your stir-fry up a notch? Try these ideas: - Experiment with different vegetables or proteins. Swap bell peppers for broccoli or add shrimp. - Adjust sweetness by varying honey or maple syrup. Taste as you go to find your perfect balance. For the full recipe, check out the details above! {{image_2}} You can change up the veggies in your stir-fry. Try adding broccoli, snap peas, or carrots for extra crunch. These vegetables cook quickly and add a nice color. You can also swap in seasonal vegetables based on what you find fresh at the market. This keeps your dish exciting and flavorful. While tofu is a great choice, you can switch it out for chicken, shrimp, or beef. Each protein brings its own taste and texture to the dish. If you want a vegetarian option, consider using tempeh. It has a nutty flavor and works well with the sweet and sour sauce. The sauce is key to the flavor. You can use different types of vinegar, like apple cider or white vinegar. Each type adds a unique twist. Also, try different sweeteners like agave or brown sugar. These swaps can change the taste and make the dish your own. For the full recipe, check out the Tangy Citrus Sweet and Sour Tofu Stir-Fry. Store any leftover Sweet and Sour Pork Stir-Fry in an airtight container. This helps keep the flavors fresh. It’s best to eat the stir-fry within 3-4 days for the best taste. After that, the quality may drop. Freezing this stir-fry is not a good idea. Tofu can become mushy once thawed. If you must freeze, consider freezing the sauce separately. This way, you can use it later with fresh ingredients. For reheating, use a skillet on medium heat. This method keeps the texture nice. Stir it gently until it is heated through. Avoid using the microwave, as it can make the tofu rubbery. Enjoy your meal just like it was fresh! Making this dish is quick and easy. It takes about 15 minutes to prep and another 15 minutes to cook. So, the total time is just 30 minutes. Perfect for a busy weeknight! Yes, you can use frozen vegetables. Just remember to adjust the cooking time. Frozen veggies may need a bit longer to cook through. Keep an eye on them to ensure they heat evenly. To keep tofu crispy, press it well. Remove excess moisture by placing it between paper towels and using a weight. Make sure it is dry before cooking. This simple step makes a big difference in texture! For a complete meal, serve this stir-fry with jasmine rice or noodles. The rice absorbs the sauce well, making every bite a flavorful delight. You can also sprinkle some sesame seeds on top for added crunch. This blog post covered the key ingredients and steps for a perfect Sweet and Sour Tofu stir-fry. We discussed preparation, cooking tips, and ways to make your dish shine. Your stir-fry will benefit from proper tofu pressing and mixing flavorful sauces. Experiment with veggies and proteins to fit your taste! Remember to store leftovers properly for the best flavor later. Now, get cooking and enjoy your delightful meal. It's time to try it yourself!

83. Sweet and Sour Pork Stir-Fry Flavorful Delight

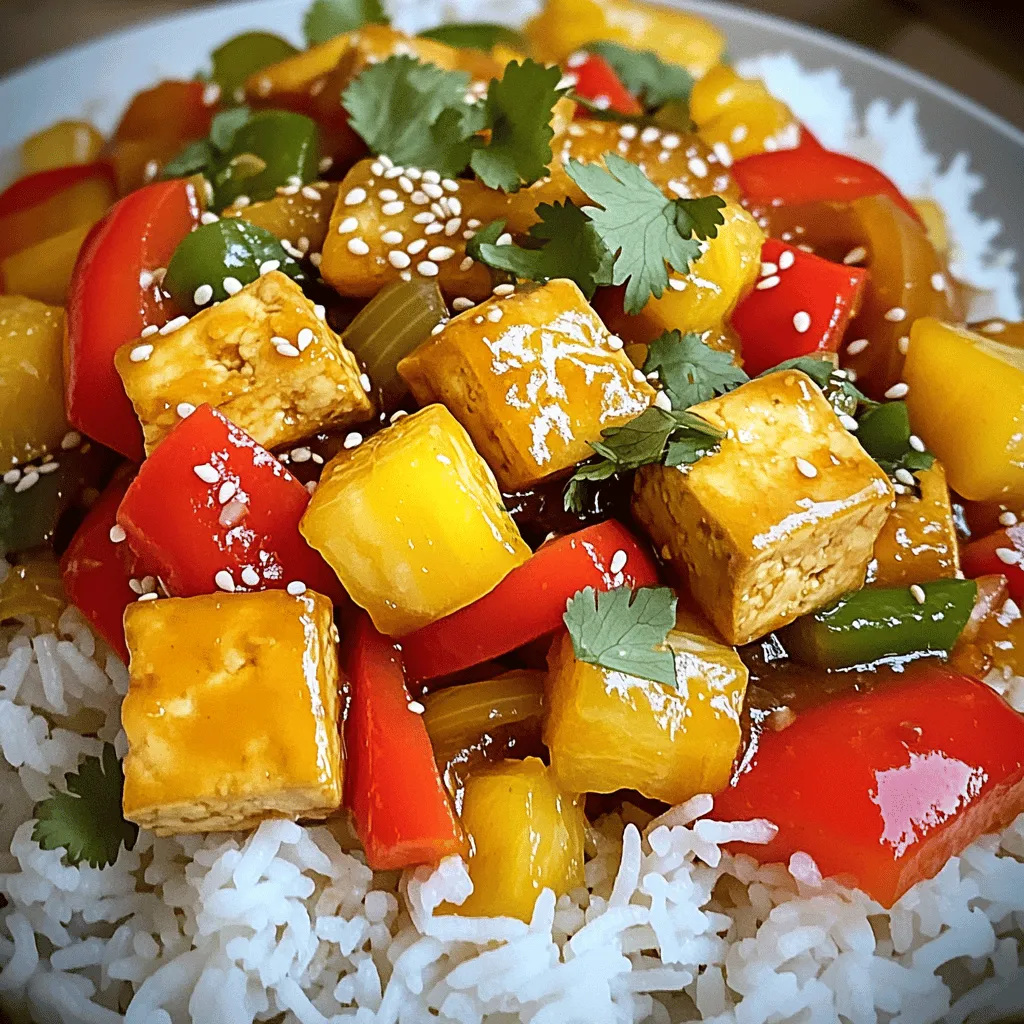
Looking for a quick and tasty dinner? This Sweet and Sour Pork Stir-Fry is packed with vibrant flavors and takes

- 1 whole chicken (about 4-5 lbs) - 2 tablespoons Herbs de Provence - 1 lemon, zested and juiced - 4 cloves garlic, minced - 3 tablespoons olive oil - 1 tablespoon Dijon mustard - Salt and pepper to taste - 1 large onion, quartered - 4 carrots, cut into large chunks - 3 sprigs fresh rosemary (for stuffing) - Roasting pan - Mixing bowl - Basting brush - Meat thermometer Gather these ingredients before you start cooking. Each item plays a key role in creating the rich flavors of this roasted chicken. The chicken should be around 4-5 pounds. This size ensures it cooks evenly and remains juicy. Herbs de Provence adds a unique taste, while the lemon brightens the dish. Fresh garlic enhances the aroma, and olive oil provides moisture. You will also need a roasting pan. It helps the chicken cook evenly. A mixing bowl is great for combining the marinade. A basting brush ensures you can evenly spread the marinade on the chicken. Finally, a meat thermometer is essential for checking the chicken's doneness. This tool will help prevent undercooking or overcooking. Once you have everything ready, you're set to create a flavorful meal. For the full recipe, refer to the complete instructions that follow. - Preheat the oven to 425°F (220°C). - In a mixing bowl, combine olive oil, garlic, lemon zest, lemon juice, Dijon mustard, Herbs de Provence, salt, and pepper to make a marinade. - Pat the chicken dry with paper towels. Gently loosen the skin over the breast and thighs. - Spread half the marinade under the skin. Rub the rest all over the outside. - Stuff the chicken’s cavity with quartered onion, carrot chunks, and fresh rosemary. - Place the chicken in a roasting pan and add any leftover vegetables around it. - Roast for about 1 hour and 15 minutes. Baste halfway with the pan juices. - Use a meat thermometer to check that the thickest part of the thigh reaches 165°F (75°C). Follow these steps to create a mouthwatering roasted chicken. For the complete instructions, refer to the Full Recipe. - Allow the chicken to marinate for at least an hour for enhanced flavor. - Use fresh Herbs de Provence for the best aroma. Marinating is key to great taste. When you let the chicken soak in the marinade, it absorbs those rich flavors. I often prepare the marinade and let it sit while I prep the chicken. Fresh herbs are a game changer, bringing out that lovely scent. They also add depth to each bite. - Basting during roasting keeps the chicken moist. - Let the chicken rest after cooking to retain juices. Basting is crucial. It adds moisture and adds flavor from the pan juices. I baste every 30 minutes for the best result. After roasting, I let the chicken rest. This step is vital. It helps the juices stay in the meat, making it juicy and tender. - Serve on a rustic board with sprigs of herbs and lemon wedges. - Arrange vegetables aesthetically for added color. Presentation matters. I love serving the chicken on a wooden board. It looks inviting and rustic. Adding lemon wedges and fresh herbs creates a bright splash. Arranging vegetables in a colorful way makes the dish pop. A little effort goes a long way in impressing guests! For the full recipe, check out the details above. {{image_2}} You can easily change the herbs in this dish. Use Italian seasoning instead of Herbs de Provence for a different flavor profile. It brings a unique taste that many enjoy. Fresh herbs like thyme or tarragon work well, too. They add a fresh burst of flavor that can elevate your chicken dish. Think about adding more vegetables to your roast. Potatoes and parsnips make great additions. They soak up the flavor and cook beautifully. You can also toss in olives or dried fruits. This adds a Mediterranean twist that complements the chicken perfectly. Try different cooking methods to change the texture and flavor. Slow roasting makes the meat more tender and juicy. It allows the flavors to meld well together. Grilling the chicken adds a smoky flavor that is hard to resist. Each method brings its own charm to this classic dish. Check out the Full Recipe for more details on cooking times and techniques. - Store leftovers in an airtight container in the fridge for up to 4 days. - Ensure the chicken is cooled before sealing it. You want to keep your roasted chicken fresh and tasty. Storing it right helps maintain flavor and texture. After dinner, let the chicken cool down. Once it's cool, place it in an airtight container. This will keep it safe from bacteria and drying out. - Wrap portions of roasted chicken tightly in plastic wrap and then foil. - Freeze for up to 3 months for best quality. If you have more chicken than you can eat, freezing is a great choice. Wrap the chicken tightly using plastic wrap. After that, cover it with foil to avoid freezer burn. Label the package with the date. This way, you know how long it's been in there. Use it within three months for the best taste. - Reheat chicken in the oven at 350°F until warmed through. - Avoid microwaving if possible to prevent drying out. When you're ready to enjoy leftovers, reheating in the oven is best. Set it to 350°F and place the chicken inside. This method keeps the meat juicy and the skin crispy. If you must use a microwave, cover the chicken with a damp paper towel. This can help reduce drying, but the oven is always better. For the full recipe, check the earlier section. Enjoy your delicious roasted chicken! - Yes, but ensure it's fully thawed before cooking for even results. - Use a meat thermometer to check that it reaches 165°F (75°C). - Pair with roasted vegetables, a fresh salad, or crusty bread for a complete meal. This blog covered how to roast a whole chicken step by step. We talked about choosing fresh ingredients and keeping your chicken moist and flavorful. Remember to marinate for the best taste and let it rest after cooking. Feel free to experiment with herbs and sides for your meals. Whether you’re a novice or an expert in the kitchen, this easy guide will help you create a delicious dish every time. Enjoy your cooking journey and the tasty results!

82. Roasted Chicken with Herbs de Provence Delight

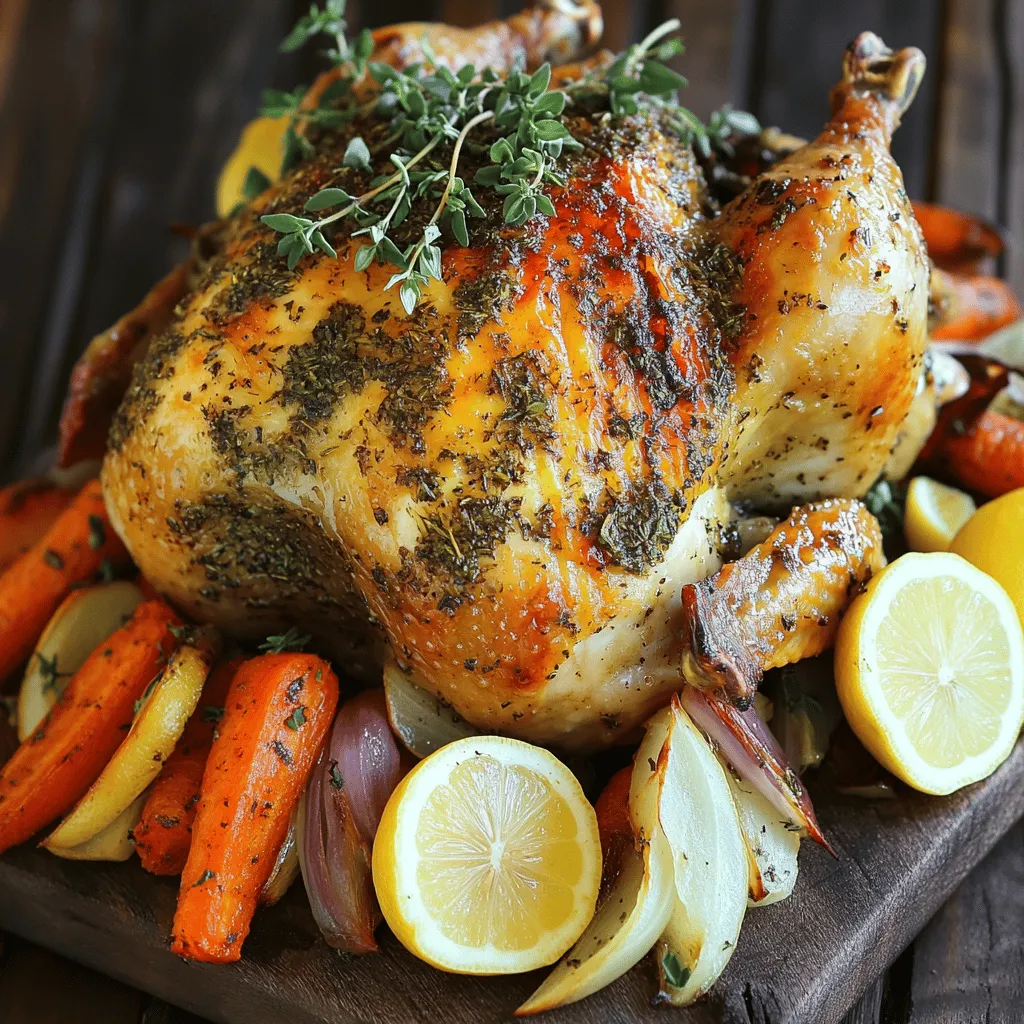
Are you ready to impress your family and friends? Let’s dive into the savory world of Roasted Chicken with Herbs

Older posts
Newer posts
← Previous Page1 … Page28 Page29 Page30 … Page63 Next →

dsad

© 2025 Recipes Pursuit • Built with GeneratePress

Our Policies

  • Copyright Policy
  • Cookie Policy
  • GDPR Policy
  • Privacy Policy
  • Disclaimer
  • Terms Of Use

More Information

  • Home
  • About
  • Contact
  • Appetizers
  • Dessert
  • Dinner
  • Drinks
©2025, Recipes Pursuit About Back To Top