Skip to content
DisclaimerTerms Of UseGDPR PolicyCookie Policy

Recipes Pursuit

  • Home
  • Drinks
  • Appetizers
  • Dinner
  • Dessert
  • About
  • Contact
  • Privacy Policy
DisclaimerTerms Of UseGDPR PolicyCookie Policy

Emma Smith

To make homemade bagel bites, gather these simple ingredients. They are easy to find and work well together. - Mini bagels - Pizza sauce - Cheese and toppings - Spices and seasoning You start with mini bagels. They are the perfect size for little bites. Slice them in half for a great base. Next, you need pizza sauce. This adds a rich, tangy flavor. Use your favorite store-bought sauce or make your own. Cheese is a must. I recommend shredded mozzarella. It melts nicely and tastes great. You can also add toppings like pepperoni, veggies, or sausage. Finally, don’t forget spices! Dried oregano and garlic powder give a nice kick. A little olive oil adds flavor and helps the bagels crisp up. For the full recipe, follow the steps carefully. You will end up with tasty, cheesy mini bagel bites that everyone will love! 1. Preheating the oven Start by preheating your oven to 375°F (190°C). This step helps the bagel bites cook evenly. 2. Preparing the bagel halves Take six mini bagels and slice them in half. Place the bagel halves cut-side up on a baking sheet. This setup ensures that toppings stay on top. 3. Assembling the toppings Brush the tops of the bagels lightly with olive oil. Then, spread about a tablespoon of pizza sauce on each half. Next, sprinkle shredded mozzarella cheese over the sauce. Add pepperoni slices or any topping you like. Finally, sprinkle dried oregano and garlic powder on top for added flavor. 4. Baking the bagel bites Place the baking sheet in the preheated oven. Bake for about 10 to 12 minutes. Keep an eye on them until the cheese is bubbly and golden. Once done, remove them from the oven and let cool slightly before serving. For a nice touch, you can garnish with fresh basil leaves. Follow these steps for deliciously cheesy mini bagel bites. For the complete process, refer to the Full Recipe. To make the best bagel bites, start with fresh mini bagels. Look for bagels that are soft and not stale. Freshness matters because it affects taste and texture. For crispy edges, brush your bagel halves lightly with olive oil. This small step makes a big difference. It helps the bagels become golden and crunchy. After baking, the edges should have a nice crisp. When it comes to melting cheese, spread it evenly over the sauce. This way, each bite has a good cheese pull. You can also place the baking sheet on a higher rack in the oven. This helps the cheese brown nicely. Follow these tips, and your bagel bites will impress everyone. For the full recipe, check out the details above. {{image_2}} You can make your bagel bites even more fun with different toppings. Here are some ideas: - Vegetarian options: Try using fresh veggies like bell peppers, mushrooms, or spinach. You can add sliced olives or artichoke hearts for a tasty twist. - Unique sauces and cheeses: Swap pizza sauce for pesto or barbecue sauce. Use different cheeses like cheddar, feta, or goat cheese. Each sauce and cheese adds a new flavor. - Different seasonings and herbs: Add a sprinkle of crushed red pepper for heat. You can also mix in fresh herbs like thyme or rosemary. This gives your bagel bites a fresh taste. Feel free to mix and match these ideas to create your perfect bagel bite. There are endless options to explore! For more details on making these tasty snacks, check out the Full Recipe. After enjoying your homemade bagel bites, you might have some left. Proper storage keeps them fresh. Place any leftover bagel bites in an airtight container. This helps prevent them from drying out. You can store them in the fridge for up to three days. When you're ready to eat, reheating is easy. Preheat your oven to 350°F (175°C). Place the bagel bites on a baking sheet. Heat them for about 5-7 minutes. This way, they get warm and crispy again. If you want to save them for longer, freezing is a smart choice. Wrap each bagel bite in plastic wrap. Then, place them in a freezer-safe bag. They can last for up to three months in the freezer. When you're ready to eat, thaw them in the fridge overnight. Reheat in the oven as mentioned above. For more details, check out the Full Recipe. How can I make bagel bites healthier? To make bagel bites healthier, use whole grain mini bagels. You can also swap regular cheese for low-fat cheese. Add more veggies like bell peppers or spinach to boost nutrition. Using less sauce can cut calories too. Can I use different types of cheese? Yes, you can use many types of cheese. Cheddar, gouda, or feta work great. Try mixing cheeses for a fun flavor twist. Just remember, some cheeses melt better than others. What’s the best way to customize bagel bites? You can customize bagel bites easily. Choose your favorite toppings like veggies, meats, or even different sauces. Add spices like red pepper flakes for heat or fresh herbs for freshness. Make each bagel bite unique to your taste. How long do homemade bagel bites last? Homemade bagel bites last about 3-4 days in the fridge. Store them in an airtight container to keep them fresh. For longer storage, you can freeze them for up to 2 months. Just reheat in the oven or microwave when you're ready to eat. For the full recipe, check out the detailed instructions above. Bagel bites are fun and easy to make. We covered the key ingredients, like mini bagels and pizza sauce. I shared step-by-step instructions for preparation and cooking. You learned tips for achieving crispy edges and perfect cheese melting. I also shared variations for different toppings and how to store leftovers. Now, you can make delicious bagel bites anytime. Enjoy creating your own tasty snacks!

Homemade Bagel Bites Quick and Tasty Snack Ideas

Craving a quick and tasty snack? Look no further! Homemade bagel bites are perfect for movie nights or after-school munchies.

To make Classic Chicken Cacciatore, gather these fresh and tasty ingredients: - 4 chicken thighs, bone-in and skin-on - 1 tablespoon olive oil - 1 onion, chopped - 3 cloves garlic, minced - 1 red bell pepper, sliced - 1 yellow bell pepper, sliced - 400g canned diced tomatoes - 1 cup chicken broth - 1 teaspoon dried oregano - 1 teaspoon dried basil - ½ teaspoon red pepper flakes (optional) - Salt and pepper to taste - Fresh basil leaves for garnish Each ingredient plays a key role in this dish. The chicken thighs bring rich flavor and tenderness. Using bone-in and skin-on adds depth to the sauce. Olive oil gives a nice base for cooking. Onion and garlic add sweetness and warmth. The red and yellow bell peppers contribute texture and color. Canned diced tomatoes create a juicy sauce while chicken broth enhances the taste. Oregano and basil provide classic Italian flavor. Optional red pepper flakes can add a bit of heat. Finally, salt and pepper balance all the flavors, while fresh basil leaves add a beautiful finish. You can easily swap some ingredients if needed. If you can't find chicken thighs, use chicken legs or breasts instead. If you want a lighter dish, olive oil can be replaced with coconut oil or butter. If you don’t have bell peppers, try zucchini or mushrooms for a different taste. You can use vegetable broth instead of chicken broth for a vegetarian option. Fresh herbs can be replaced with dried herbs; just use less since they are more concentrated. Lastly, if you prefer a milder dish, skip the red pepper flakes or adjust them to your liking. For the full recipe, check out the complete instructions! Start by gathering your ingredients. You will need: - 4 chicken thighs, bone-in and skin-on - 1 tablespoon olive oil - 1 onion, chopped - 3 cloves garlic, minced - 1 red bell pepper, sliced - 1 yellow bell pepper, sliced - 400g canned diced tomatoes - 1 cup chicken broth - 1 teaspoon dried oregano - 1 teaspoon dried basil - ½ teaspoon red pepper flakes (optional) - Salt and pepper to taste - Fresh basil leaves for garnish Next, chop the onion and peppers. Mince the garlic. This prep helps the dish cook evenly. Set everything aside so it’s ready to use. Heat the olive oil in a large skillet over medium heat. Season the chicken thighs with salt and pepper. Place them skin-side down in the pan. Brown each side for about 5-7 minutes until golden. Remove the chicken and set it aside. In that same skillet, add the chopped onion and garlic. Sauté for about 3-4 minutes until they soften. Then, add the sliced bell peppers and cook for another 5 minutes. This step brings out the sweet flavors in the peppers. Pour in the canned diced tomatoes and chicken broth, stirring well. Add the oregano, basil, and red pepper flakes if you like a bit of heat. Return the chicken to the pan. Make sure it’s submerged in the sauce. Cover the skillet and reduce the heat to a simmer. Let the chicken cook for 30-40 minutes. It should be tender and fully cooked through. Keep an eye on the heat. If it’s too high, the sauce will burn. If it’s too low, the chicken might not cook properly. It should simmer gently. To check if the chicken is done, insert a meat thermometer. It should read 165°F. If you like a thicker sauce, you can cook it uncovered for the last 10 minutes. This helps reduce the liquid. For best results, serve the cacciatore hot, garnished with fresh basil leaves. Enjoy your homemade dish! For the full recipe, check out the [Full Recipe]. To make the best Chicken Cacciatore, start with good chicken. I prefer bone-in, skin-on thighs. They add flavor and stay moist. Brown the chicken well for a rich taste. Use medium heat and don’t rush this step. After browning, let the chicken rest. This helps keep it juicy. When you cook the onions and garlic, stir them often. This prevents burning and ensures even cooking. Adding the vegetables before the liquid gives them a chance to soften perfectly. To boost flavors, use fresh herbs. Fresh basil adds a bright taste at the end. You can also add more garlic if you love it. A splash of red wine can deepen the sauce. Just a bit will do; let it simmer to cook off the alcohol. Don’t forget to taste as you cook. Adjust the salt and pepper to your liking. A pinch of sugar can balance acidity from the tomatoes. If you want some heat, add red pepper flakes. Using the right tools makes cooking easier. A large skillet or Dutch oven works best. These hold heat well, which helps with browning. A wooden spoon is perfect for stirring. It won’t scratch your pan and allows for easy mixing. A lid is also important for simmering. It helps trap steam and keeps the dish moist. Lastly, a good meat thermometer helps check for doneness. Chicken should reach 165°F for safe eating. For the full recipe, please refer to the complete instructions above. {{image_2}} Chicken cacciatore has roots in Italy. Each region adds its own twist. In Tuscany, cooks use mushrooms. In Campania, they add olives and capers. Northern Italy might include polenta for a hearty side. You can explore these flavors by trying different ingredients. Each bite tells a story of its place. Want a meat-free meal? You can swap chicken for hearty veggies. Use eggplant, zucchini, or mushrooms. These veggies soak up the sauce well. You can also add beans for protein. Lentils work nicely, too. Cooking time may change, so keep an eye on it. This way, you can enjoy the same rich flavors. Do you love heat? Add more red pepper flakes. They give a nice kick. If you prefer mild, skip the flakes. You can also add sweet bell peppers for flavor. Another option is to use a spicy sausage instead of chicken. This mix gives a tasty twist. Adjust the spice to fit your taste. To store leftover chicken cacciatore, let it cool first. Place it in an airtight container. You can keep it in the fridge for up to three days. Always label the container with the date. This helps you track how long it has been stored. When you’re ready to enjoy your leftover chicken cacciatore, you have a few options. The best way is to reheat it on the stove. Pour the cacciatore into a skillet. Heat it over medium-low heat for about 10-15 minutes. Stir it often to prevent sticking. You can also use a microwave. Place a portion in a microwave-safe bowl. Cover it with a lid or wrap it with a paper towel. Heat for 2-3 minutes, stirring halfway through. If you want to keep chicken cacciatore for longer, freezing is a great choice. Use a freezer-safe container or heavy-duty freezer bags. Make sure to remove as much air as possible. This helps prevent freezer burn. Label it with the date. You can freeze it for up to three months. To thaw, place it in the fridge overnight. Reheat it as mentioned before for the best taste. For the full recipe, check out the Rustic Chicken Cacciatore section. "Cacciatore" means "hunter" in Italian. This dish is a rustic meal, often made with game meat. It reflects a hunter's style of cooking, where simple ingredients shine. You find a mix of meat, tomatoes, and herbs. This dish brings warmth and comfort to the table. Yes, you can use other meats! Chicken is common, but you can try rabbit, pork, or beef. Each meat adds its own taste and texture. Just adjust the cooking time based on the meat type. Remember, the goal is to have tender meat that soaks up all the flavors. Check the chicken's internal temperature. It should reach 165°F (75°C). Use a meat thermometer for the best results. The meat should also be tender and pull away from the bone easily. If in doubt, cut into the thickest part. The juices should run clear, not pink. Serve Chicken Cacciatore with a side of pasta, rice, or crusty bread. These options soak up the delicious sauce. You might also add a fresh salad for a crunchy contrast. Some enjoy it with roasted vegetables to balance the meal. Explore what you love best! For the full recipe, check out Rustic Chicken Cacciatore. This blog post shared how to make classic Chicken Cacciatore. We covered the best ingredients, how to prepare and cook it, and tips for great results. You learned about fun variations, storage tips, and answers to common questions. Now, you have the tools to create this dish with ease. Enjoy cooking and sharing your Chicken Cacciatore. It can delight family and friends at any meal. Dive in and make it your own!

Classic Chicken Cacciatore Savory and Simple Recipe

Welcome to my kitchen! Today, I’ll share my favorite Classic Chicken Cacciatore recipe. This dish is not only savory but

To make Cheesy Baked Gnocchi, gather these ingredients: - 1 pound potato gnocchi (store-bought or homemade) - 2 tablespoons olive oil - 1 medium onion, finely chopped - 3 cloves garlic, minced - 1 can (14 oz) crushed tomatoes - 1 teaspoon dried basil - 1 teaspoon dried oregano - Salt and pepper to taste - 1 cup ricotta cheese - 1 cup shredded mozzarella cheese - ½ cup grated Parmesan cheese - Fresh basil leaves for garnish You can swap some ingredients based on your taste. For example, use cream cheese instead of ricotta for a creamier texture. You can mix different types of cheese for varied flavors, too. If you want a bit of heat, add red pepper flakes. This recipe is flexible, so feel free to explore. Now, let’s dive into the joy of creating this dish. Each ingredient plays a role in making the gnocchi creamy and cheesy. You will enjoy the rich flavors and the comforting feel of baked gnocchi. To make Cheesy Baked Gnocchi, follow these steps carefully. 1. Preheat the Oven: Start by preheating your oven to 375°F (190°C). This ensures that it’s hot enough for baking. 2. Cook the Gnocchi: Bring a large pot of salted water to a boil. Add the gnocchi. Cook until they float, which takes about 2-3 minutes. Drain and set aside. 3. Sauté the Onion: In a large skillet, heat 2 tablespoons of olive oil over medium heat. Add a finely chopped onion. Sauté for about 4-5 minutes, until soft and clear. 4. Add Garlic: Stir in 3 minced cloves of garlic. Cook for 1 more minute, just until it smells great. 5. Prepare the Sauce: Pour in a can of crushed tomatoes (14 oz). Add 1 teaspoon of dried basil, 1 teaspoon of dried oregano, and salt and pepper to taste. Let it simmer for 5-7 minutes to blend the flavors. 6. Mix Ingredients: In a big bowl, combine the gnocchi, the sauce, 1 cup of ricotta cheese, and half of the shredded mozzarella cheese. Gently mix everything together. 7. Transfer to Baking Dish: Pour the gnocchi mix into a greased baking dish. Spread it out evenly. Top with the rest of the mozzarella and ½ cup of grated Parmesan cheese. Now it’s time to bake your dish. 1. Bake the Gnocchi: Place the dish in the preheated oven. Bake for 25-30 minutes. You want the top to be golden and bubbly. 2. Final Touches: Once it’s done, take it out and let it cool for a few minutes. This helps with serving. Before you serve, add fresh basil leaves on top for extra flavor and color. Following these steps will give you a comforting, cheesy dish that is both easy and delightful. For more details on the ingredients, check out the Full Recipe. To make your cheesy baked gnocchi even better, focus on flavor and texture. Here are some tips: - Use fresh herbs. Fresh basil adds a burst of flavor. Chop it finely before adding. - Try different cheeses. Blend cheeses like fontina or gouda for a richer taste. - Don’t overcook the gnocchi. Boil only until they float. This keeps them soft. - Add a pinch of nutmeg. This little spice can enhance the overall flavor. Common mistakes can ruin your dish. Here are a few to avoid: - Skipping the simmer. Always let your sauce simmer. This melds the flavors well. - Overloading with cheese. Too much cheese can make it greasy. Stick to the recipe. - Not greasing the dish. Grease your baking dish well to prevent sticking. When serving cheesy baked gnocchi, presentation matters. Here are my favorite ideas: - Fresh basil garnish. Sprinkle chopped basil on top for color and flavor. - Side salad. A light salad with vinaigrette pairs beautifully with the dish. - Crusty bread. Serve with garlic bread to soak up the sauce. For the best serving experience: - Use a large spoon. Serve directly from the baking dish to keep it warm. - Add a drizzle of olive oil. A light drizzle enhances the flavors and adds shine. Explore the [Full Recipe] for more details and enjoy this delightful meal! {{image_2}} You can easily change this dish to fit your taste. Try using different cheeses like feta or goat cheese for a unique twist. If you're looking for a lighter option, swap out ricotta for a low-fat version. For a gluten-free meal, use gluten-free gnocchi or even zucchini noodles. You still get that yummy taste without the gluten. Want to add more to your dish? You can mix in proteins like grilled chicken or spicy sausage. These add flavor and make your meal heartier. For veggie lovers, consider adding spinach or bell peppers. They add color and nutrition. Broccoli or mushrooms are also great choices. Each of these options will enhance the dish's taste and texture. For the full recipe, check out the [Full Recipe]. To keep your cheesy baked gnocchi fresh, store any leftovers right away. Let it cool down for about 30 minutes. Then, transfer it to an airtight container. This helps lock in moisture and flavor. You can keep it in the fridge for up to three days. If you want to save it longer, consider freezing it. For freezing, use freezer-safe containers or heavy-duty aluminum foil. This way, it can last for about two months. When it's time to enjoy your leftovers, reheating is key. For the best results, use the oven. Preheat the oven to 350°F (175°C). Place the gnocchi in an oven-safe dish. Add a splash of water or a drizzle of olive oil to keep it moist. Cover it with foil to prevent it from drying out. Heat for about 20 minutes. If you're short on time, you can use the microwave. Heat in short bursts of 1-2 minutes, stirring in between. To refresh the dish, consider adding a sprinkle of cheese or fresh herbs before serving. This will enhance the flavors and give it a fresh look. Enjoy each bite as if it were just made! For the full recipe, check out the complete guide. What is the best type of gnocchi to use? I recommend using potato gnocchi. It has a soft texture and absorbs flavors well. You can buy it at the store or make your own from scratch. Store-bought is quick and easy, while homemade adds a personal touch. Both options work great in this cheesy baked gnocchi recipe. Can I make Cheesy Baked Gnocchi ahead of time? Yes, you can prepare it in advance. Cook the gnocchi and make the sauce. Then mix them and store it in the fridge. When you’re ready, just bake it. This saves time and makes serving easy for busy nights. What to do if the dish is too dry? If your cheesy baked gnocchi is dry, add a splash of broth or a bit of olive oil. This helps bring back moisture. You can also add more cheese before baking for a creamier texture. Remember, the sauce should be a bit saucy before cooking. How do I avoid overcooking the gnocchi? To prevent overcooking, keep an eye on the gnocchi while boiling. They are done when they float to the top, usually in 2 to 3 minutes. Don’t let them sit too long in the water. Drain them right away and mix with the sauce to keep them tender. Cheesy baked gnocchi is a simple yet delicious dish. We began with a list of ingredients and how to use them. The step-by-step instructions guided you through preparation and baking to achieve a golden top. I shared tips for perfecting flavors and avoiding mistakes. You learned ways to customize the recipe and store leftovers properly. Remember, you can always adapt this dish to your taste and enjoy it fresh. Use the storage and reheating tips to savor it later. Enjoy each bite of your creation!

Cheesy Baked Gnocchi Delightful and Easy Dish

Craving an easy and delightful dinner? Let’s dive into a cheesy baked gnocchi recipe that will impress your taste buds!

For these tasty kabobs, you need: - 1 pound boneless, skinless chicken breast, cut into 1-inch cubes - 1 large red bell pepper, cut into 1-inch pieces - 1 large green bell pepper, cut into 1-inch pieces - 1 medium red onion, cut into wedges - Skewers (soaked in water for 30 minutes if wooden) These main items give your kabobs great flavor and texture. The chicken provides protein, while the peppers and onion add crunch and color. The magic of this dish comes from the marinade. You will use: - 2 tablespoons olive oil - 2 tablespoons lemon juice - 2 teaspoons dried oregano - 2 teaspoons garlic powder - Salt and pepper to taste This mix brings a fresh taste to the chicken. The olive oil keeps it moist. Lemon juice brightens the flavors. Dried oregano and garlic powder add depth. You can make your kabobs even better with a few garnishes: - Freshly chopped parsley - A squeeze of lemon Serving them warm with a side of tzatziki or hummus adds a nice touch. These options enhance the meal and make it even more enjoyable. For the full recipe, check out the Mediterranean Delight: Simple Greek Chicken Kabobs. To make the marinade, grab a large bowl. In this bowl, mix together the olive oil and lemon juice. Add the dried oregano and garlic powder next. Sprinkle in some salt and pepper to taste. Whisk everything until it is blended well. This marinade gives the chicken a tasty Greek flavor. After making the marinade, it’s time for the chicken. Cut the boneless chicken breast into 1-inch cubes. Place the chicken cubes into the bowl with the marinade. Make sure all the pieces are well coated. Cover the bowl and put it in the fridge. Let the chicken marinate for at least 30 minutes, but 2 hours is best. This helps the flavors soak in. Now, let’s assemble the kabobs. Take the soaked skewers and start threading on the chicken cubes. Alternate between the chicken, red and green bell peppers, and red onion. This makes the kabobs colorful and fun. Once you have everything on the skewers, you’re ready to grill. For the full recipe, check the section above. Enjoy your cooking! Grilling is my favorite way to cook these kabobs. It gives them a nice smoky flavor. You start by preheating your grill to medium-high heat. Once hot, place your skewers on the grill. Cook them for about 12 to 15 minutes. Turn the skewers every few minutes. This way, you get even cooking and lovely grill marks. You want the chicken to reach 165°F for safety. The peppers and onions will soften and add great taste. If you can't grill, you can use your oven. Preheat the oven to 400°F. Place your kabobs on a baking sheet lined with foil. Bake them for about 20 to 25 minutes. You should turn them halfway through to ensure even cooking. Another option is using the broiler. Set the oven to broil and cook the kabobs for 10 to 15 minutes. Keep an eye on them, as they can cook fast. Both methods keep the kabobs juicy and flavorful. To get the best chicken, marinate it for at least 30 minutes. This lets the flavors soak in. Ensure that your grill is hot before adding the kabobs. A hot grill sears the chicken and keeps it moist. Don’t overcrowd the skewers; give the pieces some space. This helps them cook evenly. Lastly, let the kabobs rest for a few minutes after grilling. This keeps the juices inside, making every bite tender. For the full recipe, check out the link above. {{image_2}} To get the best flavor, use fresh herbs. Dried oregano adds a nice touch. The marinade of olive oil and lemon juice brings the taste alive. Let the chicken soak in the marinade for at least 30 minutes. If you can, let it marinate for a few hours. This gives the chicken time to absorb all those great flavors. To keep your chicken moist, avoid overcooking it. Check the chicken with a meat thermometer. You want it to reach 165°F (75°C). Letting the chicken rest after cooking is key. This allows the juices to settle back in. Cover it with foil to keep the heat in while it rests. You can prep the kabobs a day ahead. Just marinate the chicken and veggies the night before. Store them in the fridge until you're ready to grill. This saves time on busy days. You can also freeze the marinated kabobs for later use. Just remember to thaw them before grilling. For the full recipe, check the details above. Enjoy your cooking! You can swap chicken for tofu or veggies. Tofu absorbs flavors well, making it a great choice. Use firm tofu for best results. Cut it into cubes like chicken. Marinate it in the same mix. You can also use a mix of colorful veggies. Bell peppers, zucchini, and mushrooms work nicely. These options create a fresh taste that everyone enjoys. Want some heat? Add red pepper flakes to the marinade. This gives a nice kick. You can also try smoked paprika for a different flavor. If you like herbs, mix in fresh thyme or dill. These herbs bring a bright taste to your kabobs. Experimenting with spices makes each meal unique and fun. Sauces make kabobs even better. Tzatziki is a classic choice. It is cool and creamy, perfect with the grilled chicken. Hummus is another tasty option. It adds richness and pairs well with veggies. You can serve your kabobs with both sauces for a fun spread. Try adding a sprinkle of feta cheese on top for extra flavor. Check out the Full Recipe for more ideas! You should marinate the chicken for at least 30 minutes. This time helps the flavors soak in. For even better taste, try marinating for up to 2 hours. The longer you marinate, the more flavor your chicken gains. Just remember not to go over 24 hours, as it can become too soft. Yes, you can use frozen chicken for kabobs. Make sure to thaw it completely first. I recommend defrosting it in the fridge overnight for best results. This method keeps the chicken safe and helps maintain texture. Once thawed, proceed with the marinating steps as usual. You have plenty of delicious options. Some great sides include: - Greek salad with tomatoes and cucumbers - Tzatziki sauce for dipping - Warm pita bread - Rice or quinoa with herbs - Grilled vegetables like zucchini and eggplant These pair well and create a colorful meal. To check if the chicken is fully cooked, use a meat thermometer. The internal temperature should reach 165°F (75°C). If you don’t have a thermometer, cut into a piece of chicken. The meat should be white and juices should run clear. Avoid any pinkness inside to ensure it's safe to eat. Greek chicken kabobs are easy to make and packed with flavor. We covered the main ingredients, marinade, and cooking methods. I shared tips for juicy chicken and tasty variations, like adding tofu or spices. Remember, marinate your chicken for at least 30 minutes for the best taste. Explore different sauces to switch up your meals. Enjoy these kabobs with family and friends for a great time. Happy cooking!

Simple Greek Chicken Kabobs Flavorful and Easy Recipe

If you crave a tasty, easy meal, then you’ll love these Simple Greek Chicken Kabobs. With fresh ingredients and bold

- 1 block (14 oz) firm tofu, pressed and cubed - 2 tablespoons cornstarch - 2 tablespoons soy sauce - 1 tablespoon sesame oil - 1 cup cooked quinoa - 1 cup kale, chopped - 1 carrot, julienned - 1 cup edamame, shelled - 1 avocado, sliced - ½ cup cherry tomatoes, halved - 2 tablespoons tahini - 1 tablespoon lemon juice - Salt and pepper to taste - Sesame seeds for garnish - Optional: chili flakes for heat When making a Crispy Tofu Buddha Bowl, the ingredients are key to great taste. Start with firm tofu. Press it well to remove extra water. This helps it crisp up nicely. Cornstarch is your friend here. It makes the tofu crunchy when baked. Toss the tofu cubes in soy sauce and sesame oil to give them flavor. Quinoa adds a nutty base. It’s full of protein and pairs well with the other veggies. Kale brings a bright green color and lots of vitamins. Steam it just enough to soften. Carrots add a nice crunch. Julienne them to keep the texture light. Edamame gives a protein boost. It’s also fun to eat! Avocado adds creaminess. Slice it just before serving to keep it fresh. Cherry tomatoes bring a sweet touch. Halve them for easy eating. For your dressing, tahini and lemon juice mix well. It’s simple but adds great taste. Season with salt and pepper. Finally, sprinkle sesame seeds for a nice finish. If you like some heat, add chili flakes! For the full recipe, check out the detailed cooking steps. Enjoy this healthy and tasty meal idea! To start, press the tofu to remove excess water. Place it between two plates or cutting boards, and add a weight on top. Leave it for about 15 minutes. This step is key for a firmer texture. Next, marinate the pressed tofu. In a bowl, mix soy sauce and sesame oil. Add the tofu cubes, and gently toss until they are fully coated. Let it sit for at least 10 minutes to soak in the flavor. Preheat your oven to 425°F (220°C). Line a baking sheet with parchment paper. Spread the marinated tofu evenly on the sheet. Bake for 25-30 minutes. Flip the tofu halfway through to ensure even cooking. You'll want it golden and crispy. For maximum crispiness, sprinkle cornstarch on the tofu before baking. The cornstarch helps create a crunchy crust. Make sure the tofu is in a single layer on the sheet, so it bakes evenly. Now it's time to build your bowl! Start with a base of cooked quinoa. Layer on the steamed kale, julienned carrot, shelled edamame, sliced avocado, and halved cherry tomatoes. This makes the bowl colorful and tasty. For the finishing touch, drizzle the tahini dressing over the top. To make the dressing, whisk tahini, lemon juice, salt, and pepper in a small bowl. If it’s too thick, add a splash of water to thin it out. Finally, sprinkle sesame seeds for crunch. If you like heat, add chili flakes for a spicy kick. Enjoy your Crispy Tofu Buddha Bowl! For the full recipe, check the earlier section. To get that perfect crispy tofu, cornstarch is your best friend. When you coat the tofu cubes in cornstarch, it creates a crunchy layer. This layer seals in moisture while baking. It keeps the inside tender and the outside crispy. For even cooking, flipping your tofu is key. Halfway through baking, gently turn the cubes. This helps all sides cook evenly and become golden brown. For the tahini dressing, you want to get the right consistency. Start with tahini and add lemon juice. Mix well, then add a splash of water if it feels too thick. Taste and adjust with salt for flavor. If you want variety, try other dressings. Soy sauce mixed with a bit of ginger is tasty. Or use a simple olive oil and vinegar mix for a lighter touch. Pair your Buddha bowl with other grains like brown rice or barley. These add texture and more nutrients. You can also add seasonal vegetables, like roasted sweet potatoes or zucchini. For side dishes, consider a fresh salad or soup. A light miso soup works well and adds warmth. Enjoying these sides with your bowl makes for a complete meal. {{image_2}} You can swap tofu for tempeh or seitan. Both give a hearty bite. Tempeh has a nutty taste, while seitan mimics meat texture. You can also add chickpeas for extra protein. They boost nutrition and add creaminess. Feel free to use seasonal veggies. Bell peppers, zucchini, or sweet potatoes can add great flavor and color. Other leafy greens like spinach or Swiss chard work well too. They are packed with nutrients and keep the meal fresh. Consider adding spices or herbs for extra flavor. A pinch of cumin or paprika can elevate the dish. You can also mix in international flavors. Try kimchi for a spicy kick or sriracha for heat. These additions make your bowl unique and exciting. Explore these variations to create your own perfect Crispy Tofu Buddha Bowl. For the full recipe, check out the detailed steps! To keep your Crispy Tofu Buddha Bowl fresh, use airtight containers. Glass containers work well, as they do not retain odors. First, let the bowl cool to room temperature. Then, separate the tofu from the veggies and grains. This helps prevent sogginess. Store each component in its own container. Place the tofu in a single layer to keep it crispy. You can store the leftovers in the fridge for up to three days. When reheating your bowl, aim to restore the crispy texture. The oven is your best friend here. Preheat it to 350°F (175°C). Spread the tofu on a baking sheet and heat for about 10-15 minutes. This method revives the crunch. For the veggies and grains, microwave them in short bursts. Heat them separately to avoid steaming the tofu. Enjoy your meal just as fresh as when it was made! Yes, this Buddha bowl is vegan by default. You can use plant-based ingredients. For the dressing, swap tahini with any nut butter if you prefer. You can also use a mix of vinegar and oil for a simple dressing. There are many dairy-free options that work well, like almond yogurt or coconut yogurt. To keep your tofu crispy, press it first. Use a clean kitchen towel or paper towels to absorb excess moisture. A tofu press works great too. After pressing, marinate the tofu in soy sauce and sesame oil. Baking at the right temperature is key. Bake at 425°F and flip halfway for even crispiness. You can add grains like brown rice or farro to bulk it up. Legumes like black beans or chickpeas add protein and fiber. You can also mix in dense veggies, like sweet potatoes or broccoli. For a heartier meal, try adding nuts or seeds on top. This blog post guides you on creating a tasty Buddha bowl with crispy tofu. You learned about the essential ingredients, step-by-step instructions, and tips for great results. I shared ways to customize your bowl with different flavors and proteins. Remember, the key is to press the tofu well and bake it for crunch. Enjoy experimenting with veggies and dressings. These bowls are not only healthy but also fun to make and enjoy. Try it out, and you'll find a new favorite meal!

Crispy Tofu Buddha Bowl Healthy and Tasty Meal Idea

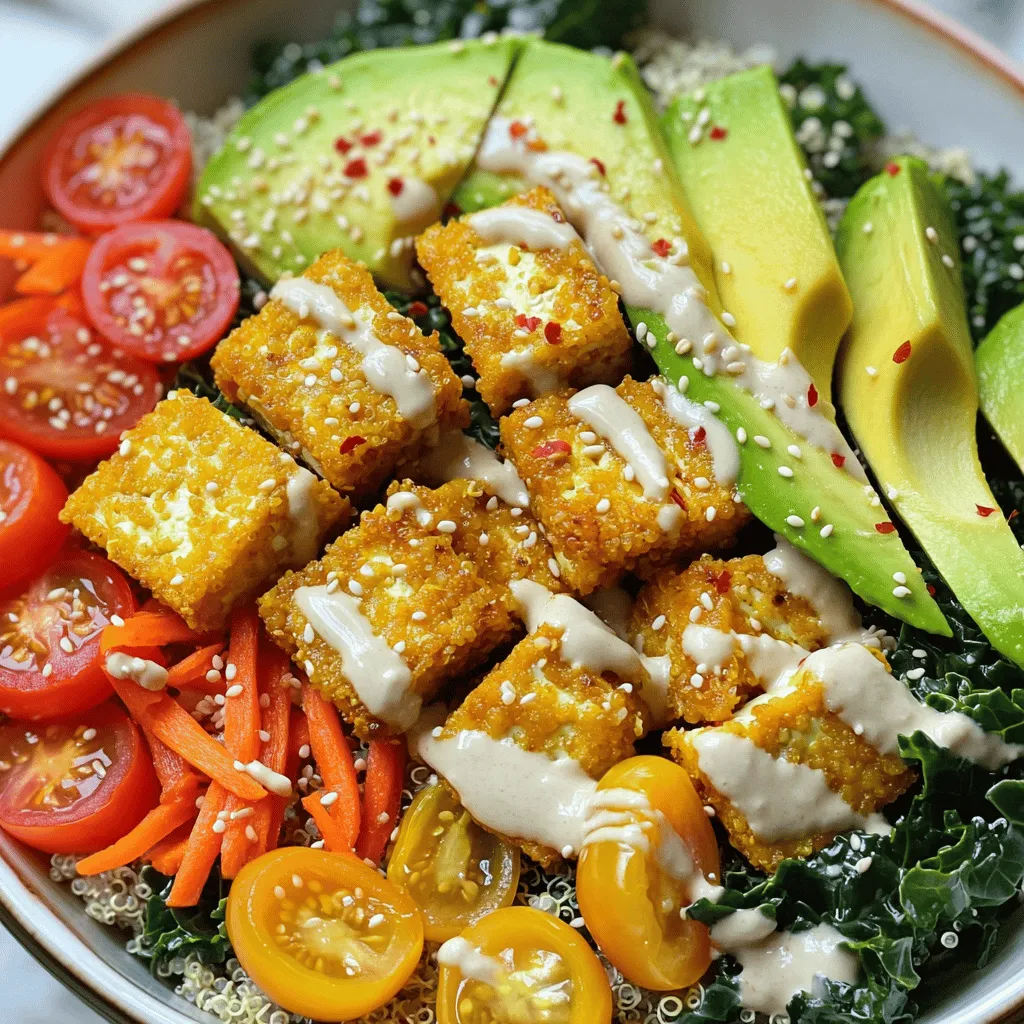
Looking for a healthy and tasty meal idea? I have you covered with this Crispy Tofu Buddha Bowl! This dish

- 4 large bell peppers (any color) - 1 lb ground chicken - 1 cup cooked quinoa - 1 cup corn (fresh or frozen) - 1 cup black beans, rinsed and drained - 1 cup diced tomatoes (canned or fresh) - 1 small onion, finely chopped - 2 cloves garlic, minced - 1 teaspoon cumin - 1 teaspoon chili powder - Salt and pepper to taste - 1 cup shredded cheese (cheddar or Mexican blend) - Fresh cilantro for garnish (optional) To make chicken stuffed bell peppers, gather these fresh ingredients. Start with large bell peppers; any color works. Ground chicken provides protein and taste. Cooked quinoa adds texture and nutrition. Corn gives sweetness, while black beans add fiber. Diced tomatoes bring juiciness to the mix. For flavor, use a small onion and garlic. Cumin and chili powder spice up the dish. Don’t forget salt and pepper to taste. Finally, top with shredded cheese for a melty finish. This recipe is easy and fun. It combines healthy foods in a colorful package. You can customize it to fit your taste. For the full recipe details, check the Full Recipe section. Enjoy your cooking adventure! - Preheat the oven to 375°F (190°C). - Prepare bell peppers by cutting tops and removing seeds. This makes space for the filling. - In a skillet, sauté onion and garlic in olive oil until they turn translucent. This takes about 3-4 minutes. - Next, add ground chicken to the skillet. Cook until browned, breaking it apart. This should take about 6-8 minutes. - Then, stir in cooked quinoa, corn, black beans, diced tomatoes, cumin, chili powder, salt, and pepper. Mix well and let it simmer for 5 minutes. This helps the flavors blend nicely. - Stuff each bell pepper with the chicken mixture. Make sure to pack it in well. - Top each pepper with the shredded cheese. This will melt and create a tasty crust. - Cover the baking dish with foil and bake in the preheated oven for 25 minutes. After that, remove the foil and bake for another 10 minutes. Look for bubbly and golden cheese on top. You can find the Full Recipe for more details. This dish is perfect for a family meal or gathering! - Use fresh herbs for added flavor. They can brighten up your dish. - Ensure the filling is moist to avoid dry peppers. If too dry, add a splash of broth. - Pair with a simple side salad or crusty bread. This adds crunch and freshness. - Consider a drizzle of your favorite dressing before serving. It can enhance the taste. These tips will help you create the best chicken stuffed bell peppers. For the full recipe, check out the details above. {{image_2}} You can easily change the protein in your stuffed peppers. Ground turkey or beef works well. This swap gives you a new taste and texture. If you want to change the grain, use brown rice or cauliflower rice instead of quinoa. Both options make the dish lighter. Want to spice things up? Add diced jalapeños for heat. They bring a nice kick to the meal. You can also mix in different cheeses for a unique taste. Try mozzarella for a creamy effect, or pepper jack for extra spice. These little changes make a big difference in flavor. You can experiment with what you like best. Store any leftover chicken stuffed bell peppers in an airtight container. This keeps them fresh. I find they taste best within 3 to 4 days. After that, the peppers may lose their crispness. If you want to enjoy them later, make sure to refrigerate them right away. For easy meals in the future, you can freeze the unbaked stuffed peppers. Just wrap them well to avoid freezer burn. When you want to bake them, you can cook from frozen. Just remember to add extra time to the oven duration. This way, they warm up nicely and stay full of flavor. To make chicken stuffed bell peppers, start by prepping the bell peppers. Cut the tops off and remove the seeds. Lightly brush the outsides with olive oil. Place them in a baking dish. Next, heat olive oil in a skillet. Sauté chopped onion and minced garlic until they look soft. This takes about 3-4 minutes. Then, add the ground chicken. Cook it until it turns brown, which takes around 6-8 minutes. Now, mix in your cooked quinoa, corn, black beans, diced tomatoes, cumin, and chili powder. Stir well and simmer for 5 minutes. This step lets all the flavors combine. After that, take the skillet off the heat and blend in half of your shredded cheese. Fill each bell pepper with the chicken and quinoa mix. Top them with the rest of the cheese. Cover the dish with foil and bake at 375°F for 25 minutes. Remove the foil and bake for another 10 minutes until the cheese bubbles and turns golden. Let the peppers cool for a few minutes before serving. Garnish with fresh cilantro if you want. For the full recipe, check the detailed instructions above. Yes, you can make stuffed peppers ahead of time. Prepare the filling and stuff the peppers. Then, store them in the fridge for up to 24 hours. Cover them with foil or plastic wrap to keep them fresh. When you are ready to cook, bake them straight from the fridge. You may need to add a few extra minutes to the baking time. If you want to store them longer, freeze the stuffed peppers. Wrap each one in plastic wrap and place them in a freezer-safe bag. They can last for up to three months. When ready to eat, bake them from frozen. Just remember to add extra time for cooking. If you want to swap out quinoa, there are many options. You can use brown rice, white rice, or even cauliflower rice. These options are great for different dietary needs. For a protein boost, try adding lentils or chickpeas. You can mix and match according to your taste. If you prefer a grain-free option, try using chopped vegetables. Diced mushrooms or zucchini work well. They add a nice texture and flavor to the dish. Experiment with what you like best! We've covered how to make delicious chicken stuffed bell peppers. You learned about the fresh ingredients you'll need, along with easy steps for preparation, cooking, and assembling the dish. I also shared tips to enhance your meal and ideas for storing leftovers. These peppers are tasty, healthy, and versatile. Whether you stick to the recipe or try your own twists, you'll enjoy every bite. Make this dish your own, and savor the flavors!

Chicken Stuffed Bell Peppers Flavorful Easy Recipe

Craving a hearty and satisfying dish? Look no further than these Chicken Stuffed Bell Peppers! This flavorful recipe combines ground

To make a hearty Rustic Ratatouille with Quinoa, gather these fresh ingredients: - 1 cup quinoa, rinsed - 2 cups vegetable broth - 1 medium eggplant, diced - 1 zucchini, diced - 1 yellow bell pepper, diced - 1 medium onion, diced - 2 cloves garlic, minced - 2 large tomatoes, diced - 1 teaspoon dried thyme - 1 teaspoon dried basil - 1 tablespoon olive oil - Salt and pepper to taste - Fresh basil leaves for garnish This mix of veggies and herbs brings color and flavor to your plate. Each ingredient plays a part. The quinoa serves as a great base, soaking up all the delicious juices from the ratatouille. The eggplant adds a creamy texture, while the zucchini and bell pepper give a fresh crunch. The garlic and onion provide a savory depth. I love using fresh, seasonal produce when I can. It makes this dish taste even better. Make sure to rinse the quinoa well. This removes the bitter coating and helps it cook nicely. For the full recipe, check out the instructions that follow. Enjoy the process of cooking and savor each bite! Bringing broth to a boil Start by pouring 2 cups of vegetable broth into a medium pot. Turn the heat to high and bring it to a boil. This will create a warm base for your quinoa. Cooking quinoa to fluffy perfection Once the broth boils, add 1 cup of rinsed quinoa. Stir it gently, then reduce the heat to low. Cover the pot and let it simmer for about 15 minutes. When done, the quinoa should be fluffy, and all the liquid should be absorbed. Set it aside for later. Cooking onion and garlic In a large skillet, heat 1 tablespoon of olive oil over medium heat. Add 2 cloves of minced garlic and 1 diced onion. Cook them for about 5 minutes until the onion turns translucent. This step builds a strong flavor base for your ratatouille. Adding eggplant and adjusting cooking time Next, add 1 medium diced eggplant to the skillet. Cook for another 5 minutes, stirring occasionally. The eggplant should start to soften, adding depth to the dish. Incorporating remaining vegetables and seasonings Now, add 1 diced zucchini and 1 diced yellow bell pepper to the skillet. Sauté everything for 5 more minutes. Then, stir in 2 diced tomatoes, 1 teaspoon of dried thyme, 1 teaspoon of dried basil, salt, and pepper to taste. Simmering to meld flavors Cover the skillet and let the ratatouille simmer for 10 to 15 minutes. This allows all the flavors to blend beautifully. When the vegetables are tender, your ratatouille is ready to serve over the quinoa. Garnish with fresh basil leaves for a lovely touch. Rinsing quinoa is key for a great texture. Dust and bits can stick to the seeds. Rinse under cold water in a fine mesh strainer. This washes away the bitter coating. The water-to-quinoa ratio is also crucial. Use two cups of liquid for every cup of quinoa. This ensures it cooks perfectly and stays fluffy. Add fresh herbs to boost the flavor. Thyme and basil work well with ratatouille. You can also try parsley or oregano. They add freshness and depth to the dish. Taste as you cook. Adjust salt and pepper to your liking. A squeeze of lemon can also brighten the flavors. Garnish with fresh basil leaves for a pop of color. You can also sprinkle some feta cheese on top. This adds a creamy contrast to the dish. Serve the ratatouille over a bed of quinoa. This makes for a complete meal. Pair it with a green salad for a well-rounded plate. For the full recipe, check out the [Full Recipe]. {{image_2}} For a vegetarian or vegan twist, you can boost protein by adding chickpeas or lentils. These legumes mix well with the ratatouille and add a hearty texture. You can also try using tofu, which soaks up flavors beautifully. For a creamy touch without dairy, consider cashew cream or coconut milk. These options add richness and keep it plant-based. Ratatouille can change with the seasons. If you find eggplant or zucchini hard to get, swap in seasonal veggies like squash or bell peppers. Fresh herbs always taste better, so use basil, thyme, or parsley when you can. If fresh herbs are not available, dried ones work too, just remember to use less since they are more potent. Serving ratatouille over quinoa is a great start. For side dishes, think of crusty bread or a simple salad. If you have leftovers, use them for wraps or toss them into a salad. You can even blend the ratatouille to make a delicious sauce for pasta. It’s all about being creative and using what you have on hand. For the full recipe, check out the detailed steps above. To keep your Rustic Ratatouille with Quinoa fresh, store it in an airtight container. Place it in the fridge if you plan to eat it within three days. Make sure it cools to room temperature before sealing. For longer storage, you can freeze the ratatouille. Use freezer-safe bags or containers to avoid freezer burn. It can last up to three months in the freezer. When you're ready to eat it, thaw it in the fridge overnight. To reheat your ratatouille, the best method is on the stove. This way, you help keep the veggies crispy. Heat a skillet over medium heat and add a splash of water or broth. Stir gently until it's hot all the way through. Alternatively, you can use a microwave. Place it in a microwave-safe bowl, cover it loosely, and heat it in short bursts. Check every 30 seconds to avoid overcooking. Enjoy your meal with all its flavors intact! The total time for this dish is about 40 minutes. You need 15 minutes to prep the ingredients and about 25 minutes to cook. This makes it great for a weeknight meal. Yes, you can add protein easily. Cooked chicken or shrimp can work well. If you prefer plant-based options, try chickpeas or lentils. They will add nutrition and heartiness. If you want a different base, several options exist. Brown rice or farro are good choices. You can also try couscous or barley for a unique twist. You can store leftovers in the fridge for about 3 to 4 days. Make sure to keep them in an airtight container. If you want to keep them longer, you can freeze portions for up to 3 months. This blog post covered a delightful quinoa dish with fresh vegetables. You learned about the essential ingredients, easy cooking steps, and clever tips for the best results. We discussed variations for special diets and creative serving options. Proper storage ensures your meal stays fresh longer. Remember, using fresh ingredients and herbs can truly elevate your dish. Experiment and make this recipe your own. Enjoy your cooking journey and share your tasty results!

Rustic Ratatouille with Quinoa Flavorful Meal Idea

Are you ready for a hearty meal that bursts with flavor? My Rustic Ratatouille with Quinoa is a perfect choice!

When making creamy spinach and mushroom risotto, you need a few key ingredients. Each one helps create the rich, savory flavor we love. Here’s what you will need: - Arborio rice - Vegetable broth - Fresh spinach - Mushrooms - Onion and garlic - Parmesan cheese and cream - Olive oil, salt, and pepper - Fresh parsley for garnish Arborio rice is the star here. It has a high starch content, giving the risotto its creamy texture. I recommend using vegetable broth to keep the dish light and vegetarian-friendly. Fresh spinach adds color and nutrition, while mushrooms bring an earthy taste. For the base flavor, onion and garlic are a must. They sauté beautifully and give depth. Parmesan cheese and cream make the risotto rich and smooth. Olive oil helps everything cook well, and salt and pepper add necessary seasoning. Finally, fresh parsley gives a pop of color and freshness. It’s the finishing touch that makes your risotto look appealing. By using these ingredients, you create a dish that’s not only delicious but also visually stunning. For the full recipe, check out the [Full Recipe]. 1. Heating the vegetable broth Start by placing four cups of vegetable broth in a saucepan. Heat it over low heat. Keeping it warm helps the rice cook evenly. 2. Sautéing onion and garlic In a large skillet, pour in two tablespoons of olive oil. Heat it on medium. Add one finely chopped onion. Stir and cook until it looks translucent, about three to four minutes. Next, add three minced garlic cloves. Cook for one to two minutes until it smells great. 3. Cooking mushrooms Now, add one cup of sliced mushrooms. You can pick any type you like. Season with one teaspoon of salt and half a teaspoon of black pepper. Cook for five to six minutes, stirring often, until they turn golden and release their moisture. 1. Toasting the Arborio rice Stir in one cup of Arborio rice next. Toast it for one to two minutes. You want the grains to look slightly translucent. 2. Adding broth gradually Begin to add the warm vegetable broth. Use one ladle at a time. Stir often and let the rice absorb most of the liquid before adding more. Repeat this for about 18 to 20 minutes. The rice should be creamy and slightly chewy. 3. Incorporating spinach, cheese, and cream When the rice is cooked, stir in one cup of chopped fresh spinach. Let it wilt. Then, take the skillet off heat. Fold in half a cup of grated parmesan cheese and a quarter cup of cream. Mix until everything is creamy and well combined. Don’t forget to taste and adjust the seasoning if you need to. For the complete instructions, check the [Full Recipe]. To make the best risotto, you need to stir often. This movement helps release the starch from the rice. The starch is what makes your risotto creamy. Use a wooden spoon for stirring. It gives you control and helps avoid sticking. If the risotto gets too thick, add a splash of broth. This will help bring it back to a creamy state. For added flavor, consider a splash of white wine. It truly enhances the taste of the dish. If you want to switch things up, try using different grains. Quinoa or farro can work well in this dish. For those avoiding dairy, use coconut cream instead of regular cream. Nutritional yeast can replace parmesan cheese for a cheesy flavor without dairy. If you want to add protein, consider cooked chicken or shrimp. You can also toss in some beans for a vegetarian protein boost. These substitutions keep the dish exciting and suited to your preferences. For the complete recipe, refer to the Full Recipe section. {{image_2}} You can make your creamy spinach and mushroom risotto special by adding seasonal vegetables. For spring, try peas or asparagus. In summer, fresh zucchini and corn add sweetness. Fall brings delicious squash, while winter can feature root vegetables like carrots or turnips. Each season offers a new flavor twist. Different types of mushrooms can change the taste, too. Common button mushrooms work well, but you can also use shiitake, cremini, or portobello. Each type brings its unique flavor and texture. Mixing a few types can add depth to your dish. Flavoring with herbs and spices can elevate your risotto. Fresh herbs like basil or thyme add brightness. A hint of nutmeg or red pepper flakes can bring warmth and spice. Experiment with what you have on hand to keep it exciting. Pair your risotto with proteins to make a complete meal. Grilled chicken, shrimp, or salmon are great options. They complement the creamy flavors of the risotto perfectly. For a vegetarian choice, add roasted chickpeas for protein and crunch. Accompaniments like a fresh salad or crusty bread work well. A bright green salad adds a refreshing crunch. Bread can soak up the creamy sauce, making each bite satisfying. For presentation ideas, serve the risotto warm in bowls. Garnish with fresh parsley and a sprinkle of parmesan on top for a visual pop. This simple touch makes your dish look gourmet and inviting. Check out the Full Recipe for detailed steps to craft this delightful dish. To store risotto leftovers, cool it to room temperature first. Then, place it in an airtight container. It will stay fresh for about three days in the fridge. When reheating, add a splash of broth or cream. This helps bring back its creamy texture. Heat it gently on the stove or in the microwave. Stir often for even warming. You can freeze risotto, but it may change texture. To freeze, let the risotto cool completely. Then, spoon it into freezer bags or containers. Remove as much air as possible before sealing. It can last up to three months in the freezer. When you’re ready to eat, thaw it overnight in the fridge. Reheat on low heat, adding broth or cream to restore creaminess. Enjoy your creamy spinach and mushroom risotto again! For the full recipe, check the section above. How to best reheat risotto? To reheat risotto, add a little broth or water. Heat it gently on low. Stir often until warm. This keeps it creamy. Can I make risotto ahead of time? Yes, you can make risotto ahead. Cook it until just al dente. Let it cool, then store in the fridge. Reheat later with broth. What can I do if my risotto is too thick? If your risotto is too thick, add warm broth. Stir it in slowly until you reach the right creaminess. Is risotto gluten-free? Yes, risotto is gluten-free. Just use Arborio rice, which is naturally gluten-free. Can I use different types of rice? You can use other short-grain rice. Arborio is best for creamy texture, but Carnaroli or Vialone Nano work too. What are the nutritional values for this risotto? This risotto has good carbs from rice, healthy fats from olive oil, and protein from cheese. Each serving has about 300 calories. For full nutritional values, refer to the Full Recipe. This blog post covered how to make delicious risotto with simple steps. We looked at key ingredients, preparation, cooking tips, variations, and storage info. Remember to stir well and adjust the texture as needed. You can also get creative with ingredients to fit your taste. Whether you're a beginner or a pro, risotto is a dish you can master. Enjoy making it your own and share it with others!

Creamy Spinach and Mushroom Risotto Delightful Dish

Welcome to the creamy, dreamy world of Spinach and Mushroom Risotto! If you love rich, comforting dishes that are easy

To make these tasty tacos, you need just a few key ingredients. Here’s a simple list: - 2 chicken breasts, diced - 1 ripe mango, diced - 1 small red onion, finely chopped - 1 red bell pepper, diced - 2 cloves garlic, minced - 1 jalapeño, deseeded and minced (adjust for heat preference) - 2 tablespoons olive oil - 1 teaspoon ground cumin - 1 teaspoon smoked paprika - Salt and pepper to taste - 8 small corn tortillas - Fresh cilantro, chopped (for garnish) - Lime wedges (for serving) Each ingredient plays a role. The chicken is the star, bringing protein to the dish. Mango adds sweetness and a tropical vibe. The onion and bell pepper give crunch and color. Garlic and jalapeño add depth and heat, making every bite exciting. You can dress up your tacos with a few optional extras. Try adding: - Sliced avocado for creaminess - Crumbled queso fresco for a salty touch - Sliced radishes for a peppery crunch - Extra cilantro for freshness These garnishes make your tacos more fun and flavorful. Feel free to mix and match! Want to change the spice level? It’s easy! Here are some tips: - For mild tacos, leave out the jalapeño or use less. - If you like heat, add more jalapeño or include diced serrano peppers. - A sprinkle of cayenne pepper can kick up the spice. Adjusting the spice lets you create a taco that fits your taste. Enjoy finding your perfect balance! If you want the full experience, check out the Full Recipe for more details. To start, gather your ingredients for the chicken mixture. In a large skillet, pour 2 tablespoons of olive oil and heat it over medium heat. Once hot, add 2 cloves of minced garlic. Sauté it for about 1 minute. The garlic should smell amazing. Next, add 2 diced chicken breasts to the skillet. Season the chicken with salt, pepper, 1 teaspoon of ground cumin, and 1 teaspoon of smoked paprika. Cook the chicken for 5 to 7 minutes. You want it to be brown and fully cooked. Now, it's time for the veggies. Stir in 1 small finely chopped red onion, 1 minced jalapeño, and 1 diced red bell pepper. Cook this mixture for another 3 to 5 minutes. The veggies should soften nicely. After that, fold in 1 ripe diced mango gently. Let it cook for 2 more minutes. This gives the mango time to warm up and blend with the spices. With the chicken and veggies ready, it’s taco time! Warm 8 small corn tortillas in a separate skillet or microwave. This makes them soft and tasty. Now, place a generous spoonful of the spicy mango chicken mixture on each tortilla. Garnish with fresh chopped cilantro and a squeeze of lime juice. This adds a fresh touch. For the full recipe, check the details above. Enjoy your tasty creation! To get juicy chicken, start with fresh breasts. Cut them into small pieces for even cooking. Heat your skillet to medium. Add olive oil and wait until it shimmers. Then, add the chicken. Season it well with salt, pepper, cumin, and smoked paprika. Cook until it turns golden brown, about 5-7 minutes. This step ensures the chicken stays moist and flavorful. To make your tacos pop, use ripe mango. Its sweetness balances the spicy jalapeño. Add the red onion and red bell pepper for crunch and color. Don't skip the garlic! It adds depth to your dish. If you want more heat, keep the seeds from the jalapeño. For extra zing, a squeeze of fresh lime juice brightens everything up. Serve your tacos on a colorful platter. Arrange them with lime wedges and chopped cilantro on the side. This makes them look inviting. You can also pair these tacos with a side of black beans or a fresh salad. It adds variety and nutrients to your meal. For a fun twist, try using hard taco shells instead of corn tortillas! You can find the Full Recipe to guide you through each step. {{image_2}} If you have dietary needs, you can easily change this recipe. For a gluten-free option, use corn tortillas, as I suggest in the Full Recipe. If you're vegetarian, swap the chicken for chickpeas or tofu. Just make sure to cook them until golden and warm. For a dairy-free option, skip cheese and use avocado to add creaminess. Mango adds a sweet twist, but you can try other fruits too. Pineapple brings a nice tang. Peaches add a juicy sweetness, while strawberries give a fresh taste. Each fruit changes the flavor, so feel free to experiment. You can choose between soft and hard shells for your tacos. Soft corn tortillas are great for a classic feel. They hold all the fillings well and are easy to bite into. Hard shells add a crunchy texture. They create a fun crunch with each bite. Pick what suits your taste! To keep your leftover tacos fresh, store them in an airtight container. Place the chicken filling and tortillas separately. This way, the tortillas do not get soggy. You can keep them in the fridge for up to three days. When you are ready to eat, reheat the chicken filling in a skillet over medium heat. Stir it often to warm it evenly. For the tortillas, heat them in a dry skillet for about 15 seconds on each side. You can also warm them in the microwave for about 10-15 seconds if you're in a hurry. If you want to freeze the chicken filling, let it cool first. Then, place it in a freezer-safe bag. Be sure to remove as much air as possible. This will help prevent freezer burn. You can freeze it for up to three months. When you’re ready to enjoy, thaw it overnight in the fridge and reheat as mentioned above. Enjoy your Spicy Mango Chicken Tacos anytime with these simple storage tips! For the full recipe, check out the earlier section. Yes, you can make Spicy Mango Chicken Tacos ahead of time. I often prepare the chicken mixture in advance. Cook the chicken and veggies, then let them cool. Store them in an airtight container in the fridge. When you're ready to serve, warm it up and assemble your tacos. This saves time on busy nights! You can serve many tasty sides with Spicy Mango Chicken Tacos. Here are some ideas: - Black beans - Mexican rice - Corn salad - Guacamole - Salsa - Chips These sides add color and flavor to your meal. They also help balance the spice of the tacos. The spice level in Spicy Mango Chicken Tacos can be adjusted. The jalapeño adds heat, but you can control it. If you want less spice, remove the seeds. If you love heat, leave them in or add more jalapeño. You can also use a milder pepper if you prefer. The mango adds a sweet balance, making each bite delicious! In this blog post, we explored how to make spicy mango chicken tacos. You learned about the main ingredients, optional garnishes, and ways to adjust spice levels for your taste. We provided steps for preparing the chicken, cooking vegetables, and assembling tacos. Tips on cooking chicken perfectly and enhancing flavors were included, along with ideas for variations and storage. These tacos are versatile and easy to customize. Enjoy them fresh or save leftovers for later. Happy cooking!

Spicy Mango Chicken Tacos Flavorful and Simple Meal

Get ready to spice up your dinner with Spicy Mango Chicken Tacos! This vibrant dish blends tender chicken, fresh mango,

To make delicious fluffy blueberry pancakes, gather these simple ingredients: - 1 cup all-purpose flour - 2 tablespoons sugar - 1 tablespoon baking powder - 1/2 teaspoon salt - 1 cup milk (dairy or plant-based) - 1 large egg - 2 tablespoons unsalted butter, melted - 1 teaspoon vanilla extract - 1 cup fresh blueberries (or frozen) - Extra butter or oil for cooking These ingredients create a perfect mix that gives the pancakes their fluffy texture. The all-purpose flour provides structure, while baking powder adds lift. Sugar sweetens the batter, and salt enhances the flavors. Milk helps to achieve the right consistency, making the pancakes moist and tender. The egg binds everything together, and melted butter adds richness. Vanilla extract boosts the flavor, making each bite delightful. Finally, blueberries add a burst of sweetness and color, making these pancakes a treat for your taste buds. For the full recipe, follow the steps to create these wonderful fluffy blueberry pancakes. Start with a large mixing bowl. Add 1 cup of all-purpose flour. Next, add 2 tablespoons of sugar. Then, mix in 1 tablespoon of baking powder and 1/2 teaspoon of salt. Whisk them together until everything is well combined. This step gives your pancakes a light and fluffy texture. In another bowl, combine 1 cup of milk, 1 large egg, 2 tablespoons of melted unsalted butter, and 1 teaspoon of vanilla extract. Whisk these ingredients until they blend smoothly. This mixture adds moisture and flavor to the pancakes. Now it's time to cook. Heat a non-stick skillet over medium heat. Add a little butter or oil to coat the pan. Pour about 1/4 cup of batter for each pancake. Cook until you see bubbles on the surface, which takes about 2-3 minutes. Carefully flip them and cook for another 1-2 minutes until golden brown. Repeat this for all the batter. For a complete guide, check the full recipe. To make the fluffiest pancakes, use fresh baking powder. This helps them rise. Mix the dry ingredients well. This ensures even rising. When you mix the wet and dry ingredients, stir gently. Don't stir too much; lumps are fine. This keeps air in the batter and makes pancakes light. Overmixing is a common mistake. It makes pancakes dense and chewy. Mix the batter just until you see the flour disappear. A few lumps are okay. The goal is to keep that air in the batter. This is key for fluffy pancakes. The right heat is very important. Too hot, and your pancakes burn on the outside. Too low, and they turn out soggy. Medium heat is best. Preheat your skillet and add a little butter. When the butter sizzles, it’s ready. Pour the batter and watch for bubbles. Flip when you see them! For the full recipe, check the Delightful Fluffy Blueberry Pancakes section. {{image_2}} You can swap blueberries for many fruits. Try strawberries, raspberries, or bananas. Each fruit brings a new taste. For strawberries, chop them into small pieces. For bananas, slice them thin. If you use raspberries, toss them in whole. Each fruit adds a sweet twist to your fluffy pancakes. To make vegan fluffy pancakes, change a few ingredients. Use plant-based milk, like almond or oat milk. Replace the egg with a flax egg. To make a flax egg, mix one tablespoon of ground flaxseed with three tablespoons of water. Let it sit for five minutes. This mix acts like an egg. You can still enjoy soft, fluffy pancakes. Adding flavor enhancers can make your pancakes special. You can mix in spices like cinnamon or nutmeg. Just a pinch can change the flavor. You might also add zest from oranges or lemons for a fresh taste. If you want a sweeter touch, add chocolate chips or nuts. These small changes create delightful flavors in your pancakes. For the full recipe, follow the steps mentioned above. Enjoy experimenting! To keep your fluffy blueberry pancakes fresh, store them in an airtight container. Place a piece of parchment paper between each pancake. This will stop them from sticking together. You can keep them at room temperature for up to two hours. If you plan to store them longer, put them in the fridge. Reheat pancakes in the microwave for about 20-30 seconds. This will warm them up without drying them out. You can also use a skillet on low heat. Just add a little butter to the pan and warm each pancake for about one minute on each side. This gives them a nice crisp edge. To freeze pancakes, let them cool completely. Stack them with parchment paper between each one. Place the stack in a freezer bag or container. Use a vacuum sealer for the best results. They will stay fresh for about one month. When you’re ready to eat, thaw them in the fridge overnight. Then follow the reheating tips to enjoy your delicious pancakes again. For the complete process, refer to the Full Recipe. To make your pancakes less dense, focus on the batter. Start by sifting the flour before measuring it. This adds air and lightens the mix. Also, do not overmix the batter; lumps are okay. Overmixing makes the pancakes tough. Finally, consider adding a bit more milk for a lighter texture. Yes, you can use frozen blueberries! They work well and save time. Just toss them in a bit of flour before adding them to the batter. This helps prevent them from sinking to the bottom. Keep in mind that frozen blueberries may turn the batter a bit blue, but they still taste great! The best topping for blueberry pancakes is pure maple syrup. It adds sweetness and complements the blueberries. Other great options include whipped cream, fresh blueberries, or a sprinkle of powdered sugar. You can also try yogurt or a fruit compote for a lovely twist. For the full recipe, check out the delightful fluffy blueberry pancakes! In this blog post, I shared a simple recipe for fluffy blueberry pancakes. You learned about the key ingredients and how to mix them well. I also provided tips to avoid dense pancakes and suggested different fruit options for variety. Finally, I covered how to store and reheat them. Pancakes can be a fun treat. Enjoy making these delights, and don’t hesitate to mix things up! Happy cooking!

Fluffy Blueberry Pancakes Delightful and Easy Recipe

Are you ready to elevate your breakfast game? These fluffy blueberry pancakes are not just easy to make, but they

Older posts
Newer posts
← Previous Page1 … Page26 Page27 Page28 … Page64 Next →

dsad

© 2025 Recipes Pursuit • Built with GeneratePress

Our Policies

  • Copyright Policy
  • Cookie Policy
  • GDPR Policy
  • Privacy Policy
  • Disclaimer
  • Terms Of Use

More Information

  • Home
  • About
  • Contact
  • Appetizers
  • Dessert
  • Dinner
  • Drinks
©2025, Recipes Pursuit About Back To Top