Skip to content
DisclaimerTerms Of UseGDPR PolicyCookie Policy

Recipes Pursuit

  • Home
  • Drinks
  • Appetizers
  • Dinner
  • Dessert
  • About
  • Contact
  • Privacy Policy
DisclaimerTerms Of UseGDPR PolicyCookie Policy

Emma Smith

- Rice - Broth - Vegetables - Herbs To make Greek Lemon Rice Soup, you will need: - 1 cup jasmine rice - 8 cups low-sodium vegetable broth - 1 large onion, finely chopped - 3 cloves garlic, minced - 2 medium carrots, diced - 2 celery stalks, diced - 3 large eggs - 1/2 cup freshly squeezed lemon juice (about 3-4 lemons) - 2 tablespoons olive oil - 1 teaspoon dried oregano - Salt and black pepper to taste - Fresh parsley, chopped for garnish When shopping for ingredients, look for bright colors in your vegetables. Choose firm carrots and celery without brown spots. For onions, find ones that feel heavy and have dry skins. Fresh herbs should smell strong and look vibrant. If possible, buy lemons that feel heavy for their size; they will yield more juice. When you select high-quality ingredients, your soup will taste even better! {{ingredient_image_1}} 1. Start by heating 2 tablespoons of olive oil in a large pot over medium heat. 2. Add 1 large chopped onion and sauté for about 5 minutes. The onion should become soft and clear. 3. Next, stir in 3 minced garlic cloves, 2 diced carrots, and 2 diced celery stalks. Cook for another 3-4 minutes. The veggies need to be tender. 4. Add 1 cup of jasmine rice to the pot. Stir to mix the rice with the veggies and oil. Toast the rice for about 2 minutes. 5. Now, pour in 8 cups of low-sodium vegetable broth. Add 1 teaspoon of dried oregano. Bring this mix to a boil. 6. Once boiling, lower the heat and let it simmer for 20 minutes. Check that the rice is fully cooked. - Sautéing: This method helps build flavor. Sauté the onions first. It softens them and makes them sweet. - Simmering: After boiling, simmer the soup. This lets the rice absorb the flavors. - Tempering Eggs: In a bowl, whisk 3 eggs with 1/2 cup of lemon juice. Slowly add hot soup to this mix while whisking. This step stops the eggs from scrambling. - When the rice is plump and soft, it is done. - The vegetables should look bright and tender. - If the soup is steaming but not boiling, it's ready for the eggs. These steps ensure you create a warm and tasty Greek lemon rice soup that comforts anyone who tries it. To boost the flavor of Greek lemon rice soup, you can easily adjust spices. Consider adding a pinch of cayenne pepper for heat. You can also include a teaspoon of thyme for a fresh herbal note. Fresh herbs like dill or mint will brighten the soup. A dash of smoked paprika can add a nice depth. A key challenge is preventing the eggs from scrambling. To avoid this, always temper the eggs first. Slowly mix hot soup into the egg and lemon mix while whisking. This step gradually warms the eggs. Once tempered, whisk the mixture back into the pot slowly. Stir constantly and keep the soup hot without boiling. Garnishing your soup makes it visually appealing. Top it with chopped fresh parsley for color. You can also add lemon zest for extra brightness. Pair the soup with crusty bread or a fresh salad. A simple Greek salad complements the soup nicely. Pro Tips Use Fresh Lemons: For the best flavor, always use freshly squeezed lemon juice rather than bottled juice. It makes a significant difference in taste! Temper the Eggs: When adding the egg and lemon mixture to the hot soup, be sure to temper the eggs gradually to avoid scrambling. This step is crucial for a creamy texture. Add Spinach or Kale: For added nutrition and color, consider stirring in some fresh spinach or kale just before serving. It will wilt quickly and enhance the dish. Adjust Consistency: If you prefer a thicker soup, you can mash some of the rice or use an immersion blender briefly to create a creamier texture. {{image_2}} You can change the rice and broth in this soup. For a different flavor, try basmati or brown rice. Quinoa is another great option if you want a gluten-free choice. You can also use chicken broth instead of vegetable broth for a heartier taste. Adding proteins or veggies can make this soup even better. Shredded chicken or cooked shrimp can bring more flavor and texture. For extra veggies, toss in spinach or peas. They will add color and nutrients to your dish. You could also add chickpeas for a protein boost. Different regions have their own takes on this soup. In some parts of Greece, people add a sprinkle of feta cheese for a salty kick. Others might use dill instead of parsley for a fresh taste. You can also find variations with spices like cumin or coriander, adding a unique twist. Explore these options to make the soup your own! After enjoying your Greek lemon rice soup, let it cool first. Use airtight containers for storage. This keeps the soup fresh. You can refrigerate it for up to four days. If you want to keep it longer, freeze it. Pour the soup into freezer-safe bags or containers. Leave some space at the top for expansion. This helps avoid spills as it freezes. When reheating, do so gently. Use a pot over low heat on the stove. Stir the soup often to prevent sticking. If the soup is too thick, add a bit of water or broth. Heat it until it warms through, but do not boil. This keeps the flavors bright and fresh. In the fridge, Greek lemon rice soup lasts about four days. If you freeze it, it can stay good for up to three months. Just make sure to label the containers with the date. This way, you know when to use them. Always check for any off smells before eating leftovers. Greek Lemon Rice Soup, or avgolemono, is a warm and tangy dish. It features rice, broth, and a creamy egg-lemon mixture. This soup has roots in Greek culture and is often served for comfort. It's perfect for cold days or when you're feeling under the weather. The blend of flavors makes it a tasty choice for family meals or gatherings. Yes, you can make this soup ahead of time. It stores well in the fridge for about three days. Just remember to keep it in an airtight container. When you're ready to eat, reheat it gently on the stove. Add a splash of broth if it gets too thick. Avoid boiling, as that can change the texture. Absolutely! To make a vegan version, swap the eggs with a plant-based option. You can use silken tofu blended with lemon juice. This creates a similar creamy texture. For broth, choose vegetable broth to keep it vegan. The flavor remains bright and refreshing, just like the traditional recipe. Enjoy your vegan Greek Lemon Rice Soup! In this article, I covered how to make a delicious Greek Lemon Rice Soup. We discussed the main ingredients like rice, broth, and fresh veggies, and I provided tips for selecting quality items. I shared step-by-step cooking instructions and gave ideas to enhance flavors while avoiding common mistakes. You can also explore variations, storage tips, and answers to frequently asked questions. By following these guidelines, you'll create a tasty dish that warms hearts. Enjoy cooking and sharing this soup with family and friends!

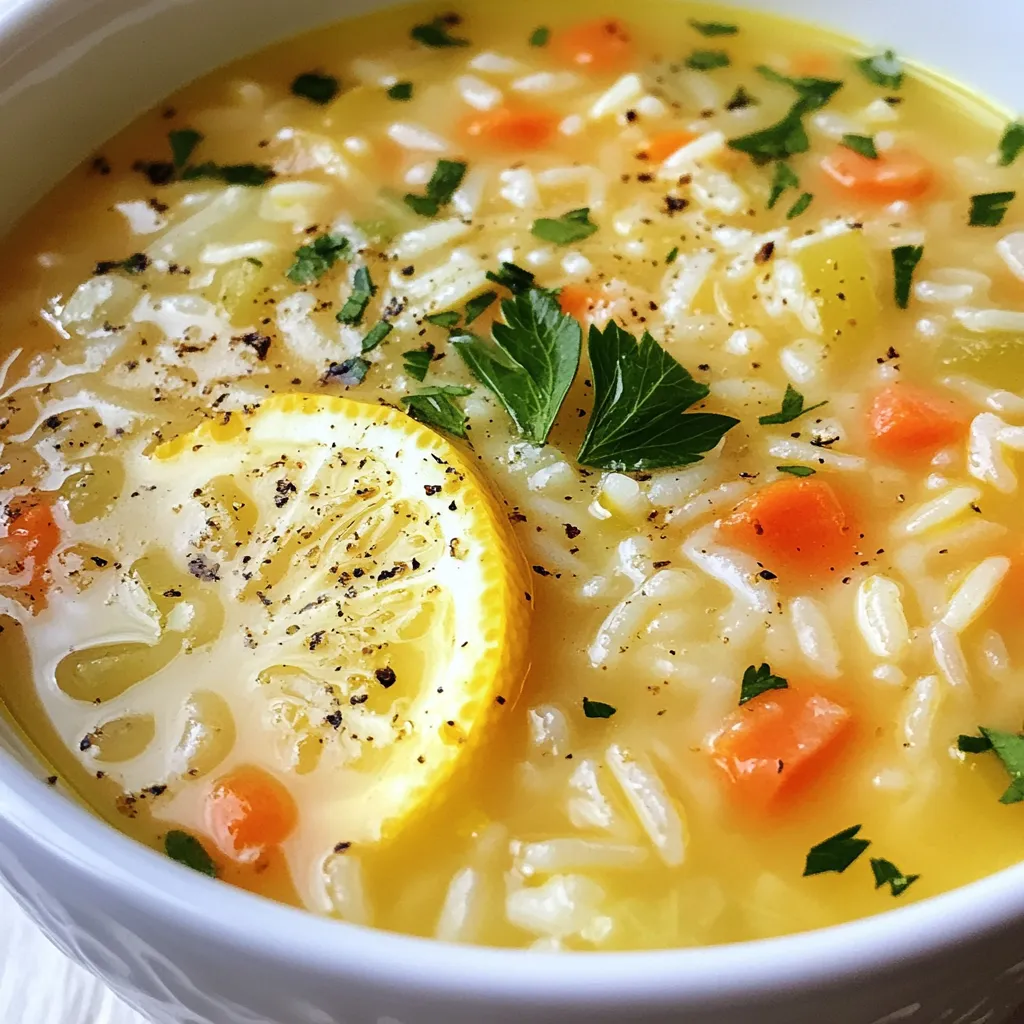
Greek Lemon Rice Soup Simple Comfort Food Recipe

Welcome to your new go-to comfort food: Greek Lemon Rice Soup! This warm bowl of goodness combines simple ingredients like

- 2 medium eggplants - 1 cup cherry tomatoes, halved - 1/2 cup cooked quinoa - 1/2 cup canned chickpeas, rinsed and drained - 1/4 cup feta cheese, crumbled - 1 small red onion, finely chopped - 2 cloves garlic, minced - 1 teaspoon dried oregano - 1/2 teaspoon smoked paprika - 1/4 cup Kalamata olives, chopped - 2 tablespoons olive oil - Salt and pepper to taste - Fresh parsley, chopped (for garnish) Gathering the right ingredients sets the stage for a great dish. Start with fresh, medium-sized eggplants. They should feel firm and have smooth skin. The cherry tomatoes add a burst of sweetness. Quinoa and chickpeas provide protein and texture. Feta cheese brings a salty kick, while red onion and garlic offer depth. Don't forget the spices! Oregano and smoked paprika infuse the dish with rich flavor. Kalamata olives add a briny bite, and olive oil helps everything meld together. Lastly, fresh parsley brightens the dish and makes it look inviting. Enjoy cooking! {{ingredient_image_1}} - Preheat oven to 400°F (200°C). - Slice the eggplants in half lengthwise. - Hollow out the insides to make shells. Leave about 1/2 inch of flesh. - Chop the scooped-out eggplant flesh and set aside. - Brush the eggplant shells with 1 tablespoon of olive oil. - Sprinkle with salt and pepper. - Place them cut-side down on a baking sheet. - Roast for 20 minutes until softened. - In a skillet, add the remaining olive oil over medium heat. - Sauté the chopped red onion and minced garlic until fragrant. - Stir in the chopped eggplant flesh, cherry tomatoes, chickpeas, quinoa, oregano, and smoked paprika. - Season with salt and pepper. Cook for 5-7 minutes until heated through. - Remove from heat and stir in the crumbled feta and chopped olives. Mix well. - Flip the roasted eggplant shells over. - Fill each shell with the stuffing mixture, pressing gently. - Return the stuffed eggplants to the oven. - Bake for an additional 15-20 minutes until heated through and tops are golden. - Let cool for a few minutes before serving. When picking eggplants, look for shiny skin. The skin should be smooth and even. A firm texture means they are fresh. Gently squeeze the eggplant; it should feel solid. Avoid any with soft spots or wrinkles. For a true Mediterranean taste, use oregano and smoked paprika. These spices add depth to your dish. Fresh herbs like parsley will brighten the meal. Always choose fresh ingredients when you can. They make a big difference in flavor. Garnish your stuffed eggplants with fresh parsley. It adds a pop of color and freshness. A drizzle of lemon juice brings out the flavors. Serve them on a beautiful platter for a nice touch. Consider adding extra feta on top for a creamy contrast. Pro Tips Use Smaller Eggplants: Smaller eggplants tend to have fewer seeds and a sweeter flavor, making them perfect for stuffing. Customize Your Filling: Feel free to add other vegetables like zucchini or bell peppers to the stuffing for added flavor and nutrition. Make Ahead: You can prepare the filling a day in advance and store it in the refrigerator. Just stuff the eggplants and bake when ready to serve. Garnish for Extra Flavor: A sprinkle of lemon zest or a drizzle of balsamic glaze on top before serving can elevate the dish with more vibrant flavors. {{image_2}} To make this dish vegan-friendly, simply skip the feta cheese. You can use nutritional yeast instead for a cheesy taste. Another option is to add a vegan cream cheese. It gives a nice creaminess without using dairy. Substitutes for cheese include: - Nutritional yeast - Vegan cream cheese - A mix of cashews and lemon juice for a creamy base If you want to add meat, ground lamb works great. Just cook it with the onions and garlic before adding other ingredients. Ground beef or turkey are good choices too. When adding meat, adjust cooking times. Make sure the meat is fully cooked before mixing it with the veggies. Try adding different Mediterranean spices for unique flavors. Cumin, coriander, or sumac can change the taste. You might also explore local ingredients. For example, use sun-dried tomatoes or artichokes for a twist. Incorporating these ideas creates a dish that reflects your taste. Enjoy experimenting! To keep your stuffed eggplants fresh, store them in the fridge. Place them in an airtight container. This helps prevent drying out. They will stay good for about 3 to 4 days. If you want to enjoy them later, freezing is a great option. To freeze stuffed eggplants, let them cool first. Wrap each one tightly in plastic wrap. Then, place them in a freezer-safe bag. This keeps them safe from freezer burn. They can last up to 3 months in the freezer. When you’re ready to eat, thaw the eggplants overnight in the fridge. To reheat, place them in the oven at 350°F (175°C) for about 25 minutes. This warms them through and keeps them tasty. Enjoy your delicious meal again! You can replace quinoa with cooked rice or lentils. Both add good texture. For rice, use white or brown varieties. For lentils, use canned ones for ease. Cook your chosen grain before mixing it with the other ingredients. This keeps it simple and quick. Yes, you can use many kinds of cheese. Try mozzarella for a creamy melt. Goat cheese adds a tangy flavor. Parmesan gives a salty kick. Each choice changes the taste. Mix and match for fun flavors. To keep eggplant firm, sprinkle it with salt before cooking. Let it sit for 15 minutes. This pulls out extra moisture. Rinse and dry it well. Also, roast it until golden and tender. This gives it a nice bite. Look for a golden top and soft filling. The eggplant should be tender but not mushy. A fork should slide in easily. The cheese should melt and bubble slightly. If all these signs are there, it’s ready to enjoy! Stuffed eggplants are a tasty and healthy dish. We learned how to choose eggplants, prepare the filling, and bake them to perfection. You can use fresh ingredients and spices to boost flavor. There are also ways to change the recipe to fit your needs—like adding meat or making it vegan. Remember to store leftovers properly and try different cheeses for fun. This recipe is not only satisfying but also filled with nutrition. Enjoy your cooking adventure and share this dish with others!

Mediterranean Stuffed Eggplant Flavorful and Easy Dish

Ready to elevate your dinner game? Mediterranean Stuffed Eggplant is a simple yet mouthwatering dish that bursts with flavor. With

- 1 cup graham cracker crumbs - 1/2 cup unsalted butter, melted - 16 oz cream cheese, softened - 3 cups apples, peeled and thinly sliced The main ingredients set the stage for your Apple Pie Cheesecake Bars. Graham cracker crumbs create a delicious base. Unsalted butter adds richness to the crust. Cream cheese gives the bars a creamy texture. Fresh, thinly sliced apples bring a lovely sweetness and crunch. - 2 tablespoons sugar - 1/2 cup sugar - 1 teaspoon cinnamon - 1/2 cup brown sugar - 1 tablespoon lemon juice - 1/2 teaspoon nutmeg For added flavor, we use a mix of sugars. The regular sugar sweetens the cream cheese filling. Brown sugar enhances the apple filling's depth. Cinnamon and nutmeg warm up the dish with cozy spices. Lemon juice adds brightness and balances the sweetness. - 2 large eggs - 1 teaspoon vanilla extract - 1 tablespoon cornstarch Eggs are key for binding the cheesecake filling. Vanilla extract enriches the flavor of the bars. Cornstarch helps the apple filling hold together. These ingredients come together to create a luscious treat that everyone will love. {{ingredient_image_1}} 1. Preheat your oven to 325°F (163°C). This step gets your oven ready to bake the bars. 2. In a medium bowl, combine 1 cup of graham cracker crumbs, 1/2 cup of melted unsalted butter, and 2 tablespoons of sugar. Mix until it is all blended well. 3. Press this mixture evenly into the bottom of a lined 9x9-inch baking dish. Bake it for 8 minutes, then take it out and let it cool slightly. 1. In a large bowl, beat 16 ounces of softened cream cheese with 1/2 cup of sugar and 1 teaspoon of vanilla extract. Mix until it becomes smooth and creamy. 2. Add 2 large eggs one at a time. Mix well after each egg until combined. 3. Stir in 1 teaspoon of cinnamon until it is fully mixed in. 1. In another bowl, toss 3 cups of thinly sliced apples with 1/2 cup of brown sugar, 1 tablespoon of lemon juice, 1/2 teaspoon of nutmeg, and 1 tablespoon of cornstarch. 2. Make sure the apples are well coated with this mixture. This adds flavor and thickens the filling. 1. Pour half of the cheesecake filling over the cooled crust. Spread it evenly. 2. Layer the apple filling over the cheesecake layer. 3. Top it with the remaining cheesecake filling. Spread it gently to cover the apples completely. 1. Bake the bars in the preheated oven for 30-35 minutes. You want the cheesecake to be set and the edges slightly golden. 2. The center may still jiggle a bit. It will firm up while cooling. 1. Take the bars out of the oven and let them cool at room temperature for about 30 minutes. 2. Place the bars in the fridge for at least 2-3 hours or overnight. This helps them set properly. 3. Once chilled, lift the bars out using the parchment paper. Slice them into squares for serving. To get the best crust, you want to avoid a soggy bottom. Here are some tips: - Pre-bake the crust: This step is key! Bake it for 8 minutes to give it a head start. - Use enough butter: The melted butter helps the crust hold together. Make sure to mix it well. If you want to try something different for the crust, consider these options: - Use cookies: Crushed gingersnaps or Oreos can add a fun twist. - Make it nutty: Ground almonds or pecans can give the crust a tasty crunch. Achieving a creamy texture is important for the cheesecake part. Here’s how to do it: - Soften the cream cheese: Always let it sit at room temperature before mixing. This helps it blend smoothly. - Mix on low speed: This prevents too much air from getting in, which can cause cracks. To avoid cracks on the surface, follow these tips: - Don’t overbake: The center should still jiggle slightly. It firms up as it cools. - Cool slowly: Let it cool in the oven with the door slightly open for a while. Choosing the right apples makes a big difference in flavor. Here are some great apple varieties: - Granny Smith: Tart and crisp, they hold up well when baked. - Honeycrisp: Sweet and juicy, they add a nice flavor contrast. When slicing apples, keep these tips in mind: - Use a sharp knife: This helps you get clean cuts and prevents bruising. - Slice evenly: Aim for thin, uniform slices for even cooking and great texture. Pro Tips Use Fresh Apples: For the best flavor, choose crisp and tart apples like Granny Smith or Honeycrisp. They hold their shape well during baking and provide a nice balance to the sweetness of the cheesecake. Soften Cream Cheese Properly: Make sure your cream cheese is at room temperature before mixing. This will ensure a smooth and creamy filling without any lumps. Let It Set: After baking, allow the cheesecake bars to cool completely at room temperature before refrigerating. This helps them firm up nicely and makes slicing easier. Customize the Spices: Feel free to adjust the spice levels to your taste. Adding a pinch of cloves or allspice can elevate the flavor profile of your apple filling. {{image_2}} You can add fun twists to these bars. One great option is to mix in caramel or toffee. It adds a rich, sweet layer. You can drizzle it over the top before baking. You can also stir some into the apple filling. Another tasty choice is to use nuts. Walnuts or pecans can add a nice crunch. Just chop them up and mix them into the apple filling. You get a lovely texture that pairs well with the creamy cheesecake. If you need gluten-free options, you can use gluten-free graham cracker crumbs. Make sure to read the label to avoid hidden gluten. For a vegan take, swap the cream cheese for a dairy-free cream cheese. You can use flax eggs instead of regular eggs. Mix 1 tablespoon of flaxseed meal with 2.5 tablespoons of water for each egg. You can change the fruit in these bars for different seasons. In spring, you might try peaches or cherries. In fall, pears are a great choice. Just slice them thin and toss them with spices. For holidays, you can add flavors like pumpkin or eggnog. Mix pumpkin puree with the cheesecake filling. You can also use spices like clove or allspice for that festive taste. Each change makes the bars feel special and new. The apple pie cheesecake bars stay fresh in the fridge for up to one week. To keep them safe, use an airtight container. This will help maintain their delicious flavor and texture. If you have leftover bars, make sure to place a piece of wax paper between layers. This prevents them from sticking together. For long-term storage, you can freeze these bars. Wrap each bar tightly in plastic wrap. Then, place them in a freezer-safe bag or container. They can last up to three months in the freezer. When you're ready to enjoy them, let the bars thaw overnight in the fridge. This keeps the texture smooth and tasty. To serve leftovers, reheat the bars gently. Use the microwave at low power for about 15-20 seconds. This warms them up without changing the texture. If you prefer, you can also use the oven. Set it to 325°F (163°C) and heat for about 10 minutes. This method helps keep the crust crispy and the filling creamy. You can use dairy-free cream cheese as a great swap. Look for brands that taste good. Another option is to use silken tofu. Blend it until smooth for a creamy texture. This keeps the recipe rich and tasty. Yes, you can! Make the bars up to two days in advance. After baking, let them cool completely. Then, cover them tightly and store them in the fridge. This helps the flavors blend well. For baking, I love using Granny Smith apples. They are tart and firm. Honeycrisp apples also work well; they add a sweet crunch. A mix of both gives great flavor and texture to the bars. To add a festive touch, try drizzling caramel sauce on top. You can also sprinkle chopped nuts for crunch. Add some whipped cream and a dash of cinnamon for a pretty look. These small details make a big difference! Yes, they can be served warm! Just let them cool for a bit after baking. Warm bars are delicious, especially with a scoop of ice cream. They taste like a cozy hug on a plate. This blog post covered how to make delicious apple cheesecake bars. We explored the main and additional ingredients needed, plus essential pantry items. You learned step-by-step instructions for preparing the crust and filling, baking, and slicing. I also shared tips for perfecting the crust and made variations to suit your taste. Remember, these bars are versatile and easy to store. Try different methods and enjoy your baking journey! In the end, these apple cheesecake bars are a treat for any occasion. Enjoy every bite!

Apple Pie Cheesecake Bars Irresistibly Tasty Treat

If you love desserts that blend flavors perfectly, then you’ll adore these Apple Pie Cheesecake Bars. With a buttery crust,

To make delicious creamy spinach stuffed tortellini, you need a set of tasty ingredients. Here’s what to gather: - 12 ounces cheese tortellini (fresh or frozen) - 2 cups fresh spinach, chopped - 1 cup ricotta cheese - 1/2 cup grated Parmesan cheese - 1 cup cream cheese, softened - 1 teaspoon garlic powder - Salt and pepper to taste - 1 tablespoon olive oil - 1/2 teaspoon crushed red pepper flakes (optional) - Fresh basil leaves for garnish Each ingredient plays a key role in building flavor. Cheese tortellini serves as the tasty base. Fresh spinach adds color and nutrition. Ricotta and cream cheese create the creamy filling. Parmesan gives a nice salty touch. Garlic powder helps enhance the overall taste. Olive oil is great for cooking. The spices add depth to the dish. Feel free to adjust the seasonings to match your taste. You can add more spices for a bolder flavor. Don't forget the optional crushed red pepper flakes if you like a bit of heat! {{ingredient_image_1}} Start by boiling a large pot of salted water. The salt adds flavor to the pasta. Once the water is boiling, add 12 ounces of cheese tortellini. Follow the package instructions for cooking time, usually around 3 to 5 minutes. You want the tortellini to be al dente. This means they should be firm but not hard when you bite into them. Drain the tortellini and set them aside. In a mixing bowl, combine 2 cups of chopped spinach, 1 cup of ricotta cheese, and 1/2 cup of grated Parmesan cheese. Add 1 cup of softened cream cheese for creaminess. Sprinkle in 1 teaspoon of garlic powder, and season with salt and pepper. Optionally, add 1/2 teaspoon of crushed red pepper flakes for a kick. Mix everything until it’s creamy and well-combined. The filling should be smooth but thick enough to stay inside the tortellini. To stuff the tortellini, open each piece carefully. Use your fingers to pinch the edges, creating a pocket. Spoon about a teaspoon of the creamy spinach mixture into the center of each tortellini. Make sure not to overfill them. Gently press the edges to seal. This keeps the filling from leaking out when you cook them. Heat 1 tablespoon of olive oil in a large skillet over medium heat. Once the oil is hot, add the stuffed tortellini in a single layer. Cook them for about 3 to 4 minutes. Flip them gently to brown both sides. You want them heated through and slightly golden on the outside. This adds a nice texture. When the tortellini are done, transfer them to a serving platter. Drizzle a bit of olive oil over the top for extra flavor. Garnish with fresh basil leaves for color and aroma. This dish pairs well with a light salad or some crusty bread. Enjoy your creamy spinach stuffed tortellini! To make the best tortellini, avoid overcooking. If you cook them too long, they become mushy. Follow the package instructions closely. Fresh tortellini cooks faster than frozen. If using frozen, check the cooking time. Always taste a piece to see if it's al dente, which means it has a slight bite. Feel free to add spices and herbs to enhance taste. Fresh basil or oregano adds great flavor. You can also try adding lemon zest for a fresh twist. Customizing the filling is fun! Consider adding sautéed mushrooms or sun-dried tomatoes. These changes can make your dish unique and special. Prepping in advance saves time. You can make the filling a day before. Store it in the fridge until you are ready to stuff the tortellini. If you’re short on time, use store-bought tortellini. They offer great taste and save you from making them from scratch. This way, you can enjoy your dish in no time! Pro Tips Use Fresh Spinach: Fresh spinach adds a vibrant flavor and texture to the filling. If you can, opt for organic spinach for the best taste. Customize the Cheese: Feel free to mix in other cheeses like feta or mozzarella for added flavor. Each cheese brings a unique twist to the dish. Don’t Overcook Tortellini: Ensure the tortellini is cooked just until al dente to maintain its shape and texture when stuffed and sautéed. Garnish for Presentation: Adding fresh basil not only enhances the flavor but also elevates the dish's presentation. A little sprinkle of extra Parmesan on top can also be a nice touch. {{image_2}} You can get creative with the filling of your tortellini. Try using different cheeses like feta or goat cheese. You can also add mushrooms or roasted red peppers for extra flavor. Another idea is to mix in artichokes or sun-dried tomatoes. They add a nice tang and depth. You can even skip the cheese and use a mix of beans for protein. Adding different vegetables works well too. Think about using zucchini, kale, or butternut squash. They blend nicely with spinach and keep the dish fresh. When it comes to sauces, marinara is a classic choice. It adds a nice tomato flavor that pairs well with the creaminess of the filling. You might also enjoy a light garlic butter sauce. Just melt butter with minced garlic and a sprinkle of parsley. If you're feeling adventurous, whip up a homemade alfredo sauce. Just mix cream, butter, and parmesan for a rich topping. This sauce complements the spinach and cheese well. Make this dish fun for kids by adding their favorite flavors. Try stuffing the tortellini with mild cheese and a bit of chicken. This keeps it simple and tasty. You can also cut back on the spice. If your kids don't like heat, skip the red pepper flakes. Instead, add a pinch of sweet paprika for color without the kick. Keep the presentation fun too. Serve the tortellini with a sprinkle of cheese on top or colorful veggies on the side. This makes the meal more inviting and enjoyable for everyone. To store your creamy spinach stuffed tortellini, place leftovers in an airtight container. This keeps them fresh and prevents drying out. Use parchment paper between layers if stacking. Store them in the fridge for up to three days. When ready to eat, just reheat them in a skillet or microwave. Make sure they are heated through before serving. You can freeze stuffed tortellini for later meals. First, arrange them in a single layer on a baking sheet. Freeze them for about an hour until solid. After freezing, transfer them to a freezer-safe bag. This helps to save space and prevents sticking. They can last up to three months in the freezer. When it's time to enjoy your tortellini, thaw them overnight in the fridge. To reheat, simmer in a pot of water for a few minutes or heat in a skillet with a splash of olive oil. This keeps them tender and delicious. Yes, you can! Tortellini comes in many flavors. You can try spinach, mushroom, or even butternut squash tortellini for a twist. Each type adds a unique taste. For a fun mix, use a combination of flavors. Your creamy spinach filling will blend well with any option. To store leftovers, place them in an airtight container. Cool them to room temperature first. Refrigerate for up to three days. If you want to keep them longer, freeze them. Use a freezer-safe bag and remove excess air. They can last for up to three months in the freezer. Absolutely! For a dairy-free option, use cashew cheese or almond cream. For a lower-fat choice, use low-fat ricotta or cream cheese. These substitutes still taste great with your spinach filling. Experiment with different cheeses to find your favorite combination. This blog post shares all you need to know about making stuffed tortellini. We covered the key ingredients, cooking steps, and tips for perfect results. You learned how to customize flavors and create variations. Now, you can store leftovers properly and even try different types of tortellini. Making stuffed tortellini is fun and gives you delicious meals. Enjoy being creative in your kitchen!

Creamy Spinach Stuffed Tortellini Tasty Italian Dish

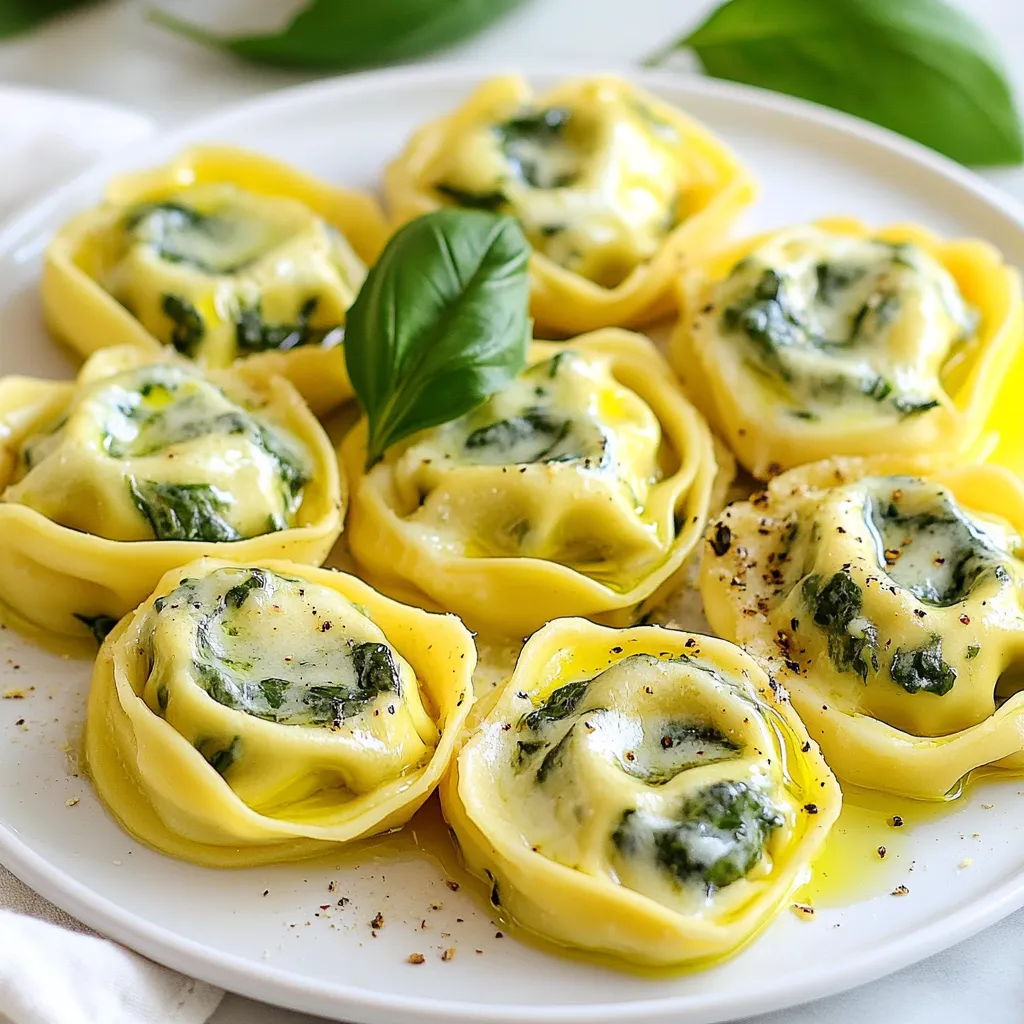
Are you ready to dive into a creamy, cheesy delight? This Creamy Spinach Stuffed Tortellini is a tasty Italian dish

To make Sweet Thai Chili Salmon, you will need: - 4 salmon fillets (6 oz each) - 1/4 cup sweet Thai chili sauce - 1 tablespoon soy sauce - 1 tablespoon fresh lime juice - 2 cloves garlic, minced - 1 teaspoon grated ginger - 1 tablespoon sesame oil - Salt and pepper to taste - 2 green onions, sliced (for garnish) - 1 tablespoon sesame seeds (for garnish) If you can't find sweet Thai chili sauce, try using a homemade mix of ketchup and honey. For soy sauce, tamari works well if you're avoiding gluten. You can replace lime juice with lemon juice for a different taste. Fresh garlic and ginger add great flavor, but you can use garlic powder and ground ginger in a pinch. Using fresh ingredients makes a big difference in flavor. Fresh salmon tastes better and has a lovely texture. Fresh garlic and ginger give a bright taste that enhances the dish. Fresh lime juice adds a zesty kick that balances the sweetness of the chili sauce. When you use the freshest ingredients, you ensure a delicious meal every time. {{ingredient_image_1}} To start, gather your ingredients. In a small bowl, mix the sweet Thai chili sauce, soy sauce, lime juice, minced garlic, and grated ginger. Whisk until everything blends well. This sauce gives the salmon its sweet and spicy kick. Next, place the salmon fillets in a shallow dish or a resealable plastic bag. Pour the marinade over the salmon, ensuring each piece is well-coated. Cover the dish or seal the bag. Refrigerate for at least 30 minutes. For a deeper flavor, marinate for up to 2 hours. While the salmon marinates, preheat your oven to 400°F (200°C). Line a baking sheet with parchment paper. This helps with easy cleanup. After marinating, take the salmon out and place it skin-side down on the baking sheet. Drizzle with sesame oil and season with salt and pepper. Bake the salmon for 12-15 minutes. It’s done when it flakes easily with a fork. If you like, you can thicken the leftover marinade by simmering it in a small saucepan. This makes a tasty glaze to drizzle on top. Marinating adds flavor and moisture to the salmon. Here are some tips to get the best results: - Timing Matters: 30 minutes is good, but longer gives better flavor. - Use Fresh Ingredients: Fresh garlic and ginger enhance the taste. - Even Coating: Make sure every piece of salmon is coated well. This helps the flavors soak in. Baking salmon can be easy, but a few tips help you achieve perfection: - Watch the Time: Check the salmon at 12 minutes. Ovens vary, so adjust if needed. - Skin-Side Down: This helps keep the salmon moist and adds flavor. - Don’t Overcook: Salmon is best when it’s just cooked through. It should still be pink inside. Using these steps, your Sweet Thai Chili Salmon will shine on the dinner table. Enjoy your cooking adventure! To boost the flavor of Sweet Thai Chili Salmon, use fresh ingredients. Fresh lime juice adds a bright taste. Minced garlic and grated ginger bring warmth to the dish. You can also add a touch of honey for added sweetness. Try mixing in a bit of red pepper flakes for heat. This will make your salmon stand out even more! One common mistake is overcooking the salmon. Keep an eye on the time. Salmon can dry out quickly. Another mistake is skipping the marinating step. The marinade gives the salmon its bold flavor. Make sure to coat the salmon well and let it sit in the fridge. Avoid using too much salt in the marinade. The soy sauce already adds saltiness. To check if your salmon is done, look for color. It should turn from bright pink to opaque. Use a fork to check if it flakes easily. If it does, it's ready! The internal temperature should reach 145°F (63°C). If you don’t have a thermometer, the fork test works great. With these tips, your Sweet Thai Chili Salmon will be a hit! Pro Tips Marinate for Maximum Flavor: Allow the salmon to marinate for at least 1 hour, or up to 2 hours, to enhance the flavors of the sweet Thai chili sauce and other ingredients. Check for Doneness: To ensure your salmon is perfectly cooked, use a fork to gently flake the thickest part of the fillet. It should easily flake apart and appear opaque. Use Fresh Ingredients: Fresh garlic and ginger will give your marinade a vibrant flavor. If you can, use freshly squeezed lime juice instead of bottled for the best taste. Garnish for Presentation: Don't skip the green onions and sesame seeds! They add a nice crunch and visual appeal to the dish, making it look restaurant-quality. {{image_2}} You can switch up the marinade to fit your taste. Try a honey garlic mix for a sweet twist. Just mix honey, minced garlic, soy sauce, and a squeeze of lime. Another option is a spicy sriracha marinade. Use sriracha, honey, soy sauce, and rice vinegar for a kick. For a fresh take, mix coconut milk, lime, and cilantro. This adds a tropical vibe to your salmon. Sweet Thai chili salmon pairs well with many sides. Serve it with jasmine rice to soak up the sauce. You can also add steamed broccoli for crunch and color. If you want something lighter, try a cucumber salad. A simple dressing of lime juice and salt works great. For a filling meal, serve it with quinoa and roasted veggies. The flavors blend nicely and make a balanced plate. To make this dish gluten-free, use tamari instead of soy sauce. It gives a similar taste without gluten. For a low-carb option, skip the rice and focus on veggies. You can add zucchini noodles or cauliflower rice instead. These options keep your meal light but still filling. Enjoy the same great flavors without the carbs! After enjoying your Sweet Thai Chili Salmon, you may have some left. To keep it fresh, let it cool to room temperature first. Then, wrap the salmon tightly in plastic wrap or place it in an airtight container. Store it in the fridge for up to three days. Keeping it sealed helps prevent it from drying out. When you're ready to enjoy leftover salmon, reheating correctly is key. Preheat your oven to 350°F (175°C). Place the salmon on a baking sheet and cover it with foil. Heat for about 10 minutes, or until warm. This method keeps the salmon moist and tasty. You can also use a microwave, but be careful not to overheat it. Heat in short bursts of 30 seconds, checking often. If you want to keep leftover salmon longer, freezing is a great option. Wrap each piece tightly in plastic wrap, then place them in a freezer bag. Press out as much air as possible before sealing. This helps prevent freezer burn. You can freeze the salmon for up to three months. When ready to eat, thaw overnight in the fridge before reheating. Yes, you can use frozen salmon. Just ensure you thaw it first. Place the salmon in the fridge overnight or run it under cold water. Once thawed, follow the recipe as normal. The sweet Thai chili sauce will still pack a punch! You can serve many sides with this dish. Here are a few ideas: - Steamed rice - Quinoa - Stir-fried vegetables - A fresh green salad - Roasted sweet potatoes These sides will balance the flavors well and make your meal complete. For thicker fillets, increase the baking time. Add about 2-4 minutes for each extra half inch of thickness. Always check for doneness by using a fork. The salmon should flake easily when fully cooked. If you have a thick piece, it may take up to 20 minutes. Adjusting the time ensures it cooks through without drying out. In this article, we explored the best ingredients and cooking steps for salmon. Fresh ingredients matter for taste and health. I shared tips for marinating and baking salmon perfectly. It’s easy to enhance flavor and avoid common mistakes. We also discussed fun variations and how to store leftovers. Remember, cooking salmon can be simple and rewarding. Enjoy trying these ideas, and have fun in the kitchen!

Sweet Thai Chili Salmon Flavorful Dinner Delight

If you’re craving a quick and tasty dinner, look no further than Sweet Thai Chili Salmon. This dish is not

- 4 medium zucchinis - 1 cup cherry tomatoes, halved - 1 cup fresh mozzarella balls, quartered - 1/4 cup fresh basil, chopped - 2 tablespoons balsamic glaze - 2 tablespoons olive oil - Salt and pepper to taste - 1/4 teaspoon garlic powder When I make Caprese Zucchini Boats, I focus on fresh ingredients. Quality ingredients make a big difference in taste. - Choosing ripe tomatoes: Look for bright, smooth cherry tomatoes. They should feel firm but not hard. A sweet aroma means they are ripe and ready to eat. - Selecting the best mozzarella: Choose mozzarella that is fresh and packed in water. It should be soft and slightly springy. This gives the best texture and flavor. - Importance of fresh basil: Fresh basil adds a fragrant touch. Look for bright green leaves that are not wilted. Smell them to ensure a strong, sweet scent. This basil will elevate your dish. These simple tips will help you select the best ingredients. They ensure your Caprese Zucchini Boats taste fresh and delicious. {{ingredient_image_1}} 1. Preheating the oven: Start by setting your oven to 375°F (190°C). This heat will help cook the zucchinis evenly. 2. Washing and slicing zucchinis: Rinse the zucchinis under cold water. Cut each zucchini in half lengthwise. This will create the perfect boat shape. 3. Scooping out the zucchini flesh: Use a spoon to scoop out the center of each half. Leave a small edge to hold the filling. Save the flesh for later use, like in a stir-fry. 1. Mixing cherry tomatoes, mozzarella, and basil: In a bowl, add the halved cherry tomatoes, quartered mozzarella balls, and chopped basil. Stir gently until the ingredients blend well. This mix gives the dish its fresh taste. 1. Drizzling and seasoning the zucchinis: Place the hollowed zucchinis in a baking dish with the cut side up. Drizzle olive oil over them. Sprinkle with salt, pepper, and garlic powder for flavor. 2. Filling and baking time: Spoon the tomato and mozzarella mix into each zucchini boat. Fill them well. Bake for 20-25 minutes. The zucchinis should be tender, and the cheese should melt and bubble. After baking, drizzle balsamic glaze for a tasty finish. Let them cool for a few minutes, then enjoy your delicious Caprese Zucchini Boats! - How to avoid soggy zucchinis To prevent soggy zucchinis, choose firm ones. Bake them just until tender. You can also sprinkle salt on the inside after scooping. Let them sit for a few minutes. This draws out excess moisture. - Adjusting seasoning for personal preference Taste your filling before baking. Add more salt, pepper, or garlic powder as needed. You can also mix in other herbs like oregano or thyme. This way, the flavors fit your taste. - Pairing with side dishes These boats pair well with a light salad. Try a simple green salad with vinaigrette. Grilled chicken or fish also make great sides. They add protein and complement the flavors. - Garnishing ideas Fresh basil leaves add a nice touch. You can also sprinkle some grated Parmesan on top. For a kick, a dash of red pepper flakes works well. These garnishes enhance the dish's look and flavor. - Grilling vs. baking Grilling adds a smoky flavor. Preheat your grill to medium heat. Cook the zucchini boats for about 10-15 minutes. Keep an eye on them to avoid burning. Baking is easier and requires less attention. - Air fryer instructions For an air fryer, set it to 375°F (190°C). Cook the filled zucchini boats for about 12-15 minutes. They will be crispy and tasty. This method saves time and energy. Pro Tips Choose Firm Zucchinis: Select zucchinis that are firm and evenly shaped for better texture and presentation. Mix Up Your Cheeses: Experiment with different types of cheese, like feta or goat cheese, to add a unique flavor twist. Use Fresh Ingredients: Fresh basil and high-quality mozzarella will elevate the dish's flavor significantly. Customize the Toppings: Feel free to add other toppings like olives or prosciutto for added depth and variety. {{image_2}} You can mix up the cheese in your Caprese zucchini boats. If you want a tangy twist, try goat cheese. Its creamy texture adds depth. Feta cheese is another great choice. It has a salty kick that contrasts well with the sweet tomatoes. Both cheeses melt nicely, giving a rich flavor. For a heartier dish, add protein to your zucchini boats. Cooked chicken is a great option. Shred it and mix it with the tomatoes and cheese. Ground turkey works well too. It adds a satisfying texture and fills you up. Just make sure to season the protein well before adding it in. If you need a vegan option, don’t worry! You can use vegan cheese. Many brands offer tasty choices that melt nicely. Replace balsamic glaze with a splash of lemon juice for brightness. You can also use nut-based dressings to add flavor. This way, everyone can enjoy the dish! To keep your cooked Caprese zucchini boats fresh, start by letting them cool. Once cooled, place them in an airtight container. You can store them in the fridge for up to three days. This method helps keep their flavor and texture intact. If you want to store them longer, freezing works too. Wrap each boat tightly in plastic wrap and then place them in a freezer bag. They can last up to three months in the freezer. When you’re ready to enjoy them, just thaw in the fridge overnight. Reheating your zucchini boats can be easy and quick. For the best results, use an oven. Preheat it to 350°F (175°C). Place the zucchini boats on a baking sheet and cover with foil. This step helps keep them moist. Bake for about 15-20 minutes, or until heated through. You can also use a microwave if you are short on time. Just place one or two boats on a microwave-safe plate and heat for 1-2 minutes. Enjoy the same great taste with these methods! Caprese Zucchini Boats last about 3 to 5 days in the fridge. Store them in an airtight container. They taste best when fresh, but you can enjoy them later. Yes, you can prepare the zucchini boats ahead of time. Scoop the zucchini and mix the filling a few hours before baking. Just keep everything in the fridge until you are ready to bake. This saves time on busy days. You can use leftover zucchini flesh in many ways. Add it to a stir-fry for extra flavor. Blend it into a smoothie for a healthy boost. You can also mix it into sauces or soups for added nutrition. Yes, Caprese Zucchini Boats are healthy. They are low in calories and high in nutrients. Zucchini is a great source of fiber. Fresh tomatoes and basil add vitamins and antioxidants. The mozzarella provides protein, making this dish balanced and nutritious. Caprese zucchini boats are a tasty, fresh dish you can make easily. We covered all the key ingredients and how to pick the best ones. You learned the steps for prep, baking, and options for storing leftovers. Don’t forget to try different cheeses or proteins to mix things up. This dish is healthy and fun for everyone. Enjoy your next meal with these tasty boats!

Caprese Zucchini Boats Fresh and Flavorful Recipe

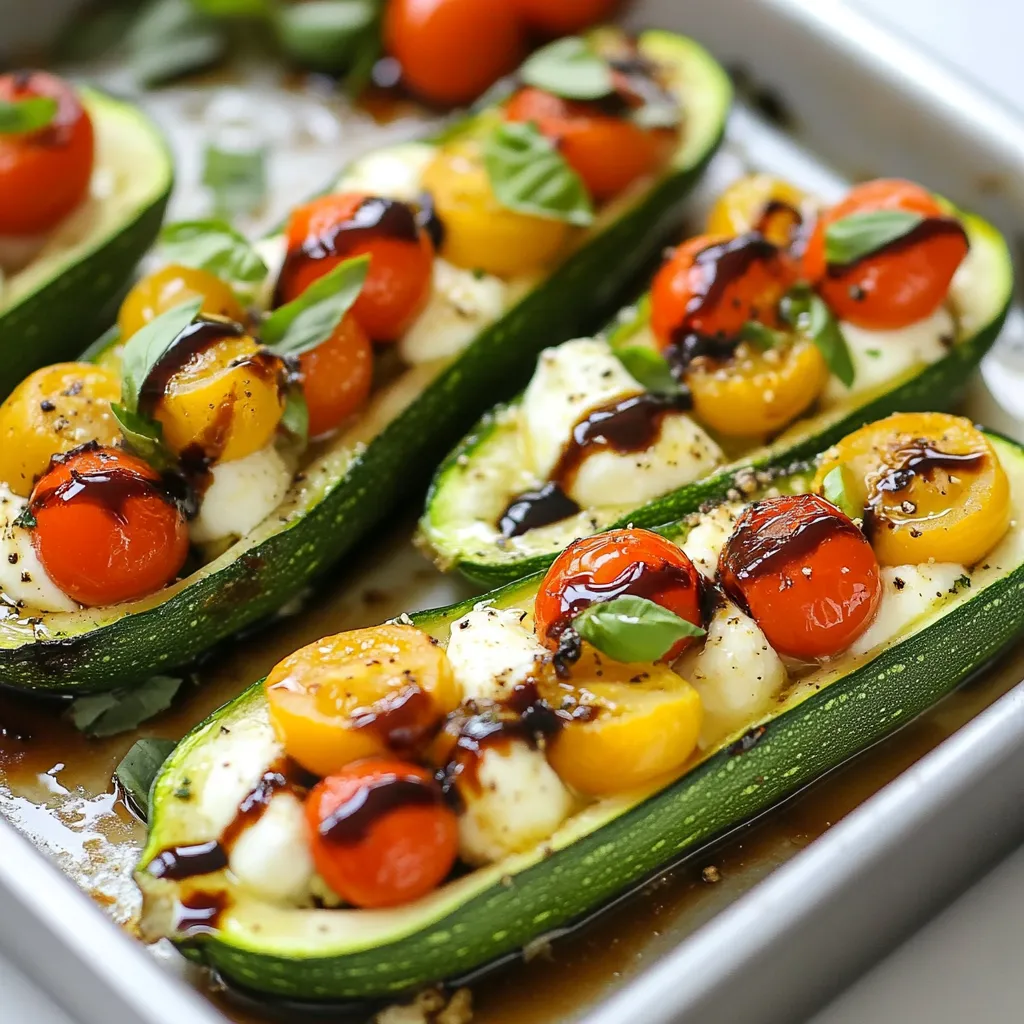
Looking for a delicious, healthy meal? Try these Caprese Zucchini Boats! They are easy to make and packed with fresh

You need 1 pound of fresh salmon fillet. Make sure it is skinless. Cut the salmon into bite-sized cubes. This size helps it cook evenly. Fresh salmon is best for flavor and texture. For this dish, use 4 tablespoons of unsalted butter. Butter adds richness to the salmon. You will also need 4 cloves of garlic, minced. Fresh garlic gives your dish a strong and tasty flavor. You will need 1 tablespoon of fresh parsley, chopped. This herb adds a nice touch of color and freshness. Also, squeeze in 1 tablespoon of lemon juice for a zesty kick. Finally, season with salt and black pepper to taste. If you like heat, add ½ teaspoon of chili flakes. These are optional but can spice things up. Don't forget lemon wedges to serve with your dish! {{ingredient_image_1}} First, take your fresh salmon fillet and cut it into bite-sized cubes. Make sure to use a sharp knife for clean cuts. Pat the salmon cubes dry with a paper towel. This step helps the salmon sear nicely. Once dry, season the cubes with salt and black pepper on all sides. This simple seasoning enhances the salmon's flavor. Next, grab a large skillet and set it over medium heat. Add four tablespoons of unsalted butter to the skillet. Swirl the pan gently as the butter melts. You want it to melt completely without browning. This melted butter will create a rich base for our garlic butter sauce. Now, it's time to cook the salmon bites. - Adding Garlic and Finishing Touches: Increase the heat to medium-high. Carefully add the salmon cubes to the skillet in a single layer. Cook for about 2 to 3 minutes on one side until they turn golden brown. Use tongs or a spatula to gently flip the cubes. Cook them for another 2 to 3 minutes until they are cooked through. They should flake easily but still feel tender. After cooking, lower the heat. Stir in the minced garlic, fresh parsley, lemon juice, and, if you like spice, chili flakes. Swirl the pan to coat the salmon in the garlic butter sauce. - Serving the Dish: Remove the skillet from the heat. Serve the garlic butter salmon bites right away. Garnish with more parsley and lemon wedges for squeezing over the top. The lemon adds a bright touch that balances the richness of the butter. Enjoy these tasty bites while they’re hot! When you pick salmon, look for bright, shiny skin. The flesh should be firm and moist. Fresh salmon has a clean smell, not fishy. Ask your fishmonger for skinless fillets if you prefer. Always check the sell-by date for freshness. To get those golden brown bites, dry the salmon first. This step helps it sear well. Use medium-high heat in your skillet. Add the salmon in a single layer. Avoid crowding the pan; it can steam instead of sear. Flip the salmon gently after a few minutes. Cook until it easily flakes. You can customize the flavor to match your taste. Add more garlic for a bolder taste. A splash of soy sauce can bring umami depth. For a citrus twist, try lime juice instead of lemon. If you like heat, mix in more chili flakes. Experiment until you find your perfect blend! Pro Tips Dry the Salmon: Patting the salmon dry before seasoning helps achieve a better sear and enhances flavor. Don't Overcrowd the Pan: Cook the salmon in batches if necessary to ensure even cooking and prevent steaming. Use Fresh Ingredients: Opt for fresh garlic and parsley for the best flavor; dried herbs will not provide the same intensity. Adjust the Heat: Control the skillet heat carefully to avoid burning the garlic, which can turn bitter. {{image_2}} To make spicy garlic butter salmon bites, add chili flakes. Use ½ teaspoon for a kick. You can also use hot sauce for more heat. Mix the hot sauce with lemon juice before adding it to the pan. This will give your bites a zesty flavor with a spicy twist. If you love herbs, try adding fresh dill or basil. Both herbs pair well with salmon. You can also use dried herbs like thyme or oregano. Chop the herbs finely and mix them in with the garlic. This adds depth to the garlic butter sauce. You will enjoy the fresh taste in every bite. You can cook salmon bites in different ways. Try baking them in the oven. Preheat your oven to 400°F. Place the salmon bites in a single layer on a baking sheet. Bake for about 10-12 minutes or until cooked through. Another method is grilling. Use skewers to hold the salmon cubes. Grill them for about 8-10 minutes, turning occasionally. Each method gives a unique flavor and texture to the salmon bites. After enjoying your garlic butter salmon bites, you can save leftovers. Place them in an airtight container. Make sure to cool the salmon bites to room temperature first. Store them in the fridge for up to three days. The flavor remains good, but the texture may change a bit. To reheat your salmon bites, use a skillet or oven for best results. Heat a skillet over medium heat. Add a little butter to the pan. Once hot, add the salmon bites. Sear for about 2-3 minutes until warm. You can also use the oven. Preheat it to 350°F (175°C). Place the salmon bites on a baking tray and heat for about 10 minutes. This keeps them moist and tasty. If you want to save them longer, freezing is a great option. Place the cooled salmon bites in a freezer-safe bag. Squeeze out the air before sealing. Label the bag with the date. They can stay in the freezer for up to three months. To use, thaw them in the fridge overnight before reheating. This way, you keep the best flavor and texture. You cook salmon bites for about 5 to 6 minutes total. Start by searing them for 2 to 3 minutes on one side. Then flip and cook for another 2 to 3 minutes. They should be golden brown and flaky when done. Yes, you can use frozen salmon. Just make sure to thaw it first. Thawing helps the salmon cook evenly. Pat it dry to remove excess moisture. This step ensures a great sear. Garlic butter salmon bites pair well with many sides. Here are some ideas: - Roasted vegetables like asparagus or broccoli - A fresh green salad with lemon vinaigrette - Rice or quinoa for a filling meal - Garlic bread for a tasty touch These sides will balance the rich flavors of the salmon bites. You now know how to make delicious garlic butter salmon bites. We covered fresh salmon, garlic, and herbs as key ingredients. I shared step-by-step instructions for preparation and cooking. You learned tips on selecting and searing salmon for great bites. We explored fun variations and how to store leftovers. Keep your dish simple yet tasty. Try different flavors to make it your own. Enjoy your cooking adventure!

Garlic Butter Salmon Bites Easy and Tasty Recipe

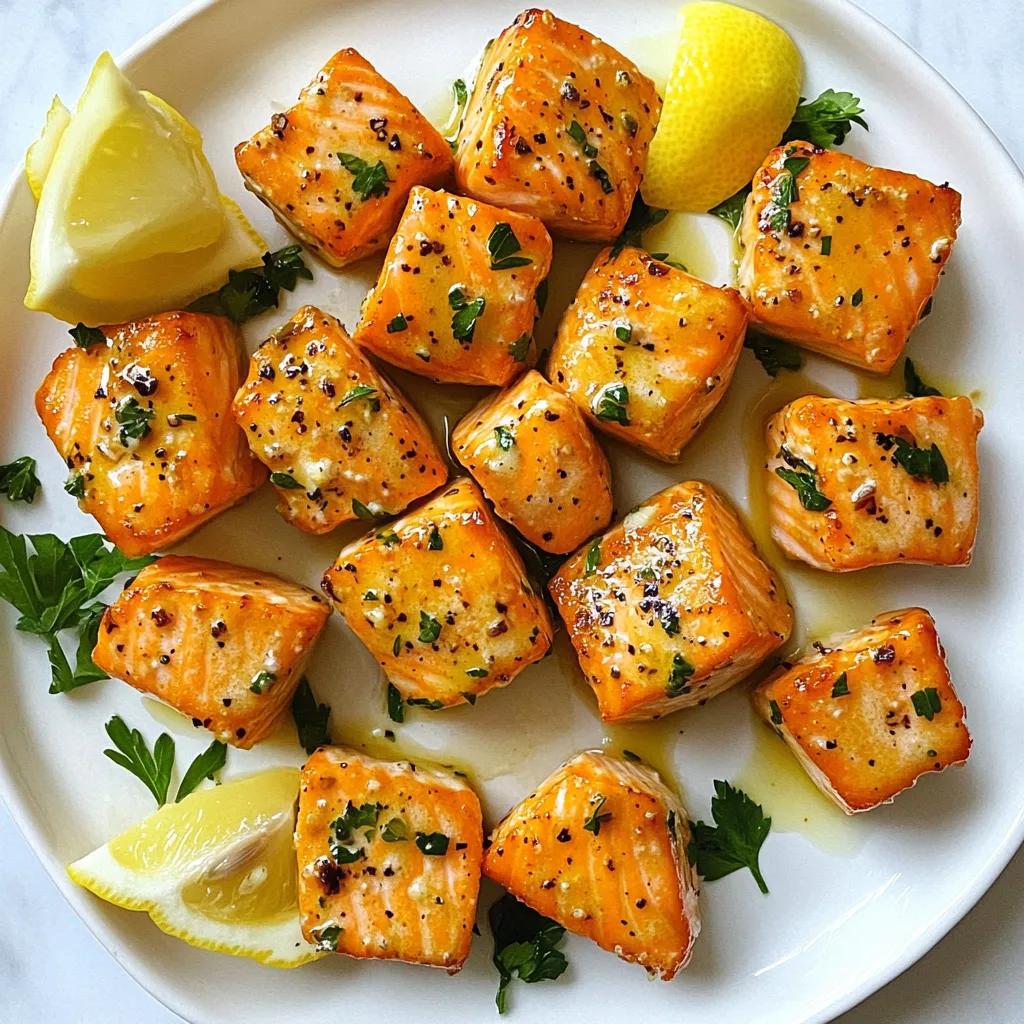
If you’re craving a quick and tasty dish, Garlic Butter Salmon Bites are a must-try! In this easy recipe, you’ll

- 4 medium zucchinis: These will become your zoodles. Spiralize them using a spiralizer or a vegetable peeler. Set them aside for later. - 1 red bell pepper: Thinly slice this pepper. It adds a sweet crunch to your dish. - 1 cup snap peas: Trim the ends off these peas. They should be bright and fresh for the best taste. - 1 small carrot: Julienning this carrot gives it a nice, thin shape. Use a sharp knife to cut it into thin strips. - Overview of sauces and condiments: - ½ cup unsweetened creamy peanut butter: This is the star of the sauce. It gives a rich, nutty flavor. - 3 tablespoons soy sauce or tamari: This adds a salty depth to your dish. - 2 tablespoons honey or maple syrup: This brings a touch of sweetness. Choose based on your taste. - 1 tablespoon lime juice: A splash of lime adds brightness to the sauce. - 1 tablespoon sriracha: Adjust this based on how spicy you want your dish. - 2 cloves garlic: Mince these cloves for strong flavor. - 1 tablespoon fresh ginger: Grate the ginger for a zingy taste. - 2 tablespoons sesame oil: This oil gives a lovely richness when cooking. - Chopped fresh cilantro: Use this as a garnish for a fresh finish. - Crushed peanuts: Top your zoodles with these for added crunch and flavor. These ingredients work together to create a flavorful, easy dish that's both healthy and fun to make. {{ingredient_image_1}} To start, you need to make zoodles from zucchini. You can use a spiralizer for fun, curly noodles. If you don’t have a spiralizer, grab a vegetable peeler. Run it down the zucchini to create thin strips. This method works well, too. Once you make your zoodles, set them aside on a plate or in a bowl. Now, let’s whip up the peanut sauce. In a small bowl, add creamy peanut butter, soy sauce, and honey or maple syrup. Squeeze in lime juice, and add minced garlic and grated ginger. Use a whisk to mix it all together until it’s smooth. If you like it spicy, add more sriracha to taste. Whisking helps blend the flavors well. Heat sesame oil in a large skillet over medium heat. Add your sliced red bell pepper, snap peas, and julienned carrot. Stir-fry these veggies for about 3-4 minutes. You want them to soften, but still be crunchy. This keeps the dish fresh and colorful. Now, it’s time to add your zoodles. Toss everything together in the skillet. Cook for an additional 2-3 minutes. You want the zoodles to warm up but not get mushy. Finally, remove the skillet from heat. Pour the peanut sauce over the zoodle mix. Toss well to coat all the veggies. To keep zoodles from getting soggy, cook them briefly. Zucchini has a lot of water. If you stir-fry them too long, they become mushy. Aim for just 2-3 minutes of cooking after adding them to the pan. You want them warm and tender but still with a bit of crunch. Adjust the cooking time to your liking. If you prefer a firmer zoodle, reduce the time. If you like softer zoodles, add a minute or two. It’s all about your taste and texture. To make your dish even better, add garnishes. Chopped fresh cilantro adds a nice herbal note. Crushed peanuts give a satisfying crunch. Both enhance the dish's flavor and texture. For storage, keep leftover sauce and zoodles in separate containers. This helps prevent sogginess. Use the sauce within a week. Zoodles are best eaten fresh, but they can last for a couple of days in the fridge. For a gluten-free option, use tamari instead of soy sauce. For a vegan dish, replace honey with maple syrup. You can also switch up the nut butter. Almond butter or cashew butter works well too. Want more veggies? Try adding bell peppers, broccoli, or carrots. Just adjust the cooking times based on the vegetables you use. Pro Tips Use Fresh Zucchini: For the best texture and flavor, choose firm and fresh zucchini. Avoid those that are soft or have blemishes. Adjust Spice Level: Control the heat of your dish by varying the amount of sriracha in the sauce. Start with a smaller amount and add more if needed. Keep Zoodles Crunchy: Don’t overcook the zoodles; they should be warm and slightly crisp. This will enhance the overall texture of the dish. Garnish for Extra Flavor: Fresh cilantro and crushed peanuts not only add color but also enhance the taste and texture. Don't skip this step! {{image_2}} You can add protein to your Spicy Thai Peanut Zoodles. Chicken, shrimp, or tofu all work well. If you choose chicken, cook bite-sized pieces for about 6-7 minutes until they are done. For shrimp, just 3-4 minutes will do, as they cook quickly. Tofu needs to be pressed and cubed before cooking. Stir-fry it for about 5-6 minutes until golden. These proteins add flavor and make your meal more filling. Feel free to mix in seasonal vegetables. Broccoli, bell peppers, or carrots add great color and taste. For broccoli, steam it for a few minutes before adding it to your stir-fry. Snap peas and zucchini are perfect because they cook quickly. Adjust cooking times based on the veggies you choose. Harder vegetables need more time, while softer ones need less. Pair your zoodles with different sauces for extra flavor. A sweet chili sauce or a sesame dressing can add a twist. You can also make your own by mixing soy sauce, lime, and a touch of honey. A peanut sauce with coconut milk gives a creamy finish. These options will enhance the taste and allow you to enjoy your dish in new ways. To keep your Spicy Thai Peanut Zoodles fresh, use airtight containers. Glass or plastic containers work well. Store them in the fridge for up to three days. Keep the zoodles and sauce separate if possible. This helps maintain texture. If they mix, the zoodles may become too soggy. Reheat your zoodles on the stove. This method helps avoid mushiness. Use a non-stick pan on low heat. You can add a splash of water to help steam them gently. If you microwave, use short bursts and stir often. This keeps the zoodles crisp. You can freeze zoodles, but it's best to blanch them first. Blanching helps preserve their color and texture. After blanching, cool them quickly and pack in freezer bags. They can last up to three months in the freezer. The peanut sauce can also be frozen. Just make sure to store it in a separate container. It will keep well for about two months. Zoodles are noodles made from zucchini. They are a great low-carb alternative to pasta. To make zoodles, you can use a spiralizer or a vegetable peeler. Spiralizing creates long, curly noodles. If you use a peeler, you will get thin strips. Both methods work well. After you make them, set the zoodles aside until you cook them. Yes, you can meal prep Spicy Thai Peanut Zoodles. You can make the zoodles and sauce ahead of time. Store them separately in airtight containers. This way, they stay fresh. When you are ready to eat, just stir-fry the veggies and add the zoodles and sauce. This dish can last in the fridge for up to three days. Yes, this dish can be gluten-free. Use tamari instead of soy sauce. Tamari is a gluten-free option that tastes great. Always check the labels on your ingredients. Some brands may add gluten. With these small changes, you can enjoy a delicious gluten-free meal. To make the sauce less spicy, reduce the amount of sriracha. Start with one teaspoon and taste. You can always add more if you want it spicier. Another option is to add more peanut butter or honey. These ingredients help balance the heat. Adjust the sauce to fit your taste buds. Yes, you can use other vegetables. Carrots, bell peppers, and cucumbers work well. Just cut them into noodle shapes or thin strips. You can also use a mix of vegetables. This adds more color and crunch to your dish. Adjust cooking times based on the vegetables you choose. In this blog post, we explored how to make Spicy Thai Peanut Zoodles, covering everything from ingredients to cooking techniques. You learned about choosing the right vegetables and sauces, as well as tips for the best texture. Remember, cooking zoodles can be fun and healthy. You can also adjust flavors or try new vegetables. Keep experimenting and enjoy tasty meals with your family. Use these tips to turn simple ingredients into a delicious dish that fits your needs!

Spicy Thai Peanut Zoodles Flavorful and Easy Recipe

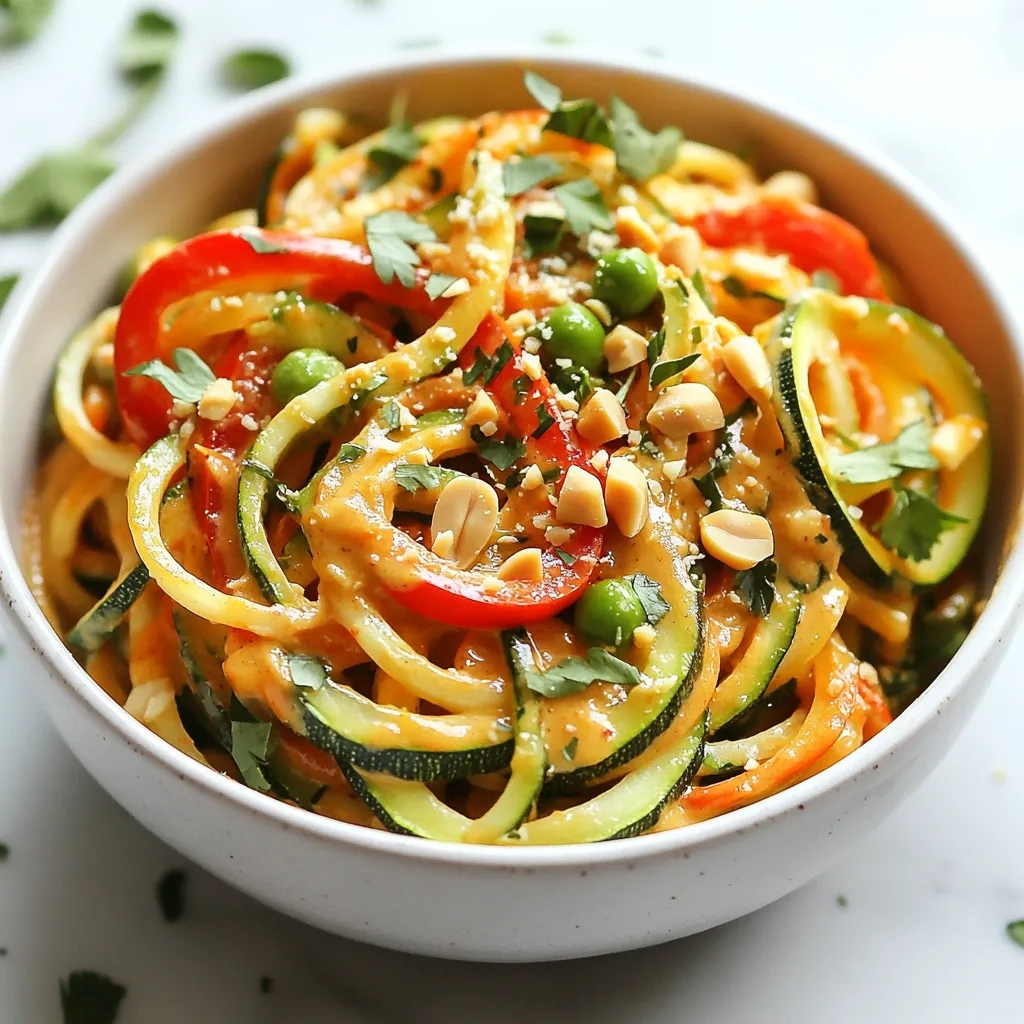
Are you ready to spice up your dinner routine? Spicy Thai Peanut Zoodles are here to impress! This easy recipe

For the meatballs, you need: - 1 lb ground chicken - 1/2 cup breadcrumbs - 1/4 cup fresh cilantro, chopped - 2 green onions, finely chopped - 1 tablespoon red curry paste - 1 teaspoon fish sauce - 1 teaspoon lime juice - 2 cloves garlic, minced - 1 tablespoon ginger, grated - 1 egg - Salt and pepper to taste These ingredients combine to create a juicy, flavorful meatball. The ground chicken is lean and takes on all the flavors you mix in. Breadcrumbs help keep them tender. For the sauce, you will need: - 1 can (14 oz) coconut milk - 1 tablespoon lime juice (for sauce) Coconut milk is rich and creamy. It pairs perfectly with the spices in the meatballs. The lime juice adds brightness and balance to the sauce. You should also have fresh herbs and seasoning on hand: - Fresh basil leaves, for garnish Basil adds a lovely aroma and flavor. It makes the dish look beautiful too! Always use fresh herbs for the best taste. When you gather all these ingredients, you will create a dish that is both savory and simple. Each element plays a key role in building the flavor in your Thai Red Curry Chicken Meatballs. {{ingredient_image_1}} To start, gather your ingredients. You will need one pound of ground chicken, half a cup of breadcrumbs, and some fresh cilantro. Chop a quarter cup of cilantro and two green onions. In a large bowl, mix the chicken, breadcrumbs, cilantro, and green onions. Add one tablespoon of red curry paste. Include one teaspoon of fish sauce and lime juice. Mince two cloves of garlic and grate one tablespoon of ginger. Add these to the bowl. Crack in one egg, then season with salt and pepper. Mix everything well until it is fully combined. This step creates a flavorful base for your meatballs. Next, form the mixture into meatballs. Aim for about one inch in diameter. You should have about 20 meatballs. Set them aside on a plate. Heat a tablespoon of oil in a large skillet over medium heat. Add the meatballs in small batches to avoid crowding. Brown the meatballs for five to seven minutes. Turn them occasionally until they are golden. Once cooked through, remove them from the skillet and set aside. This creates a nice crust and locks in flavors. In the same skillet, pour in a 14-ounce can of coconut milk. Bring it to a gentle simmer. Add one tablespoon of lime juice and a pinch of salt. Stir well to combine. Once the sauce is ready, add the meatballs back into the skillet. Gently coat each meatball in the coconut curry sauce. Let everything simmer for another five minutes. This allows the flavors to meld together beautifully. Taste the sauce and adjust the seasoning if needed. Now your Thai Red Curry Chicken Meatballs are ready to serve! Enjoy them over jasmine rice or noodles and garnish with fresh basil leaves. To shape meatballs, keep your hands wet. This stops the mixture from sticking. Use about one tablespoon of the meat mixture for each ball. Roll it gently but firmly. Aim for a size of one inch in diameter. This size cooks evenly and stays moist. If the meatballs are too big, they may not cook through. Balancing flavors is key. The red curry paste adds heat and depth. Use fish sauce for a salty kick. Lime juice brightens the dish. Always taste as you go. Adjust by adding more lime juice or salt if needed. Fresh cilantro adds a nice, herbal note. Don’t skip it! For the best texture, brown the meatballs on medium heat. This creates a nice crust. Cook them in batches to avoid steaming. After browning, let them simmer in the coconut milk. This keeps them juicy and allows flavors to meld. Avoid overcooking, as that can dry them out. Pro Tips Use Fresh Ingredients: Fresh herbs like cilantro and basil will enhance the flavor of your meatballs and sauce dramatically. Always opt for fresh over dried if possible. Adjust Spice Level: If you prefer a spicier dish, add extra red curry paste or fresh chili peppers to the meatball mixture or the sauce. Perfecting Meatballs: For consistently shaped meatballs, use a small ice cream scoop to portion the mixture before rolling them by hand. Serving Suggestions: These meatballs pair beautifully with jasmine rice or rice noodles; consider adding steamed vegetables for a complete meal. {{image_2}} If you have special dietary needs, you can easily adjust this recipe. Here are some ideas: - Ground Chicken: You can swap it for ground turkey or even tofu for a plant-based meal. - Breadcrumbs: Use gluten-free breadcrumbs or oats if you prefer. - Fish Sauce: Replace it with soy sauce or a vegan alternative. - Egg: For an egg-free option, use a flaxseed egg or applesauce. These swaps keep the dish tasty while meeting your needs. You can cook these meatballs in two main ways: baking or pan-frying. - Baking: Preheat your oven to 400°F. Place meatballs on a baking sheet and bake for 20 minutes. This method is healthier and easier. - Pan-frying: This method gives meatballs a nice brown color. Brown them on the stove in a skillet, as the recipe suggests. Both methods work well, so choose what you prefer! Thai Red Curry Chicken Meatballs shine when paired with the right sides. - Serve them over fragrant jasmine rice or rice noodles. - Add a side of steamed veggies like broccoli or snap peas for crunch. - Drizzle extra coconut sauce over your dish for added flavor. - Garnish with fresh basil leaves for a burst of freshness. These combinations make for a complete and satisfying meal. After enjoying your Thai red curry chicken meatballs, store the leftovers wisely. Let the meatballs cool down to room temperature. Then, place them in an airtight container. This keeps them fresh. You can store them in the fridge for up to three days. To keep the meatballs from drying out, add a little of the coconut curry sauce before sealing the container. This adds moisture and flavor when you reheat. If you want to save the meatballs for later, freezing is a great option. First, let the cooked meatballs cool completely. Next, arrange them on a baking sheet in a single layer. Freeze them for about an hour. This prevents them from sticking together. After they are frozen, transfer the meatballs to a freezer bag. Label the bag with the date. These can stay good in the freezer for up to three months. To reheat your meatballs, there are a few methods you can use. The microwave is quick but may dry them out. For the best results, use the stovetop. Heat a skillet over medium heat and add a splash of coconut milk or water. Add the meatballs and cover the skillet. Heat for about 5-7 minutes, turning them gently. This method keeps them moist and flavorful. You can also reheat them in the oven at 350°F for about 15 minutes. Enjoy your meatballs warm and ready to savor! To make Thai Red Curry Chicken Meatballs, start by mixing ground chicken with breadcrumbs, chopped cilantro, and green onions. Then, add red curry paste, fish sauce, lime juice, minced garlic, grated ginger, egg, salt, and pepper. Mix until everything blends well. Next, shape the mixture into meatballs, about one inch wide. Heat oil in a skillet and brown the meatballs for 5-7 minutes. After that, pour in coconut milk and simmer. Add the meatballs back, coat them in the sauce, and simmer for 5 more minutes. Yes, you can use other meats. Ground turkey or pork works well. If you want a different flavor, try ground beef or lamb. Each meat will give a unique taste. Just keep the same amounts. The cooking time may change slightly. Always ensure the meat reaches a safe temperature. To adjust the spice level, change the amount of red curry paste. For milder meatballs, use less paste. You can also add more coconut milk to soften the heat. If you want more spice, you can add chili flakes or fresh chilies. Always taste as you go to find the right balance for you. Thai red curry chicken meatballs are a tasty dish with bright flavors. We discussed the key ingredients and how to prepare them well. You learned about cooking meatballs, making the coconut sauce, and combining it all. I shared tips for shaping, flavoring, and cooking them just right. We also talked about variations, storage tips, and answered common questions. Enjoy making this dish your own. Use this knowledge to impress friends and family.

Thai Red Curry Chicken Meatballs Savory and Simple Dish

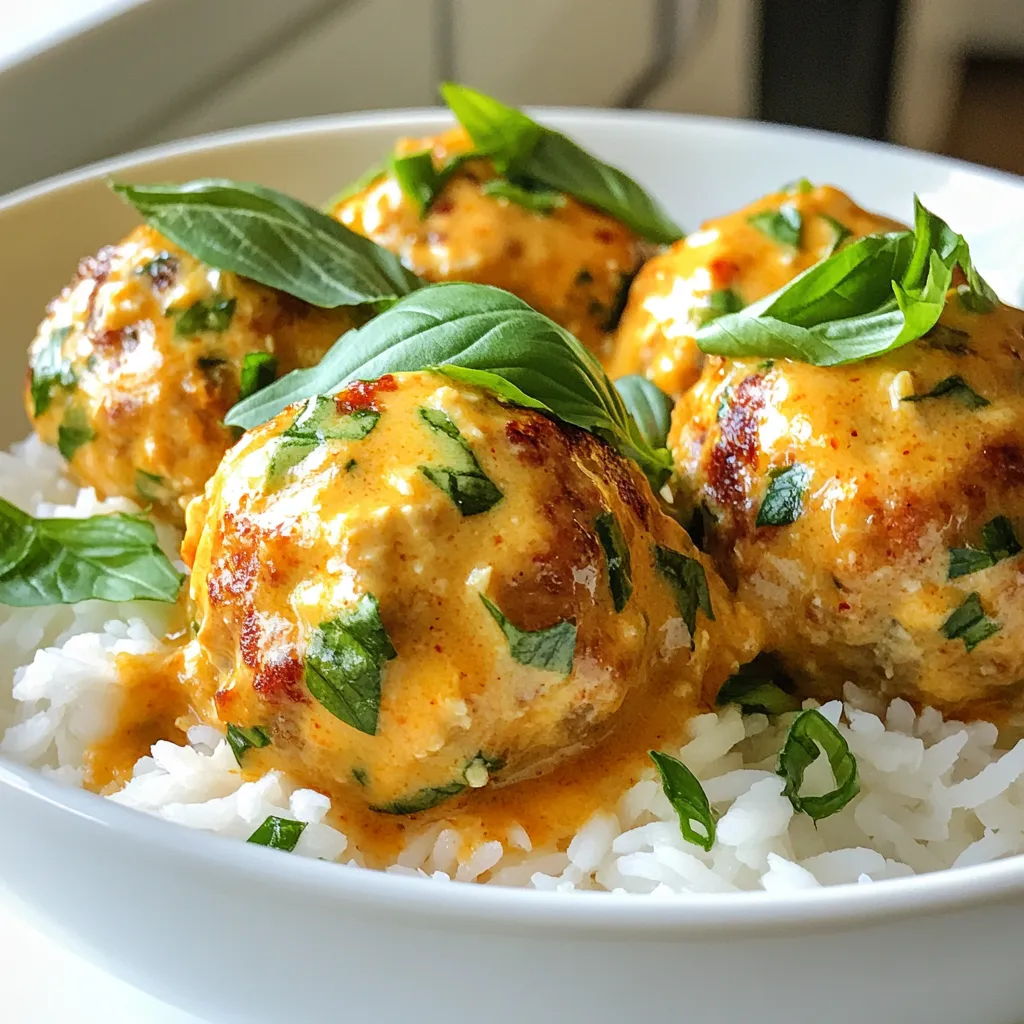
If you’re looking for a dish that packs a punch and offers comfort, Thai Red Curry Chicken Meatballs are a

- 1 cup quinoa (rinsed) - 2 cups chicken broth - 1 pound chicken breast, cut into bite-sized pieces - 1 lemon (zested and juiced) Quinoa serves as the base of this dish. It is high in protein and fiber. Using chicken broth adds depth and flavor. The chicken breast gives a nice protein punch. The lemon brings brightness to every bite. - 2 tablespoons fresh parsley, chopped - 1 tablespoon fresh basil, chopped - 1 teaspoon garlic powder - 1 teaspoon onion powder - 1/2 teaspoon salt - 1/2 teaspoon black pepper Fresh herbs add color and taste. Parsley and basil create a fresh flavor. Garlic and onion powder enhance the savory notes. Salt and pepper balance everything out. This combination makes the chicken bites really pop. - 2 tablespoons olive oil - 1/4 cup breadcrumbs (optional for crunch) Olive oil helps to cook the chicken perfectly. It adds a lovely richness. If you want some crunch, use breadcrumbs. They give texture and an extra layer of flavor. You can decide if you want that crunch or not! {{ingredient_image_1}} To start, you need to cook the quinoa. In a medium pot, combine 1 cup of rinsed quinoa with 2 cups of chicken broth. This broth adds rich flavor. Bring the mixture to a boil. Once boiling, reduce the heat and cover the pot. Let it simmer for 15 minutes. This time allows the quinoa to absorb all the liquid. When done, fluff it with a fork and set it aside. Next, you will prepare the chicken. Take 1 pound of chicken breast cut into bite-sized pieces. In a bowl, mix the chicken with the juice and zest of 1 lemon. Add 2 tablespoons of chopped fresh parsley and 1 tablespoon of chopped fresh basil. Include 1 teaspoon of garlic powder, 1 teaspoon of onion powder, 1/2 teaspoon of salt, and 1/2 teaspoon of black pepper. This blend gives the chicken a bright and fresh flavor. Let the chicken marinate for at least 15 minutes. This step is key for deep flavor. Now, it’s time to cook the chicken. Heat 2 tablespoons of olive oil in a skillet over medium heat. Add the marinated chicken pieces to the pan. Cook for 5 to 7 minutes, stirring occasionally. You want the chicken to turn golden brown and reach an internal temperature of 165°F. Once cooked, add the quinoa to the skillet. Stir everything together gently. Allow it to warm through for another 2 to 3 minutes. If you like some crunch, sprinkle 1/4 cup of breadcrumbs over the mixture and let it cook for an additional minute. This will give your dish a delightful texture. For the best results, marinate the chicken for at least 15 minutes. This time allows the chicken to soak up all the tasty lemon and herb flavors. If you have more time, marinating longer enhances the taste even more. Fresh herbs like parsley and basil make a big difference in flavor. They add bright notes that dried herbs just can't match. Always choose fresh for the best results. When cooking chicken, aim for an internal temperature of 165°F. This ensures the chicken is safe to eat and juicy. Use a meat thermometer for best accuracy. To add crunch, sprinkle breadcrumbs on the chicken and quinoa mix. Let them cook for just a minute to achieve the perfect crispy bite. This simple step makes a big change in texture. Serve these chicken bites on a nice platter. Garnish with lemon wedges and a sprinkle of fresh herbs for color. This not only looks pretty but also gives hints of the flavors inside. You can also pair these bites with a light dip, like yogurt or garlic sauce. This adds a new layer of flavor and makes for a fun meal. Pro Tips Enhance Flavor: For a deeper flavor, marinate the chicken for longer, ideally 1-2 hours, in the lemon mixture before cooking. Use Fresh Herbs: Fresh herbs make a significant difference in taste. Consider adding thyme or oregano for extra flavor. Perfectly Cooked Quinoa: To ensure fluffy quinoa, remember to rinse it thoroughly to remove bitterness and cook it with the right liquid ratio. Breadcrumb Variations: For a twist, try using seasoned panko breadcrumbs or crushed nuts for a different texture and flavor. {{image_2}} For a gluten-free option, you can use quinoa. It is naturally gluten-free and a great base for this dish. If you want to swap out the chicken, try chickpeas or tofu. Both options provide protein and work well with the lemon and herbs. To spice things up, add red pepper flakes or cayenne pepper. These spices give a nice kick. You can also mix in new herbs, like cilantro or dill. Each herb brings its own unique taste to the dish. Pair these chicken bites with dips like tzatziki or hummus. They add creaminess and flavor. For side dishes, consider a fresh salad or roasted vegetables. These options balance the meal and keep it light. Store leftover Lemon Herb Quinoa Chicken Bites in a sealed container. Keep them in the fridge. Make sure to eat them within three days for the best taste. To reheat, place the bites in a microwave-safe dish. Add a splash of water to keep them moist. Heat them for one to two minutes, stirring halfway through. You can also warm them in a skillet over low heat for a few minutes, stirring gently. To freeze, let the chicken bites cool completely. Place them in an airtight container or a freezer bag. Remove as much air as possible before sealing. You can freeze them for up to three months. When you’re ready to eat, thaw the bites in the fridge overnight. For a quicker option, use the microwave on the defrost setting. Once thawed, reheat them as mentioned above. The freshness of Lemon Herb Quinoa Chicken Bites is easy to check. Look for signs like a sour smell or a change in color. If they smell off or look strange, it’s best to throw them away. For best quality, consume the bites within three days when refrigerated and within three months when frozen. Enjoy them while they are fresh for the tastiest experience! You can prep these bites easily. Start by cooking the quinoa. Let it cool and store it in the fridge. Marinate the chicken pieces with lemon juice and herbs. Keep the marinated chicken in a separate container in the fridge. When you are ready to eat, cook the chicken and mix it with the quinoa. This method saves time and keeps flavors fresh. Yes, you can. Some great options are brown rice, farro, or couscous. Each grain will bring a different texture and flavor. Cook the grains according to the package instructions. Make sure to adjust cooking times, as they can vary. These alternatives will still pair well with the lemon and herbs. These bites go well with many sides. Try serving them with a fresh green salad. Roasted vegetables also make a great match. You can add a light dipping sauce, like tzatziki or hummus, for extra flavor. These pairings enhance the meal and make it more colorful on the plate. This post guides you to make Lemon Herb Quinoa Chicken Bites. We explored key ingredients like quinoa, chicken, and fresh herbs. I shared step-by-step cooking instructions and tips for flavor and texture. You can adapt the dish with dietary options or new flavors. Remember to store leftovers properly for freshness. Enjoy your tasty bites now and later!

Lemon Herb Quinoa Chicken Bites Savory Delight

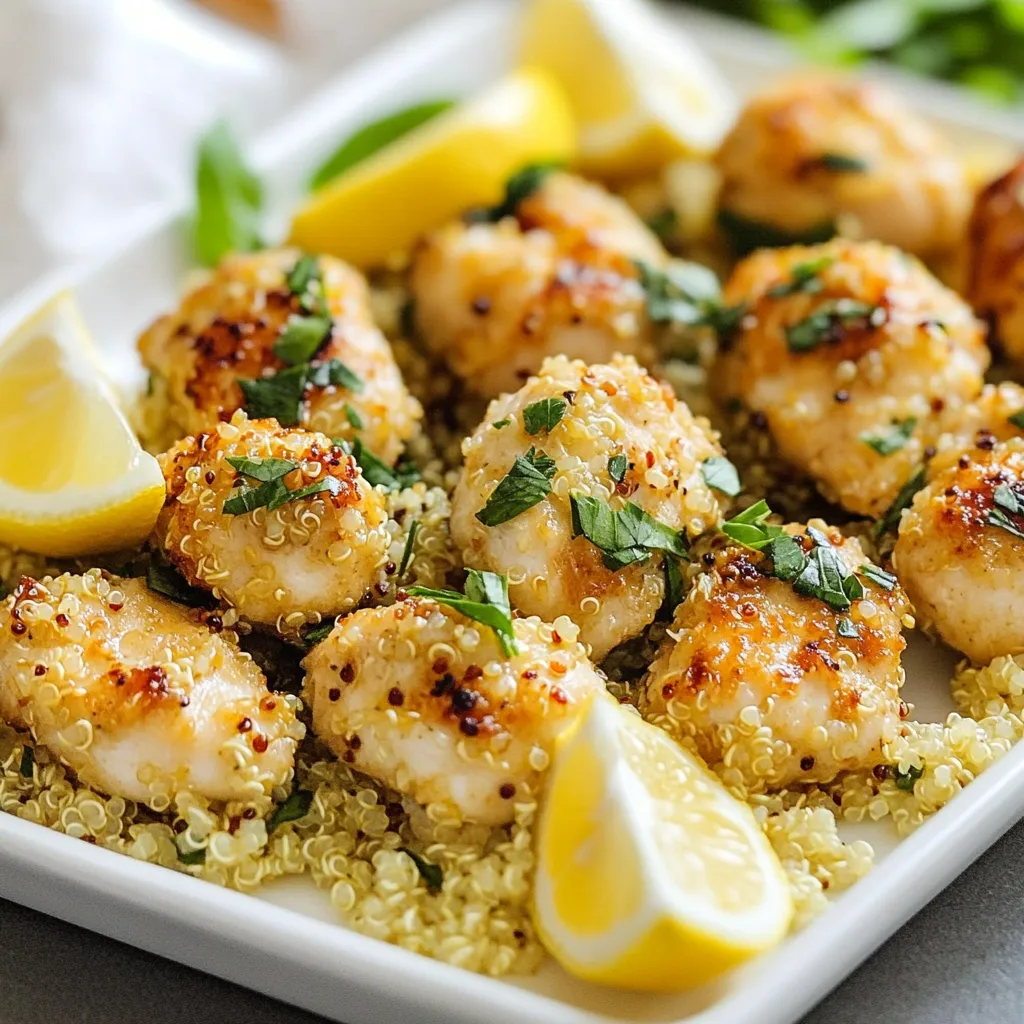
Are you ready for a tasty treat? In this blog post, I’ll guide you through making Lemon Herb Quinoa Chicken

Older posts
Newer posts
← Previous Page1 … Page156 Page157 Page158 Next →

dsad

© 2026 Recipes Pursuit • Built with GeneratePress

Our Policies

  • Copyright Policy
  • Cookie Policy
  • GDPR Policy
  • Privacy Policy
  • Disclaimer
  • Terms Of Use

More Information

  • Home
  • About
  • Contact
  • Appetizers
  • Dessert
  • Dinner
  • Drinks
©2026, Recipes Pursuit About Back To Top