Skip to content
DisclaimerTerms Of UseGDPR PolicyCookie Policy

Recipes Pursuit

  • Home
  • Drinks
  • Appetizers
  • Dinner
  • Dessert
  • About
  • Contact
  • Privacy Policy
DisclaimerTerms Of UseGDPR PolicyCookie Policy

Emma Smith

- 1 cup quinoa, rinsed - 2 cups vegetable broth or water - 1/2 cup dried cranberries - 1/2 cup pecans, toasted and roughly chopped - 1/2 cup diced cucumber - 1/4 cup finely chopped red onion - 1/4 cup feta cheese, crumbled (optional) - 2 tablespoons olive oil - 1 tablespoon apple cider vinegar - 1 tablespoon maple syrup - Salt and pepper to taste - Fresh parsley, chopped for garnish The main star of this salad is quinoa. It brings protein and fiber. The dried cranberries add a sweet touch, while toasted pecans give crunch. Diced cucumber offers a fresh bite, and red onion adds zing. Feta cheese is optional but brings creaminess. Olive oil and vinegar create a simple dressing that ties it all together. You can add ingredients to make the salad even better. Try adding diced bell peppers for a sweet crunch. Avocado can make it creamy. Fresh herbs like mint or basil can give a fresh taste. A dash of lemon juice can brighten the flavors. If you need to avoid certain allergens, there are easy swaps. For a nut-free option, skip the pecans or use seeds like pumpkin. If you're dairy-free, leave out the feta cheese. To make it gluten-free, ensure your quinoa is certified gluten-free. You can also use apple juice instead of vinegar for a sweeter dressing. {{ingredient_image_1}} To start, rinse 1 cup of quinoa under cold water. This step removes any bitter taste. In a medium saucepan, combine the rinsed quinoa with 2 cups of vegetable broth or water. Place the saucepan on the stove over medium-high heat. Bring the mixture to a boil. Once it starts boiling, reduce the heat to low. Cover the saucepan and let it simmer for about 15 minutes. The quinoa is done when it absorbs all the liquid and looks fluffy. After cooking, remove the saucepan from heat and let it cool for a few minutes. In a large mixing bowl, add the cooled quinoa. Next, toss in 1/2 cup of dried cranberries, 1/2 cup of toasted pecans, and 1/2 cup of diced cucumber. Add 1/4 cup of finely chopped red onion and 1/4 cup of crumbled feta cheese, if you want a creamy touch. Gently stir these ingredients together. Make sure everything is well mixed. This step helps the flavors blend nicely. For the dressing, grab a small bowl. Whisk together 2 tablespoons of olive oil, 1 tablespoon of apple cider vinegar, and 1 tablespoon of maple syrup. Add salt and pepper to taste. Mix until the dressing is smooth and well combined. Pour this dressing over the quinoa mixture. Toss everything gently to coat the salad evenly. Taste your salad and adjust the seasoning if needed. Let it sit for at least 15 minutes. This resting time allows the flavors to meld together. Before serving, sprinkle fresh chopped parsley on top for a bright finish. To cook quinoa just right, start by rinsing it well. This removes the bitter coating. Use two cups of vegetable broth or water for each cup of quinoa. Bring the liquid to a boil over medium-high heat. Once it boils, lower the heat to a simmer and cover it. Let it cook for about 15 minutes. The quinoa will absorb all the liquid and become fluffy. After cooking, let it cool for a few minutes before using it in your salad. Toasting pecans adds a rich flavor. Start by preheating your oven to 350°F (175°C). Spread the pecans in a single layer on a baking sheet. Bake them for about 8-10 minutes. Keep an eye on them to avoid burning. Stir them halfway through for even toasting. Once they are golden and fragrant, let them cool before chopping. This step makes a big difference in your salad. You can easily tweak this salad to suit your taste. For a tangy kick, add more apple cider vinegar. If you like sweetness, drizzle in extra maple syrup. Fresh herbs like basil or mint can brighten the dish. To make it heartier, toss in some cooked chicken or chickpeas. Always taste the salad before serving and adjust the seasoning with salt and pepper. This way, you ensure the flavors are just right. Pro Tips Rinse the Quinoa: Rinsing quinoa before cooking removes its natural coating, called saponin, which can make it taste bitter. Always rinse under cold water for the best flavor. Toast the Pecans: Toasting pecans enhances their flavor and adds a delightful crunch to the salad. Simply place them in a dry skillet over medium heat for a few minutes until fragrant. Let It Marinate: Allowing the salad to sit for at least 15 minutes before serving helps the flavors meld together, creating a more harmonious dish. Customize Your Add-ins: Feel free to mix in other ingredients like diced apples, olives, or even cooked chickpeas for additional flavor and texture. Get creative! {{image_2}} You can boost the protein in your Cranberry Pecan Quinoa Salad easily. Adding cooked chicken is a great choice. Just shred or cube it and mix it in. Chickpeas are another option. Rinse canned chickpeas and toss them in. Both options make the salad heartier and more filling. Seasonal veggies add flavor and color to your salad. In spring, try adding asparagus or peas. Summer brings fresh tomatoes or bell peppers. In the fall, roasted sweet potatoes taste great. You can even use winter squash for a unique twist. Feel free to mix and match based on what you have. This salad is naturally gluten-free due to quinoa. To keep it vegan, skip the feta cheese. You can replace it with avocado for creaminess. Another option is to use a nut-based cheese. These swaps keep the salad healthy while catering to different diets. Enjoy customizing it to fit your needs. To store leftover cranberry pecan quinoa salad, place it in an airtight container. Make sure to cool the salad first. This helps keep it fresh. You can store it in the fridge for up to four days. If you have any extra dressing, keep it separate to prevent sogginess. The salad tastes best when fresh, but leftovers are still good. If you want to freeze it, place the salad in a freezer-safe bag. It can last up to three months in the freezer. When you are ready to eat it, just thaw it in the fridge overnight. I recommend eating the salad cold, but you can warm it if you prefer. To reheat, place it in a saucepan over low heat. Stir it gently until warm. Avoid overheating to keep the ingredients fresh and tasty. If you added feta cheese, it might soften, but that's okay! Yes, you can prepare this salad ahead of time. Make it up to a day before you serve. Just keep it in the fridge. This salad tastes even better after the flavors blend. When you are ready to serve, give it a little stir. You might want to add a splash of olive oil to freshen it up. Quinoa is a superfood packed with nutrition. It is high in protein and fiber. This grain helps you feel full longer. Quinoa also offers essential amino acids. It is gluten-free, which is great for those with allergies. Furthermore, it contains vitamins and minerals like magnesium and iron. Including quinoa in your diet can support heart health and weight loss. If you want to make this salad more filling, add protein. Cooked chicken, chickpeas, or black beans work well. You can also toss in more vegetables like bell peppers or carrots. For healthy fats, add avocado slices. These additions will make the salad more satisfying and nutritious. Enjoy creating your perfect version! Cranberry pecan quinoa salad is a tasty, healthy dish. We covered key ingredients, optional addons, and allergen swaps. You learned to cook quinoa, mix the salad, and make a great dressing. I shared tips for perfect quinoa and toasting nuts, plus fun variations. Lastly, we discussed storage options and common questions. Enjoy making this salad and make it your own. Happy cooking!

Cranberry Pecan Quinoa Salad Fresh and Healthy Delight

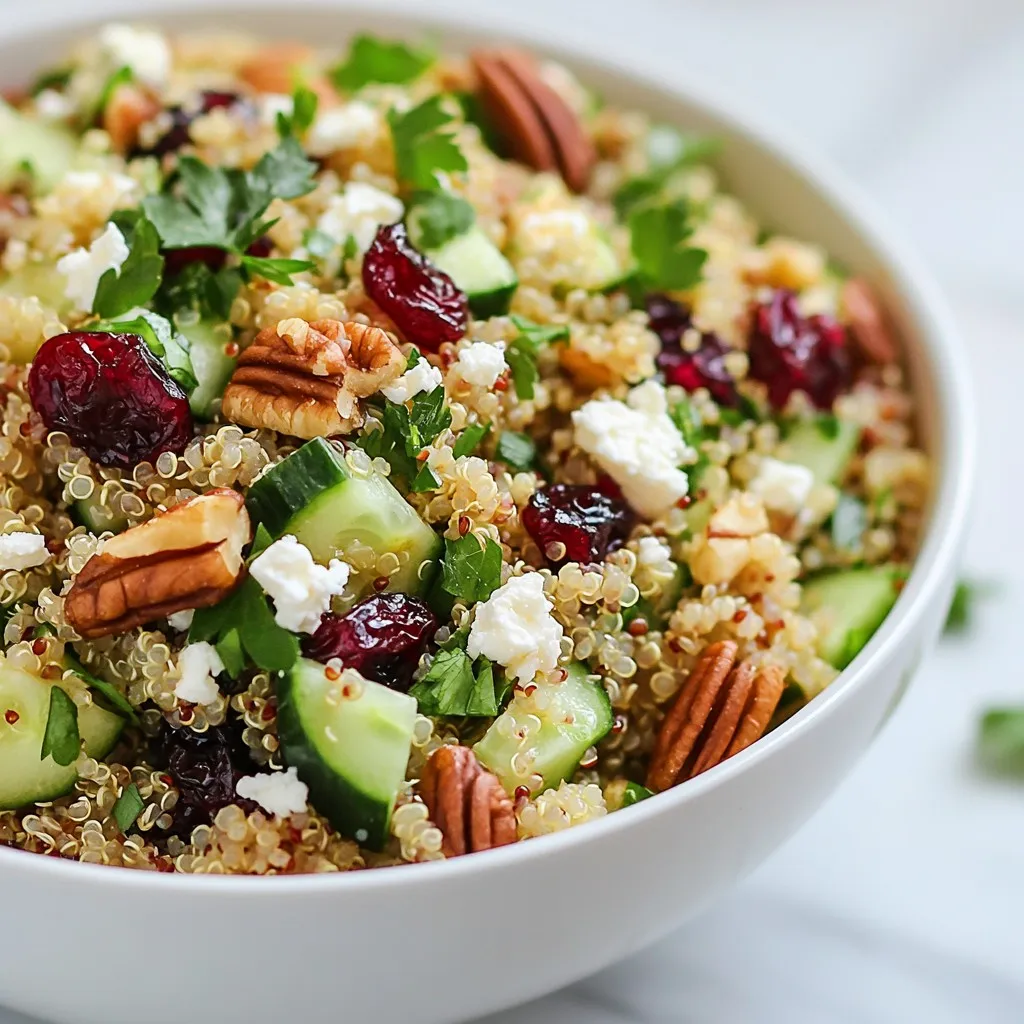
Looking for a fresh and healthy salad that bursts with flavor? You’ll love this Cranberry Pecan Quinoa Salad! Packed with

- 16 oz baby Portobello mushrooms - 4 tablespoons olive oil - 4 cloves garlic - ½ cup grated Parmesan cheese - 1 teaspoon dried thyme - 1 teaspoon dried oregano - Salt and pepper to taste - Fresh parsley, chopped - Lemon wedges Garlic Parmesan Roasted Mushrooms start with baby Portobello mushrooms. These mushrooms have a rich flavor. They are tender and soak up seasonings well. You need 16 ounces, which is about 450 grams. Make sure to clean them and trim the stems. Next, you will need olive oil. Use four tablespoons for a nice, rich taste. Garlic is key here too. You will want four cloves minced. This gives the dish a strong and savory kick. Then, Parmesan cheese adds a lovely salty flavor. Grate about a half cup to sprinkle over the mushrooms. Now for the seasonings. Dried thyme and oregano work great together. Use one teaspoon of each. Salt and pepper are important, too. Add them to taste for a balanced flavor. For garnish, chop some fresh parsley. It adds color and freshness. Finally, serve the mushrooms with lemon wedges. The lemon gives a bright flavor that pairs well with the savory mushrooms. These ingredients make a dish that is sure to impress! {{ingredient_image_1}} 1. Preheat your oven to 400°F (200°C). This helps mushrooms cook evenly and get crispy. 2. In a large bowl, add the cleaned baby portobello mushrooms. Pour in 4 tablespoons of olive oil. 3. Mince 4 cloves of garlic and add them to the bowl. Garlic brings great flavor. 4. Sprinkle in 1 teaspoon each of dried thyme and oregano. Then, add salt and pepper to taste. 5. Toss everything together. Make sure all the mushrooms are well-coated with oil and spices. 1. Spread the coated mushrooms on a baking sheet. Use parchment paper to avoid sticking. 2. Roast them in the preheated oven for 15 minutes. This begins the cooking process and enhances their flavor. 1. Take the baking sheet out of the oven after 15 minutes. Sprinkle ½ cup of grated Parmesan cheese over the mushrooms. 2. Place the baking sheet back into the oven. Roast for another 10-15 minutes. The cheese should melt and turn golden brown. 3. Once they are done, remove the mushrooms from the oven. Garnish with fresh parsley for a pop of color. 4. Serve hot, with lemon wedges on the side. The lemon adds a bright touch to the rich flavors. The best mushrooms for this dish are baby portobello mushrooms. They are meaty and flavorful. You can also use cremini or button mushrooms if you like. These mushrooms soak up the garlic and olive oil well. Choose firm mushrooms with no dark spots. Freshness is key for great taste. To cook your mushrooms evenly, space them out on the baking sheet. If they are too close, they will steam instead of roast. Use parchment paper for easy cleanup and to prevent sticking. A single layer allows heat to reach all sides. This gives you a nice golden finish. You can boost the flavors with more herbs and spices. Try adding rosemary or basil for a twist. A pinch of red pepper flakes can add heat. Consider a splash of lemon juice for brightness. These small changes can take your mushrooms to the next level. Enjoy experimenting with different tastes! Pro Tips Use Fresh Herbs: Fresh thyme and oregano can elevate the flavor profile significantly compared to dried herbs. Don’t Overcrowd the Pan: Ensure the mushrooms are in a single layer to achieve optimal roasting and caramelization. Experiment with Cheese: Try using different types of cheese like Gruyère or feta for a unique flavor twist. Adjust Cooking Time: Depending on your oven, keep an eye on the mushrooms to prevent overcooking; they should be tender but not mushy. {{image_2}} You can mix it up with different cheeses. Mozzarella melts well and gives a nice stretch. Asiago adds a sharp twist that many enjoy. Feel free to try them out. You may find your new favorite flavor! Want a quicker option? Use an air fryer! Set it to 375°F (190°C). Cook the mushrooms for about 10-12 minutes. They will turn crispy and delicious. Grilling is another fun way to enjoy these mushrooms. Just toss them on the grill over medium heat. Cook until they get nice grill marks. This adds a smoky flavor that is hard to beat. If you want a vegan version, swap the Parmesan for nutritional yeast. It gives a cheesy flavor without any dairy. You can also use vegan cheese for a similar taste. Just make sure it melts well! To keep your Garlic Parmesan Roasted Mushrooms fresh, store them in the fridge. Use an airtight container to prevent moisture loss. They stay good for about three to four days. If you want to eat them later, make sure they cool down first. This helps keep their flavor and texture. To reheat your mushrooms, the oven works best. Preheat it to 350°F (175°C). Place the mushrooms on a baking sheet. Heat them for about 10 minutes. This method keeps them crispy. You can also use a microwave, but they might get soggy. If you use a microwave, heat them in short bursts to avoid overcooking. You can freeze Garlic Parmesan Roasted Mushrooms, but they lose some texture. First, let them cool completely. Then, place them in a freezer-safe bag. Try to remove as much air as possible. They can last up to three months in the freezer. When you thaw them, reheat in the oven for the best results. Garlic Parmesan Roasted Mushrooms last about three to five days in the fridge. Store them in an airtight container to keep them fresh. Always check for any off smells or changes in texture before eating. You can use dried mushrooms, but they need some prep. Soak them in warm water for about 20 to 30 minutes. This helps them soften and regain their shape. Fresh mushrooms give the best flavor and texture, so try to use them if you can. These mushrooms are great as a side dish. They go well with steak, chicken, or pasta. You can also serve them on a salad or as a topping for pizza. Their rich flavor adds a tasty touch to many meals. This post shared how to make Garlic Parmesan Roasted Mushrooms. We covered key ingredients, like baby Portobello mushrooms, garlic, and olive oil. I gave step-by-step instructions for roasting them perfectly. We also explored tips for choosing mushrooms and enhancing flavors. Plus, I offered tasty variations to suit every diet. In closing, these roasted mushrooms are easy to make and delicious. Try them as a side or snack. Enjoy this dish any time, knowing it’s full of flavor!

Garlic Parmesan Roasted Mushrooms Flavorsome Delight

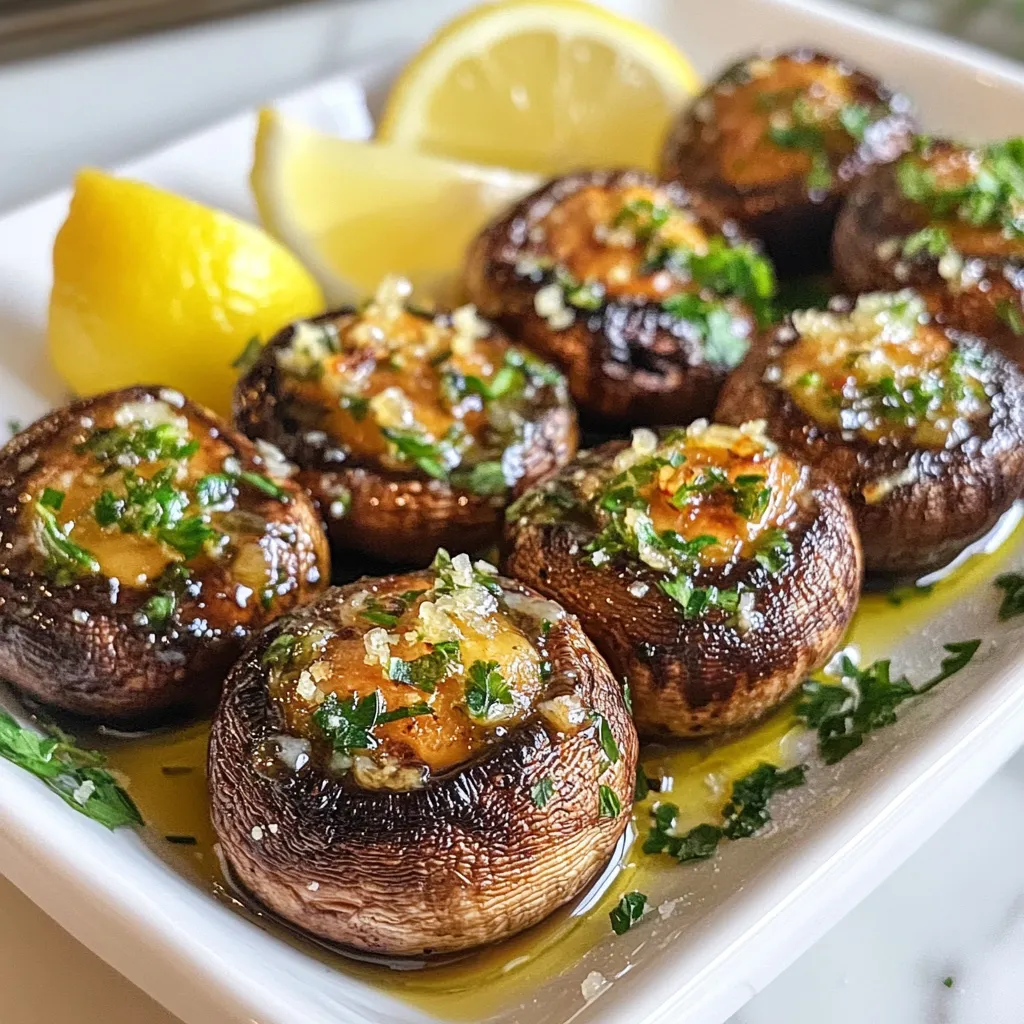
If you crave a tasty side dish, look no further than Garlic Parmesan Roasted Mushrooms. These little bites are savory

To make this tasty mango coconut chia pudding, you will need: - 1 cup coconut milk - 1/2 cup almond milk (or any plant-based milk) - 1/4 cup chia seeds - 2 tablespoons maple syrup (or sweetener of choice) - 1 ripe mango, diced - A pinch of salt - Toasted coconut flakes, for garnish - Fresh mint leaves, for garnish Each ingredient plays a key role. The coconut milk gives a creamy base, while almond milk lightens it. Chia seeds make the pudding thick and full of fiber. Mango adds sweetness and a fruity flair. The maple syrup enhances the flavor and gives a touch of sweetness. You can switch up the sweeteners. Honey, agave, or stevia work great too. If you want a sugar-free option, use a natural sweetener. For milk, oat milk or soy milk are good choices. They add their unique taste and texture. Feel free to try different combinations! This pudding is not just yummy; it's also good for you. - Chia seeds: They are high in fiber, protein, and omega-3s. - Coconut milk: It has healthy fats that can boost your energy. - Mango: This fruit is rich in vitamins A and C. It helps your immune system. - Almond milk: It is lower in calories and packed with vitamin E. Each bite of this pudding is a step toward better health! {{ingredient_image_1}} To make Mango Coconut Chia Pudding, start by mixing the coconut milk, almond milk, maple syrup, and salt in a bowl. Use a whisk to blend these ingredients well. Then, add the chia seeds. Stir until there are no clumps. Cover the bowl with plastic wrap or a lid. Refrigerate for at least four hours, or overnight for best results. This waiting time helps the chia seeds soak up the liquids and thicken the pudding. To get the perfect texture, check the pudding after chilling. If it seems too thick, add a splash of coconut or almond milk. Stir well to mix. The goal is a creamy, smooth pudding that is not too runny. Remember, the chia seeds absorb liquid, so adjust as needed. When serving, use clear glasses or bowls. This way, you can show off the beautiful layers. Spoon the thick pudding into your serving dish. Top with diced mango for a fresh touch. Add toasted coconut flakes and a sprig of mint for extra flair. These garnishes not only look great but also enhance the flavor. Enjoy your lovely, tropical treat! To make perfect chia pudding, use high-quality chia seeds. They should be fresh and not clumpy. Always mix the seeds into your liquid well. This step helps prevent clumping. I find that whisking is best for an even mix. Let the pudding rest in the fridge for at least four hours. This allows the seeds to absorb the liquid and thicken. If you want a smoother texture, blend the mixture before chilling. A common mistake is not measuring the chia seeds correctly. Too many seeds can make the pudding too thick. Too few seeds can lead to a watery pudding. Also, avoid using expired milk. Always check the date before you start. Lastly, do not skip the chilling time. If you serve it too early, it won’t set properly. For more flavor, try adding vanilla extract or a pinch of cinnamon. You can also mix in other fruits, like bananas or berries. For texture, add nuts or granola before serving. This adds a nice crunch. Top your pudding with toasted coconut flakes for added flavor. Fresh mint leaves also provide a refreshing taste and beautiful look. Enjoy experimenting with different flavors to find your favorite! Pro Tips Chia Seed Activation: Make sure to stir the chia seeds well after adding them to the liquid. This helps break up any clumps and ensures even hydration. Sweetness Adjustment: Taste your pudding mixture before refrigerating. You can always adjust the sweetness by adding more maple syrup or your preferred sweetener if needed. Texture Variation: For a creamier texture, blend the coconut and almond milk mixture before adding the chia seeds. This can create a smoother pudding. Garnish Ideas: Experiment with different toppings! Fresh berries, sliced bananas, or a drizzle of honey can add flavor and visual appeal to your pudding. {{image_2}} You can switch up the fruit in your chia pudding. Try strawberries, peaches, or blueberries. Each fruit adds its own flavor and color. Mixing fruits can make your pudding look beautiful and tasty. For a tropical twist, add pineapple or passion fruit. You can also use a mix of fruits for more fun. This recipe is already vegan-friendly. You can use maple syrup or other sweeteners. If you want it sugar-free, choose stevia or erythritol. Both give sweetness without sugar. You can skip the sweetener if the mango is ripe enough. It adds natural sweetness and flavor. For extra tropical flavor, add shredded pineapple or banana slices. You can mix these fruits with the mango. This adds texture and taste. Another great option is to sprinkle in some lime zest. It gives a fresh kick that brightens the pudding. When you want to go wild, try adding nuts or seeds for crunch. To store leftover mango coconut chia pudding, place it in an airtight container. This keeps it fresh and prevents any odors from other foods. Make sure to seal the lid tightly. I often use glass containers for easy viewing and storage. The pudding will last in the fridge for about 4 to 5 days. If you want to store it longer, freezing is a great option. Divide the pudding into portions and place them in freezer-safe containers. It can last up to 2 months in the freezer. Just remember to label the containers with the date. You can enjoy the pudding cold or warm it slightly. If you choose to heat it, place the pudding in a microwave-safe bowl. Heat it in short bursts, about 15 to 20 seconds at a time. Be sure to stir in between to avoid hot spots. If it thickens too much, add a splash of coconut or almond milk to reach your desired texture. Chia pudding is a creamy dish made from chia seeds. When mixed with liquid, the seeds swell and create a gel-like texture. This makes it a fun and healthy treat. You can flavor it with fruits, sweeteners, or spices. It’s simple to make and packed with nutrients. To make chia pudding thicker, add more chia seeds. For a thinner pudding, use less chia seeds. You can also adjust the liquid amount. If it’s too thick after chilling, mix in a splash of coconut or almond milk. Stir well until you reach your desired consistency. Yes! You can use any milk you like. Almond milk, oat milk, or soy milk work well. Each type of milk will change the flavor a bit. Coconut milk gives a rich, tropical taste, but feel free to experiment with your favorites. Absolutely! This pudding is nutritious and full of healthy fats, fiber, and protein. Chia seeds help with digestion and keep you full. The mango adds vitamins, while coconut milk provides healthy fat. It’s a great option for breakfast or a snack. Enjoy it guilt-free! Mango coconut chia pudding is an easy and tasty treat. We covered key ingredients, plus how to prepare and store it well. Using the right mix of flavors brings joy to each bite. Remember to avoid common mistakes to get better results. Try new fruits or toppings to keep it fun. Make it your own by mixing in different flavors. Enjoy your healthy pudding, knowing that it's both good for you and delicious.

Mango Coconut Chia Pudding Simple and Healthy Recipe

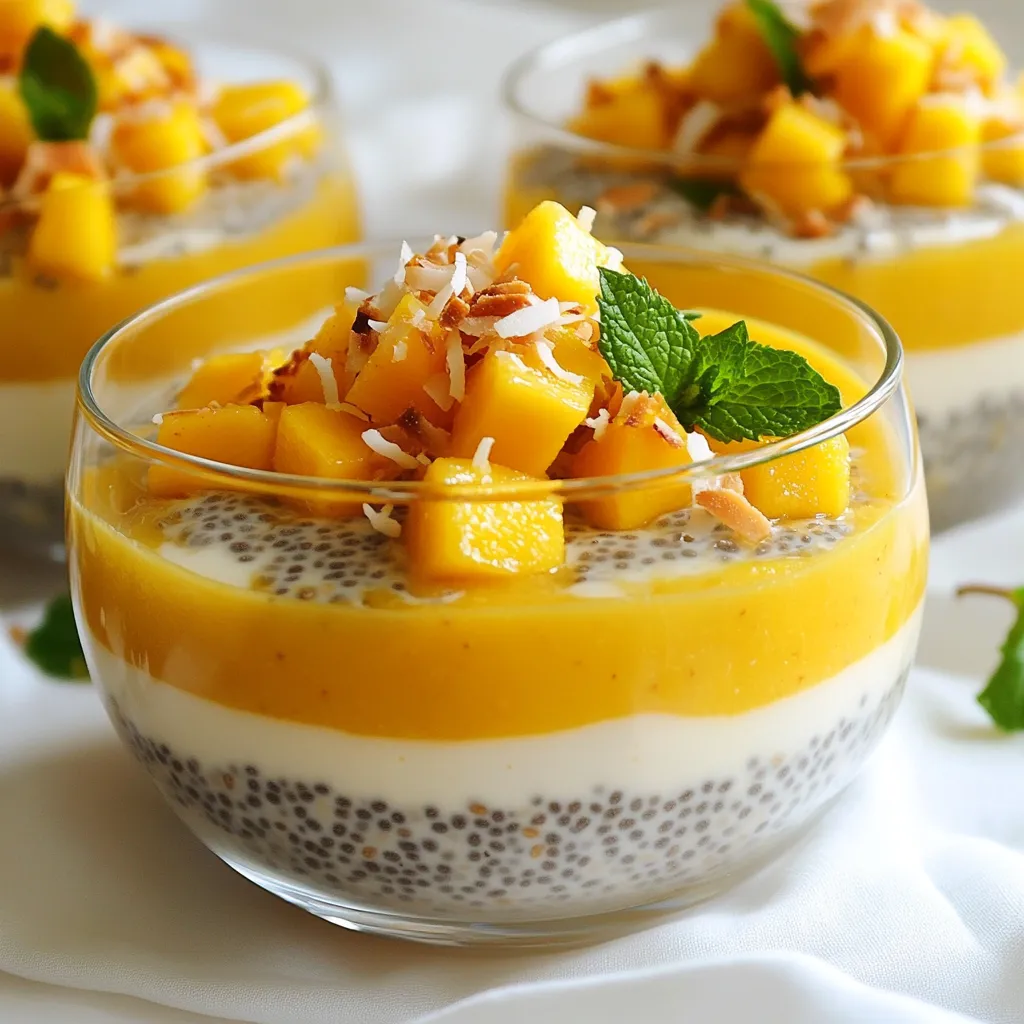
If you’re looking for a delicious treat that’s also healthy, you’ve found it! My Mango Coconut Chia Pudding recipe is

To make White Chocolate Macadamia Blondies, gather these simple ingredients: - 1 cup unsalted butter, melted - 1 cup packed light brown sugar - 1/2 cup granulated sugar - 2 large eggs - 2 teaspoons vanilla extract - 2 cups all-purpose flour - 1 teaspoon baking powder - 1/2 teaspoon salt - 1 cup white chocolate chips - 1 cup macadamia nuts, roughly chopped You can swap some ingredients if needed. Try these options: - Use salted butter for a richer taste. - Brown sugar can be replaced with coconut sugar for a hint of caramel. - If you lack white chocolate chips, use dark chocolate chips instead. - Almonds or walnuts can replace macadamia nuts for a different crunch. Select high-quality ingredients for the best flavor. Here are my top tips: - Choose fresh macadamia nuts. Look for a crunchy texture and no dark spots. - Use real vanilla extract, not imitation, for a richer taste. - Opt for good-quality white chocolate. It should have a smooth texture and nice aroma. - Ensure your flour is fresh. Old flour can affect the texture of your blondies. {{ingredient_image_1}} First, get everything ready. Gather your ingredients and tools. You will need an 8x8 inch baking dish, mixing bowls, and a whisk. Preheat your oven to 350°F (175°C). This step is key to getting that perfect bake. Grease the baking dish or line it with parchment paper for easy removal. 1. In a large bowl, mix the melted butter, brown sugar, and granulated sugar. Whisk until it’s smooth. 2. Add two eggs, one at a time. Mix well after adding each egg. 3. Stir in the vanilla extract. This adds great flavor. 4. In another bowl, sift together the flour, baking powder, and salt. 5. Gradually add the dry mix to the wet mix. Stir until just combined. Don’t overmix or the blondies may be tough. 6. Now, fold in the white chocolate chips and chopped macadamia nuts. Make sure they are evenly mixed. 7. Pour the batter into your prepared baking dish. Spread it evenly with a spatula. 8. Bake for 20-25 minutes. Look for lightly golden edges. Use a toothpick to check doneness. It should come out with a few moist crumbs. To check if your blondies are done, use a toothpick. Insert it into the center. If it comes out with a few moist crumbs, they are ready. If it’s wet with batter, bake for a few more minutes. Remember, the edges should be golden brown. Let the blondies cool in the pan for about 10 minutes. Then, transfer them to a wire rack. This cooling step is crucial for the best texture. To get that perfect texture in your blondies, focus on not overmixing the batter. Mix just until you see no dry flour. This helps keep them soft and chewy. Use room temperature eggs for better blending. Room temperature butter also helps the sugars mix well. One big mistake is not measuring your flour right. Too much flour makes blondies dry. Always spoon flour into the measuring cup and level it off. Another mistake is baking them too long. Watch for a light gold edge, and test with a toothpick. A few moist crumbs are perfect! Using the right tools makes baking easier. A good mixing bowl helps you combine ingredients well. A rubber spatula is great for folding in chocolate and nuts. An 8x8 inch baking dish is perfect for this recipe. Don't forget parchment paper for easy removal! A wire rack cools your blondies evenly. Pro Tips Use Room Temperature Eggs: Make sure your eggs are at room temperature before mixing them into the batter. This helps in creating a smoother and creamier texture for your blondies. Don't Overmix the Batter: When combining the dry ingredients with the wet ingredients, mix until just combined. Overmixing can lead to dense and tough blondies. Chill the Batter: For a thicker blondie, chill the batter in the refrigerator for about 30 minutes before baking. This helps the blondies maintain their shape and results in a chewier texture. Check for Doneness: To ensure perfectly baked blondies, insert a toothpick into the center; it should come out with a few moist crumbs, not wet batter. This guarantees they are soft and fudgy. {{image_2}} You can easily add more flavors to your blondies. Try mixing in a teaspoon of almond extract for a nutty touch. You can also add a pinch of cinnamon for warmth. If you want a fruity twist, fold in some diced dried cherries or cranberries. They add a nice color and taste! If you need a gluten-free version, swap the all-purpose flour for a gluten-free blend. Many brands work well in baking. Just make sure the blend contains xanthan gum for the right texture. This way, you can still enjoy these sweet treats without gluten! Macadamia nuts shine in these blondies, but other nuts work too. Try chopped walnuts or pecans for a different texture. You can even use hazelnuts for a fun twist. Each nut brings its own flavor, making your blondies unique every time! To keep your white chocolate macadamia blondies fresh, store them in an airtight container. Place a piece of wax paper between layers to avoid sticking. This method helps maintain their soft texture and sweet flavor. You can freeze blondies for later enjoyment. First, let them cool completely. Then, cut them into squares. Wrap each square tightly in plastic wrap. Place the wrapped squares in a freezer-safe bag or container. They will stay fresh for up to three months in the freezer. These blondies can last for about a week at room temperature if stored properly. Keep them away from direct sunlight and heat. For the best taste, enjoy them within the first few days. You can also warm them slightly in the microwave for a soft, gooey treat. Yes, you can use dark or milk chocolate instead of white chocolate. Dark chocolate gives a richer flavor. Milk chocolate offers a sweeter taste. Just remember to adjust the amount based on sweetness. You want to keep the balance right. To make blondies chewy, use more brown sugar. Brown sugar adds moisture and creates a softer texture. Also, do not overmix the batter. Mix until just combined. Overmixing can make them tough. Finally, bake them until they are just set. A toothpick should come out with a few moist crumbs. Blondies and brownies differ mainly in flavor and color. Blondies use brown sugar and no cocoa powder. This gives them a sweet, buttery taste. Brownies, on the other hand, are chocolatey and rich. They often have a denser texture. While both are delicious, blondies have a lighter, sweeter profile. This blog post covered key aspects of making delicious blondies. We discussed essential ingredients, suitable swaps, and tips for choosing the best ones. The step-by-step guide helped you through baking and checking for doneness. You learned how to achieve the right texture and avoid common mistakes. Variations enabled customization, while storage tips ensure freshness. In summary, use this knowledge to create perfect blondies every time. Enjoy your baking journey!

White Chocolate Macadamia Blondies Delightful Treats

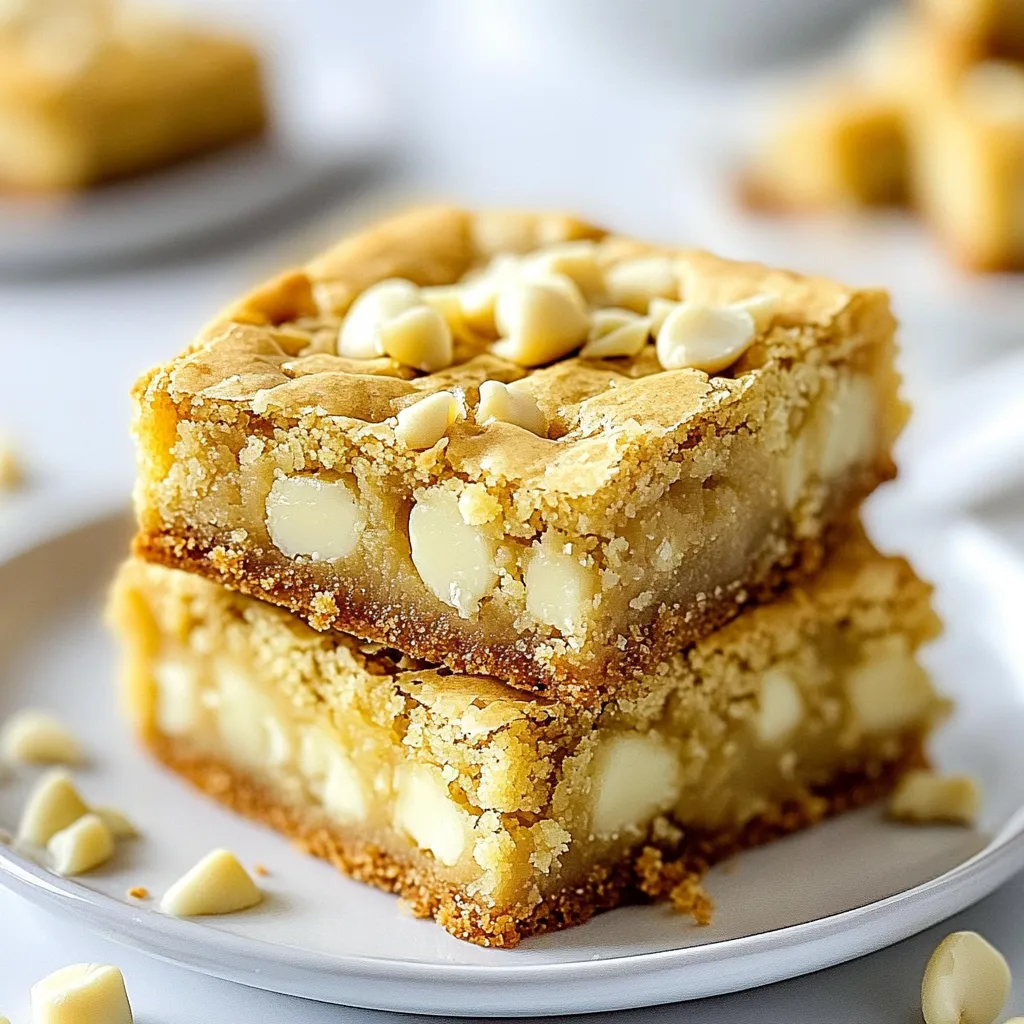
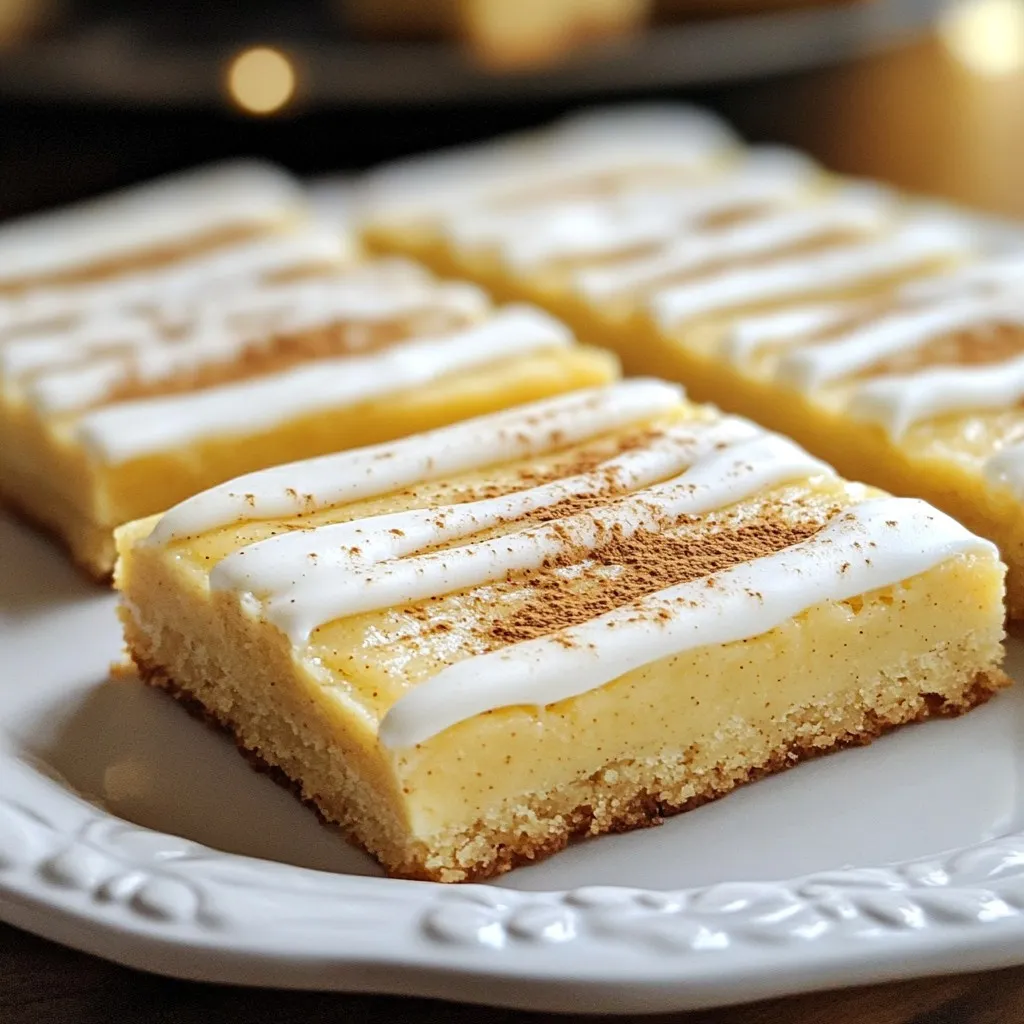
If you love sweet treats, you’re in for a real delight! These White Chocolate Macadamia Blondies are easy to make

- Bell Peppers: You can choose any color. Red, yellow, green, and orange all work well. Each adds a bit of sweetness. I like using large peppers to hold more filling. - Sausage Options: I often use Italian sausage for rich flavor. If you want a lighter dish, chicken sausage is a great choice. Both options bring protein and taste. - Cheese Varieties: This recipe shines with ricotta, cream cheese, mozzarella, and Parmesan. Ricotta gives creaminess. Cream cheese adds depth. Mozzarella melts beautifully, while Parmesan gives a nice finish. - Seasonings and Special Ingredients: Garlic is a must for flavor. Italian seasoning brings warmth. Red pepper flakes add a kick, but you can skip them if you prefer mild. Don’t forget salt and pepper for balance. Each ingredient plays a key role in layering flavors. When combined, they create a creamy, savory filling that makes these stuffed peppers a hit. Enjoy experimenting with different types for your twist! {{ingredient_image_1}} Prepping and Cutting the Peppers Start by cutting the tops off the bell peppers. Remove the seeds and membranes. You can use any color you like, like red, green, or yellow. This makes your dish more fun and colorful. Oil Coating Techniques Next, brush the outside of each pepper with olive oil. This helps them brown nicely while baking. Place them upright in a baking dish so they stay steady while you fill them. Sausage Preparation and Browning In a large skillet, add the Italian sausage over medium heat. Break it apart with a spatula as it cooks. You want it to be browned and fully cooked. This step adds a lot of flavor to your filling. Adding Spinach and Garlic Once the sausage is cooked, add minced garlic. Cook it for about one minute until it gets fragrant. Then, stir in the chopped spinach. Cook for about 2-3 minutes until the spinach wilts. This gives the filling a nice green color and fresh taste. Filling the Peppers Evenly In a large bowl, mix the sausage and spinach with ricotta, cream cheese, mozzarella, Parmesan, Italian seasoning, salt, and pepper. Spoon this creamy mixture into each pepper evenly. Make sure they are well-filled for the best flavor. Baking with and without Foil Cover the baking dish tightly with aluminum foil. Bake in a preheated oven at 375°F (190°C) for 25 minutes. After that, remove the foil. Sprinkle extra mozzarella on top of each pepper. Bake uncovered for another 10-15 minutes until the cheese is bubbly and golden. Enjoy the aroma as they bake! To keep your peppers standing tall, trim a tiny bit off the bottom. This helps them balance better. You want them to stay upright as they bake. If you worry about them tipping, use a baking dish with high sides. This will help guide them and keep them in place. You can prep these stuffed peppers a day early. Just stuff them and cover them tightly with foil. Store them in the fridge until you’re ready to bake. If you have leftovers, place them in an airtight container. They last well in the fridge for about three days. To reheat, pop them in the oven at 350°F (175°C) until heated through. To get that perfect, melty cheese on top, add it during the last part of baking. This keeps it from burning and makes it gooey. If you want extra crispiness, broil the peppers for a minute or two at the end. Just watch closely to avoid burning. Enjoy that golden brown cheese goodness! Pro Tips Choose Your Peppers: Select bell peppers that are firm and have a vibrant color for the best flavor and presentation. Seasoning is Key: Don't be afraid to taste and adjust the seasoning of the filling before stuffing the peppers to ensure maximum flavor. Make Ahead: You can prepare the stuffed peppers in advance and refrigerate them. Just add a few extra minutes to the baking time if baking from cold. Add Some Crunch: For a textural contrast, consider topping the stuffed peppers with breadcrumbs or crushed nuts before the final baking step. {{image_2}} You can make a tasty vegetarian version of these stuffed peppers. Just swap the sausage for cooked quinoa or beans. Quinoa adds a nice texture and protein. Beans, like black or kidney, give a hearty feel. Both options work well with the creamy filling. You can keep the spinach and cheese for flavor. Feel free to add some chopped veggies too. Zucchini or mushrooms can add great taste. If you want a dairy-free dish, use plant-based cheeses. There are many good options now. Look for ricotta and cream cheese made from nuts or soy. These can mimic the creamy texture. Use a good dairy-free mozzarella for the top. Nutritional yeast can add a cheesy flavor too. This way, you keep the deliciousness while avoiding dairy. Just check the labels to ensure they fit your needs. Want to add some heat? You can spice things up with different seasonings. Try adding cumin or paprika for warmth. You can also mix in some fresh herbs like basil or cilantro. For a twist, add cooked chorizo or ground turkey instead of sausage. This adds a new flavor profile. Don't forget to adjust the salt and pepper to balance the spices. With these changes, you can create your own unique stuffed peppers. To keep your creamy spinach sausage stuffed peppers fresh, let them cool first. Place leftovers in an airtight container. Store them in the fridge for up to three days. Make sure to label the container with the date. This way, you won’t forget when you made them! If you want to save some for later, freezing is a great option. Wrap each stuffed pepper in plastic wrap. Then, place them in a freezer-safe bag. You can freeze them for up to three months. When ready to eat, thaw them overnight in the fridge. This makes reheating easier. To reheat, you have a few choices. The oven works best for keeping that cheesy texture. Preheat your oven to 350°F (175°C). Place the peppers in a baking dish. Cover with foil to prevent drying. Heat for about 20 minutes or until warm. If you’re in a hurry, the microwave is an option. Heat in short bursts, checking often. Enjoy them warm and cheesy! Yes, you can use frozen spinach! Just thaw it and drain excess water. Frozen spinach works well, but fresh spinach gives a better taste and texture. When using frozen spinach, add it to your skillet after browning the sausage. Stir it in until it heats through. This keeps the flavor intact. You can get creative with your fillings! Here are some ideas: - Cooked quinoa for a healthy grain option - Black beans for added protein and fiber - Chopped tomatoes or bell peppers for extra flavor - Corn for a sweet crunch - Different cheeses like feta or cheddar for a unique twist Mix and match these options to create your perfect stuffed pepper! The peppers are done when they are tender and the cheese is bubbly. You can check by poking one with a fork. If it feels soft, it’s ready! The cheese should be golden and slightly crispy on top. Always let them cool for a few minutes before serving. Enjoy the deliciousness! We covered the key ingredients for stuffed peppers, from colorful bell peppers to various sausage choices. You learned step-by-step instructions for prepping, cooking, and stuffing. Tips helped you make perfect peppers and explore variations for all diets. Lastly, proper storage and reheating can keep your leftovers tasty. Enjoy creating your own stuffed peppers with these clear methods, and remember, a little creativity can make them even better!

Creamy Spinach Sausage Stuffed Peppers Easy Recipe

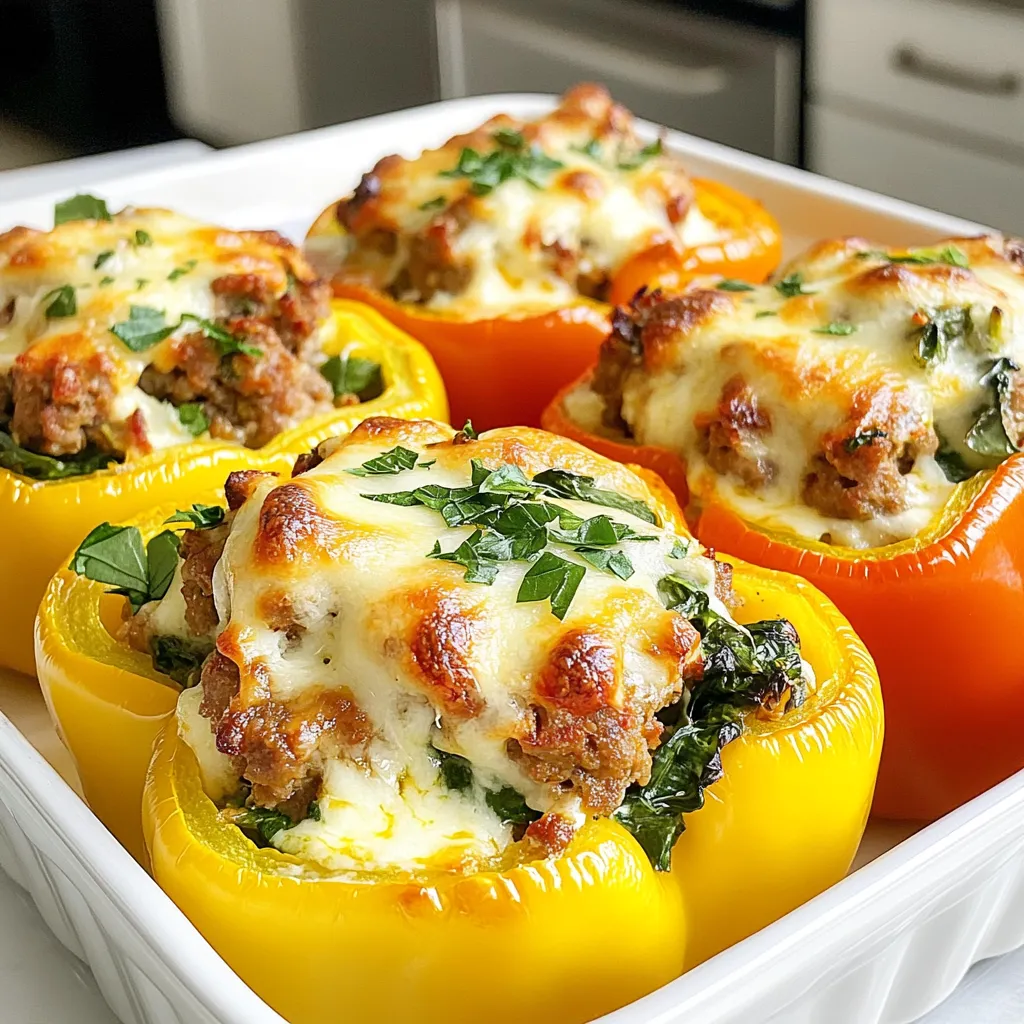
If you’re craving a meal that’s both creamy and hearty, my Creamy Spinach Sausage Stuffed Peppers are perfect for you!

- 2 cups pretzel sticks - 1 cup semi-sweet chocolate chips - 1 cup caramel candies (unwrapped) - 2 tablespoons heavy cream - 1/2 teaspoon sea salt - Optional: 1/4 cup crushed nuts (pecans or almonds) For this chocolate caramel pretzel bark, you need a few key ingredients. First, grab your pretzel sticks. They add the perfect crunch. Next, semi-sweet chocolate chips bring that rich, sweet flavor. You also need caramel candies, which you should unwrap. These will melt beautifully with cream. The heavy cream helps the caramel become smooth and creamy. A sprinkle of sea salt on top balances out the sweetness. If you want to add a twist, you can include crushed nuts. Pecans or almonds work great here. These ingredients come together for a sweet and salty treat. Each bite is a fun mix of flavors and textures. You’ll love how simple it is to make this bark with these easy-to-find items! {{ingredient_image_1}} - Preheat oven to 350°F (175°C). - Prepare the baking sheet with parchment paper. - Spread pretzel sticks on the sheet. Start by preheating your oven. This step warms it up for the baking process. Next, grab a baking sheet and line it with parchment paper. This helps with easy cleanup later. Spread your pretzel sticks evenly across the sheet. Make sure they cover the whole surface so every bite has that salty crunch. - Melt caramel candies with heavy cream. - Pour caramel over pretzels and bake. In a small pot, add the unwrapped caramel candies and heavy cream. Heat this mixture on low, stirring it often. You want to melt it until it's smooth. Once melted, carefully pour the warm caramel over the pretzel sticks. Use a spatula to spread it out evenly. Then, place the baking sheet in the oven for about 5 minutes. This step warms the caramel and makes it bubbly. - Melt chocolate chips in intervals. - Drizzle and spread chocolate over caramel. Now, it’s time for the chocolate. Take a microwave-safe bowl and add the chocolate chips. Heat them in the microwave in 30-second intervals. Stir after each interval until the chocolate is completely smooth. Once the pretzel and caramel mix is out of the oven, drizzle the melted chocolate over the top. Use a spatula or the back of a spoon to spread the chocolate evenly across the caramel. If you want, sprinkle some crushed nuts on top for extra crunch. Finish with a sprinkle of sea salt for that perfect flavor balance. To make your Chocolate Caramel Pretzel Bark perfect, focus on melting the caramels fully. Use low heat and stir until smooth. This helps avoid lumps and ensures a nice, creamy layer. Next, watch the baking time closely. You want to warm the caramel without overbaking. Bake for just about five minutes. This keeps the bark chewy and soft, not hard. For a beautiful presentation, arrange the bark pieces on a decorative platter. Drizzle some extra melted chocolate on top to impress your guests. Serve each piece on small parchment squares for a classy touch. Pair your bark with a glass of cold milk or a warm cup of coffee. It also tastes great next to vanilla ice cream or yogurt. Enjoy experimenting with different drinks and desserts! Pro Tips Use Fresh Ingredients: Always use fresh pretzel sticks and high-quality chocolate chips for the best flavor and texture. Chill Before Serving: Allow the bark to cool completely in the refrigerator to ensure it sets properly and is easy to break into pieces. Experiment with Toppings: Feel free to add different toppings like sprinkles or drizzled white chocolate for a fun twist. Storage Tips: Store any leftover bark in an airtight container at room temperature for up to a week to maintain freshness. {{image_2}} You can easily change the taste of your chocolate caramel pretzel bark. Adding spices can give it a fun twist. Try mixing in a bit of cinnamon for warmth or cayenne for some heat. Both spices pair well with chocolate and caramel. You can also switch up the chocolate. Use dark chocolate for a rich flavor or white chocolate for a sweeter touch. Each chocolate type brings its own charm to the bark. If you have dietary needs, there are great options. For gluten-free pretzel options, use gluten-free pretzel sticks. They taste just as good! If you want a dairy-free option, look for dairy-free chocolate. Many brands offer great taste without dairy. These swaps make your chocolate caramel pretzel bark friendly for more eaters. Enjoy making it your own! To keep your Chocolate Caramel Pretzel Bark fresh, place it in an airtight container. Use a container that fits the bark well, so it does not break. You can layer pieces with parchment paper to prevent sticking. Avoid exposing the bark to heat or sunlight. This will help maintain its taste and texture. You can store Chocolate Caramel Pretzel Bark for up to two weeks at room temperature. If you want to keep it longer, freezing is an option. Wrap the bark tightly in plastic wrap, then place it in a freezer bag. This method helps prevent freezer burn. To thaw, simply leave it in the fridge overnight before enjoying. How do I prevent the chocolate from blooming? To prevent chocolate from blooming, use quality chocolate chips. Melt them slowly and stir well. Make sure they do not get too hot. If the chocolate cools too much, it may bloom. Keep the melted chocolate warm until you drizzle it over the caramel. Can I make this recipe in advance? Yes, you can make Chocolate Caramel Pretzel Bark in advance. It stores well in the fridge for up to two weeks. Just make sure it is in an airtight container. This way, you can enjoy it later without losing its taste or texture. What can I substitute for caramel candies? You can use homemade caramel sauce if you prefer. Another option is to use dulce de leche. If you need a dairy-free choice, look for vegan caramel. Each will give a slightly different taste but will still be delicious. You’ve learned how to make a tasty Chocolate Caramel Pretzel Bark. Gathering the right ingredients, like pretzel sticks and chocolate chips, sets the stage for this treat. You’ve seen the steps from melting caramel to drizzling chocolate. Remember to store it properly to keep it fresh. With these tips and variations, you can make this recipe your own. Enjoy sharing this simple delight with family and friends!

Chocolate Caramel Pretzel Bark Irresistible Treat

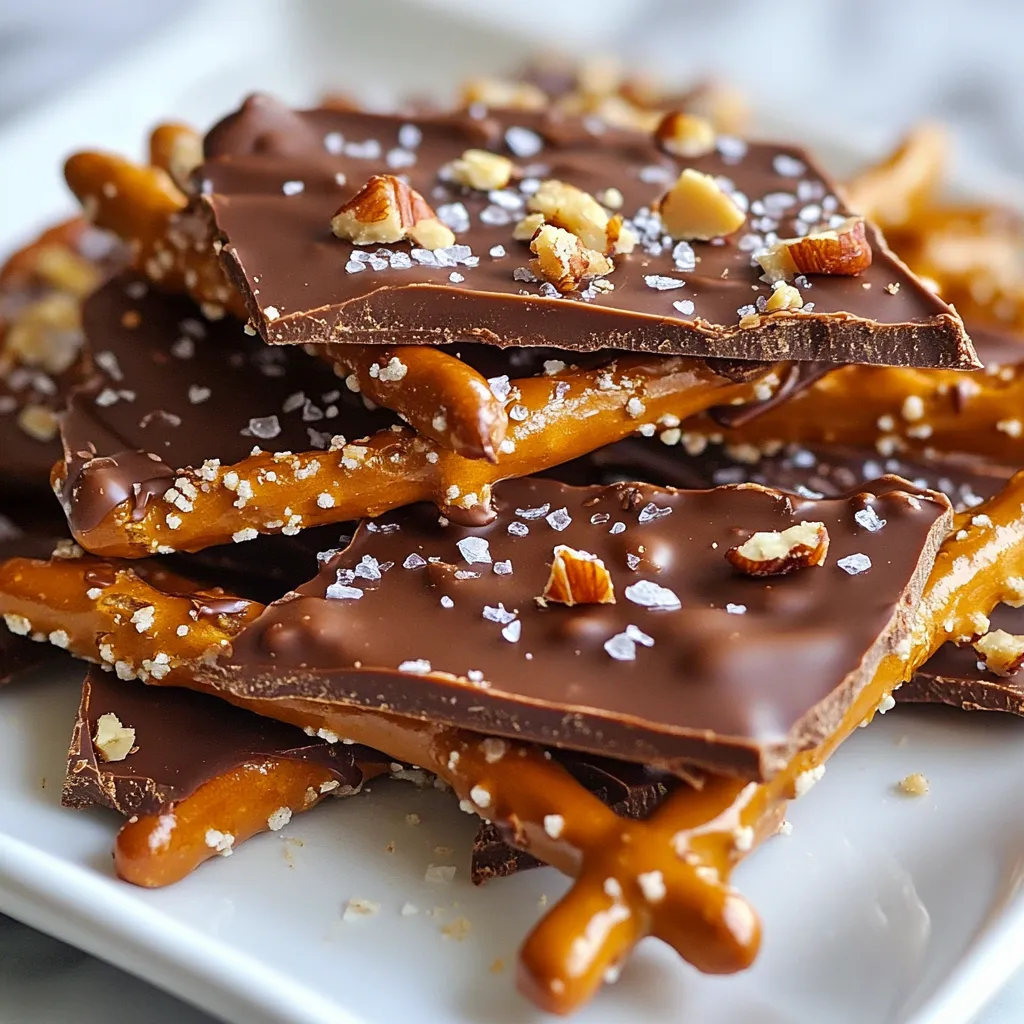
Get ready for a treat you can’t resist: Chocolate Caramel Pretzel Bark! This sweet and salty snack combines crunchy pretzels,

Here’s what you need to make gingerbread waffle cookies. Gather these simple ingredients: - 2 cups all-purpose flour - 1 teaspoon baking powder - 1 teaspoon baking soda - 1 tablespoon ground ginger - 1 tablespoon ground cinnamon - 1/2 teaspoon ground cloves - 1/4 teaspoon salt - 1/2 cup unsalted butter, softened - 1/2 cup brown sugar, packed - 1/4 cup molasses - 1 large egg - 1 teaspoon vanilla extract - 1/2 cup powdered sugar (for icing) - 1 tablespoon milk (for icing) - Optional toppings: crushed candy canes or sprinkles These ingredients create a warm, spiced flavor. The spices give a cozy taste, perfect for the holidays. The molasses adds rich sweetness. The butter keeps the cookies soft and moist. I love using brown sugar because it adds depth. You can change the toppings as you like. Crushed candy canes give a fun crunch. Sprinkles add a colorful twist. Make sure to measure your ingredients well. Accurate measurements lead to the best results. Enjoy the process of mixing these flavors together! {{ingredient_image_1}} Start by preheating your waffle iron. Follow the manufacturer’s guide to make sure it heats up properly. A hot waffle iron gives you the best results. In a large bowl, whisk together the dry ingredients. Add 2 cups of all-purpose flour, 1 teaspoon baking powder, 1 teaspoon baking soda, 1 tablespoon ground ginger, 1 tablespoon ground cinnamon, 1/2 teaspoon ground cloves, and 1/4 teaspoon salt. Mix well and set this aside. In another bowl, cream together 1/2 cup of softened unsalted butter and 1/2 cup of packed brown sugar. Beat them until the mixture is light and fluffy. This should take about 2-3 minutes. Now, add the wet ingredients. Mix in 1/4 cup of molasses, 1 large egg, and 1 teaspoon of vanilla extract. Stir until everything is well combined. Next, gradually add the dry mixture to the wet ingredients. Stir gently until just mixed; avoid overmixing. Lightly grease the waffle iron with non-stick spray. Pour about 1/4 cup of the gingerbread batter into the hot waffle iron. Close the lid and cook until the cookies turn golden brown and crispy, which takes about 4-5 minutes. Once cooked, remove the waffle cookies from the iron. Place them on a wire rack to cool. Repeat this process until you use all the batter. For icing, mix 1/2 cup of powdered sugar with 1 tablespoon of milk in a small bowl until smooth. Drizzle the icing over your cooled waffle cookies. You can add crushed candy canes or colorful sprinkles on top for fun. To get the best texture for your gingerbread waffle cookies, measure your flour correctly. Use the spoon-and-level method. This means spooning flour into your measuring cup and leveling it off with a knife. Too much flour makes cookies dry. Use room temperature butter to cream well with sugar. This helps create a light and airy mix. Don’t overmix when combining wet and dry ingredients. Stir just until you see no dry flour. For smooth icing, sift the powdered sugar before mixing. This step helps prevent lumps. Mix with milk slowly to control the consistency. If your icing is too thick, add a little more milk. If it's too runny, add more powdered sugar. You can drizzle the icing using a spoon or a piping bag for more control. Add toppings like crushed candy canes right after icing while it's still wet. This makes them stick better. Store your gingerbread waffle cookies in an airtight container. This keeps them fresh and soft. If you want them to last longer, place parchment paper between layers. For longer storage, freeze the cookies. Wrap them in plastic wrap and then in foil. This way, they stay fresh for up to two months. To eat, just thaw them at room temperature. You can warm them up in a toaster for a crispy bite. Pro Tips Chill the Batter: For even fluffier waffles, let the batter rest in the fridge for about 30 minutes before cooking. Use a Non-Stick Spray: Ensure your waffle iron is well-greased to prevent the cookies from sticking and to achieve a perfect golden brown color. Experiment with Spices: Feel free to adjust the spice levels according to your taste, or add nutmeg for a unique twist! Perfect Icing Consistency: For a thicker icing, reduce the milk; for a drizzle, add a bit more milk until you reach your desired consistency. {{image_2}} To make gluten-free gingerbread waffle cookies, swap all-purpose flour for gluten-free flour. Use a blend that works well in baking. This choice gives you a nice texture. Ensure your baking powder is also gluten-free. Enjoy the same warm spices and flavors! For vegan gingerbread waffle cookies, replace butter with coconut oil or vegan butter. Use flaxseed meal mixed with water instead of the egg. Mix 1 tablespoon of flaxseed meal with 2.5 tablespoons of water. Let it sit for five minutes to thicken. Use maple syrup instead of molasses if you prefer. These swaps keep the flavor while being plant-based. Want to add a twist? Try mixing in chocolate chips or chopped nuts. Walnuts or pecans add a nice crunch. Sprinkle in some dried fruit like cranberries for a fruity touch. You can also stir in a bit of orange zest for a bright, citrus flavor. Get creative with your add-ins for a unique cookie! To keep your gingerbread waffle cookies fresh, place them in an airtight container. Layer parchment paper between the cookies to prevent sticking. Store them at room temperature for the best taste. If you want to save some for later, freeze the cookies. First, let them cool completely. Then, wrap each cookie in plastic wrap. Place the wrapped cookies in a freezer bag. They will stay fresh for up to three months. Stored properly, these cookies can last about a week at room temperature. If you freeze them, they can last up to three months. Just remember to let them thaw before enjoying! Yes, you can make these cookies ahead. Bake them and cool them completely. Store them in an airtight container. They stay fresh for about a week. You can also freeze them for up to three months. Just remember to thaw before serving. If you don’t have a waffle iron, you can use a griddle. Just spoon the batter onto the hot griddle. Cook them like pancakes. Keep an eye on the time. They should be golden brown on each side. Absolutely! Feel free to mix your spices. Try adding nutmeg or cardamom for a twist. Just keep the amounts balanced, so it stays tasty. Experimenting can lead to fun new flavors. To make icing thicker, add more powdered sugar. If it’s too thick, add a tiny bit of milk. Mix until you reach your desired consistency. Icing should drizzle but not run off too quickly. These cookies can be adapted for special diets. For gluten-free, use a gluten-free flour blend. For vegan, replace the egg with a flax egg and use plant-based butter. Always check labels to keep it safe for allergies. We explored how to make gingerbread waffle cookies from scratch. We discussed the key ingredients, step-by-step instructions, and tips to help you succeed. You learned about variations for different diets and how to store your cookies for freshness. Now, you have all the tools to create these tasty treats. Get ready to impress your friends and family with your baking skills! Enjoy every bite of your gingerbread waffle cookies.

Gingerbread Waffle Cookies Sweet and Simple Recipe

Craving a sweet treat that combines the warmth of gingerbread with the crispness of waffles? You’re in the right place!

To make these tasty energy balls, you need: - 1 cup rolled oats - 1/2 cup almond butter - 1/3 cup honey or maple syrup - 1 cup dried cranberries, chopped - 1/2 cup unsalted pistachios, chopped - 1/4 cup chia seeds - 1 teaspoon vanilla extract - Pinch of salt Each ingredient plays a key role in the flavor and texture of these energy balls. If you don’t have almond butter, you can use peanut butter or sunflower seed butter. Maple syrup can be swapped for honey if you prefer. For a nut-free option, choose sunflower seeds instead of pistachios. If you need gluten-free oats, make sure to check the label. You can also use dried cherries instead of cranberries for a twist. These energy balls pack a nutritional punch. - Rolled oats provide fiber for good digestion. - Almond butter offers healthy fats and protein. - Honey or maple syrup gives natural sweetness along with antioxidants. - Dried cranberries add vitamins and minerals. - Pistachios are rich in protein and healthy fats. - Chia seeds are loaded with omega-3s and fiber. - Vanilla extract not only adds flavor but also may help reduce stress. Together, these ingredients create a balanced snack that fuels your body and keeps you energized. {{ingredient_image_1}} To start, grab a large mixing bowl. Add 1 cup of rolled oats, 1/2 cup of almond butter, and 1/3 cup of honey or maple syrup. Stir everything together. You want it to be sticky and mixed well. Next, add 1 cup of chopped dried cranberries and 1/2 cup of chopped unsalted pistachios. Then mix in 1/4 cup of chia seeds. Don’t forget to add 1 teaspoon of vanilla extract and a pinch of salt. Mix until all ingredients are blended together. When mixing, use a sturdy spatula or a wooden spoon. This helps in combining the thick almond butter with the oats. If the mixture feels too dry, add a little more almond butter or syrup. If it's too wet, add a few more oats. You want a texture that holds together when you roll it into a ball. Make sure every bite has a bit of each ingredient for the best flavor. After mixing, place the bowl in the fridge for 15-30 minutes. This makes the mixture easier to handle. Once chilled, take a tablespoon-sized portion and roll it into a ball with your hands. You can roll the balls in extra chopped pistachios or shredded coconut for a crunchy touch. Line a baking sheet with parchment paper and place the rolled balls on it. Freeze for about 30 minutes to set. Store them in an airtight container. Enjoy your tasty, healthy snacks! To keep your energy balls fresh, store them in an airtight container. You can use a glass jar or a plastic container. Place a layer of parchment paper between the layers if you stack them. This prevents sticking and helps keep them intact. Store them in the fridge for up to a week. If you need more time, freeze them for later use. They can last up to three months in the freezer. Want to boost the flavor? Try adding a pinch of cinnamon or nutmeg. These spices pair well with cranberries and give a warm taste. For a crunchier texture, roll the balls in extra chopped pistachios or shredded coconut. This adds a fun look and makes them more exciting to eat. You can also mix in a handful of dark chocolate chips for a sweet twist. One mistake is not chilling the mixture long enough. If it’s too soft, rolling the balls can be tricky. Make sure to chill for at least 15 minutes. Another mistake is skipping the salt. A pinch of salt enhances the flavors and balances the sweetness. Lastly, don’t rush the mixing. Take your time to ensure all ingredients blend well. This makes for a tasty treat that holds together nicely. Pro Tips Use Fresh Ingredients: For the best flavor and nutrition, choose high-quality, fresh dried cranberries and pistachios. Customize Your Sweetness: Adjust the sweetness level by using more or less honey or maple syrup according to your taste preference. Experiment with Add-ins: Feel free to mix in other nuts, seeds, or superfoods like flaxseeds or hemp hearts for added nutrition. Storage Tips: Keep your energy balls in the freezer for longer shelf life; they can last up to three months when stored properly. {{image_2}} You can swap pistachios for other nuts. Try almonds, walnuts, or cashews. Each nut adds a unique taste. Seeds also work well. Use sunflower seeds or pumpkin seeds for a crunchy twist. Just chop them up like the pistachios. This keeps the texture nice. If you want less sugar, use different sweeteners. Maple syrup is great, but try agave nectar too. For a sugar-free option, use stevia or monk fruit. These sweeteners give a nice flavor without the extra sugar. Mix them in just like honey or maple syrup. Want to get creative? Add chocolate chips or shredded coconut. Dark chocolate chips add sweetness and richness. Coconut gives a tropical feel. You can even toss in some dried fruits like apricots or figs. Just remember to keep the total mix balanced. Enjoy playing with flavors! To keep your Cranberry Pistachio Energy Balls fresh, store them in an airtight container. This prevents air from drying them out. You can place parchment paper between layers to avoid sticking. Keep them in the fridge for best results. The cool temperature helps maintain their taste and texture. Want to save some for later? Freezing is a great option! After rolling the energy balls, place them on a baking sheet. Freeze them for about 30 minutes until firm. After that, transfer them to a freezer-safe bag or container. This way, you can enjoy them anytime. If stored correctly, these energy balls last a week in the fridge. In the freezer, they can last up to three months. Just remember to label the container with the date. This helps you keep track of how long they’ve been stored. Enjoy these tasty treats whenever you need a quick energy boost! To make these energy balls vegan, swap honey for maple syrup. Use almond butter that has no added ingredients. Ensure the dried cranberries are not sweetened with honey. This simple change keeps the recipe plant-based. You can use fresh cranberries, but they are tart. Fresh cranberries have more moisture. You may need to adjust the amount of sweetener to balance the taste. If you do use fresh, chop them finely and mix them well into the mixture. These energy balls offer great nutrition. Each ball has about 100 calories. They are rich in fiber, protein, and healthy fats. Key nutrients include: - Rolled oats: Good for energy and digestion. - Almond butter: Provides protein and healthy fats. - Dried cranberries: Offer antioxidants and vitamins. - Pistachios: Add protein, fiber, and healthy fats. - Chia seeds: Are packed with omega-3s and fiber. These tasty bites can keep you full and satisfied! Cranberry Pistachio Energy Balls are simple to make and fun to enjoy. We covered the key ingredients, their health perks, and how to mix and chill them just right. I shared handy tips for storing, flavoring, and avoiding common mistakes. You can also explore tasty variations with nuts, sweeteners, and mix-ins. Remember, proper storage keeps them fresh longer. With these insights, you can make your energy balls healthy and delicious. Enjoy creating your own tasty snacks!

Cranberry Pistachio Energy Balls Tasty and Nutritious

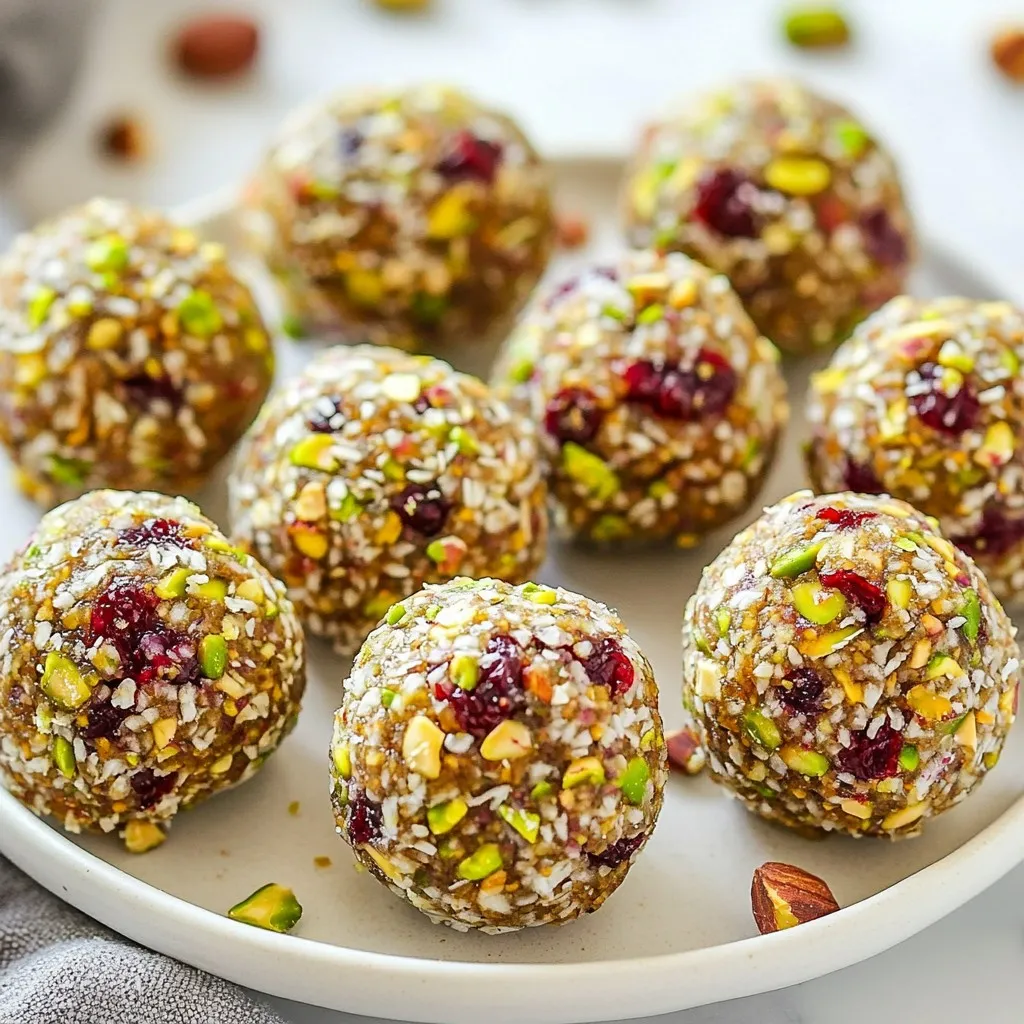
Looking for a healthy snack that hits the spot? Try these Cranberry Pistachio Energy Balls! They are easy to make

To make this dish, you will need: - 2 chicken breasts, boneless and skinless - Salt and pepper, to taste - 2 tablespoons olive oil - 3 cloves garlic, minced - 1 onion, finely chopped - 4 cups fresh spinach - 1 cup heavy cream - 1 cup shredded parmesan cheese - 1 teaspoon dried Italian herbs - Fresh lemon juice, to taste - Optional: Red pepper flakes, for a hint of spice The right seasonings make this dish shine. Salt and pepper add depth to the chicken. Garlic and onion provide a strong base flavor. The dried Italian herbs bring a lovely aroma. A squeeze of fresh lemon juice brightens the dish. Red pepper flakes can give it a nice kick if you like heat. If you can’t find an ingredient, don’t worry! You can swap chicken with turkey or tofu. Use coconut milk instead of heavy cream for a dairy-free option. Fresh herbs can replace dried ones, but use more since they are milder. If you don’t have parmesan, try any hard cheese you like. {{ingredient_image_1}} First, take your chicken breasts. Season both sides with salt and pepper. This step adds the base flavor. Let the chicken sit for a few minutes to absorb the seasoning. Heat olive oil in a large skillet over medium-high heat. Once the oil is hot, carefully add the chicken breasts. Sear each side for about 6-7 minutes. Look for a golden brown color. This shows the chicken is cooked through. Once done, remove the chicken and set it aside on a plate. In the same skillet, add chopped onion and minced garlic. Sauté them for about 2-3 minutes. You want the onions to look clear and smell great. Next, add the fresh spinach. Stir it until it wilts, which takes around 2 minutes. After that, lower the heat and pour in the heavy cream. Stir in the shredded parmesan cheese and dried Italian herbs. Let the mixture simmer for about 3-4 minutes. This will thicken the sauce a bit. Now, slice the cooked chicken into strips and add it back to the skillet. Make sure the chicken is well-coated in the creamy sauce. Finish with a squeeze of fresh lemon juice and add more salt or pepper if needed. Enjoy your delicious meal! To get that dreamy creamy texture, use heavy cream. It thickens well and adds richness. Stir the cream into your skillet gently, letting it warm before adding the cheese. Parmesan melts nicely, making the sauce smooth. If it looks too thick, add a splash of chicken broth. This helps keep it silky. Start with dry chicken. Pat it down with paper towels. This helps it sear better. Use medium-high heat to get a nice golden color. Cook each side for about 6-7 minutes. Make sure the chicken is fully cooked. It should reach 165°F inside. Letting it rest for a few minutes after cooking keeps it juicy. Herbs and spices can really enhance this dish. Use dried Italian herbs for a classic taste. Fresh herbs like basil can add brightness, too. A squeeze of lemon juice lifts the flavors. If you like heat, sprinkle in some red pepper flakes. This gives a nice kick without overpowering the dish. Pro Tips Use Fresh Ingredients: Fresh spinach and high-quality chicken make a significant difference in flavor and texture, elevating your dish to the next level. Control the Heat: When making the cream sauce, keep the heat low to prevent the cream from curdling and to achieve a smooth consistency. Customize the Flavor: Experiment with different herbs and spices to tailor the dish to your taste. Adding nutmeg can complement the cream beautifully. Serve Immediately: This dish is best enjoyed fresh. The cream sauce may thicken as it cools, so serve it right after cooking for optimal creaminess. {{image_2}} You can easily boost the nutrition of this dish. Try adding vegetables like bell peppers, zucchini, or mushrooms. These veggies add color and flavor. Just sauté them with the onions and garlic. For a pop of sweetness, add some cherry tomatoes. They will burst and give a nice contrast to the cream sauce. If you want to change the protein, you have many choices. You can use turkey or shrimp instead of chicken. For a plant-based option, try tofu or chickpeas. Simply cook them the same way. Adjust the cooking time based on your choice. Shrimp cooks fast, while tofu may need a bit more time to get crispy. For those with dietary needs, there are cream sauce swaps. Use coconut milk or almond milk for a dairy-free option. You can also try cashew cream for a richer taste. If you want a lighter sauce, use vegetable broth mixed with a bit of cornstarch. This will keep it creamy without the heavy cream. To store leftovers, let your creamy chicken and spinach skillet cool down first. Then, transfer it to an airtight container. Make sure to seal it tightly. Keep the container in the fridge. Your dish will stay fresh for up to three days. When you're ready to enjoy leftovers, use a skillet for reheating. Place the skillet over low heat. Add a splash of water or cream to keep it moist. Stir gently until warmed through. This method helps maintain the creamy texture. You can also microwave it in short bursts. Stir between each burst to heat evenly. If you want to freeze your creamy chicken and spinach skillet, let it cool completely. Portion it into freezer-safe containers. Make sure to leave some space at the top for expansion. It can stay in the freezer for up to three months. When you’re ready to eat, thaw it in the fridge overnight before reheating. The cooking time for the chicken is about 12 to 14 minutes. I sear each chicken breast for 6 to 7 minutes on each side. You want them to be golden brown and fully cooked. Use a meat thermometer to check if they reach 165°F. Yes, you can prepare this dish ahead of time. Cook the chicken and make the sauce. Store them separately in the fridge for up to 2 days. When ready to serve, just reheat gently in a skillet. Add fresh spinach right before serving for the best flavor. To add spice, sprinkle red pepper flakes into the sauce. You can also use hot sauce for a kick. For more flavor, add extra garlic or fresh herbs like basil or thyme. Squeeze in more lemon juice for brightness, too. This blog post covered everything you need for a delicious chicken dish. We discussed the key ingredients, step-by-step instructions, and helpful tips for a creamy texture. You learned variations, storage methods, and answered common questions on cooking time and prep. Now, you can confidently prepare this meal at home. Enjoy the cooking process and feel free to experiment with flavors. Your kitchen adventure awaits!

Creamy Chicken & Spinach Skillet Flavor Boost Meal

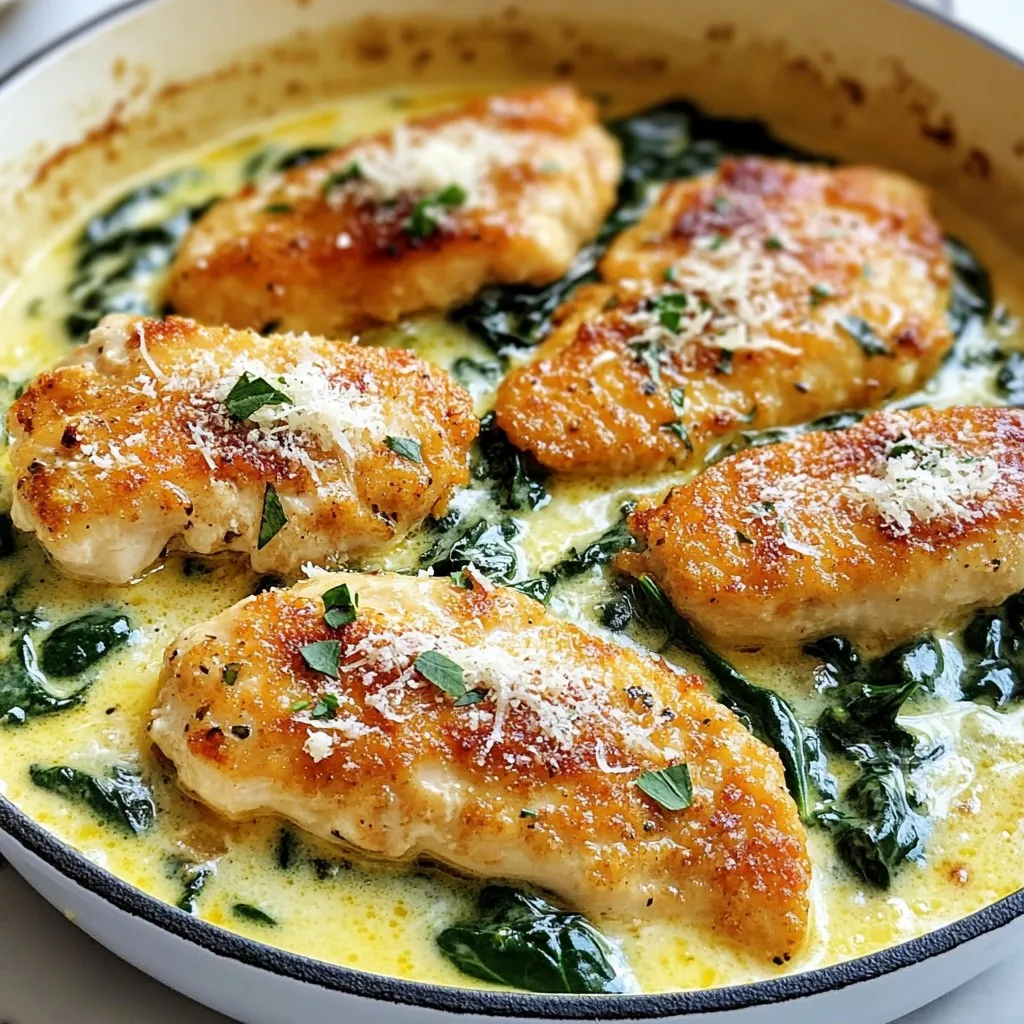
Craving a one-pan meal that’s both creamy and packed with flavor? You’ve come to the right place! My Creamy Chicken

- 2 ½ cups all-purpose flour - 1 teaspoon baking powder - ½ teaspoon baking soda - ½ teaspoon ground nutmeg - ½ teaspoon ground cinnamon - ½ teaspoon salt - 1 cup unsalted butter, softened - 1 ½ cups granulated sugar - 1 large egg - 1 teaspoon vanilla extract - ½ cup eggnog - 1 cup powdered sugar - 2 tablespoons milk (for icing) - Extra ground nutmeg or cinnamon for garnish Using fresh spices is key for great flavor. Ground nutmeg and cinnamon add warmth. Always sift your flour to avoid lumps. Make sure your butter is soft but not melted. This helps create a light texture. You can replace eggnog with milk or a milk alternative mixed with vanilla. If you need a dairy-free option, try coconut oil instead of butter. For a gluten-free version, use a 1:1 gluten-free flour blend. {{ingredient_image_1}} 1. Preheat the Oven: Start by preheating your oven to 350°F (175°C). This is key to baking the bars evenly. Grease a 9x13-inch baking pan or line it with parchment paper. This makes removing the bars much easier later. 2. Mix Dry Ingredients: In a medium bowl, whisk together 2 ½ cups of all-purpose flour, 1 teaspoon of baking powder, ½ teaspoon of baking soda, ½ teaspoon of ground nutmeg, ½ teaspoon of ground cinnamon, and ½ teaspoon of salt. Set this bowl aside. Mixing dry ingredients now helps ensure even flavor. 3. Cream Butter and Sugar: In a large bowl, beat 1 cup of softened unsalted butter and 1 ½ cups of granulated sugar. Use a hand mixer or a stand mixer. Mix until it is light and fluffy, which takes about 3-4 minutes. This step adds air, making the bars soft. 4. Add Egg and Flavorings: Next, mix in 1 large egg and 1 teaspoon of vanilla extract until well combined. Then pour in ½ cup of eggnog and mix until the batter is smooth. The eggnog adds a rich flavor and moisture. 5. Combine Ingredients: Gradually add your dry ingredients to the butter mixture. Mix until just combined. Be careful not to overmix here. Overmixing can make the bars tough. 6. Spread the Batter: Pour the batter into the prepared baking pan. Use a spatula to spread it evenly. This ensures all bars bake uniformly. 1. Bake: Place the pan in the preheated oven. Bake for 20-25 minutes. To check if they are done, insert a toothpick into the center. If it comes out clean, the bars are ready. 2. Cooling: Once baked, allow the bars to cool in the pan for 10 minutes. After that, transfer them to a wire rack to cool completely. This step is crucial for the best texture. 1. Make the Icing: In a small bowl, whisk together 1 cup of powdered sugar and 2 tablespoons of milk until smooth. If needed, adjust the consistency by adding more milk or sugar. A good icing should be spreadable but not too runny. 2. Frost the Bars: Once the bars are completely cooled, use a spatula to spread the icing on top. This adds sweetness and makes the bars festive. 3. Garnish: For added flavor and appeal, sprinkle extra ground nutmeg or cinnamon over the frosted bars. This gives them a beautiful finish and enhances the holiday spirit. 4. Cut and Serve: Finally, cut the bars into squares and enjoy your festive treats! These Eggnog Sugar Cookie Bars are perfect for sharing with friends and family during the holidays. When making Eggnog Sugar Cookie Bars, avoid overmixing your batter. This can make the bars tough. Mix until just combined. Also, watch your baking time. If you bake them too long, they can dry out. Check them at the 20-minute mark with a toothpick. If it comes out clean, they are done. To boost the flavor, use fresh spices. Ground nutmeg and cinnamon can lose their taste over time. Grate your own nutmeg for the best result. Don't skip the eggnog; it adds moisture and flavor. Also, let the bars cool completely before icing. This helps the icing set better. For best results, use a hand mixer or stand mixer. This helps cream the butter and sugar well. A 9x13-inch baking pan is perfect for this recipe. Use parchment paper for easy removal. Finally, have a spatula on hand for spreading the batter and icing smoothly. Pro Tips Use Fresh Eggnog: For the best flavor, use fresh eggnog instead of a carton that has been sitting in your fridge for a while. Don’t Overmix: When combining the wet and dry ingredients, mix just until incorporated to ensure your cookie bars stay tender. Cool Completely: Allow the bars to cool completely before frosting to prevent the icing from melting and sliding off. Customize Your Spices: Feel free to adjust the spices to your taste; adding a pinch of cloves or ginger can enhance the holiday flavor! {{image_2}} You can make Eggnog Sugar Cookie Bars even more fun. Try adding chocolate chips for a sweet twist. White chocolate chips work great too. You can also mix in dried cranberries or chopped nuts for a crunchy texture. Consider using flavored eggnog, like pumpkin spice or vanilla, to change the taste. Each option brings a new layer of flavor that is sure to please. While the icing in the recipe is delicious, you can switch it up. Cream cheese frosting pairs perfectly with these bars. It adds a tangy flavor that balances the sweetness well. You can also use a simple glaze made with powdered sugar and eggnog. For a festive touch, sprinkle crushed peppermint on top. This gives a holiday look and taste. If you need a gluten-free option, swap the all-purpose flour with a gluten-free blend. Make sure it works well for baking. For a dairy-free version, use vegan butter and almond or coconut milk. You can also use flax eggs instead of a regular egg. This keeps the bars tasty while fitting different diets. Enjoy these treats without worry! Store your Eggnog Sugar Cookie Bars in an airtight container. This keeps them fresh and tasty. Make sure to let them cool completely before sealing. If you stack them, place parchment paper between layers. This prevents sticking and keeps the bars nice. To freeze these bars, first cool them completely. Then, cut them into squares. Wrap each square in plastic wrap, then place them in a freezer bag. Press out as much air as you can before sealing. They will stay fresh for up to three months. When ready to enjoy, thaw them in the fridge overnight. These cookie bars stay fresh for about a week at room temperature. To keep them extra fresh, store them in the fridge. If you notice any dryness, try adding a slice of bread in the container. The bread adds moisture and can help revive the bars. Always check for any signs of spoilage before enjoying. Yes, you can make these Eggnog Sugar Cookie Bars ahead of time. They stay fresh for several days. Just bake them, let them cool, and frost them. Store them in an airtight container at room temperature. You can also freeze the bars without icing. Thaw them before serving for tasty treats. If you need a substitute for eggnog, use a mix of milk and cream. Mix one cup of milk with a tablespoon of vanilla extract and a pinch of nutmeg. This combo gives you a similar flavor. You can also use almond milk or coconut milk. Just add the same spices to get that festive taste. To check if the cookie bars are done, insert a toothpick into the center. If it comes out clean or with a few crumbs, they are ready. Bake them for 20-25 minutes. Keep an eye on them so they don’t overbake. The edges should look lightly golden, and the center will feel set. In this post, we explored eggnog sugar cookie bars. We detailed ingredients, preparation steps, and tips for baking. You learned about common mistakes, unique flavor additions, and storage methods. Remember, using fresh ingredients can enhance flavor, and trial can help you perfect your recipe. Enjoy baking and sharing these treats. Creating these bars can bring joy and warmth to any gathering. Your family and friends will appreciate your effort!

Eggnog Sugar Cookie Bars Decadent Holiday Treat

When the holiday season arrives, there’s nothing quite like a sweet treat to lift your spirit. I’m excited to share

Older posts
Newer posts
← Previous Page1 … Page154 Page155 Page156 … Page158 Next →

dsad

© 2026 Recipes Pursuit • Built with GeneratePress

Our Policies

  • Copyright Policy
  • Cookie Policy
  • GDPR Policy
  • Privacy Policy
  • Disclaimer
  • Terms Of Use

More Information

  • Home
  • About
  • Contact
  • Appetizers
  • Dessert
  • Dinner
  • Drinks
©2026, Recipes Pursuit About Back To Top