Skip to content
DisclaimerTerms Of UseGDPR PolicyCookie Policy

Recipes Pursuit

  • Home
  • Drinks
  • Appetizers
  • Dinner
  • Dessert
  • About
  • Contact
  • Privacy Policy
DisclaimerTerms Of UseGDPR PolicyCookie Policy

Emma Smith

To make the Strawberry Cheesecake French Toast Bake, you will need a few simple ingredients. Each one plays a key role in creating that creamy, sweet, and fruity flavor we love. Here's what you'll need: - 1 loaf of brioche bread, cut into cubes: Brioche adds a soft, buttery flavor. - 8 oz cream cheese, softened: Cream cheese gives that rich cheesecake taste. - ½ cup granulated sugar: Sugar sweetens the dish and balances the tanginess. - 2 large eggs: Eggs help bind the mixture and create a fluffy texture. - 1 cup milk: Milk adds creaminess and moisture to the bake. - 1 tsp vanilla extract: Vanilla enhances the overall flavor profile. - ½ tsp ground cinnamon: Cinnamon adds warmth and a hint of spice. - 2 cups fresh strawberries, hulled and sliced: Strawberries provide freshness and sweetness. - ¼ cup strawberry preserves: Preserves amplify the strawberry flavor. - Powdered sugar for dusting: A light dusting adds a nice touch. - Fresh mint leaves for garnish (optional): Mint makes for a pretty and fresh garnish. With these ingredients, you can create a delightful breakfast or brunch dish that impresses everyone. The combination of flavors will make you feel like you are enjoying dessert for breakfast! 1. Preheating the oven: Start by preheating your oven to 350°F (175°C). This step is key for even baking. 2. Mixing cream cheese and sugar: In a large mixing bowl, blend 8 oz of softened cream cheese with ½ cup of granulated sugar. Mix until it becomes smooth and creamy. This creates a rich base for your bake. 3. Combining wet ingredients and strawberries: Next, add 2 large eggs, 1 cup of milk, 1 tsp of vanilla extract, and ½ tsp of ground cinnamon to your cream cheese mixture. Whisk them together until fully combined. Now, gently fold in 2 cups of fresh strawberries that you have hulled and sliced, along with ¼ cup of strawberry preserves. This gives your bake a fruity flavor. 1. Layering bread cubes: Cut a loaf of brioche bread into cubes. Layer these cubes evenly in a greased 9x13-inch baking dish. Each piece of bread should be snug and close to one another. 2. Soaking the bread mixture: Pour your cream cheese and strawberry mixture over the bread cubes. Make sure every piece of bread is soaked well. Use a spatula to gently press down on the bread. This helps it absorb all the lovely flavors. 3. Covering and baking: Cover the dish with aluminum foil. Place it in your preheated oven and bake for 30 minutes. After that, remove the foil and bake for an additional 15-20 minutes. You want the top to be golden brown and the center to be set. 1. Cooling time: Once baked, allow the dish to cool slightly before serving. This helps set the layers. 2. Dusting with powdered sugar: Dust the top with powdered sugar for a sweet finish. This adds a lovely touch and makes it look pretty. 3. Optional garnish: If you like, add fresh mint leaves on top. They add a nice pop of color and a hint of flavor. Soaking the bread is very important. This step helps the brioche absorb all the creamy goodness. I recommend soaking it for at least 30 minutes. This allows the bread to get soft and flavorful. Using day-old bread also makes a big difference. Fresh bread can be too soft and mushy. Day-old brioche has the right texture to hold up well during baking. You can boost the flavor with spices or extracts. A pinch of nutmeg or a splash of almond extract works wonders. These small additions can take your dish to the next level. For toppings, think about whipped cream or a drizzle of maple syrup. Fresh berries or a sprinkle of crushed nuts also add a nice touch. Pair your bake with warm syrup or whipped cream for extra richness. You can serve it as a cozy breakfast or a sweet lunch treat. It works great for brunch with friends, too. Adding a side of crispy bacon or sausage can balance the sweetness. This makes for a delightful meal everyone will enjoy! {{image_2}} You can switch up the bread in your bake. Instead of brioche, try challah or sourdough. Both bring their own unique taste and texture. Challah is richer, while sourdough adds a tangy flavor. You can also swap strawberries for other fruits. Blueberries or raspberries work well, too. They add a burst of flavor and color. Mixing fruits can create exciting new tastes. If you need gluten-free options, choose gluten-free bread. Many brands offer tasty choices. Make sure the preserves you use are also gluten-free. For a vegan twist, use plant-based cream cheese. You can replace eggs with flaxseed meal mixed with water. This keeps the bake moist and delicious. Almond or oat milk can replace regular milk easily. Using seasonal fruits can give your bake a fresh feel. In summer, try peaches or cherries. In fall, apples and pears add warmth. For holiday-inspired versions, think about adding spices. A hint of nutmeg or gingerbread spices can make it festive. You can even use cranberry preserves for a tart kick. To keep your Strawberry Cheesecake French Toast Bake fresh, store it in the fridge. Place it in an airtight container. This helps keep moisture in and prevents other odors from mixing in. You can store it for up to three days. After that, it may lose its taste and texture. You can reheat leftovers in a few ways. The best method is to use the oven. Preheat it to 350°F (175°C). Place the bake in a dish and cover it with foil. Heat for about 15-20 minutes. This keeps it moist and warm. If you’re short on time, you can use the microwave. Heat in short bursts of 30 seconds. Check often to avoid overheating, which can make it dry. If you want to save some for later, you can freeze it. Cut the leftover bake into portions. Wrap each piece tightly in plastic wrap, then place it in a freezer bag. This helps prevent freezer burn. You can freeze it for up to three months. When you’re ready to enjoy, take it out and thaw it in the fridge overnight. For quicker thawing, you can use the microwave on low power. Can I make this recipe ahead of time? Yes, you can prepare this dish the night before. Just follow the steps up to soaking the bread. Cover it and store it in the fridge overnight. In the morning, bake it straight from the fridge. This saves time and makes mornings easier. What can I substitute for cream cheese? If you need a substitute, try ricotta cheese or Greek yogurt. Both provide a creamy texture. They also add a unique flavor to your dish. Use the same amount as the cream cheese in the recipe. Why is my bake soggy? A soggy bake often means the bread did not absorb enough liquid. To fix this, ensure you press the bread down well. You may also want to bake it a bit longer to help it firm up. How to avoid burning the top? To prevent burning, cover the dish with foil for the first part of baking. Remove it later to brown the top. This method keeps the inside moist while allowing the top to crisp. Can I serve this at a brunch? Absolutely! This dish is perfect for brunch. Its sweet flavors and beautiful presentation make it a hit. Guests will love the mix of strawberries and cream cheese. What beverages pair well with this dish? For drinks, I suggest coffee or a light tea. You can also serve fresh juice or a fruity smoothie. These drinks complement the sweet taste of the bake nicely. This recipe brings together simple ingredients for a delightful dish. You learned how to prepare, bake, and serve a tasty treat using brioche, cream cheese, and fresh strawberries. Keep texture in mind and explore ingredient swaps for fun variations. Don't forget to store leftovers properly or try freezing them. With these tips and tricks, your dish will shine at any meal. Embrace your creativity in the kitchen and enjoy every bite!

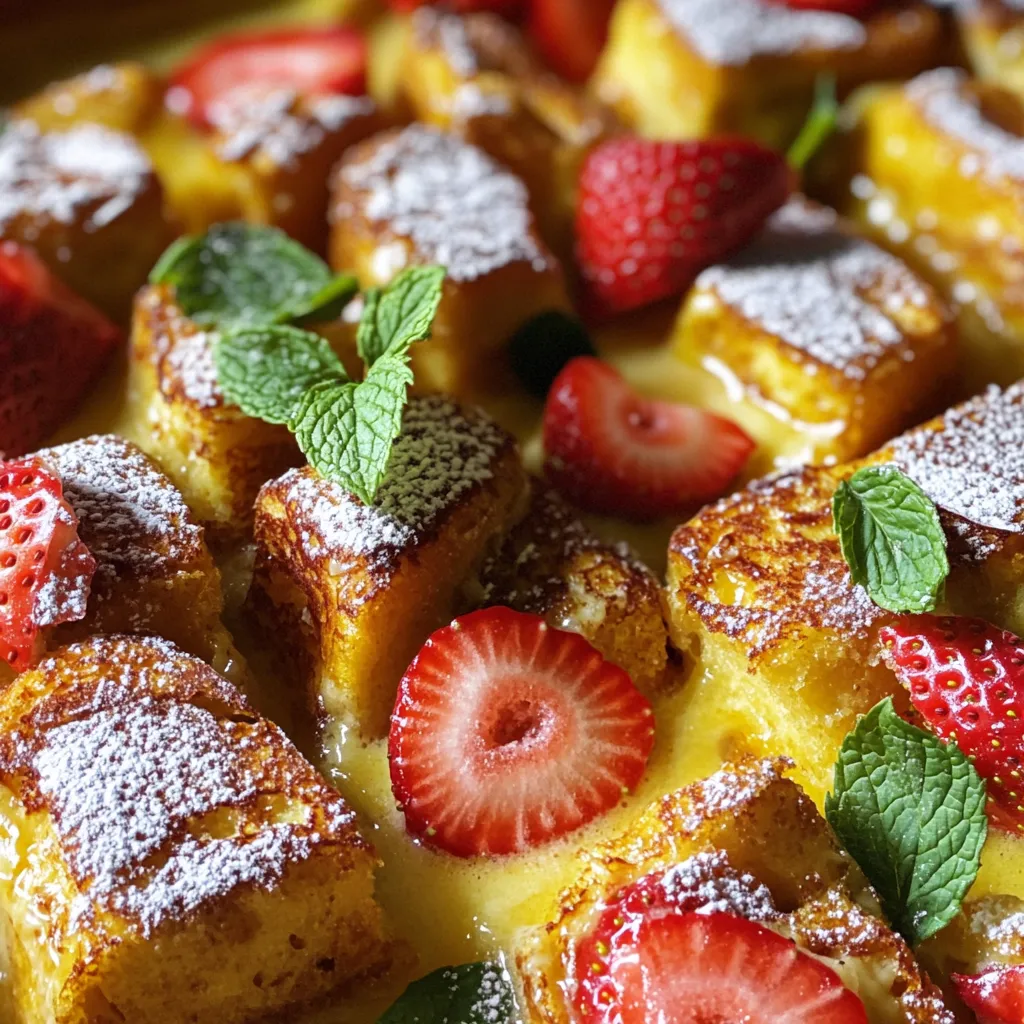
Strawberry Cheesecake French Toast Bake Delight

Are you ready to impress your family and friends with a delicious Strawberry Cheesecake French Toast Bake? This fun twist

- 1 lb chicken tenders - 1 cup all-purpose flour - 2 large eggs, beaten - 1 cup breadcrumbs (preferably panko for extra crunch) - 2 tablespoons everything bagel seasoning - 1 teaspoon garlic powder - 1 teaspoon onion powder - Salt and pepper to taste - Cooking spray Gathering these ingredients sets you up for success. The chicken tenders are the star of the dish. They are juicy and tender, perfect for breading. The all-purpose flour helps the egg stick, giving a nice base for the coating. Be sure to use panko breadcrumbs; they give a great crunch and texture. The everything bagel seasoning adds a burst of flavor, making each bite special. The garlic and onion powder enhance the taste, while salt and pepper bring balance. A light spray of cooking oil helps everything crisp up beautifully in the air fryer. Each ingredient plays a role, making this dish a delight to eat. First, preheat your air fryer to 400°F (200°C). This step helps the chicken cook evenly and get crispy. While the air fryer heats, set up your breading station. You will need three shallow dishes for this process. - In the first dish, add 1 cup of all-purpose flour. - In the second dish, beat 2 large eggs until they are smooth. - In the third dish, mix 1 cup of breadcrumbs, 2 tablespoons of everything bagel seasoning, 1 teaspoon of garlic powder, 1 teaspoon of onion powder, salt, and pepper. Now, it's time to coat the chicken tenders. Take one chicken tender and dip it into the flour. Make sure to coat it well and shake off any extra flour. This helps the egg stick better. Next, dip the floured chicken into the beaten eggs. The egg should cover the chicken completely. This step adds moisture and allows the crumbs to stick. Finally, roll the chicken tender in the breadcrumb mixture. Press gently to make sure the crumbs stick well. This creates a nice crunchy layer on your chicken. After breading, arrange the chicken tenders in a single layer in the air fryer basket. Be careful not to overcrowd them, or they won't cook evenly. You may need to work in batches. Lightly spray the chicken tenders with cooking spray. This will help them get extra crispy while cooking. Cook the chicken tenders for 10-12 minutes. Flip them halfway through cooking for even browning. Check that the internal temperature reaches 165°F (74°C) to ensure they are fully cooked. Once cooked, remove the chicken tenders from the air fryer. Let them rest for a few minutes before serving. Enjoy your crunchy, flavorful Everything Bagel Chicken Tenders! To make these chicken tenders extra crispy, use panko breadcrumbs. Panko has a light texture that crisps up nicely in the air fryer. It creates a great crunch that you will love. Don’t skip the cooking spray. A light spray helps the breadcrumbs brown evenly. It also adds more crispness to each bite. Avoid clumping by working quickly. Dip the chicken in flour first, then in egg, and finally in the breadcrumb mix. Make sure to shake off any excess flour and egg. This helps the coating stick better. For an even coating, press the chicken into the breadcrumbs. This way, they stick well and create a thick, crunchy layer. Do not overcrowd the air fryer basket. If you add too many tenders at once, they won’t cook evenly. Each piece needs space for hot air to circulate. Cook in batches if needed. Adjust the cooking time for each batch to ensure all tenders are golden brown and crispy. {{image_2}} You can change the flavor of your chicken tenders by using different seasonings. Try using Cajun spice for a kick. You can also add Italian herbs for a fresh taste. If you like heat, mix in some cayenne pepper or chili flakes. This makes the tenders spicy and fun. If you need a gluten-free option, swap the flour with almond flour. You can also use gluten-free breadcrumbs. For a cheesy twist, add grated Parmesan to your breadcrumb mix. This gives a tasty crunch and a rich flavor. Pair these chicken tenders with your favorite dips. Ranch, honey mustard, or BBQ sauce work great. You can also serve them over a bed of greens for a nice meal. Adding sliced veggies on the side makes it colorful. Get creative with how you plate your meal! To keep your chicken tenders fresh, store them in the fridge. Use airtight containers to prevent moisture loss. Wrap them tightly with plastic wrap or foil for extra protection. You can also use resealable bags. Just remember to squeeze out the air before sealing. This helps keep the tenders tasty for up to three days. When it's time to enjoy your leftovers, reheating is key. The best method is to use the air fryer again. Set it to 350°F (175°C) for about 5-7 minutes. This helps keep them crispy. You can also use an oven, but it may take longer. Avoid the microwave if you want to keep that crunch. If you must use it, heat in short bursts, checking often. You can freeze un-cooked or cooked chicken tenders. For uncooked tenders, bread them, then freeze on a baking sheet. Once solid, transfer to a freezer bag. For cooked tenders, let them cool fully before freezing. Store in freezer-safe containers for up to three months. When ready to eat, thaw in the fridge overnight. For uncooked tenders, cook them from frozen. Just add a few extra minutes to cook time. Yes, you can use frozen chicken tenders. However, it’s best to thaw them first. This helps them cook evenly and get crispy. If you use them frozen, add a few extra minutes to the cooking time. Check for doneness regularly to avoid overcooking. To make this recipe healthier, you can use whole wheat flour instead of all-purpose flour. Also, try using less oil when spraying the chicken. You can bake the chicken tenders instead of frying them to cut down on fat. Use lean chicken breasts if you prefer a lighter option. Many dips complement Everything Bagel chicken tenders well. Here are some tasty options: - Creamy ranch dressing - Spicy mustard - Honey mustard sauce - Avocado dip - Classic ketchup You can mix and match to find your favorite! Check the chicken tenders for an internal temperature of 165°F (74°C). Use a meat thermometer for accuracy. The chicken should be golden brown and no longer pink inside. If you don’t have a thermometer, cut one tender open. If the juices run clear, it’s ready! You now have all the tools to create delicious Everything Bagel chicken tenders. We discussed the main ingredients, cooking steps, and tips for crispy results. Remember to prepare your breading station and avoid overcrowding the air fryer. Don’t forget about variations and how to store leftovers properly. Enjoy experimenting with flavors and serving suggestions. Cooking can be fun and rewarding. Make these tenders a part of your meal rotation!

Air Fryer Everything Bagel Chicken Tenders Delight

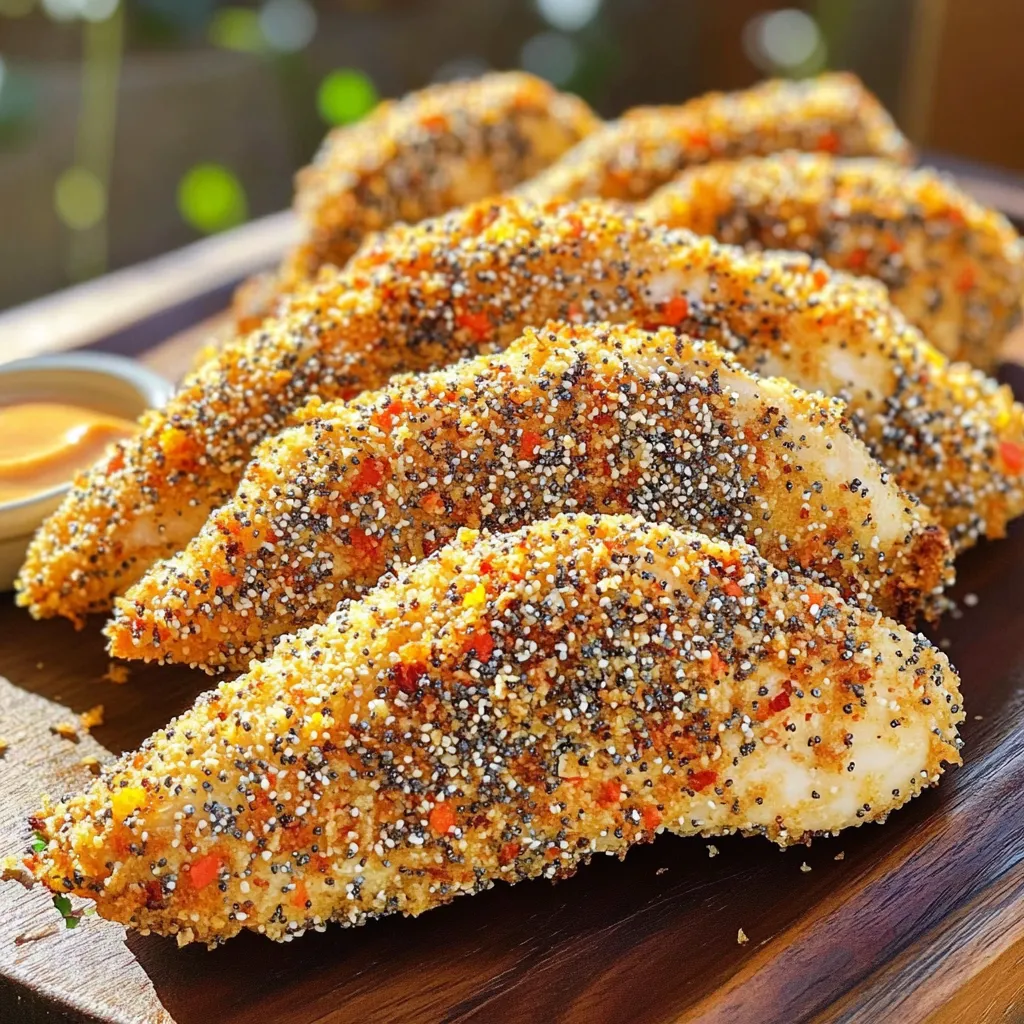
Get ready to take your dinner game to the next level with Air Fryer Everything Bagel Chicken Tenders! These tasty

For this recipe, you need 2 ripe peaches. They should be fresh, juicy, and sweet. Peel and dice them into small pieces. This helps them cook evenly. A tablespoon of lemon juice adds brightness. It keeps the peaches from browning too. The lemon juice also enhances the sweet taste of the peaches. You will use 2 tablespoons of brown sugar. This sugar adds a deep, rich flavor. It melts into the peach filling, making it sweet and sticky. You also need 3 tablespoons of granulated sugar. This sugar is for coating the hand pies. It gives a sweet crunch on top. Don’t forget 1 teaspoon of ground cinnamon. Cinnamon adds warmth and spice to the flavor. For the crust, use one sheet of pie crust. You can buy it or make your own. The crust should be easy to work with. It holds the peach filling nicely. You will also need 1 tablespoon of cornstarch. This thickens the filling and keeps it from being runny. It helps make the hand pies crisp and delicious. To start, gather your ingredients. You need two ripe peaches, diced small. Add one tablespoon of lemon juice to keep them fresh. Then mix in two tablespoons of brown sugar. This adds sweetness. Next, sprinkle in one teaspoon of ground cinnamon for warmth. Finally, stir in one tablespoon of cornstarch. This helps thicken the filling. Mix everything well and set it aside. Let the flavors blend together for about ten minutes. Now, it’s time to assemble. Roll out your pie crust on a floured surface. Cut the crust into squares or circles, about four inches wide. Take one piece and place a spoonful of your peach filling in the center. Fold the crust over to make a triangle or half-moon shape. Press the edges to seal. Use a fork to crimp the edges for a nice look. This step also keeps the filling inside. Brush the tops with a beaten egg for shine. Preheat your air fryer to 350°F (175°C). Arrange the hand pies in the basket in a single layer. Make sure they have space around them. You may need to cook them in batches. Air fry for ten to twelve minutes. Flip them halfway through for even cooking. They are done when golden brown and crispy. Once cooked, carefully remove them and let them cool slightly. Enjoy these delightful treats warm. To get a golden crust, brush your pies with a beaten egg. This gives them a shiny finish. Make sure your air fryer is preheated to 350°F (175°C) for even cooking. Space the hand pies apart so they cook well. Flip them halfway through cooking for a crisp crust all around. Want to add more flavor? Try adding a pinch of nutmeg to your peach filling. You can also mix in some vanilla extract for extra sweetness. If you don’t have peaches, use other fruits like apples or berries. They work great too! You can swap brown sugar for white sugar if needed. If the hand pies burst open, ensure you seal the edges well. A fork can help crimp them securely. If they are not browning enough, check your air fryer temperature. They may need a minute or two more. If you find them too sweet, cut back on the sugar in the filling next time. {{image_2}} You can switch peaches for other fruits. Apples, berries, and cherries work great. Each fruit gives a new flavor. For apples, add a bit of nutmeg. For berries, use less sugar. You can mix fruits too. A peach and berry mix is always a hit. If you want to change the taste, try different sweeteners. Use honey or maple syrup for a twist. You can also add spices for depth. Try ginger or nutmeg along with cinnamon. These add warmth and flavor to your hand pies. Making these hand pies vegan is easy. Use a plant-based egg wash like almond milk. For a gluten-free option, choose a gluten-free pie crust. Make sure to check the ingredients. These changes keep the taste while fitting your diet. Enjoy your hand pies without worry! To store leftover hand pies, let them cool first. Place them in an airtight container. You can keep them at room temperature for two days. For longer storage, refrigerate them. They will last in the fridge for up to five days. When you want to enjoy the hand pies again, preheat your air fryer to 350°F (175°C). Place the hand pies in the basket. Heat them for about 5-7 minutes. This will make them warm and crispy again. You can also reheat them in a regular oven at the same temperature. If you want to freeze the hand pies, do it before you bake them. Place the unbaked hand pies on a baking sheet. Freeze them until firm, then transfer to a freezer bag. They will stay fresh for up to three months. When ready to bake, cook them straight from the freezer. Just add a few extra minutes to the cooking time. Enjoy your homemade treat anytime! Yes, you can use frozen peaches. They work well in this recipe. Just thaw and drain them before using. Frozen peaches can add a nice texture and flavor too. If they seem too watery, add a bit more cornstarch to help thicken the filling. This way, your hand pies will stay crisp. The hand pies are done when they turn golden brown. Air fry them for 10-12 minutes at 350°F (175°C). Flip them halfway through cooking for even browning. Look for a crispy crust and a bubbly filling. If they look a bit pale, give them an extra minute or two. Trust your eyes! Yes, you can make the crust from scratch! Use flour, butter, and water to create a simple dough. Roll it out to the right thickness. It will take a bit more time, but the taste is worth it. Homemade crust can have a nice, flaky texture that pairs perfectly with the peach filling. Just remember to chill the dough before you roll it out! This blog post outlined how to make delicious peach hand pies. We covered fresh ingredients like peaches and lemon juice, sweeteners, and the essential crust. I shared step-by-step instructions on preparing, assembling, and air frying your hand pies. For the best results, I shared tips on achieving the perfect crust and common troubleshooting. You can also explore variations with different fruits and storage tips for leftovers. Now you have everything you need to create tasty treats that you can enjoy anytime. Happy baking!

Air Fryer Cinnamon Sugar Peach Hand Pies Delight

Get ready to delight your taste buds with my Air Fryer Cinnamon Sugar Peach Hand Pies! Bursting with juicy peaches

- 1 lb ground chicken - 1/4 cup breadcrumbs - 2 cloves garlic, minced - 1 teaspoon ginger, minced To make the meatballs, you start with ground chicken. This lean meat keeps the dish light. I add breadcrumbs to help bind the mixture. Garlic and ginger bring in great flavor. Their aroma fills your kitchen as they cook, making the meal even better. - 1/4 cup honey - 1/4 cup soy sauce (low sodium preferred) - 2 tablespoons rice vinegar The sauce is the star of this dish. Honey adds sweetness and helps caramelize the meatballs. Soy sauce gives a savory touch, while rice vinegar adds a bit of tang. Together, they create a balanced flavor that complements the chicken. - 2 cups mixed bell peppers, sliced - 1 cup broccoli florets - Fresh cilantro, for garnish For veggies, I use colorful bell peppers and broccoli. They add crunch and nutrition. Plus, they soak up the sauce while cooking. Fresh cilantro makes a great garnish. It adds a burst of freshness and color right before serving. Set your oven to 400°F (200°C). This high heat helps the meatballs brown nicely. Line a large baking sheet with parchment paper. This makes cleanup a breeze. In a large bowl, combine the following: - 1 lb ground chicken - 1/4 cup breadcrumbs - 1/4 cup finely chopped green onions - 1 egg, lightly beaten - 2 cloves garlic, minced - 1 teaspoon ginger, minced - 1 teaspoon salt - 1/2 teaspoon pepper - 1/4 teaspoon red pepper flakes (optional) Mix everything well. Make sure the ingredients blend together. This step is key to juicy meatballs. Shape the mixture into small meatballs. Each should be about 1 inch wide. Place them on one side of the prepared baking sheet. Keep some space between them for even cooking. In a small bowl, whisk together: - 1/4 cup honey - 1/4 cup soy sauce - 2 tablespoons rice vinegar - 1 tablespoon sesame oil Whisk until it’s fully mixed. This sauce adds a sweet and savory touch. On the other side of the baking sheet, spread out: - 2 cups sliced bell peppers - 1 cup broccoli florets Drizzle with a little olive oil, salt, and pepper. Toss the veggies to coat them evenly. They will cook and soak up the flavors. Place the sheet pan in the oven. Bake for about 20-25 minutes. Check that the internal temperature of the meatballs reaches 165°F. When they are done, the veggies should be tender. For an extra glaze, brush the meatballs with more sauce in the last 5 minutes. Enjoy the aroma filling your kitchen! To make great meatballs, start with the right blend. Ground chicken needs binding. I use breadcrumbs and an egg to help hold them together. Mix everything well. This keeps the meatballs from falling apart. Shape them into small balls, about one inch wide. This size cooks evenly. Want more taste? You can add herbs and spices. Fresh herbs like parsley or basil brighten the dish. Dried spices like cumin or paprika add depth. If you enjoy heat, try adding more red pepper flakes. Just a pinch can change the flavor! Using parchment paper is key. It prevents sticking and makes cleanup easy. Place your meatballs and veggies with space in between. This lets the heat flow and helps everything cook evenly. Avoid crowding the pan. Give each meatball room to shine! {{image_2}} If you want to switch things up, try using turkey or beef. Both options work well in this recipe. Turkey gives you a leaner meatball, while beef offers a richer flavor. When using turkey, keep the seasoning similar to maintain that sweet and savory taste. For beef, you might want to add a bit more seasoning to balance the flavors. Just remember, cook time may vary slightly based on the meat used. You can also play with different sauces. Teriyaki sauce adds a sweet and salty taste that pairs nicely with the meatballs. Sweet chili sauce gives a spicy kick, perfect for those who like a bit of heat. Whichever sauce you choose, just mix it well and pour it over the meatballs and veggies, just like in the original recipe. Experimenting with these sauces can lead to new favorites! Don’t limit yourself to just bell peppers and broccoli. You can use any veggies you love. Carrots, snap peas, or zucchini can add great color and texture. Just chop them into similar sizes so they cook evenly. You can even mix in some onions for added flavor. The versatility of vegetables lets you customize this dish to fit your taste and what you have on hand. To keep your leftovers fresh, use airtight containers. Glass or plastic containers work well. Allow the meatballs to cool before sealing. Store them in the fridge for up to four days. If you have leftover veggies, store them separately to keep them crisp. To reheat meatballs, use the oven for the best results. Preheat your oven to 350°F. Place the meatballs on a baking sheet. Add a splash of water to keep them moist. Heat for about 10-15 minutes until they are warm and tender. You can also use the microwave if you're in a hurry. Heat in 30-second intervals, checking often. To freeze meatballs, let them cool completely. Arrange them in a single layer on a baking sheet. Freeze them for about an hour. Once frozen, place them in a freezer-safe bag. They can last up to three months in the freezer. To defrost, move them to the fridge overnight before reheating. This method keeps them juicy and flavorful. Yes, you can make these meatballs ahead of time. Prepare the meatball mixture and shape them. Place the uncooked meatballs on a baking sheet. Cover them with plastic wrap and store in the fridge for up to a day. You can also freeze them for longer storage. Just freeze them on the sheet first, then transfer to a bag. When ready to cook, bake them from frozen, adding a few extra minutes to the cooking time. These meatballs pair well with many sides. Consider serving them with: - Steamed rice - Quinoa or couscous - A fresh green salad - Roasted vegetables - Noodles tossed in sesame oil These sides balance the sweet and savory flavors of the meatballs and make a complete meal. To ensure your meatballs are fully cooked, use a meat thermometer. The internal temperature should reach 165°F (74°C). This ensures they are safe to eat. If you don’t have a thermometer, cut one open. The meat should be no longer pink, and juices should run clear. Always check a few meatballs to be sure they are all cooked. In this post, I covered how to make delicious honey garlic chicken meatballs. You learned about the key ingredients, from ground chicken to fresh vegetables. I shared step-by-step instructions for baking and served up tips for perfect results. You can also explore fun variations, like using turkey or different sauces. Finally, I provided storage tips to keep your leftovers fresh and tasty. Now, you can create tasty meals that impress. Enjoy cooking and experimenting with flavors!

Sheet-Pan Honey Garlic Chicken Meatballs Delight

Get ready to savor a dish that’s simple, flavorful, and fun! My Sheet-Pan Honey Garlic Chicken Meatballs are your answer

To make Slow Cooker Tomato Basil Tortellini Soup, gather these ingredients: - 1 tablespoon olive oil - 1 medium onion, chopped - 3 cloves garlic, minced - 4 cups vegetable broth - 1 can (28 oz) crushed tomatoes - 2 teaspoons dried basil - 1 teaspoon dried oregano - 1 teaspoon sugar - Salt and pepper to taste - 9 oz cheese tortellini (fresh or frozen) - 1 cup heavy cream (or coconut cream for a lighter version) - 1 cup baby spinach - Fresh basil leaves for garnish You can change a few ingredients if needed: - Use coconut oil instead of olive oil for a different flavor. - Swap the vegetable broth for chicken broth if you want a richer taste. - Use fresh tomatoes instead of canned if you prefer. - If you do not have dried basil, use fresh basil (about 1/4 cup). - Use any pasta if you are out of tortellini. Just adjust the cooking time. Choosing the right brands can enhance your soup: - For olive oil, I recommend Colavita or California Olive Ranch for good taste. - Use Pacific Foods or Swanson for vegetable broth; both offer great flavor. - For crushed tomatoes, Muir Glen is a fantastic option. - I like to use Buitoni or Rana for tortellini; they have great cheese options. - When choosing cream, Organic Valley is my go-to for heavy cream. These brands can help make your soup even more delicious. Enjoy the cooking process! First, gather your ingredients. You need olive oil, onion, garlic, vegetable broth, crushed tomatoes, basil, oregano, sugar, and cheese tortellini. If you want a creamy texture, grab heavy cream or coconut cream. Don’t forget the spinach for freshness! 1. Prep the Base: Heat olive oil in a skillet on medium heat. Add the chopped onion. Sauté until it looks clear, about 5 minutes. Add minced garlic and cook for one more minute. This step adds great flavor. 2. Combine in Slow Cooker: Move the onion and garlic mix to your slow cooker. Pour in the vegetable broth and crushed tomatoes. Add the dried basil, oregano, sugar, salt, and pepper. Mix it well. This creates a tasty base. 3. Cook Time: Cover the slow cooker. Set it to low for 4-6 hours or high for 2-3 hours. The longer it cooks, the better the flavors blend. 4. Add Tortellini: In the last 30 minutes, stir in the cheese tortellini. No need to thaw if you use frozen. This will make the soup hearty. 5. Finish with Cream and Spinach: When the tortellini is ready, mix in the heavy cream and baby spinach. Cook for another 10 minutes on high. The spinach wilts quickly, adding color and nutrients. 6. Serve: Ladle the warm soup into bowls. Top with fresh basil leaves for a nice finish. Enjoy every bite! If your soup seems too thick, add a bit more vegetable broth. If it’s too watery, let it cook longer to thicken. If you find it bland, adjust with more salt or pepper. Taste as you go! - Low Setting: 4-6 hours is best for deep flavors. - High Setting: 2-3 hours works well if you’re short on time. - Tortellini Addition: Always add it in the last 30 minutes, regardless of the setting. - Final Cream and Spinach: Add in the last 10 minutes on high for a creamy finish. This method ensures your soup comes out perfect every time! To make the soup taste great, start with fresh herbs. Use fresh basil instead of dried for a richer flavor. You can also add a splash of balsamic vinegar. This will give the soup a nice tang. For extra depth, try adding a pinch of red pepper flakes. This will add a little heat, making each bite exciting. Using frozen tortellini is easy and saves time. You don’t need to thaw it before adding it to the slow cooker. Just toss it in during the last 30 minutes. This keeps the tortellini from getting too soft. Stir gently to mix it in. This way, each piece stays intact and adds texture. If you want a lighter soup, swap heavy cream for coconut cream. This adds a nice hint of sweetness. You can also use half-and-half for a creamy texture without too many calories. For a dairy-free option, try almond milk or oat milk. These options keep the soup light and tasty while still being creamy. {{image_2}} To make a vegetarian version of this soup, simply use vegetable broth. This swap keeps the flavors rich without meat. You can also add more veggies, like carrots or bell peppers. They add great taste and color to the dish. Using fresh herbs boosts the flavor too. Try adding extra basil or even parsley for a fresh twist. For a gluten-free option, choose gluten-free tortellini. Many brands offer tasty choices made from rice or corn. You can also make your own tortellini if you feel adventurous. Just use gluten-free flour in your dough. Make sure to check the broth for gluten. Some brands add gluten as a thickener. If you want a heartier soup, add protein or grains. Cooked chicken or turkey works well. You can toss in some cannellini beans for extra fiber. Quinoa or barley also makes the soup filling and nutritious. Don't forget to adjust the broth if you add more ingredients. A little extra liquid keeps it from being too thick. To store leftovers, let the soup cool first. Pour it into an airtight container. Make sure to leave some space at the top. This helps prevent spills when it expands in the fridge. Keep it in the fridge for up to three days. Always label the container with the date. This way, you know when it’s time to eat it. If you want to freeze the soup, use a freezer-safe container. Fill the container, but leave some space at the top. The soup can freeze well for up to three months. When you’re ready to eat it, move it to the fridge overnight. This allows it to thaw safely. Avoid refreezing once it has thawed, as this can change the soup’s texture. When reheating, use a pot on the stove for even heating. Add a splash of broth or water if the soup seems too thick. Stir often to avoid sticking. You can also use the microwave. Heat it in short bursts, stirring in between. This helps heat it evenly. Always check the temperature before serving. It should be hot throughout for the best taste. Yes, you can. If you want a lighter soup, use coconut cream instead. You can also skip the cream and add more broth. The soup will still taste great without it. Just make sure to adjust the seasoning a bit. You can add more herbs for extra flavor. This soup pairs well with many side dishes. Try serving it with crusty bread or a fresh salad. Grilled cheese sandwiches are also a hit. You can even add some garlic bread for a tasty touch. These options will make your meal more complete and satisfying. If your soup seems too watery, there are a few tricks. You can mix in a bit of cornstarch with cold water. Stir this mixture into the soup and cook for a few more minutes. Another option is to mash some of the tortellini. This will help thicken the soup naturally. Lastly, let it cook longer with the lid off to reduce the liquid. This blog post covered how to make a delicious Slow Cooker Tomato Basil Tortellini Soup. We looked at key ingredients and swaps, along with the best brands for taste. I explained step-by-step cooking, troubleshooting tips, and timing for slow cookers. You learned great ways to enhance flavors and how to store leftovers. Finally, I shared answers to common questions. With these tips and tricks, you are ready to enjoy this hearty soup anytime. Happy cooking!

Slow Cooker Tomato Basil Tortellini Soup Delight

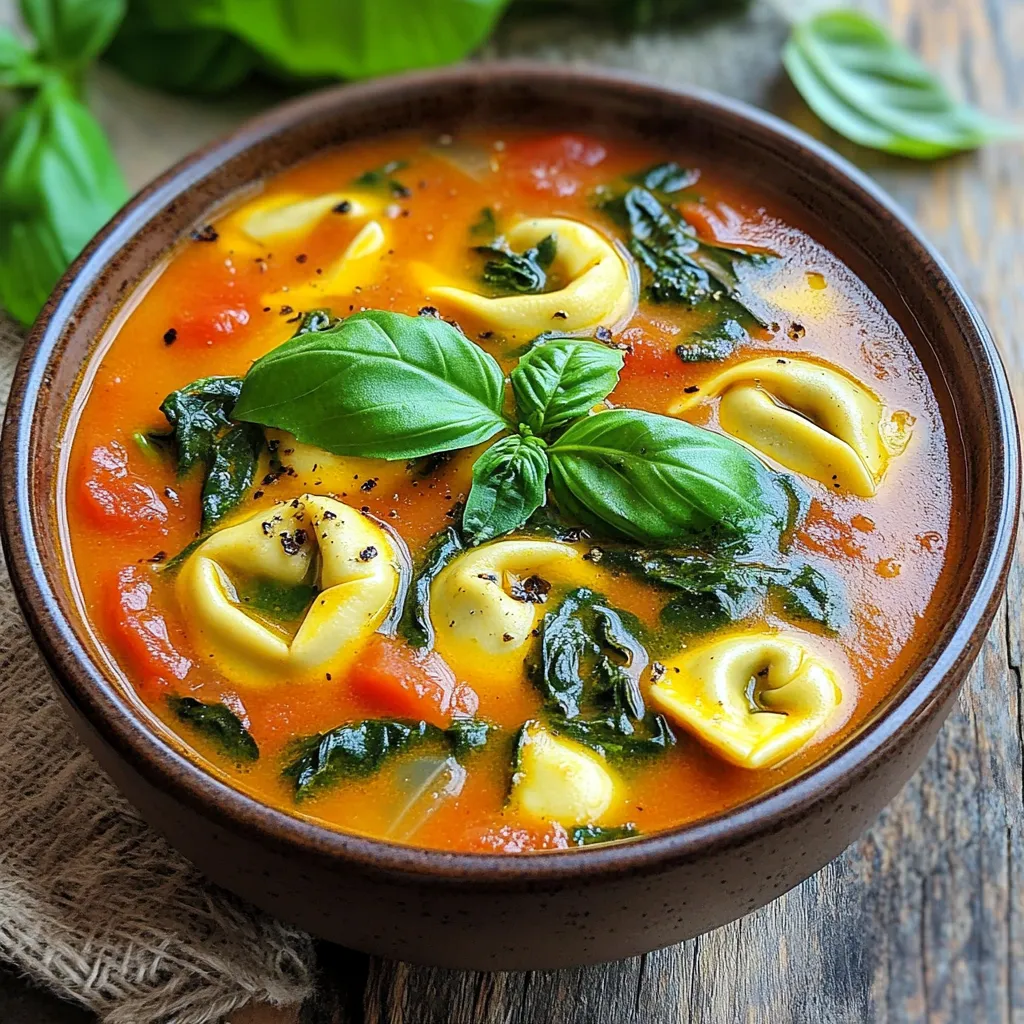
Welcome to your new favorite comfort food: Slow Cooker Tomato Basil Tortellini Soup! This recipe combines rich flavors with simple

To make Caramel Pecan Sticky Bun French Toast Bake, you need: - 1 loaf of day-old cinnamon rolls (cut into quarters) - 4 large eggs - 1 cup milk - 1/4 cup heavy cream - 1 tablespoon vanilla extract - 1 teaspoon ground cinnamon - 1/2 cup chopped pecans - 1/2 cup caramel sauce (store-bought or homemade) - Butter, for greasing the baking dish You can add some extra sweetness with: - Powdered sugar for dusting If you need substitutes, here are some ideas: - Use almond milk or oat milk instead of regular milk. - Replace heavy cream with coconut cream for a dairy-free option. - If you don't have cinnamon rolls, use brioche or challah bread. - You can swap pecans for walnuts or almonds if needed. These ingredients will help you create a tasty treat that everyone will love! 1. First, heat your oven to 350°F (175°C). This helps cook the bake evenly. 2. Next, grease a 9x13-inch baking dish with butter. This stops the bake from sticking. 3. In a large bowl, whisk together the eggs, milk, heavy cream, vanilla extract, and ground cinnamon. Mix until smooth and well combined. 4. Now, cut the day-old cinnamon rolls into quarters. Add them to the egg mixture slowly. Gently fold the bread until it coats evenly. Let it soak for about 10 minutes. 1. While the rolls soak, pour the caramel sauce into the bottom of the greased baking dish. This creates a sweet layer. 2. Sprinkle the chopped pecans evenly over the caramel. This adds crunch and flavor. 3. After soaking, pour the cinnamon roll mixture over the caramel and pecans. Spread it out evenly so every bite is tasty. 4. Bake in the preheated oven for 30-35 minutes. Look for a golden brown top and a slightly set center. 5. Once baked, take the dish out of the oven. Let it cool for about 10 minutes. This makes it easier to serve. 6. Carefully invert the dish onto a large serving platter. The caramel and pecans will drizzle over the top, creating a beautiful finish. Serve your Caramel Pecan Sticky Bun French Toast Bake warm. For an extra touch, dust with powdered sugar. This adds a nice sweetness. You can also pair it with fresh fruit or whipped cream. Enjoy this treat with friends or family. It makes a perfect breakfast or brunch dish! Many people rush the soaking time. You should let the bread soak for ten minutes. This helps the mixture absorb well. If you skip this, the texture may turn out dry. Another common mistake is not greasing the dish enough. A well-greased dish ensures the buns release easily after baking. Lastly, avoid using fresh cinnamon rolls. Day-old rolls soak better and give a nice texture. To get the best texture, use a mix of eggs, milk, and cream. The cream adds richness, making each bite smooth. Whisk the mixture well to avoid clumps. When pouring the soaked bread into the dish, spread it evenly. This way, every piece cooks the same. Bake it until the top is golden brown. This shows it is cooked through and ready to serve. When soaking the bread, gently fold it into the egg mix. Don't stir too hard, as this can break the rolls apart. Make sure every piece gets coated. This helps the cinnamon rolls soak up the flavors. If you have time, let it soak longer for deeper flavor. You can even prepare it the night before and refrigerate it. Just remember to let it sit at room temperature before baking. {{image_2}} You can add fruit to this dish for a tasty twist. Berries work great. Try fresh strawberries, blueberries, or raspberries. Cut them into small pieces. Fold them into the egg mixture with the cinnamon rolls. Apples also make a nice choice. Dice them and mix them in for a sweet crunch. Pecans are tasty, but other nuts can shine too. Walnuts have a rich flavor and pair well with caramel. Almonds can add a nice crunch and a hint of sweetness. Chop them up before adding them to the caramel. You can even use mixed nuts if you want a variety. You can boost the flavor in many ways. Add a pinch of nutmeg for warmth. A splash of maple syrup can add a sweet touch. For a tropical vibe, mix in some coconut flakes. You can also swap in almond extract for a nutty twist. These small changes can make your dish unique and exciting. To keep your Caramel Pecan Sticky Bun French Toast Bake fresh, place leftovers in an airtight container. This helps prevent drying out. You can store it in the fridge for up to three days. If you want to keep it longer, consider freezing it. To reheat, you can use the oven or the microwave. If using the oven, preheat it to 350°F (175°C). Cover the dish with foil and heat for about 15 minutes. For the microwave, heat individual servings for 30 seconds to 1 minute. Make sure it's warm all the way through. To freeze, wrap the dish tightly in plastic wrap and then in foil. You can freeze it for up to three months. When you’re ready to eat it, thaw it in the fridge overnight. Then, reheat it in the oven or microwave as mentioned above. This way, you can enjoy your tasty treat anytime! Yes, you can prepare this dish the night before. Just follow the steps up to soaking the cinnamon rolls. Once you mix them in the egg mixture, cover the dish and place it in the fridge. In the morning, bake it straight from the fridge. You may need to add a few extra minutes to the baking time. If you don’t have cinnamon rolls, try using brioche or challah bread. Both breads soak up the egg mixture well and add a nice flavor. You can also use croissants for a flaky twist. Just cut them into pieces like the cinnamon rolls. Look for a golden brown top. The center should be slightly firm but not jiggle. A toothpick inserted in the center should come out clean. If it's too wet, bake for a few more minutes. Let it cool for about 10 minutes before serving. This blog post covered key steps for a great recipe. You learned about ingredients, preparation, and baking. I shared tips to fix common mistakes and how to store leftovers. Variations let you play with flavors and textures, keeping your dish fresh. Remember, cooking is about having fun and being creative. Trust your taste and enjoy the process!

Caramel Pecan Sticky Bun French Toast Bake Delight

If you’re craving a sweet and rich breakfast, you’ll love my Caramel Pecan Sticky Bun French Toast Bake! This dish

- 1 cup orzo pasta - 4 cups vegetable broth - 1 tablespoon olive oil - 4 cloves garlic, minced - 1 small onion, finely chopped - 1 cup spinach, chopped - 1 zucchini, diced - 1 cup cherry tomatoes, halved - 1 teaspoon dried thyme - 1/2 teaspoon black pepper - 1/2 cup heavy cream (or coconut cream for a dairy-free option) - Juice and zest of 1 lemon - 1/4 cup grated Parmesan cheese (optional, for garnish) - Fresh parsley, chopped (for garnish) I love using fresh ingredients for this dish. The orzo pasta gives a nice, chewy texture. The vegetable broth adds a rich base full of flavor. Olive oil brings a lovely aroma to the pot. Garlic and onion create a strong taste that fills the kitchen. Spinach is my favorite green to include. It cooks down nicely and adds color. Zucchini brings a mild sweetness and crunch. Cherry tomatoes burst with juice and sweetness, enhancing the dish. Dried thyme adds depth and earthiness. Black pepper offers a gentle heat. Use heavy cream for a rich finish, or coconut cream for a lighter option. Finally, lemon juice and zest brighten up every bite. Garnishing with Parmesan cheese and parsley gives a nice touch. Each ingredient plays a role in making this dish a creamy delight. 1. Heat 1 tablespoon of olive oil in a large pot over medium heat. 2. Add the finely chopped onion and sauté for 3-4 minutes. The onion should be soft and translucent. 3. Next, stir in 4 cloves of minced garlic. Cook for about 1 minute until it smells good. 4. Now, add 1 diced zucchini and 1 cup of halved cherry tomatoes. Cook these for 3-4 minutes. The veggies should start to soften. 5. Pour in 4 cups of vegetable broth and bring it to a boil. 6. Once boiling, add 1 cup of orzo pasta along with 1 teaspoon of dried thyme and 1/2 teaspoon of black pepper. 1. Reduce the heat to a simmer. Cook for 9-10 minutes, stirring often. The orzo should be tender and soak up most of the broth. 2. Stir in 1 cup of chopped spinach, 1/2 cup of heavy cream, and the juice and zest of 1 lemon. Mix it well. 3. Let it cook for 2 more minutes to heat everything through. 4. Taste your dish and adjust the seasoning if needed. 5. Serve hot, garnished with 1/4 cup of grated Parmesan cheese and some chopped parsley if you like. Enjoy your creamy garlic lemon orzo! Avoiding overcooking To keep orzo tender, watch the cooking time closely. Orzo cooks fast, about 9-10 minutes. Stir often to prevent sticking. If you cook it too long, it can turn mushy. So, taste it near the end. You want it al dente, with a firm bite. Ensuring creaminess To achieve that creamy texture, add the heavy cream at the right moment. After the orzo absorbs most of the broth, stir in the cream, lemon juice, and zest. This will make your dish rich and smooth. If you want a lighter version, use coconut cream. It gives a lovely taste, too. Additional herbs and seasonings For extra flavor, feel free to mix in herbs. Fresh basil or parsley adds brightness. You can also try dill for a unique twist. A pinch of red pepper flakes gives a nice kick. Experimenting with spices will make your dish truly yours. Garnish suggestions Garnishing makes your dish pop. Try adding grated Parmesan on top. It melts beautifully and adds saltiness. Fresh parsley offers color and freshness. For a fun touch, sprinkle some lemon zest just before serving. It brightens the dish and enhances the lemon flavor. {{image_2}} For a vegetarian twist, you can swap heavy cream. Try using coconut cream instead. It gives a rich taste without dairy. You can also add different veggies. Think bell peppers, asparagus, or even peas. These add color and flavor to your dish. More veggies make it more fun and healthy! If you want to add protein, chicken or shrimp work well. Cook the meat before adding the broth. This makes sure everything blends nicely. For a different approach, use beans or lentils. These options are great for plant-based diets. They add heartiness and keep the dish filling. To keep your One-Pot Creamy Garlic Lemon Orzo fresh, store it in an airtight container. Place it in the fridge. It stays good for about three days. If you want to keep it longer, freezing works well too. Divide the orzo into smaller portions. Use freezer-safe bags or containers. This way, you can enjoy it later. Your orzo will last in the freezer for up to three months. When it's time to eat your leftovers, reheating is key. You can use a microwave or a stove. If using a microwave, heat it in 30-second bursts. Stir in between to help it warm evenly. If you choose the stove, add a splash of broth or cream. This helps keep the dish creamy and moist. Heat it on low, stirring often. Enjoy your flavorful dish just as you did the first time! Can I use other pasta types? Yes, you can use other pasta types. Try small shapes like ditalini or tiny shells. Just adjust the cooking time. Check the package for timing. The goal is to get tender pasta. How can I make it dairy-free? To make this dish dairy-free, swap heavy cream for coconut cream. This gives a nice, creamy texture. You could also use a dairy-free cream alternative from the store. Just make sure it’s unsweetened. What can I serve with this dish? This orzo pairs well with a fresh salad. A simple green salad with vinaigrette works great. You can also serve it with grilled chicken or fish. This adds protein and makes a complete meal. This blog post shared a tasty recipe for one-pot creamy garlic lemon orzo. We covered ingredients like orzo, broth, and fresh veggies. You learned step-by-step how to cook it right. We discussed tips for avoiding overcooking and enhancing flavor. I also shared vegetarian options and how to store leftovers. Now, you can enjoy a simple, rich dish that is easy to make. Don't hesitate to experiment with flavors and ingredients to make it your own. Happy cooking!

One-Pot Creamy Garlic Lemon Orzo Flavorful Delight

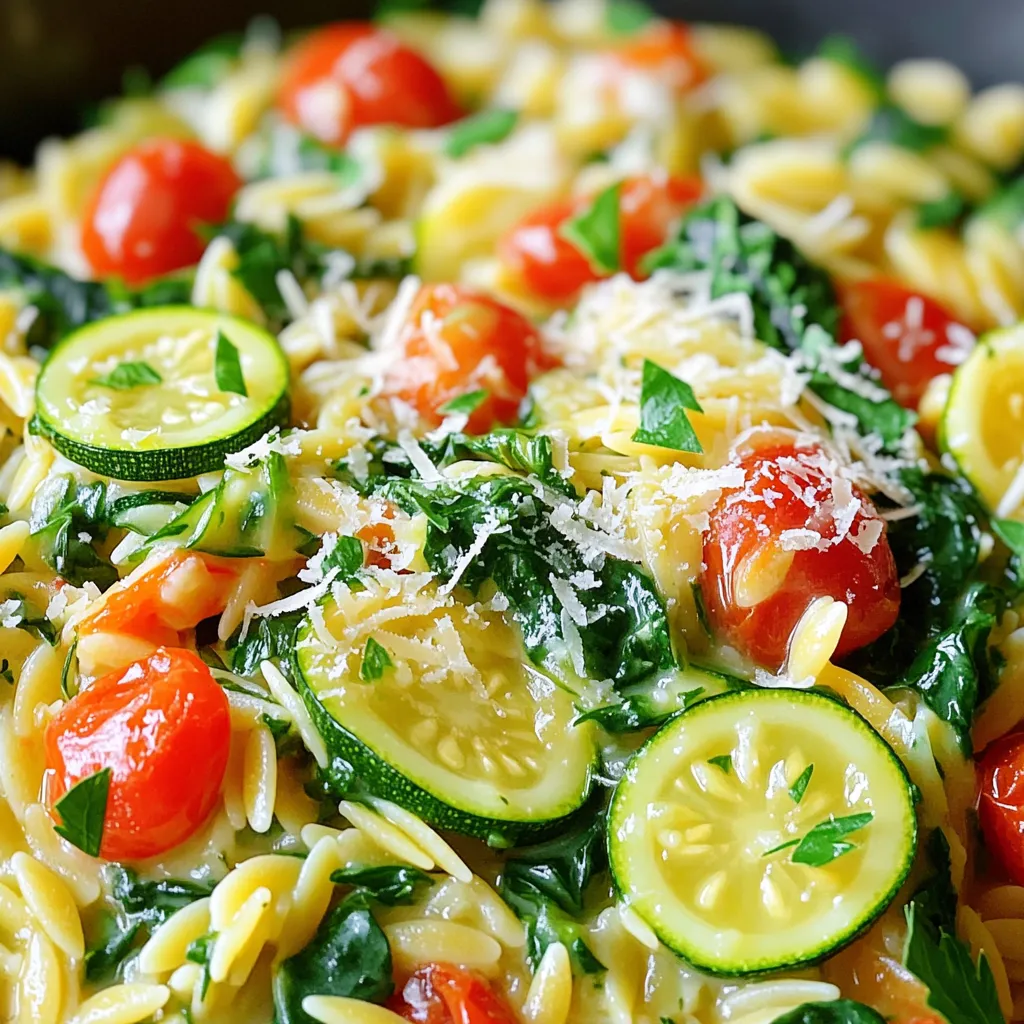
If you’re craving a quick, tasty meal, let’s dive into my One-Pot Creamy Garlic Lemon Orzo. This dish features creamy

- 1 can chickpeas - 1 tablespoon olive oil - 1 teaspoon chili powder - 1 teaspoon garlic powder - 1 teaspoon onion powder - 1 teaspoon smoked paprika - 1/2 teaspoon salt - 1/4 cup nutritional yeast To make Air Fryer Nacho Cheese Chickpeas, you need a few basic items. The chickpeas are the star of this dish. They give a great crunch when cooked right. Olive oil helps the spices stick to the chickpeas and adds flavor. The spices bring a bold taste, while nutritional yeast makes it cheesy without dairy. - 1/4 teaspoon cayenne pepper (for extra kick) - Additional garnishes (jalapeños, cilantro, avocado) You can also add cayenne pepper for some heat. If you want to make it pretty, use garnishes like jalapeños, fresh cilantro, or avocado. These extras can take your snack to the next level. They add color, flavor, and fun! You can mix and match based on what you like or have on hand. First, open the can of chickpeas. Drain them in a colander and rinse well under cold water. This helps remove any tin taste. Next, dry the chickpeas with paper towels. Make sure they are dry. This step is key to getting them crispy. In a mixing bowl, add one tablespoon of olive oil. Then, include the following spices: one teaspoon of chili powder, one teaspoon of garlic powder, one teaspoon of onion powder, one teaspoon of smoked paprika, and half a teaspoon of salt. If you like heat, add a quarter teaspoon of cayenne pepper. Finally, mix in a quarter cup of nutritional yeast for that cheesy flavor. Stir well until everything is combined into a paste. Now, take your dried chickpeas and add them to the bowl with the seasoning mixture. Stir gently but thoroughly. Make sure every chickpea gets coated in the spice mix. This gives each bite a burst of flavor. Preheat your air fryer to 400°F (200°C). Once it’s hot, place the chickpeas in the basket. Make sure they lay in a single layer. If you have too many, cook in batches. Air fry them for 15 to 20 minutes. Halfway through, shake the basket. This helps them cook evenly. Check to see if they are crispy enough for your taste. After air frying, take the chickpeas out and let them cool for a few minutes. This step helps them crisp up even more. If you want to get fancy, add a sprinkle of nutritional yeast or fresh cilantro on top. Serve them in a bright bowl with jalapeños or avocado slices for extra flavor. Enjoy these crunchy snacks however you like! To get crispy chickpeas, start by drying them well. After rinsing the chickpeas, use paper towels to remove moisture. If they stay wet, they won't get that nice crunch. Next, cooking at the right time and temperature is key. Set your air fryer to 400°F (200°C) and cook for 15-20 minutes. Shake the basket halfway through to ensure even cooking. Check them often until they reach your desired crispiness. You can boost the flavor with different spices. Try adding cumin or paprika for a twist. If you want a spicy kick, increase the cayenne pepper. Don’t be afraid to experiment! You can also try different toppings. Fresh cilantro, sliced jalapeños, or avocado can add extra flair to your snack. Cleaning your air fryer is simple. After it cools down, wipe the basket and tray with a damp cloth. If there are stubborn bits, soak them in warm, soapy water for a few minutes. Make sure to dry everything well before using it again. Regular cleaning keeps your air fryer in top shape and ready for your next tasty treat. {{image_2}} You can easily change the flavor of your nacho cheese chickpeas. Instead of the standard spices, try different blends. For a ranch flavor, use ranch seasoning instead of chili powder. If you love BBQ, swap the garlic powder for BBQ seasoning. You can even add cumin for a warm, earthy taste. The options are endless! Each blend will give you a new twist on this crispy snack. If you want to switch things up, there are great alternatives for chickpeas and spices. You can use black beans or lentils instead of chickpeas. These options also add protein and flavor. For the seasoning, if you don’t have nutritional yeast, try using grated cheese. You can also mix in taco seasoning for a fun spin. Adjust the spices to your taste and enjoy! Making this recipe gluten-free is simple. All the ingredients are naturally gluten-free. If you want to make it nut-free, there’s no need for any nut products here. Just ensure your seasoning blends are also nut-free. This way, everyone can enjoy this tasty snack without worry. To keep your nacho cheese chickpeas fresh, store them in an airtight container. This helps prevent moisture and keeps them crispy. Place the container in a cool, dry place, away from sunlight. They taste best within 2 days, but they can last up to 5 days in the fridge. To re-crisp your chickpeas, use the air fryer. Preheat it to 400°F. Spread the chickpeas in the basket in a single layer. Air fry for about 5 minutes, checking often. This will revive the crunch and flavor. You can freeze nacho cheese chickpeas! Place them in a freezer-safe bag or container. Remove excess air to prevent freezer burn. They can stay frozen for up to 3 months. When ready to eat, thaw and reheat in the air fryer for the best texture. Air fryer nacho cheese chickpeas can last for about 3 to 5 days. Store them in an airtight container at room temperature. This keeps them crunchy and tasty. If they lose some crispiness, put them back in the air fryer for a few minutes to re-crisp. Yes, you can use dried chickpeas instead of canned. To do this, soak the dried chickpeas overnight. Then, cook them until soft before using. This takes more time but offers a fresher taste. Make sure to dry them well before seasoning and air frying. Yes, air fryer nacho cheese chickpeas are healthy. Chickpeas are high in protein and fiber. They help keep you full and satisfied. Plus, they are low in fat, especially when air-fried. The spices add flavor without extra calories. Enjoy this snack without guilt! You learned how to make tasty air fryer nacho cheese chickpeas. Choose essential ingredients like chickpeas, olive oil, and spices. Optional items like cayenne or garnishes can boost flavor. Follow clear steps for prep, seasoning, and air frying. The tips help you get crispy results every time. You can explore flavor variations and learn smart storage methods. Enjoy experimenting with this simple, healthy snack. Make it yours, and keep it fun!

Air Fryer Nacho Cheese Chickpeas Crispy Snack Delight

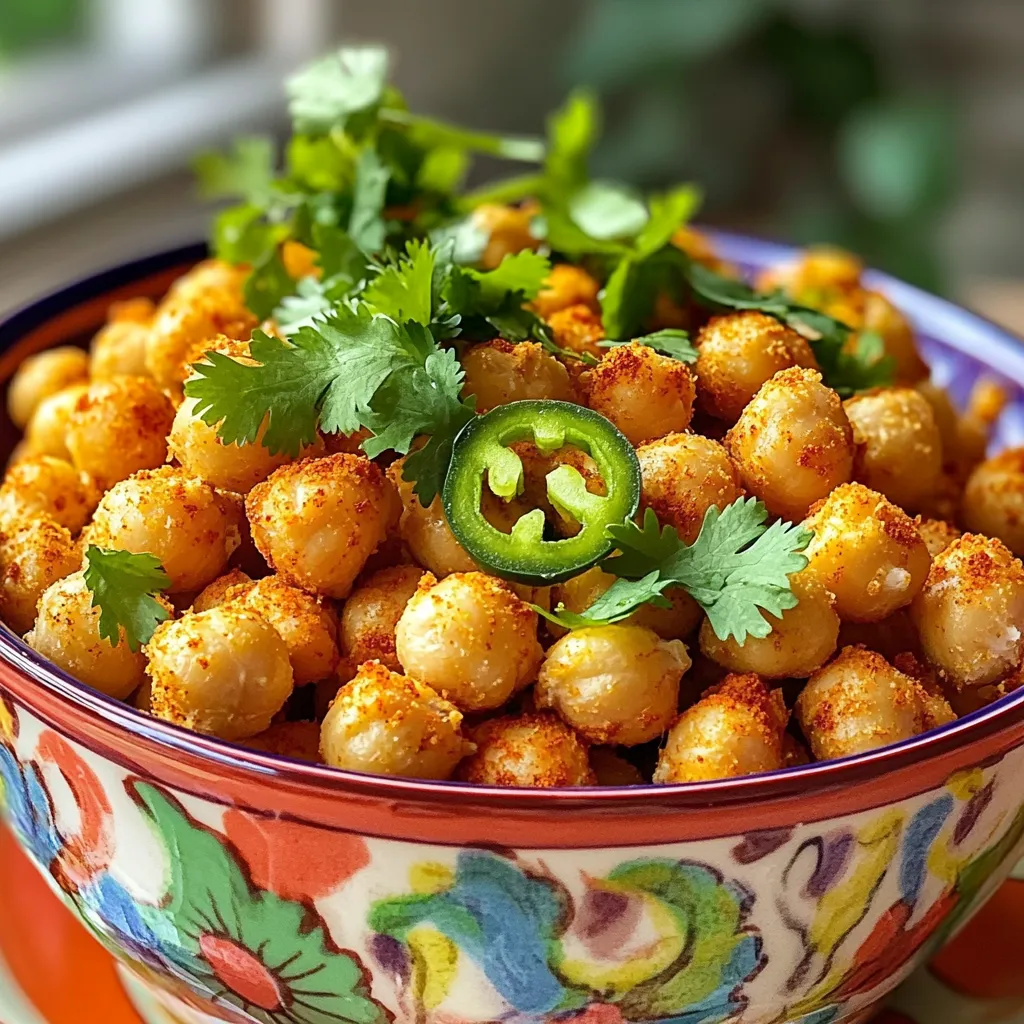
Are you ready for a tasty snack that’s easy and fun to make? Air Fryer Nacho Cheese Chickpeas are the

- 1 large head of cauliflower - 4 tablespoons olive oil - 6 cloves garlic, minced - 1 teaspoon dried oregano - 1 teaspoon dried thyme - 1 teaspoon smoked paprika - Salt and pepper to taste - Fresh parsley, chopped (for garnish) - Lemon wedges (for serving) The main star of this dish is the cauliflower. Choose a large, firm head. This ensures thick, juicy steaks. Olive oil adds richness and helps the flavors blend. Garlic brings a strong, warm taste. For herbs and spices, I use dried oregano, thyme, and smoked paprika. These add depth and aroma. Don't forget to season with salt and pepper to boost the flavors. Finally, garnishes like fresh parsley and lemon wedges elevate the dish. The parsley adds color, while lemon gives a bright finish. Together, these ingredients create a flavorful dish that is simple yet impressive. To start, preheat your oven to 425°F (220°C). This step ensures the cauliflower cooks evenly. Next, remove the leaves from the head of cauliflower. Trim the stem but keep the head whole. Now, slice the cauliflower into 1-inch thick steaks. You should get about 2-4 steaks, depending on the size of your cauliflower. Prepare your baking sheet by lining it with parchment paper. This helps prevent sticking and makes cleanup easy. In a small bowl, mix together the olive oil, minced garlic, dried oregano, dried thyme, smoked paprika, salt, and pepper. Whisk these ingredients until well combined. This mixture adds great flavor. Make sure it has a smooth and even consistency. You want every bite to have that tasty garlic herb blend. Now, it’s time to roast! Brush both sides of each cauliflower steak generously with the garlic herb mixture. Place the steaks on the prepared baking sheet. Drizzle any leftover mixture over the top for extra flavor. Roast the cauliflower steaks in the preheated oven for about 25-30 minutes. Flip them halfway through to ensure even cooking. Check for doneness by looking for a golden brown color. They should be tender when pierced with a fork. Once done, remove the steaks from the oven. Sprinkle fresh parsley on top for a burst of color and flavor. Serve warm with lemon wedges for a zesty kick. Enjoy your delicious garlic herb roasted cauliflower steaks! Seasoning is key to tasty cauliflower steaks. I always use plenty of salt and pepper. The garlic herb mix adds a lot of flavor too. For the best results, brush the steaks well. Roasting at 425°F (220°C) works wonders. This high heat gives the steaks a nice brown color. Roast them for 25-30 minutes. Flip halfway through to cook evenly. The inside should be tender, while the outside gets crispy. You need some basic tools to make this dish. A sharp knife helps you slice the cauliflower easily. A sturdy cutting board is also a must. For roasting, use a good baking sheet. I recommend one with a non-stick surface. Parchment paper is great too. It helps prevent sticking and makes cleanup easy. Garnishing makes the dish pop! I like to sprinkle fresh parsley on top. It adds color and freshness. Serve the steaks warm with lemon wedges. The lemon juice gives a zesty kick. You can also mix in a side salad or some grains for a complete meal. Enjoy your beautiful, flavorful cauliflower steaks! {{image_2}} You can switch things up with different oils and herbs. For oil, try avocado or coconut oil. They bring a unique taste and work well for roasting. As for herbs, fresh options like basil or cilantro can add a fresh twist. For those following a vegan diet, this recipe is already perfect. It uses plant-based ingredients. If you want a vegetarian option, you can add cheese on top before roasting. This adds a creamy texture and rich flavor. To take your garlic herb roasted cauliflower to the next level, consider adding spices. A pinch of cayenne pepper gives it a nice kick. You can also try adding toppings like feta cheese or toasted nuts for crunch. Experimenting with sauces can also elevate this dish. A drizzle of tahini or a squeeze of sriracha creates a fun flavor contrast. Try different sauces to find your favorite combination! Garlic herb roasted cauliflower steaks pair well with many side dishes. A light salad with lemon vinaigrette works beautifully. You can also serve it alongside grains like quinoa or rice for a filling meal. If you have leftovers, don’t worry! You can enjoy them in many ways. Chop them up and add to a wrap or salad. You can even blend them into a creamy soup. The flavors will shine through in any dish you create! To keep your garlic herb roasted cauliflower steaks fresh, use airtight containers. Glass or plastic containers work well. Store the leftovers in the fridge for up to three days. Always let them cool before sealing. To reheat cauliflower steaks, the oven is best. Preheat it to 350°F (175°C). Place the steaks on a baking sheet. Heat for about 10-15 minutes until warm. You can also use a microwave, but it may make them soggy. If you microwave, cover them with a damp paper towel to help keep some moisture. Yes, you can freeze roasted cauliflower. Wrap each steak in plastic wrap or foil. Place them in a freezer-safe bag to avoid freezer burn. They will last about three months in the freezer. When ready to eat, thaw them in the fridge overnight before reheating. It takes about 25 to 30 minutes to roast cauliflower steaks. You should preheat your oven to 425°F (220°C) first. Halfway through, flip the steaks for even cooking. Keep an eye on them. They should be golden brown and tender when done. Yes, you can use fresh herbs! Fresh herbs add a bright flavor. If you use fresh, double the amount. For example, if the recipe calls for 1 teaspoon of dried oregano, use 2 teaspoons of fresh oregano. This change will make your dish even more vibrant. Several sides pair well with these steaks. Here are some tasty options: - Quinoa or rice for a hearty base - A fresh garden salad for crunch - Roasted potatoes for a classic touch - Grilled vegetables for added flavor - Hummus or a yogurt dip for extra creaminess These sides will complete your meal and enhance the flavors of the cauliflower steaks. In this blog post, we explored how to make delicious garlic herb cauliflower steaks. You learned about essential ingredients like cauliflower, olive oil, garlic, and spices. I shared step-by-step instructions for prepping, creating the herb mixture, and roasting. We also discussed tips for flavor, tools for preparation, and even storage options. Now, you can enjoy this tasty dish and impress your friends. Experiment with flavors and variations to make it your own. Enjoy every bite!

Garlic Herb Roasted Cauliflower Steaks Flavorful Dish

If you’re looking for a tasty, healthy meal, garlic herb roasted cauliflower steaks are a must-try. These flavorful steaks are

- 1 cup rolled oats - 1 cup all-purpose flour - 1/2 cup brown sugar, packed - 1/2 cup granulated sugar - 1/2 teaspoon baking soda - 1/2 teaspoon baking powder - 1 teaspoon pumpkin pie spice - 1/2 teaspoon salt - 1/2 cup unsalted butter, softened - 1/2 cup pumpkin puree - 1 large egg - 1 teaspoon vanilla extract - 3/4 cup semi-sweet chocolate chips - 1/2 cup chopped walnuts (optional) What are good gluten-free options? You can replace all-purpose flour with almond flour or a gluten-free blend. Make sure your oats are certified gluten-free. What about vegan alternatives? For a vegan version, swap the egg with a flaxseed egg. Mix one tablespoon of ground flaxseed with three tablespoons of water. Let it sit for five minutes. Use coconut oil instead of butter and non-dairy milk for creaminess. These substitutions keep the flavor and texture close to the original recipe. Enjoy the cookies with these adjustments! 1. Preheat your oven to 350°F (175°C). This is key for even baking. 2. Line a baking sheet with parchment paper. This helps cookies not stick. 1. In a large bowl, cream the softened butter with brown and granulated sugar. Mix until the mixture looks light and fluffy. 2. Add pumpkin puree, egg, and vanilla extract to the bowl. Stir until well combined. 3. In another bowl, whisk rolled oats, all-purpose flour, baking soda, baking powder, pumpkin pie spice, and salt together. 4. Gradually add the dry mixture to the wet mixture. Stir until just combined. Be careful not to overmix. 5. Gently fold in chocolate chips and walnuts, if you like. This adds great texture. 1. Use a tablespoon to scoop out dough. Place each scoop on the baking sheet. Leave space between them. 2. Bake in the preheated oven for 10-12 minutes. Look for golden edges; this means they are ready. 3. Let cookies cool on the baking sheet for 5 minutes. Then, move them to a wire rack to cool completely. Enjoy your pumpkin spice oatmeal chocolate chip cookies! To make great cookies, avoid overmixing. When you add dry ingredients to the wet, mix gently. Just combine until you don’t see dry flour. Overmixing can make your cookies tough. Check for doneness by looking at the edges. They should be golden brown. The center can look soft. It will firm up as it cools. Store cookies in an airtight container. This keeps them soft and fresh for days. If you want to keep them longer, freeze them. Place cookies in a single layer in a freezer bag. They can last up to three months. To thaw, just leave them at room temperature for a bit. They will taste fresh again. Serve your cookies on a rustic wooden platter. Line it with parchment paper for a cozy look. Dusting them with a little cinnamon adds a nice touch. You can also arrange them in a stack. It makes for a great visual appeal. {{image_2}} You can change the flavors of these cookies easily. Try adding more spices, like nutmeg or cinnamon, to boost warmth. A splash of maple extract can also add a nice twist. You might also want to switch your chocolate chips. White chocolate chips can give a sweet, creamy taste that pairs well with pumpkin spice. If you need gluten-free cookies, swap the all-purpose flour for gluten-free flour. Many blends work well here. For vegan cookies, replace the butter with coconut oil. Use a flax egg instead of the chicken egg. Just mix one tablespoon of flaxseed meal with three tablespoons of water and let it sit for a few minutes. Get creative with mix-ins to make your cookies unique. Dried fruits like cranberries or raisins add a burst of flavor. You can also toss in some pumpkin seeds for a crunchy texture. Different nuts, such as pecans or almonds, can enhance the taste. Just make sure to chop them up a bit before adding. To keep your pumpkin spice oatmeal chocolate chip cookies fresh, follow these steps. Let the cookies cool completely before storing. This helps avoid sogginess. Place the cookies in an airtight container. You can add parchment paper between layers to prevent sticking. I recommend storing them at room temperature for the best taste. For longer storage, you can refrigerate or freeze your cookies. If you refrigerate them, use a sealed container. This keeps them fresh for about a week. For freezing, wrap each cookie in plastic wrap. Then, place them in a freezer bag. They can last for up to three months in the freezer. When you're ready to enjoy, just thaw them at room temperature. These cookies last about five days at room temperature. If stored in the fridge, they can stay good for a week. In the freezer, they can last up to three months. Always check for any signs of spoilage before eating. Fresh cookies taste the best! Yes, you can use quick oats. Quick oats will make your cookies softer. The texture may change a bit, but they will still taste great. If using quick oats, reduce the baking time slightly. Look for golden edges on the cookies. The center should feel set but soft. If you press gently, the cookie should spring back. If you want a chewier cookie, take them out a bit earlier. Yes, you can skip the pumpkin. Use applesauce or mashed bananas instead. This will keep the cookies moist. The flavor will change, so add a bit more spice if you like. This blog post covered how to make tasty pumpkin cookies. We listed key ingredients, including oats, pumpkin, and chocolate chips. You found step-by-step instructions for mixing and baking. Plus, we shared tips for perfecting your cookies and ways to store them. Now, enjoy baking these cookies for any occasion. Keep experimenting with flavors and ingredients to find your favorites. Happy baking!

Pumpkin Spice Oatmeal Chocolate Chip Cookies Delight

Are you ready to bring fall flavors to your kitchen? In this post, we’ll create mouthwatering Pumpkin Spice Oatmeal Chocolate

Older posts
Newer posts
← Previous Page1 … Page14 Page15 Page16 … Page137 Next →

dsad

© 2025 Recipes Pursuit • Built with GeneratePress

Our Policies

  • Copyright Policy
  • Cookie Policy
  • GDPR Policy
  • Privacy Policy
  • Disclaimer
  • Terms Of Use

More Information

  • Home
  • About
  • Contact
  • Appetizers
  • Dessert
  • Dinner
  • Drinks
©2025, Recipes Pursuit About Back To Top