Skip to content
DisclaimerTerms Of UseGDPR PolicyCookie Policy

Recipes Pursuit

  • Home
  • Drinks
  • Appetizers
  • Dinner
  • Dessert
  • About
  • Contact
  • Privacy Policy
DisclaimerTerms Of UseGDPR PolicyCookie Policy

Emma Smith

To make garlic herb roasted chicken, gather these simple ingredients: - 1 whole chicken (3-4 lbs) - 6 cloves garlic, minced - 2 tablespoons fresh rosemary, chopped - 2 tablespoons fresh thyme, chopped - 2 tablespoons fresh parsley, chopped - 1 lemon, zested and quartered - 1/4 cup olive oil - Salt and pepper to taste - 1 teaspoon paprika - 1 onion, quartered - 2 cups assorted root vegetables (carrots, potatoes, turnips), chopped Each ingredient plays a key role in making the chicken juicy and flavorful. Fresh herbs add bright tastes. Garlic gives a savory punch. Lemon zest brightens every bite. Olive oil keeps the chicken moist. Root vegetables soak up all the yummy flavors. Having these ready will make your cooking smooth and fun! {{ingredient_image_1}} 1. Preheat your oven to 425°F (220°C). This high heat helps create crispy skin. 2. In a mixing bowl, combine: - 6 cloves garlic, minced - 2 tablespoons fresh rosemary, chopped - 2 tablespoons fresh thyme, chopped - 2 tablespoons fresh parsley, chopped - Zest of 1 lemon - 1/4 cup olive oil - 1 teaspoon paprika - Salt and pepper to taste This mixture forms a fragrant herb paste. 3. Pat the chicken dry with paper towels. Removing moisture is key for crispiness. 1. Carefully separate the skin from the meat over the breast and thighs. This creates pockets for flavor. 2. Rub half of the herb paste under the skin. Then, spread the rest all over the chicken. 3. Stuff the cavity with: - Quartered lemon - Quartered onion This adds moisture and flavor from inside the bird. 4. Place the chicken in a large roasting pan. Surround it with: - 2 cups assorted root vegetables (carrots, potatoes, turnips), chopped Drizzle the veggies with olive oil and season with salt and pepper. 1. Roast the chicken in the oven for about 1 hour and 15 minutes. It’s done when the internal temperature hits 165°F (74°C). Look for a golden brown skin. 2. Every 30 minutes, baste the chicken with pan juices. This keeps the meat moist and adds flavor. Enjoy the aroma of your kitchen as the chicken roasts! - Drying the chicken: Start by patting the chicken dry with paper towels. This step helps the skin crisp up. Any moisture will steam the skin, making it soggy instead. - Basting frequency: Baste the chicken every 30 minutes. This keeps it juicy and adds flavor. Use the pan juices for the best results. - Marinating times: For the best flavor, marinate your chicken for at least an hour. If you have time, let it sit overnight in the fridge. This allows the herbs and garlic to soak in. - Alternative herb combinations: Feel free to mix herbs. Try tarragon or sage for a different taste. You can even use dried herbs if fresh ones are not available. - Resting the chicken: After roasting, let the chicken rest for 10-15 minutes. This helps the juices settle. Cutting too soon makes the meat dry. - Presentation ideas: Serve the chicken on a large platter. Arrange the roasted veggies around it. Add fresh herbs on top for a pop of color. This makes your meal look stunning! Pro Tips Pat the Chicken Dry: Ensure the chicken is thoroughly dried before applying the herb paste to achieve crispy skin when roasting. Use Fresh Herbs: Fresh herbs provide a more intense flavor compared to dried; if possible, always opt for fresh for the best taste. Baste for Moisture: Basting the chicken every 30 minutes with pan juices keeps the meat juicy and adds more flavor to the skin. Let it Rest: Allowing the chicken to rest for 10-15 minutes after roasting helps the juices redistribute, making for a more tender and flavorful meal. {{image_2}} You can change the flavor of your garlic herb roasted chicken easily. Try an Italian herb mix. Use basil, oregano, and a bit of sage. This mix gives a fresh taste. You can also explore Mediterranean flavors. Add dill, mint, and a touch of lemon zest. These herbs brighten the chicken while enhancing its taste. Switch up the veggies for a new twist. Use seasonal vegetables like squash or zucchini. These add color and nutrition. You can also add fruits. Apples and pears roast well, adding sweetness. They complement the savory chicken nicely. You have options with cooking methods too. Try grilling the chicken for a smoky flavor. Just marinate it in the herb paste first. Cook it on medium heat until it reaches the right temperature. Another option is the slow cooker. This method keeps the chicken super tender. Just follow the same prep and cook on low for about six hours. Store your leftover garlic herb roasted chicken in an airtight container. This keeps out air and moisture. Use a shallow dish to help it cool faster. The chicken stays fresh for up to four days in the fridge. If you notice any odd smells or changes, it’s best to toss it out. You can freeze garlic herb roasted chicken to enjoy later. First, let the chicken cool completely. Wrap it tightly in plastic wrap and then in foil. This helps avoid freezer burn. You can also slice the chicken before freezing. It will last for about four months in the freezer. To thaw, place the chicken in the fridge overnight. If you need it faster, put it in a sealed bag and submerge it in cold water. This method works well without cooking the chicken. When reheating, aim to keep the chicken moist. The best way is to use an oven set to 350°F (175°C). Place the chicken in a baking dish with a splash of broth or water. Cover it with foil to trap steam. This method helps keep the chicken juicy. If you're in a hurry, you can use a microwave. Heat it in short bursts, checking often. Be careful not to overcook it, as this can make it dry. Enjoy your delicious meal again, just like the first time! You should cook garlic herb roasted chicken for about 15 to 20 minutes per pound. For a chicken weighing 3-4 pounds, aim for 1 hour and 15 minutes. The key is to check often and make sure it cooks evenly. Yes, you can prepare the chicken ahead of time. You can make the herb paste and rub it on the chicken a day before. This helps the flavors soak in. Just keep it in the fridge until you are ready to cook. The safe internal temperature for cooked chicken is 165°F (74°C). Use a meat thermometer to check the thickest part of the thigh. This ensures your chicken is fully cooked and safe to eat. This recipe is already gluten-free! All the ingredients, like fresh herbs and vegetables, do not contain gluten. Just make sure any added ingredients, like broth, are gluten-free if you choose to use them. Great sides for garlic herb roasted chicken include: - Roasted root vegetables (carrots, potatoes, turnips) - Steamed green beans - A fresh green salad - Mashed potatoes - Quinoa or rice pilaf These add color and balance to your meal. This blog post covered all you need to know for a delicious garlic herb roasted chicken. We explored the key ingredients, preparation steps, and cooking methods. I shared tips for perfect crispiness and flavor enhancement. You saw variations to keep things interesting and learned about proper storage. Remember, great meals come from using fresh ingredients and cooking with care. Try this recipe, and I believe you will impress everyone at your table. Enjoy your cooking journey!

Garlic Herb Roasted Chicken Juicy and Flavorful Meal

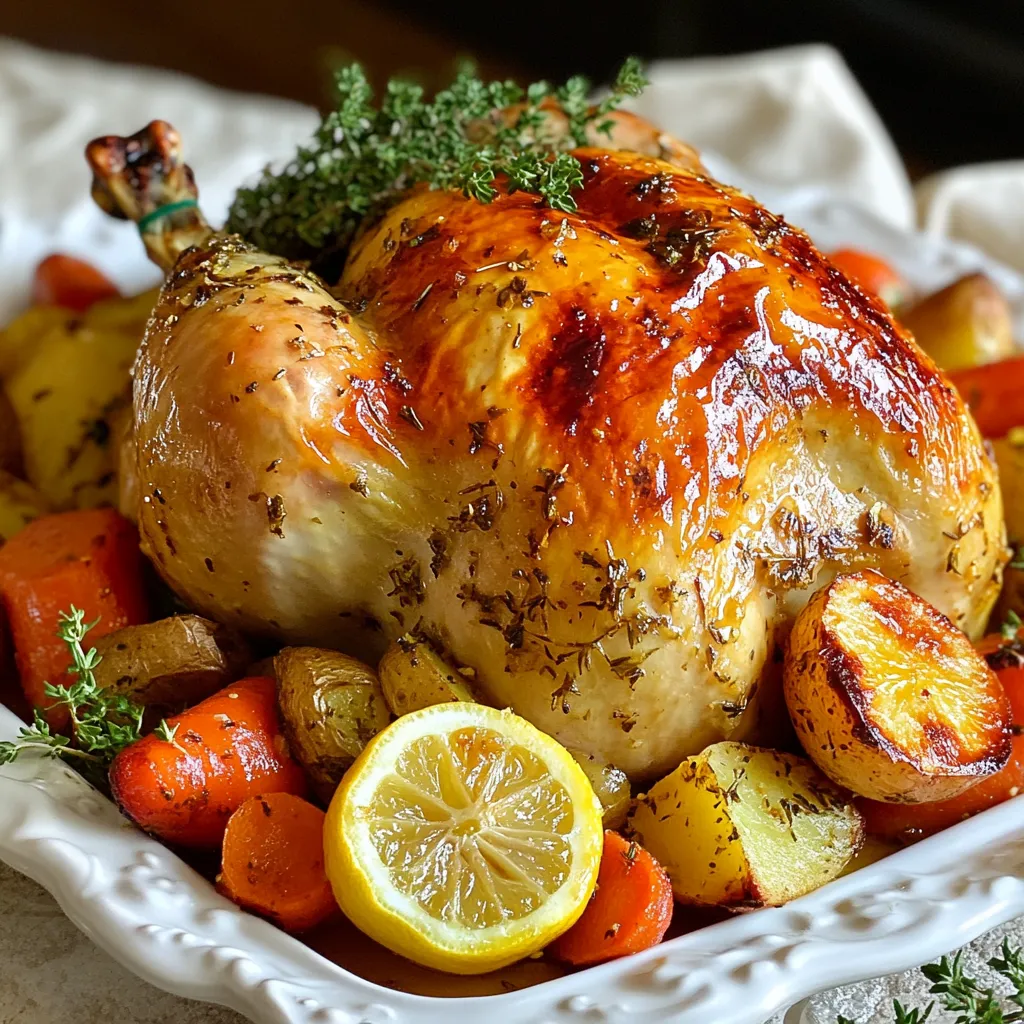
Looking to impress at your next dinner? Garlic Herb Roasted Chicken is the answer! This dish brings together juicy chicken,

- 1 cup quinoa, rinsed - 2 cups vegetable broth - 1 can black beans, drained and rinsed - 1 cup corn kernels (fresh or frozen) - 1 red bell pepper, diced - 1 avocado, diced - 1 small red onion, finely chopped - 1 cup cherry tomatoes, halved - 1/4 cup fresh cilantro, chopped - Juice and zest of 2 limes - 1 teaspoon cumin - 1 teaspoon smoked paprika - Salt and pepper to taste - 8 small corn tortillas When I make Zesty Lime Quinoa Tacos, I love using fresh and healthy ingredients. The quinoa is the star. It is high in protein and gluten-free. I use vegetable broth to cook the quinoa. This adds flavor to the dish. The black beans bring in fiber, while corn adds sweet crunch. I always chop a red bell pepper for color and taste. Avocado gives a creamy texture. I add red onion for a bite and cherry tomatoes for juiciness. Finally, cilantro adds freshness. For seasoning, I use lime juice and zest. This brings a bright, zesty flavor. Cumin and smoked paprika give warmth. Salt and pepper balance everything out. I wrap my filling in small corn tortillas. They are perfect for holding all the tasty ingredients. You can find these at most grocery stores. If you want a gluten-free option, look for gluten-free tortillas. Each ingredient works together to create a meal that is both flavorful and healthy. {{ingredient_image_1}} 1. In a medium saucepan, bring 2 cups of vegetable broth to a boil. 2. Once boiling, add 1 cup of rinsed quinoa. 3. Cover the pot, reduce the heat to low, and simmer for about 15 minutes. 4. Check the quinoa. It should be fluffy and the liquid fully absorbed. 5. Remove from heat. Let it sit for 5 minutes. Fluff it gently with a fork. 1. In a large mixing bowl, combine the cooked quinoa with: - 1 can of black beans, drained and rinsed - 1 cup of corn kernels (fresh or frozen) - 1 diced red bell pepper - 1 diced avocado - 1 small red onion, finely chopped - 1 cup of halved cherry tomatoes - 1/4 cup of chopped fresh cilantro 2. In a small bowl, whisk together the juice and zest of 2 limes, 1 teaspoon of cumin, 1 teaspoon of smoked paprika, and salt and pepper to taste. 3. Pour this lime dressing over the quinoa mixture. Toss gently to mix everything well. 1. To warm the 8 small corn tortillas, heat them in a dry skillet over medium heat. 2. Warm each tortilla for about 30 seconds on each side. They should be pliable and easy to fill. 3. Take a tortilla and fill it with a generous scoop of the quinoa mixture. 4. Repeat this step for all tortillas. Serve them immediately, adding any optional toppings like hot sauce or sour cream. To get fluffy quinoa, rinse it well before cooking. This step removes bitterness. Use two cups of vegetable broth for one cup of quinoa. Bring the broth to a boil, then add the rinsed quinoa. Cover the pot and turn the heat low. Let it simmer for about 15 minutes. After cooking, remove it from heat. Let the quinoa sit for 5 minutes. This allows it to absorb any remaining liquid. Fluff it gently with a fork for the best texture. To make your tacos pop, consider adding extra spices. A dash of chili powder can add warmth. Try a pinch of garlic powder for a deeper flavor. You can adjust the lime juice to change the acidity. More lime juice makes it brighter, while less gives a milder taste. Don’t forget to taste your mix as you go. This helps you find your perfect balance. Warming tortillas is key for a great taco. Use a dry skillet on medium heat. Warm each tortilla for about 30 seconds on each side. This makes them soft and easy to fold. For the best taste, choose small corn tortillas. They hold the filling well and add a nice flavor. If you want a gluten-free option, use corn or rice tortillas. They work perfectly with this fresh filling. Pro Tips Rinse the quinoa: This removes the natural coating called saponin, which can make the quinoa taste bitter. Use fresh lime: Fresh lime juice and zest enhance the flavor significantly compared to bottled alternatives. Customize your toppings: Add ingredients like diced jalapeños or a dollop of sour cream to personalize your tacos. Keep tortillas warm: Wrap warmed tortillas in a clean kitchen towel to keep them warm and pliable while you assemble the tacos. {{image_2}} You can easily change the protein in your tacos. Try adding shredded chicken or turkey. This gives the tacos a hearty touch. The meat pairs well with the zesty flavors. If you prefer a vegetarian option, use tofu or tempeh. Both are great sources of protein. They soak up all the lime and spice flavors. This way, you can enjoy a healthy meal that fits your diet. Sometimes, you might not have quinoa on hand. You can switch it out for rice or farro. Both grains work well in these tacos. They add a nice texture and flavor. If you want to change the beans, you can use chickpeas or lentils. These options fit different dietary needs while keeping the dish tasty. Toppings can change the whole taco experience. You can mix and match to find your favorite combo. Try adding hot sauce or diced jalapeños for extra heat. If you want a creamier taste, use sour cream or guacamole. For a healthier twist, consider using plain Greek yogurt. It adds creaminess with lower fat. You can also sprinkle some fresh herbs on top to brighten your dish. To keep your quinoa tacos fresh, store leftovers in the fridge. Use airtight containers. This helps keep the filling from drying out. Place the taco filling and tortillas in separate containers. This prevents sogginess. It’s best to eat leftovers within three days for the best taste. You can freeze assembled tacos for later meals. Wrap each taco tightly in plastic wrap. Then, place them in a freezer bag. This keeps them fresh for up to three months. When you’re ready to eat, thaw them in the fridge overnight. Reheat in a skillet over low heat. This warms the tortillas and filling evenly. Quinoa tacos can last in the fridge for about three to four days. If you notice any off smells or strange colors, it’s time to toss them. Fresh ingredients like avocado and tomatoes spoil faster. Always check these items before eating leftovers. To make Zesty Lime Quinoa Tacos gluten-free, choose gluten-free tortillas. Many brands offer corn tortillas that are safe. Always read the labels for hidden gluten. Next, check all your ingredients. Ensure the vegetable broth and canned goods are labeled gluten-free. This way, you enjoy tasty tacos without worry. Yes, meal prepping is a great idea! Cook the quinoa and mix in the other ingredients ahead of time. Keep the mixture in an airtight container in the fridge. For best storage, use glass containers. They help keep your tacos fresh. When ready to eat, warm the filling and tortillas separately. This keeps everything tasty and fresh. Quinoa is packed with protein and fiber. It has all nine essential amino acids, making it a complete protein. This is great for muscle health and energy. Compared to traditional taco fillings, quinoa is lower in fat. It also has more vitamins and minerals. This makes it a healthier choice for your tacos. Enjoy the taste and health benefits all in one bite! Zesty Lime Quinoa Tacos are tasty and easy to make. We covered the main ingredients, such as quinoa, black beans, and fresh veggies. You learned how to cook the quinoa and prepare the filling. We also shared tips for warming tortillas and making your tacos even better. Try adding your favorite proteins and toppings to customize your tacos. Store leftovers well for quick meals later. With these ideas, you can enjoy delicious, healthy tacos any time. Dive in and make this recipe your own!

Zesty Lime Quinoa Tacos Flavorful and Healthy Meal

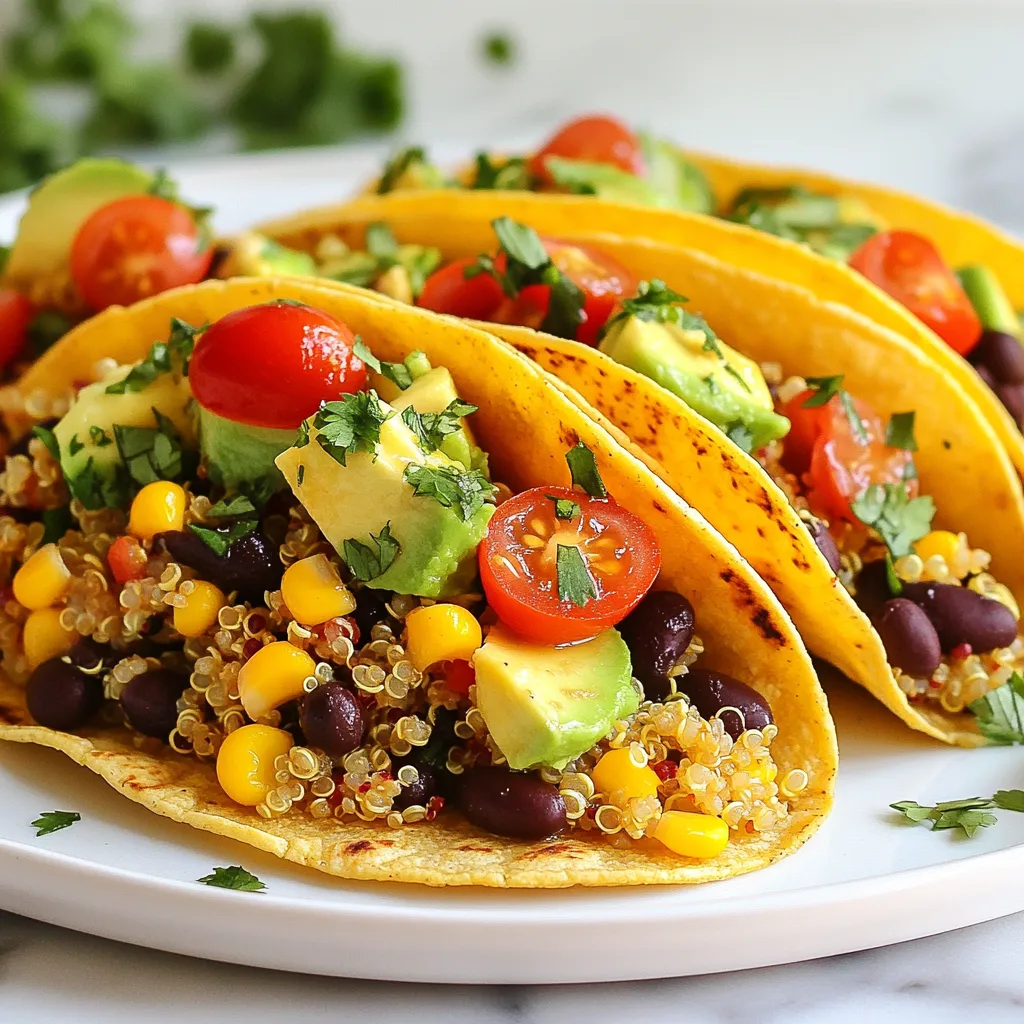
Looking for a fun and healthy meal? Try my Zesty Lime Quinoa Tacos! These tasty tacos are filled with fluffy

- 4 large ripe tomatoes - 1 cup orzo pasta - 1/2 cup feta cheese, crumbled - 1/4 cup Kalamata olives, chopped - 1/2 cup cucumber, diced - 1/4 cup red onion, finely chopped - 2 cloves garlic, minced - 2 tablespoons olive oil - 1 tablespoon lemon juice - 1 teaspoon dried oregano - Salt and pepper to taste - Fresh parsley for garnish - Garlic adds a punch of flavor. - Olive oil keeps the dish moist and rich. - Fresh parsley gives a bright touch. 1. Preheating the oven: Start by preheating your oven to 375°F (190°C). This step is vital for even baking. 2. Cutting and hollowing tomatoes: Cut the tops off each tomato. Use a spoon to scoop out the insides. Set these hollowed tomatoes aside. Chop the pulp finely for later use. 3. Cooking orzo pasta: In a medium pot, boil salted water. Cook the orzo according to package instructions. Make sure it is al dente, then drain it. 1. Mixing orzo stuffing: In a large bowl, mix the cooked orzo, chopped tomato pulp, feta cheese, olives, cucumber, red onion, minced garlic, olive oil, lemon juice, oregano, salt, and pepper. Stir until all ingredients blend well. 2. Stuffing the tomatoes: Gently stuff each hollowed tomato with the orzo mixture. Press down lightly to pack it in. 1. Baking time and temperature: Place the stuffed tomatoes in a baking dish. Bake them for 20-25 minutes until the tops turn golden and the tomatoes soften. 2. Garnishing tips: Once out of the oven, let the tomatoes cool for a few minutes. Garnish with fresh parsley before serving. For a colorful touch, drizzle with extra olive oil. {{ingredient_image_1}} How to choose the best tomatoes When picking tomatoes, look for large and ripe ones. They should feel heavy for their size. The skin should be smooth and shiny. A rich red color means they are ripe. Avoid any with bruises or blemishes. Ensuring orzo is perfectly cooked To cook orzo just right, use plenty of salted water. Bring the water to a rolling boil. Add the orzo and stir to prevent sticking. Cook until it is al dente, which means firm to the bite. This usually takes about 8-10 minutes. After cooking, drain it well. Plating the dish For a beautiful presentation, place the stuffed tomatoes on a colorful platter. Drizzle a bit of olive oil over them. A sprinkle of fresh parsley adds a nice touch. This makes the dish look fresh and inviting. Recommended sides Pair your stuffed tomatoes with a simple salad. A Greek salad works well, with cucumbers, olives, and feta. You can also serve with crusty bread to soak up any extra juices. Both options add flavor and balance to your meal. Gluten-free alternatives If you need a gluten-free option, use quinoa or rice instead of orzo. Both will absorb flavors well. They will also provide a nice texture in the stuffed tomatoes. Vegetarian options To make this dish vegetarian, simply leave out the feta cheese. You can replace it with a vegan cheese or more veggies. Try adding spinach or bell peppers for extra flavor. Adding spices and herbs Feel free to boost the flavor with spices. A pinch of red pepper flakes adds heat. Fresh basil or mint also pairs nicely with the dish. Experiment with your favorite herbs to find what you love. Incorporating different cheeses For a twist, try using mozzarella or goat cheese instead of feta. Each cheese brings its own unique taste. Experimenting with different cheeses can make this dish exciting every time you make it. Store your leftover Mediterranean Orzo Stuffed Tomatoes in an airtight container. This keeps them fresh and tasty. Make sure to let them cool down before sealing. In the fridge, they last about 3 to 4 days. If you want to keep them longer, freezing is a great option. To freeze stuffed tomatoes, wrap each one tightly in plastic wrap. This protects them from freezer burn. You can also place them in a freezer bag. Be sure to remove as much air as possible. When you want to eat them, take them out and let them thaw in the fridge overnight. To reheat frozen tomatoes, preheat your oven to 375°F (190°C). Place the thawed tomatoes on a baking tray. Bake for about 20 minutes or until they are heated through. Enjoy your delicious meal! Pro Tips Use Ripe Tomatoes: Choose tomatoes that are firm but slightly soft to the touch for the best flavor and texture. Customize the Filling: Feel free to add other ingredients like spinach, artichokes, or even cooked chicken to enhance the stuffing. Don’t Overcook the Orzo: Since the orzo will continue to cook in the oven, make sure to stop cooking it when it’s al dente. Serve Warm: These stuffed tomatoes are best enjoyed warm, so serve them immediately after baking for optimal flavor. {{image_2}} Can I prepare stuffed tomatoes ahead of time? Yes, you can make these stuffed tomatoes ahead of time. Just prepare the filling and stuff the tomatoes. Cover them and store them in the fridge for up to 24 hours. Bake them just before serving. This makes it easy to enjoy a fresh meal. How do I reheat the Mediterranean Orzo Stuffed Tomatoes? To reheat, place the stuffed tomatoes in an oven-safe dish. Cover with foil and bake at 350°F (175°C) for about 15-20 minutes. This keeps them moist. If you want, you can microwave them too. Just heat in short intervals until warm. What to do if tomatoes are too watery? If your tomatoes are watery, sprinkle a little salt inside the hollowed tomatoes. Let them sit for about 10 minutes. This helps draw out excess moisture. You can also cook the filling a bit longer to reduce water before stuffing. How to avoid overcooking orzo? To avoid overcooking orzo, cook it al dente. This means it should still be firm when bitten. Follow the package instructions closely. Drain it immediately and rinse with cold water. This stops the cooking process and keeps it perfect for stuffing. This blog post covered how to make delicious Mediterranean Orzo Stuffed Tomatoes. We listed the fresh ingredients needed, shared preparation tips, and detailed the cooking steps. I also provided ideas for variations and storage advice. In summary, these stuffed tomatoes are easy to make and fun to customize. Experiment with flavors and enjoy a healthy meal that impresses. Cooking should be fun, so try this dish tonight!

Mediterranean Orzo Stuffed Tomatoes Flavorful Delight

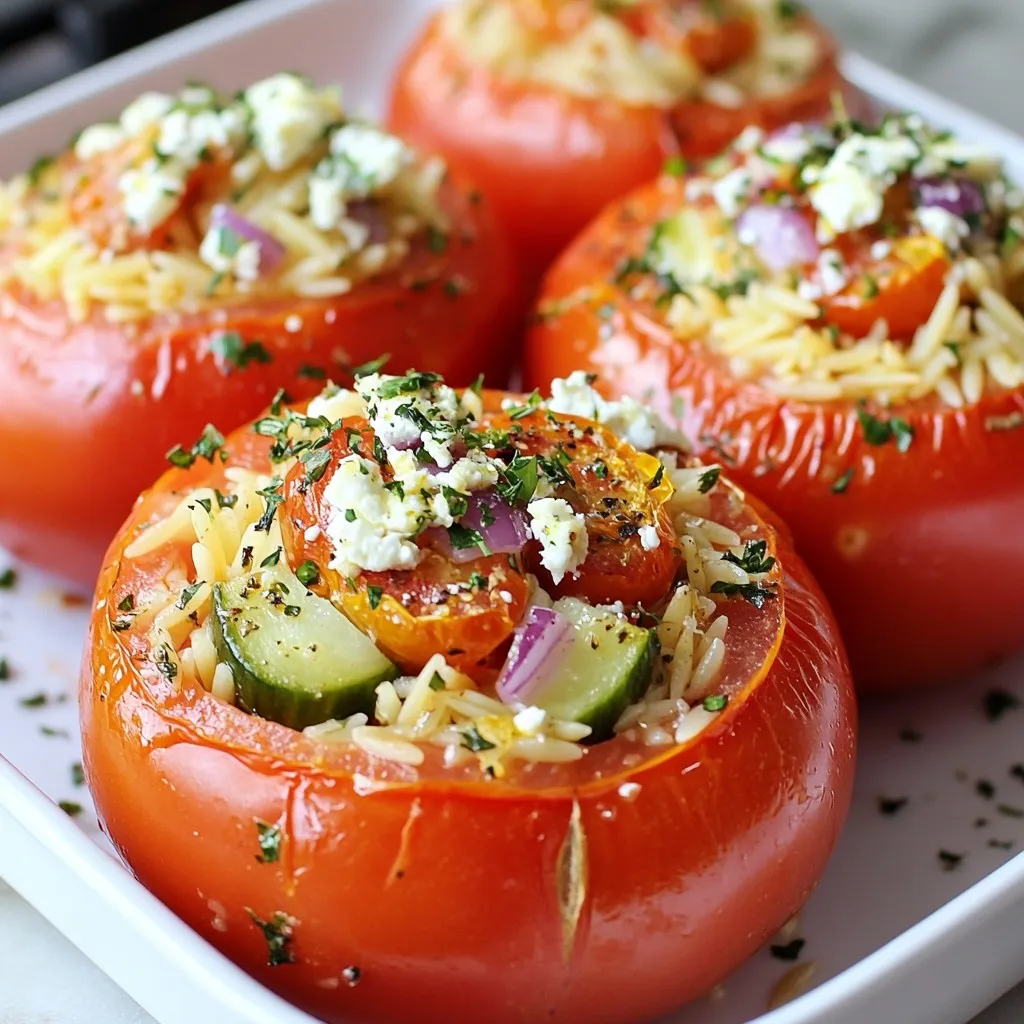
Are you ready for a vibrant burst of flavor? Mediterranean Orzo Stuffed Tomatoes are a delicious treat packed with fresh

To make this tasty dish, gather these ingredients: - 1 cup Arborio rice - 4 cups vegetable broth - 1 cup mushrooms, sliced (cremini or button) - 1 medium onion, finely chopped - 3 cloves garlic, minced - 1/3 cup grated Parmesan cheese - 4 tablespoons unsalted butter, divided - 2 tablespoons olive oil - 1/4 cup fresh parsley, chopped - Salt and pepper to taste - Lemon zest from 1 lemon You will need a few tools to prepare this risotto: - Large skillet - Wooden spoon or spatula - Saucepan for broth - Ladle for adding broth - Knife for chopping - Cutting board You can make this dish your own with some swaps: - Use any rice that cooks creamy, like Carnaroli. - Swap vegetable broth for chicken broth if you prefer. - Try different mushrooms like shiitake or portobello. - For a vegan option, use plant-based butter and cheese. - Fresh herbs like thyme or chives can replace parsley for a new flavor twist. These simple changes keep your risotto exciting and tasty! {{ingredient_image_1}} Start by heating the vegetable broth in a saucepan over low heat. Keeping it warm helps the rice cook evenly. You want the broth hot but not boiling. This step sets up a good base for your risotto. In a large skillet, melt 2 tablespoons of butter with 2 tablespoons of olive oil over medium heat. Once hot, add the finely chopped onion. Cook until it turns soft and translucent, around 4-5 minutes. Next, stir in 3 cloves of minced garlic and 1 cup of sliced mushrooms. Cook this mix for 5-7 minutes. The mushrooms should be tender and lightly browned, adding a rich flavor to the dish. Add 1 cup of Arborio rice to the skillet. Stir it well to coat the rice with the butter and oil. Toast the rice for about 2 minutes until it looks slightly translucent. Now, it’s time to add the broth. Use a ladle to add warm broth, one scoop at a time. Stir gently and let the rice absorb the liquid before adding more. Repeat this for 18-20 minutes. The rice should be creamy and al dente. Once the rice is cooked, mix in the last 2 tablespoons of butter, 1/3 cup of grated Parmesan cheese, 1/4 cup of fresh chopped parsley, and the zest from 1 lemon. Stir well to combine everything into a creamy delight. Taste it and adjust the salt and pepper if needed. This step enhances the flavor and adds a lovely finish. Serve your risotto in shallow bowls, and don’t forget to garnish with extra parsley and Parmesan. Add a sprinkle of lemon zest for that extra zing! To make creamy risotto, you need patience and attention. Start with warm broth. Add it slowly, one ladle at a time. Stir the rice often. This helps release the starch, making the dish creamy. Keep cooking until the rice is al dente. Don’t rush it! At the end, mix in butter and cheese. This adds richness and flavor. Many cooks make the same mistakes when making risotto. One common error is adding too much broth at once. This can lead to a clumpy texture. Another mistake is not stirring enough. Stirring helps the rice cook evenly. Also, avoid cooking rice too long. Overcooked risotto turns mushy. Lastly, don’t forget to taste as you go. Adjust the seasoning for the best flavor. Risotto pairs well with many dishes. For a light meal, serve it with a fresh salad. You can also add grilled chicken or shrimp for protein. A glass of white wine complements the flavors nicely. For a fun twist, add a squeeze of lemon juice. This brightens the dish and adds depth to the taste. Enjoy experimenting with different flavors! Pro Tips Use Warm Broth: Keeping your broth warm is essential for a creamy risotto, as it helps the rice cook evenly and absorb flavors better. Don’t Rush the Stirring: Stirring the risotto regularly allows the rice to release its starches, making the dish creamier. Take your time to enjoy the process! Opt for Fresh Ingredients: Using fresh mushrooms and herbs will elevate the flavor of your risotto, making it more vibrant and aromatic. Finish with a Splash of Acid: A squeeze of lemon juice or a splash of white wine at the end adds brightness and balance to the rich flavors of the risotto. {{image_2}} You can use many types of mushrooms in this risotto. Each adds its own flavor. Cremini mushrooms give a rich, earthy taste. Button mushrooms are mild and sweet. Shiitake mushrooms bring a unique umami kick. For a wild twist, try porcini or chanterelle mushrooms. Mixing different kinds can also create a fun texture and taste. Want to make this risotto heartier? You can add proteins like chicken or shrimp. For chicken, use cooked, diced pieces. Stir them in at the end to warm them up. If you prefer shrimp, sauté them with the mushrooms. This adds a nice seafood flavor. Both options make the dish filling and satisfying. If you want a vegetarian or vegan dish, swap the butter for olive oil. Use a vegan cheese or skip cheese altogether. For added protein, toss in some cooked lentils or chickpeas. These will keep the dish hearty and healthy. Always check that your vegetable broth is vegan. With these swaps, you can enjoy a creamy, tasty risotto without any animal products. To store leftover risotto, let it cool first. Place it in an airtight container. Make sure to seal it well. You can store it in the fridge for up to three days. If you want to keep it longer, consider freezing it instead. When reheating risotto, add a little broth or water. This helps bring back its creamy texture. Heat it slowly on the stove over low heat. Stir often to prevent sticking. You can also use a microwave, but add liquid first. This keeps it from drying out. To freeze risotto, scoop it into smaller portions. Use freezer-safe bags or containers. Make sure to remove as much air as possible. Label the bags with the date. You can freeze it for up to two months. When ready to eat, thaw it overnight in the fridge. Reheat as described above for the best texture. The best rice for risotto is Arborio rice. It has a high starch content. This starch gives risotto its creamy texture. Other good options include Carnaroli and Vialone Nano. These types also absorb flavors well. Yes, you can make risotto without wine. Just skip the wine and use more broth. The broth will help keep the dish rich and flavorful. You can add a splash of lemon juice for brightness. Risotto is done when it is creamy and slightly firm. The rice should be al dente. You can taste it to check for doneness. If it’s too hard, keep cooking and stir in more broth. Absolutely! You can add vegetables like peas, spinach, or asparagus. Just sauté them with the mushrooms. This adds color and flavor to your risotto. You can also use roasted vegetables for a richer taste. In this blog post, I shared how to make garlic butter mushroom risotto. We covered the necessary ingredients, cooking tools, and tips to ensure a creamy texture. I also offered helpful variations and storage tips. Remember, risotto is versatile. You can add proteins or make it vegan. With careful attention and practice, you’ll create a delicious dish. Enjoy experimenting and finding your perfect risotto!

Garlic Butter Mushroom Risotto Creamy Flavor Delight

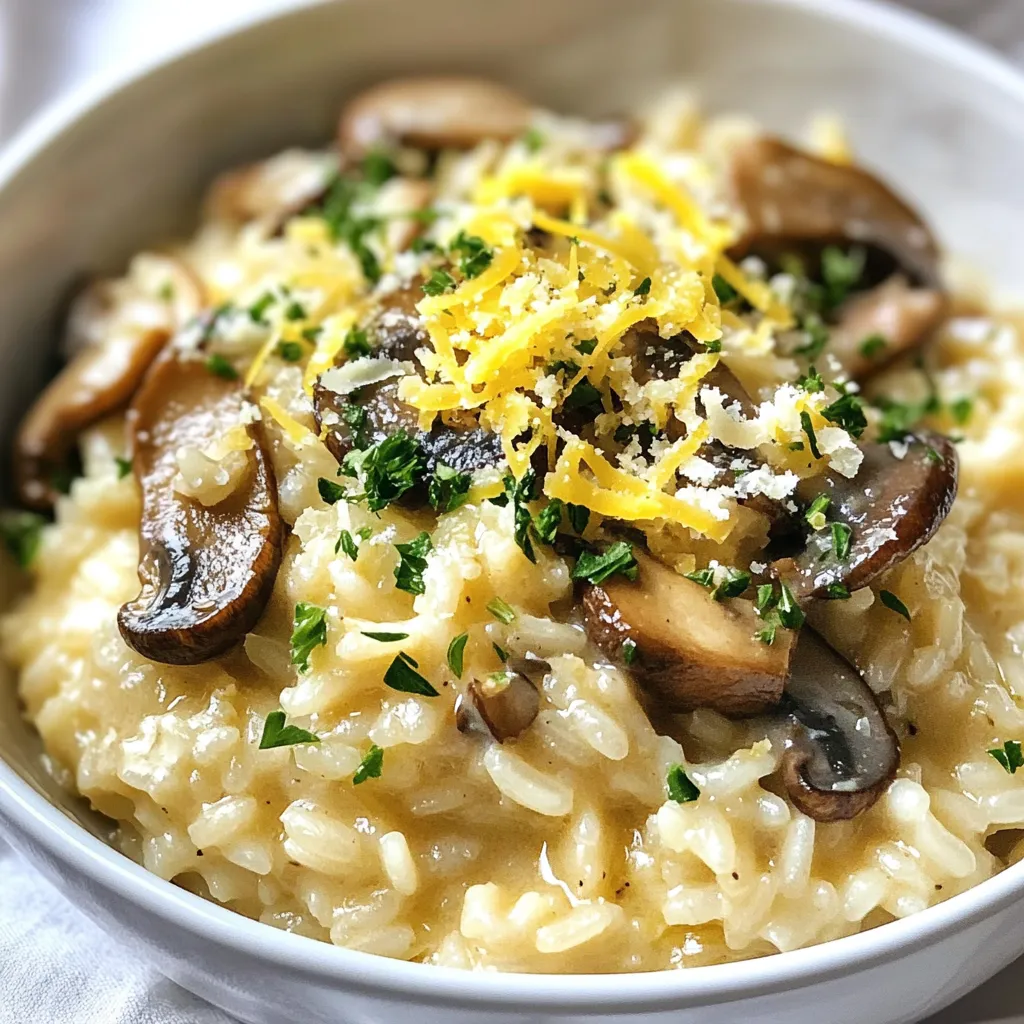
If you crave creamy, savory dishes, you’ll love my Garlic Butter Mushroom Risotto. This dish combines rich flavors that warm

To make these tasty treats, you need a few key ingredients. Here’s what you need: - 2 cups all-purpose flour - 1 tbsp baking powder - 1/2 tsp baking soda - 1/2 tsp salt - 1 tsp ground cinnamon - 1/4 tsp nutmeg - 1/2 cup unsalted butter, melted - 1 cup granulated sugar - 2 large eggs - 1 tsp vanilla extract - 1 cup buttermilk These ingredients work together to create a soft and fluffy muffin. The flour gives structure, while the baking powder and soda help it rise. The butter adds richness, and the eggs bind everything together. The buttermilk makes the muffins moist and tender. For the sweet and crunchy topping, gather these items: - 1/2 cup granulated sugar - 1 tbsp ground cinnamon - 4 tbsp unsalted butter, melted This mixture gives the muffins that classic doughnut taste. The melted butter helps the cinnamon sugar stick to the warm muffins. You can always mix things up with your ingredients. Here are some ideas: - Swap all-purpose flour for whole wheat flour for a healthier option. - Use coconut oil instead of butter for a dairy-free version. - Replace granulated sugar with brown sugar for a deeper flavor. - Add chopped nuts or chocolate chips for extra texture and taste. These simple changes let you customize the muffins to your liking. Feel free to experiment while keeping the main flavors intact. {{ingredient_image_1}} First, preheat your oven to 350°F (175°C). This helps the muffins rise. While the oven heats, grease a muffin tin. You can also use paper liners for easy cleanup. Make sure to cover each cup well, so the muffins don’t stick. Now, grab a medium bowl. In it, mix the dry ingredients: 2 cups of all-purpose flour, 1 tablespoon of baking powder, 1/2 teaspoon of baking soda, 1/2 teaspoon of salt, 1 teaspoon of ground cinnamon, and 1/4 teaspoon of nutmeg. Set this bowl aside. In a large bowl, whisk together 1/2 cup of melted unsalted butter and 1 cup of granulated sugar until smooth. Next, add in 2 large eggs, one at a time. Mix well after each egg. Then, stir in 1 teaspoon of vanilla extract and 1 cup of buttermilk. It should look creamy and well combined. Gradually fold the dry ingredients into the wet mixture. Be gentle here. Overmixing can make the muffins tough. Fill each muffin cup about 2/3 full with the batter. You can use a scoop or a spoon for this. Bake them in your preheated oven for 15-18 minutes. To check if they are done, insert a toothpick into the center. If it comes out clean, they are ready. While the muffins bake, prepare the topping. In a small bowl, mix together 1/2 cup of granulated sugar and 1 tablespoon of ground cinnamon. Once the muffins are done, let them cool in the tin for about 5 minutes. Then, remove them from the tin. Dip the tops of each warm muffin into 4 tablespoons of melted butter. After that, roll them in the cinnamon-sugar mixture until they are well coated. This gives them a sweet and crunchy finish. Enjoy your tasty treat! When making cinnamon sugar doughnut muffins, proper mixing is key. Start by whisking the dry ingredients together first. This helps blend the baking powder and baking soda evenly. It also ensures the spices mix well. In a separate bowl, mix the melted butter and sugar until smooth. This creates a nice base for your muffins. Add the eggs one at a time. Mix well after each egg to keep the batter light. Lastly, combine the wet and dry mixtures gently. Use a spatula and fold until just mixed. Avoid overmixing; this keeps your muffins soft. To make sure your muffins turn out fluffy, focus on your ingredients. Use room temperature eggs and buttermilk. These ingredients blend better and create air pockets in the batter. This adds lightness to your muffins. Don't forget to measure your flour correctly; spoon it into your measuring cup and level it off with a knife. Too much flour can make the muffins dense. Bake your muffins in a preheated oven for even cooking. Check for doneness by inserting a toothpick. If it comes out clean, your muffins are ready. Once your muffins are baked, let them cool for about five minutes in the tin. This helps them set and makes them easier to remove. Use a wire rack for the best cooling results. While they cool, prepare your cinnamon-sugar coating. Mix granulated sugar and cinnamon in a small bowl. Dip each warm muffin top in melted butter, then roll it in the cinnamon-sugar mixture. This creates a sweet crust that pairs perfectly with the soft muffin inside. Enjoy your treats warm for the best flavor! Pro Tips Use Fresh Spices: Ensure your ground cinnamon and nutmeg are fresh for the best flavor. Old spices can lose their potency and impact the overall taste of your muffins. Don’t Overmix: When combining wet and dry ingredients, mix just until combined. Overmixing can lead to dense muffins instead of light and fluffy ones. Let Them Cool Slightly: Allow the muffins to cool in the tin for a few minutes before removing them. This helps them set and makes them easier to take out without breaking. Customize Your Topping: Feel free to add a pinch of nutmeg or even a splash of vanilla to the cinnamon-sugar topping for an extra flavor boost! {{image_2}} You can make these muffins gluten-free! Substitute the all-purpose flour with a gluten-free blend. Look for a mix that works well for baking. The muffins will still be soft and tasty. Want to spice things up? Try adding pumpkin puree for a fall treat. Use one cup of pumpkin in place of half the buttermilk. You can also add pumpkin spice. A mix of cinnamon, nutmeg, and ginger works great here. Feeling adventurous? Swap the cinnamon sugar topping for a chocolate glaze. Melt half a cup of chocolate chips with one tablespoon of butter. Dip the tops of the muffins in the glaze while they are warm. It adds a rich, sweet flavor that everyone will love. These variations let you customize your muffins to fit your taste. Enjoy trying new flavors! To keep your cinnamon sugar doughnut muffins fresh, place them in an airtight container. You can store them at room temperature for up to 3 days. If you want them to last longer, consider refrigerating them. Just make sure to wrap them tightly to avoid drying out. When you want to enjoy a muffin again, reheating is simple. You can use the microwave for about 10-15 seconds. This warms them up and keeps them soft. If you prefer a crispy top, pop them in the oven at 350°F (175°C) for about 5 minutes. If you made a big batch, freezing is a great option. Wrap each muffin in plastic wrap, then place them in a freezer bag. They can last up to 3 months in the freezer. When you're ready to eat, just thaw them in the fridge overnight or leave them out for a few hours. Enjoy your delicious treats anytime! You can tell muffins are done by using a toothpick. Insert the toothpick into the center of a muffin. If it comes out clean, the muffins are ready. If there is wet batter on the toothpick, bake them a few more minutes. Watching the tops is also helpful. They should look golden brown when they are finished. Yes, you can use a muffin mix. It’s a quick option if you’re short on time. Just follow the package instructions and add cinnamon for that extra flavor. However, homemade batter tastes fresher and allows for more control over the flavors. You can use my recipe for a great taste and texture. Leftover cinnamon sugar is great for many things. You can sprinkle it on toast, pancakes, or waffles for a sweet treat. It also works well on oatmeal or yogurt. If you want a fun snack, mix it into popcorn for a sweet twist. Store it in an airtight container for future use. Cinnamon sugar doughnut muffins are tasty and easy to make. We covered the key ingredients, steps, tips, and fun variations. Remember to mix the batter gently for fluffier muffins. Experiment with gluten-free options or fun flavors like pumpkin spice. Store extras well to enjoy later. Enjoy making these delicious treats that brighten your day!

Cinnamon Sugar Doughnut Muffins Simple and Tasty Treat

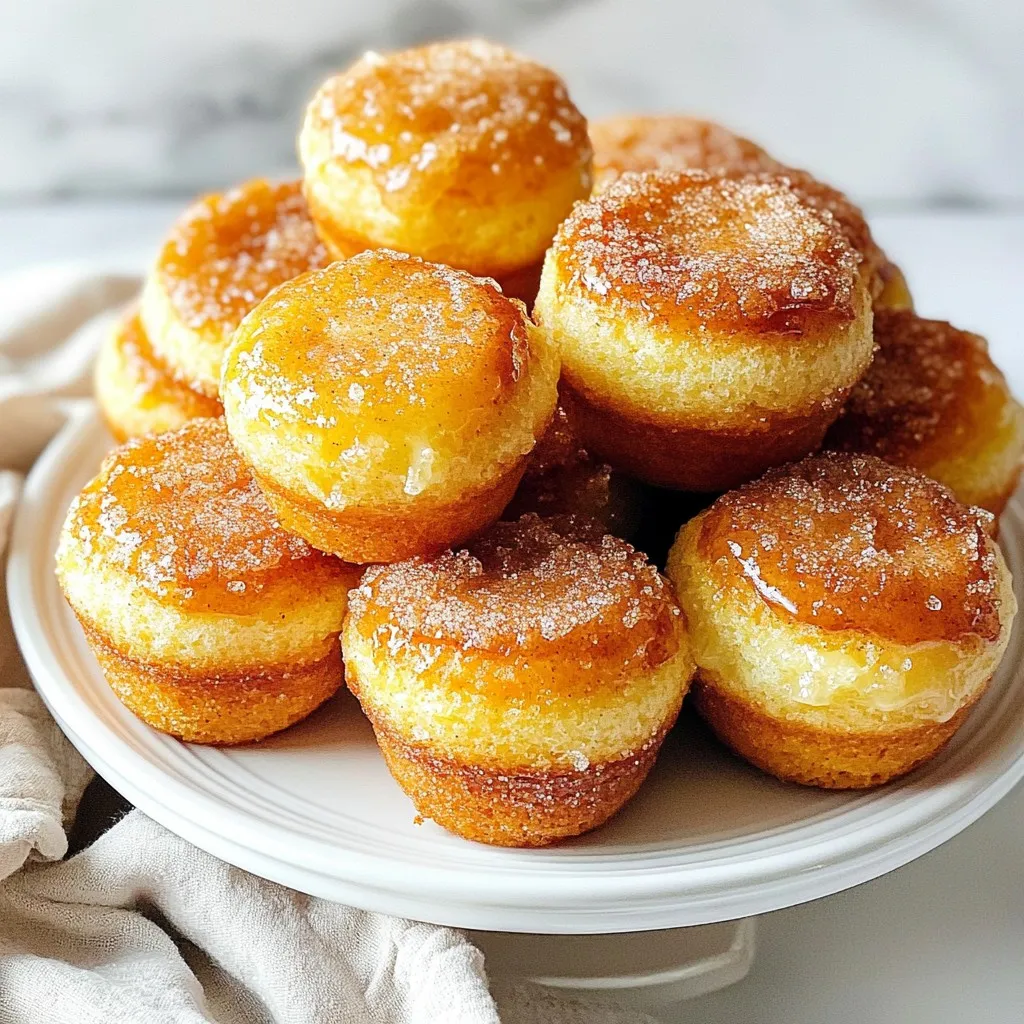
Are you ready to delight your taste buds? Cinnamon Sugar Doughnut Muffins are the perfect blend of sweet and spice.

Fresh blueberries are the star of this recipe. They add sweetness and a burst of flavor. You need 2 cups of ripe blueberries. Look for berries that are plump and firm. These will give you the best taste and color. Greek yogurt adds creaminess and protein to these popsicles. You can use plain or vanilla yogurt. One cup is enough for a smooth texture. Greek yogurt also makes these treats feel rich and satisfying. For sweetness, you can choose honey or maple syrup. Both work well in this recipe. Start with 1/2 cup and adjust based on your taste. Honey adds a floral note, while maple syrup gives a warm flavor. Fresh lemon juice adds a zesty kick. You’ll need 1 cup from about 4 to 5 lemons. The zest from one lemon enhances the lemon flavor. It makes the popsicles taste fresh and bright. A pinch of salt may seem small, but it plays a big role. Salt helps balance the sweetness and enhances flavors. It brings out the natural taste of the blueberries and lemon. Just a little makes a big difference in the final product. {{ingredient_image_1}} To start, take 2 cups of fresh blueberries. Place them in a small saucepan. Heat the blueberries over medium heat. Stir gently for about 5 minutes. They should burst and release their juices. This step brings out their sweet flavor. Once done, let the mixture cool slightly. Next, grab a blender or food processor. Add 1 cup of Greek yogurt, plain or vanilla. Then, add 1/2 cup of honey or maple syrup. You can adjust the sweetness to fit your taste. Now, pour in 1 cup of fresh lemon juice, and add 1 tablespoon of lemon zest. Finally, add a pinch of salt. Blend everything until it is smooth and creamy. Now, take the cooled blueberry mixture. In a bowl, gently fold it into your yogurt blend. This creates beautiful marble-like swirls. Be careful not to over-mix. You want to keep some blueberries whole for texture. It's time to fill your popsicle molds. Pour the blueberry yogurt mixture into each mold. Fill them about 3/4 full. Leave a little space at the top. This space helps the mixture expand while freezing. Insert popsicle sticks into each mold. Place them in the freezer. Freeze for at least 6 hours. You want them to be solid before serving. To remove your popsicles, run warm water over the outside of the molds. Do this for a few seconds. The popsicles should release easily. Serve them right away and enjoy the refreshing taste! When picking blueberries, look for firm and plump fruit. They should have a deep blue color with a slight white bloom. Avoid berries that are soft or have blemishes. Fresh blueberries taste better and add great flavor to your popsicles. If you can, buy organic blueberries. They often have better taste and are grown without harmful chemicals. The recipe calls for honey or maple syrup. You can change the amount based on what you like. If you prefer a sweeter treat, use more sweetener. If you want a tangy flavor, use less. Always taste the mixture before pouring it into molds. This way, you can make sure it’s just right for you. To get a creamy texture, use full-fat Greek yogurt. It blends well and gives a rich flavor. Make sure to blend the yogurt with lemon juice and sweetener until smooth. If the mix seems too thick, add a splash of water or more lemon juice. This helps it blend better and makes the popsicles smooth. If you don’t have popsicle sticks, you can use small cups or molds. Pour the mixture into these cups and freeze. After a few hours, when they are firm, run warm water over the outside of the cups. This helps loosen the popsicles so you can enjoy them easily. Pro Tips Choose Ripe Blueberries: Use fresh, ripe blueberries for the best flavor and sweetness. Look for plump, firm berries with a deep blue color for optimal results. Adjust Sweetness: Depending on your preference and the tartness of your lemons, feel free to adjust the amount of honey or maple syrup in the mixture. Experiment with Flavors: Try adding other fruits like strawberries or raspberries to the mixture for a delicious twist. You can also add a splash of vanilla extract for extra flavor. Storage Tips: Store the popsicles in an airtight container in the freezer for up to 2 weeks for the best texture and flavor. {{image_2}} You can make these popsicles even better by adding other fruits. Raspberries and strawberries work great. Just use the same steps. Cook them in a pan until they soften. Then, mix them with the yogurt blend just like the blueberries. This adds color and flavor. If you want a dairy-free option, try coconut yogurt or almond yogurt. These will still give a creamy texture. Use the same amount as Greek yogurt. The taste will change, but it stays yummy and fresh. Enjoy the fruity flavor without the dairy. You can add extra flavors, like vanilla or mint. For vanilla, stir in one teaspoon before blending. For mint, add a few fresh leaves while blending. This makes your popsicles taste unique and fun. It’s a great way to surprise your taste buds. Swirls make your popsicles look amazing. Try adding coconut cream or melted chocolate. Just drizzle these in before freezing. Use a skewer to create pretty patterns. This gives a nice surprise with each bite. Plus, it adds extra creaminess or richness to the taste. To keep your blueberry lemon Greek yogurt popsicles fresh, store them in an airtight container. This step prevents freezer burn and keeps flavors intact. If you use popsicle molds, make sure to cover them well. You can also wrap each popsicle in plastic wrap for extra protection. These popsicles stay good for about two months in the freezer. After that, they may lose flavor and texture. Always check for ice crystals or any strange smells before enjoying. Thaw your popsicles before serving to make them easier to eat. You can run warm water over the mold for a few seconds. This method helps loosen the popsicle without melting it too quickly. If you prefer, let them sit at room temperature for a few minutes. Enjoy your treat when it’s ready! Yes, you can use frozen blueberries. Just thaw them first. This helps them blend well. You may need to adjust the cooking time since they often release more juice. Cook them until they are warm and soft. To make these popsicles healthier, use low-fat Greek yogurt. You can also reduce the sweetener. Try using less honey or maple syrup. Adding a bit of spinach or kale can boost nutrients without changing the flavor much. Yes, there are alternatives to Greek yogurt. You can use regular yogurt, but the texture will be different. For a dairy-free option, try coconut yogurt or almond yogurt. These will change the flavor, so choose one you like. Definitely! You can make mini popsicles with this recipe. Just use smaller molds. Adjust the freezing time since they will freeze faster. These mini pops make great snacks for kids or a cool treat on a hot day. In this post, we explored how to make tasty blueberry popsicles. We covered key ingredients like fresh blueberries, Greek yogurt, and sweeteners. You learned to prepare, blend, and freeze these treats. We shared helpful tips and variations to make them your own. Lastly, we gave advice on storage and answered common questions. Now, you have the tools to create delicious, healthy popsicles. Enjoy this simple recipe and experiment with flavors! Your perfect summer treat awaits.

Blueberry Lemon Greek Yogurt Popsicles Refreshing Treat

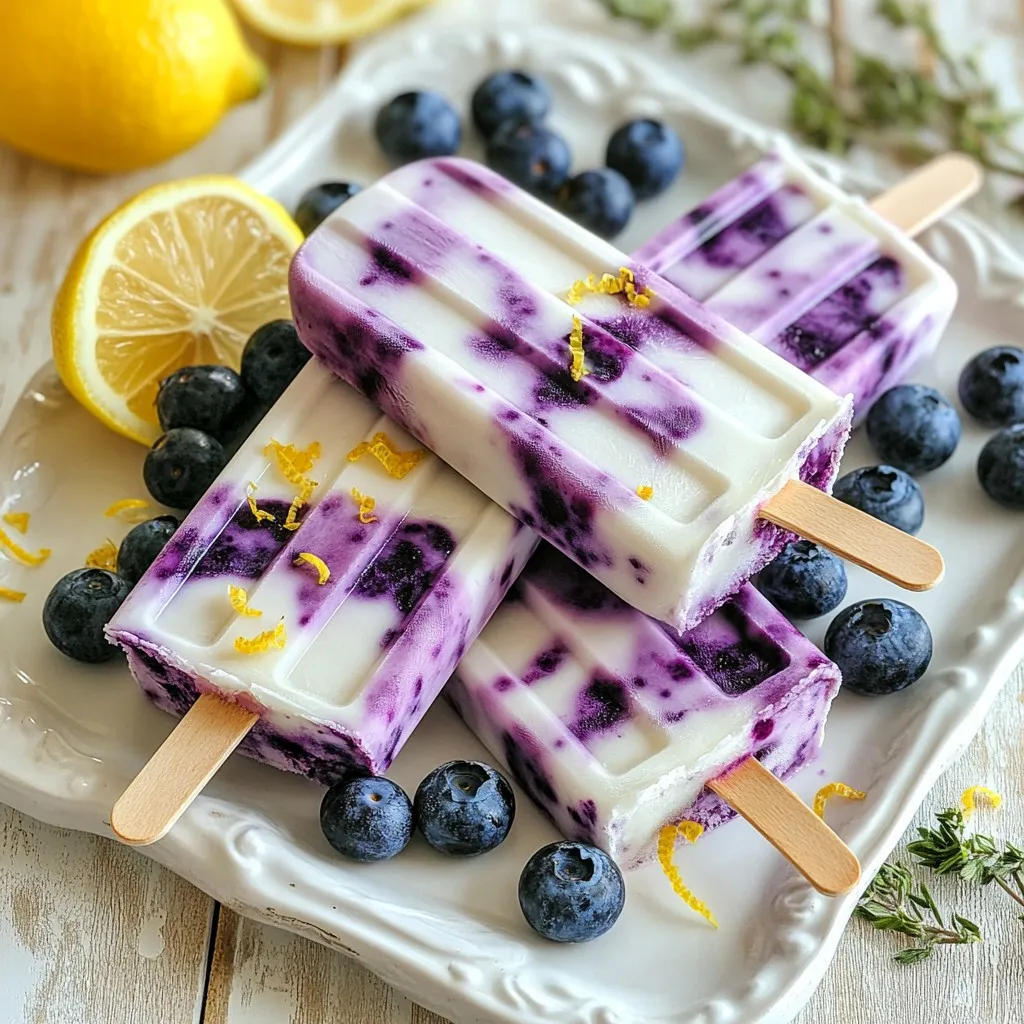
Craving a cool, tasty treat? Look no further! These Blueberry Lemon Greek Yogurt Popsicles are your perfect summer snack. Packed

- 1 cup quinoa, rinsed - 2 cups vegetable broth or water - 1/2 cup dried cranberries - 1/2 cup pecans, toasted and roughly chopped - 1/2 cup diced cucumber - 1/4 cup finely chopped red onion - 1/4 cup feta cheese, crumbled (optional) - 2 tablespoons olive oil - 1 tablespoon apple cider vinegar - 1 tablespoon maple syrup - Salt and pepper to taste - Fresh parsley, chopped for garnish The main star of this salad is quinoa. It brings protein and fiber. The dried cranberries add a sweet touch, while toasted pecans give crunch. Diced cucumber offers a fresh bite, and red onion adds zing. Feta cheese is optional but brings creaminess. Olive oil and vinegar create a simple dressing that ties it all together. You can add ingredients to make the salad even better. Try adding diced bell peppers for a sweet crunch. Avocado can make it creamy. Fresh herbs like mint or basil can give a fresh taste. A dash of lemon juice can brighten the flavors. If you need to avoid certain allergens, there are easy swaps. For a nut-free option, skip the pecans or use seeds like pumpkin. If you're dairy-free, leave out the feta cheese. To make it gluten-free, ensure your quinoa is certified gluten-free. You can also use apple juice instead of vinegar for a sweeter dressing. {{ingredient_image_1}} To start, rinse 1 cup of quinoa under cold water. This step removes any bitter taste. In a medium saucepan, combine the rinsed quinoa with 2 cups of vegetable broth or water. Place the saucepan on the stove over medium-high heat. Bring the mixture to a boil. Once it starts boiling, reduce the heat to low. Cover the saucepan and let it simmer for about 15 minutes. The quinoa is done when it absorbs all the liquid and looks fluffy. After cooking, remove the saucepan from heat and let it cool for a few minutes. In a large mixing bowl, add the cooled quinoa. Next, toss in 1/2 cup of dried cranberries, 1/2 cup of toasted pecans, and 1/2 cup of diced cucumber. Add 1/4 cup of finely chopped red onion and 1/4 cup of crumbled feta cheese, if you want a creamy touch. Gently stir these ingredients together. Make sure everything is well mixed. This step helps the flavors blend nicely. For the dressing, grab a small bowl. Whisk together 2 tablespoons of olive oil, 1 tablespoon of apple cider vinegar, and 1 tablespoon of maple syrup. Add salt and pepper to taste. Mix until the dressing is smooth and well combined. Pour this dressing over the quinoa mixture. Toss everything gently to coat the salad evenly. Taste your salad and adjust the seasoning if needed. Let it sit for at least 15 minutes. This resting time allows the flavors to meld together. Before serving, sprinkle fresh chopped parsley on top for a bright finish. To cook quinoa just right, start by rinsing it well. This removes the bitter coating. Use two cups of vegetable broth or water for each cup of quinoa. Bring the liquid to a boil over medium-high heat. Once it boils, lower the heat to a simmer and cover it. Let it cook for about 15 minutes. The quinoa will absorb all the liquid and become fluffy. After cooking, let it cool for a few minutes before using it in your salad. Toasting pecans adds a rich flavor. Start by preheating your oven to 350°F (175°C). Spread the pecans in a single layer on a baking sheet. Bake them for about 8-10 minutes. Keep an eye on them to avoid burning. Stir them halfway through for even toasting. Once they are golden and fragrant, let them cool before chopping. This step makes a big difference in your salad. You can easily tweak this salad to suit your taste. For a tangy kick, add more apple cider vinegar. If you like sweetness, drizzle in extra maple syrup. Fresh herbs like basil or mint can brighten the dish. To make it heartier, toss in some cooked chicken or chickpeas. Always taste the salad before serving and adjust the seasoning with salt and pepper. This way, you ensure the flavors are just right. Pro Tips Rinse the Quinoa: Rinsing quinoa before cooking removes its natural coating, called saponin, which can make it taste bitter. Always rinse under cold water for the best flavor. Toast the Pecans: Toasting pecans enhances their flavor and adds a delightful crunch to the salad. Simply place them in a dry skillet over medium heat for a few minutes until fragrant. Let It Marinate: Allowing the salad to sit for at least 15 minutes before serving helps the flavors meld together, creating a more harmonious dish. Customize Your Add-ins: Feel free to mix in other ingredients like diced apples, olives, or even cooked chickpeas for additional flavor and texture. Get creative! {{image_2}} You can boost the protein in your Cranberry Pecan Quinoa Salad easily. Adding cooked chicken is a great choice. Just shred or cube it and mix it in. Chickpeas are another option. Rinse canned chickpeas and toss them in. Both options make the salad heartier and more filling. Seasonal veggies add flavor and color to your salad. In spring, try adding asparagus or peas. Summer brings fresh tomatoes or bell peppers. In the fall, roasted sweet potatoes taste great. You can even use winter squash for a unique twist. Feel free to mix and match based on what you have. This salad is naturally gluten-free due to quinoa. To keep it vegan, skip the feta cheese. You can replace it with avocado for creaminess. Another option is to use a nut-based cheese. These swaps keep the salad healthy while catering to different diets. Enjoy customizing it to fit your needs. To store leftover cranberry pecan quinoa salad, place it in an airtight container. Make sure to cool the salad first. This helps keep it fresh. You can store it in the fridge for up to four days. If you have any extra dressing, keep it separate to prevent sogginess. The salad tastes best when fresh, but leftovers are still good. If you want to freeze it, place the salad in a freezer-safe bag. It can last up to three months in the freezer. When you are ready to eat it, just thaw it in the fridge overnight. I recommend eating the salad cold, but you can warm it if you prefer. To reheat, place it in a saucepan over low heat. Stir it gently until warm. Avoid overheating to keep the ingredients fresh and tasty. If you added feta cheese, it might soften, but that's okay! Yes, you can prepare this salad ahead of time. Make it up to a day before you serve. Just keep it in the fridge. This salad tastes even better after the flavors blend. When you are ready to serve, give it a little stir. You might want to add a splash of olive oil to freshen it up. Quinoa is a superfood packed with nutrition. It is high in protein and fiber. This grain helps you feel full longer. Quinoa also offers essential amino acids. It is gluten-free, which is great for those with allergies. Furthermore, it contains vitamins and minerals like magnesium and iron. Including quinoa in your diet can support heart health and weight loss. If you want to make this salad more filling, add protein. Cooked chicken, chickpeas, or black beans work well. You can also toss in more vegetables like bell peppers or carrots. For healthy fats, add avocado slices. These additions will make the salad more satisfying and nutritious. Enjoy creating your perfect version! Cranberry pecan quinoa salad is a tasty, healthy dish. We covered key ingredients, optional addons, and allergen swaps. You learned to cook quinoa, mix the salad, and make a great dressing. I shared tips for perfect quinoa and toasting nuts, plus fun variations. Lastly, we discussed storage options and common questions. Enjoy making this salad and make it your own. Happy cooking!

Cranberry Pecan Quinoa Salad Fresh and Healthy Delight

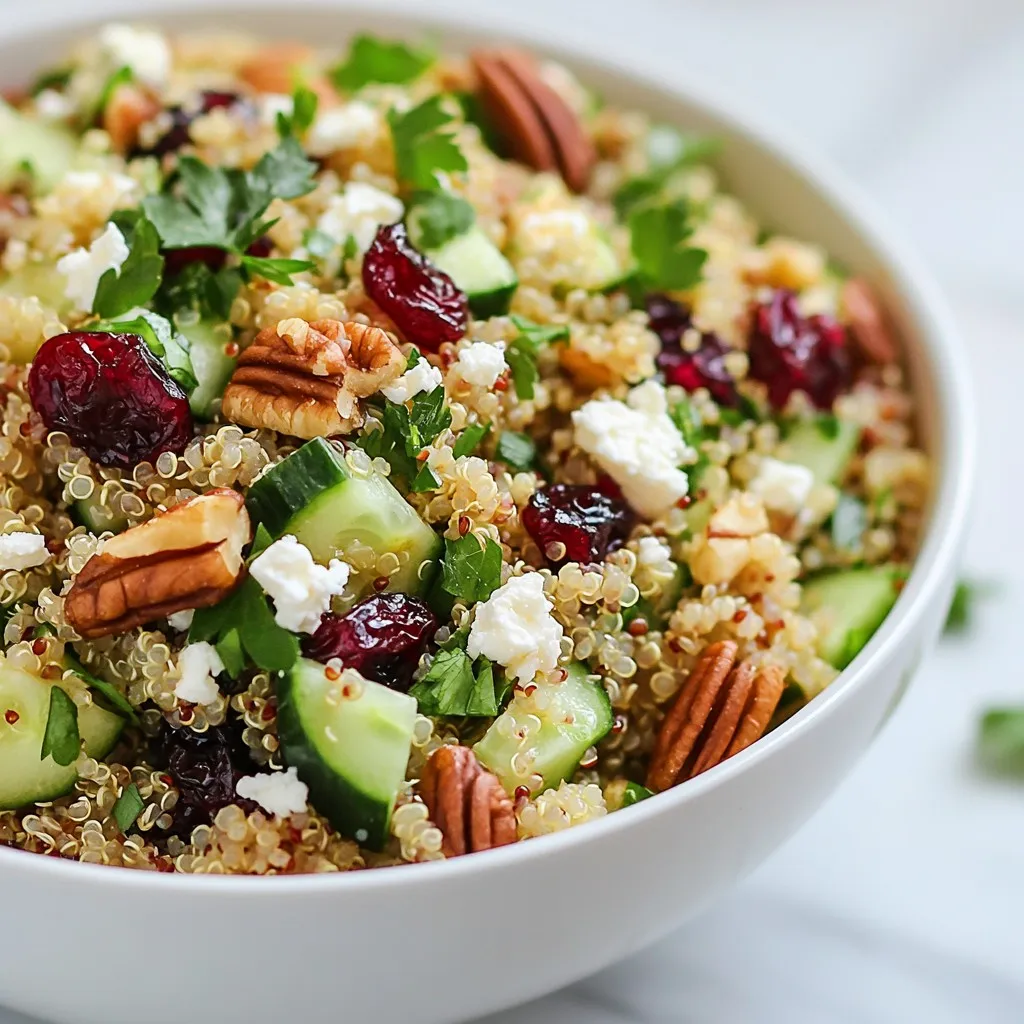
Looking for a fresh and healthy salad that bursts with flavor? You’ll love this Cranberry Pecan Quinoa Salad! Packed with

- 16 oz baby Portobello mushrooms - 4 tablespoons olive oil - 4 cloves garlic - ½ cup grated Parmesan cheese - 1 teaspoon dried thyme - 1 teaspoon dried oregano - Salt and pepper to taste - Fresh parsley, chopped - Lemon wedges Garlic Parmesan Roasted Mushrooms start with baby Portobello mushrooms. These mushrooms have a rich flavor. They are tender and soak up seasonings well. You need 16 ounces, which is about 450 grams. Make sure to clean them and trim the stems. Next, you will need olive oil. Use four tablespoons for a nice, rich taste. Garlic is key here too. You will want four cloves minced. This gives the dish a strong and savory kick. Then, Parmesan cheese adds a lovely salty flavor. Grate about a half cup to sprinkle over the mushrooms. Now for the seasonings. Dried thyme and oregano work great together. Use one teaspoon of each. Salt and pepper are important, too. Add them to taste for a balanced flavor. For garnish, chop some fresh parsley. It adds color and freshness. Finally, serve the mushrooms with lemon wedges. The lemon gives a bright flavor that pairs well with the savory mushrooms. These ingredients make a dish that is sure to impress! {{ingredient_image_1}} 1. Preheat your oven to 400°F (200°C). This helps mushrooms cook evenly and get crispy. 2. In a large bowl, add the cleaned baby portobello mushrooms. Pour in 4 tablespoons of olive oil. 3. Mince 4 cloves of garlic and add them to the bowl. Garlic brings great flavor. 4. Sprinkle in 1 teaspoon each of dried thyme and oregano. Then, add salt and pepper to taste. 5. Toss everything together. Make sure all the mushrooms are well-coated with oil and spices. 1. Spread the coated mushrooms on a baking sheet. Use parchment paper to avoid sticking. 2. Roast them in the preheated oven for 15 minutes. This begins the cooking process and enhances their flavor. 1. Take the baking sheet out of the oven after 15 minutes. Sprinkle ½ cup of grated Parmesan cheese over the mushrooms. 2. Place the baking sheet back into the oven. Roast for another 10-15 minutes. The cheese should melt and turn golden brown. 3. Once they are done, remove the mushrooms from the oven. Garnish with fresh parsley for a pop of color. 4. Serve hot, with lemon wedges on the side. The lemon adds a bright touch to the rich flavors. The best mushrooms for this dish are baby portobello mushrooms. They are meaty and flavorful. You can also use cremini or button mushrooms if you like. These mushrooms soak up the garlic and olive oil well. Choose firm mushrooms with no dark spots. Freshness is key for great taste. To cook your mushrooms evenly, space them out on the baking sheet. If they are too close, they will steam instead of roast. Use parchment paper for easy cleanup and to prevent sticking. A single layer allows heat to reach all sides. This gives you a nice golden finish. You can boost the flavors with more herbs and spices. Try adding rosemary or basil for a twist. A pinch of red pepper flakes can add heat. Consider a splash of lemon juice for brightness. These small changes can take your mushrooms to the next level. Enjoy experimenting with different tastes! Pro Tips Use Fresh Herbs: Fresh thyme and oregano can elevate the flavor profile significantly compared to dried herbs. Don’t Overcrowd the Pan: Ensure the mushrooms are in a single layer to achieve optimal roasting and caramelization. Experiment with Cheese: Try using different types of cheese like Gruyère or feta for a unique flavor twist. Adjust Cooking Time: Depending on your oven, keep an eye on the mushrooms to prevent overcooking; they should be tender but not mushy. {{image_2}} You can mix it up with different cheeses. Mozzarella melts well and gives a nice stretch. Asiago adds a sharp twist that many enjoy. Feel free to try them out. You may find your new favorite flavor! Want a quicker option? Use an air fryer! Set it to 375°F (190°C). Cook the mushrooms for about 10-12 minutes. They will turn crispy and delicious. Grilling is another fun way to enjoy these mushrooms. Just toss them on the grill over medium heat. Cook until they get nice grill marks. This adds a smoky flavor that is hard to beat. If you want a vegan version, swap the Parmesan for nutritional yeast. It gives a cheesy flavor without any dairy. You can also use vegan cheese for a similar taste. Just make sure it melts well! To keep your Garlic Parmesan Roasted Mushrooms fresh, store them in the fridge. Use an airtight container to prevent moisture loss. They stay good for about three to four days. If you want to eat them later, make sure they cool down first. This helps keep their flavor and texture. To reheat your mushrooms, the oven works best. Preheat it to 350°F (175°C). Place the mushrooms on a baking sheet. Heat them for about 10 minutes. This method keeps them crispy. You can also use a microwave, but they might get soggy. If you use a microwave, heat them in short bursts to avoid overcooking. You can freeze Garlic Parmesan Roasted Mushrooms, but they lose some texture. First, let them cool completely. Then, place them in a freezer-safe bag. Try to remove as much air as possible. They can last up to three months in the freezer. When you thaw them, reheat in the oven for the best results. Garlic Parmesan Roasted Mushrooms last about three to five days in the fridge. Store them in an airtight container to keep them fresh. Always check for any off smells or changes in texture before eating. You can use dried mushrooms, but they need some prep. Soak them in warm water for about 20 to 30 minutes. This helps them soften and regain their shape. Fresh mushrooms give the best flavor and texture, so try to use them if you can. These mushrooms are great as a side dish. They go well with steak, chicken, or pasta. You can also serve them on a salad or as a topping for pizza. Their rich flavor adds a tasty touch to many meals. This post shared how to make Garlic Parmesan Roasted Mushrooms. We covered key ingredients, like baby Portobello mushrooms, garlic, and olive oil. I gave step-by-step instructions for roasting them perfectly. We also explored tips for choosing mushrooms and enhancing flavors. Plus, I offered tasty variations to suit every diet. In closing, these roasted mushrooms are easy to make and delicious. Try them as a side or snack. Enjoy this dish any time, knowing it’s full of flavor!

Garlic Parmesan Roasted Mushrooms Flavorsome Delight

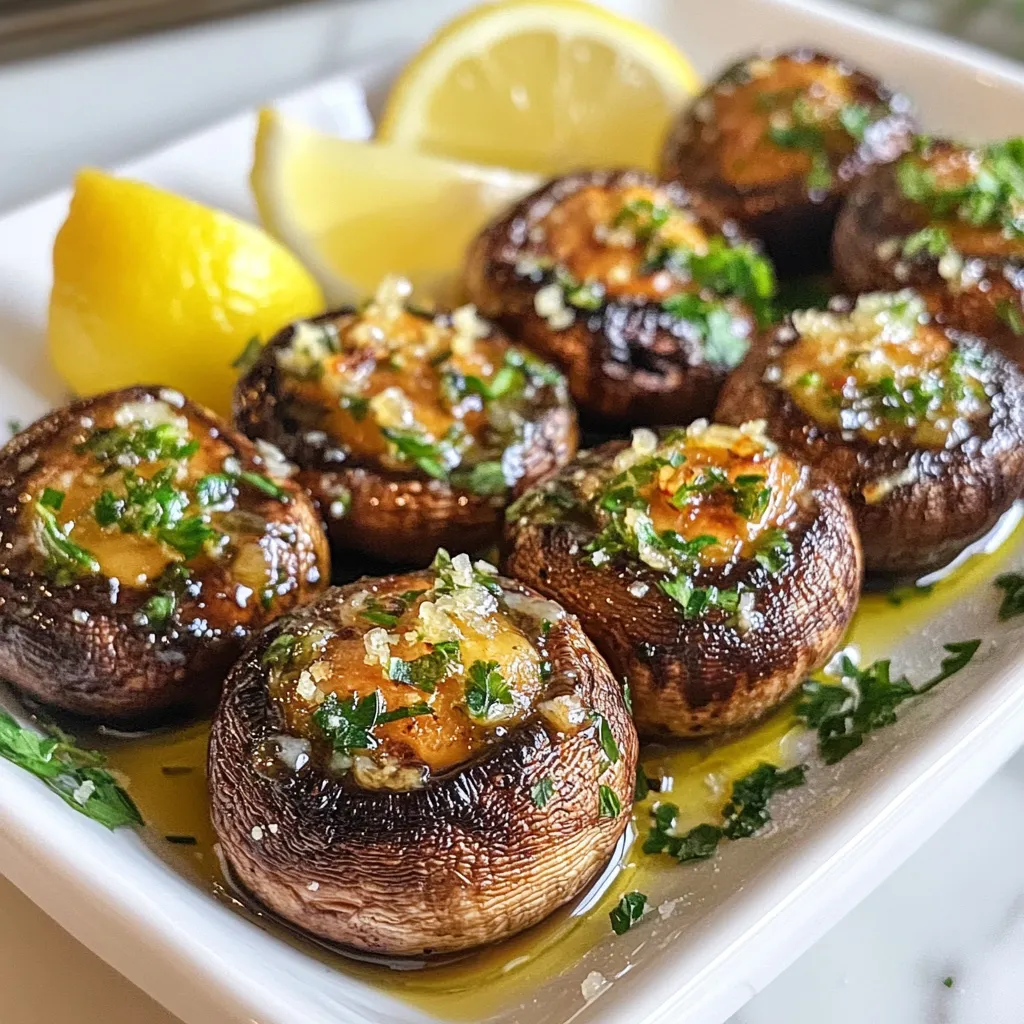
If you crave a tasty side dish, look no further than Garlic Parmesan Roasted Mushrooms. These little bites are savory

To make this tasty mango coconut chia pudding, you will need: - 1 cup coconut milk - 1/2 cup almond milk (or any plant-based milk) - 1/4 cup chia seeds - 2 tablespoons maple syrup (or sweetener of choice) - 1 ripe mango, diced - A pinch of salt - Toasted coconut flakes, for garnish - Fresh mint leaves, for garnish Each ingredient plays a key role. The coconut milk gives a creamy base, while almond milk lightens it. Chia seeds make the pudding thick and full of fiber. Mango adds sweetness and a fruity flair. The maple syrup enhances the flavor and gives a touch of sweetness. You can switch up the sweeteners. Honey, agave, or stevia work great too. If you want a sugar-free option, use a natural sweetener. For milk, oat milk or soy milk are good choices. They add their unique taste and texture. Feel free to try different combinations! This pudding is not just yummy; it's also good for you. - Chia seeds: They are high in fiber, protein, and omega-3s. - Coconut milk: It has healthy fats that can boost your energy. - Mango: This fruit is rich in vitamins A and C. It helps your immune system. - Almond milk: It is lower in calories and packed with vitamin E. Each bite of this pudding is a step toward better health! {{ingredient_image_1}} To make Mango Coconut Chia Pudding, start by mixing the coconut milk, almond milk, maple syrup, and salt in a bowl. Use a whisk to blend these ingredients well. Then, add the chia seeds. Stir until there are no clumps. Cover the bowl with plastic wrap or a lid. Refrigerate for at least four hours, or overnight for best results. This waiting time helps the chia seeds soak up the liquids and thicken the pudding. To get the perfect texture, check the pudding after chilling. If it seems too thick, add a splash of coconut or almond milk. Stir well to mix. The goal is a creamy, smooth pudding that is not too runny. Remember, the chia seeds absorb liquid, so adjust as needed. When serving, use clear glasses or bowls. This way, you can show off the beautiful layers. Spoon the thick pudding into your serving dish. Top with diced mango for a fresh touch. Add toasted coconut flakes and a sprig of mint for extra flair. These garnishes not only look great but also enhance the flavor. Enjoy your lovely, tropical treat! To make perfect chia pudding, use high-quality chia seeds. They should be fresh and not clumpy. Always mix the seeds into your liquid well. This step helps prevent clumping. I find that whisking is best for an even mix. Let the pudding rest in the fridge for at least four hours. This allows the seeds to absorb the liquid and thicken. If you want a smoother texture, blend the mixture before chilling. A common mistake is not measuring the chia seeds correctly. Too many seeds can make the pudding too thick. Too few seeds can lead to a watery pudding. Also, avoid using expired milk. Always check the date before you start. Lastly, do not skip the chilling time. If you serve it too early, it won’t set properly. For more flavor, try adding vanilla extract or a pinch of cinnamon. You can also mix in other fruits, like bananas or berries. For texture, add nuts or granola before serving. This adds a nice crunch. Top your pudding with toasted coconut flakes for added flavor. Fresh mint leaves also provide a refreshing taste and beautiful look. Enjoy experimenting with different flavors to find your favorite! Pro Tips Chia Seed Activation: Make sure to stir the chia seeds well after adding them to the liquid. This helps break up any clumps and ensures even hydration. Sweetness Adjustment: Taste your pudding mixture before refrigerating. You can always adjust the sweetness by adding more maple syrup or your preferred sweetener if needed. Texture Variation: For a creamier texture, blend the coconut and almond milk mixture before adding the chia seeds. This can create a smoother pudding. Garnish Ideas: Experiment with different toppings! Fresh berries, sliced bananas, or a drizzle of honey can add flavor and visual appeal to your pudding. {{image_2}} You can switch up the fruit in your chia pudding. Try strawberries, peaches, or blueberries. Each fruit adds its own flavor and color. Mixing fruits can make your pudding look beautiful and tasty. For a tropical twist, add pineapple or passion fruit. You can also use a mix of fruits for more fun. This recipe is already vegan-friendly. You can use maple syrup or other sweeteners. If you want it sugar-free, choose stevia or erythritol. Both give sweetness without sugar. You can skip the sweetener if the mango is ripe enough. It adds natural sweetness and flavor. For extra tropical flavor, add shredded pineapple or banana slices. You can mix these fruits with the mango. This adds texture and taste. Another great option is to sprinkle in some lime zest. It gives a fresh kick that brightens the pudding. When you want to go wild, try adding nuts or seeds for crunch. To store leftover mango coconut chia pudding, place it in an airtight container. This keeps it fresh and prevents any odors from other foods. Make sure to seal the lid tightly. I often use glass containers for easy viewing and storage. The pudding will last in the fridge for about 4 to 5 days. If you want to store it longer, freezing is a great option. Divide the pudding into portions and place them in freezer-safe containers. It can last up to 2 months in the freezer. Just remember to label the containers with the date. You can enjoy the pudding cold or warm it slightly. If you choose to heat it, place the pudding in a microwave-safe bowl. Heat it in short bursts, about 15 to 20 seconds at a time. Be sure to stir in between to avoid hot spots. If it thickens too much, add a splash of coconut or almond milk to reach your desired texture. Chia pudding is a creamy dish made from chia seeds. When mixed with liquid, the seeds swell and create a gel-like texture. This makes it a fun and healthy treat. You can flavor it with fruits, sweeteners, or spices. It’s simple to make and packed with nutrients. To make chia pudding thicker, add more chia seeds. For a thinner pudding, use less chia seeds. You can also adjust the liquid amount. If it’s too thick after chilling, mix in a splash of coconut or almond milk. Stir well until you reach your desired consistency. Yes! You can use any milk you like. Almond milk, oat milk, or soy milk work well. Each type of milk will change the flavor a bit. Coconut milk gives a rich, tropical taste, but feel free to experiment with your favorites. Absolutely! This pudding is nutritious and full of healthy fats, fiber, and protein. Chia seeds help with digestion and keep you full. The mango adds vitamins, while coconut milk provides healthy fat. It’s a great option for breakfast or a snack. Enjoy it guilt-free! Mango coconut chia pudding is an easy and tasty treat. We covered key ingredients, plus how to prepare and store it well. Using the right mix of flavors brings joy to each bite. Remember to avoid common mistakes to get better results. Try new fruits or toppings to keep it fun. Make it your own by mixing in different flavors. Enjoy your healthy pudding, knowing that it's both good for you and delicious.

Mango Coconut Chia Pudding Simple and Healthy Recipe

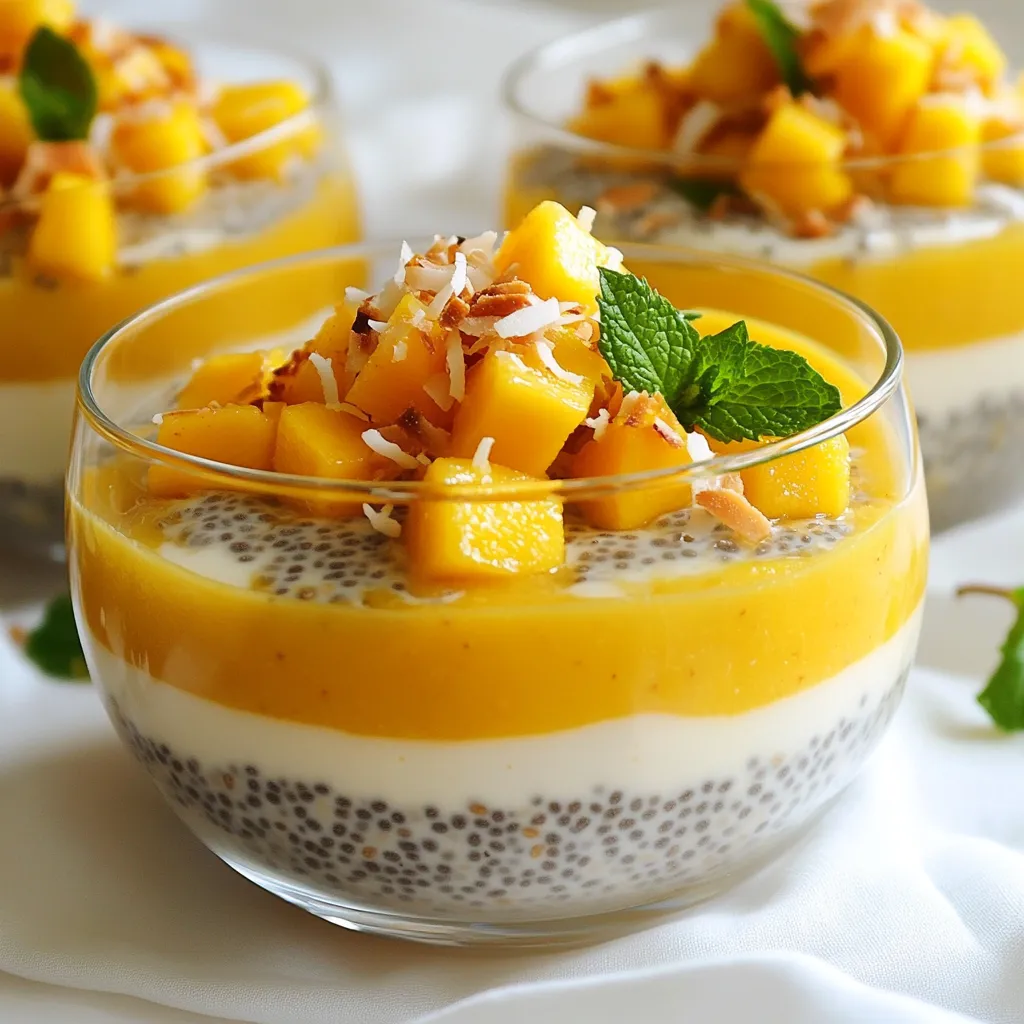
If you’re looking for a delicious treat that’s also healthy, you’ve found it! My Mango Coconut Chia Pudding recipe is

To make White Chocolate Macadamia Blondies, gather these simple ingredients: - 1 cup unsalted butter, melted - 1 cup packed light brown sugar - 1/2 cup granulated sugar - 2 large eggs - 2 teaspoons vanilla extract - 2 cups all-purpose flour - 1 teaspoon baking powder - 1/2 teaspoon salt - 1 cup white chocolate chips - 1 cup macadamia nuts, roughly chopped You can swap some ingredients if needed. Try these options: - Use salted butter for a richer taste. - Brown sugar can be replaced with coconut sugar for a hint of caramel. - If you lack white chocolate chips, use dark chocolate chips instead. - Almonds or walnuts can replace macadamia nuts for a different crunch. Select high-quality ingredients for the best flavor. Here are my top tips: - Choose fresh macadamia nuts. Look for a crunchy texture and no dark spots. - Use real vanilla extract, not imitation, for a richer taste. - Opt for good-quality white chocolate. It should have a smooth texture and nice aroma. - Ensure your flour is fresh. Old flour can affect the texture of your blondies. {{ingredient_image_1}} First, get everything ready. Gather your ingredients and tools. You will need an 8x8 inch baking dish, mixing bowls, and a whisk. Preheat your oven to 350°F (175°C). This step is key to getting that perfect bake. Grease the baking dish or line it with parchment paper for easy removal. 1. In a large bowl, mix the melted butter, brown sugar, and granulated sugar. Whisk until it’s smooth. 2. Add two eggs, one at a time. Mix well after adding each egg. 3. Stir in the vanilla extract. This adds great flavor. 4. In another bowl, sift together the flour, baking powder, and salt. 5. Gradually add the dry mix to the wet mix. Stir until just combined. Don’t overmix or the blondies may be tough. 6. Now, fold in the white chocolate chips and chopped macadamia nuts. Make sure they are evenly mixed. 7. Pour the batter into your prepared baking dish. Spread it evenly with a spatula. 8. Bake for 20-25 minutes. Look for lightly golden edges. Use a toothpick to check doneness. It should come out with a few moist crumbs. To check if your blondies are done, use a toothpick. Insert it into the center. If it comes out with a few moist crumbs, they are ready. If it’s wet with batter, bake for a few more minutes. Remember, the edges should be golden brown. Let the blondies cool in the pan for about 10 minutes. Then, transfer them to a wire rack. This cooling step is crucial for the best texture. To get that perfect texture in your blondies, focus on not overmixing the batter. Mix just until you see no dry flour. This helps keep them soft and chewy. Use room temperature eggs for better blending. Room temperature butter also helps the sugars mix well. One big mistake is not measuring your flour right. Too much flour makes blondies dry. Always spoon flour into the measuring cup and level it off. Another mistake is baking them too long. Watch for a light gold edge, and test with a toothpick. A few moist crumbs are perfect! Using the right tools makes baking easier. A good mixing bowl helps you combine ingredients well. A rubber spatula is great for folding in chocolate and nuts. An 8x8 inch baking dish is perfect for this recipe. Don't forget parchment paper for easy removal! A wire rack cools your blondies evenly. Pro Tips Use Room Temperature Eggs: Make sure your eggs are at room temperature before mixing them into the batter. This helps in creating a smoother and creamier texture for your blondies. Don't Overmix the Batter: When combining the dry ingredients with the wet ingredients, mix until just combined. Overmixing can lead to dense and tough blondies. Chill the Batter: For a thicker blondie, chill the batter in the refrigerator for about 30 minutes before baking. This helps the blondies maintain their shape and results in a chewier texture. Check for Doneness: To ensure perfectly baked blondies, insert a toothpick into the center; it should come out with a few moist crumbs, not wet batter. This guarantees they are soft and fudgy. {{image_2}} You can easily add more flavors to your blondies. Try mixing in a teaspoon of almond extract for a nutty touch. You can also add a pinch of cinnamon for warmth. If you want a fruity twist, fold in some diced dried cherries or cranberries. They add a nice color and taste! If you need a gluten-free version, swap the all-purpose flour for a gluten-free blend. Many brands work well in baking. Just make sure the blend contains xanthan gum for the right texture. This way, you can still enjoy these sweet treats without gluten! Macadamia nuts shine in these blondies, but other nuts work too. Try chopped walnuts or pecans for a different texture. You can even use hazelnuts for a fun twist. Each nut brings its own flavor, making your blondies unique every time! To keep your white chocolate macadamia blondies fresh, store them in an airtight container. Place a piece of wax paper between layers to avoid sticking. This method helps maintain their soft texture and sweet flavor. You can freeze blondies for later enjoyment. First, let them cool completely. Then, cut them into squares. Wrap each square tightly in plastic wrap. Place the wrapped squares in a freezer-safe bag or container. They will stay fresh for up to three months in the freezer. These blondies can last for about a week at room temperature if stored properly. Keep them away from direct sunlight and heat. For the best taste, enjoy them within the first few days. You can also warm them slightly in the microwave for a soft, gooey treat. Yes, you can use dark or milk chocolate instead of white chocolate. Dark chocolate gives a richer flavor. Milk chocolate offers a sweeter taste. Just remember to adjust the amount based on sweetness. You want to keep the balance right. To make blondies chewy, use more brown sugar. Brown sugar adds moisture and creates a softer texture. Also, do not overmix the batter. Mix until just combined. Overmixing can make them tough. Finally, bake them until they are just set. A toothpick should come out with a few moist crumbs. Blondies and brownies differ mainly in flavor and color. Blondies use brown sugar and no cocoa powder. This gives them a sweet, buttery taste. Brownies, on the other hand, are chocolatey and rich. They often have a denser texture. While both are delicious, blondies have a lighter, sweeter profile. This blog post covered key aspects of making delicious blondies. We discussed essential ingredients, suitable swaps, and tips for choosing the best ones. The step-by-step guide helped you through baking and checking for doneness. You learned how to achieve the right texture and avoid common mistakes. Variations enabled customization, while storage tips ensure freshness. In summary, use this knowledge to create perfect blondies every time. Enjoy your baking journey!

White Chocolate Macadamia Blondies Delightful Treats

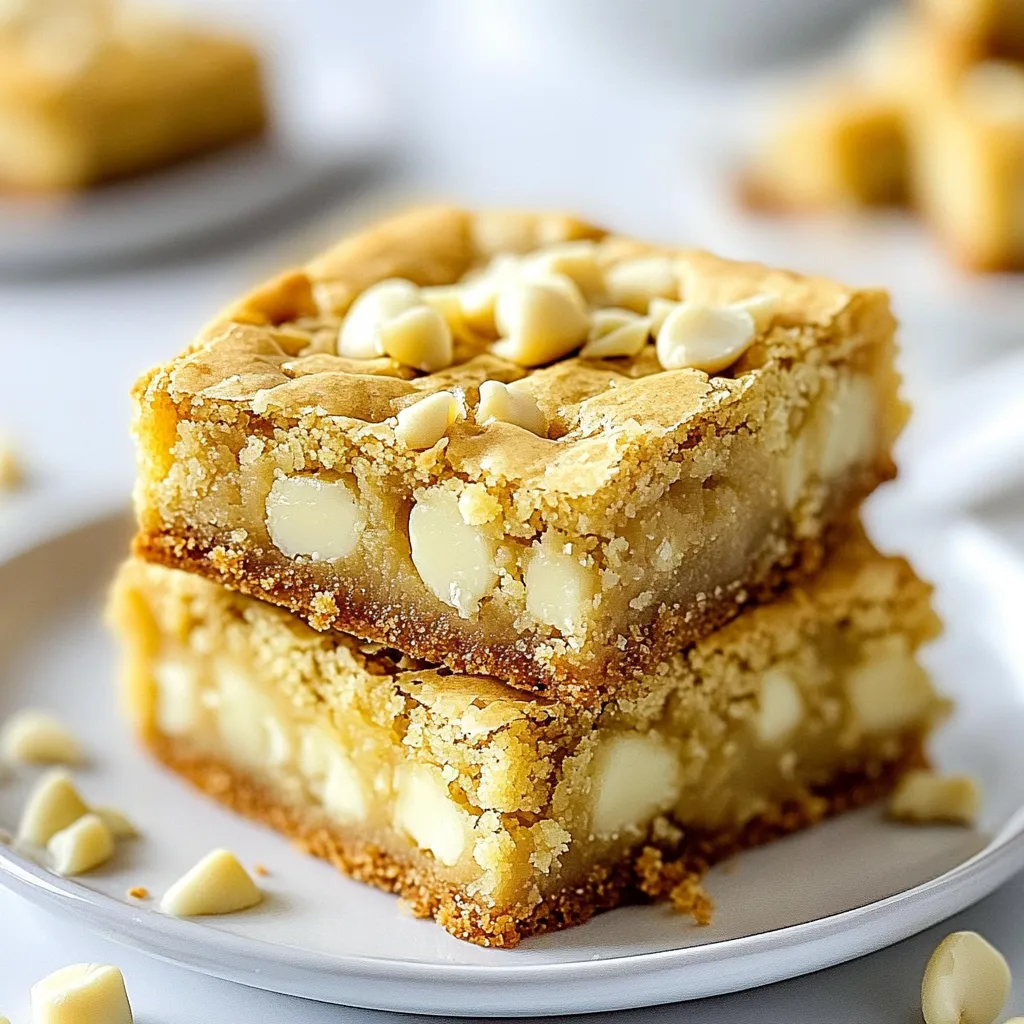
If you love sweet treats, you’re in for a real delight! These White Chocolate Macadamia Blondies are easy to make

Older posts
Newer posts
← Previous Page1 … Page132 Page133 Page134 … Page137 Next →

dsad

© 2025 Recipes Pursuit • Built with GeneratePress

Our Policies

  • Copyright Policy
  • Cookie Policy
  • GDPR Policy
  • Privacy Policy
  • Disclaimer
  • Terms Of Use

More Information

  • Home
  • About
  • Contact
  • Appetizers
  • Dessert
  • Dinner
  • Drinks
©2025, Recipes Pursuit About Back To Top