Skip to content
DisclaimerTerms Of UseGDPR PolicyCookie Policy

Recipes Pursuit

  • Home
  • Drinks
  • Appetizers
  • Dinner
  • Dessert
  • About
  • Contact
  • Privacy Policy
DisclaimerTerms Of UseGDPR PolicyCookie Policy

Emma Smith

- 1 ½ cups all-purpose flour - ½ cup unsalted butter, chilled and diced - 3 medium apples (Granny Smith or Honeycrisp), peeled and sliced - ¼ cup caramel sauce (store-bought or homemade) - 1 tablespoon sugar - ¼ cup brown sugar - 1 tablespoon lemon juice - 1 teaspoon cinnamon - ½ teaspoon sea salt - 1 beaten egg - Vanilla ice cream for serving {{ingredient_image_1}} - Mixing dry ingredients: Start by taking a mixing bowl. Add 1 ½ cups of all-purpose flour, ½ teaspoon of salt, and 1 tablespoon of sugar. Stir them together with a whisk. This mix creates the base of your dough. - Incorporating butter: Next, take ½ cup of chilled, diced unsalted butter. Add it to the dry mix. Use a pastry cutter or your fingers to mix until it looks like coarse crumbs. This step adds flavor and flakiness. - Forming the dough: Slowly add 4 to 5 tablespoons of ice water, one tablespoon at a time. Mix gently until the dough holds together. Shape the dough into a disk, wrap it in plastic wrap, and chill in the fridge for at least 30 minutes. - Slicing and seasoning apples: While your dough chills, take 3 medium apples. I prefer Granny Smith or Honeycrisp for their tartness. Peel them and slice them thinly. In a bowl, toss the slices with 1 tablespoon of lemon juice, 1 teaspoon of cinnamon, and ¼ cup of brown sugar. - Letting the mixture rest: Allow the apple mixture to sit for about 15 minutes. This time helps the flavors blend together. It also allows the apples to release some juice, which adds flavor. - Rolling out the dough: After chilling, sprinkle flour on your surface. Roll out the dough into a rough circle, about 12 inches in diameter. Make sure it’s not too thick. Transfer the dough to a lined baking sheet. - Arranging apple slices: Place the apple slices in the center of the dough, leaving about a 2-inch border. Drizzle ¼ cup of caramel sauce over the apples for that sweet touch. - Folding and finishing touches: Fold the edges of the dough over the apples. Pleat the dough as needed to create a rustic look. This step helps keep the apples snug and makes it pretty. - Preheating the oven: Preheat your oven to 400°F (200°C). This step ensures the galette cooks evenly. Line a baking sheet with parchment paper to avoid sticking. - Baking instructions: Bake the galette for 30 to 35 minutes. Look for tender apples and a golden-brown crust. The smell of cinnamon and caramel will fill your kitchen, making it hard to wait! - Cooling before serving: Once baked, let the galette cool slightly. This step helps set the filling. Serve it warm, and feel free to drizzle more caramel sauce on top for extra sweetness. Chilled ingredients are key for a flaky crust. Use cold butter and ice water. This keeps the fat from melting before baking, which helps create layers. Mix the dough lightly. Overworking it can make the crust tough. Use a pastry cutter or your fingers to blend. You want it to look like coarse crumbs before adding water. Be gentle and stop mixing when it just comes together. Then, shape it into a disk and chill. Choosing the right apples makes a big difference. I like using Granny Smith or Honeycrisp. These apples have the right mix of sweetness and tartness. This balance keeps the filling bright and fresh. To enhance flavor, toss the apples with lemon juice and cinnamon. The lemon juice adds a nice zing. Let the mixture sit for about 15 minutes to let the flavors blend. Serving your galette warm is a must. It pairs beautifully with vanilla ice cream. The cold ice cream contrasts with the warm galette. You can also drizzle extra caramel sauce on top. This boosts the sweet flavor and adds a lovely shine. A sprinkle of sea salt on the caramel can enhance the taste even more. Enjoy every bite! Pro Tips Chill Your Ingredients: Make sure your butter is very cold, and consider chilling the flour as well. This helps create a flakier crust. Apple Selection: Use a mix of sweet and tart apples for a more complex flavor profile. Granny Smith and Honeycrisp are perfect together! Prevent Soggy Crust: To avoid a soggy bottom, consider sprinkling a thin layer of cornstarch or flour on the dough before adding the apples. Rest the Dough: Allowing the dough to rest in the refrigerator not only makes it easier to roll out but also improves the texture of the finished crust. {{image_2}} You can add fun flavors to your galette. Adding nuts like walnuts or pecans gives a nice crunch. Chop them finely and sprinkle them over the apples before baking. This adds texture and taste. You can also use spices. Nutmeg and allspice enhance the apple flavor. Just a pinch of either spice can change the taste. Mix these spices with the apples for a new depth of flavor. When serving your galette, try different toppings. Whipped cream adds a light and fluffy touch. You can use store-bought or make your own. You can also switch up the sauces. Chocolate sauce drizzled over the galette adds richness. Berry sauce gives a tart contrast. Both options bring fresh excitement to each slice. If you need gluten-free options, swap the all-purpose flour for a gluten-free blend. Many blends work well in baking. Just check the package for the best results. For vegan options, replace the butter with coconut oil or vegan butter. Use a flax egg instead of the beaten egg for the crust. These changes keep the galette tasty while meeting your dietary needs. To keep your caramel apple galette fresh, place it in the fridge. Use an airtight container or wrap it tightly in plastic wrap. This helps prevent the galette from drying out. You can store it in the fridge for up to three days. If you want to keep it longer, freezing is a great option. When it's time to enjoy your galette again, reheating is key. Preheat your oven to 350°F (175°C). Place the galette on a baking sheet and cover it lightly with foil. This keeps the crust from burning. Heat for about 10-15 minutes, or until warm. The crust will stay crispy this way, which is what we all want! If you want to freeze your galette, freeze it unbaked. Wrap the assembled galette in plastic wrap and then foil. This protects it from freezer burn. You can freeze it for up to three months. To bake a frozen galette, remove it from the freezer. Thaw it in the fridge for a few hours. Then, bake it as directed in the recipe, adding a few extra minutes for baking time. Enjoy the warm, delicious flavors! A galette is a free-form pastry. It has roots in France, where it was made for many years. It is often round and rustic. Unlike pie, it does not need a pie pan. You roll out the dough, place the filling in the center, and fold the edges. This makes it easier and fun to prepare. Yes, you can use many fruits for galette. Some great options include: - Pears - Peaches - Berries (like blueberries or raspberries) - Plums These fruits add their own unique flavor and texture. You can mix fruits too for a fun twist. Just keep the same steps for the filling when preparing. The galette is done when the apples are tender and the crust is golden brown. Here are some key signs to check for: - The edges of the crust should look golden and crisp. - The apples inside should be soft enough to pierce with a fork. - You can also smell a sweet aroma as it bakes. These signs show that your galette is ready to enjoy! In this post, we explored how to make a caramel apple galette. You learned about the key ingredients, from flour to apples and caramel. The step-by-step guide made the process easy, from mixing dough to baking. I shared useful tips for a flaky crust and perfect apple filling. We discussed fun variations and how to store leftovers. This galette is tasty and simple, perfect for any dessert lover. Enjoy creating your own!

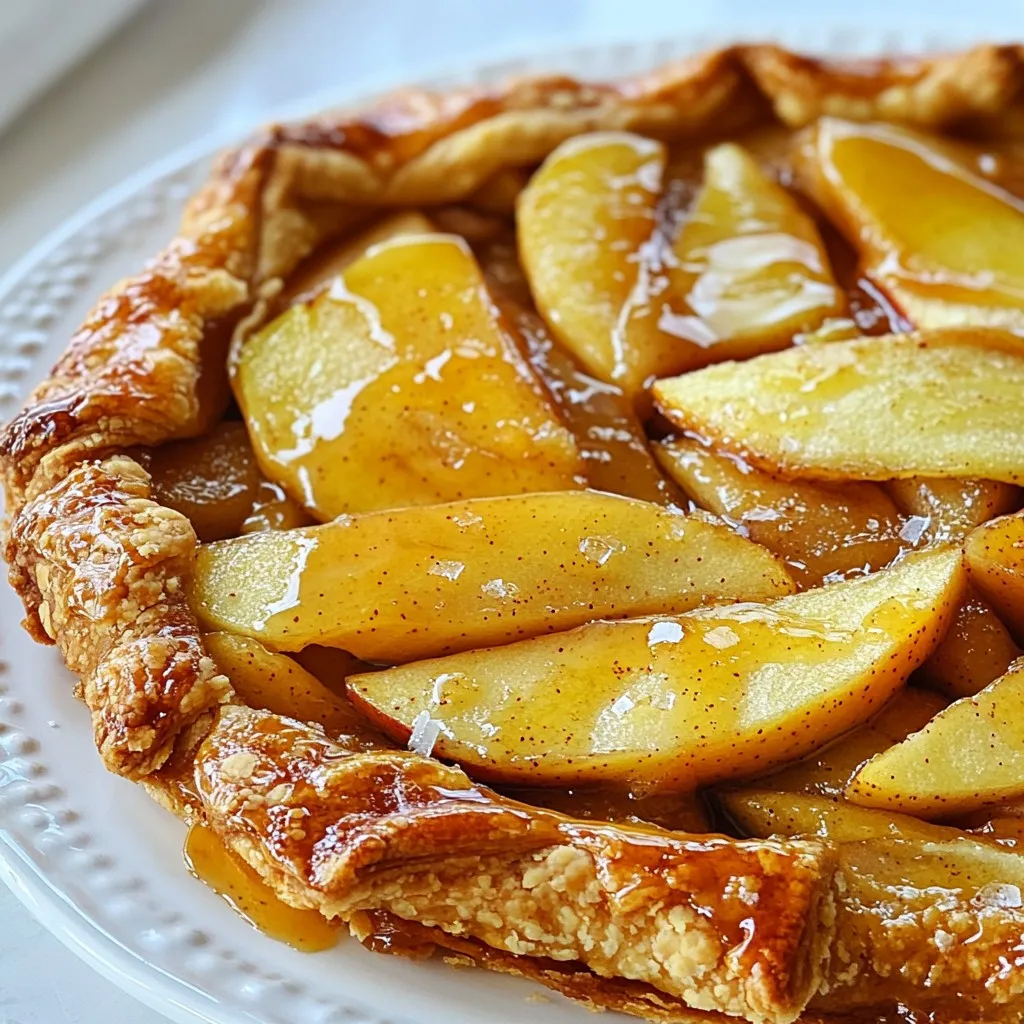
Caramel Apple Galette Delightfully Sweet and Simple

Are you ready to whip up a sweet treat that impresses? A Caramel Apple Galette combines crisp, juicy apples and

- 1 medium cauliflower, cut into florets - 1 cup bell peppers (red and yellow), sliced - 1 cup snap peas, trimmed - 2 carrots, julienned In this dish, cauliflower serves as the star. It has a nice crunch and absorbs the teriyaki flavor well. I love using both red and yellow bell peppers for a pop of color. Snap peas add sweetness and a nice snap. Carrots bring a hint of earthiness and a touch of sweetness. - 2 cloves garlic, minced - 1 tablespoon fresh ginger, minced - 3 tablespoons teriyaki sauce - 2 tablespoons sesame oil - 1 tablespoon olive oil Garlic and ginger provide a strong base for flavor. They make the kitchen smell amazing as they cook. The teriyaki sauce ties everything together, adding a sweet and savory touch. I use sesame oil for its rich, nutty taste. Olive oil helps cook the veggies and adds extra flavor. - 1 tablespoon sesame seeds (optional for garnish) - 3 green onions, chopped - Salt and pepper to taste Garnishes make your dish look pretty and add texture. I like to sprinkle sesame seeds on top for crunch. Chopped green onions add a fresh bite. Don’t forget to season with salt and pepper to enhance all those great flavors! {{ingredient_image_1}} Start by cutting the cauliflower into small florets. This helps them cook evenly. Aim for pieces about one inch wide. Next, slice the bell peppers into thin strips. You can use red and yellow peppers for color. Then, julienne the carrots into matchstick shapes. This makes them easier to stir-fry and adds a nice crunch. In a large skillet or wok, heat two tablespoons of sesame oil and one tablespoon of olive oil over medium-high heat. Once it’s hot, add two cloves of minced garlic and one tablespoon of minced ginger. Sauté for about 30 seconds until fragrant. Then, add the cauliflower florets. Cook them for four to five minutes. You want them to soften and get a little brown on the edges. Next, stir in one cup of sliced bell peppers, one cup of trimmed snap peas, and the julienned carrots. Keep stir-frying for another five minutes. The veggies should be tender but still crisp. Now it’s time to add three tablespoons of teriyaki sauce. Pour it over the vegetables and stir well to coat them evenly. Cook for an additional two to three minutes to heat the sauce through. Season with salt and pepper to taste. Finally, remove the skillet from the heat and stir in three chopped green onions. Serve hot, and if you like, sprinkle with sesame seeds for a nice touch. To make your Teriyaki Cauliflower Stir Fry shine, choose a great teriyaki sauce. Look for one that has a balanced taste. It should be sweet, salty, and a bit tangy. You can even try making your own! Just mix soy sauce, sugar, and mirin. Perfect sautéing is key. Start with hot oil. I like to use sesame oil for added flavor. Add garlic and ginger first. This brings out their aroma. Stir them for about 30 seconds. Then, add your veggies. Make sure not to overcrowd the pan. This helps to keep your vegetables crisp. Cooking times matter when using different vegetables. Cauliflower takes about 5 minutes to soften. Bell peppers and snap peas only need about 3 to 5 minutes. Carrots, sliced thinly, cook fast too. Watch for signs of doneness. Your veggies should be bright and tender-crisp. If they look dull or mushy, you've cooked them too long. The goal is to keep a nice crunch while making sure they are warm. Pro Tips Use Fresh Vegetables: Fresh, seasonal vegetables will enhance the flavor and nutrition of your stir fry. Customize Your Sauce: Feel free to adjust the amount of teriyaki sauce based on your taste preference or try adding a splash of soy sauce for extra umami. Don’t Overcook: For the best texture, ensure the vegetables remain tender-crisp; they should still have a slight bite. Garnish for Flair: Adding sesame seeds or chopped nuts not only enhances the presentation but also adds a delightful crunch. {{image_2}} You can make your Teriyaki Cauliflower Stir Fry even better by adding protein. Tofu or tempeh works great. - Tofu: Use firm tofu for a nice texture. Cut it into cubes and sauté it with the garlic and ginger. This adds protein and keeps the dish vegan. - Tempeh: Tempeh has a nutty taste. Slice it thin and cook it until crispy. Add it with your veggies for a hearty meal. If you prefer meat, try chicken or shrimp. - Chicken: Cut chicken breast into bite-sized pieces. Cook it first, then add the veggies. This will give you a tasty stir fry. - Shrimp: Use peeled and deveined shrimp. Add them when the veggies are almost done. They cook quickly and add great flavor. Switching up the vegetables can keep your stir fry exciting. - Substitutions: You can use broccoli, zucchini, or even mushrooms. These add different flavors and textures. Feel free to mix and match! - Frozen Vegetables: If you're short on time, frozen veggies are a quick option. They are easy to use and still taste good. Just add them to the skillet and cook until heated through. By using these variations, you can customize your Teriyaki Cauliflower Stir Fry to fit your taste and needs. Enjoy the creativity! To store your Teriyaki Cauliflower Stir Fry, let it cool first. Place it in an airtight container. This keeps it fresh in the fridge for up to three days. When you want to reheat it, use a skillet over medium heat. Add a splash of water or teriyaki sauce to help it heat evenly. Stir frequently to warm it through. You can also use the microwave if you’re in a hurry. Just cover it with a damp paper towel to prevent drying out. Heat in short bursts, stirring in between. To freeze your stir fry, first let it cool completely. Then, portion it into freezer-safe bags or containers. Remove as much air as you can to avoid freezer burn. Label the bags with the date to keep track. It’s best to use it within three months for the best taste. When you’re ready to eat, thaw it in the fridge overnight. To reheat, use a skillet or microwave. Add a little water or sauce to keep the veggies tender. This way, you maintain the great texture and flavor. Teriyaki Cauliflower Stir Fry can last up to four days in the fridge. Store it in an airtight container. This keeps it fresh and tasty. When you want to eat it again, just heat it up. Make sure it gets hot all the way through. Yes, you can make this recipe gluten-free. Look for gluten-free teriyaki sauce at the store. Many brands offer this option now. Just check the label to be sure it is gluten-free. This way, everyone can enjoy the dish without worry. You can serve Teriyaki Cauliflower Stir Fry with a few tasty options. Rice is a great choice. It soaks up the sauce well. You can also use noodles for a fun twist. Both are simple and delicious sides. In this post, we covered how to make Teriyaki Cauliflower Stir Fry. We discussed the main ingredients, flavorful additions, and optional garnishes. You learned step-by-step instructions for preparation and cooking. We also shared tips for enhancing flavor and adjusting cooking times. As you explore variations, consider adding proteins or different veggies. Store your leftovers properly for maximum taste. Enjoy this dish now and later, knowing it’s simple and tasty!

Teriyaki Cauliflower Stir Fry Simple and Flavorful Meal

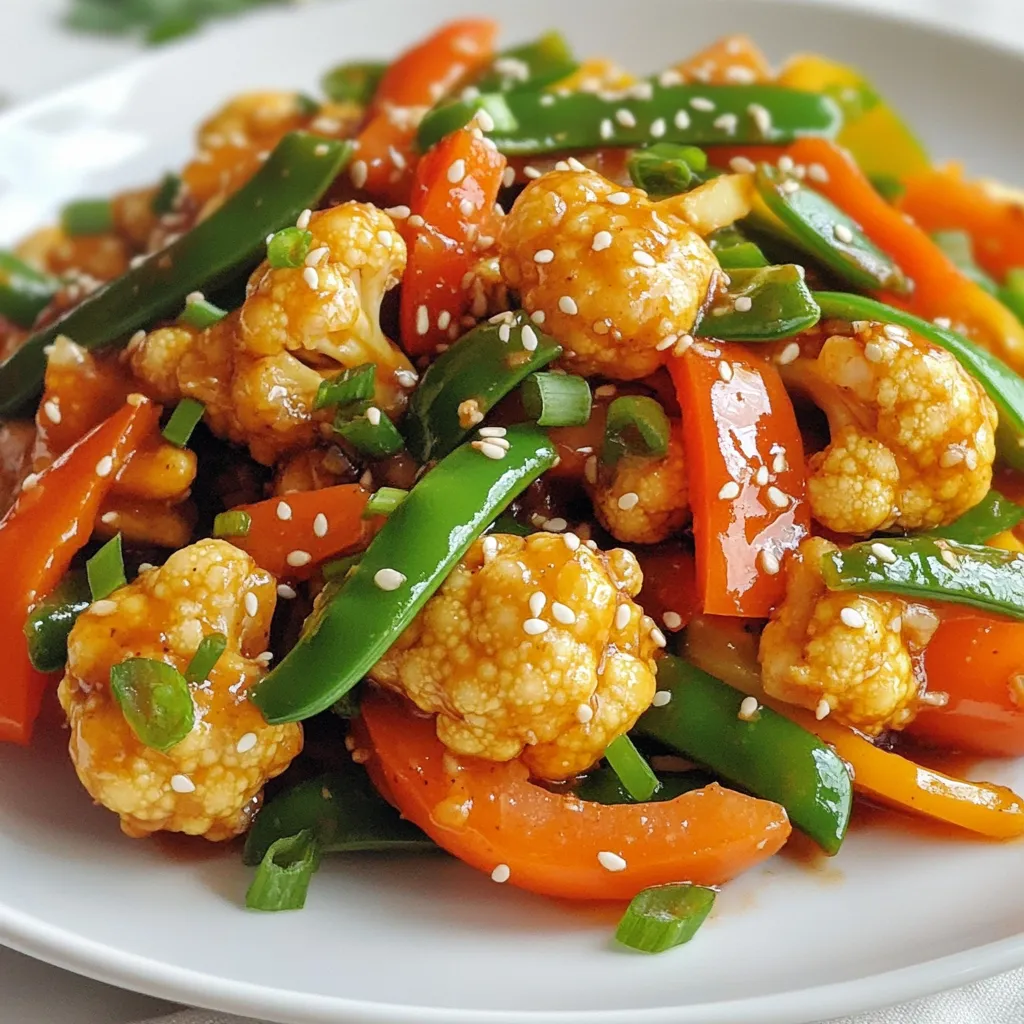
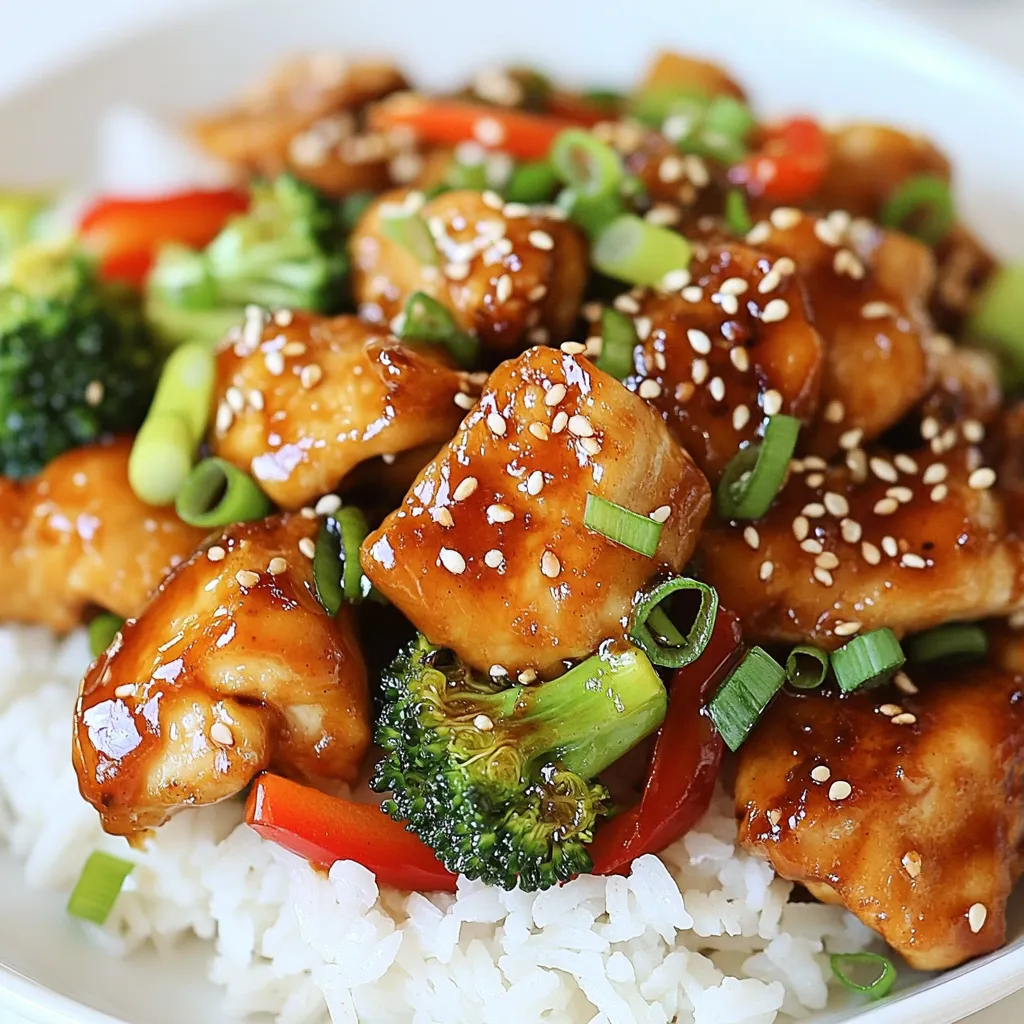
Looking for a quick and tasty dinner? This Teriyaki Cauliflower Stir Fry is packed with flavor! You’ll love how easy

For my peanut butter chocolate chunk cookies, gather these items: - 1 cup creamy peanut butter - 1/2 cup brown sugar - 1/2 cup granulated sugar - 1 large egg - 1 teaspoon vanilla extract - 1/2 teaspoon baking soda - A pinch of salt - 1 cup dark chocolate chunks - 1/2 cup chopped roasted peanuts (optional) Each ingredient plays a key role in the taste and texture. - Creamy peanut butter gives a rich flavor. - Brown sugar adds moisture and depth. - Granulated sugar balances sweetness. - Large egg binds everything together. - Vanilla extract enhances the overall taste. - Baking soda helps the cookies rise. - Salt brightens the flavors. - Dark chocolate chunks create melty pockets of goodness. - Chopped roasted peanuts add extra crunch. You can make these cookies your own! - Use crunchy peanut butter for added texture. - Replace brown sugar with coconut sugar for a different flavor. - Swap granulated sugar with honey or maple syrup, but adjust the liquid. - If you want nuts, try walnuts or pecans instead of peanuts. - Add coconut flakes or dried fruit for a unique twist. {{ingredient_image_1}} To make these cookies, you need about 15 minutes for prep. Gather all your ingredients first. Preheat your oven to 350°F (175°C). Line a baking sheet with parchment paper. This helps to prevent sticking. 1. In a large bowl, mix 1 cup of creamy peanut butter with 1/2 cup of brown sugar and 1/2 cup of granulated sugar. Stir until it becomes smooth and creamy. 2. Now, add 1 large egg and 1 teaspoon of vanilla extract. Mix well until everything is blended. 3. Next, sprinkle in 1/2 teaspoon of baking soda and a small pinch of salt. Stir until the baking soda is mixed evenly. 4. Gently fold in 1 cup of dark chocolate chunks. If you want, you can add 1/2 cup of chopped roasted peanuts. Use a spatula for this step. 5. Use a cookie scoop or a tablespoon to drop rounded balls of dough onto the baking sheet. Space them about 2 inches apart. 6. Slightly press each cookie ball to flatten it. This helps them bake evenly. 7. Bake the cookies in the oven for 10 to 12 minutes. The edges should be golden brown. The centers might look a bit undercooked. 8. After baking, take them out and let them cool on the baking sheet for 5 minutes. Then, move them to a wire rack to cool fully. Cookies are done when the edges turn golden brown. The centers might look soft, and that is okay. They will firm up as they cool. Keep an eye on them to avoid overbaking. Enjoy your fresh cookies! To bake perfect peanut butter chocolate chunk cookies, start with room temperature ingredients. This helps them mix better. Use a cookie scoop for even-sized balls. This ensures they bake evenly. Press each ball slightly for a flat shape. This helps them cook through. Keep an eye on the edges; you want them golden. The centers may look soft, but they will firm up as they cool. Keep your cookies fresh by storing them in an airtight container. This keeps them soft and chewy. If you want them to last longer, freeze them. Place them in a freezer-safe bag. They can stay fresh for up to three months. When you’re ready to eat, let them thaw at room temperature. Reheat them for a few seconds in the microwave for that fresh-baked taste. Avoid overmixing your dough. Too much mixing can make the cookies tough. Don’t skip the baking soda; it helps them rise. If you want a rich flavor, use high-quality chocolate chunks. Make sure not to crowd the baking sheet. Leave enough space between each cookie for even baking. Lastly, always check your oven temperature with an oven thermometer. Ovens can be off, which affects baking time. Pro Tips Use Room Temperature Ingredients: Make sure your peanut butter and egg are at room temperature for better incorporation and a smoother cookie dough. Don’t Overbake: To achieve that soft and chewy texture, take the cookies out of the oven when the edges are golden, even if the centers appear slightly undercooked. Customize Your Mix-ins: Feel free to experiment with different types of chocolate, such as milk or white chocolate, or add in dried fruits like cranberries for an added twist. Storage Tips: Store your cookies in an airtight container at room temperature for up to a week or freeze for longer shelf life, ensuring they stay fresh and delicious. {{image_2}} You can make these cookies gluten-free with a simple swap. Use gluten-free flour instead of regular flour. Almond flour or oat flour works well. This change keeps the cookies soft and chewy. They still taste great without the gluten! To make these cookies vegan, swap the egg for a flax egg. Mix one tablespoon of ground flaxseed with three tablespoons of water. Let it sit until it thickens. You can also use maple syrup in place of granulated sugar. This gives a nice, rich flavor while keeping the recipe plant-based. Add your twist to these cookies! Try mixing in a teaspoon of cinnamon for warmth. You can also use different chocolates, like white or milk chocolate. For a nutty crunch, throw in some chopped walnuts or almonds. Dried fruits, like cranberries or raisins, can add a fruity touch. The choices are endless! To keep your cookies fresh, store them in an airtight container. Place parchment paper between layers to avoid sticking. This method helps maintain the soft texture. You can also add a slice of bread to keep them moist. The bread will absorb excess air and keep the cookies chewy. You can freeze the cookie dough before baking. Scoop the dough into balls and place them on a baking sheet. Freeze until solid, then transfer them to a freezer bag. When ready to bake, no need to thaw! Just bake them for an extra minute or two. If you freeze baked cookies, let them cool first. Wrap them in plastic wrap and place them in a freezer bag. To reheat, microwave for a few seconds or warm in the oven. These cookies last about one week at room temperature. If stored properly, they can last up to three months in the freezer. Always check for signs of spoilage like dryness or a change in smell. Enjoy your treats while they are fresh for the best taste! Yes, you can use crunchy peanut butter. It will add a nice texture. The cookies will have little bits of peanuts, making each bite fun. If you love that crunch, go for it! You can make these cookies healthier by using natural peanut butter. Look for one with no added sugar or oils. You can also substitute some sugar with mashed bananas or unsweetened applesauce. This keeps the cookies moist and adds flavor. If you need a substitute for baking soda, use baking powder. Use three times the amount. If the recipe calls for 1/2 teaspoon of baking soda, use 1 1/2 teaspoons of baking powder. Just remember, your cookies may not rise as much. Absolutely! You can mix in milk chocolate or white chocolate chunks. You can even use chocolate chips. You can also add mini chocolate chips for a fun twist. Mix and match to find your favorite combo! Peanut butter chocolate chunk cookies are easy to make at home. We covered ingredients, baking steps, and storage tips to help you succeed. Remember to avoid common mistakes to get the best results. Feel free to explore variations like gluten-free or vegan options. With these tips, you can enjoy perfect cookies anytime. Happy baking!

Peanut Butter Chocolate Chunk Cookies Easy Treat Recipe

Are you craving a sweet treat that’s easy to make and hard to resist? I’ve got just the recipe for

To make flavorful sweet and sour chicken meatballs, gather these main ingredients: - 1 pound ground chicken - 1/2 cup breadcrumbs - 1/4 cup grated Parmesan cheese - 1 egg, beaten - 2 cloves garlic, minced - 1 teaspoon ginger, grated - 1 tablespoon soy sauce - 1/2 teaspoon salt - 1/4 teaspoon black pepper - 1/4 cup green onions, chopped - 1/2 cup pineapple chunks (fresh or canned) - 1/2 cup bell pepper, chopped (red and yellow for color) - 1/2 cup sweet and sour sauce (store-bought or homemade) These ingredients work together to create a tasty balance of savory and sweet. Adding garnishes can elevate your dish. Consider these options: - Sesame seeds for a nice crunch - Fresh cilantro for vibrant color and flavor - Extra chopped green onions for a fresh touch These garnishes add flavor and make your dish look beautiful. You can swap some ingredients for different flavors or preferences. Here are a few ideas: - Use turkey or pork instead of ground chicken for a different taste. - Omit cheese if you want a dairy-free option. - Try quinoa instead of breadcrumbs for a gluten-free choice. - Use teriyaki sauce in place of sweet and sour sauce for a different twist. These substitutions allow you to customize the recipe to your liking. {{ingredient_image_1}} Start by gathering your ingredients. You will need ground chicken, breadcrumbs, Parmesan cheese, and an egg. You will also need minced garlic, grated ginger, soy sauce, salt, and black pepper. 1. In a large bowl, combine the ground chicken, breadcrumbs, and grated Parmesan. 2. Add the beaten egg, minced garlic, grated ginger, soy sauce, salt, and black pepper. 3. Mix everything well with your hands. The mixture should be sticky and hold together. 4. Form the mixture into meatballs about 1 inch in diameter. Preheat your oven to 400°F (200°C). 1. Line a baking sheet with parchment paper to prevent sticking. 2. Place the meatballs on the sheet, leaving space between each. 3. Bake them for 15-20 minutes. They should be golden brown and cooked through. While the meatballs bake, you can prepare the sauce. 1. If you use store-bought sauce, skip this step. 2. In a small saucepan, combine 1/2 cup of sugar, 1/2 cup of vinegar, and 1/4 cup of ketchup. 3. Heat gently until the sugar dissolves. Stir often to mix well. Now it’s time to bring everything together. 1. In a separate skillet, heat a little oil over medium heat. 2. Add chopped bell peppers and pineapple chunks. Sauté for 3-5 minutes until the peppers are tender. 3. Once the meatballs are done, add them to the skillet. 4. Pour the sweet and sour sauce over the meatballs and veggies. 5. Toss gently to coat everything in sauce. 6. Cook for 2-3 more minutes to blend the flavors. 7. Remove from heat and garnish with sesame seeds and fresh cilantro before serving. Serve these tasty meatballs on a platter. You can drizzle extra sauce on top and sprinkle with chopped green onions for a vibrant look. Enjoy! To make great meatballs, keep a few things in mind. First, don’t overmix the meat. Mixing too much can make them tough. Aim for a gentle mix to keep them soft. Use breadcrumbs to help bind the meat together. They also add a nice texture. The egg acts as glue, so make sure to add it to your mix. For the best size, form meatballs about one inch wide. This size cooks evenly and stays juicy. Adding seasoning is key to great taste. Use fresh garlic and ginger for a burst of flavor. They bring warmth and depth to the meatballs. Soy sauce adds umami, which enhances the overall taste. Don’t forget about salt and pepper; they bring out the other flavors. You can also add chopped green onions for a fresh kick. If you like a bit of sweetness, include pineapple chunks in the mix. They not only taste good but keep the meatballs moist. These meatballs shine on a big platter. Drizzle extra sweet and sour sauce over them for an extra zing. Sprinkle sesame seeds and green onions on top to make them look pretty. Serve them with steamed white rice to soak up the sauce. If you want a veggie side, try stir-fried bell peppers or broccoli. For a fun twist, serve with toothpicks for easy eating at parties. Pro Tips Use Fresh Ingredients: Opt for fresh pineapple and crisp bell peppers to enhance the flavor and texture of your meatballs. Customize the Sauce: Feel free to adjust the sweetness or acidity of your sweet and sour sauce by adding more sugar or vinegar to suit your taste. Don't Overmix: When combining the meatball ingredients, mix just until combined to keep the meatballs tender and prevent them from becoming tough. Serving Suggestions: Serve these meatballs with steamed rice or noodles to soak up the delicious sauce and make for a complete meal. {{image_2}} You can make Sweet and Sour Chicken Meatballs healthier. Use ground turkey instead of chicken. Turkey has less fat and is still tasty. You can also swap breadcrumbs for oats. Oats add fiber and keep the meatballs moist. Try adding grated zucchini or carrots for extra veggies. This keeps the meatballs light and fresh. While sweet and sour sauce is classic, you can explore other flavors. Try teriyaki sauce for a sweet, savory twist. You can use a honey garlic sauce for a sweeter taste. If you love heat, go for a spicy chili sauce. Mix these sauces with the meatballs to create a new dish each time. Add spices to change up the flavor. For a spicy kick, include red pepper flakes in the meat mixture. You can also add sriracha to the sauce for heat. Want a tropical vibe? Toss in coconut milk instead of some sauce. This gives a creamy texture and a hint of sweetness. Experimenting with flavors makes cooking fun! To store your sweet and sour chicken meatballs, place them in an airtight container. Make sure they cool down first. You can keep them in the fridge for up to three days. If you want to keep them longer, consider freezing. When you’re ready to enjoy leftovers, there are a few easy ways to reheat them. The microwave is quick. Just place the meatballs on a plate and cover them with a damp paper towel. Heat for 30 seconds to a minute until warm. You can also use a skillet. Heat a little oil in the pan and add the meatballs. Cook on medium heat for about 5 minutes, stirring often. If you want to freeze the meatballs, let them cool completely first. Place them in a single layer on a baking sheet. Freeze them for about 1-2 hours. Once they are firm, transfer them to a freezer bag. This way, you can take out just what you need later. They will stay good for about three months. When you're ready to eat, thaw them in the fridge overnight before reheating. Yes, you can use other meats. Ground turkey, pork, or beef work well. Each type of meat adds a different flavor. Make sure to adjust cooking times if needed. For turkey, cook until it reaches 165°F. For pork or beef, cook until 160°F. These meatballs go great with several sides. Serve them over steamed white rice. The rice soaks up the sauce. You can also serve with fried rice or noodles. For a crunchy side, try a fresh salad. Add some veggies like cucumbers and carrots for color. Making sweet and sour sauce is simple! Combine 1/2 cup of sugar, 1/2 cup of vinegar, and 1/4 cup of ketchup in a small saucepan. Heat it gently. Stir until the sugar dissolves. For extra flavor, add a little soy sauce or pineapple juice. This sauce is a great match for many dishes! You learned about sweet and sour chicken meatballs, from ingredients to tips. I shared how to make the meatballs, bake them, and prepare the sauce. You also saw ways to store leftovers and different flavor variations. In conclusion, this dish is fun and flexible. You can try many ingredients and tips to make it your own. Enjoy cooking and making sweet and sour chicken meatballs for everyone!

Savory Sweet and Sour Chicken Meatballs Easy Recipe

Craving a dish that’s both sweet and tangy? You’re in the right place! I’ll show you how to whip up

- 1 ½ cups all-purpose flour - 1 tsp baking powder - ½ tsp baking soda - ½ tsp salt - ½ cup unsalted butter, softened - 1 cup granulated sugar - 2 large eggs - 1 tsp vanilla extract - Zest of 1 lemon - ½ cup fresh lemon juice - 1 cup fresh raspberries (plus extra for topping) To make this loaf cake, you need some key items. First, all-purpose flour acts as the base. Baking powder and baking soda help it rise, while salt adds flavor. Next, you want to use unsalted butter for a creamy texture. Granulated sugar gives it sweetness. Then, mix in two large eggs to bind everything together. Vanilla extract brings a warm touch. Don’t forget the lemon! Zest from one lemon gives bright flavor. Fresh lemon juice adds tang. Finally, the stars of the show are fresh raspberries. They bring a burst of sweetness and color. - ½ cup powdered sugar - 1-2 tbsp lemon juice For a sweet finish, you need powdered sugar and lemon juice. The glaze adds a nice shine and a bit more lemon flavor. Mix these until smooth, and drizzle over the cooled loaf. This adds a lovely touch and makes the cake even more appealing. {{ingredient_image_1}} Preheat your oven to 350°F (175°C). This step ensures your cake bakes evenly. Next, grease and flour a 9x5-inch loaf pan. Greasing helps the cake come out easily after baking. In a medium bowl, whisk together 1 ½ cups of all-purpose flour, 1 teaspoon of baking powder, ½ teaspoon of baking soda, and ½ teaspoon of salt. Mixing these dry ingredients first helps them blend well. Set this bowl aside. In a large mixing bowl, cream ½ cup of softened unsalted butter with 1 cup of granulated sugar. Mix until it's light and fluffy, about 3 to 4 minutes. This process adds air to your batter. Now, add 2 large eggs, one at a time, and mix well after each. Stir in 1 teaspoon of vanilla extract and the zest of 1 lemon. This adds flavor and brightness. Gradually add your dry mixture to the creamed butter. Alternate this with ½ cup of fresh lemon juice. Start and end with the flour mixture. Mix until just combined. Then, gently fold in 1 cup of fresh raspberries. Be careful not to crush them as you mix. Pour the batter into your prepared loaf pan. Smooth the top with a spatula. Bake for 50 to 60 minutes. Check for doneness by inserting a toothpick into the center. If it comes out clean, your cake is ready. Once the cake cools in the pan for 10 minutes, transfer it to a wire rack. For the glaze, whisk together ½ cup of powdered sugar with 1 to 2 tablespoons of lemon juice until smooth. Drizzle this glaze over the cooled cake. Top with extra fresh raspberries for a lovely touch. Using room temperature ingredients helps the cake mix well. It lets the butter and sugar blend smoothly, giving the cake a light feel. For a fluffier cake, beat the butter and sugar for a full 3-4 minutes. This step adds air to the batter, making it rise nicely in the oven. When picking fresh raspberries, look for bright color and firmness. Avoid berries that feel mushy or have dark spots. If fresh raspberries are not available, you can use frozen ones. Just make sure they are thawed and drained before adding them to the batter. This prevents excess moisture in your cake. To boost the flavor of your loaf, try adding a splash of almond extract. You can also mix in a bit of vanilla extract for extra warmth. Both will make the cake taste even better while pairing perfectly with the lemon and raspberries. Pro Tips Use Room Temperature Ingredients: Ensure your butter and eggs are at room temperature for better incorporation and a fluffier texture. Handle Raspberries Gently: When folding in the raspberries, be gentle to avoid crushing them, which can affect the loaf's appearance and texture. Adjust Glaze Consistency: If the glaze is too thick, add more lemon juice a teaspoon at a time until you reach the desired drizzling consistency. Store Properly: To keep your loaf moist, wrap it in plastic wrap and store it in an airtight container at room temperature for up to 3 days. {{image_2}} You can change the flavor of your Raspberry Lemon Loaf Cake easily. Adding other fruits can enhance the taste. Try blueberries or strawberries for a fun twist. These fruits mix well with lemon and add a new layer of flavor. You can also incorporate nuts for a crunchy texture. Almonds or walnuts are great options. They give the cake a rich flavor and a delightful bite. Just chop them roughly and fold them in gently. If you want a healthier version, consider using whole wheat flour. It adds more fiber to your cake. You can also use sugar substitutes if you prefer less sugar. Options like honey or maple syrup work well. For vegan adaptations, replace regular eggs with flax eggs. Mix one tablespoon of flaxseed meal with three tablespoons of water. Let it sit until it thickens. You can also use vegan butter instead of unsalted butter. This keeps the cake moist while making it plant-based. Pair your loaf cake with lemon curd for a zesty kick. The tartness of the curd complements the sweetness of the cake. Whipped cream is another great choice. It adds creaminess and balances the flavors. Think about the occasion when serving your cake. It’s perfect for brunch, tea time, or dessert. You can slice it into thick pieces or serve it as small bites for guests. Each slice can be topped with extra raspberries for a beautiful finish. To keep your raspberry lemon loaf cake fresh, wrap it well. Use plastic wrap or aluminum foil. This keeps moisture in and prevents it from drying out. If you have a cake dome, that works great too. Store it at room temperature for short-term storage. However, for longer storage, the fridge is a better option. Just remember that the cake can dry out in the fridge, so wrap it tightly. You can freeze this cake to enjoy later. First, let the loaf cool completely. Then, wrap it in plastic wrap, followed by aluminum foil. This double layer helps avoid freezer burn. You can freeze the cake for up to three months. When you’re ready to eat it, take it out and let it thaw at room temperature. This keeps the texture nice and soft. The shelf life of your loaf cake is about three to four days at room temperature if stored well. In the fridge, it lasts about a week. If you freeze it, as mentioned, you can keep it for up to three months without losing flavor. Always check for any signs of spoilage, like mold or off smells, before eating. Yes, you can use frozen raspberries. They work well in this loaf cake. To use frozen berries, first, let them thaw. Then, gently pat them dry with a paper towel. This step helps reduce excess moisture. When adding them to the batter, fold them in slowly to avoid breaking them apart. This way, you will still have nice chunks of fruit in your cake. If you don’t have fresh lemon juice, bottled juice is a good option. Just use the same amount. You can also use lemon zest with water for flavor. Mix one tablespoon of zest with two tablespoons of water for each tablespoon of juice needed. This may change the taste slightly, but it still adds a nice lemon flavor. You can tell the cake is done by checking the edges. They should be lightly golden brown. Use a toothpick to test it. Insert it in the center of the cake. If it comes out clean or with just a few crumbs, the loaf is ready. If the toothpick has wet batter, give it more time in the oven. Yes, you can turn this loaf cake into cupcakes! Use a muffin pan and line it with cupcake liners. Fill each liner about two-thirds full with batter. Bake them for 18-22 minutes. Keep an eye on them, as they bake faster than the loaf. Use the toothpick test to check for doneness. This blog post shared a clear path to creating a delicious lemon raspberry loaf cake. We covered essential ingredients, step-by-step instructions, and helpful tips for the perfect bake. Remember, the right temperature for your ingredients is key. Feel free to experiment with fruit and flavors. Store your cake properly to enjoy it longer. Whether you serve it at brunch or with tea, this cake will delight everyone. Now, you have all the tools to bake something truly special!

Raspberry Lemon Loaf Cake Easy and Flavorful Delight

If you’re searching for a bright and tasty treat, look no further! This Raspberry Lemon Loaf Cake is easy to

- 1 pound shrimp, peeled and deveined - 1 cup couscous - 2 cups vegetable or chicken broth - 3 tablespoons olive oil - 4 cloves garlic, minced - 1 lemon (zest and juice) - 1 teaspoon paprika - 1/2 teaspoon red pepper flakes - Salt and pepper to taste - 1/4 cup fresh parsley, chopped - Lemon slices for garnish The main ingredients for lemon garlic shrimp couscous are simple yet powerful. The shrimp provide a fresh taste, while couscous adds a nice base. The broth gives the dish depth. Next, flavor enhancers like olive oil and garlic bring warmth and richness. The lemon zest and juice add brightness and balance to the dish. Seasonings play a vital role. Paprika adds a mild smokiness, and red pepper flakes bring a hint of heat. Don't forget salt and pepper to round things out. Fresh parsley gives color and freshness. This combination makes for a quick, flavorful dish that delights the senses. You can adjust the spice level to suit your taste. Enjoy creating this vibrant meal! {{ingredient_image_1}} 1. Bring broth to a boil. Use vegetable or chicken broth for flavor. 2. Stir in couscous and let it sit. Remove from heat. Cover it for about 5 minutes. 3. Fluff with a fork. This makes the couscous light and fluffy. 1. Heat olive oil in a skillet. Use medium heat to avoid burning. 2. Sauté minced garlic. Cook for about 1 minute until it smells great. 3. Cook shrimp until pink and opaque. This takes about 2-3 minutes on each side. 1. Add lemon juice and zest to shrimp. This gives a fresh, tangy flavor. 2. Mix shrimp with fluffed couscous and parsley. Stir well to blend all the ingredients. 3. Adjust seasoning to taste. Add more salt, pepper, or spices as you like. To cook shrimp perfectly, aim for 2-3 minutes on each side. Shrimp cook fast. Overcooking makes them tough. When they turn pink, they’re done. Remove them from heat right away. This keeps them juicy and tender. Spice things up with extra seasonings. You can try cayenne pepper or garlic powder. For a fresh taste, add herbs like dill or basil. You can also add veggies for more nutrition. Spinach, bell peppers, or cherry tomatoes work great. They add color and vitamins. Pair Lemon Garlic Shrimp Couscous with a simple salad. A green salad complements the dish well. You can also serve it with crusty bread for a hearty meal. For drinks, consider white wine or sparkling water. Both enhance the flavors in this dish. Pro Tips Fresh Shrimp Matters: Always use fresh or properly thawed shrimp for the best texture and flavor. Frozen shrimp can be watery if not thawed correctly. Adjust Spice Level: Feel free to modify the amount of red pepper flakes based on your heat preference. Start with less and add more if desired. Perfectly Fluffy Couscous: Make sure to fluff the couscous with a fork after it has absorbed the liquid, which helps to prevent clumping. Garnish for Color: Adding fresh parsley and lemon slices not only enhances the dish visually but also adds a burst of freshness to each bite. {{image_2}} You can switch out couscous for other grains. Quinoa is a great choice. It adds a nutty flavor. Orzo is another fun option. It looks like rice but has a unique taste. Both grains cook well and pair nicely with shrimp. If you need gluten-free options, quinoa is perfect. It is naturally gluten-free. You can also try gluten-free couscous, which is made from corn or rice. This way, you can enjoy the dish while sticking to your diet. Adding vegetables boosts flavor and nutrition. Seasonal veggies work great. Zucchini, asparagus, or cherry tomatoes add color and taste. You can roast or sauté them before adding to the dish. Spinach is a fantastic addition. It cooks down quickly and adds vitamins. Toss in a handful just before serving. Bell peppers also add crunch and a sweet taste. Slice them thin and sauté them with the garlic for extra flavor. If you want to switch proteins, there are many options. You can use scallops, crab, or even fish like salmon. They all cook quickly and taste great with lemon and garlic. For vegetarian alternatives, try chickpeas or tofu. Both soak up flavors well. Chickpeas add protein and texture. Tofu can be sautéed until golden and crispy. These swaps make the dish exciting and satisfying for everyone. After you finish your Lemon Garlic Shrimp Couscous, store the leftovers in an airtight container. This helps keep it fresh. You can refrigerate it for about 3 days. Remember to let it cool down first before sealing it up. This keeps moisture from building up inside the container. To freeze your dish, place it in a freezer-safe bag or container. Make sure to remove as much air as possible. This will help prevent freezer burn. You can freeze it for up to 2 months. When it's time to eat, thaw it in the fridge overnight. Reheat it gently on the stove over low heat. Add a splash of broth to keep it moist. Use glass or BPA-free plastic containers for the best preservation. They seal tightly and keep flavors locked in. To avoid sogginess in couscous, make sure it cools completely before storing. You can also separate the couscous and shrimp if you plan to keep them for a longer time. This keeps everything fresher until you're ready to enjoy it again. It takes about 25 minutes to prepare Lemon Garlic Shrimp Couscous. The prep time is just 10 minutes. You will need 15 minutes for cooking. Yes, you can make this dish ahead of time. To prep in advance, cook the couscous and shrimp separately. Store them in the fridge. When you're ready to eat, just combine them. This helps keep the shrimp tender. If you want a substitute for shrimp, try chicken, scallops, or tofu. Chicken will need a bit more cooking time. For a vegetarian option, use chickpeas or diced vegetables. These options still give you great flavor. Yes, Lemon Garlic Shrimp Couscous is a healthy dish. Shrimp is low in calories but high in protein. The dish also has healthy fats from olive oil and fresh herbs. Couscous adds fiber, making it a good choice for meals. You can use frozen shrimp for this recipe. Just thaw the shrimp first. Place them in cold water for about 15 minutes. Then, pat them dry before cooking. This helps them cook evenly and stay juicy. Lemon Garlic Shrimp Couscous is a delicious and easy dish to make. We covered key ingredients, cooking steps, and tips to enhance flavor. You also learned about variations and storage methods. This meal is flexible and fits different diets. With fresh herbs and simple spices, you create big flavor. Enjoy this tasty dish for any meal, and don’t be afraid to experiment. Your kitchen will shine with this recipe!

Lemon Garlic Shrimp Couscous Flavorful Quick Dish

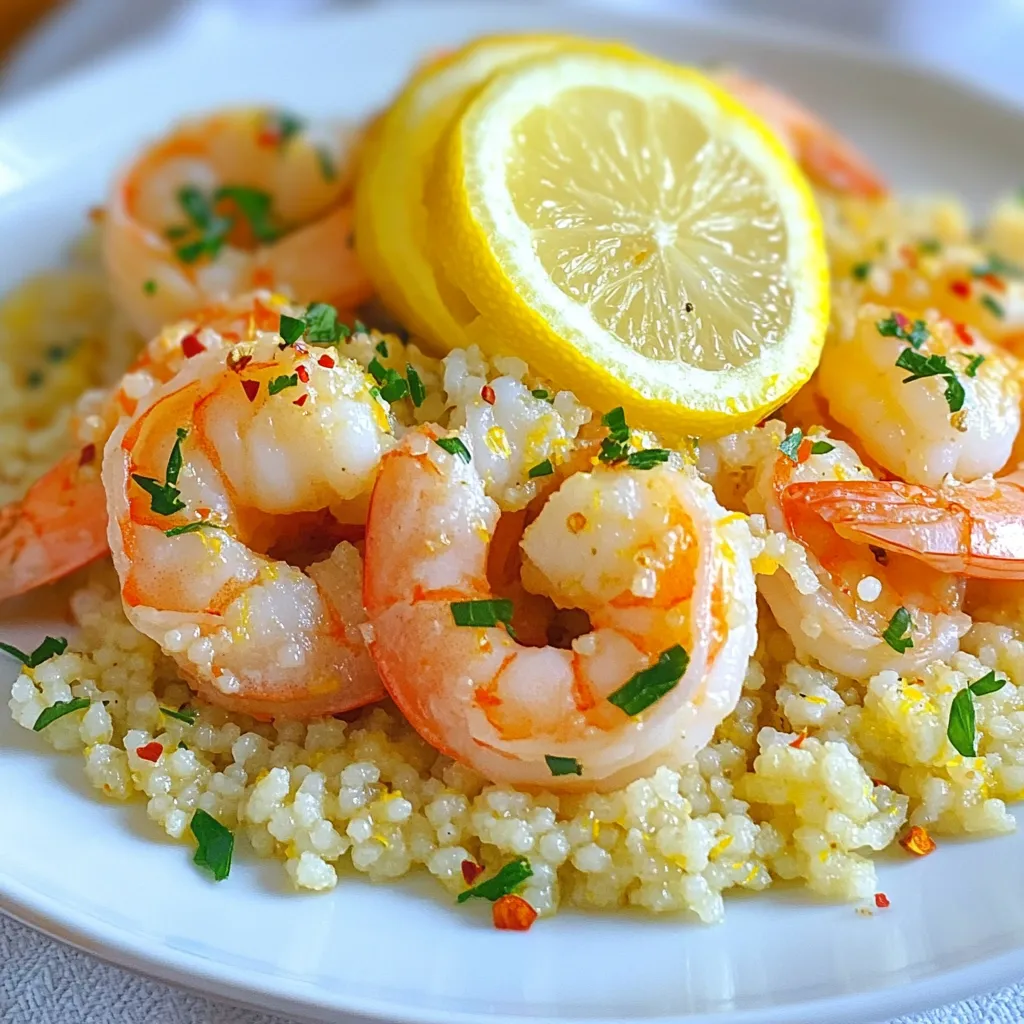
Are you looking for a quick, delicious meal that packs a punch? Look no further than my Lemon Garlic Shrimp

- 4 salmon fillets - 1/4 cup honey - 4 cloves garlic, minced - 2 tablespoons soy sauce (or tamari for gluten-free) - 1 tablespoon olive oil - 1 teaspoon fresh ginger, grated - 1 teaspoon sesame oil The star of this dish is the salmon. Each fillet brings a rich flavor. You want good quality salmon. It should look bright and feel firm. The honey, garlic, and soy sauce blend makes a sweet and savory sauce. I love the balance it adds to the fish. Olive oil keeps things moist, while sesame oil adds a nice touch. - 1 zucchini, sliced - 1 red bell pepper, sliced - 1 cup green beans, trimmed - Salt and pepper to taste For veggies, I pick zucchini, red bell pepper, and green beans. They add color and crunch. The zucchini cooks well and stays tender. The red bell pepper gives a sweet taste. Green beans are crisp and fresh. Season these with salt and pepper to enhance their flavor. This mix of veggies pairs perfectly with the salmon. You can also play with these ingredients. Try adding asparagus or baby carrots. Just remember, keep the veggies colorful for a great look! {{ingredient_image_1}} First, you need to preheat your oven to 400°F (200°C). This step ensures the salmon cooks evenly. Next, whisk your honey garlic marinade. In a mixing bowl, combine 1/4 cup honey, 4 minced garlic cloves, 2 tablespoons soy sauce, 1 tablespoon olive oil, 1 teaspoon grated ginger, and 1 teaspoon sesame oil. Mix until smooth. This marinade adds great flavor to the salmon. Now, cut four large pieces of aluminum foil, about 12 inches long. This is where you will place everything. In the center of each foil piece, arrange equal amounts of vegetables. You should use sliced zucchini, red bell pepper, and trimmed green beans. Season these with salt and pepper for added taste. Then, place a salmon fillet on top of the vegetables. Make sure the skin side is down. Generously spoon the honey garlic mixture over each salmon fillet. It’s important to coat them well for maximum flavor. Next, fold the foil over the salmon and vegetables. Pinch the edges to seal the packets tightly. This step keeps all the juices and flavors inside. Place the foil packets on a baking sheet. Bake them in the preheated oven for 15-20 minutes. Check for doneness by ensuring the salmon is cooked through and flaky. Carefully open the packets, watching out for steam. Your honey garlic salmon is now ready to be served and enjoyed! To cook salmon well, use foil packets. This helps the fish cook evenly. When you bake, the steam keeps the salmon moist. Place the salmon on top of the veggies. This ensures they cook at the same time. Check your salmon after 15 minutes. Salmon is done when it flakes easily with a fork. If you see it still looks raw, close the packets and bake for a few more minutes. For the best look, serve the salmon right in the foil packets. This adds a rustic touch. You can also plate the salmon on a colorful dish. Garnish the salmon with fresh parsley or sesame seeds. This adds a pop of color and flavor. You can also squeeze a little lemon juice on top. It brightens the dish and balances the sweetness of the honey. Pro Tips Use Fresh Ingredients: Fresh salmon and seasonal vegetables will enhance the flavor of your dish significantly. Adjust Cooking Time: The thickness of your salmon fillets may require a slight adjustment in cooking time; check for doneness at 15 minutes. Experiment with Veggies: Feel free to substitute or add other vegetables like asparagus or broccoli to personalize your foil packets. Perfectly Seal the Packets: Ensure that your foil packets are tightly sealed to keep the moisture and flavors locked in during cooking. {{image_2}} You can change up the veggies in your honey garlic salmon foil packets. Broccoli, asparagus, or carrots work great. You might also try snap peas or mushrooms for a different twist. Each veggie brings a unique taste and texture. For marinades, consider using teriyaki sauce or a mix of lemon juice and herbs. A spicy chili sauce adds heat if you like a kick. Try adding fresh herbs like basil or cilantro for fresh flavor. You can also mix in some Dijon mustard for a tangy touch. Grilling the foil packets is a fun way to cook this dish. It adds a smoky flavor that complements the salmon and veggies. Heat your grill to medium heat. Place the packets on the grill and cook for about 10-15 minutes. Check for doneness by carefully opening a packet. You can also use an air fryer for a quick option. Set your air fryer to 350°F (175°C). Place the packets in the basket and cook for about 10-12 minutes. The air fryer will give you a crispy finish while sealing in the flavors. To store your foil packets in the fridge, let them cool first. Then, place the packets in an airtight container. You can keep them for up to three days. If you want to reheat leftover salmon, preheat your oven to 350°F (175°C). Place the packets on a baking sheet and heat for about 10-15 minutes. This keeps the salmon moist. You can make this dish ahead of time. Prepare the foil packets and store them in the fridge for up to a day. Just remember to add the marinade right before cooking. For freezing, wrap each packet tightly in plastic wrap and then in foil. They will stay fresh for up to three months. When you are ready to cook, you can bake them straight from the freezer. Just add a few extra minutes to the cooking time. How long to cook salmon in foil? I recommend cooking salmon in foil for 15 to 20 minutes at 400°F (200°C). The salmon will be flaky and tender when it's done. Cooking time may vary based on the thickness of your fillets. Always check the center to make sure it’s fully cooked. Can I use frozen salmon for this recipe? Yes, you can use frozen salmon! Just remember to adjust the cooking time. Make sure the salmon is thawed before cooking for the best flavor and texture. If it’s still frozen, increase the cooking time by a few minutes. Gluten-free options For a gluten-free version, simply use tamari instead of soy sauce. This small swap keeps the dish safe for those with gluten sensitivity. The flavor will remain rich and delicious. Low-carb variations This dish is already low in carbs. The vegetables add nutrients without many carbs. You can skip the honey for a lower sugar option. This way, you still enjoy the taste without added carbs. What to serve with honey garlic salmon? I love serving honey garlic salmon with a simple green salad or steamed rice. The fresh flavors balance well with the sweet and savory salmon. You can also pair it with quinoa for a healthy twist. Pairing drinks with the meal For drinks, try a crisp white wine like Sauvignon Blanc. It complements the honey garlic sauce nicely. If you prefer non-alcoholic options, sparkling water with a slice of lemon works perfectly too. This blog post shared a simple recipe for honey garlic salmon in foil packets. We covered ingredients, preparation steps, cooking tips, and variations. You now have the tools to create a tasty dish while making meal prep easy. Remember, using fresh vegetables and marinades enhances the flavor. Explore different cooking methods, like grilling or air frying, to keep things exciting. Enjoy this healthy meal with your family and friends, and feel free to experiment. Your kitchen can be a fun place to discover new flavors and dishes!

Honey Garlic Salmon Foil Packets Easy and Flavorful Dish

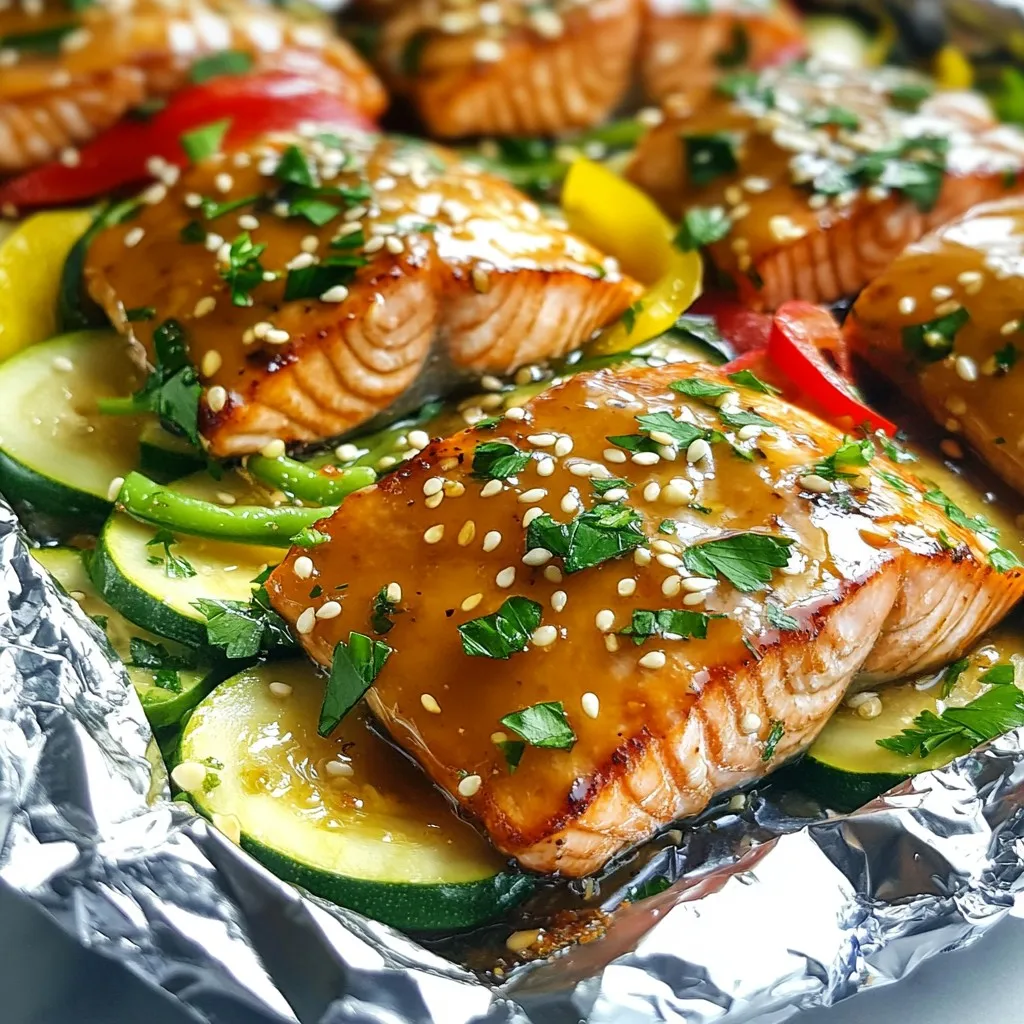
Are you looking for a quick and tasty dinner idea? Honey garlic salmon foil packets might be just what you

- 500g chicken thighs, boneless and skinless, cut into bite-sized pieces - 1/2 cup sweet Thai chili sauce - 2 tablespoons soy sauce - 1 tablespoon fish sauce - 2 cloves garlic, minced - 1 teaspoon fresh ginger, grated - 1 red bell pepper, thinly sliced - 1 cup broccoli florets - 2 green onions, chopped - Sesame seeds - Cooked jasmine rice Gather these ingredients before you start. Fresh chicken thighs give a tender bite. Sweet Thai chili sauce adds a perfect balance of sweet and spicy. Soy sauce and fish sauce bring depth to the dish. Minced garlic and grated ginger enhance the flavor. They add warmth and brightness. Red bell pepper and broccoli are colorful and nutritious. They cook quickly and stay crisp. For garnishes, chopped green onions add onion flavor and crunch. Sesame seeds give a nutty touch. Serve the chicken over fluffy jasmine rice for a complete meal. This rice soaks up the delicious sauce well. Enjoy the vibrant colors and flavors on your plate! {{ingredient_image_1}} To start, mix the marinade. In a bowl, add the sweet Thai chili sauce, soy sauce, fish sauce, minced garlic, grated ginger, and cornstarch. Stir until smooth. This marinade will give your chicken a wonderful flavor. Next, add the chicken pieces to the bowl. Make sure each piece is well coated in the marinade. Cover the bowl and let it sit for at least 30 minutes. If you have time, marinate it in the fridge for up to 2 hours. This step is key for deep flavor. Now, heat 2 tablespoons of vegetable oil in a large skillet or wok over medium-high heat. Once the oil is hot, add the marinated chicken. Spread it in a single layer. Cook the chicken for about 5 to 7 minutes. Stir occasionally to ensure even cooking. The chicken should turn golden brown and be cooked all the way through. To check if it's done, cut a piece in half. There should be no pink inside, and the juices should run clear. Next, it’s time to add some color and crunch. Toss in the sliced red bell pepper and broccoli florets. Stir-fry these for about 3 to 4 minutes. You want them to be crisp-tender and bright in color. Once the veggies are cooked, pour any remaining marinade into the skillet. Stir everything together to coat it in the sauce. Let it cook for about one more minute. This will thicken the sauce just a bit, making it even more delicious. Now your Sweet Thai Chili Chicken dish is almost ready! To get the best flavor from your chicken, marination is key. First, mix your marinade well. The blend of sweet Thai chili sauce, soy sauce, fish sauce, garlic, ginger, and cornstarch makes a tasty coating. - Best practices for marinating chicken: - Use a large bowl for even coverage. - Make sure each piece of chicken is well coated. - Time recommendations for flavor absorption: - Marinate for at least 30 minutes. - For deeper flavor, aim for 2 hours in the fridge. Choosing the right cooking method matters. A skillet and a wok both work, but each has its own perks. - Skillet vs. wok cooking benefits: - A skillet is great for even cooking and a nice sear. - A wok allows for high heat and quick stir-frying. - Adjusting heat for optimal cooking: - Start with medium-high heat. - Adjust as needed to prevent burning the chicken. Garnishes can elevate your dish. Simple touches can make your meal look stunning. - Suggestions for additional garnishes: - Chopped green onions add color and crunch. - A sprinkle of sesame seeds gives a nice finish. - Pairing options with rice or noodles: - Serve over fluffy jasmine rice for a classic pairing. - Noodles also work well, soaking up the sauce. Pro Tips Marinate for Maximum Flavor: Allowing the chicken to marinate for at least 30 minutes, or up to 2 hours, enhances the flavors and tenderizes the meat. Use Fresh Ingredients: Fresh garlic and ginger significantly elevate the dish's flavor profile compared to dried alternatives. Control the Heat: Ensure your skillet or wok is hot before adding the chicken; this helps achieve a nice sear and prevents sticking. Customize Your Veggies: Feel free to swap in your favorite vegetables, such as snap peas or carrots, to suit your taste preferences. {{image_2}} You can switch chicken for other protein options. Tofu makes a great vegetarian choice. Shrimp is also tasty and cooks quickly. For veggies, use what is in season. Try snap peas or zucchini for a fresh twist. Want more heat? Add fresh chilies like Thai bird's eye chili. You can also use chili flakes to increase spice. If you prefer a milder dish, reduce the chili sauce. A dash of sugar can balance the heat too. Feel free to experiment with sauces. Try adding peanut sauce for a nutty taste. A splash of lime juice adds brightness. You can even mix different sauces for your own unique flavor. To store leftovers, place the Sweet Thai Chili Chicken in an airtight container. Make sure it cools to room temperature first. This keeps the taste fresh for up to three days. If you want to enjoy it later, keep the chicken and rice in separate containers. This helps prevent sogginess in the rice. You can freeze Sweet Thai Chili Chicken for up to three months. To freeze, let it cool completely. Then, put it in a freezer-safe container or a zip-top bag. Squeeze out as much air as possible. When ready to eat, thaw it overnight in the fridge. To reheat, use the stovetop or microwave. If you use the stovetop, heat it in a pan over low heat. Stir often to keep it from sticking. This method helps avoid sogginess. If using a microwave, cover it with a damp paper towel to keep moisture in. Always check that it reaches 165°F for safety. Sweet Thai Chili Chicken is a bright and tasty dish. It blends sweet and spicy flavors, perfect for a quick meal. The dish comes from Thailand and uses sweet Thai chili sauce. This sauce gives it a unique taste. You can find it in many Asian markets. You make this dish with chicken, fresh veggies, and a savory sauce. It’s a favorite for many because of its bold flavors and ease of cooking. Yes, you can make Sweet Thai Chili Chicken ahead of time. The chicken can marinate for up to two hours. This helps the flavors soak in. Once cooked, you can store leftovers in the fridge for up to three days. To keep it fresh, place it in an airtight container. For longer storage, you can freeze it. Just make sure to cool the dish first. It will stay good in the freezer for about three months. When ready to eat, thaw it overnight in the fridge and reheat it. You can serve Sweet Thai Chili Chicken with many sides. Here are some tasty options: - Cooked jasmine rice - Steamed or stir-fried vegetables - Noodles with soy sauce - Fresh salad with lime dressing - Spring rolls for a crunchy bite These sides complement the flavors of the chicken well. Enjoy mixing and matching to find your perfect meal! This blog post explored how to make Sweet Thai Chili Chicken. I discussed main ingredients, step-by-step cooking, and tips for the best results. You can easily enhance flavors with various herbs or sauces. Remember, you can swap chicken for tofu or shrimp for variety. Storing leftovers properly is key to enjoying the dish later. With these insights, you'll impress your family and friends. Get cooking and enjoy all that great taste!

Sweet Thai Chili Chicken Flavorful Stir-Fry Delight

Ready to elevate your dinner game? Sweet Thai Chili Chicken is a vibrant dish that bursts with flavor and color.

- 4 slices of thick brioche or challah bread - 2 ripe bananas, sliced - 2 tablespoons unsalted butter - 2 tablespoons brown sugar - 2 large eggs - 1/2 cup milk - 1 teaspoon vanilla extract - 1/2 teaspoon ground cinnamon - Pinch of salt - Maple syrup (for serving) - Optional: Chopped nuts or whipped cream for garnish Each ingredient in this recipe offers unique health benefits. - Brioche or Challah Bread: These breads provide energy through carbs. - Bananas: They are rich in potassium, which helps keep your heart healthy. - Eggs: Eggs are a great protein source and support muscle growth. - Milk: It provides calcium, which is vital for strong bones. - Cinnamon: This spice can help lower blood sugar levels and has antioxidant properties. - Butter: While it adds richness, use it in moderation for balanced nutrition. You can easily swap ingredients if needed. - Bread: Use whole grain or gluten-free bread for a different texture. - Bananas: Apples or pears can replace bananas for a new flavor. - Butter: Coconut oil can serve as a dairy-free option. - Milk: Almond or oat milk works well for a dairy-free choice. - Eggs: A flaxseed meal mix can replace eggs for a vegan option. - Brown Sugar: Use honey or maple syrup for a natural sweetener. {{ingredient_image_1}} Start by melting 1 tablespoon of butter in a large skillet over medium heat. Add the sliced bananas to the skillet. Sprinkle the brown sugar over the bananas. Gently stir to coat the bananas in the sugar. Cook for about 3-4 minutes. You want them to soften and caramelize. When they look golden and shiny, remove them from the heat and set aside. This step adds rich flavor and sweetness. In a mixing bowl, crack 2 large eggs. Pour in 1/2 cup of milk and add 1 teaspoon of vanilla extract. Then, sprinkle in 1/2 teaspoon of ground cinnamon and a pinch of salt. Whisk everything together until well combined. This custard will soak into your bread, making it soft and tasty. Preheat a non-stick skillet or griddle over medium heat. Add the remaining tablespoon of butter to the hot skillet. Once the butter melts and coats the surface, dip each slice of thick brioche or challah bread into the custard mixture. Make sure both sides are well soaked. Place the soaked bread slices into the skillet. Cook for about 3-4 minutes on each side. Look for a golden brown color and crispy texture. Serve the French toast stacked high. Top with the caramelized bananas, drizzle with maple syrup, and add nuts or whipped cream if you like. Enjoy this sweet breakfast treat! To caramelize bananas, pick ripe ones. They should be soft and sweet. Use a medium heat. This helps the sugars melt slowly. First, melt 1 tablespoon of butter in your skillet. Then, add the sliced bananas. Sprinkle the brown sugar evenly on top of the bananas. Stir gently, letting them cook for about 3-4 minutes. Watch them closely. You want them golden, not burnt. The bananas should soften and get a nice glaze. Once done, take them off the heat and set aside. For the best French toast, use thick slices of brioche or challah bread. These types soak up the custard well. Whisk together eggs, milk, vanilla, cinnamon, and a pinch of salt in a bowl. Dip each slice into this mixture. Make sure to coat both sides. Let the bread soak for a few seconds. This adds to the creaminess. When cooking, keep the heat at medium. This helps the outside get golden brown while the inside stays soft. Flip each slice when it's crispy. Serve your French toast on a pretty plate. Stack the slices high for a nice look. Top with the warm caramelized bananas. Drizzle with maple syrup for sweetness. For an elegant touch, add chopped nuts or whipped cream on top. A light dusting of cinnamon or powdered sugar adds charm too. This makes your dish look and taste amazing. Enjoy the feast for your eyes and stomach! Pro Tips Use Stale Bread: For the best texture, use day-old brioche or challah. Stale bread absorbs the custard better without getting too soggy. Customize Your Toppings: Experiment with different toppings like fresh berries, chocolate chips, or a sprinkle of nutmeg to elevate your French toast experience. Perfect Caramelization: Make sure to cook the bananas on medium heat to avoid burning the sugar. Stir gently to ensure even caramelization. Keep It Warm: If making multiple servings, keep the cooked French toast warm in a low oven (around 200°F) until you're ready to serve. {{image_2}} You can use many types of bread for this dish. Thick brioche or challah works great. But don’t stop there! You can try sourdough for a tangy twist. Whole wheat bread adds a nutty flavor. Even gluten-free bread can be used for a tasty option. Each bread type brings its own taste and texture. Experiment and find your favorite! There are many ways to boost flavor in this dish. You can add spices like nutmeg or cardamom. A touch of vanilla extract adds warmth. You can also try almond extract for a unique taste. A sprinkle of cocoa powder can give it a rich twist. These small changes can make your French toast even better. You can easily make this dish vegan. Use plant-based milk like almond or oat milk. Replace the eggs with a mix of flaxseed and water. For a gluten-free option, choose gluten-free bread. Make sure to check labels for hidden gluten. These swaps keep the flavor while meeting your needs. Enjoy your breakfast treat with peace of mind! To store leftover Caramelized Banana French Toast, let it cool first. Place the slices in an airtight container. You can keep them in the fridge for up to three days. If you want to keep them longer, consider freezing them. To reheat, use a skillet or griddle. Heat it over medium-low heat. Place the French toast slices on the skillet. Cook for about 2-3 minutes on each side. This method keeps them crispy and warm. You can also use a microwave if you're short on time. Warm them for 30 seconds, but they may lose some crispness. To freeze, wrap each slice in plastic wrap. Place them in a freezer-safe bag or container. They can last up to two months in the freezer. When ready to enjoy, thaw them in the fridge overnight. Reheat as described above for the best taste and texture. Yes, you can prepare parts of this dish ahead of time. You can caramelize the bananas and store them in the fridge. Just cover them with plastic wrap. The next day, heat them in a pan before serving. You can also mix the custard a day in advance. Store it in the fridge. When ready, dip the bread, cook, and enjoy. If you need an egg substitute, use mashed bananas or applesauce. Use 1/4 cup of either for one egg. You can also try flaxseed meal. Mix one tablespoon of flaxseed meal with three tablespoons of water. Let it sit for five minutes to thicken. This works well to bind the ingredients. To make this French toast healthier, use whole grain bread instead of brioche or challah. You can also reduce the sugar in the caramelized bananas. Instead of butter, use a small amount of coconut oil or a non-stick spray. Add fresh fruit on top for extra nutrients and flavor. In this post, we explored how to make Caramelized Banana French Toast. We covered key ingredients and their benefits, plus smart substitutes. I shared step-by-step instructions and tips to perfect your dish. You can also try variations with different bread and flavors. Consider how you’ll store leftovers and reheat them for the best taste. This dish is easy to make ahead too. Embrace these ideas to enjoy a tasty meal that you can share with others.

Caramelized Banana French Toast Tempting Breakfast Treat

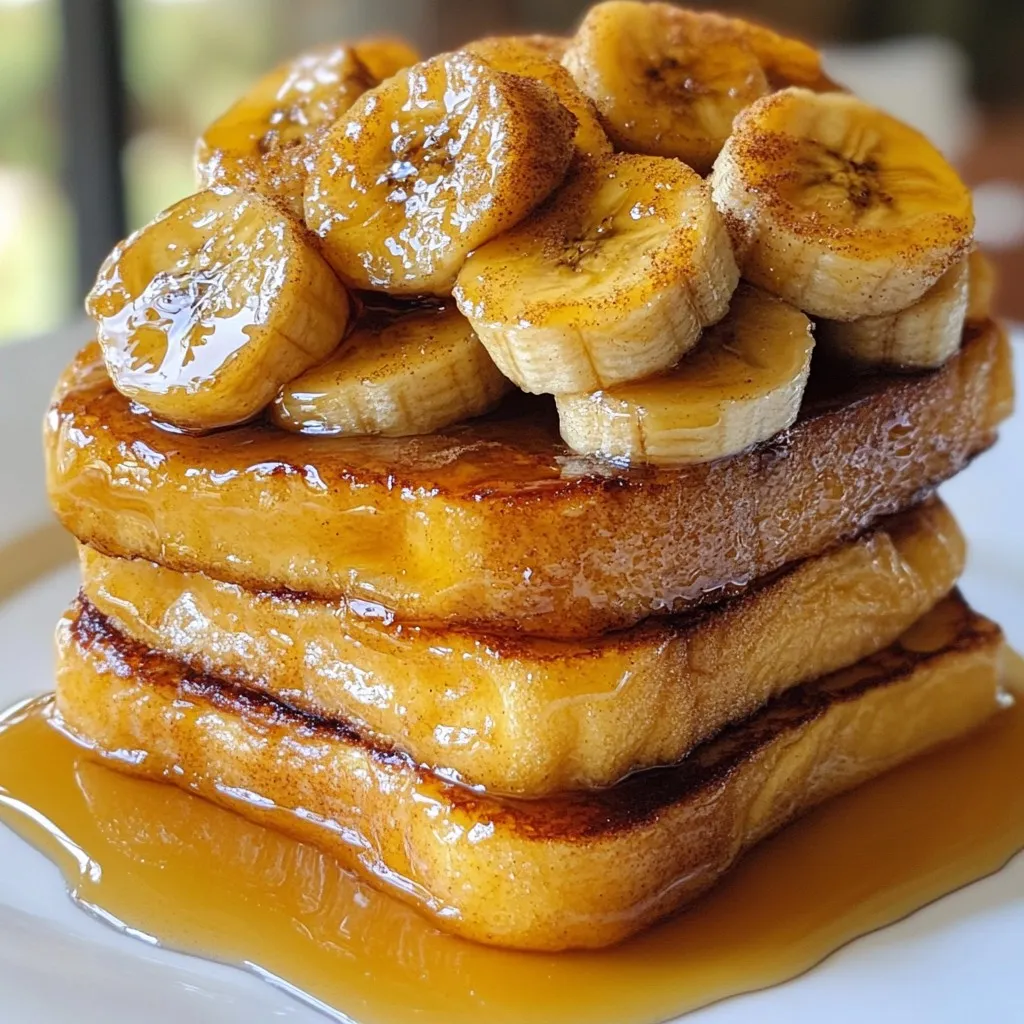
Are you ready to take your breakfast to the next level? This Caramelized Banana French Toast is a must-try treat

For this tasty dish, you will need the following main ingredients: - 4 boneless, skinless chicken breasts - 2 tablespoons olive oil - 1 teaspoon garlic powder - Salt and pepper to taste - 1 can (14.5 oz) diced tomatoes, with juices - 1 cup heavy cream - 1 cup fresh basil leaves, chopped (plus extra for garnish) - 1 teaspoon dried Italian seasoning - ½ cup grated Parmesan cheese - ½ teaspoon red pepper flakes (optional for spice) These ingredients come together to create a rich and creamy sauce. The chicken stays juicy while soaking in the flavors. Besides the main ingredients, you can add some extra flavor with these seasonings: - Italian seasoning gives depth to the sauce. - Red pepper flakes add a nice kick if you like spice. - Fresh basil enhances the taste and adds freshness. Feel free to adjust the salt and pepper to your liking. You can easily adapt this recipe for different diets: - For a lighter version, use chicken thighs or skinless chicken. - Swap heavy cream for coconut milk or a plant-based cream for dairy-free. - To make it vegetarian, replace chicken with tofu or hearty vegetables. These variations help everyone enjoy this creamy delight while fitting their diet. {{ingredient_image_1}} Start by heating 2 tablespoons of olive oil in a large skillet over medium-high heat. While the oil heats, season 4 boneless, skinless chicken breasts on both sides. Use 1 teaspoon of garlic powder, salt, and pepper to taste. When the oil is hot, carefully place the chicken breasts in the skillet. Sear each side for about 6-7 minutes until they turn golden brown and are fully cooked. Once done, remove the chicken and set it aside on a plate. In the same skillet, add 1 can of diced tomatoes (14.5 oz) with their juices. Scrape any brown bits from the pan to add flavor. Let the tomatoes cook for 2-3 minutes until they start to simmer. Next, lower the heat to medium-low and stir in 1 cup of heavy cream, 1 cup of chopped fresh basil, 1 teaspoon of Italian seasoning, and optional ½ teaspoon of red pepper flakes for a bit of heat. Mix everything well until it blends nicely. Gradually add ½ cup of grated Parmesan cheese. Stir until it melts into a creamy sauce. Return the seared chicken breasts to the skillet. Spoon some of that rich creamy sauce over the chicken. Allow it to simmer for another 3-5 minutes. This lets the chicken soak up the delicious flavors. Once ready, you can remove it from the heat and let it rest for a few minutes before serving. Enjoy the savory delight of your creamy tomato basil chicken! To cook chicken breasts well, start with even thickness. If needed, pound the chicken to ensure it cooks evenly. Season both sides with garlic powder, salt, and pepper before cooking. Heat olive oil in your skillet until it shimmers. Add the chicken and don’t crowd the pan. This helps it brown nicely. Cook for 6-7 minutes on each side. Check for a golden color and make sure it's cooked through. Using a meat thermometer, the internal temperature should reach 165°F. To amp up the creamy tomato flavor, use high-quality diced tomatoes. Look for ones packed in juice to keep the sauce rich. Adding fresh basil gives it a bright and tasty kick. Stir in heavy cream gently to avoid curdling. Incorporating grated Parmesan cheese adds depth and creaminess. If you like spice, sprinkle in red pepper flakes. This adds warmth without overpowering the dish. Let the sauce simmer to blend the flavors well. For a beautiful presentation, serve the chicken on a clean plate. Spoon a generous amount of creamy tomato sauce over the chicken. Add extra chopped basil on top for color. A sprinkle of Parmesan cheese gives a nice touch. You can also use a drizzle of olive oil for shine. Consider serving with a side of pasta or crusty bread to soak up the sauce. This makes the dish look as good as it tastes! Pro Tips Use Fresh Basil: Fresh basil adds a vibrant flavor that dried basil simply can't match. Add it at the end of cooking to preserve its aromatic qualities. Perfectly Cooked Chicken: To ensure even cooking, pound the chicken breasts to an even thickness before searing. This helps them cook uniformly. Adjust the Creaminess: If you prefer a lighter sauce, you can substitute part of the heavy cream with chicken broth. This will still keep the sauce flavorful without being too rich. Garnish for Presentation: Always finish your dish with a sprinkle of Parmesan and a few extra basil leaves. This not only enhances the flavor but also makes for an appealing presentation. {{image_2}} To make a lighter creamy tomato basil chicken skillet, you can swap heavy cream for half-and-half or Greek yogurt. Both options keep some creaminess while cutting calories. You can also use skinless chicken thighs instead of breasts. They are tender and flavorful, adding depth without extra fat. Use low-sodium diced tomatoes to control salt levels. This keeps the dish tasty without feeling heavy. If you want a vegetarian version, replace the chicken with firm tofu or chickpeas. Both options absorb flavors well. Use vegetable broth instead of olive oil to sauté. You can also add more veggies, like spinach or zucchini. These fresh ingredients add nutrients and color. Keep the creamy tomato sauce the same, and you’ll have a delightful vegetarian meal. For spice lovers, add more red pepper flakes to the sauce. Start with one teaspoon and taste as you go. You can also mix in some chopped jalapeños for a fresh kick. If you prefer less heat, reduce the red pepper flakes or leave them out. Adjusting the spice level helps everyone enjoy this dish their own way. Feel free to experiment with these variations. Each one adds a unique twist to the classic creamy tomato basil chicken skillet. To store your leftover creamy tomato basil chicken, let it cool first. Place it in an airtight container. This keeps the chicken fresh and tasty. You can store it in the fridge for up to three days. Make sure to label the container with the date. When you are ready to eat the leftovers, you can reheat them. I recommend using the stove for the best taste. Place the chicken in a skillet over medium heat. Add a splash of cream or water to keep it moist. Heat for about 5-7 minutes, stirring often. You can also use a microwave if you prefer that method. Heat it in short bursts of 1-2 minutes. Stir after each burst to ensure even heating. If you want to save this dish for later, freezing is a great option. First, cool the chicken completely. Then, portion it into freezer-safe bags or containers. Remove as much air as possible to avoid freezer burn. This dish can be frozen for up to three months. When you are ready to enjoy it, thaw it overnight in the fridge. Reheat it as explained above, and you will have a quick and tasty meal ready to go! Yes, you can use frozen chicken breasts. Just make sure to thaw them first. You can do this in the fridge overnight or use the microwave. Once thawed, season and cook them as the recipe states. This helps the chicken cook evenly and stay juicy. To add spice, you can include red pepper flakes. Start with ½ teaspoon and adjust to your taste. You can also add diced jalapeños or hot sauce. These options will give you that extra kick without changing the dish's creamy base. This dish goes well with many sides. Here are some great options: - Rice: White or brown rice soaks up the sauce well. - Pasta: Serve with fettuccine or penne for a hearty meal. - Salad: A fresh green salad adds a nice crunch. - Garlic Bread: Perfect for dipping into the sauce. These sides will make your meal balanced and delicious. Enjoy! In this blog post, we covered how to make a Creamy Tomato Basil Chicken Skillet. We explored main ingredients, cooking steps, and helpful tips. You learned how to adjust the dish for your diet and how to store leftovers. This easy dish is tasty and flexible. You can make it fit your needs and preferences. I hope you enjoy cooking and sharing this meal with others!

Creamy Tomato Basil Chicken Skillet Savory Delight

Welcome to the savory world of Creamy Tomato Basil Chicken Skillet! This dish combines juicy chicken, fresh tomatoes, and fragrant

Older posts
Newer posts
← Previous Page1 … Page130 Page131 Page132 … Page137 Next →

dsad

© 2025 Recipes Pursuit • Built with GeneratePress

Our Policies

  • Copyright Policy
  • Cookie Policy
  • GDPR Policy
  • Privacy Policy
  • Disclaimer
  • Terms Of Use

More Information

  • Home
  • About
  • Contact
  • Appetizers
  • Dessert
  • Dinner
  • Drinks
©2025, Recipes Pursuit About Back To Top