Skip to content
DisclaimerTerms Of UseGDPR PolicyCookie Policy

Recipes Pursuit

  • Home
  • Drinks
  • Appetizers
  • Dinner
  • Dessert
  • About
  • Contact
  • Privacy Policy
DisclaimerTerms Of UseGDPR PolicyCookie Policy

Emma Smith

- 14 oz firm tofu, drained and pressed - 3 tablespoons sweet chili sauce - 2 tablespoons soy sauce - 1 tablespoon sesame oil - 1 tablespoon rice vinegar - 1 tablespoon grated fresh ginger - 2 cloves garlic, minced - 1 tablespoon cornstarch - 2 green onions, chopped (for garnish) - Sesame seeds (for garnish) - Cooked jasmine rice (for serving) To make sweet chili glazed tofu, you need just a few key ingredients. Firm tofu forms the base of this dish. It gives you a nice texture and holds up well during cooking. The sweet chili sauce adds that perfect touch of sweetness and heat. Soy sauce brings in a salty flavor, while sesame oil gives a rich, nutty taste. Rice vinegar adds acidity and balances the dish. Fresh ginger and garlic bring warmth and depth to the flavor profile. Cornstarch helps create a crispy coating on the tofu. For garnishing, I use green onions and sesame seeds. They add color and crunch. Serving the tofu over jasmine rice makes it a hearty meal. Each bite will be full of flavor and satisfaction. {{ingredient_image_1}} - First, drain the tofu. Place it on a clean towel. - Press down gently to remove excess water. - Cut the pressed tofu into 1-inch cubes. Pat them dry with a paper towel. - In a large bowl, mix the sweet chili sauce and soy sauce. - Next, add sesame oil, rice vinegar, grated ginger, and minced garlic. - Whisk until all ingredients blend well together. - Add the tofu cubes to the marinade. Toss gently to coat all sides. - Let the tofu marinate for at least 15 minutes. - After marinating, sprinkle cornstarch over the tofu. Toss again to coat evenly. - Heat a non-stick skillet over medium-high heat. - Add the marinated tofu in a single layer. Cook for about 4-5 minutes on each side. - Look for a golden brown and crispy texture. - Drizzle any remaining marinade into the skillet in the last minute. This will glaze the tofu. - Once cooked, remove the skillet from heat. Transfer the glazed tofu to a serving platter. To make your tofu crispy, start with firm tofu. Press it well to remove excess water. This helps it soak up the marinade and get that perfect crunch. After cutting your tofu into 1-inch cubes, pat them dry with a paper towel. This extra step reduces moisture and helps achieve crispiness. You can also try alternate cooking methods like baking or air frying. For baking, preheat your oven to 400°F (200°C). Spread the marinated tofu on a baking sheet. Bake for about 25-30 minutes, flipping halfway through. If you use an air fryer, set it to 375°F (190°C) and cook for around 15-20 minutes, shaking the basket halfway. Both methods yield crispy tofu with less oil. To boost flavor, consider adding spices like smoked paprika or cayenne pepper. These can give your dish a nice kick. You can also mix in a splash of lime juice for brightness. For extra umami, try adding a few drops of fish sauce or a splash of hoisin sauce. Adjust the sweetness and heat levels by changing the amount of sweet chili sauce. If you prefer it less sweet, use less sweet chili sauce and add more soy sauce. For more heat, add fresh chopped chilies or a dash of chili flakes. These small tweaks can make a big difference in how your dish tastes. Pro Tips Press the Tofu: Ensure you press the tofu well to remove excess moisture. This step is crucial for achieving a crispy texture during cooking. Customize the Marinade: Feel free to adjust the sweetness or spiciness of the sauce according to your taste. Adding more chili sauce can enhance the heat! Use a Non-Stick Skillet: A non-stick skillet will help prevent the tofu from sticking and make it easier to achieve that golden, crispy finish. Garnish for Flavor and Presentation: Don’t skip the garnishes! Chopped green onions and sesame seeds not only add flavor but also elevate the dish’s visual appeal. {{image_2}} You can add mushrooms to your sweet chili glazed tofu. Mushrooms give the dish a rich texture. Shiitake or button mushrooms work well. Slice the mushrooms and sauté them in the skillet first. Then, add the marinated tofu. This not only adds flavor but also makes the dish more filling. The mushrooms soak up the sweet chili sauce and enhance every bite. Want a balanced meal? Make a sweet chili tofu stir-fry! Add your favorite vegetables like bell peppers, broccoli, or snap peas. Stir-fry the veggies in the skillet before adding tofu. This gives color and crunch to the dish. Toss everything together at the end with the glaze. You get a tasty meal rich in nutrients. Feel free to swap the sweet chili sauce! Teriyaki sauce adds a savory twist. It has a thick, sweet flavor that pairs well with tofu. Chili garlic sauce brings heat to your dish. This sauce gives it a spicy kick. Try these sauces to discover new tastes. Each sauce gives a unique spin on the classic recipe. To store cooked tofu, first let it cool. Place the tofu in an airtight container. This keeps it fresh longer. You can store it in the fridge for up to three days. Make sure it's not sitting in sauce to avoid sogginess. If you have extra sauce, keep it in a separate container. To reheat your sweet chili glazed tofu, use a skillet. Heat it on medium until warm. This helps keep the tofu crispy. Avoid using the microwave, as it can make the tofu soft. If you must use a microwave, heat it for only a short time. Check every 30 seconds to avoid overcooking. Yes, you can freeze sweet chili glazed tofu! First, let it cool completely. Cut it into pieces if you haven't already. Store it in a freezer-safe bag or container. Squeeze out excess air before sealing. It can last up to three months. When ready to eat, thaw it in the fridge overnight before reheating. Yes, you can use extra-firm tofu. It holds shape well and cooks nicely. Soft tofu, however, is delicate. It can break apart easily during cooking. If you use soft tofu, be gentle when handling it. Adjust cooking times too. Extra-firm tofu takes about the same time as firm tofu. Soft tofu may need less time to cook since it heats quickly. Most sweet chili sauces are vegan-friendly. They typically contain sugar, chili peppers, vinegar, and garlic. Always check the label if you have concerns. Some brands may add fish sauce or other non-vegan ingredients. Look for sauces labeled as vegan to be safe. Making your own sauce is another great option. Sweet chili glazed tofu pairs well with several sides. Here are some great options: - Cooked jasmine rice - Steamed broccoli - Stir-fried vegetables - Quinoa - Salad with a light dressing These sides balance the flavors and create a complete meal. Enjoy experimenting with your favorite dishes! In this article, we explored how to make delicious sweet chili glazed tofu. We covered key ingredients, step-by-step cooking methods, and clever tips for perfecting the dish. You learned how to adjust flavors and even create variations like stir-fries. Remember, cooking is fun, and experimenting makes it better. Enjoy your sweet chili glazed tofu and feel free to explore new ideas. This dish can be a tasty part of your meals, sharing flavor and joy with everyone. Enjoy the cooking journey!

Sweet Chili Glazed Tofu Quick and Flavorful Recipe

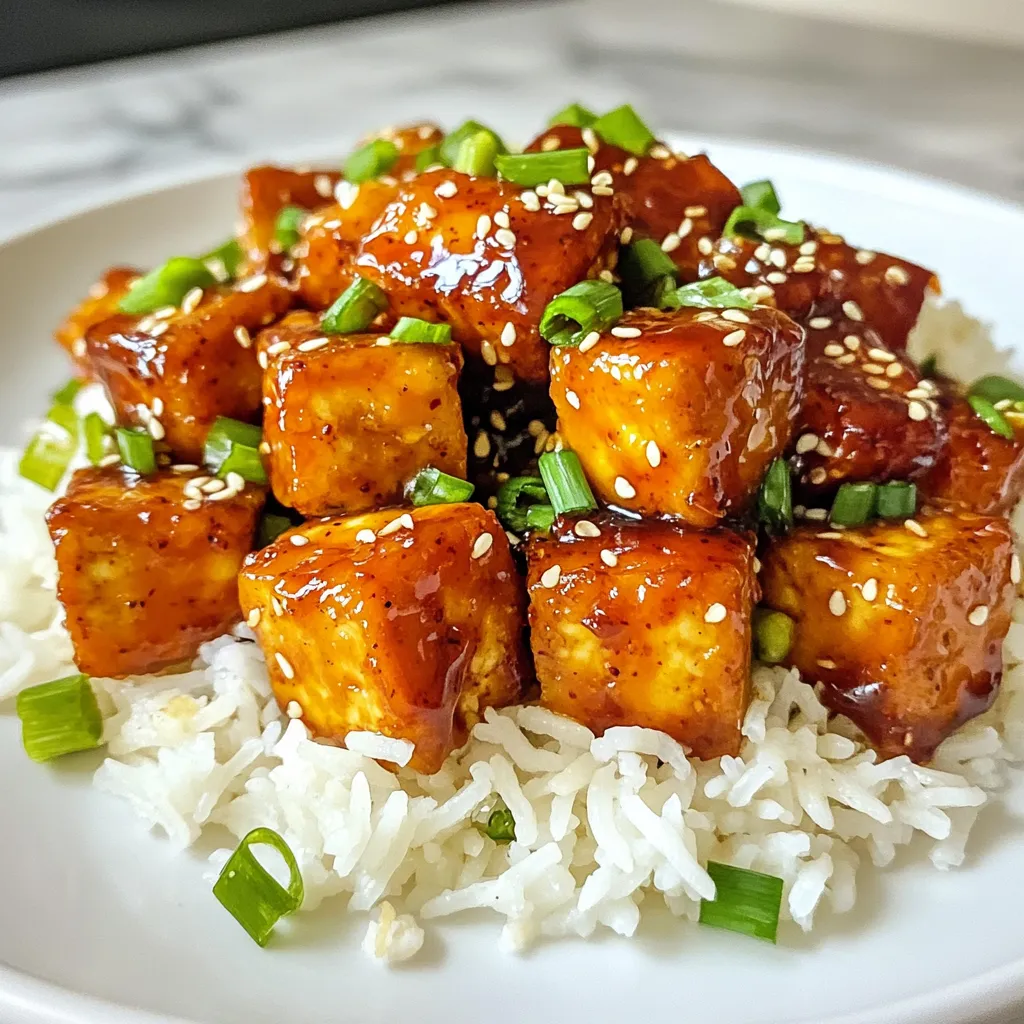
Are you ready to excite your taste buds with a dish that’s both quick and flavorful? This Sweet Chili Glazed

For this Coconut Ginger Curry Chicken, you'll need these simple items: - 1 lb boneless, skinless chicken thighs, cut into bite-sized pieces - 1 tablespoon coconut oil - 1 medium onion, finely chopped - 3 cloves garlic, minced - 1 tablespoon fresh ginger, grated - 1-2 tablespoons red curry paste (adjust to taste) - 1 can (14 oz) coconut milk - 1 tablespoon fish sauce (or soy sauce for a vegetarian option) - 1 tablespoon brown sugar - 1 bell pepper (red or yellow), sliced - 1 cup snap peas (or green beans) - Fresh cilantro, chopped, for garnish - Salt and pepper, to taste - Steamed rice or quinoa, for serving You can swap ingredients based on your taste or what you have. If you don't like chicken, try firm tofu or shrimp. For a lighter option, use skinless chicken breasts. You can also use vegetable broth instead of fish sauce. If you want less heat, use less red curry paste. For a sweeter taste, add more brown sugar. When picking chicken, look for bright pink meat. Avoid any that looks gray or has an off smell. For onions, choose firm ones with dry skin. Garlic should be plump and not sprouting. Fresh ginger is smooth and firm. When buying bell peppers, pick ones that feel heavy for their size. For snap peas, look for vibrant green ones that snap easily. Always choose fresh ingredients to boost the flavor of your dish. {{ingredient_image_1}} To start, gather your ingredients. You need one pound of boneless chicken thighs. Cut them into small pieces. Next, finely chop one medium onion. Mince three cloves of garlic and grate one tablespoon of fresh ginger. Slice one bell pepper and prepare one cup of snap peas. Finally, measure out your curry paste, coconut milk, fish sauce, and brown sugar. First, heat one tablespoon of coconut oil in a large skillet over medium heat. Add the chopped onion and sauté it for about five minutes. Once the onion is translucent, stir in the minced garlic and grated ginger. Cook for one minute until you smell the aroma. Next, add the chicken pieces to the skillet. Season them with salt and pepper. Cook the chicken for five to seven minutes until it is browned on all sides. Now, stir in one to two tablespoons of red curry paste. Mix well to coat the chicken evenly. Pour in one can of coconut milk, one tablespoon of fish sauce, and one tablespoon of brown sugar. Stir until well combined. Bring the mixture to a gentle simmer over medium-low heat. After ten minutes, add the sliced bell pepper and snap peas. Cook for an additional five minutes. You want the veggies tender but still crisp. Taste the curry and adjust the seasoning. You can add more salt, pepper, or sugar if needed. Remove the skillet from heat. Garnish the dish with fresh chopped cilantro. Serve it over steamed rice or quinoa for a complete meal. Enjoy your flavorful Coconut Ginger Curry Chicken! To make a great coconut ginger curry chicken, follow these simple tips: - Use fresh ginger for the best flavor. - Cut chicken thighs into uniform pieces for even cooking. - Sauté onions until they turn soft and clear. This adds a great base flavor. - Adjust the red curry paste to match your spice level. Start with less if you’re unsure. - Simmer the curry gently. This helps meld the flavors perfectly. Here are some common mistakes you should avoid: - Don’t skip the browning step for the chicken. It adds depth to the dish. - Avoid using low-quality coconut milk. It makes a big difference in taste. - Don’t overcook the vegetables. They should be tender yet crisp. - Be careful with salt. Fish sauce is salty, so taste often. To elevate your curry, try these flavor boosters: - Add a squeeze of lime juice for a fresh kick. - Toss in a teaspoon of turmeric for color and health benefits. - Include a dash of chili flakes for extra heat. - Experiment with herbs like basil or mint for a unique twist. - Serve with fresh cilantro on top for a burst of flavor. Pro Tips Adjusting Spice Level: If you prefer a milder curry, start with 1 tablespoon of red curry paste and add more gradually until it reaches your desired heat. Fresh Ginger vs. Ground: For the best flavor, always use fresh ginger instead of ground ginger, as it provides a more vibrant taste to the dish. Vegetable Variations: Feel free to add other vegetables like zucchini or carrots for added nutrition and color in your curry. Make Ahead: This curry can be made a day in advance and tastes even better the next day as the flavors meld together. {{image_2}} You can easily make this dish vegetarian or vegan. Swap the chicken for tofu or chickpeas. Use soy sauce instead of fish sauce. Both options add great flavor and protein. You can also add more veggies, like carrots or mushrooms. This makes the dish colorful and tasty. If you prefer other proteins, try shrimp or fish. Both options cook quickly and soak up the curry flavor. For a heartier meal, you can use beef or pork. Just adjust the cooking time to ensure they are done. Each protein gives a unique twist to the recipe. Adjusting the spice level is simple. If you like it mild, start with less red curry paste. You can always add more later. For a spicier kick, add fresh chili peppers or extra curry paste. Remember, tasting as you cook helps you find the right balance. To store leftovers, let the curry cool first. Use a clean, airtight container. Place the chicken curry inside and seal it well. Store it in the fridge. It will stay fresh for about 3 to 4 days. If you want to freeze the curry, use freezer-safe containers. Make sure to leave some space at the top. The curry can expand when frozen. You can keep it in the freezer for up to 2 months. Label the container with the date for easy tracking. When reheating, use a pot on the stove or a microwave. If using the stove, heat it on low. Stir often to ensure even warming. If using a microwave, cover the dish to avoid splatters. Heat in short bursts, stirring in between. Make sure it is hot throughout before serving. Coconut Ginger Curry Chicken is a tasty dish that blends chicken with coconut milk and spices. The chicken becomes tender and flavorful. Fresh ginger adds a nice zing to the curry. Red curry paste brings warmth and a hint of spice. This dish is creamy, aromatic, and perfect for a cozy dinner. Yes, you can make Coconut Ginger Curry Chicken ahead of time. Cook the dish and let it cool. Store it in an airtight container in the fridge for up to three days. Reheat on the stove or microwave before serving. The flavors deepen over time, making it even better! The spice level depends on the amount of red curry paste you use. Start with one tablespoon for mild heat. If you love spice, add more to taste. The coconut milk helps balance the heat, so it stays flavorful without being too hot. I recommend serving Coconut Ginger Curry Chicken over steamed rice or quinoa. These sides soak up the tasty sauce. You can also add a side of sautéed greens or a fresh salad. This adds color and crunch to your meal. Enjoy the mix of flavors and textures! In this blog post, we explored the delicious world of Coconut Ginger Curry Chicken. We detailed the ingredients and offered substitutions for freshness. The step-by-step instructions help you navigate preparation and cooking with ease. I shared tips to make your dish perfect and avoid common mistakes. You can also find variations for different diets, like vegetarian options. Lastly, I explained how to store leftovers and answer questions you might have. Cooking this dish brings flavor and joy to your table. Enjoy your culinary adventure!

Coconut Ginger Curry Chicken Flavorful Dinner Recipe

If you’re looking for a dinner that bursts with flavor, try my Coconut Ginger Curry Chicken. This dish combines rich

- Cauliflower florets - Olive oil - Garlic - Vegetable broth - Heavy cream or plant-based cream - Nutmeg - Pasta of choice - Parmesan cheese or nutritional yeast - Fresh parsley and red pepper flakes This dish starts with one large head of cauliflower. Cut it into bite-sized florets. The florets will roast and become golden brown. You will also need three tablespoons of olive oil for roasting. Olive oil adds flavor and helps the cauliflower crisp. Garlic brings a lot of taste. Use three cloves of minced garlic. You will add the garlic while the cauliflower roasts. It gives a nice aroma and taste to the dish. Next, you need one cup of vegetable broth. This broth is key for making the sauce creamy and rich. If you want a vegan option, use plant-based cream instead of heavy cream. It works well in this recipe. Add a pinch of nutmeg for warmth. It enhances the flavors in the cream sauce. For the pasta, use 12 ounces of your favorite type. Fusilli or penne are great choices. Cook the pasta al dente for the best texture. Don't forget the cheese! You will need half a cup of grated Parmesan cheese. If you prefer a vegan option, use nutritional yeast instead. Finally, fresh parsley adds color and freshness. You can also sprinkle red pepper flakes for some heat. These ingredients come together to make a rich and tasty dish you will love. {{ingredient_image_1}} - Preheating the oven: First, set your oven to 425°F (220°C). This high heat will help caramelize the cauliflower, giving it a nice flavor. - Tossing cauliflower with olive oil, salt, and pepper: Take a large baking sheet. Place your cauliflower florets on it. Drizzle 2 tablespoons of olive oil over them. Add salt and pepper to taste. Toss it all together until the florets are well coated. - Roasting cauliflower with garlic: Spread the florets out in a single layer on the baking sheet. Roast them for about 25 minutes. Flip them halfway through. In the last 5 minutes, add minced garlic to the tray. This will give your dish a lovely aroma and taste. - Boiling water: While the cauliflower roasts, fill a large pot with water. Add a good pinch of salt. Bring it to a boil over high heat. - Cooking pasta to al dente: Once the water is boiling, add your pasta. Stir it well and cook according to the package instructions. Aim for al dente, which means it should be firm to the bite. When done, drain the pasta but keep about 1 cup of the water. - Blending the roasted cauliflower mixture: In a blender, add the roasted cauliflower and garlic, vegetable broth, heavy cream, and nutmeg. Blend until you have a smooth and creamy sauce. - Combining sauce with pasta: In the pot you used for the pasta, add the creamy sauce to the drained pasta. Stir in the grated Parmesan cheese. The cheese will melt into the sauce, adding richness. - Adjusting consistency: If the sauce seems too thick, add some reserved pasta water a little at a time. Mix until you reach your desired creaminess. Taste it! Adjust salt, pepper, and red pepper flakes if you like some heat. To get the best caramelization on your cauliflower, make sure to cut the florets into similar sizes. This helps them roast evenly. Spread them out on the baking sheet in a single layer. This allows hot air to reach all sides. Roast at 425°F until they turn golden brown. This usually takes about 25 minutes. Flip them halfway through for even cooking. Timing is key for adding garlic. You should add minced garlic during the last five minutes of roasting. This keeps the garlic from burning and gives it a sweet flavor. The roasted garlic will blend perfectly with the cauliflower later. To boost the flavor, consider extra seasonings. A pinch of smoked paprika adds depth. You can also try adding a squeeze of lemon juice for brightness. Fresh herbs, like thyme or rosemary, can elevate the dish as well. If you need vegan options, swap heavy cream for plant-based cream. Nutritional yeast can replace Parmesan cheese for a cheesy taste. Don't forget to adjust the seasonings to match your taste! Pro Tips Use Fresh Ingredients: For the best flavor, always use fresh garlic and high-quality olive oil. They make a significant difference in the dish's overall taste. Adjust the Creaminess: If you prefer a lighter sauce, you can substitute half of the cream with more vegetable broth. This will still keep the sauce flavorful while reducing richness. Perfect Pasta Cooking: Make sure to cook your pasta al dente, as it will continue to cook slightly when mixed with the hot sauce. This prevents it from becoming mushy. Garnish for Flavor: Fresh parsley not only adds a pop of color but also enhances the dish's flavor profile. Don't skip this step! {{image_2}} You can use many types of pasta for this dish. Fusilli and penne are great choices. Fusilli holds the sauce well because of its twists. Penne has a smooth surface and adds a nice bite. Both will taste amazing with the creamy sauce. If you need gluten-free options, try rice or corn pasta. These choices keep the dish light and full of flavor. You can make this pasta even better by adding more ingredients. Toss in veggies like spinach, peas, or cherry tomatoes for color and crunch. If you want more protein, consider adding grilled chicken, shrimp, or chickpeas. Each choice gives the dish a nice twist. Spice things up by adding crushed red pepper flakes for heat. You can also add fresh herbs like basil or thyme for a fresh taste. These small changes can make your creamy roasted cauliflower pasta unique and exciting. To store leftovers, keep the creamy roasted cauliflower pasta in an airtight container. Make sure it is cool before sealing. This helps keep the flavors fresh. The shelf life in the fridge is about 3 to 4 days. If you want to enjoy it later, check for any signs of spoilage before eating. To freeze the dish, let it cool completely. Then, place it in a freezer-safe container. Make sure to leave some space at the top, as the pasta may expand. You can freeze it for up to 3 months. When you want to eat it, thaw the pasta overnight in the fridge. For reheating, warm it in a pot over low heat. Add a splash of vegetable broth or water to help bring back the creamy texture. Stir frequently until it's heated through. Yes, you can make this recipe vegan. To do this, swap the dairy items. - Use plant-based cream instead of heavy cream. - Replace Parmesan cheese with nutritional yeast. These changes keep the dish creamy and tasty. To make the sauce dairy-free, focus on plant-based options. You can use: - Coconut cream for a rich texture. - Almond milk for a lighter choice. - Cashew cream for a nutty flavor. These will ensure a smooth and creamy sauce without dairy. For this creamy roasted cauliflower pasta, choose pasta that holds sauce well. I recommend: - Fusilli, as its twists catch the sauce nicely. - Penne, which has ridges for extra grip. Both options work great to enhance your dish. This blog post explored a creamy cauliflower pasta dish, highlighting essential ingredients, step-by-step instructions, and helpful tips. You learned how to prepare and roast cauliflower for maximum flavor. We discussed various pasta options and ways to enhance the dish’s taste. Storage tips ensure your leftovers stay fresh. In my experience, this recipe is easy and flexible. Feel free to experiment with flavors and ingredients. Enjoy crafting this creamy delight, and share your tasty results!

Creamy Roasted Cauliflower Pasta Delightful and Easy

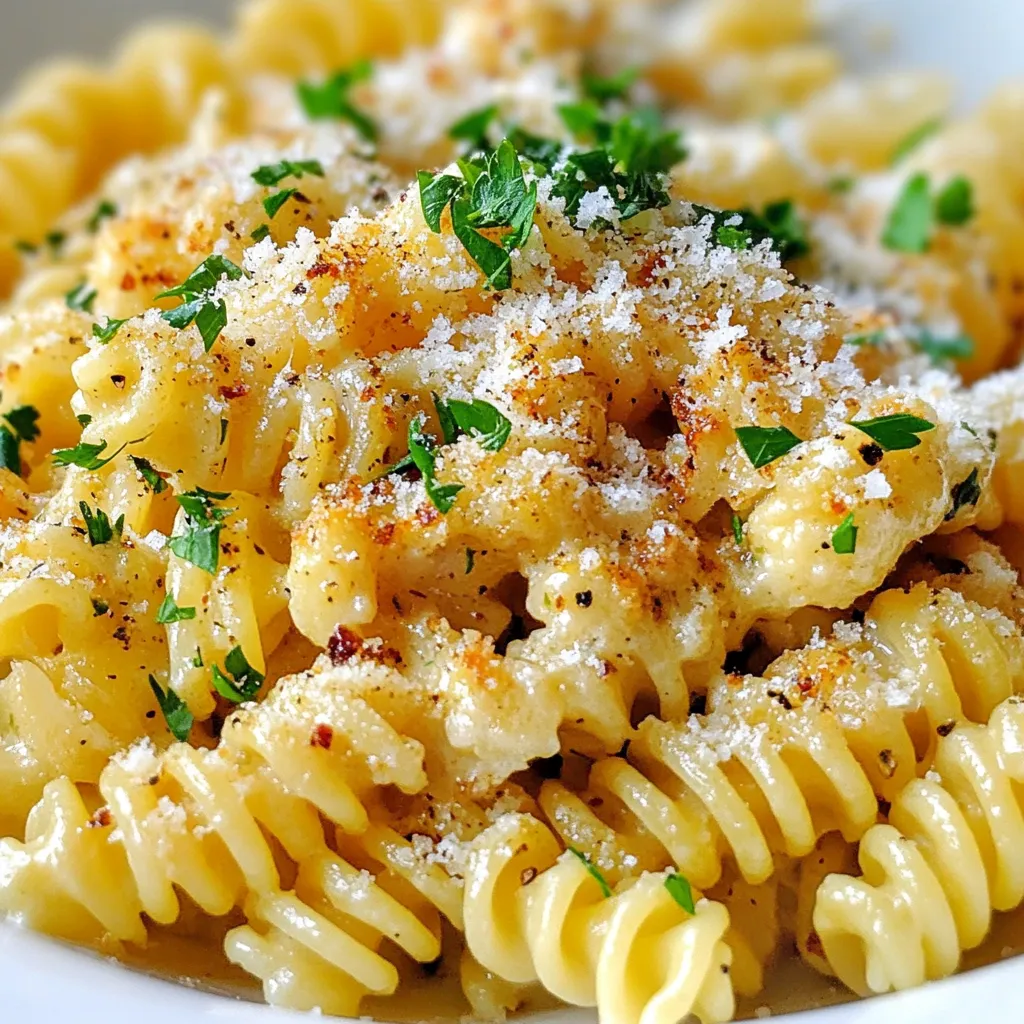
If you’re looking for a comforting, delicious meal that’s easy to make, you’ve found it! My Creamy Roasted Cauliflower Pasta

To make Pesto Ricotta Stuffed Shells, you need the following ingredients: - 20 jumbo pasta shells - 1 cup ricotta cheese - 1 cup fresh basil pesto - 1 cup shredded mozzarella cheese - 1/2 cup grated Parmesan cheese - 1 large egg - 1 teaspoon garlic powder - Salt and pepper to taste - 2 cups marinara sauce - Fresh basil leaves for garnish These ingredients work together to create a rich and tasty dish. Jumbo pasta shells are perfect for stuffing. Ricotta cheese gives a creamy texture. Pesto adds a fresh flavor that shines through. The blend of mozzarella and Parmesan provides a wonderful cheesy topping. The egg helps bind everything together. Garlic powder adds depth, while salt and pepper enhance the taste. Marinara sauce brings moisture and tang to the dish. Finally, fresh basil leaves make it look pretty and add aroma. When you gather these ingredients, you set the stage for a lovely meal. Each one plays a role in making your stuffed shells flavorful and satisfying. Enjoy cooking this dish as you explore its layers of taste! {{ingredient_image_1}} 1. Start by boiling a large pot of salted water. This helps flavor the pasta. 2. Cook the jumbo pasta shells in the boiling water for about 10 to 12 minutes. You want them al dente, so they hold their shape. 3. Once done, drain the shells in a colander. Rinse them under cold water. This stops the cooking process and keeps them from sticking. 1. In a big mixing bowl, combine the ricotta cheese, half of the pesto, and half of the mozzarella cheese. 2. Add the grated Parmesan cheese, egg, garlic powder, salt, and pepper. 3. Mix everything until it blends well. You want a creamy and smooth filling. 1. Grab a 9x13-inch baking dish and spread a layer of marinara sauce on the bottom. This adds moisture and flavor. 2. Carefully fill each cooked pasta shell with the ricotta mixture. Place them open side up in the dish. 3. After filling, drizzle the remaining pesto over the shells. Then sprinkle the rest of the mozzarella cheese on top. 4. Pour the rest of the marinara sauce around the shells. This keeps the pasta moist while baking. 1. Cover the baking dish tightly with aluminum foil. This helps keep the shells from drying out. 2. Bake in your preheated oven at 375°F (190°C) for 25 minutes. 3. After that, remove the foil and bake for another 10 minutes. You want the cheese to be bubbly and golden brown. 4. Let the dish cool for a few minutes. Then, garnish with fresh basil leaves before serving. To ensure your pasta shells do not stick, follow these steps: - Use plenty of salted water for boiling. - Stir the shells gently within the first few minutes. - Rinse cooked shells under cold water to stop cooking. To prevent filling from spilling out, try this: - Use a piping bag to fill the shells. - Pack the filling tightly but not overstuffed. For extra flavor in your stuffed shells, consider adding: - Fresh herbs like parsley or oregano. - A pinch of crushed red pepper for heat. You can also try these seasonings: - A dash of lemon zest for brightness. - A sprinkle of smoked paprika for depth. Pair your stuffed shells with these sides: - A crisp garden salad for freshness. - Garlic bread for a nice crunch. For an appealing presentation, garnish with: - Fresh basil leaves on top. - A drizzle of extra pesto over the dish. Pro Tips Use Fresh Ingredients: For the best flavor, opt for fresh basil and high-quality ricotta cheese. Don't Overcook the Shells: Cook the jumbo shells just until al dente to prevent them from becoming mushy when baked. Customize Your Filling: Feel free to add sautéed spinach or other vegetables to the ricotta mixture for extra nutrition. Let It Rest: Allow the dish to cool for a few minutes before serving to help the filling set and make it easier to serve. {{image_2}} You can make your pesto ricotta stuffed shells even heartier. Just add cooked ground meat or sausage to the ricotta mix. Ground beef, turkey, or chicken work well. Use about 1 cup of cooked meat for added flavor. This twist makes the dish more filling and perfect for meat lovers. If you want a meat-free version, you have great options. You can substitute cheese or add more veggies. Try using goat cheese or feta for a tangy taste. You can also mix in cooked spinach, zucchini, or mushrooms. This gives you a fresh, vibrant dish full of color and nutrients. For those who need gluten-free meals, swap in gluten-free pasta shells. Many brands offer tasty alternatives that hold up well. You can also try using dairy-free cheese if you're avoiding dairy. Look for options that melt well, like cashew cheese or almond cheese. This way, everyone can enjoy this delicious meal! Let your Pesto Ricotta Stuffed Shells cool down before you store them. This step keeps the texture nice. Once they cool, place them in airtight containers. Glass or plastic containers both work well. Make sure to cover the shells with a lid. This helps keep them fresh longer. You can reheat your stuffed shells in the microwave or oven. For the microwave, place a shell on a plate. Heat it for about 1-2 minutes. If you want the cheese to stay melty, use the oven. Preheat it to 350°F (175°C) and bake for 15-20 minutes. Cover the dish with foil to keep the shells moist. This helps maintain the texture and flavor. You can freeze your shells before or after baking. For freezing before baking, arrange them in a single layer in a container. To freeze after baking, let them cool completely first. Wrap them tightly in foil or plastic wrap. When you're ready to eat, thaw them in the fridge overnight. Then, reheat as described above. This method keeps your meal fresh and tasty. Yes, you can make these shells ahead of time. Prepare the filling and stuff the shells. Lay them in the baking dish with sauce. Cover the dish tightly and store it in the fridge. This method keeps the flavors fresh. You can bake them the next day. Just add a few extra minutes to the baking time if they are cold. If you don’t have ricotta, you can use cottage cheese. Cream cheese works too, but it is richer. Greek yogurt is another option for a lighter touch. You can blend any of these to get a creamy texture. Each option will give a different taste, so choose what you like best. To keep your shells intact, use plenty of water. Boil them gently without overcrowding the pot. Stir them lightly while cooking to prevent sticking. Once cooked, drain them carefully. Rinse with cold water to stop the cooking. This method helps maintain their shape and texture. Absolutely! These stuffed shells are great for meal prep. You can prepare the filling a few days in advance. Cook the shells and stuff them before baking. They also freeze well. Just thaw and bake when you’re ready to enjoy them. This makes for a quick and easy meal on busy days. This recipe for Pesto Ricotta Stuffed Shells brings together simple ingredients like jumbo pasta, ricotta, and basil pesto. I showed you how to prepare, assemble, and bake these shells with step-by-step instructions. You also learned tips for storage, reheating, and variations to suit your taste. With this dish, you’ll have a tasty meal that’s easy to make and enjoy. Don't hesitate to experiment with your favorite flavors. Happy cooking!

Pesto Ricotta Stuffed Shells Flavorful and Easy Recipe

Get ready to impress your taste buds with my Pesto Ricotta Stuffed Shells! This dish is not only easy to

To make these tasty Peanut Butter Chocolate Chip Blondies, gather these items: - 1 cup creamy peanut butter - 1/2 cup unsweetened brown sugar - 1/2 cup granulated sugar - 1 large egg - 1 teaspoon vanilla extract - 1/2 teaspoon baking powder - 1/4 teaspoon salt - 1 cup all-purpose flour - 1/2 cup semi-sweet chocolate chips - Optional: 1/4 cup chopped peanuts for added crunch You can switch things up with these optional ingredients: - Add 1/4 cup chopped peanuts for extra crunch. - Use dark chocolate chips for a richer flavor. - Mix in some butterscotch chips for a sweet twist. Using good quality ingredients makes a big difference. Here are my tips: - Choose natural creamy peanut butter without added sugar or oils. - Use fresh eggs for the best rise and texture. - Opt for high-quality chocolate chips for rich flavor. - Look for unbleached all-purpose flour for a better texture. These choices ensure your blondies are moist, sweet, and simply delicious! {{ingredient_image_1}} 1. First, preheat your oven to 350°F (175°C). This helps the blondies bake evenly. 2. Next, grease a 9x9-inch baking pan or line it with parchment paper. This makes removal easier. 3. In a medium bowl, mix 1 cup of creamy peanut butter, 1/2 cup of brown sugar, and 1/2 cup of granulated sugar. Stir until it feels smooth. 4. Add in 1 large egg and 1 teaspoon of vanilla extract. Mix until well combined. 5. Now, sprinkle in 1/2 teaspoon of baking powder and 1/4 teaspoon of salt. Then, add 1 cup of all-purpose flour. Mix until just combined. Do not overmix. 6. Fold in 1/2 cup of semi-sweet chocolate chips. If you want a crunch, add 1/4 cup of chopped peanuts. 7. Pour the batter into your prepared baking pan. Use a spatula to smooth it out evenly. 8. Bake for 20 to 25 minutes. The edges should be lightly golden. Insert a toothpick in the center; it should come out mostly clean. A few moist crumbs are fine. 9. Once baked, let the blondies cool in the pan for 10 to 15 minutes. 10. If you used parchment paper, lift the blondies out and transfer them to a wire rack. 11. Allow them to cool completely before cutting into squares. 12. For a special touch, serve warm with extra melted peanut butter and a sprinkle of sea salt. Enjoy with milk or vanilla ice cream! One common mistake is overmixing the batter. This can make your blondies tough. Mix until just combined to keep them soft. Another mistake is not measuring your ingredients correctly. Use measuring cups for accuracy. If you forget to preheat the oven, your blondies may bake unevenly. Always preheat for the best results. For the best texture, use creamy peanut butter. It blends smoothly and gives a nice flavor. Make sure to grease your baking pan well or use parchment paper. This helps with easy removal. Bake until the edges are golden but the center is slightly soft. A toothpick should come out with a few moist crumbs, not clean. Serve the blondies warm for a delightful taste. Drizzle some melted peanut butter on top for added flair. Sprinkle a little sea salt to enhance the flavor. For an extra treat, pair them with a scoop of vanilla ice cream or a glass of cold milk. This makes the dessert even more enjoyable! Pro Tips Use Room Temperature Ingredients: Allow your peanut butter and egg to come to room temperature before mixing. This ensures a smoother batter and better incorporation of ingredients. Check for Doneness: Since ovens can vary, start checking your blondies a few minutes before the recommended time. They should be lightly golden on the edges and a toothpick should come out with a few moist crumbs. Store Properly: To keep blondies fresh, store them in an airtight container at room temperature for up to a week. For longer storage, you can freeze them for up to three months. Experiment with Mix-ins: Feel free to customize your blondies by adding different mix-ins like butterscotch chips, white chocolate, or dried fruit for a unique twist on the classic recipe. {{image_2}} You can make these blondies gluten-free. Simply swap all-purpose flour with a gluten-free blend. Many blends work well, so pick one you like. Make sure it has xanthan gum for the best texture. This way, everyone can enjoy a tasty treat! If you need a nut-free version, replace the peanut butter with sun butter. Sun butter comes from sunflower seeds and tastes great. It gives you that creamy texture without nuts. Always check labels to avoid cross-contamination if allergies are a concern. Want to make these blondies a bit healthier? You can use coconut sugar instead of regular sugar. It has a lower glycemic index and adds a nice flavor. Another option is to use whole wheat flour. This adds more fiber and nutrients to your dessert. You can also reduce the chocolate chips for less sugar while still enjoying a sweet treat. To keep your peanut butter chocolate chip blondies fresh, store them in an airtight container. This helps maintain their chewy texture and rich flavor. Place parchment paper between layers to avoid sticking. Blondies can last for about five days at room temperature. For longer storage, consider refrigerating them. Just be sure to wrap them well to prevent drying out. Freezing blondies is a great way to enjoy them later. Cut the cooled blondies into squares. Wrap each piece tightly in plastic wrap, then place them in a freezer bag. Label the bag with the date. You can freeze them for up to three months. When you want to enjoy one, just take it out and let it thaw at room temperature. To enjoy your blondies warm, preheat your oven to 350°F (175°C). Place the blondies on a baking sheet. Heat them for about 5-10 minutes. You can also microwave a single square for about 15-20 seconds. This will make them soft and gooey again, perfect for serving with a scoop of ice cream! To make Peanut Butter Chocolate Chip Blondies, start by gathering your ingredients. You will need: - 1 cup creamy peanut butter - 1/2 cup unsweetened brown sugar - 1/2 cup granulated sugar - 1 large egg - 1 teaspoon vanilla extract - 1/2 teaspoon baking powder - 1/4 teaspoon salt - 1 cup all-purpose flour - 1/2 cup semi-sweet chocolate chips - Optional: 1/4 cup chopped peanuts First, preheat your oven to 350°F. Grease a 9x9-inch baking pan or line it with parchment paper. Then, mix the peanut butter, brown sugar, and granulated sugar until smooth. Next, add the egg and vanilla, stirring well. Sprinkle in the baking powder and salt, then add the flour. Mix until just combined, then fold in the chocolate chips and chopped peanuts. Pour the batter into the pan and smooth it out. Bake for 20-25 minutes until golden. Let cool before cutting into squares. Yes, you can use crunchy peanut butter! It will add a nice texture. The chunks of peanuts give extra crunch in each bite. Just make sure to mix it well with the sugars. This small change can make your blondies even more delightful. To check if the blondies are done, insert a toothpick into the center. If it comes out mostly clean with a few moist crumbs, they are ready. The edges should look lightly golden. Be careful not to overbake, as this can make them dry. Serve your blondies warm for the best taste. Drizzle some melted peanut butter on top. A sprinkle of sea salt adds a nice touch. They pair wonderfully with a glass of cold milk or a scoop of vanilla ice cream. You can also cut them into smaller squares and serve at parties. Blondies can last about five days at room temperature if stored in an airtight container. If you want them to last longer, you can freeze them. Wrap each piece in plastic wrap, then place in a freezer bag. They can stay good for up to three months in the freezer. This blog post covered key steps for making delicious blondies. We explored ingredients, preparation, and baking guidelines. I shared tips to avoid common mistakes and enhance your baking. You learned about variations, storage tips, and answers to frequent questions. In the end, making great blondies is all about quality ingredients and care. With these tips, you can bake fantastic treats that friends and family will love. Now, get started and enjoy your baking journey!

Peanut Butter Chocolate Chip Blondies Tasty Dessert Recipe

Craving a sweet treat that’s both easy and delicious? Look no further! This Peanut Butter Chocolate Chip Blondies recipe hits

- 4 large whole wheat wraps - 1 cup classic hummus - 1 cup cucumber, thinly sliced - 1 cup bell peppers (red, yellow, or orange), thinly sliced - 1 cup cherry tomatoes, halved - 1 cup kalamata olives, pitted and sliced - 1 cup mixed greens (spinach, arugula, or romaine) - ½ cup red onion, thinly sliced - ¼ cup feta cheese, crumbled (optional) - 2 tablespoons olive oil - 1 tablespoon lemon juice - Salt and pepper to taste - Fresh dill or parsley for garnish (optional) Each ingredient plays a key role in making these wraps pop with flavor and nutrition. The whole wheat wraps offer a hearty and wholesome base. The classic hummus adds creaminess and richness, making each bite satisfying. Fresh vegetables bring crunch and freshness. I love using cucumbers and bell peppers for their vibrant colors and crisp textures. Cherry tomatoes add a burst of sweetness, while kalamata olives bring a salty bite that enhances the whole dish. Mixed greens add a healthy touch, and red onion brings sharpness. If you want a creamy twist, sprinkle feta cheese on top. The olive oil and lemon juice dressing not only brightens the flavors but also adds a zesty zing. Feel free to add fresh herbs like dill or parsley as a finishing touch. This not only looks great but also boosts flavor. With these ingredients, you set the stage for a flavorful and healthy meal that’s easy to prepare! {{ingredient_image_1}} - Wash and slice vegetables: Start by washing the cucumber, bell peppers, cherry tomatoes, and red onion. Thinly slice these veggies and put them aside in a bowl. This makes them easy to grab later. - Prepare the dressing: In a small bowl, mix together 2 tablespoons of olive oil and 1 tablespoon of lemon juice. This dressing adds flavor to the greens. Toss the mixed greens in the bowl, adding a pinch of salt and pepper to taste. - Spread hummus on the wrap: Lay a whole wheat wrap flat on a clean surface. Use about 1 cup of classic hummus and spread it evenly across the wrap. Leave about an inch of space from the edges. - Layer the fillings: Start at one end of the wrap. Add a handful of mixed greens, followed by the sliced cucumber, bell peppers, cherry tomatoes, and kalamata olives. If you like, sprinkle ¼ cup of crumbled feta cheese on top for some extra taste. - Roll the wrap: Carefully roll the wrap tightly. Tuck in the sides as you go to keep the filling inside. When it’s fully rolled, slice the wrap in half diagonally using a sharp knife. - Slice the wraps: If you made more than one wrap, repeat the rolling and slicing steps for the rest. Each wrap should look colorful and appetizing. - Garnish with herbs: For a nice touch, you can garnish each wrap with fresh dill or parsley. This adds flavor and makes the wraps look pretty when served. - Best practices for slicing vegetables: Use a sharp knife for clean cuts. Slice cucumbers, bell peppers, and red onions thinly. This helps them fit well in the wrap. For cherry tomatoes, cut them in half for easy eating. - Choosing the right wraps: Whole wheat wraps work best for flavor and nutrition. They add fiber and keep the wraps sturdy. You can also try spinach or herb wraps for a fun twist. - Presentation ideas: Serve the wraps on a colorful platter. Add a small bowl of extra hummus for dipping. You can also place lemon wedges and fresh herbs around the wraps for a bright look. - Pairing options: These wraps pair well with a side of fresh fruit or a light salad. You can also enjoy them with a glass of iced tea or sparkling water for a refreshing meal. Pro Tips Fresh Ingredients: Use the freshest vegetables available for the best flavor and texture in your wraps. Customize Your Fillings: Feel free to add or substitute other veggies like shredded carrots or avocado to suit your taste. Make Ahead: Prepare the fillings in advance and store them in the fridge to save time on busy days. Perfect Rolling Technique: Roll the wraps tightly and tuck in the sides as you go to keep everything secure and prevent spills. {{image_2}} You can change the veggies in your Greek hummus veggie wraps to fit your taste. Try adding shredded carrots or sliced radishes for a crunchy twist. Zucchini or roasted eggplant can also make a tasty filling. If you want a dairy-free option, use plant-based cheese. Many brands offer feta-style cheese made from almonds or cashews. These options still give you that creamy taste without dairy. Adding herbs and spices can take your wraps to the next level. Fresh dill or parsley adds a bright flavor. You can also sprinkle some oregano or basil for extra zest. For a kick, consider adding crushed red pepper or a pinch of cumin. These flavors enhance the hummus and veggies, making each bite exciting. Experiment with different spices to find your perfect mix! To store your Greek hummus veggie wraps, wrap each one tightly in plastic wrap. This keeps them fresh longer. You can also use a reusable container. Just make sure the lid is secure. Place the wraps in the fridge. They will stay good for about 2 days. For best taste, enjoy them soon after making. To keep them fresh, avoid adding wet ingredients too early. If you want to reheat your wraps, use a skillet over medium heat. This method warms them without making them soggy. Cook each wrap for about 2-3 minutes on each side. If you prefer using a microwave, wrap the veggie wrap in a damp paper towel. Heat for about 30-45 seconds. This helps maintain moisture. Just remember, reheating may change the texture a bit. Enjoy your wraps warm or cold! Can I make these wraps ahead of time? Yes, you can make these wraps ahead of time. Just wrap them tightly in plastic wrap. Store them in the fridge. They will stay fresh for up to two days. How do I keep the wraps from getting soggy? To keep the wraps from getting soggy, spread hummus only on the area you'll fill. Use a thin layer of hummus. Avoid putting wet veggies in the wrap. This will help keep everything crisp. Can I use gluten-free wraps? Absolutely! You can find gluten-free wraps at most stores. Look for ones made from rice or corn. They work well and taste great in this recipe. Calories per serving Each wrap has about 250 calories. This can vary based on toppings and portion sizes. Health benefits of ingredients These wraps are packed with healthy ingredients. Here are some benefits: - Whole wheat wraps provide fiber and help with digestion. - Hummus is rich in protein and healthy fats. - Fresh veggies add vitamins and minerals. - Olive oil has heart-healthy fats. - Kalamata olives are good for your skin and heart. - Feta cheese (if used) adds calcium and flavor. Enjoy these Greek hummus veggie wraps for a tasty and healthy meal! In this post, we explored how to create tasty whole wheat wraps. We covered key ingredients, like fresh veggies and hummus, and shared simple steps for preparation and assembly. Tips on storing and serving your wraps will ensure they remain fresh and delicious. You can also swap ingredients for fun variations. Remember, making wraps can be easy and enjoyable. With a little creativity, you can craft meals that taste great and are healthy. Enjoy your wrap-making journey!

Greek Hummus Veggie Wraps Flavorful and Healthy Meal

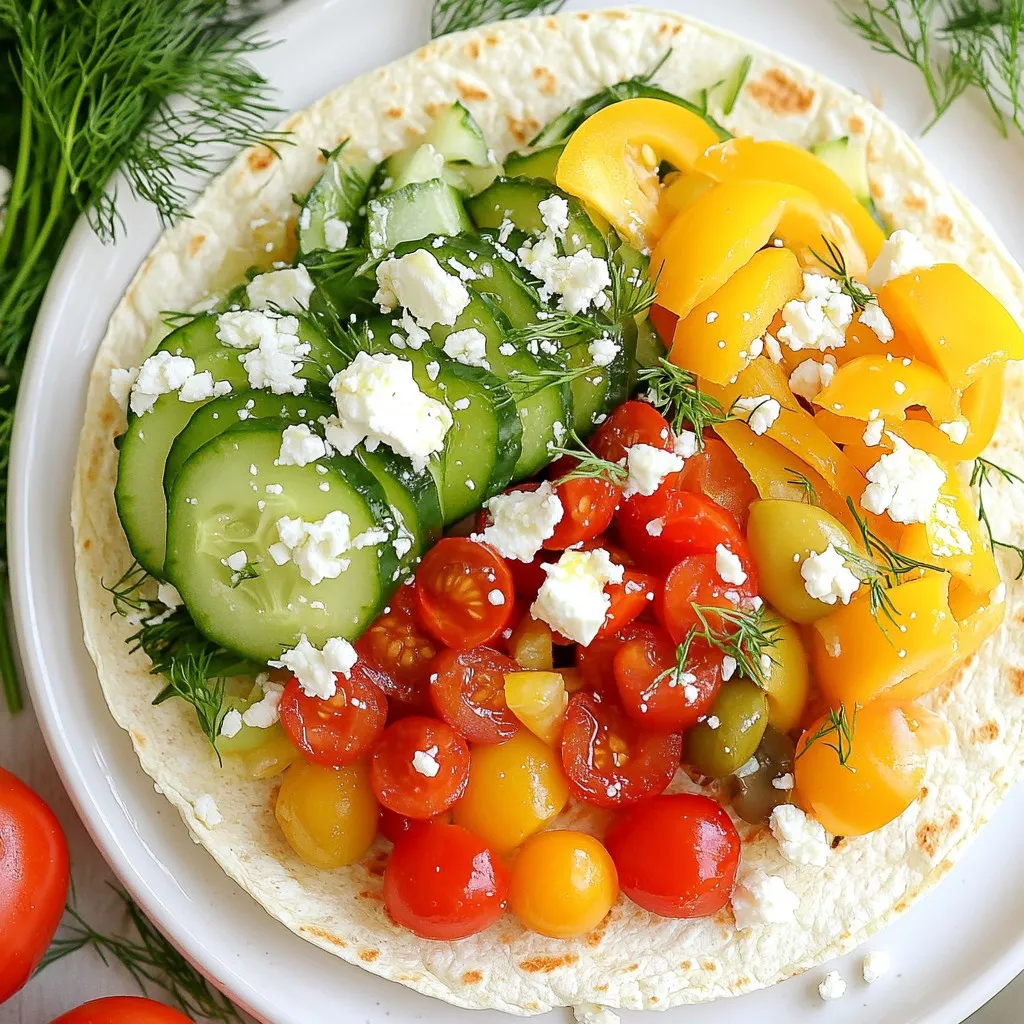
Looking for a quick, healthy meal? Greek Hummus Veggie Wraps are your answer! Packed with fresh veggies, creamy hummus, and

- 1 ripe mango, peeled and diced - 1 fresh jalapeño, sliced (adjust for spiciness) - 1 cup fresh lime juice (about 4-5 limes) - 2 tablespoons agave syrup or honey (to taste) - 2 cups sparkling water - Ice cubes - Lime wedges and jalapeño slices for garnish - Salt or Tajín for rimming The Mango Jalapeño Margarita Mocktail brings a unique twist to classic flavors. You start with a ripe mango. This fruit adds sweetness and a creamy texture. Then, you add a fresh jalapeño. Adjust the slices based on your heat preference. You need fresh limes for juice. The tangy flavor of lime makes the drink bright. Agave syrup or honey adds sweetness. You can choose how sweet you want your mocktail. Sparkling water gives it a fizzy touch, making it refreshing. For extra enjoyment, you can add ice cubes. Ice keeps your drink cold and refreshing. Garnishing with lime wedges and jalapeño slices makes it look beautiful. Rimming your glass with salt or Tajín adds a fun kick to each sip. These ingredients work together to create a vibrant mocktail that excites your taste buds. {{ingredient_image_1}} 1. Start by placing the diced mango in a blender. 2. Add half of the sliced jalapeño, lime juice, and agave syrup. 3. Blend the mixture until it becomes smooth. 4. Next, strain the mixture through a fine mesh sieve into a pitcher. 5. Use a spatula to press down and get all the juice out. 1. Taste the mixture. If it needs more sweetness, add more agave syrup. 2. If you want more heat, blend in more jalapeño slices. Strain again if needed. 3. Fill each glass with ice cubes to keep the drink cold. 4. Pour the mango mixture into the glasses until they are about two-thirds full. 5. Top off each glass with sparkling water. Stir gently to mix. 1. For a fun twist, rim each glass with salt or Tajín. 2. Rub a lime wedge around the rim, then dip it into the salt or Tajín. 3. Finally, add lime wedges and jalapeño slices on the rim for decoration. - Use ripe mango for maximum flavor: A ripe mango adds sweetness and depth. Look for mangoes that yield slightly to pressure. - Adjust jalapeño for desired heat level: Start with half a jalapeño. Blend it in, then taste. Add more if you want extra spice. - Ideal glassware for serving: Use tall glasses to showcase the colorful mocktail. Clear glasses let the vibrant colors shine. - Pairing options with snacks: Serve with tortilla chips and salsa. The salty crunch makes a great match. - Prep steps that can be done in advance: You can blend the mango mixture ahead of time. Store it in the fridge for up to two days. - How to store the mixture: Keep it in a sealed jar or pitcher. This keeps it fresh and tasty. Pro Tips Choose Ripe Mangoes: For the best flavor, select mangoes that are slightly soft to the touch and have a sweet aroma. This ensures a naturally sweet and rich puree. Adjust Spiciness: Start with half the jalapeño and taste the mixture before adding more. This allows you to customize the heat level to your preference without overwhelming the drink. Chill Ingredients: Chill your sparkling water and glasses in advance. This keeps your mocktail refreshing and prevents dilution from melting ice too quickly. Experiment with Garnishes: Don't limit yourself to lime and jalapeño for garnishes. Try adding fresh herbs like mint or basil for a unique twist that complements the flavors. {{image_2}} You can change the flavor of your Mango Jalapeño Margarita Mocktail easily. Try adding other fruit juices. Pineapple juice adds a tropical twist. Orange juice brings a sweet citrus taste. Both pair well with mango and jalapeño. You can also use fresh herbs for new flavors. Mint offers a fresh and cooling note. Basil adds a sweet and fragrant touch. Experimenting with these can make your mocktail unique. Controlling the spice level is simple. Use less jalapeño if you prefer a milder drink. You can start with just a few slices. Taste your mixture, then add more if you want extra heat. Another option is to remove the seeds from the jalapeño. Most of the heat is in the seeds. This small change can make a big difference in spice level. If you love this mocktail, you might enjoy similar drinks. Try a cucumber mint cooler. It’s refreshing and light. A virgin mojito also works well and offers a zest of lime and mint. Seasonal variations can be fun too. In summer, add fresh berries for a fruity twist. In fall, try cinnamon or apple juice for a cozy flavor. These changes keep your drinks fresh and exciting. Store the mango mixture in an airtight container. Keep it in the fridge. It stays fresh for up to three days. Make sure to seal it tightly to prevent air from getting in. This helps keep the flavors vibrant. Yes, you can freeze the mango mixture! Pour it into a freezer-safe container. Leave a little space at the top for expansion. It can last up to three months in the freezer. When you're ready to use it, thaw it in the fridge overnight. You can also thaw it in warm water for quicker results. Got extra mango or jalapeño? Try making a fruit salsa! Chop the mango and jalapeño, then mix with diced onion and cilantro. You can also add it to tacos for a spicy kick. Another idea? Blend the leftover mango into smoothies. It pairs well with yogurt and other fruits. A Mango Jalapeño Margarita Mocktail is a refreshing drink. It blends sweet mango with zesty jalapeño. The drink has a bright, fruity taste with a hint of heat. You get the tartness of fresh lime juice, which adds a nice balance. The sparkling water gives it a bubbly finish. This mocktail is perfect for hot days or fun gatherings. Yes, you can make this drink without jalapeño. If you want a milder mocktail, simply leave it out. You can still enjoy the sweet mango and lime flavors. If you want some spice, try using a pinch of chili powder or a dash of hot sauce instead. This keeps the mocktail vibrant without the heat. You can use honey instead of agave syrup. Honey adds sweetness and flavor to the drink. If you want a vegan option, try maple syrup. Simple syrup is another choice, made by mixing equal parts sugar and water. Just adjust the amount to fit your taste. This mocktail blends ripe mango, jalapeño, and fresh lime for a tasty treat. You can adjust the heat and sweetness to suit your taste. Remember, using fresh ingredients makes a huge difference. Don’t forget to garnish for extra flair! You can easily store the mixture for later use or freeze it for future enjoyment. Feel free to get creative with variations. The possibilities are endless. So grab your ingredients and enjoy this refreshing drink at your next gathering!

Mango Jalapeño Margarita Mocktail Refreshing Delight

Looking for a cool drink that packs a punch? The Mango Jalapeño Margarita Mocktail is the perfect blend of sweet

- 1 cup orzo pasta - 2 cups vegetable broth - 1 cup fresh spinach, roughly chopped - 1 cup cremini mushrooms, sliced Orzo pasta is a small, rice-shaped pasta that cooks quickly. It absorbs flavors well, making it a great base for this dish. Fresh spinach adds a pop of color and nutrients. Cremini mushrooms bring a rich, earthy taste that pairs perfectly with creamy elements. - 1/2 cup cream cheese (or a dairy-free alternative) - 1/2 cup grated Parmesan cheese (or nutritional yeast for a vegan option) Cream cheese adds that creamy texture we all love. If you need a dairy-free choice, look for a plant-based cream cheese. Parmesan cheese adds depth, but nutritional yeast works well for a vegan twist. - 1 tablespoon olive oil - Fresh herbs (thyme or parsley) - Salt and pepper to taste Olive oil helps sauté the vegetables and adds richness. Fresh herbs like thyme or parsley brighten up the dish with their flavor. Salt and pepper bring out the natural taste of the ingredients, so don’t skip them! {{ingredient_image_1}} 1. Start by boiling 2 cups of vegetable broth in a medium saucepan. 2. Once the broth bubbles, add 1 cup of orzo pasta. Cook it for about 8-10 minutes. 3. Check the pasta. It should be al dente, tender but still firm. Drain the orzo and set it aside. 1. Grab a large skillet and heat up 1 tablespoon of olive oil over medium heat. 2. Add 1 small finely chopped onion and sauté it for about 3-4 minutes. The onion should turn translucent. 3. Next, toss in 2 cloves of minced garlic and 1 cup of sliced cremini mushrooms. Cook these for 5-6 minutes. The mushrooms should become tender and browned. 4. Now, stir in 1 cup of roughly chopped fresh spinach. Cook it for another 2-3 minutes until it wilts down. 1. Lower the heat and add 1/2 cup of cream cheese to the skillet. Stir until it melts and mixes well with the mushroom spinach. 2. Add the cooked orzo to the skillet and mix everything together. 3. Finally, sprinkle in 1/2 cup of grated Parmesan cheese for extra creaminess. 4. Season with salt and pepper to taste, stirring to blend. 5. Heat the mixture for another 2-3 minutes, stirring now and then. 6. Remove from heat and garnish with fresh thyme or parsley before serving. To achieve the perfect creaminess in your dish, start by melting the cream cheese properly. Cut the cream cheese into small cubes. Then, add it to the warm skillet with your mushroom mixture. Stir it in slowly until it melts. This helps it blend well with the other ingredients, making your orzo rich and creamy. If you need substitutions, you can use a dairy-free cream cheese. Cashew cream is another great choice for a vegan option. It adds richness without dairy. To boost flavor, try adding spices or fresh herbs. Thyme and parsley work great in this dish. You can also sprinkle in some garlic powder or pepper flakes for a kick. Adjust the seasoning to your taste. Start with a pinch of salt and pepper, then taste. Add more if needed! For sautéing vegetables, heat olive oil in your skillet over medium heat. Add onions first, cooking until they turn clear. Then, add garlic and mushrooms. This order helps build layers of flavor. To ensure the orzo doesn’t stick, stir it often while cooking. If you find it clumping, add a splash of vegetable broth or a drizzle of olive oil. This keeps the orzo fluffy and perfect for your creamy mushroom spinach orzo. Pro Tips Use Fresh Ingredients: Fresh spinach and mushrooms enhance the flavor and texture of the dish. Always opt for the freshest produce you can find. Adjust Creaminess: If you prefer a creamier dish, add more cream cheese or Parmesan cheese, adjusting to your taste for the perfect consistency. Flavor Boost: Consider adding a splash of white wine after sautéing the onions and mushrooms for an extra layer of flavor. Let it reduce before adding the spinach. Herb Variations: Experiment with different herbs like basil or dill for a unique twist. Fresh herbs can elevate this dish significantly. {{image_2}} You can add protein to make your meal heartier. Chicken or shrimp are great options. Simply cook them in the skillet before adding the mushrooms. For a vegetarian-friendly choice, try chickpeas or lentils. They blend well with the flavors and add healthy protein. Want to make it gluten-free? Use gluten-free orzo pasta. Many brands offer this. For vegan or dairy-free adjustments, swap cream cheese for a plant-based option. Nutritional yeast can replace Parmesan cheese, giving a cheesy flavor without dairy. Seasonal ingredients can change the dish's vibe. In spring, use fresh asparagus or peas. In fall, add roasted pumpkin or butternut squash. You can also switch the spinach for kale or Swiss chard. These tweaks keep your meal fresh and exciting. To keep your Creamy Mushroom Spinach Orzo fresh, store leftovers in an airtight container. Make sure to cool the dish before sealing. This helps prevent moisture loss and keeps flavors intact. Use glass or plastic containers that seal tightly. They work well for storing food safely. When it’s time to enjoy leftovers, the best way to reheat orzo is on the stove. Place the orzo in a skillet over low heat. Add a splash of vegetable broth or water. Stir often to keep it from sticking. This method helps maintain the creamy texture and rich flavor. You can also use a microwave. Just heat in short bursts, stirring in between. Yes, you can freeze Creamy Mushroom Spinach Orzo! This dish freezes well for up to three months. To freeze, let it cool completely. Then, scoop the orzo into freezer bags. Remove as much air as possible before sealing. When you're ready to eat, thaw it in the fridge overnight. Reheat as mentioned above to enjoy a tasty meal again. Creamy Mushroom Spinach Orzo lasts about 3 to 5 days in the fridge. Make sure to store it in an airtight container. This helps keep the flavors fresh and prevents spoilage. If you notice any odd smells or changes in texture, it’s best to toss it out. Yes, you can use other types of pasta! Options like penne, fusilli, or even gluten-free pasta work well. Just adjust the cooking time according to the package instructions. Each pasta shape will add a unique twist to your dish. Definitely! Creamy Mushroom Spinach Orzo is great for meal prep. You can cook a big batch and store it in portions. When you’re ready to eat, just reheat the desired portion. If you want to keep it creamy, add a splash of broth or cream while reheating. This blog post covered making Creamy Mushroom Spinach Orzo, focusing on its main ingredients and how to combine them. You learned how to cook orzo, sauté mushrooms, and create a creamy texture. We shared tips for adding protein, adapting diets, and storing leftovers. In conclusion, this dish offers flexibility and flavor. You can easily customize it to fit your needs. Enjoy experimenting with ingredients to create your perfect orzo dish!

Creamy Mushroom Spinach Orzo Flavorful Comfort Meal

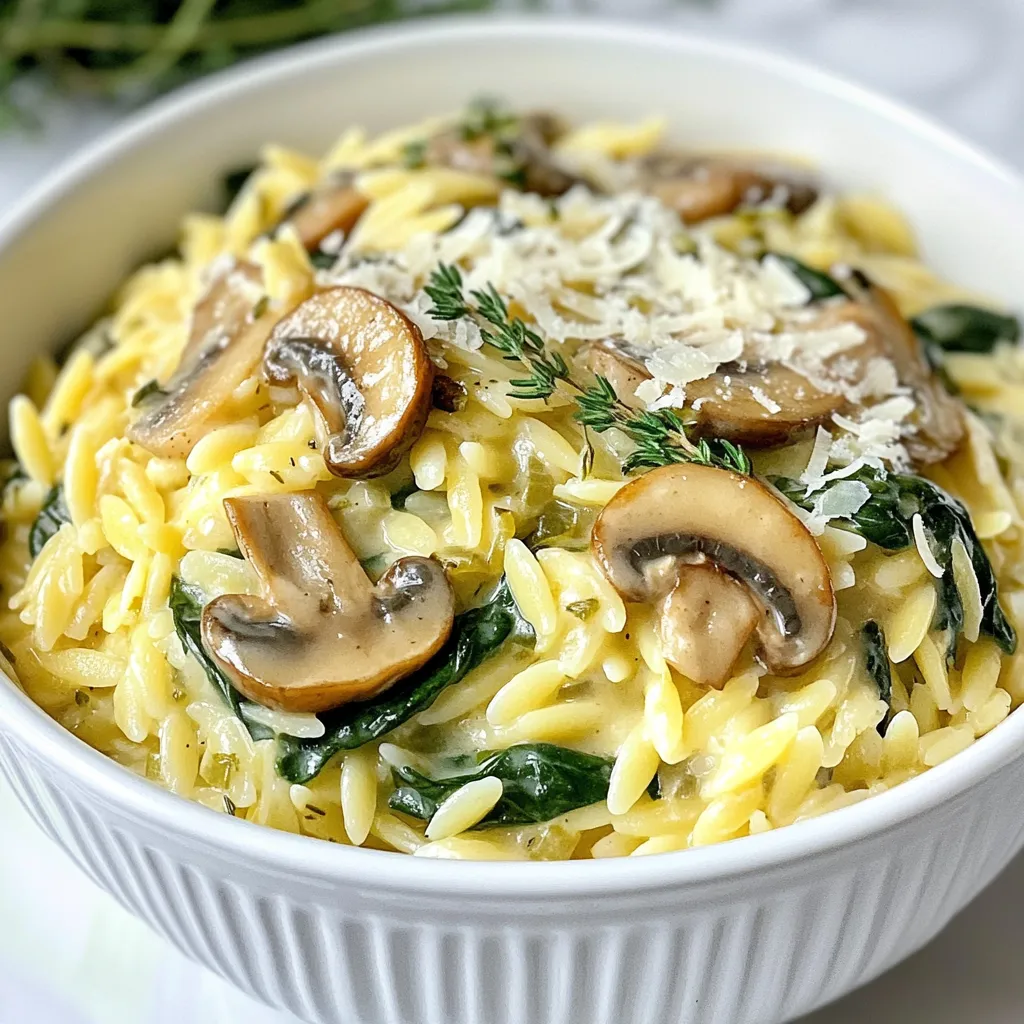
Looking for a warm and creamy dish that hits the spot? My Creamy Mushroom Spinach Orzo is the answer! Packed

- 1 ½ cups graham cracker crumbs - ⅓ cup granulated sugar - ½ cup unsalted butter, melted - 16 oz cream cheese, softened - 1 cup granulated sugar - 2 large eggs - ⅓ cup sour cream - ¼ cup fresh lemon juice - Zest of 1 lemon - 1 cup fresh strawberries, pureed - 1 tablespoon cornstarch Graham cracker crumbs form the base. They give a sweet and crunchy texture. Use unsalted butter for better control of salt levels. Cream cheese provides that rich, creamy filling. Make sure it's softened for easy mixing. Fresh strawberries add bright flavor and color. They bring a juicy sweetness to the bars. Pureeing the strawberries with cornstarch keeps the mixture from being too runny. This helps the bars hold their shape. - 8x8-inch baking pan - Parchment paper - Mixing bowls - Electric mixer or whisk - Measuring cups and spoons - Rubber spatula - Toothpick or knife for swirling - Refrigerator for chilling These tools will help make your baking smooth and fun. The parchment paper makes it easy to lift the bars out later. An electric mixer saves time and effort, making sure everything is blended well. {{ingredient_image_1}} To start, preheat your oven to 325°F (160°C). Line an 8x8-inch baking pan with parchment paper. Leave some paper hanging over the edges, so you can lift the bars out later. In a medium bowl, mix together 1 ½ cups of graham cracker crumbs, ⅓ cup of granulated sugar, and ½ cup of melted unsalted butter. Stir until the crumbs are well coated. Press this mixture firmly into the bottom of the pan. Bake the crust for 10 minutes. Once done, let it cool slightly. In a large mixing bowl, beat 16 oz of softened cream cheese with 1 cup of granulated sugar. Mix until it is smooth and creamy. Add in 2 large eggs, one at a time, mixing well after each. Then, add ⅓ cup of sour cream, ¼ cup of fresh lemon juice, and the zest of 1 lemon. Mix these ingredients until they are fully combined. In a small bowl, blend 1 cup of pureed fresh strawberries with 1 tablespoon of cornstarch. This blend helps keep the strawberry layer from being too runny. Now, divide the cheesecake batter in half. Mix the strawberry puree into one half of the batter until it is well blended. Next, pour the plain cheesecake batter into the cooled crust. Spread it evenly. Then, gently spoon the strawberry cheesecake batter over the top. Use a toothpick or knife to swirl the strawberry batter into the plain batter for a marbled design. Bake this in the oven for 30 to 35 minutes. The cheesecake should be set but still slightly jiggle in the middle. After baking, let it cool at room temperature. Then, refrigerate for at least 4 hours, or overnight for the best results. When ready to enjoy, lift the bars out of the pan using the parchment paper. Slice into squares and serve! - Use room temperature cream cheese. This makes mixing easier and smoother. - Beat the batter gently. Over-mixing can add air and cause cracks. - Chill the bars well. Letting them cool overnight improves the flavor and texture. - Check for doneness. The center should be slightly jiggly, not solid. - Garnish wisely. Fresh strawberries and mint enhance both flavor and look. - Skipping the cornstarch. This helps prevent the strawberry layer from becoming watery. - Not cooling the crust. Letting it cool slightly before adding the filling helps keep it stable. - Overbaking. Keep an eye on the bars; they can dry out quickly. - Using too much lemon juice. Balance is key; too much can overpower the flavors. - Divide the batter evenly. This ensures you have enough of each flavor. - Spoon, don’t pour. Gently spoon the strawberry mixture to keep layers distinct. - Use a toothpick or knife. Make gentle swirls to create a beautiful marbled effect. - Don’t over-swirl. A few swirls are enough to blend the colors without losing definition. Pro Tips Chill for Best Texture: Make sure to refrigerate the cheesecake bars for at least 4 hours or overnight. This helps the flavors meld together and ensures a creamy texture. Use Fresh Strawberries: For the best flavor, use fresh strawberries instead of frozen ones. They will provide a brighter taste and better texture. Prevent Cracking: To help prevent cracks on the surface, avoid overmixing the cheesecake batter once the eggs are added, and bake it at a lower temperature. Swirling Technique: When creating the marble effect, use a gentle hand with a toothpick or knife to avoid overmixing and maintain distinct layers. {{image_2}} You can change the fruit in these bars. Try using raspberries or blueberries. They both work great! For a tropical twist, mango puree is fantastic. Each fruit adds its flavor, changing the taste of the bars. Use about one cup of any fruit puree. Just remember to adjust the sugar, if needed. Making these bars gluten-free is easy. Replace the graham cracker crumbs with gluten-free crumbs. You can find these at most stores. Be sure to check the label. Ensure all other ingredients are also gluten-free. This way, everyone can enjoy these delicious treats! You can control how sweet these bars are. If you prefer less sugar, cut back on the sugar in the cream cheese mixture. You can also use natural sweeteners, like honey or maple syrup. Start with half the amount and taste as you mix. Finding the right balance is key to making your perfect dessert! Store your strawberry lemonade cheesecake bars in an airtight container. This keeps them fresh and prevents them from drying out. You can also wrap individual bars in plastic wrap for easy grab-and-go snacks. If you want to save space, stack them with parchment paper in between layers. These cheesecake bars can last in the fridge for up to one week. If you freeze them, they can stay good for up to three months. Just make sure to thaw them overnight in the fridge before enjoying them. This helps keep the texture nice and creamy. If you prefer warm cheesecake bars, reheat them gently in the microwave. Heat them for about 10-15 seconds at a time. This warms them up without cooking them further. Avoid using the oven, as it can dry them out. Enjoy your delicious treats fresh, warm, or cold! Yes, you can use frozen strawberries. Just thaw them first. Once thawed, remove excess water. Puree them as you would fresh strawberries. This keeps your cheesecake bars tasty and smooth. You can use Greek yogurt or cottage cheese. Both options give a nice texture. If you want a non-dairy option, try cashew cream or a store-bought vegan cream cheese. Each will change the flavor a bit, but they still work well. Look for a slight jiggle in the center. The edges should be set and firm. If the bars are too jiggly, they need more time. Bake in 5-minute increments until they reach the right texture. Absolutely! You can make these bars a day or two in advance. Just store them in the fridge. Chilling enhances the flavors and makes them easier to slice. Enjoy them cold for a refreshing treat! This blog post covered making delicious cheesecake bars with strawberries. You learned about the key ingredients, tools needed, and the step-by-step instructions for a perfect bake. We discussed tips to avoid mistakes and ways to customize your dessert. Knowing how to store and reheat them ensures your treats stay fresh. Keep experimenting with fruit flavors and substitutions to find your favorite version. Enjoy your baking journey and have fun with every bite you take!

Strawberry Lemonade Cheesecake Bars Delicious Treat

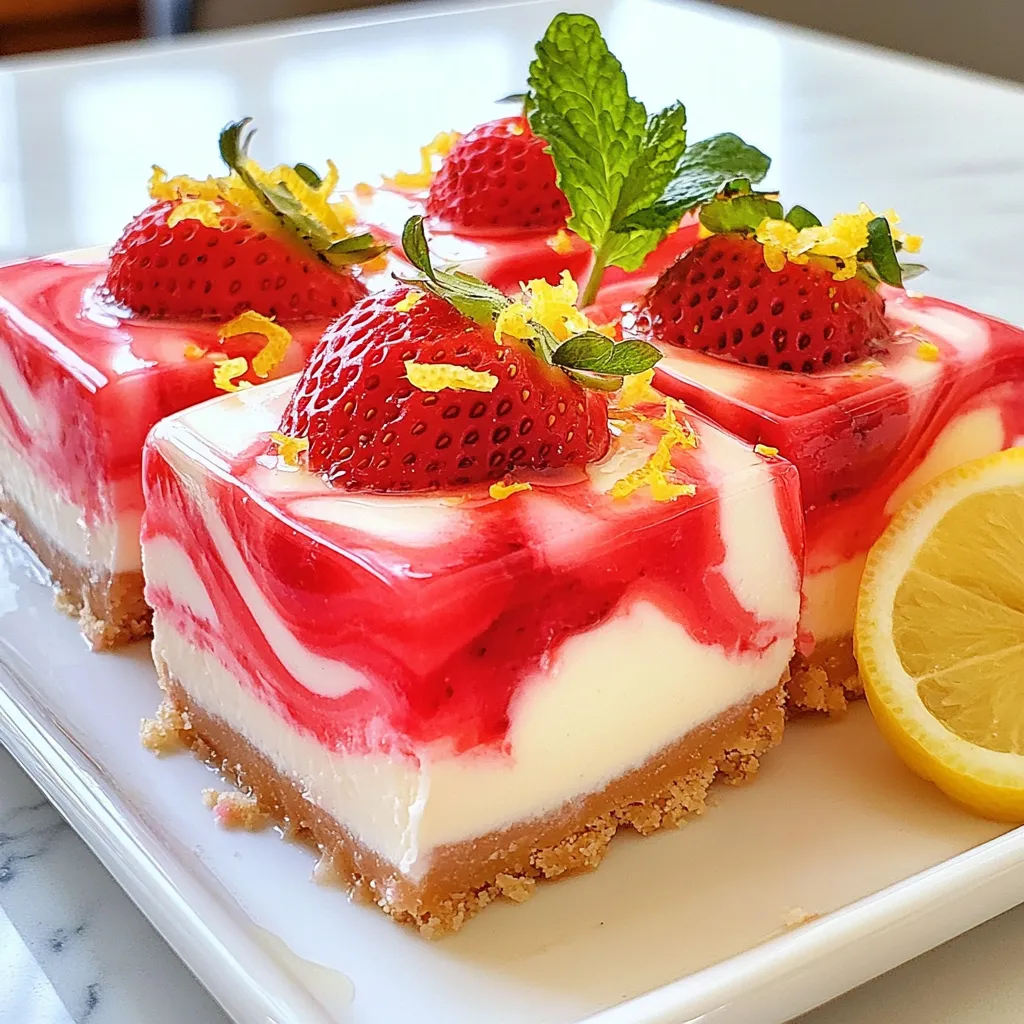
Looking for a sweet treat to brighten your day? These Strawberry Lemonade Cheesecake Bars are a must-try! With a creamy

- 1 pound ground turkey - 1 cup fresh spinach, chopped - 1/2 cup feta cheese, crumbled - 1/2 cup breadcrumbs - 1/4 cup grated Parmesan cheese The core of this recipe is ground turkey. It offers a lighter protein choice than beef. Spinach adds color and nutrition. Feta cheese brings richness and a salty kick. Breadcrumbs help bind the meatloaf. Parmesan adds depth of flavor. - 1/4 cup onion, finely chopped - 1 garlic clove, minced - 2 large eggs - 1 tablespoon olive oil - 1 tablespoon lemon juice Onion and garlic give a great base flavor. They also add aroma and sweetness. Eggs act as a binder, keeping the meatloaf together. Olive oil keeps it moist, while lemon juice brightens the dish. Dried oregano, salt, and black pepper enhance the overall taste. - Fresh parsley Fresh parsley not only adds color but also freshness. You can sprinkle it on top before serving. It makes the dish look appealing and adds a hint of herbaceous flavor. {{ingredient_image_1}} 1. Preheat your oven to 350°F (175°C). This helps the meatloaf cook evenly. 2. Prepare your loaf pan. You can line it with parchment paper or grease it lightly. 3. In a skillet, heat one tablespoon of olive oil over medium heat. 4. Add 1/4 cup of finely chopped onion to the skillet. Sauté until it turns translucent, about 3-4 minutes. 5. Add one minced garlic clove and sauté for another minute. Remove the skillet from heat and let it cool slightly. 1. In a large mixing bowl, combine one pound of ground turkey with one cup of chopped fresh spinach. 2. Add 1/2 cup of crumbled feta cheese, 1/2 cup of breadcrumbs, and 1/4 cup of grated Parmesan cheese to the bowl. 3. Pour in the cooled onion and garlic mixture. This adds great flavor! 4. In another bowl, whisk together two large eggs, one teaspoon of dried oregano, 1/2 teaspoon of salt, and 1/4 teaspoon of black pepper. 5. Add one tablespoon of olive oil and one tablespoon of lemon juice to the egg mixture. 6. Pour this egg mixture into the turkey mix. Blend everything gently. Avoid overmixing to keep it tender. 1. Transfer the meatloaf mixture into the prepared loaf pan. Press it down gently to shape it. 2. Bake in your preheated oven for 50-60 minutes. The meatloaf is done when it reaches an internal temperature of 165°F (74°C) and the top looks golden brown. 3. Once it’s done baking, let the meatloaf rest for about 10 minutes before slicing. This helps it hold its shape when you cut it. 4. If you like, garnish with fresh parsley before serving. Enjoy your delicious Greek spinach feta turkey meatloaf! To avoid a dry meatloaf, use ground turkey that is not too lean. A mix with some fat keeps the meatloaf moist. Also, don’t overmix your ingredients. This can make it tough. Just mix until everything is combined. For even cooking, shape your meatloaf into a uniform size. A thicker loaf takes longer to cook. Check the internal temperature with a meat thermometer. It should reach 165°F (74°C) for safety. To boost flavor, add fresh herbs. Oregano and dill pair well with this dish. You can also try adding a pinch of red pepper flakes for heat. Mix in some chopped bell peppers or zucchini for extra veggies. They add moisture and nutrients. This meatloaf goes well with simple sides. Roasted potatoes or a fresh salad make great pairings. For a nice touch, serve it with a dollop of tzatziki sauce. For presentation, slice the meatloaf into thick pieces. Arrange them on a platter, and sprinkle with fresh parsley. It makes a lovely dish to share! Pro Tips Use Fresh Spinach: Fresh spinach adds a vibrant flavor and color to the meatloaf. If you’re using frozen spinach, make sure to thaw and drain it well to avoid excess moisture. Don’t Overmix: When combining the ingredients, mix just until they are incorporated. Overmixing can lead to a dense meatloaf. Let It Rest: Allow the meatloaf to rest for about 10 minutes after baking. This helps it hold its shape and makes slicing easier. Customize Your Cheese: Feel free to experiment with different types of cheese, such as goat cheese or mozzarella, for a unique flavor twist. {{image_2}} If you wish to change things up, you can swap out turkey. Ground chicken or even lean beef works well. Both options keep the meatloaf juicy and tasty. For a lighter choice, try ground turkey breast. It has less fat but still packs flavor. If you are dairy-free, you have options for feta. Look for dairy-free feta made from nuts. It adds a nice tang without the dairy. Another option is to use a soft tofu blended with lemon juice. This gives a creamy texture while keeping it dairy-free. To keep things exciting, try different cheeses. Goat cheese adds a tangy twist. Cheddar gives a sharp flavor that many love. You can even mix cheeses for a unique taste. If you want some heat, add spices like red pepper flakes or cayenne. Just a pinch can bring a nice kick. You could also use smoked paprika for a warm, smoky flavor. Experiment with what you like best! This meatloaf has roots in Mediterranean cooking. You can add olives or sun-dried tomatoes for more flavor. These additions enhance the dish and give it a fresh twist. For an international flair, consider adding curry powder or soy sauce. These flavors change the taste and make the meatloaf unique. You can even try a Mexican spin with taco seasoning and corn. The options are endless, so have fun with it! To keep your Greek spinach feta turkey meatloaf fresh, store leftovers properly. Place the meatloaf in an airtight container. This helps prevent moisture loss and keeps flavors intact. Refrigerate it within two hours of cooking. It will stay fresh for about three to four days. If you want to keep it longer, freezing is a great option. Wrap slices tightly in plastic wrap, then place them in a freezer bag. This way, you can enjoy it for up to three months. When reheating, the goal is to keep the meatloaf moist and tasty. Preheat your oven to 325°F (163°C). Place the meatloaf in a baking dish and cover it with foil. Heat for about 20-25 minutes. You can also use the microwave for quicker results. Heat slices on a microwave-safe plate for 1-2 minutes. To boost the flavor, drizzle a little olive oil or lemon juice over each slice before reheating. Always check for signs of spoilage. If the meatloaf has an off smell or unusual color, it’s best to discard it. The texture may also change, becoming slimy. For the best quality, consume refrigerated meatloaf within four days. If frozen, aim to use it within three months for optimal taste. Always label your containers with dates for easy tracking. Can I make meatloaf ahead of time? Yes, you can make meatloaf ahead of time. Prepare the meatloaf and place it in the fridge. Cover it well and store it for up to 24 hours. This saves time on busy days. Just bake it when you are ready to serve. What can I substitute for breadcrumbs? If you don’t have breadcrumbs, you can use crushed crackers or oats. Both work well to bind the meatloaf. You can also use ground nuts for a gluten-free option. Adjust the amount to match your taste. How do I know when the meatloaf is done? The best way to check if your meatloaf is done is to use a meat thermometer. Insert it into the center of the loaf. It should read 165°F (74°C). If you don’t have a thermometer, check that the top is golden brown. The meatloaf should not be pink inside. Can I use ground chicken instead of turkey? Yes, ground chicken works well in this recipe. It will have a slightly different flavor but will be just as tasty. Just follow the same steps. The cooking time may vary slightly, so check for doneness. Is this recipe healthy? This meatloaf is a healthy option. It uses lean ground turkey, fresh spinach, and feta cheese. These ingredients add protein and nutrients. The use of olive oil also provides healthy fats. It’s a balanced meal that can fit into a healthy diet. Nutritional information for servings Each serving of Greek Spinach Feta Turkey Meatloaf (based on 6 servings) contains approximately: - Calories: 260 - Protein: 25g - Carbohydrates: 14g - Fat: 12g - Fiber: 1g This makes it a filling and nutritious choice for dinner. This meatloaf recipe combines turkey, spinach, and feta for great taste and nutrition. Following the step-by-step guide ensures you bake a moist and flavorful dish. Use the tips to avoid dryness and enhance flavors. Explore variations to suit your tastes, and don’t forget to store leftovers properly. Enjoy this fun and healthy meal that brings a twist to your dinner table. Your family will love it, and you can feel good about serving it!

Greek Spinach Feta Turkey Meatloaf to Savor Today

Are you ready to elevate your dinner game? This Greek Spinach Feta Turkey Meatloaf is a delightful twist on a

Older posts
Newer posts
← Previous Page1 … Page129 Page130 Page131 … Page137 Next →

dsad

© 2025 Recipes Pursuit • Built with GeneratePress

Our Policies

  • Copyright Policy
  • Cookie Policy
  • GDPR Policy
  • Privacy Policy
  • Disclaimer
  • Terms Of Use

More Information

  • Home
  • About
  • Contact
  • Appetizers
  • Dessert
  • Dinner
  • Drinks
©2025, Recipes Pursuit About Back To Top