Skip to content
DisclaimerTerms Of UseGDPR PolicyCookie Policy

Recipes Pursuit

  • Home
  • Drinks
  • Appetizers
  • Dinner
  • Dessert
  • About
  • Contact
  • Privacy Policy
DisclaimerTerms Of UseGDPR PolicyCookie Policy

Emma Smith

- 1 can (14 oz) artichoke hearts, drained and rinsed - 2 tablespoons olive oil - 1 teaspoon garlic powder - 1 teaspoon onion powder - ½ teaspoon smoked paprika - ¼ cup grated Parmesan cheese - Salt and pepper to taste - Fresh parsley for garnish Gathering the right ingredients is key to making Air Fryer Garlic Parmesan Artichoke Hearts. Start with a can of artichoke hearts. Make sure to drain and rinse them well. This step helps remove excess salt and brine. Next, you will need olive oil. It adds richness and helps the seasonings stick. Garlic powder and onion powder give that classic savory flavor. Smoked paprika adds a nice touch of warmth. Grated Parmesan cheese is essential for that cheesy finish. Don’t forget to add salt and pepper to taste. Finally, fresh parsley will brighten the dish and add color. With these ingredients, you’re ready to create a delicious and crispy treat! Start by opening the can of artichoke hearts. Drain them well to remove any liquid. Next, rinse them under cold water. This helps remove extra salt and enhances their flavor. After rinsing, pat them dry with a paper towel. This step is key to getting them crispy in the air fryer. In a medium bowl, combine the drained artichoke hearts with 2 tablespoons of olive oil. Add 1 teaspoon of garlic powder, 1 teaspoon of onion powder, and ½ teaspoon of smoked paprika. Season with salt and pepper to taste. Toss everything together well. It is important to coat each heart evenly. This ensures every bite is packed with flavor. Preheat your air fryer to 375°F (190°C). This helps the artichoke hearts cook evenly. Place the seasoned artichoke hearts in a single layer in the air fryer basket. Avoid overcrowding; this helps them crisp up nicely. Air fry them for 12 to 15 minutes. Halfway through, shake the basket gently to ensure even cooking. When they turn golden brown and crispy, they are ready. Enjoy your delicious air fryer garlic parmesan artichoke hearts! To get that perfect crunch, do not overcrowd the basket. If you pile the artichokes, they won't cook evenly. I suggest cooking in batches if needed. For small artichoke hearts, aim for 12 minutes. Larger pieces may need up to 15 minutes. Always shake the basket halfway through for even cooking. You can boost the taste by adding spices like Italian seasoning or even a pinch of cayenne for some heat. Add the Parmesan cheese in the last few minutes of cooking. This helps it melt perfectly without burning. Fresh herbs take your dish to the next level. Try using basil or chives for a different flavor. Pair your artichoke hearts with a creamy dipping sauce like ranch or a zesty aioli for extra enjoyment. {{image_2}} You can swap Parmesan for other cheese types. Try using mozzarella for a mild taste. Cheddar adds a sharper flavor. For a bit of tang, go for feta. If you prefer non-dairy options, use cashew cheese or coconut-based cheese. These alternatives still give a tasty finish. Want to change it up? Add lemon zest or a splash of lemon juice. This brightens the dish and adds freshness. If you enjoy heat, toss in some chili flakes. This small change makes your artichoke hearts spicy and exciting. Using frozen artichoke hearts works well too. Just thaw and rinse them before use. If you're vegan, look for plant-based Parmesan. Nutritional yeast is a great option for a cheesy flavor without dairy. These swaps keep your dish delicious and friendly for all diets. To keep your artichoke hearts fresh, store them in the fridge. Use an airtight container for best results. Make sure the container is clean and dry before adding your leftovers. You can also use plastic wrap to cover the dish tightly. You can freeze cooked artichoke hearts. First, let them cool down completely. Place them in a freezer-safe bag or container. Remove as much air as you can to prevent freezer burn. When you want to eat them, thaw them in the fridge overnight. Reheat them in the air fryer for a crispy finish. In the fridge, your artichoke hearts will stay fresh for about 3 to 5 days. Check for signs of spoilage. If they smell off or look slimy, it’s best to throw them away. Keeping them sealed tight helps maintain their flavor and texture. Yes, you can use fresh artichoke hearts. They have a great taste. Just cook them longer. First, clean and trim the artichokes. Remove the tough outer leaves and the fuzzy center. Boil them for about 10-15 minutes until tender. Afterward, you can follow the same steps in the recipe. No, you do not need to soak canned artichoke hearts. Rinsing them is enough. This removes excess salt and improves flavor. Fresh artichoke hearts also do not need soaking. Simply prepare them as described earlier. Check for a golden brown color. They should also be crispy on the outside. Cook them for 12-15 minutes in the air fryer. Shake the basket halfway through the cooking time for even crispiness. You can serve these tasty bites as a snack or appetizer. Try pairing them with a creamy dip, like ranch or aioli. They also go great with a fresh salad or crusty bread. For a fun twist, serve them alongside cocktails or wine. This blog post gave you a complete guide to making garlic Parmesan artichoke hearts using an air fryer. We covered the key ingredients, detailed steps, helpful tips for crispiness, and tasty variations. Remember, it's all about the right techniques and flavors. Trust your steps while cooking, and don't be afraid to experiment. Enjoy your artichoke hearts with your favorite dips or as a side. Cooking should be fun and tasty!

Air Fryer Garlic Parmesan Artichoke Hearts Delight

Looking for a tasty and easy snack? You’ll love these Air Fryer Garlic Parmesan Artichoke Hearts! They’re crispy, full of

To make this creamy one-pot butternut squash risotto, gather these key ingredients: - 1 medium butternut squash, peeled and diced - 1 cup Arborio rice - 1 medium onion, finely chopped - 3 cloves garlic, minced - 4 cups vegetable broth - 1 cup unsweetened almond milk - 1/2 cup grated Parmesan cheese (or nutritional yeast for a vegan option) - 2 tablespoons olive oil - 1 teaspoon dried thyme - Salt and pepper to taste - Fresh parsley, chopped (for garnish) Fresh ingredients make a big difference in flavor. Using fresh butternut squash enhances the dish's sweetness and texture. Fresh garlic adds a fragrant kick. Fresh herbs like parsley brighten your risotto. Always choose high-quality, fresh items for the best taste. If you want a vegan risotto, swap Parmesan cheese for nutritional yeast. This gives a cheesy flavor without dairy. For gluten-free options, Arborio rice is naturally gluten-free. Just ensure your vegetable broth is also gluten-free. You can also add more veggies like spinach or mushrooms for extra nutrition and flavor. Start by peeling the butternut squash. Use a sharp peeler for ease. Cut the squash in half and scoop out the seeds. Then, dice it into small cubes. This helps it cook faster and blend into the risotto. Fresh squash has the best flavor, so pick a firm one. In a large pot, heat two tablespoons of olive oil over medium heat. Add the chopped onion. Sauté for about five minutes until it turns translucent. Next, add three minced garlic cloves and one teaspoon of dried thyme. Stir for a minute to release their aroma. This step builds a great base for your risotto. Now, it's time to add one cup of Arborio rice. Stir it into the mixture to coat each grain with oil. Toast the rice for two minutes while stirring constantly. This helps create a creamy texture later. After that, start adding four cups of vegetable broth, one cup at a time. Let the rice soak up the broth before adding more. Stir it frequently. This process should take about 15 to 20 minutes. Once the rice is al dente, pour in one cup of unsweetened almond milk. Stir until it becomes creamy. Add half a cup of grated Parmesan cheese and season with salt and pepper. Mix well. Your risotto is almost ready! To get that creamy texture, use Arborio rice. This rice has a lot of starch. The starch makes the risotto smooth. Stir often and add broth slowly. This lets the rice soak up the liquid. If your risotto is too thick, add more almond milk or broth. Keep stirring until it is creamy and dreamy. Toasting Arborio rice is key. After softening the squash, add the rice. Stir it for about two minutes. This step adds a nutty flavor. It also helps the rice absorb all the liquid better. Make sure the grains are heated evenly. This will give your risotto a nice base flavor. You can adjust the flavors to your taste. Add salt and pepper slowly. Taste as you go. For a deeper flavor, try adding more thyme. You can also add a squeeze of lemon juice at the end. This brightens the dish. Don't forget to sprinkle fresh parsley on top. It adds color and a fresh taste. {{image_2}} You can easily add protein to your risotto. Chicken works great. Just cook it before you add the rice. Dice the chicken and stir it in after the risotto is creamy. Shrimp is another tasty option. Add it just before the risotto is ready. Cook until the shrimp turns pink. This adds flavor and makes your meal heartier. You can mix in other veggies too. Spinach is a nice choice. Add it in the last few minutes of cooking. It wilts quickly and adds color. Mushrooms also work well. Sauté sliced mushrooms with the onions for a rich taste. You can use any veggies you love, like peas or bell peppers. Just be sure to adjust cooking times. If you're vegan, there are easy swaps. Use nutritional yeast instead of Parmesan. It gives a cheesy flavor without dairy. You can also add more herbs like basil or rosemary for a fresh taste. For extra flavor, try a splash of lemon juice. It brightens the dish. Don't forget to check your broth for animal products if you want it fully vegan. To keep your creamy risotto fresh, let it cool first. Then, transfer it to an airtight container. This helps keep moisture in and prevents drying out. Store the container in the fridge for up to three days. If you want to eat it later, use a glass or plastic container that seals well. Avoid stacking too many items on top. This keeps the risotto safe from spills and odors. When you are ready to enjoy the risotto again, use the stove for reheating. Place the leftover risotto in a pot over low heat. Add a splash of broth or almond milk to keep it creamy. Stir often to avoid sticking. You can also microwave it if you’re short on time. Just heat it in a microwave-safe bowl, adding a bit of liquid. Stir halfway through to ensure even heating. You can freeze risotto if you have extra. Use a freezer-safe container and store it for up to three months. Make sure to leave some space at the top of the container. The risotto will expand when frozen. To thaw, move it to the fridge for several hours or overnight. Once thawed, reheat it on the stove, adding liquid as needed. Enjoy your creamy risotto anytime! To prevent mushy risotto, use Arborio rice. This rice is short-grained and absorbs liquid well. Always add broth slowly, one cup at a time. Stir often to help the rice release its starch. This makes the risotto creamy, not mushy. Cook until the rice is al dente. This means it should have a slight bite. If you follow these steps, your risotto will stay perfectly creamy. Yes, you can use brown rice, but the texture will differ. Brown rice takes longer to cook and has a chewier bite. It won't get as creamy as Arborio rice. If you choose brown rice, increase the cooking time by about 10-15 minutes. Also, you may need more broth. This change can alter the dish's flavor and creaminess, so adjust your expectations. Butternut squash risotto pairs well with many dishes. For protein, try grilled chicken or shrimp. A light salad with mixed greens is also great. You could serve roasted vegetables on the side for added flavor. If you want a simple option, crusty bread works nicely too. Each choice will enhance the meal and make it more satisfying. This article covered key steps to make a creamy butternut squash risotto. Fresh ingredients enhance flavor and texture. You can swap for vegan or gluten-free options easily. I shared tips for perfect creaminess and flavor adjustments. Remember, adding proteins or veggies can make it unique. For storage, use proper techniques and reheat wisely. With these insights, you can create a delicious dish that impresses everyone. Enjoy your cooking adventure!

Creamy One-Pot Butternut Squash Risotto Delight

Step into a world of creamy comfort with my One-Pot Butternut Squash Risotto Delight! This dish combines rich flavors and

- 3 ½ cups all-purpose flour - 1 cup canned pumpkin puree - 1 tablespoon pumpkin pie spice - 1 tablespoon ground cinnamon - 1 teaspoon salt - 1 tablespoon sugar - 1 packet (2 ¼ teaspoons) active dry yeast - 1 ¼ cups warm water (110°F) - 2 tablespoons honey (for boiling) - 1 egg (for egg wash) - Optional: pumpkin seeds for topping Use fresh yeast for the best rise. Check the expiration date on the packet. Choose high-quality all-purpose flour for a better texture. Organic options can add flavor. Canned pumpkin should be pure pumpkin, not pumpkin pie filling. This keeps flavors pure. Use fresh spices for stronger flavor. Ground spices lose potency over time. If you can't find pumpkin puree, use homemade puree from roasted pumpkin. You can swap all-purpose flour with bread flour for a chewier bagel. Maple syrup can replace honey in the boiling water. It gives a nice flavor twist. If you prefer, skip the egg wash and use milk for a vegan option. To start, take a small bowl. Add warm water and sugar. Then sprinkle the yeast on top. Let this sit for about 5-10 minutes. You will see bubbles form. This shows your yeast is alive and ready to work. It’s crucial for your bagels to rise. Without this step, your bagels will not puff up. Next, grab a large mixing bowl. Whisk together flour, pumpkin pie spice, ground cinnamon, and salt. Make a well in the center of the mix. Add the canned pumpkin and the yeast mixture into the well. Stir with a spatula until a dough forms. Move the dough to a lightly floured surface. Knead it for about 8-10 minutes. You want it to be smooth and elastic. This builds strength in the dough. After kneading, place the dough in a greased bowl. Cover it with a clean kitchen towel. Let it rise in a warm spot for about 1 hour. Once it doubles in size, punch it down. Divide the dough into 8 equal pieces. Roll each piece into a ball. Poke a hole in the center of each ball. Gently stretch the hole to keep it from closing. Now, prepare a large pot of water. Add honey to the water and bring it to a gentle boil. Boil each bagel for about 1 minute on each side. This gives them a chewy texture. After boiling, place them on a parchment-lined baking sheet. Preheat your oven to 425°F (220°C). Beat an egg and brush it over the bagels. Sprinkle pumpkin seeds on top if you want. Bake the bagels for 20-25 minutes. They should be golden brown when done. Make sure to check them near the end to avoid burning. Once baked, let them cool on a wire rack. To get that soft yet chewy bagel, knead the dough well. Knead for 8-10 minutes until it feels smooth and elastic. This step helps develop the gluten. A well-kneaded dough gives you the right bite. Also, let the dough rise in a warm area. This helps it double in size, which means a fluffier bagel. You can boost the flavor in your bagels. Try adding chopped nuts or dried fruit. Walnuts or cranberries work great. You can also swap the pumpkin spice for apple pie spice for a twist. If you want more warmth, add a pinch of nutmeg. These small changes make your bagels unique. One common mistake is under-kneading the dough. This can lead to flat bagels. Another mistake is not boiling them long enough. Boiling gives bagels their chewy crust. Make sure to boil for one minute on each side. Lastly, keep an eye on baking time. Over-baking can make them too hard. Aim for a nice golden color instead. {{image_2}} You can mix up this recipe with seasonal flavors. Add chopped apples for a fresh twist. You might also try adding a splash of maple syrup for sweetness. For a spicy kick, toss in some chopped candied ginger. Each option brings a unique taste to your bagels. Toppings can transform your bagels. Try sprinkling extra pumpkin pie spice on top before baking. You can also use sesame seeds or poppy seeds for crunch. For a sweet touch, add a sprinkle of cinnamon sugar. These toppings add flavor and make your bagels more fun! You can adjust this recipe for different diets. For gluten-free bagels, use a gluten-free flour blend. Make sure it has xanthan gum for the right texture. To make them vegan, swap the egg wash for a milk alternative. You can also replace honey with agave syrup in the boiling water. These changes keep the taste while meeting dietary needs. To keep your bagels fresh, store them at room temperature. Place them in a paper bag or a cloth bag. This method allows airflow and prevents them from getting too soft. If you plan to eat them within two days, this is a great option. When you want to enjoy your bagels again, here’s how to reheat them: - Oven Method: Preheat your oven to 350°F (175°C). Place bagels on a baking sheet and warm for about 10 minutes. - Toaster Method: Slice them in half and toast until warm and slightly crispy. This method adds a nice crunch. If you want to keep bagels for longer, freezing works well. Here’s how to do it: - Allow the bagels to cool completely. - Wrap each bagel tightly in plastic wrap or aluminum foil to avoid freezer burn. - Place the wrapped bagels in a freezer-safe bag. They can last up to three months. When you're ready to eat, simply thaw them in the fridge overnight or toast them directly from the freezer. Enjoy your fresh bagels anytime! Yes, you can use fresh pumpkin. First, roast or steam it until soft. Then, puree it until smooth. Fresh pumpkin may change the bagel's texture slightly. Canned pumpkin gives a consistent result and is easier to use. The best way to boil bagels is to use a large pot of water. Add 2 tablespoons of honey to the water. Bring it to a gentle boil. Boil each bagel for one minute on each side. This process helps create a chewy crust. Bagels are done baking when they turn golden brown. Look for a shiny surface too. You can tap the bottom lightly; it should sound hollow. If they are golden and sound right, they are ready. Yes, you can make these bagels ahead of time. After shaping, you can refrigerate them overnight. Just cover them well. When ready to bake, let them sit at room temperature for 30 minutes. Then boil and bake as usual. This method saves time on busy mornings. This blog post covered everything you need for making great bagels. We explored the key ingredients and their quality to help your bagels shine. I shared clear steps, tips, and common mistakes to avoid for the best results. We also looked at fun variations and smart storage tips to keep them fresh. Remember, bagels can be personal, so feel free to experiment with flavors and toppings. Enjoy your bagel-making journey!

Bakery-Style Pumpkin Spice Bagels Simple and Tasty

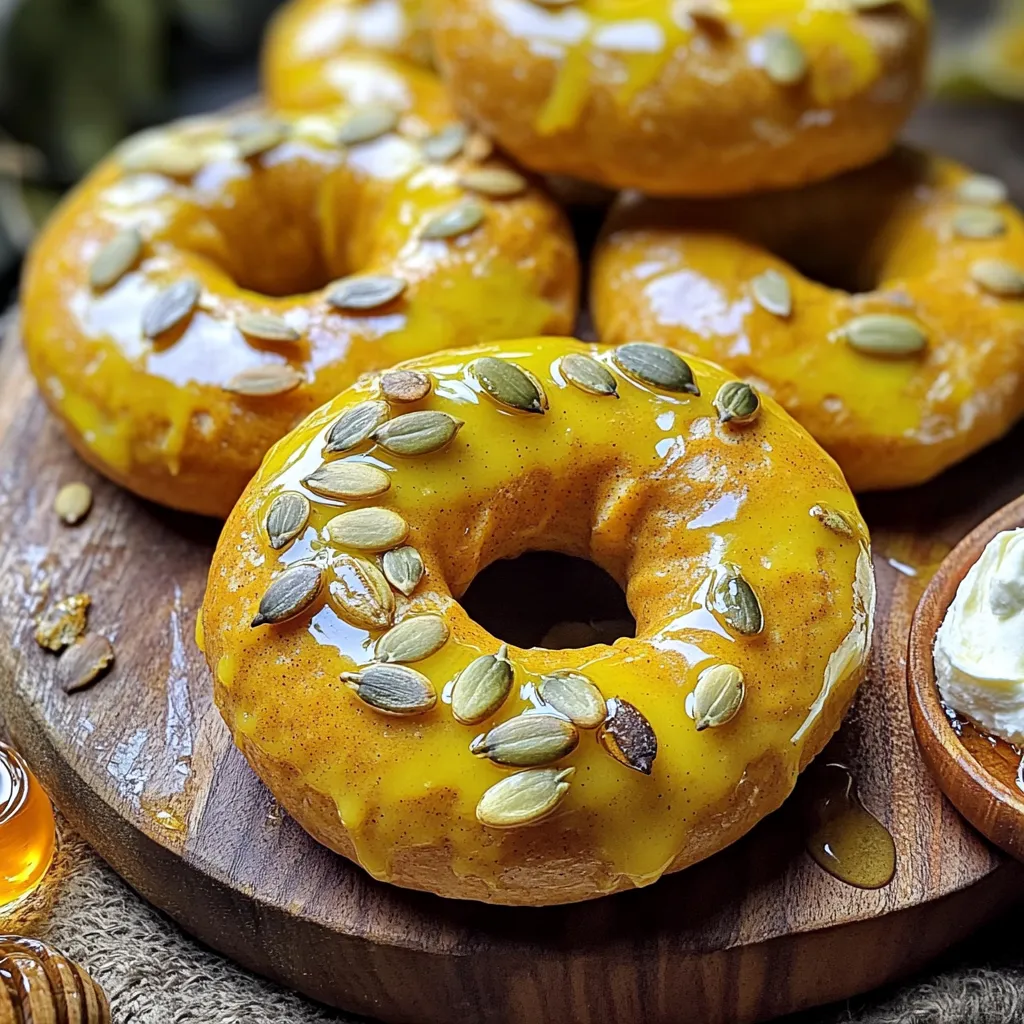
Craving something warm and spicy? You’re in for a treat with my Bakery-Style Pumpkin Spice Bagels! These bagels blend rich

To make this dish, gather these main ingredients: - 1 pound large shrimp, peeled and deveined - 1 cup unsweetened shredded coconut - 1 cup panko breadcrumbs - 1/2 cup all-purpose flour - 2 large eggs, beaten - 1 teaspoon garlic powder - 1 teaspoon paprika - Salt and pepper to taste - Cooking spray These ingredients create a crunchy, sweet, and savory treat. The shrimp bring a fresh taste, while the coconut and panko add crunch. For the chili sauce, you will need: - 1/4 cup sweet chili sauce - 1 tablespoon lime juice - 1 teaspoon sriracha (adjust for spiciness) - 1 teaspoon chopped fresh cilantro (for garnish) This sauce adds a tangy kick to your shrimp. The sweetness of the chili sauce pairs well with the heat from the sriracha. Feel free to add these for extra flavor: - Red pepper flakes for heat - Additional lime wedges for serving - Chopped green onions as a garnish These options allow you to make the dish your own. They enhance the taste and add a pop of color. Start by taking 1 pound of large shrimp. Make sure they are peeled and deveined. Pat the shrimp dry with paper towels. This step helps the breading stick better. Season them with 1 teaspoon of garlic powder, 1 teaspoon of paprika, salt, and pepper. Mix well and set them aside. This mix gives the shrimp great flavor. Next, set up your breading station using three bowls. In the first bowl, add 1/2 cup of all-purpose flour. In the second bowl, beat 2 large eggs. The last bowl should have a mix of 1 cup of unsweetened shredded coconut and 1 cup of panko breadcrumbs. This setup makes breading quick and easy. Now, preheat your air fryer to 400°F (200°C) for about 5 minutes. While it heats, lightly spray the air fryer basket with cooking spray. Take each shrimp and dredge it in the flour, shaking off any extra. Next, dip it into the egg until fully coated. Finally, press the shrimp into the coconut-panko mix, making sure it is well-covered. Place the breaded shrimp in a single layer in the air fryer basket. Make sure they do not touch. Spray the tops lightly with more cooking spray. Cook for 8-10 minutes, flipping halfway through. The shrimp should turn golden brown and crispy. Enjoy the delightful crunch when they are done! To make your coconut shrimp extra crispy, follow these steps. First, use panko breadcrumbs. They give a great crunch. Second, spray the shrimp lightly with cooking spray before air frying. This helps them brown evenly. Finally, arrange the shrimp in a single layer. They need space to crisp up. For the best flavor and texture, choose large shrimp. Look for shrimp that are peeled and deveined. Fresh shrimp works well, but frozen shrimp is also fine. Just be sure to thaw them completely. Pat them dry before cooking. This helps the breading stick better. Air fryers can vary in cooking time. If your air fryer runs hot, check the shrimp at 7 minutes. If you have a cooler model, they may need up to 12 minutes. Always flip the shrimp halfway through to ensure even cooking. Keep an eye on them to avoid burning. {{image_2}} You can easily change the heat in your chili sauce. If you want more spice, add more sriracha. Start with a teaspoon and taste it. Add more a little at a time. You can also use fresh chopped chili peppers for a different kick. Try jalapeños or serranos for extra heat. Always taste as you go. Switching up the breading can make this dish fun. Use crushed cornflakes instead of panko for a crunchier texture. You can also use almond flour for a gluten-free option. Try adding spices like cumin or cayenne to the flour for extra flavor. Mix in some grated Parmesan with the coconut for a cheesy twist. Coconut shrimp pairs well with many sides. Serve it with a fresh salad for a light meal. You can also pair it with rice or noodles. A tangy mango salsa adds a tasty contrast. For a fun twist, serve it in tacos with crunchy slaw. Don’t forget to drizzle more chili sauce on top! To store leftover coconut shrimp, let them cool first. Place them in an airtight container. Make sure the lid seals tightly. You can keep them in the fridge for up to three days. If you want to keep them longer, freezing is a great option. To reheat coconut shrimp, preheat your air fryer to 350°F (175°C). Place the shrimp in a single layer in the basket. Heat for about 5-7 minutes. This keeps the shrimp crispy. You can also use an oven for reheating. Just spread them out on a baking sheet and bake for 10-12 minutes at 350°F (175°C). You can freeze uncooked coconut shrimp before air frying. Just follow the breading steps and place them on a baking sheet. Freeze them until solid, then transfer to a freezer bag. They will last for up to three months. When you're ready to cook, no need to thaw. Just add a few extra minutes to the cooking time in the air fryer. You can add more sriracha to your chili sauce. Start with one teaspoon and taste it. If you want more heat, add more sriracha in small amounts. You can also mix in cayenne pepper or red pepper flakes. This gives your sauce a nice kick. Yes, you can use frozen shrimp. Just make sure to thaw them first. Place them in the fridge overnight or run them under cold water. Pat them dry before seasoning. This helps the breading stick better. Coconut shrimp pairs well with many sides. You can serve it with rice, salad, or coleslaw. A fruity salsa or a zesty dipping sauce also works great. These sides balance the rich flavors of the shrimp. Enjoy mixing and matching! Coconut shrimp is a fun and tasty dish to make. We explored its main ingredients, cooking steps, and tips for crispiness. The sauce adds flavor, and variations let you customize it. Storing leftovers properly keeps it fresh, and our FAQs answer common questions. Enjoy making your coconut shrimp. You’ll impress friends and family with this dish!

Air Fryer Coconut Shrimp with Chili Sauce Delight

Are you ready to elevate your appetizer game? In this guide, I’ll show you how to make Air Fryer Coconut

To make strawberry cheesecake overnight oats, you will need: - 1 cup rolled oats - 1 ½ cups almond milk (or milk of choice) - ½ cup Greek yogurt (plain or vanilla) - 2 tablespoons cream cheese, softened - 2 tablespoons maple syrup (or honey) - 1 teaspoon vanilla extract - ½ cup fresh strawberries, chopped (plus extra for topping) - 1 tablespoon chia seeds - A pinch of salt These ingredients work together to create a rich and creamy texture, just like cheesecake. You can swap some ingredients for different flavors or dietary needs: - Use coconut milk or soy milk instead of almond milk. - Try dairy-free yogurt if you want a vegan option. - Swap cream cheese with cashew cream for a nut-based version. - Use agave syrup instead of maple syrup if preferred. - For a sweeter taste, add more maple syrup or honey. These substitutions let you enjoy this recipe in many ways. Fresh ingredients make a big difference in taste. - Choose ripe strawberries for the best flavor. - Use plain Greek yogurt for a thicker texture. - Check the expiration dates on dairy products before using. - Store the oats in a sealed container to keep them fresh. Using quality ingredients will enhance the overall taste of your overnight oats. First, gather all your ingredients. You need rolled oats, almond milk, Greek yogurt, cream cheese, maple syrup, vanilla extract, fresh strawberries, chia seeds, and salt. Measure out one cup of rolled oats. Then, pour in one and a half cups of almond milk. Next, add half a cup of Greek yogurt. Take two tablespoons of softened cream cheese and mix it in. Add two tablespoons of maple syrup and one teaspoon of vanilla extract. Finally, sprinkle in one tablespoon of chia seeds and a pinch of salt. Now, it’s time to mix everything. In a medium bowl, stir all the ingredients together. Make sure the cream cheese breaks down well. You want a smooth mixture. Once it's smooth, gently fold in half a cup of chopped strawberries. This adds a nice fruity flavor. Next, it’s time to store your oats. Divide the mixture evenly into two jars or containers. Seal them tight with lids. Place the jars in the fridge overnight. This lets the oats soak up the flavors. In the morning, stir the oats to mix everything well. If you like, top with extra strawberries and a drizzle of maple syrup. Enjoy your strawberry cheesecake overnight oats cold for a tasty breakfast! To get the best texture for your strawberry cheesecake overnight oats, keep these tips in mind: - Use rolled oats. They soak up liquid well and stay chewy. - Add chia seeds. They help thicken the oats and add fiber. - Mix well. Ensure the cream cheese blends in fully for creamy bites. - Let it sit. Refrigerate for at least six hours to soften the oats. Enjoy your overnight oats in fun ways! Here are some tasty ideas: - Top with extra strawberries. This adds a fresh burst of flavor. - Drizzle with maple syrup. It adds sweetness and a nice shine. - Pair with nuts. Almonds or walnuts add crunch and healthy fats. - Serve with a side of fruit. Try bananas or blueberries for extra nutrition. Here are some common mistakes to steer clear of: - Skipping the soaking time. Don’t rush this; the oats need time to soften. - Using too much liquid. Stick to the recipe for the right balance. - Not mixing enough. Ensure all ingredients blend for the best taste. - Forgetting to taste. Adjust sweetness or toppings to suit your palate. {{image_2}} You can change the flavor of your overnight oats easily. Try using different fruits like blueberries, peaches, or bananas. Each fruit brings a unique taste. You can also switch the yogurt. Use coconut yogurt for a tropical twist or a dairy-free option. This keeps the recipe fun and fresh. If you want a vegan version, swap the Greek yogurt and cream cheese for plant-based alternatives. You can use almond or coconut yogurt. For a gluten-free option, ensure you choose certified gluten-free oats. This way, everyone can enjoy the dish. Seasonal fruits can make your overnight oats more exciting. In summer, use ripe peaches or cherries. In fall, add diced apples with a sprinkle of cinnamon. In winter, try chopped citrus fruits like oranges. These ingredients not only taste great but also add color and nutrition to your meal. To keep your strawberry cheesecake overnight oats fresh, store them in sealed jars. Glass jars work best, as they do not retain odors. Place them in the fridge right after mixing. Make sure they are airtight to prevent any moisture loss. This keeps the oats creamy and the flavors strong. You can store these overnight oats for up to three days. They taste best within the first two days. After that, the oats may lose some texture. If you notice any off smells or changes in color, it’s best to toss them. Always check before eating. These oats are meant to be eaten cold. They offer a refreshing taste in the morning. If you prefer warm oats, you can reheat them. To do this, add a splash of almond milk and microwave for about 30 seconds. Stir well and enjoy. Remember, warming will change the texture, but it can still be tasty! Yes, you can use quick oats. Quick oats cook faster and absorb liquid well. They will make your oats softer. Just remember that the texture will change. Rolled oats give a chewier bite. If you prefer a creamier mix, quick oats work well. To make this recipe vegan, swap Greek yogurt for a plant-based yogurt. Use vegan cream cheese or omit it entirely. Almond milk is a great choice. Maple syrup is already vegan. This way, you can enjoy the same yummy taste without dairy. Absolutely! This recipe is perfect for meal prep. You can make it ahead and store it in jars. Just divide the mixture into two containers. Seal them and place them in the fridge. They will stay fresh for a few days. This makes a quick breakfast for busy mornings! This post covered all you need for perfect overnight oats. We explored key ingredients and how to substitute them for freshness. You learned step-by-step instructions for preparing and storing. I shared tips for texture and common mistakes to avoid. You can make many tasty variations to match your needs. Remember these storage tips to keep your oats fresh. With these insights, you can enjoy your oats any way you like. Dive in and make your breakfast fun and healthy!

Strawberry Cheesecake Overnight Oats Tasty and Easy Recipe

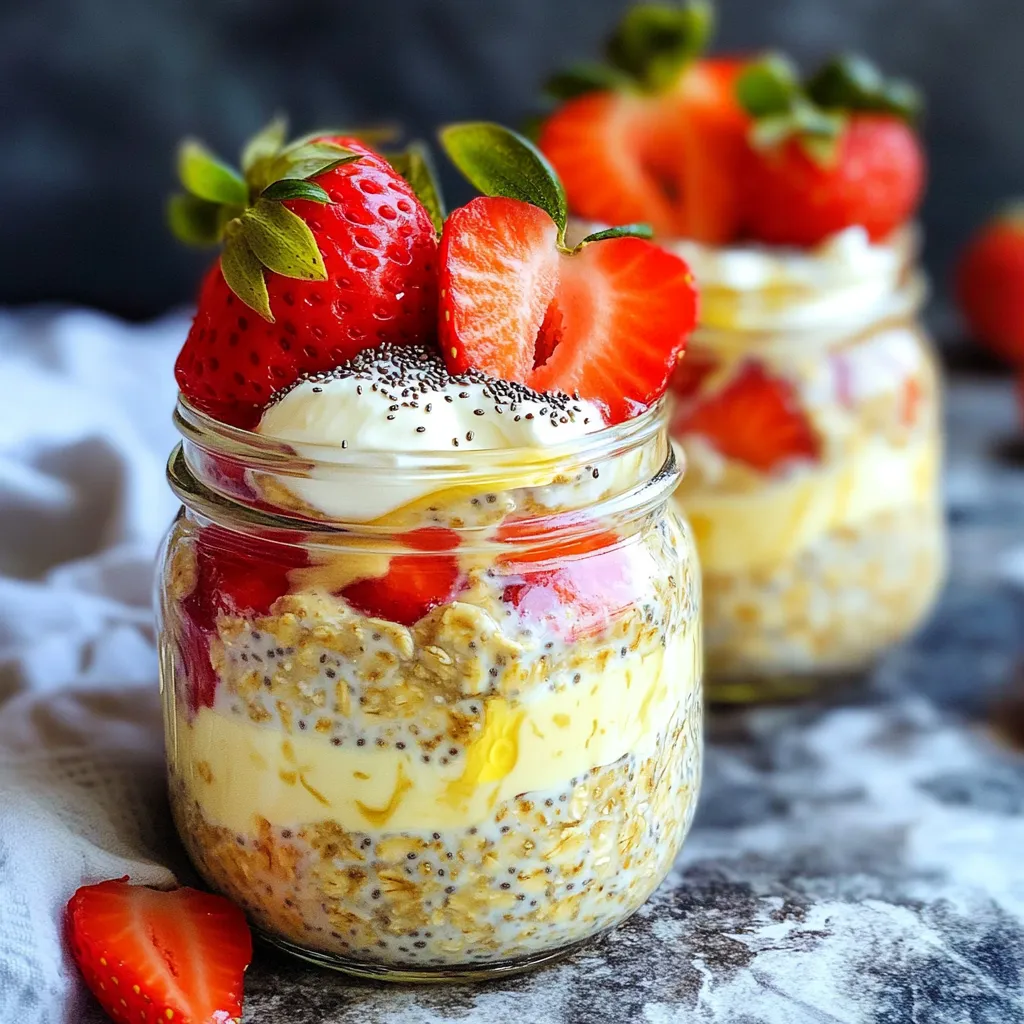
If you crave a quick breakfast that tastes like dessert, you’re in the right place! My Strawberry Cheesecake Overnight Oats

- 1 cup orzo pasta - 2 cups vegetable broth - 1 tablespoon olive oil - 3 cloves garlic, minced - 4 cups fresh spinach, roughly chopped - 1 cup heavy cream or coconut cream for a vegan option - 1 lemon, zested and juiced - 1/2 cup grated Parmesan cheese or nutritional yeast for vegan - Salt and pepper to taste - Optional: Red pepper flakes for heat - Fresh parsley, chopped for garnish To make a tasty creamy lemon spinach orzo skillet, gather these simple ingredients. The orzo pasta forms the base, giving you that lovely bite. Vegetable broth adds a rich flavor. Olive oil helps sauté the garlic, giving it a nice golden color. Minced garlic brings a warm aroma to the dish. Fresh spinach adds a pop of green and nutrients. For creaminess, use heavy cream or coconut cream. The lemon zest and juice add brightness, making the dish fresh. Grated Parmesan cheese or nutritional yeast gives a cheesy flavor. Season with salt and pepper to make everything sing. If you like some heat, add red pepper flakes. Finally, fresh parsley adds a lovely touch on top. These ingredients come together for a bright, creamy dish that feels special yet is easy to make. - Heat olive oil in a skillet over medium heat. - Add minced garlic and sauté until it smells great, about one minute. Watch it closely to avoid burning. - Add one cup of orzo pasta to the skillet. Toast it lightly for two to three minutes, stirring often. - Pour in two cups of vegetable broth and bring the mix to a boil. Once boiling, lower the heat, cover, and let it simmer. Cook for ten to twelve minutes until the orzo is soft and most of the broth is gone. - Stir in four cups of fresh spinach, lemon zest, and lemon juice. Cook for another two to three minutes until the spinach wilts down. - Add one cup of heavy cream and mix well. Let it simmer for two more minutes to thicken. - Finally, stir in half a cup of grated Parmesan cheese until it melts and becomes creamy. Season with salt, pepper, and red pepper flakes if you want some heat. Enjoy your creamy lemon spinach orzo! To get the best creamy texture, keep the heat low when you add the cream. This way, it simmers gently and blends beautifully. Stir often to mix it well. If the sauce is too thick, add a little vegetable broth. If it's too thin, let it simmer a bit longer. Adding fresh herbs can lift the flavor. Try basil or dill for a fresh twist. You can also mix in other veggies, like peas or asparagus, for extra color and taste. This makes the dish more fun and healthy. For a lovely presentation, serve the orzo in shallow bowls. Top each bowl with more Parmesan and a lemon wedge. This adds a pop of color. Pair it with a light salad or a crisp white wine. A Sauvignon Blanc works well. Enjoy the bright flavors! {{image_2}} For a vegan version, swap out heavy cream for coconut cream. It gives a rich taste without dairy. Use nutritional yeast instead of Parmesan cheese. This adds a cheesy flavor while keeping it plant-based. You can also use cashew cream for a creamy texture. Blend soaked cashews with water for a smooth mix. Want to add protein? Grilled chicken or shrimp works great. Cook them separately and stir them in at the end. For a vegetarian option, add chickpeas or lentils. They boost protein while keeping the dish hearty. Tofu is another good choice. Sauté it until golden before mixing it in. If you need a gluten-free dish, try quinoa or rice instead of orzo. These grains cook well and absorb the flavors nicely. Brown rice adds a nutty taste. Cook them according to package instructions. You can also use gluten-free pasta. Just adjust the cooking time to avoid mushiness. To keep your creamy lemon spinach orzo fresh, use airtight containers. Glass or plastic containers work well. You can store it in the fridge for up to three days. Make sure to let it cool before sealing. You can reheat your orzo in the microwave or on the stovetop. For the microwave, place it in a bowl and cover it. Heat in short bursts, stirring in between. On the stovetop, add a splash of broth or cream. Heat over low until warm. This helps keep it creamy and smooth. To freeze the dish, let it cool completely. Place it in a sturdy freezer bag or container. Remove as much air as possible before sealing. When you are ready to eat, defrost it in the fridge overnight. After freezing, the texture may change. It might be less creamy and more grainy. Yes, you can make this recipe vegan. To do this, swap the heavy cream for coconut cream. This keeps it thick and creamy. For cheese, use nutritional yeast instead of Parmesan. It adds a nice cheesy flavor without dairy. These swaps keep the dish just as tasty and enjoyable. To keep orzo firm, watch the cooking time. Cook it for only 10-12 minutes in the broth. Stir it often while cooking to prevent sticking. Make sure to check the package instructions too, as cooking times can differ. Drain any extra liquid if needed, but let it absorb most of the broth for the best texture. You can use other pasta types if you prefer. Try small shapes like penne or fusilli. Just adjust the cooking time based on the pasta you choose. Ensure you follow the package instructions for best results. This way, you can enjoy the same creamy lemon flavor no matter the pasta! This blog post covered a delightful creamy orzo recipe. You learned about key ingredients like garlic, spinach, and cream. We explored simple steps to cook and perfect the dish. You also discovered tips for making it vegan and gluten-free. In the end, this recipe offers lots of options for flavor and texture. Get creative with your own twists. Enjoy sharing this dish with others!

Creamy Lemon Spinach Orzo Skillet Fresh and Flavorful

Looking for a quick and tasty meal? My Creamy Lemon Spinach Orzo Skillet mixes fresh flavors for a delightful dish.

To make the Slow Cooker Rustic Vegetable Stew, you'll need the following: - 4 medium carrots, sliced - 3 medium potatoes, diced - 2 celery stalks, chopped - 1 medium onion, diced - 2 cloves garlic, minced - 1 zucchini, diced - 1 bell pepper (any color), chopped - 1 can (14.5 oz) diced tomatoes (with juices) - 4 cups vegetable broth - 1 cup green beans, trimmed and cut into 1-inch pieces - 2 teaspoons dried thyme - 1 teaspoon dried rosemary - 1 teaspoon paprika - Salt and pepper to taste - 2 tablespoons olive oil - Fresh parsley, chopped (for garnish) Choosing fresh produce is key for this stew. Look for firm, vibrant vegetables. Carrots should be bright orange and smooth. Potatoes must feel heavy with no sprouting eyes. Celery should be crisp and green. Zucchini should be shiny and firm. Bell peppers can be any color, but pick ones that feel heavy and have unblemished skin. Fresh green beans should snap easily when bent. The herbs and spices bring depth to the stew. Dried thyme adds a warm, earthy flavor. Rosemary gives a pine-like aroma and taste. Paprika adds a hint of sweet smoke, enhancing the dish. Salt and pepper are essential for balancing flavors. Adjust these to your taste as you cook. Fresh parsley is perfect for garnish, adding color and brightness at the end. First, wash all your vegetables well. This keeps your stew clean and fresh. Slice the carrots into thin rounds. Dice the potatoes into small cubes. Chop the celery into bite-sized pieces. Dice the onion finely. Mince the garlic into small bits. Cut the zucchini into chunks. Finally, chop the bell pepper into small pieces. Heat the olive oil in a skillet over medium heat. Add the diced onions and minced garlic. Sauté them until the onions turn clear, which takes about 3-4 minutes. This step adds rich flavor to your stew. The smell will be amazing! In your slow cooker, add the sautéed onions and garlic. Then, toss in the carrots, potatoes, celery, zucchini, and bell pepper. Next, add the green beans and diced tomatoes with their juices. Pour in the vegetable broth, which makes the stew hearty. Sprinkle in the dried thyme, rosemary, paprika, salt, and pepper. Stir everything gently to mix it well. Make sure all veggies are covered by the broth. Cover the slow cooker and set it to low heat for 6-8 hours or high heat for 3-4 hours. This will give you tender veggies. When done, taste and adjust the seasoning as needed. To get the best taste from your stew, always use fresh veggies. Fresh carrots, potatoes, and celery add depth. Sautéing the onions and garlic first makes a big difference. This step brings out their sweetness and aroma. Use quality vegetable broth, as it forms the base of your stew. Adding herbs like thyme and rosemary boosts the flavor. Don’t forget to season with salt and pepper. Taste your stew at the end, and adjust if needed. One common mistake is overcooking the vegetables. They can turn mushy if you cook too long. Always check the doneness around the 6-hour mark on low heat. Another mistake is not seasoning enough. Under-seasoning can lead to bland stew. Don’t skip the sautéing step for the garlic and onions. Skipping this can dull the flavors. Lastly, ensure all veggies are cut evenly. Uneven sizes lead to uneven cooking. You can easily adjust this stew to fit your taste. If you like it spicy, add red pepper flakes or cayenne. For a richer flavor, try adding a splash of balsamic vinegar. If you want more protein, toss in beans or lentils. You can also switch vegetables based on what you have. Swap zucchini for squash or add peas for sweetness. Experiment with different herbs to find your favorite combo. {{image_2}} You can mix and match vegetables in this stew. Try using sweet potatoes instead of regular potatoes. They add a sweet flavor. You can also add parsnips for a nice twist. If you love greens, toss in some kale or spinach at the end. They wilt nicely and boost nutrition. Remember, the goal is to use what you have. The stew will still taste great! This stew is already vegetarian. To make it vegan, ensure your broth is plant-based. You can also add legumes like lentils or chickpeas. They add protein and fiber. If you want creaminess, blend a portion of the stew and stir it back. It gives a thick texture without using dairy. Your vegan friends will love it! To turn this stew into a filling meal, add proteins. You can include diced chicken or turkey. Just brown the meat before adding it to the slow cooker. For a vegetarian option, add tofu or tempeh. They absorb flavors well. Another great choice is beans, like kidney or black beans. They are rich in protein and keep the stew hearty. After cooking your stew, let it cool down. Transfer it to an airtight container. Store it in the fridge. It stays fresh for 3 to 5 days. Make sure to label the container. This will help you remember when you made it. You can freeze the stew for later. Use a freezer-safe container or a zip-top bag. Leave some space at the top for expansion. It keeps well for up to 3 months. When you're ready to eat, just thaw it in the fridge overnight. To reheat, pour the stew into a pot. Heat it on low until it's warm. You can also use the microwave. Heat it in short bursts, stirring in between. If it seems thick, add a splash of broth or water. Taste and adjust the seasoning if needed. Enjoy your warm, hearty stew! You can store your stew in the fridge for up to five days. Make sure to let it cool first. Use an airtight container to keep it fresh. If you want to keep it longer, freeze it. In the freezer, your stew can last up to three months. Just thaw it overnight in the fridge before reheating. Yes, you can add meat if you like. Chicken, beef, or sausage work well. Just brown the meat in a skillet before adding it to the slow cooker. This adds flavor and depth to your stew. Adjust the cooking time as needed. Meat may need a bit more time to cook fully. This stew pairs nicely with crusty bread or a fresh salad. You can serve it over quinoa or rice for a hearty meal. A sprinkle of parmesan cheese on top adds a nice touch. For a light option, try serving with steamed green vegetables or a bright coleslaw. We’ve covered how to make a great Slow Cooker Rustic Vegetable Stew. You learned about choosing fresh ingredients, preparing them right, and cooking techniques that enhance flavor. I shared tips to avoid common mistakes and ways to adjust the stew to fit your taste. Don’t forget about fun variations that include vegan options and adding protein. Lastly, proper storage and reheating tips keep your stew fresh. Now you're ready to create your own delicious meal!

Slow Cooker Rustic Vegetable Stew Hearty and Satisfying

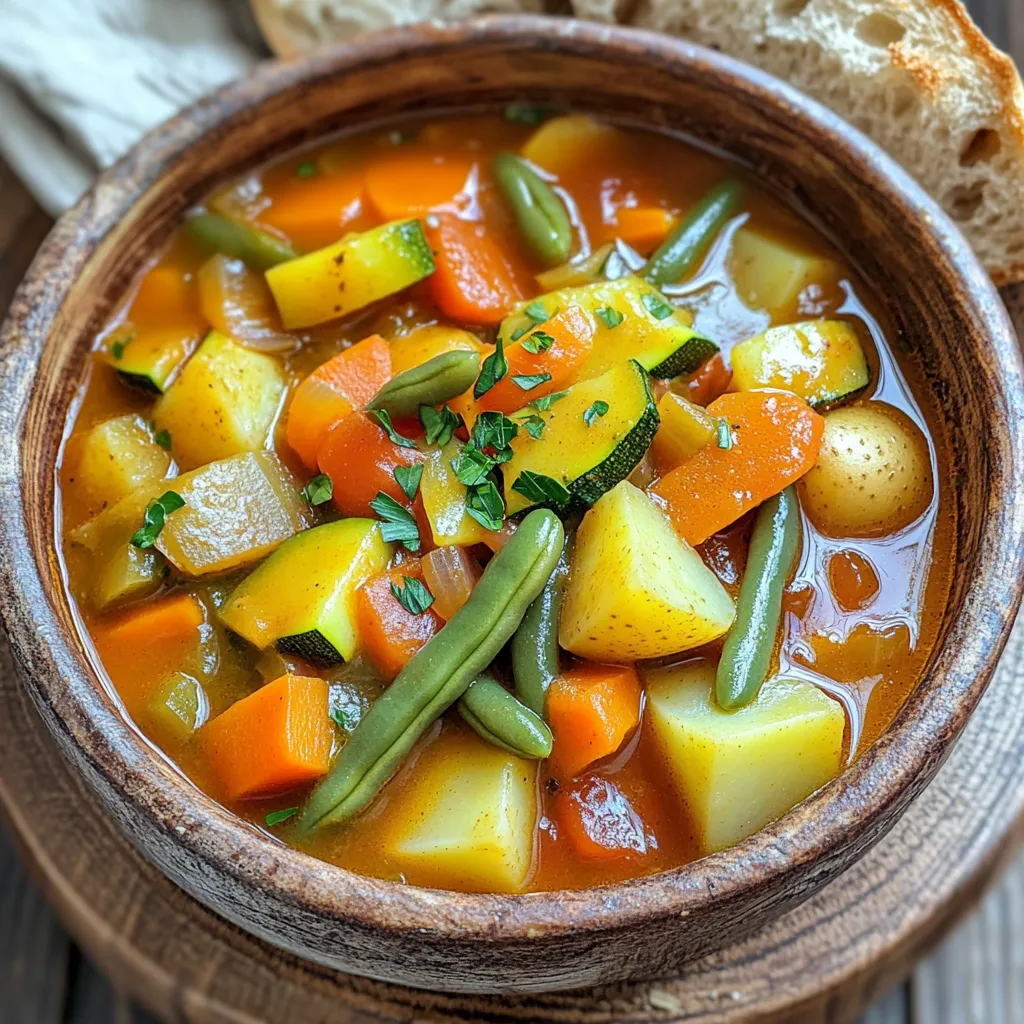
Looking for a warm meal that warms your soul? The Slow Cooker Rustic Vegetable Stew is just what you need.

To make these no-bake salted caramel pretzel bars, you will need: - 2 cups pretzel rods, crushed - 1 cup graham cracker crumbs - 1/2 cup unsalted butter, melted - 1 cup brown sugar, packed - 1 cup sweetened condensed milk - 1 teaspoon vanilla extract - 1 cup semi-sweet chocolate chips - 1/4 cup sea salt (for topping) These ingredients create a sweet and salty treat that is hard to resist. You can swap some ingredients if you need to. For example: - Use almond butter instead of unsalted butter for a nutty flavor. - Try honey or maple syrup in place of brown sugar for a different sweetness. - If you don’t have graham cracker crumbs, use crushed cookies like digestive biscuits. - Dark chocolate chips can replace semi-sweet chocolate chips for a richer taste. These changes can keep your recipe fresh and exciting. Want to make these bars a bit healthier? Here are some tips: - Use whole grain pretzels for extra fiber. - Choose reduced-fat sweetened condensed milk to cut calories. - Add nuts or seeds for added nutrition and crunch. - Use a sugar substitute like stevia for a lower sugar option. These choices can help you enjoy the flavors while being a bit kinder to your health. First, gather your ingredients. You need crushed pretzel rods and graham cracker crumbs. In a large bowl, mix 2 cups of pretzel rods with 1 cup of graham cracker crumbs. Pour in 1/2 cup of melted unsalted butter. Stir until everything is well combined. The mixture should feel moist. Next, take a lined 9x9 inch baking dish. Press the pretzel mixture firmly into the bottom. Make sure it is even. This forms the base of your bars. Set this aside while you prepare the caramel. Now, grab a medium saucepan. Add 1 cup of packed brown sugar and 1 cup of sweetened condensed milk. Place it over medium heat. Stir it often until it comes to a boil. This will take a few minutes. Once boiling, reduce the heat to low. Let it simmer for 3-4 minutes while stirring. You want the mixture to thicken. When it does, remove it from the heat. Stir in 1 teaspoon of vanilla extract for flavor. Immediately pour the caramel over the pretzel crust. Use a spatula to spread it evenly. This layer adds a rich, sweet taste to your bars. Next, it's time to melt the chocolate. Place 1 cup of semi-sweet chocolate chips in a microwave-safe bowl. Heat them in 30-second bursts. Stir after each burst until smooth and melted. Pour the melted chocolate over the caramel layer. Spread it out with a spatula. This adds a creamy finish to your bars. Finally, sprinkle 1/4 cup of sea salt on top. This will give a nice salty contrast to the sweet layers. Refrigerate your bars for at least 2 hours. This helps them set properly. Once firm, lift them out using the parchment paper. Cut into squares and enjoy your tasty creation! To get the best texture, make sure the crust is tightly pressed. This helps it hold together. Use a flat object, like a measuring cup, to press it down firmly. When you pour the caramel on top, let it cool slightly. If it's too hot, it may melt the crust. For the top layer, ensure the chocolate is smooth. Stir it well after melting. This gives the bars a nice finish. One common mistake is not letting the bars chill long enough. They need at least two hours in the fridge to set. If you skip this, they may fall apart when cut. Another mistake is overcooking the caramel. Keep an eye on it while it simmers. If it gets too thick, it won’t pour well. Lastly, don’t skip the sea salt. It balances the sweetness and makes each bite pop. You can easily boost flavor with simple tweaks. Try adding a pinch of cinnamon to the pretzel crust. This gives a warm, cozy taste. You could also mix in some crushed nuts for crunch. Using dark chocolate instead of semi-sweet can add richness. For a fun twist, drizzle caramel on top before the chocolate. It adds extra sweetness and looks great, too! {{image_2}} You can make these bars even better by adding nuts. Chopped pecans or walnuts add crunch. I suggest mixing in about 1/2 cup of your favorite nuts. You can also sprinkle nuts on top before the chocolate layer sets. This adds flavor and texture to every bite. If you want to switch up the chocolate, try using white chocolate or milk chocolate. To do this, just melt the chocolate of your choice. You can even mix in a bit of peanut butter for a yummy twist. This will change the taste but still keep it delicious. To make these bars gluten-free, use gluten-free pretzels and graham cracker crumbs. For a vegan option, swap the butter for coconut oil. You can also use a plant-based condensed milk. These simple changes let everyone enjoy the treat, no matter their diet! Store your No-Bake Salted Caramel Pretzel Bars in an airtight container. This keeps them fresh and tasty. If you don’t have a container, wrap them tightly in plastic wrap. Place the bars in the fridge for best results. This helps them stay firm and delicious. These bars will stay good for about one week in the fridge. After a few days, the pretzels may soften. For the best taste and crunch, try to eat them within three days. If you want to keep them longer, consider freezing them. To freeze your bars, first cut them into squares. Wrap each square in plastic wrap and place them in a freezer bag. Make sure to remove as much air as possible. They can stay frozen for up to three months. When you're ready to eat them, just thaw in the fridge for a few hours. Enjoy the same great taste! Yes, you can swap in nuts. Almonds or pecans work well. Just chop them small. This adds a nice crunch. You can mix nuts with pretzels too. The caramel is ready when it thickens and bubbles. Stir it for 3-4 minutes. It should coat the back of a spoon. If it drips off too fast, cook a bit longer. No worries! You can use crushed cookies instead. Try vanilla wafers or digestive biscuits. They all give a great taste and texture. Absolutely! These bars store well. You can make them a day or two in advance. Just keep them in the fridge. This lets the flavors blend nicely. Use a sharp knife for clean cuts. First, lift the bars out using the parchment. Then, cut them into squares or rectangles. This makes serving easy and neat. You learned how to make tasty salted caramel pretzel bars from this post. We covered ingredients, step-by-step instructions, and helpful tips. You can try flavor swaps and options for special diets. Remember, good storage keeps them fresh. Enjoy experimenting with this fun recipe! Happy cooking and creating your delicious treats!

No-Bake Salted Caramel Pretzel Bars Delightful Treat

Craving a sweet and salty treat without turning on the oven? You’re in for a treat! These No-Bake Salted Caramel

- 1 pound package of gnocchi - 1 pound large shrimp, peeled and deveined - 4 tablespoons unsalted butter - 5 cloves garlic, minced - 1 teaspoon dried oregano - 1 teaspoon paprika - ½ teaspoon red pepper flakes (adjust for spice preference) - Salt and pepper to taste - 1 cup cherry tomatoes, halved - 2 cups spinach leaves - Fresh parsley, chopped (for garnish) - Zest and juice of 1 lemon To make this dish shine, start with quality ingredients. Gnocchi is the main star here. I love using fresh gnocchi, as it gives a soft and fluffy bite. You can also use store-bought, but fresh is best. Next, the shrimp brings a nice, juicy texture. Pick large shrimp for a hearty bite. Make sure they are peeled and deveined for ease. Butter and garlic are key for flavor. The unsalted butter melts beautifully, and the minced garlic adds a rich aroma. You can’t skip these! Spices make it pop. Dried oregano and paprika bring warmth and depth. Red pepper flakes add a touch of heat. Adjust the amount to fit your taste. Fresh vegetables are a must. Cherry tomatoes burst with sweetness. Spinach adds color and nutrients. Don’t forget the fresh parsley for garnish! Finally, lemon zest and juice brighten the entire dish. This combo of flavors creates a wonderful balance. Use these ingredients to craft a delightful meal. 1. Preheat your oven and melt butter. Set your oven to 400°F (200°C). This heat will help the gnocchi crisp up. In a small pan, melt 4 tablespoons of unsalted butter over medium heat. Add 5 cloves of minced garlic. Cook for about 1-2 minutes until it smells great. Then, remove it from the heat. 2. Combine ingredients on the sheet pan. Grab a large baking sheet. Spread 1 pound of uncooked gnocchi evenly on it. Next, add 1 pound of peeled and deveined large shrimp. Toss in 1 cup of halved cherry tomatoes. This mix will add color and flavor. 3. Drizzle garlic butter and season. Pour the garlic butter over the gnocchi, shrimp, and tomatoes. Then, sprinkle 1 teaspoon of dried oregano, 1 teaspoon of paprika, and ½ teaspoon of red pepper flakes for spice. Add salt and pepper to taste. Toss everything well to coat. 1. Roast gnocchi and shrimp. Place the baking sheet in your preheated oven. Roast for 15 minutes. This time lets the gnocchi get a nice golden color and the shrimp cook through. 2. Add spinach midway through cooking. After 15 minutes, take the baking sheet out. Add 2 cups of spinach leaves. Gently toss everything to mix in the spinach. Return the baking sheet to the oven for another 5-7 minutes. The shrimp should be fully cooked, and the gnocchi should be crispy. 3. Finishing touches before serving. Once done, remove the baking sheet from the oven. Drizzle the zest and juice of 1 lemon over the dish. Toss lightly to mix. Finally, garnish with chopped fresh parsley for a pop of color. This dish is both easy and fun to make. Enjoy your Sheet-Pan Garlic Butter Gnocchi and Shrimp! How to achieve crispy gnocchi To get crispy gnocchi, spread it out in a single layer on the sheet pan. This helps each piece get direct heat. Make sure the oven is fully preheated to 400°F (200°C). The high heat cooks the gnocchi fast and makes it golden. Tossing the gnocchi with garlic butter helps it crisp up too. Ensuring shrimp is perfectly cooked For perfectly cooked shrimp, look for a bright pink color. They should curl slightly and be firm to the touch. Cook them for about 15 minutes in the oven. If you add the spinach halfway through, it gives the shrimp extra time to cook without drying out. Best ways to present the dish You can serve this dish straight from the sheet pan for a cozy vibe. If you want a fancier look, plate the shrimp and gnocchi individually. Make sure to include some spinach and tomatoes. A lemon wedge on the side adds a pop of color and flavor. Complementary side dishes and beverages This dish pairs well with a crisp salad or a loaf of crusty bread. A light white wine, like Sauvignon Blanc, goes great with the flavors. You could also serve a refreshing sparkling water with lemon for a non-alcoholic option. {{image_2}} You can swap ingredients easily in this dish. For protein, try chicken or tofu. Both work well with the garlic butter. If you want a veggie boost, add bell peppers or zucchini. These swaps keep the dish fresh and tasty. To make it vegan, use plant-based gnocchi. Replace shrimp with chickpeas or extra veggies. For butter, try vegan butter or olive oil. These changes still give you a rich taste. Spruce up the dish with herbs and spices. Fresh basil or thyme adds a nice touch. You can even mix in some lemon zest for extra zing. Experimenting with sauces can change the whole dish. A splash of soy sauce adds umami. For a creamy twist, drizzle some Alfredo sauce before serving. These little changes can make your meal shine. To keep your leftovers fresh, use airtight containers. Glass or plastic containers work well. Store the gnocchi and shrimp mix in the fridge. They will stay good for up to three days. For the best taste, reheat leftovers in the oven. Set the oven to 350°F (175°C). Place the dish in a safe oven dish. Heat for about 10-15 minutes. This method helps keep the gnocchi crispy. When reheating, be careful not to overcook the shrimp. Shrimp cooks quickly, so check often. If the shrimp become rubbery, they lose their flavor. Take them out as soon as they are warm. Enjoy your meal again without losing the original taste! Can I use frozen gnocchi or shrimp? Yes, you can use frozen gnocchi and shrimp. Just add a few extra minutes to the cooking time. This will help them cook through and warm up nicely. How can I make this dish spicier? To add heat, increase the red pepper flakes. You can also include fresh chili peppers or hot sauce. Adjust to your taste for the perfect kick. What if I don’t have garlic butter? If you don't have garlic butter, you can make your own. Simply melt unsalted butter and add minced garlic. Sauté it briefly until fragrant. This will give you a tasty garlic flavor. Can I prep this dish ahead of time? Yes, you can prep this dish ahead. Chop the vegetables and season the shrimp and gnocchi. Store them in the fridge until you're ready to cook. This makes it easy to throw everything together when you're short on time. In this blog post, we explored a tasty dish made with gnocchi and shrimp. You learned about the key ingredients and step-by-step instructions for cooking. We also shared tips for perfecting the dish and suggested ways to serve it. You can easily modify the recipe to fit your taste. Remember, proper storage and reheating will keep leftovers enjoyable. Enjoy making this dish and sharing it with friends and family. Cooking can be fun and creative!

Sheet-Pan Garlic Butter Gnocchi and Shrimp Delight

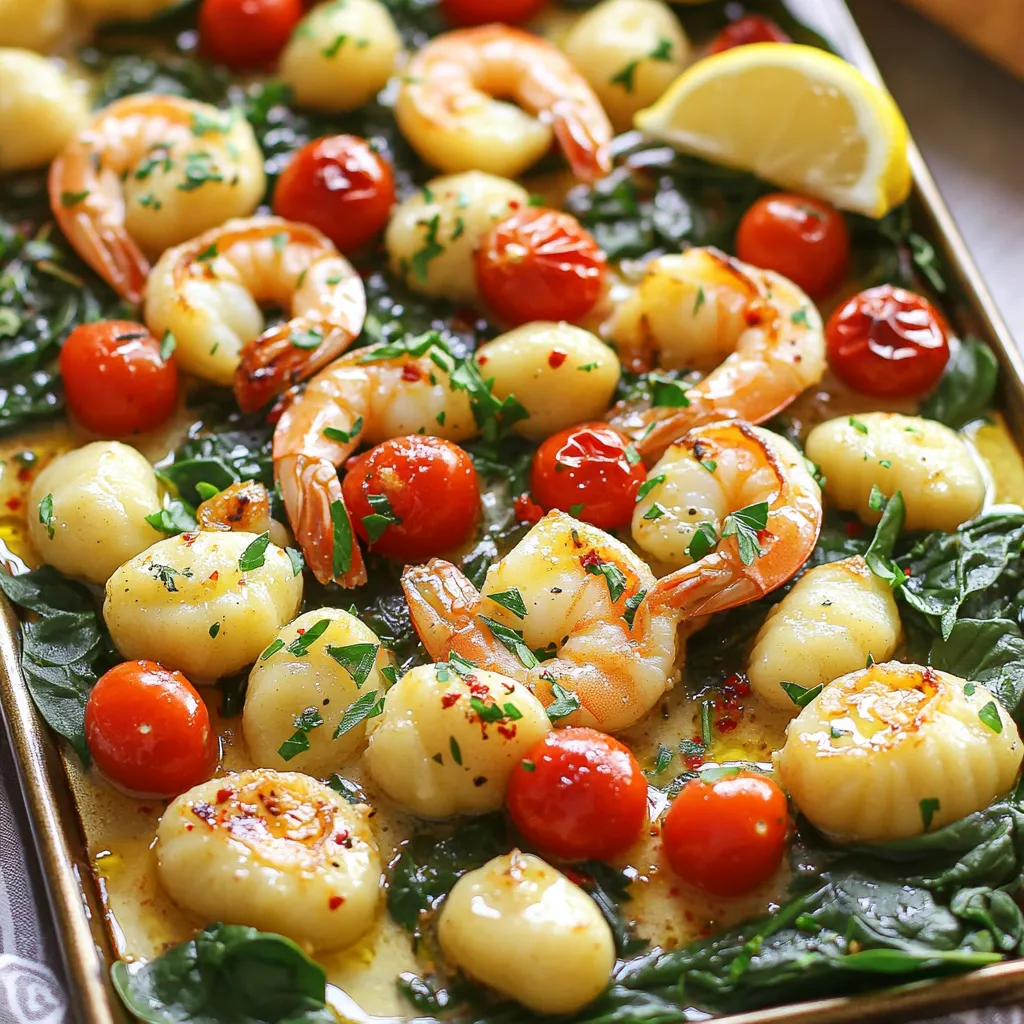
Looking for a quick and tasty dinner? Your search ends here! My Sheet-Pan Garlic Butter Gnocchi and Shrimp Delight combines

- 1 pound ground beef - 1 cup breadcrumbs - 1/2 cup grated Parmesan cheese - 1 teaspoon garlic powder - 1 teaspoon onion powder - 1 teaspoon Italian seasoning - 1/2 teaspoon salt - 1/4 teaspoon black pepper - 1 cup mozzarella cheese, cut into small cubes - 1 egg, beaten - 1/4 cup fresh parsley, chopped (optional, for garnish) - Marinara sauce, for serving To create these tasty meatballs, gather all your ingredients first. Using fresh ground beef makes for juicy meatballs. Breadcrumbs help bind everything together. Parmesan cheese adds a great flavor. Seasonings are key! Garlic powder and onion powder bring depth. Italian seasoning gives that classic taste. Don’t forget salt and black pepper for balance. You need mozzarella cheese to stuff inside. Cut it into small cubes so it melts perfectly. The egg helps hold the meatballs together, making them firm. Fresh parsley is optional. It adds a nice touch when you serve. Finally, have marinara sauce ready for dipping. It pairs wonderfully with the meatballs. This simple list of ingredients sets you up for success. Now you can make delicious air fryer mozzarella stuffed meatballs! Start by getting a large mixing bowl. In it, combine these ingredients: - 1 pound ground beef - 1 cup breadcrumbs - 1/2 cup grated Parmesan cheese - 1 teaspoon garlic powder - 1 teaspoon onion powder - 1 teaspoon Italian seasoning - 1/2 teaspoon salt - 1/4 teaspoon black pepper - 1 egg, beaten Mix them well. You want a smooth and even mix. Make sure the spices and cheese blend in with the meat. This is key for great flavor. Now, take a small amount of the meat mixture. It should fit in your palm. Press it flat, making a small circle. Place a cube of mozzarella cheese in the middle. Fold the meat around the cheese and roll it into a ball. Repeat this for all the meat mixture. Keep them about the same size for even cooking. Next, preheat your air fryer to 375°F (190°C). While it heats, lightly spray the air fryer basket with cooking spray. This helps prevent sticking. Once the air fryer is ready, arrange the meatballs in a single layer. Make sure they don’t touch each other. This allows hot air to flow around them. Cook the meatballs for 12-15 minutes. They should be golden brown and cooked through. Flip them halfway for extra crispiness. After cooking, carefully take them out. Let them rest for a couple of minutes. Serve them hot with marinara sauce on the side. Enjoy your tasty meal! To make great meatballs, avoid overmixing the meat mixture. Overmixing can make them tough. Mix just enough until all the ingredients blend well. When stuffing the mozzarella, take a small piece of meat. Flatten it in your palm, then place a cube of cheese in the center. Fold the meat around the cheese and shape it into a ball. This keeps the cheese inside while cooking. Preheat your air fryer to 375°F (190°C) before adding the meatballs. This helps them cook evenly. Give each meatball space in the basket. Lay them in a single layer without touching. This helps them crisp up nicely. Cooking times can differ based on your air fryer. Start with 12-15 minutes. If your air fryer is smaller or larger, check them after 10 minutes. Use a meat thermometer to ensure they reach 165°F (74°C). Pair your meatballs with warm marinara sauce. It adds flavor and moisture. You can also serve them with spaghetti or on a sub roll for a meatball sandwich. For side dishes, consider a simple salad or garlic bread. These add freshness and balance to the meal. Enjoy your cheesy, delicious meatballs! {{image_2}} You can switch up the meat in this recipe. Ground turkey or chicken works great. These options are leaner but still tasty. They may need a bit more seasoning to match the flavor of beef. For a vegetarian twist, try using plant-based meat. There are many options available today. Just make sure it holds together well when you form the meatballs. To amp up the taste, add herbs or spices you love. Oregano, basil, or even a pinch of red pepper flakes can kick it up a notch. Fresh herbs can also add a nice touch. Incorporating finely chopped vegetables is another option. Try mixing in some bell peppers or spinach. This gives extra flavor and nutrition to your meatballs. When it comes to sauce, there are many choices. You can use traditional marinara sauce or try something unique. Look for different marinara styles, like spicy or garlic-infused. For a creamy dip, consider cheese sauce or pesto. Both options pair well with the cheesy meatballs. Each sauce can change the whole meal experience. To keep your mozzarella stuffed meatballs fresh, store them properly after cooking. First, let the meatballs cool down to room temperature. Then, place them in an airtight container. - Refrigeration guidelines: Store the meatballs in the fridge for up to 3 days. Make sure to cover them well to prevent dryness. - Freezing instructions: For longer storage, you can freeze the meatballs. Place them in a single layer on a baking sheet and freeze until solid. Then, move them to a freezer-safe bag or container. They will last for about 3 months in the freezer. When you're ready to enjoy your leftover meatballs, reheating them properly is key to keeping them tasty. - Best methods for reheating in the air fryer: Preheat your air fryer to 350°F (175°C). Place the meatballs in a single layer in the basket. Heat them for about 5-7 minutes, turning halfway through. This method keeps them crispy on the outside while warm and gooey on the inside. - Alternative reheating methods: You can also reheat the meatballs in the oven. Preheat to 350°F (175°C) and place them on a baking sheet. Heat for about 10-15 minutes. Another option is to use a microwave, but this may make them a bit soggy. If using the microwave, heat for 1-2 minutes, checking often. You cook meatballs in an air fryer for 12-15 minutes at 375°F (190°C). Check that they turn golden brown and are fully cooked. To ensure even cooking, flip the meatballs halfway through the cooking time. Yes, you can use frozen meatballs in the air fryer. Cook them at the same temperature, but add a few extra minutes to the cooking time. Check if they are heated through before serving. You can serve mozzarella stuffed meatballs with marinara sauce for dipping. They pair well with pasta, garlic bread, or a fresh salad. You can also add vegetables for a balanced meal. To prevent sticking, spray the air fryer basket lightly with cooking spray. Also, avoid overcrowding the basket. Space the meatballs apart to allow hot air to circulate around them. You can make tasty mozzarella stuffed meatballs with simple steps. We covered the key ingredients, from ground beef to cheese. The process involves mixing, stuffing, and air frying. Tips like avoiding overmixing help ensure they turn out great. You learned about variations for different diets and how to store leftovers. Enjoy making these easy meatballs, and don't hesitate to get creative with flavors or sauces. Happy cooking!

Air Fryer Mozzarella Stuffed Meatballs Simple Recipe

Are you ready to elevate your dinner game? This simple recipe for Air Fryer Mozzarella Stuffed Meatballs will impress everyone

Older posts
Newer posts
← Previous Page1 … Page12 Page13 Page14 … Page137 Next →

dsad

© 2025 Recipes Pursuit • Built with GeneratePress

Our Policies

  • Copyright Policy
  • Cookie Policy
  • GDPR Policy
  • Privacy Policy
  • Disclaimer
  • Terms Of Use

More Information

  • Home
  • About
  • Contact
  • Appetizers
  • Dessert
  • Dinner
  • Drinks
©2025, Recipes Pursuit About Back To Top