Skip to content
DisclaimerTerms Of UseGDPR PolicyCookie Policy

Recipes Pursuit

  • Home
  • Drinks
  • Appetizers
  • Dinner
  • Dessert
  • About
  • Contact
  • Privacy Policy
DisclaimerTerms Of UseGDPR PolicyCookie Policy

Emma Smith

- 1 lb large shrimp, peeled and deveined - 2 cups mixed bell peppers (red, green, yellow), sliced - 1 cup snap peas, trimmed - 1 medium carrot, julienned - 3 green onions, chopped - 3 cloves garlic, minced - 1 tablespoon ginger, minced - 1/4 cup low-sodium soy sauce - 1/4 cup honey or agave syrup - 1 tablespoon sesame oil - 1 tablespoon cornstarch mixed with 2 tablespoons water (slurry) - 2 tablespoons sesame seeds, for garnish - Cooked jasmine rice or quinoa, for serving You can swap honey for agave syrup if you want a vegan option. If you need a soy-free option, try coconut aminos instead of soy sauce. For veggies, feel free to use broccoli or zucchini if you can’t find bell peppers. When choosing shrimp, look for a firm feel and a shiny look. Fresh shrimp should smell like the sea, not fishy. For veggies, go for bright colors and a crisp texture. Avoid any that have brown spots or soft spots. Fresh ingredients make your Teriyaki shrimp stir fry shine. {{ingredient_image_1}} Start by heating the sesame oil in a large skillet or wok over medium-high heat. Once hot, add the minced garlic and ginger. Sauté them for about 30 seconds until you smell their great aroma. Next, raise the heat to high and toss in the shrimp. Cook the shrimp for 2 to 3 minutes until they turn pink. This shows they are almost done. Remove the shrimp from the pan and set them aside. In the same skillet, add your sliced bell peppers, snap peas, and julienned carrot. Stir-fry these vegetables for about 4 to 5 minutes. You want them tender but still crunchy. While the veggies cook, mix the soy sauce and honey in a small bowl. Pour this sweet sauce over the vegetables in the skillet. Now, return the shrimp to the skillet and stir everything together. To thicken the sauce, slowly add the cornstarch slurry. Keep stirring for another 2 to 3 minutes until the sauce coats the shrimp and veggies nicely. Finally, mix in the chopped green onions and take the skillet off the heat. Serve this colorful dish over jasmine rice or quinoa, and sprinkle sesame seeds on top for a nice finish. You can use either a skillet or a wok for this dish. A wok has high sides and a flat bottom. This design helps with even cooking and quick stir-frying. It allows you to toss the food easily. A skillet works well too. It has a larger surface area, which is great for browning the shrimp. If you have both, I recommend using a wok for the best results. - Heat sesame oil: 1 minute - Sauté garlic and ginger: 30 seconds - Cook shrimp: 2 to 3 minutes - Stir-fry vegetables: 4 to 5 minutes - Mix sauce and combine: 2 to 3 minutes - Add green onions and serve: 1 minute Total time for cooking is about 15 to 20 minutes. This makes it a quick and easy meal! To make your Teriyaki shrimp stir fry really pop, focus on fresh ingredients. Use large shrimp that are peeled and deveined. Fresh bell peppers add great color and taste. I love using red, green, and yellow peppers for a fun mix. Sauté garlic and ginger first; this opens up their flavors. Add the shrimp quickly for a nice sear. The soy sauce and honey mixture brings everything together. Pour it over your cooked shrimp and veggies for that sweet and savory finish. If you like your stir fry spicier, add a pinch of red pepper flakes. You can also use chili sauce for more heat. For sweetness, adjust the honey or agave syrup to fit your taste. If you want less sweetness, reduce the amount but keep a balance. Experiment with different ratios until you find what you love. Taste as you go; it helps you get the perfect flavor every time. To keep your shrimp tender, don't overcook them. Cook them just until they turn pink, which takes about 2-3 minutes. When you remove them from the pan, let them rest. This stops the cooking process. When you return them to the pan, add the cornstarch slurry. This thickens the sauce and coats the shrimp perfectly. Stir gently to avoid breaking the shrimp. Enjoy that lovely texture in each bite! Pro Tips Fresh Shrimp is Best: Always opt for fresh or frozen shrimp without preservatives for the best flavor and texture. Vegetable Variety: Feel free to mix in your favorite vegetables like broccoli or zucchini for added nutrition and color. Adjust Sweetness: Depending on your preference, you can adjust the amount of honey or agave syrup to make it sweeter or less sweet. Perfectly Cooked Shrimp: Be careful not to overcook the shrimp; they should be just pink and opaque when done to ensure they remain juicy. {{image_2}} You can easily change the protein in this recipe. Chicken works great in this dish. Use boneless chicken breast or thighs. Cut them into small pieces for even cooking. Tofu is another good option. Press the tofu to remove extra water. Then, cube it and cook until golden. Both options absorb the tasty teriyaki sauce well. Want to pack in more veggies? Add broccoli or zucchini to your stir fry. Broccoli adds a nice crunch and nutrients. Cut the florets into bite-sized pieces. Zucchini is tender and cooks quickly. Slice it into thin rounds or half-moons. Feel free to mix in any seasonal vegetables you like. The more colors, the better! If you want to change the flavor, try different sauces. You can use a store-bought teriyaki sauce for convenience. If you're feeling creative, make your own sauce. Combine soy sauce, honey, and a splash of rice vinegar. You can also add a bit of sriracha for some heat. This gives you a unique twist on the classic flavor while keeping it simple. To store your leftover Teriyaki Shrimp Stir Fry, let it cool down first. Use an airtight container. This helps keep the flavors fresh. You can store it in the fridge for up to three days. If you think you won’t eat it soon, freeze it instead. When reheating, you want to keep the shrimp and veggies crisp. Use a skillet over medium heat. Add a splash of water or soy sauce to create steam. This will help avoid dryness. Stir gently until heated through, which takes about 5-7 minutes. You can also use a microwave, but be careful not to overcook. For long-term storage, divide the Teriyaki Shrimp Stir Fry into smaller portions. Place each portion in a freezer-safe bag. Remove as much air as possible before sealing. Label the bags with the date. You can freeze it for up to three months. When ready to eat, thaw it in the fridge overnight before reheating. To make Teriyaki sauce, mix these ingredients in a bowl: - 1/4 cup low-sodium soy sauce - 1/4 cup honey or agave syrup - 1 tablespoon minced ginger - 1 tablespoon minced garlic Combine them well. Heat this mix in a small pan until warm. Let it simmer for a few minutes. If you want it thicker, add a cornstarch slurry (1 tablespoon cornstarch mixed with 2 tablespoons water). Stir until it thickens. Now, you have a tasty sauce! Yes, you can use frozen shrimp. Just make sure to thaw them first. Place the shrimp in cold water for about 10 minutes. Drain them well. Then, peel and devein if needed. This way, they will cook evenly in your stir fry. You can serve Teriyaki Shrimp Stir Fry with quinoa for a healthy twist. Noodles are also great. Try soba or rice noodles. For a lighter option, serve it over a bed of mixed greens. Each choice adds a unique flavor to your meal! In this post, I shared a simple recipe for Teriyaki Shrimp Stir Fry. We covered the essential ingredients and some easy swaps. I provided step-by-step instructions and tips for perfecting your dish. You learned about variations, storage options, and common questions. Experiment with flavors and ingredients to make this dish your own. Enjoy cooking and share this tasty meal with friends and family.

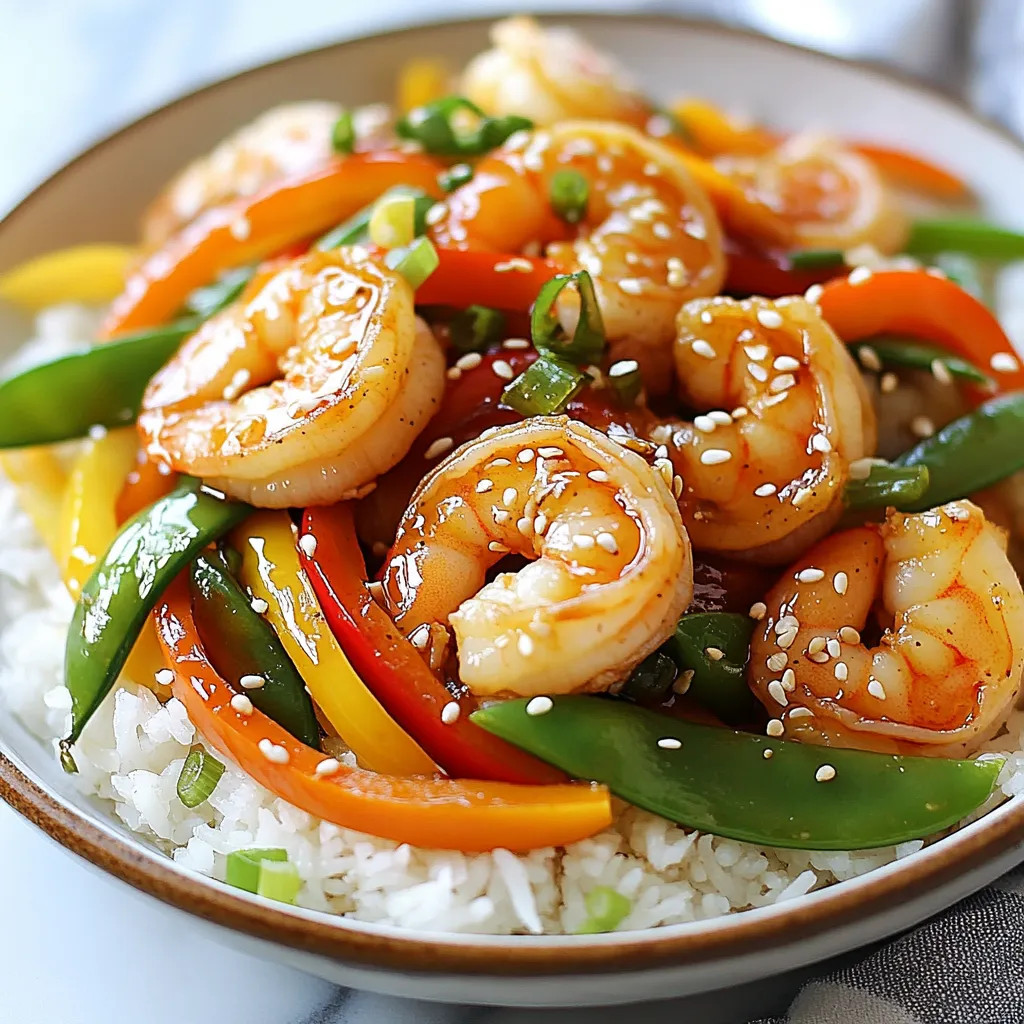
Teriyaki Shrimp Stir Fry Flavorful and Quick Meal

Ready to whip up a tasty meal that’s quick and easy? My Teriyaki Shrimp Stir Fry brings bold flavors to

To make honey garlic chicken wings, you will need: - 2 pounds chicken wings - 1/2 cup honey - 1/4 cup soy sauce - 4 cloves garlic, minced - 1 tablespoon fresh ginger, grated - 1 tablespoon apple cider vinegar - 1 teaspoon sesame oil - 1/2 teaspoon black pepper - 1/4 teaspoon red pepper flakes (optional) These ingredients combine to create a sweet and savory taste that you will love. You might already have these items at home: - Soy sauce - Honey - Black pepper - Apple cider vinegar - Sesame oil Having these staples makes it easy to whip up this dish any time. For a nice touch, consider these garnishes: - Sesame seeds - Chopped green onions These add flavor and color, making your wings look even more appealing. {{ingredient_image_1}} First, gather your ingredients. You need honey, soy sauce, garlic, ginger, vinegar, sesame oil, black pepper, and red pepper flakes if you want some heat. In a large bowl, whisk the honey and soy sauce together. Add the minced garlic and grated ginger next. Mix in the apple cider vinegar, sesame oil, black pepper, and red pepper flakes. Ensure everything blends well. This mix will create a sweet and savory marinade that makes the wings shine. Take your two pounds of chicken wings and add them to the marinade. Toss the wings to coat them fully. You want every wing to soak up that tasty mix. Cover the bowl with plastic wrap and place it in the fridge. Let it marinate for at least one hour. If you have time, let it sit overnight. This step builds the best flavor in your wings. While the wings marinate, preheat your oven to 400°F (200°C). Line a baking sheet with aluminum foil or parchment paper for easy cleanup. Place a wire rack on top of the sheet. This rack helps the air circulate around the wings, giving them that perfect crispiness. After marinating, remove the wings from the bowl. Let the extra marinade drip off, then lay the wings in a single layer on the rack. Bake them in the oven for 40-45 minutes. Flip the wings halfway to ensure even cooking. For the last ten minutes, brush on more marinade for a nice glaze. When they turn golden and crispy, they are ready to come out. To get the best taste, marinate your chicken wings overnight. This lets the flavors soak in deep. Use a mix of honey, soy sauce, garlic, ginger, and vinegar. Each of these adds a unique taste. If you have time, let them sit for at least one hour. The longer, the better. To make sure your wings are crispy, use a wire rack on your baking sheet. This allows hot air to move around the wings. It helps the skin get nice and crunchy. Also, bake them at 400°F (200°C). Turn them halfway through cooking for even crispiness. You can grill or bake your wings. Grilling adds a smoky flavor. It’s great for summer cookouts. Just watch them closely to avoid burning. Baking is easier for large batches. It gives you crispy wings without much fuss. Both methods work well. Choose what fits your mood! Pro Tips Marinate Longer for Flavor: Allow the wings to marinate overnight for deeper flavor penetration and a more intense taste. Use a Wire Rack: Baking the wings on a wire rack helps them cook evenly and become crispier by allowing air to circulate around them. Watch for Burning: Keep an eye on the wings during the last 10 minutes of baking when glazing with marinade to prevent burning. Serve with Dipping Sauces: Pair your wings with a variety of dipping sauces like ranch, blue cheese, or a spicy sriracha for added flavor options. {{image_2}} If you love heat, try spicy honey garlic wings. Add red pepper flakes to the marinade. This little tweak packs a punch. You can also use hot sauce for a bolder flavor. Just mix in a few tablespoons before marinating. The sweet honey balances the spice perfectly. For a different glaze, make teriyaki chicken wings. Use soy sauce, honey, and brown sugar for sweetness. Add ginger and garlic for depth. This mix gives wings a rich, sticky sauce. After baking, brush on extra teriyaki sauce for that shiny finish. Your guests will love this twist! Try honey BBQ wings for a smoky flavor. Mix honey with your favorite BBQ sauce. The blend of sweet and tangy makes these wings a hit. You can use homemade or store-bought BBQ sauce. Brush on the honey BBQ sauce in the last 10 minutes of baking. This will create a nice glaze. These wings are perfect for any gathering! Store leftover honey garlic chicken wings in an airtight container. This keeps them fresh and tasty. Make sure to let them cool before sealing. Refrigerate the wings within two hours after cooking. They should stay good for about three days. If you want to keep them longer, consider freezing. To freeze honey garlic chicken wings, first let them cool completely. Place them in a freezer-safe bag or container. Squeeze out as much air as possible to avoid freezer burn. Label the bag with the date. They can last up to three months in the freezer. When you're ready to eat, just thaw them in the fridge overnight. For the best taste and texture, reheat wings in the oven. Preheat the oven to 375°F (190°C). Place the wings on a baking sheet lined with parchment paper. Bake for about 10-15 minutes until they are hot and crispy. You can also use an air fryer for a quicker option. Heat them at 360°F (182°C) for about 8-10 minutes. This keeps the wings nice and crunchy! The best way to marinate chicken wings is to use a large bowl. Combine the marinade ingredients well. Make sure to coat each wing fully in the mix. Cover the bowl with plastic wrap and chill it in the fridge. Let them marinate for at least one hour. For more flavor, marinate overnight. Yes, you can make honey garlic sauce ahead of time. Mix honey, soy sauce, minced garlic, ginger, and vinegar in a bowl. Store it in an airtight container in the fridge. It stays fresh for up to one week. Just remember to give it a stir before using it. You should bake chicken wings for 40 to 45 minutes at 400°F (200°C). Flip them halfway through to ensure even cooking. This helps them become golden and crispy. For added glaze, brush the wings with marinade in the last 10 minutes. Honey garlic wings taste great with many dipping sauces. Ranch dressing is a classic choice. You can also try blue cheese for a tangy kick. Sweet chili sauce adds a nice contrast too. Feel free to experiment with your favorites! Honey garlic chicken wings can be gluten-free. Use gluten-free soy sauce instead of regular soy sauce. Check labels on all ingredients to ensure they are gluten-free. With this swap, you can enjoy these wings worry-free! You learned about making honey garlic chicken wings, from ingredients to cooking tips. Understanding the best practices for marinating and baking helps you achieve crispy skin and bold flavor. You discovered variations like spicy or sticky teriyaki wings to mix things up. Remember, storing and reheating properly keeps your wings fresh and tasty. Use these tips to impress your friends and family with your cooking skills. Enjoy every bite!

Honey Garlic Chicken Wings Tasty and Easy Recipe

Are you ready to savor the sweet and savory delight of Honey Garlic Chicken Wings? This easy recipe is perfect

- 4 medium zucchinis, halved lengthwise - 2 cups cooked chicken, shredded - 1 cup barbecue sauce (homemade or a good brand) - 1 cup corn kernels (fresh, canned, or frozen) - 1/2 cup red onion, finely diced - 1 cup shredded cheddar cheese - 1 tablespoon olive oil - 1 teaspoon smoked paprika - Salt and pepper to taste - Chopped fresh cilantro for garnish You can add more flavor to your BBQ chicken zucchini boats. Try these options: - Black beans for extra protein - Jalapeños for heat - Diced bell peppers for crunch - Sour cream or Greek yogurt as a topping - Other cheeses like pepper jack or mozzarella Each serving of BBQ chicken zucchini boats is packed with nutrition. Here’s a quick look: - Calories: Around 350 - Protein: 30 grams - Carbohydrates: 20 grams - Fat: 15 grams - Fiber: 5 grams This dish offers a great balance of protein and veggies. The zucchini adds fiber while the chicken gives you protein. This recipe makes a wholesome meal that keeps you full. {{ingredient_image_1}} First, preheat your oven to 375°F (190°C). Grab four medium zucchinis and cut them in half lengthwise. Use a melon baller or a spoon to scoop out the center. Leave about a 1/4-inch border to make them look like boats. Lightly sprinkle salt and pepper inside each zucchini half. Next, in a big mixing bowl, combine two cups of shredded cooked chicken with one cup of barbecue sauce. Add one cup of corn kernels and half a cup of finely diced red onion. Mix in one teaspoon of smoked paprika and a pinch of salt and pepper. Ensure all the ingredients are well-coated with the sauce. Drizzle one tablespoon of olive oil on the cut side of each zucchini half. Place them cut side up in a baking dish. Spoon the BBQ chicken mixture into each zucchini boat. Pack them comfortably but do not overcrowd. Sprinkle one cup of shredded cheddar cheese on top of each filled boat. Cover the baking dish with aluminum foil and bake in the preheated oven for 20 minutes. After that, remove the foil and continue to bake for another 10 to 15 minutes. The cheese should be melted and bubbly, with the zucchini tender. To get that perfect melty cheese, make sure not to overcook the zucchini. You want them soft but not mushy. If you like a golden top, broil the zucchini boats for one to two minutes after baking. Keep an eye on them. Cheese can go from perfect to burnt quickly under the broiler. For extra flavor, try mixing different cheeses or adding extra spices to the cheese before sprinkling it on. Enjoy the delicious results! To make BBQ chicken zucchini boats, you need some basic tools. Here’s what I recommend: - A sharp knife for cutting zucchinis - A melon baller or a spoon for scooping out the center - A large mixing bowl for combining the filling - A baking dish for cooking the boats - Aluminum foil to cover the dish while baking These tools help you work efficiently and safely. They also make clean-up easier! When making zucchini boats, some common mistakes can spoil your dish. Here’s what to watch out for: - Overfilling the boats: If you pack too much filling, it may spill out. - Not salting the zucchinis: Salting helps draw out moisture, keeping the boats from getting soggy. - Skipping the foil: Covering the dish with foil helps cook the zucchini evenly. Remove it later to brown the cheese. Avoiding these pitfalls makes your dish tastier and more appealing. You can boost the flavor of your BBQ chicken zucchini boats with fresh herbs and spices. Here are some ideas: - Cilantro: Adds a fresh touch, perfect for garnish. - Chili powder: For a spicy kick, mix into the chicken filling. - Garlic powder: A great addition for a savory depth. - Fresh basil: Sprinkle on top just before serving for a fragrant finish. These simple changes can elevate your dish. Enjoy experimenting with flavors! Pro Tips Choose the Right Zucchini: Select firm and medium-sized zucchinis for the best texture. Overripe zucchinis can be watery and mushy. Customize the Filling: Feel free to add other vegetables or spices to the chicken mixture, such as bell peppers or jalapeños, for extra flavor and texture. Make Ahead: Prepare the zucchini boats in advance and store them in the refrigerator. Bake them just before serving for a quick meal. Experiment with Cheeses: Try different types of cheese like mozzarella or pepper jack for a unique twist on the flavor profile. {{image_2}} You can easily make these zucchini boats vegetarian. Swap out the chicken for black beans or lentils. These options add protein and texture. You can also use cooked quinoa for a hearty base. Mix in your favorite veggies like bell peppers or mushrooms for extra flavor. Top them with cheese or a vegan cheese substitute. While barbecue sauce is a classic, try other sauces too. A spicy buffalo sauce adds a kick. You could use a sweet teriyaki sauce for a different taste. For a tangy option, try a ranch dressing mixed with herbs. Each sauce will change the flavor profile of your zucchini boats. If you want to switch up the chicken, try shredded turkey or tofu. Both options work well with the other flavors. For cheese, consider using mozzarella or pepper jack. These toppings melt nicely and add great taste. Feel free to mix and match proteins and cheeses to find your favorite combo! To store leftover zucchini boats, let them cool first. Then, place them in an airtight container. You can keep them in the fridge for up to three days. Make sure to layer them with parchment paper to avoid sticking. When you reheat the zucchini boats, use the oven for the best taste. Preheat your oven to 350°F (175°C). Place the boats on a baking sheet and cover them with foil. Heat for about 15 minutes or until warm. This keeps the cheese nice and melty. You can freeze these zucchini boats for later. First, let them cool completely. Wrap each boat tightly in plastic wrap, then place them in a freezer bag. They can stay frozen for up to three months. To cook, thaw in the fridge overnight and then reheat in the oven as mentioned above. This method keeps the flavor fresh! Yes, you can prepare BBQ chicken zucchini boats in advance. You can stuff the zucchini and cover them with foil. Store them in the fridge for up to 24 hours. When ready to cook, bake them as instructed. This saves time on busy days, and they still taste great! You can use many vegetables in zucchini boats. Here are some ideas: - Bell peppers - Eggplant - Mushrooms - Tomatoes - Carrots Feel free to mix and match. Just remember to cut them small and cook until soft. Making barbecue sauce is simple and fun! Here’s a quick recipe: - 1 cup ketchup - 1/4 cup apple cider vinegar - 1/4 cup brown sugar - 1 tablespoon Worcestershire sauce - 1 teaspoon smoked paprika - Salt and pepper to taste Mix all ingredients in a bowl. Adjust the taste as you like. This sauce is tasty and perfect for many dishes! BBQ chicken zucchini boats are a fun way to enjoy healthy meals. We covered the key ingredients, steps for prep, and tips for perfect cheese. Don't forget to try different flavors and sauces to make your boats unique. Remember to store any leftovers properly to keep them tasty. These boats are easy to customize and great for sharing. Give this recipe a try, and enjoy a delicious dish that's simple and fun to make!

BBQ Chicken Zucchini Boats Flavorful and Easy Recipe

Are you ready to enjoy a tasty twist on classic BBQ? My BBQ Chicken Zucchini Boats are flavorful, easy to

To make these delightful fritters, you need fresh ingredients. Here’s the list: - 2 medium zucchinis, grated - 1 cup sweet corn kernels (fresh or frozen) - 1/2 cup all-purpose flour - 2 large eggs, beaten - 1/4 cup green onions, finely chopped - 1/4 cup grated Parmesan cheese - 1 teaspoon cumin powder - 1/2 teaspoon paprika - Salt and pepper to taste - 3 tablespoons olive oil (for frying) Each ingredient brings a unique flavor and texture. The zucchini keeps them moist, while the corn adds a sweet crunch. The eggs bind everything together. The green onions give a fresh touch, and the Parmesan adds a savory taste. Spice it up with cumin and paprika, which create warmth and depth. Finally, the olive oil is key for that golden, crispy finish. {{ingredient_image_1}} Start by grating the zucchinis. You can use a box grater or a food processor for this. Once grated, place the zucchini in a clean kitchen towel. Squeeze out as much moisture as you can. This step is very important. If you skip it, your fritters may turn out soggy. In a large bowl, mix the drained zucchini with one cup of sweet corn and finely chopped green onions. Stir in the two beaten eggs, which will help bind everything together. In another bowl, whisk together half a cup of all-purpose flour, cumin, paprika, salt, and pepper. Gradually add this dry mix to your zucchini and corn mix. Fold in a quarter cup of grated Parmesan cheese for extra flavor. Heat a tablespoon of olive oil in a non-stick skillet over medium heat. Once the oil is hot, drop spoonfuls of your fritter mixture into the skillet. Flatten them slightly with the back of your spoon to form nice patties. Cook each fritter for about three to four minutes on each side. You want them to be golden brown and crispy. Add more olive oil as needed between batches. After cooking, place the fritters on a plate lined with paper towels to soak up any extra oil. To avoid soggy fritters, you must remove excess moisture from the zucchini. Grate the zucchini and place it in a clean kitchen towel. Squeeze out as much liquid as you can. This step is key for a crispy texture. For the best cooking method, use a non-stick skillet and heat olive oil over medium heat. This temperature helps the fritters cook evenly. Cook them for about 3-4 minutes on each side until golden brown. If they need more time, adjust the heat to avoid burning. I love to garnish my fritters with fresh herbs like parsley or cilantro. A dip of yogurt or sour cream adds creaminess. These toppings not only enhance the flavor, but they also make the dish look vibrant. Serve the fritters warm for the best taste. For an attractive plate, arrange the fritters on a colorful platter. Consider stacking them slightly for height. You can also use small bowls for dips on the side. This way, your dish looks inviting and fun. Get creative with your serving options to impress your guests! Pro Tips Moisture Management: Squeeze out as much moisture as possible from the grated zucchini to prevent soggy fritters. Flavor Variations: Experiment with different herbs and spices, such as dill or chili flakes, to customize the flavor of your fritters. Fritter Size: For even cooking, keep the fritter sizes consistent when dropping them into the skillet. Serving Suggestions: Pair the fritters with a zesty dipping sauce or a fresh salad for a complete meal experience. {{image_2}} If you want to make your zucchini corn fritters gluten-free, simply swap out all-purpose flour for a gluten-free blend. Many brands offer great mixes that work well in this recipe. You can also use almond flour or coconut flour. Both add a unique flavor and still keep the fritters light. For a dairy-free option, you can replace the Parmesan cheese with nutritional yeast. This adds a cheesy taste without any dairy. You can also use vegan cheese if you prefer. It melts nicely and gives a good flavor. To spice things up, try adding chili powder or garlic powder to your fritter mix. These spices bring a warm kick and depth to the flavor. You can start with a small amount and add more if you want a stronger taste. Incorporating fresh herbs can brighten the dish. Basil and dill pair well with zucchini and corn. Chop them finely and mix them into the batter for a fresh burst of flavor. You can add more veggies for extra color and taste. Diced bell peppers add a sweet crunch. Grated carrots also work nicely, giving both sweetness and nutrition. Using different types of corn can change the taste. Roasted corn adds a smoky flavor, while grilled corn brings a charred sweetness. Both options elevate the fritters, making them a fun twist on the classic recipe. To keep your leftover zucchini corn fritters fresh, follow these tips: - Cool them down: Let the fritters cool completely before storing. - Use an airtight container: Place them in a container that seals tightly. This keeps them from drying out. - Refrigerate: Store the fritters in the fridge. They stay good for about 3 to 4 days. If you want to keep them longer, consider freezing. Wrap them in plastic wrap, then place them in a freezer bag. They can last up to 3 months in the freezer. When it’s time to enjoy your fritters again, you can reheat them easily. Here are two great methods: - Oven: Preheat your oven to 375°F (190°C). Place the fritters on a baking sheet. Heat for 10 to 15 minutes. This method keeps them crispy. - Skillet: Heat a non-stick skillet over medium heat. Add a little olive oil. Cook the fritters for about 3 to 4 minutes on each side. This method restores their crunch. Both methods help maintain the yummy crispiness of your fritters. Enjoy them just like when they were fresh! Yes, you can make zucchini corn fritters ahead of time. To prep in advance, follow these tips: - Grate the zucchini and squeeze out moisture a day before. This helps keep your fritters from becoming soggy. - Mix the batter and store it in the fridge for up to 24 hours. This allows the flavors to blend. - Cook the fritters when you are ready to serve. Freshly cooked fritters taste best. Zucchini corn fritters pair well with several side dishes. Here are some tasty options: - Yogurt dip: A tangy yogurt dip adds creaminess and a nice contrast. - Sour cream: A dollop of sour cream enhances the flavors. - Fresh herbs: Try parsley or cilantro for a burst of freshness. - Salad: A light salad with lemon dressing brings a refreshing touch. You can easily make zucchini corn fritters vegan. Here are some simple swaps: - Egg replacement: Use 1/4 cup of unsweetened applesauce or a flax egg (1 tablespoon ground flaxseed mixed with 2.5 tablespoons water). - Cheese alternative: Choose a dairy-free cheese or omit it entirely for a lighter fritter. - Adjustments: Make sure to check the flour for any non-vegan additives. Use a gluten-free flour if desired. Zucchini corn fritters are simple and fun to make. We explored the key ingredients and steps, ensuring you know how to get the right texture and flavor. Remember to drain your zucchini well for crispy fritters. You can also mix things up with different herbs or spices to suit your taste. Store any extras in the fridge and reheat for a quick snack. Enjoy making these tasty fritters for yourself or to share!

Zucchini Corn Fritters Delightful and Crispy Treat

Are you ready to enjoy a tasty snack that’s both healthy and delicious? Zucchini Corn Fritters are your answer! With

- 4 medium zucchinis, spiralized - 1 cup fresh basil leaves - 1/2 cup pine nuts (toasted) - 1/2 cup grated Parmesan cheese - 3 cloves garlic, minced - 1/2 cup extra virgin olive oil - 1/2 cup heavy cream or coconut cream for a dairy-free option - Salt and pepper to taste - Cherry tomatoes, halved (for garnish) - Additional pine nuts (for garnish) To make Creamy Pesto Zucchini Noodles, you need fresh ingredients. Start with four medium zucchinis. Spiralize them for that fun noodle shape. If you don't have a spiralizer, use a vegetable peeler to make thin strips. Next, gather your pesto ingredients. You will need one cup of fresh basil leaves. Fresh basil gives the best flavor. Also, toast half a cup of pine nuts to enhance their taste. You'll need half a cup of grated Parmesan cheese and three cloves of minced garlic. These ingredients blend well to create a rich pesto. For the creamy sauce, you'll use half a cup of extra virgin olive oil. This is essential for a smooth pesto. If you prefer a dairy-free option, swap the heavy cream for coconut cream. Lastly, season with salt and pepper to your taste. Don’t forget some garnishes! Halved cherry tomatoes add a pop of color. Use extra pine nuts for a nice crunch on top. With these ingredients, you're set for a delicious meal. {{ingredient_image_1}} Using a Spiralizer To start, grab your spiralizer. Cut off the ends of each zucchini. Place one zucchini in the spiralizer and twist it. This will create long, thin noodles. Repeat this for all four zucchinis. Once done, set them aside. Alternative Methods for Zucchini Noodles If you don’t have a spiralizer, don’t worry! You can use a vegetable peeler to make thin ribbons. Just peel the zucchini until you reach the seeds. This method works well too. Combining Ingredients in the Food Processor Now, let's make the pesto. Take your food processor and add the fresh basil leaves. Then, toss in the toasted pine nuts, grated Parmesan cheese, and minced garlic. Achieving the Perfect Consistency Pulse the mixture until it is finely chopped. Next, while the food processor runs, slowly pour in the olive oil. This helps to blend everything into a smooth paste. Add salt and pepper to taste, then set the pesto aside. Heating Cream and Mixing with Pesto In a large skillet, pour in the heavy cream over medium heat. Stir it gently to warm it up. Once the cream is hot, add the pesto. Mix well until you see a creamy sauce form. Incorporating Noodles into the Sauce Add the zucchini noodles to your creamy sauce. Toss them gently to coat all the noodles. Cooking Time and Desired Texture Cook for about 3 to 5 minutes. You want the noodles to be hot but still firm. This keeps their texture nice and fresh. Plating the Dish Once cooked, plate the creamy zucchini noodles. Use tongs to twist them into a neat mound. Garnishing for Flavor and Presentation For a pop of color, add halved cherry tomatoes on top. Sprinkle some extra toasted pine nuts for crunch. This adds flavor and makes the dish look fantastic. Enjoy your meal! Choosing Quality Zucchinis When picking zucchinis, look for firm ones with a shiny skin. Avoid any with soft spots or blemishes. Medium zucchinis work best for spiralizing. They offer the right balance of flavor and texture. Aim for zucchinis that feel heavy for their size. This weight means they are fresh and full of moisture. Best Types of Basil for Pesto Fresh basil is key to great pesto. Look for vibrant green leaves with no brown edges. Sweet basil is a classic choice, but you can try Genovese or Thai basil for different flavors. Each type brings its own unique aroma and taste. For a fun twist, mix in some spinach for extra nutrients! Adjusting Flavor and Consistency Taste your pesto as you make it. If it’s too thick, add more olive oil or cream. If it’s too bitter, add a pinch of salt or more cheese. A splash of lemon juice can brighten the flavors too. Every ingredient plays a part, so adjust to your liking. Substitutions for Allergies or Preferences If you have nut allergies, swap out pine nuts for sunflower seeds. You can also use nutritional yeast instead of Parmesan for a vegan option. Coconut cream is a great dairy-free choice for a rich texture. Be creative and find what works best for you! Tips for Cooking Zucchini Noodles When cooking zucchini noodles, heat them gently. High heat can make them soggy. Cook for 3 to 5 minutes until they are warm but still firm. Stir them gently to coat with sauce without breaking them. This keeps their lovely shape and crunch. Maintaining Nutritional Value To keep zucchini noodles healthy, avoid overcooking. Quick cooking preserves vitamins and minerals. Pair them with fresh ingredients like cherry tomatoes for added nutrients. This dish is not just tasty; it’s a smart choice for health too! Pro Tips Use Fresh Ingredients: For the best flavor in your pesto, use fresh basil and high-quality extra virgin olive oil. Customize Your Pesto: Feel free to experiment by adding other herbs like parsley or spinach to your pesto for a unique twist. Don't Overcook the Zucchini: Cook the zucchini noodles just until heated through to maintain their texture and avoid mushiness. Save Some Pasta Water: If the sauce is too thick, add a splash of reserved pasta cooking water to achieve the desired consistency. {{image_2}} You can easily make this dish dairy-free. First, swap heavy cream for coconut cream. Coconut cream gives a rich flavor without dairy. It keeps your dish creamy and smooth. For the pesto, use a vegan alternative. Replace Parmesan with nutritional yeast. This swap adds umami flavor and keeps it plant-based. You won’t miss the cheese in your creamy pesto! Want more protein? Add grilled chicken or shrimp. These options work well with the creamy sauce. Simply cook them first and toss them in at the end. If you prefer plant-based proteins, try tofu or chickpeas. They blend nicely with zucchini noodles. You can also use lentils for added texture and nutrition. Spice up your dish with more herbs and spices. Fresh herbs like parsley or thyme can add depth. You can also mix in a bit of lemon zest for brightness. If you like heat, add red pepper flakes. They bring a nice kick to the creamy pesto. Start with a small amount and adjust to your taste. Enjoy the extra flavor! After enjoying your creamy pesto zucchini noodles, store the leftovers properly. First, let the dish cool down to room temperature. This step helps prevent condensation inside the container. - Use an airtight container to keep your noodles fresh. - Place a paper towel inside the lid to absorb moisture. - Store in the fridge for up to three days. Keeping the pesto separate from the noodles can help retain the flavor and texture. When it’s time to enjoy your leftovers, reheating correctly is key. You want to keep the texture and flavor just right. - Microwave: Place the noodles in a microwave-safe dish. Cover it with a damp paper towel. Heat in short bursts, stirring in between. This method warms the dish evenly. - Stovetop: Heat a skillet over low heat. Add a splash of olive oil or a little water to avoid sticking. Stir gently until heated through. Avoid high heat as it can make the zucchini noodles mushy. You want them firm and tasty, just like when first made! Zucchini noodles, or zoodles, are noodles made from zucchini. They are a fun and healthy alternative to regular pasta. To make them, you can use a spiralizer or a vegetable peeler. - Nutritional Benefits of Zucchini Noodles: Zucchini is low in calories and high in water. It also contains vitamins A and C, which help support your immune system. Plus, zucchini has fiber, which aids digestion. - Comparisons with Traditional Pasta: Traditional pasta is high in carbs and calories. Zucchini noodles, on the other hand, are lighter and can be a great option for those watching their carbs. They also provide more nutrients and can help you feel full without the heavy feeling that pasta can bring. Yes, you can make pesto in advance. This saves time on busy days. - Storage Time for Pesto: You can store pesto in the fridge for about 5 days. Just make sure to keep it in an airtight container. - Tips for Freshness: To keep your pesto fresh, drizzle a bit of olive oil on top before sealing it. This helps prevent browning and keeps the flavor bright. Overcooked zucchini noodles can become mushy and lose their shape. - Signs of Overcooked Noodles: If your zoodles are limp and watery, they are overcooked. They should have a slight crunch to them. - Ideal Cooking Time for Zucchini Noodles: Aim for 3-5 minutes of cooking time. This will keep your noodles tender but still firm, giving you the perfect bite. You’ve learned how to make a tasty dish with zucchini noodles, pesto, and cream. This meal is simple yet full of flavor. Choose fresh ingredients and don't shy away from personalizing the pesto. Try different proteins or herbs to suit your taste. Remember to store any leftovers properly to keep them fresh. Your journey into healthy cooking can be fun and rewarding. Enjoy your delicious creation and the good food habits you've started!

Creamy Pesto Zucchini Noodles Delicious and Easy Dish

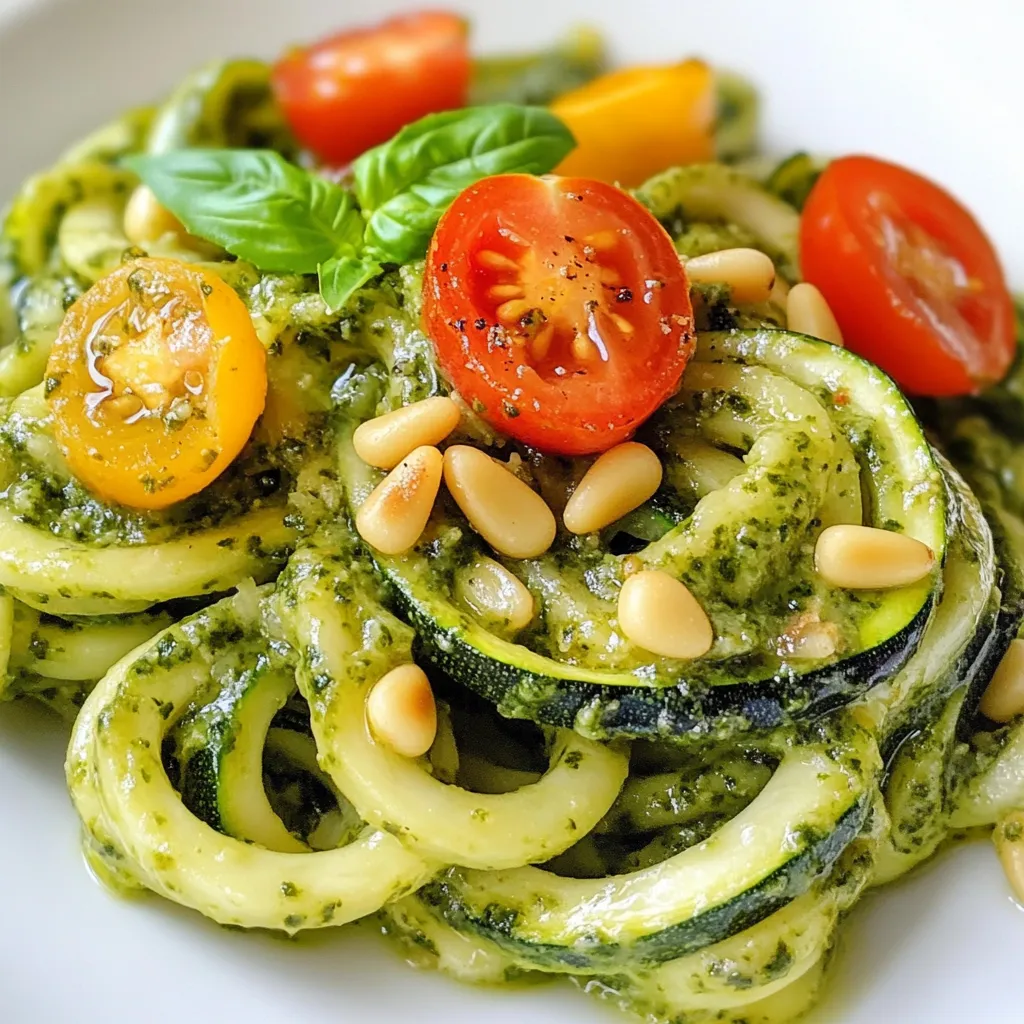
Are you ready to delight your taste buds with a creamy, flavorful dish? Creamy Pesto Zucchini Noodles are an easy

To make a tasty Cranberry Almond Quinoa Salad, you need the following ingredients: - 1 cup quinoa, rinsed - 2 cups water or vegetable broth - 1 cup fresh or dried cranberries - 1/2 cup sliced almonds, toasted - 1/2 cup diced cucumber - 1/4 cup chopped red onion - 1/4 cup feta cheese (optional) - 1/4 cup fresh parsley, chopped - 3 tablespoons olive oil - 2 tablespoons apple cider vinegar - 1 tablespoon honey or maple syrup - Salt and pepper to taste If you want to change things up, here are some easy swaps: - Use quinoa blends or bulgur instead of quinoa. - Swap dried cranberries for raisins or chopped dates. - Replace sliced almonds with walnuts or pecans. - Use lemon juice instead of apple cider vinegar. - Try agave syrup or brown sugar instead of honey. This salad is not only delicious but also packed with nutrients: - Quinoa: High in protein and fiber, quinoa helps keep you full longer. - Cranberries: These berries are rich in antioxidants and can boost your immune system. - Almonds: They provide healthy fats and vitamin E, great for your skin. - Cucumber: Low in calories, cucumbers add hydration and crunch to the salad. - Parsley: This herb is full of vitamins and adds flavor with few calories. With these ingredients, you create a healthy dish that is easy to make and fun to eat. {{ingredient_image_1}} To start, rinse 1 cup of quinoa in a fine mesh strainer. Rinsing helps remove the bitter coating called saponin. Next, in a medium saucepan, combine the rinsed quinoa and 2 cups of water or vegetable broth. Bring the pot to a boil over medium heat. Once it boils, lower the heat, cover it, and let it simmer for about 15 minutes. After that time, all the liquid should be absorbed. Remove the pot from heat and let it sit for 5 minutes. This resting time helps the quinoa fluff up. Finally, use a fork to fluff the quinoa and let it cool to room temperature. In a large mixing bowl, add the cooled quinoa. Then, throw in 1 cup of cranberries, 1/2 cup of toasted almonds, 1/2 cup of diced cucumber, and 1/4 cup of chopped red onion. If you like, add 1/4 cup of feta cheese for a creamy touch. Don't forget to mix in 1/4 cup of fresh parsley for a pop of color and flavor. Use a large spoon to gently combine all the ingredients. This step is key for an even mix of flavors in every bite. Now, let's make the dressing. In a small bowl, whisk together 3 tablespoons of olive oil, 2 tablespoons of apple cider vinegar, and 1 tablespoon of honey or maple syrup. Add a pinch of salt and pepper to taste. This dressing balances the sweetness of the cranberries and the crunch of the almonds. Once the dressing is ready, pour it over the salad. Toss gently to make sure every ingredient gets coated. After mixing, let the salad sit for at least 15 minutes. This helps the flavors blend and makes it even tastier. To cook fluffy quinoa, start with rinsed quinoa. Rinsing removes bitter saponins. Use a medium saucepan and add quinoa and water or broth. Bring it to a boil over high heat. Once boiling, lower the heat to a simmer. Cover the pot and let it cook for about 15 minutes. When the liquid is gone, remove it from heat. Let it sit covered for five minutes. This step helps make the quinoa fluffy. Finally, fluff it with a fork and let it cool. Toasting almonds adds a nice crunch and flavor. Start by slicing the almonds if they aren’t sliced already. Heat a dry skillet over medium heat. Once hot, add the almonds to the skillet. Stir them often to prevent burning. Toast for about 3 to 5 minutes, until they turn golden brown and smell nutty. Remove the almonds from the heat right away. Let them cool before adding them to the salad. You can add more flavor to your salad with simple add-ins. Try adding diced apples for sweetness or bell peppers for crunch. Chopped herbs like mint or basil also work well. For added protein, consider chickpeas or grilled chicken. You can even add citrus juice for a zesty twist. Get creative! Mixing and matching your favorite ingredients makes this salad personal and fun. Pro Tips Perfectly Cooked Quinoa: Ensure you rinse the quinoa thoroughly before cooking to remove its natural coating, called saponin, which can impart a bitter taste. Add Flavor to Quinoa: For a more flavorful base, consider cooking the quinoa in vegetable broth instead of water. Toast Your Nuts: Toast the sliced almonds in a dry skillet over medium heat for a few minutes to enhance their flavor and crunchiness. Let It Chill: Allow the salad to sit for at least 15 minutes after mixing to let the flavors meld together for a more delicious experience. {{image_2}} You can easily make this salad vegan. Just skip the feta cheese. You can use more nuts or seeds for extra crunch. Try adding sunflower seeds or pumpkin seeds. They add great flavor and texture. If you want creaminess, mash up some avocado. It pairs well with cranberries and almonds. This recipe is naturally gluten-free. Quinoa is a great substitute for grains like wheat. Just ensure your vegetable broth is gluten-free as well. Check the labels for safety. You can also swap in other gluten-free grains, like millet or rice, for variety. You can change this recipe with the seasons. In spring, add fresh peas for a crisp bite. In summer, try diced bell peppers for color and crunch. In fall, roasted sweet potatoes make it hearty and warm. In winter, consider using pomegranate seeds for a festive touch. Each swap brings new flavors and keeps the salad fresh. To keep your cranberry almond quinoa salad fresh, store it in the fridge. Place it in an airtight container. This keeps moisture in and prevents odors from other foods. Leftovers can last up to three days. I suggest using glass containers for storage. Glass is safe and won't stain. You can also use BPA-free plastic containers. Just make sure they seal well. For meal prep, divide the salad into single servings. This makes it easy to grab and go. Keep the dressing separate until serving. This helps keep the salad fresh and crisp. If you want to enjoy it later, store the salad and dressing in different containers. You can make this salad ahead of time. Cook the quinoa and let it cool. Combine all the ingredients in a bowl. Mix the dressing in a separate bowl. Don’t add the dressing until you are ready to serve. This keeps the salad fresh and tasty. You can store it in the fridge for up to three days. Yes, you can use other dried fruits. Some great options are raisins, apricots, or dates. They all add sweetness and flavor. Just chop them into small pieces before adding them to the salad. This way, they mix well with the quinoa and other ingredients. This salad pairs well with many dishes. It goes great with grilled chicken or fish. You can also serve it with a light soup for a full meal. It is delicious with crusty bread or a fresh baguette, too. The flavors complement each other nicely. This blog covered how to create a tasty Cranberry Almond Quinoa Salad. You learned about the key ingredients, their benefits, and how to cook quinoa perfectly. We shared useful tips on adding flavor and offered variations for vegan and gluten-free diets. Proper storage helps keep your salad fresh for days. Try this salad for a healthy meal. Enjoy all the flavors and benefits it offers!

Cranberry Almond Quinoa Salad Nutritious and Easy Recipe

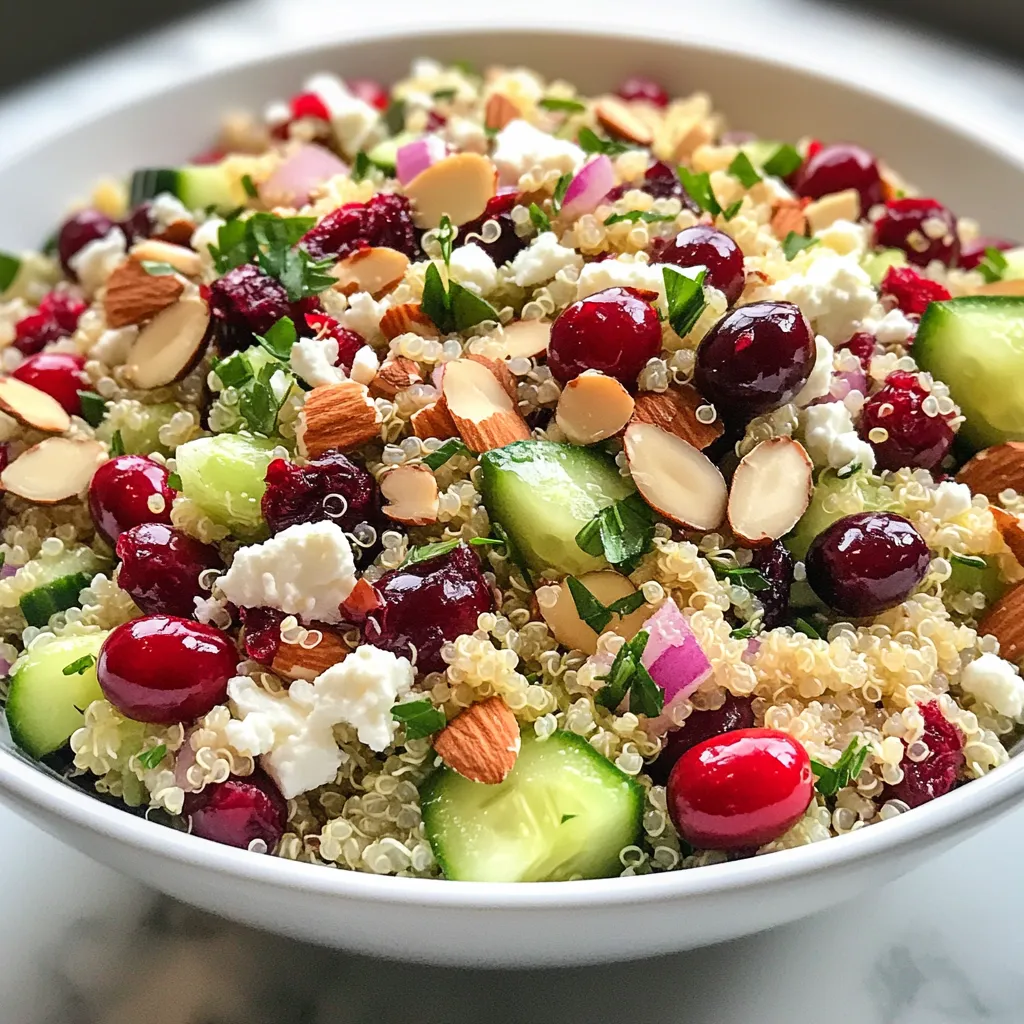
Are you looking for a fresh, nutritious meal that’s easy to make? The Cranberry Almond Quinoa Salad is the perfect

- 2 lbs chicken wings - 1/4 cup gochujang (Korean red chili paste) - 2 tablespoons soy sauce - 1 tablespoon sesame oil - 2 tablespoons honey - 4 cloves garlic, minced - 1-inch piece ginger, grated - 1 tablespoon rice vinegar - 1 teaspoon black pepper The main star of this dish is chicken wings. They are juicy and tender. The marinade adds great flavor. Gochujang gives a nice kick. The soy sauce adds saltiness. Sesame oil gives a rich taste. Honey balances the heat with sweetness. Garlic and ginger add depth. Rice vinegar brings in a bit of tang. Black pepper enhances all the flavors. - 1 tablespoon sesame seeds, for garnish - 2 green onions, chopped, for garnish Garnishes make wings look pretty and add flavor. Sesame seeds give a nutty crunch. Chopped green onions add freshness. They also make your dish pop with color. - Alternatives for gochujang: You can use sriracha for a different spice. Chili paste can work too, but it may lack some depth. - Honey substitutes: Maple syrup adds sweetness but changes the flavor. Agave syrup is a good vegan option. Brown sugar can add sweetness too, but it will need to be dissolved in warm water. These substitutes work well, but each will change the taste slightly. Choose based on your needs and what you have at home. {{ingredient_image_1}} To start, you need to mix the marinade ingredients. In a large bowl, combine the gochujang, soy sauce, sesame oil, honey, minced garlic, grated ginger, rice vinegar, and black pepper. Whisk these until you have a smooth mixture. This marinade adds deep flavors and a spicy kick to the wings. Marinating time is key. Letting the wings soak in the marinade helps the flavors to blend. If you have time, marinate for at least one hour. For the best taste, leave them overnight. Now it's time to coat the wings. Take the chicken wings and place them in the bowl with the marinade. Use your hands to ensure each wing is well coated. Don't rush this part; it’s crucial for good flavor. Next, cover the bowl and put it in the fridge. This keeps the wings cool and allows the marinade to work its magic. Let them sit for at least one hour for a tasty result. Preheat your oven to 425°F (220°C). This high temperature helps to crisp the wings. Line a baking sheet with aluminum foil. Place a wire rack on top. This lets hot air flow around the wings, making them crispy. After marinating, take the wings out of the fridge. Place them on the wire rack in a single layer. Bake for 25 to 30 minutes. Flip the wings halfway through to ensure they cook evenly. They should turn golden brown and crispy. While the wings bake, strain the remaining marinade into a small saucepan. Bring it to a boil, then reduce the heat and let it simmer for about five minutes. This thickens the sauce, making it perfect for glazing. Once the wings are done, toss them in the thickened glaze. Make sure they are evenly coated. This step adds even more flavor and a sticky texture. Enjoy your delicious Spicy Korean Chicken Wings! To get crispy skin on your wings, you need to dry them well. Pat them with paper towels before marinating. This helps remove moisture. The key is also baking them on a wire rack. A wire rack allows hot air to circulate around the wings, making them crispier. Place the wings in a single layer on the rack. This way, they won’t steam each other while cooking. Do you want milder wings? Simply reduce the amount of gochujang in the marinade. You can start with just 2 tablespoons. If you want more heat, add extra gochujang. You can also include red pepper flakes for a spicy kick. Taste the marinade before using it to find your perfect spice level. These wings taste great with sides like rice or fresh veggies. You can also serve them with dipping sauces. A cool yogurt dip balances the heat well. As for drinks, beer pairs nicely with spicy wings. If you prefer something non-alcoholic, try a sweet tea or soda. These drinks make your meal even more enjoyable. Pro Tips Marinate Longer for More Flavor: For the best flavor, marinate the wings overnight. This allows the spices to penetrate the meat deeply, giving you a richer taste. Use a Wire Rack: Elevating the wings on a wire rack while baking ensures even heat circulation, resulting in crispier skin all around. Reserve Some Marinade: Before adding the marinade to the raw chicken, set aside a portion for glazing after baking. This avoids cross-contamination and enhances the flavor. Adjust Spice Level: If you prefer milder wings, reduce the amount of gochujang or add a bit of ketchup to balance the heat while maintaining sweetness. {{image_2}} You can change the taste of these spicy Korean chicken wings. One way is to make a sweet and spicy version. Add more honey for sweetness. This balance makes the wings fun and tasty. Another option is to add citrus elements. Squeeze some lime or lemon juice into the marinade. This adds a fresh zing that brightens the dish. You can also use orange juice for a sweeter twist. You don't have to bake these wings if you want to try other methods. Grilling them gives a smoky flavor. Just marinate as usual, then grill until golden brown. You can also use an Instant Pot or air fryer. The Instant Pot cooks them fast and keeps them juicy. The air fryer gives you crispy wings without much oil. Both methods save time and effort. These wings work great as appetizers. Serve them on platters with toothpicks for easy eating. Pair them with dips like ranch or blue cheese for fun flavors. You can also adapt these wings for meal prep. Make a big batch and store them in containers. They are perfect for quick lunches or snacks during the week. Just reheat and enjoy! To keep your spicy Korean chicken wings fresh, follow these tips: - Place wings in an airtight container. - Store them in the fridge. These wings can last for about 3 to 4 days. After that, their taste might fade. When reheating, you have options. You can use the oven or microwave: - Oven: Preheat to 350°F (175°C). Place wings on a baking sheet. Heat for about 10-15 minutes. This keeps them crispy. - Microwave: This method is fast. Place wings on a plate. Heat in short bursts, about 30 seconds each. This may make them less crispy. If you want to freeze the wings, here’s how: - Place cooled wings in a freezer bag. - Squeeze out the air before sealing. - They can last up to 3 months in the freezer. When you’re ready to eat, thaw the wings in the fridge overnight. This keeps them safe and tasty. Gochujang is a red chili paste from Korea. It is made from Korean red chili powder, glutinous rice, fermented soybeans, and salt. The paste has a sweet-spicy flavor with a rich umami taste. It gives dishes heat and depth. You’ll find it in many Korean recipes, and it adds a unique kick to your meals. Yes, you can use other types of chicken. Chicken drumsticks or thighs work well as substitutes. Just adjust cooking times as needed. Bone-in pieces stay juicy and flavorful. If you prefer boneless, cut chicken breasts into bite-sized pieces. These wings have a good level of heat. Gochujang is spicy but also sweet. The heat varies depending on the brand and amount used. For a milder flavor, you can reduce the amount of gochujang. Taste as you go to find your perfect heat level. Absolutely! You can marinate the wings a day early. This helps the flavors soak in well. Just keep the wings covered in the fridge. Bake them fresh when you’re ready to serve. This way, you enjoy hot, crispy wings without the stress. This blog post covered how to make tasty chicken wings with a flavorful marinade. We discussed main ingredients, optional garnishes, and substitutes for gochujang and honey. You learned about marinating the wings for the best taste and techniques for baking them. We also explored tips for perfect texture, adjusting spice levels, and serving ideas. Lastly, we examined storage practices and answered common questions. Now, you can confidently create wings that impress everyone. Enjoy cooking and share your delicious results!

Spicy Korean Chicken Wings Tasty and Easy Recipe

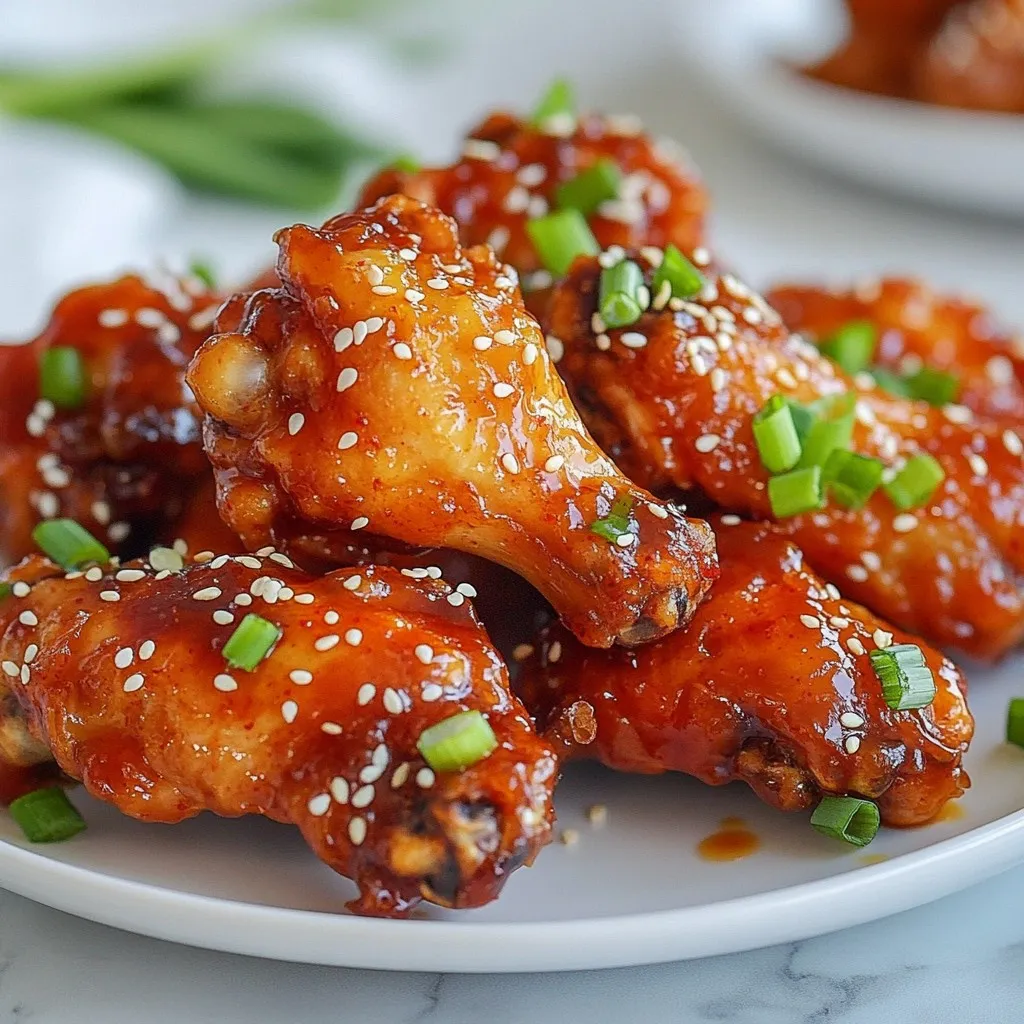
Get ready to spice up your next meal with my easy recipe for Spicy Korean Chicken Wings! These wings pack

- 2 cups fresh spinach, chopped - 1 cup ricotta cheese - 1 cup all-purpose flour (plus extra for dusting) - 1 large egg - 1/2 teaspoon salt - 1/2 teaspoon freshly grated nutmeg - 1/4 cup grated Parmesan cheese - 2 tablespoons olive oil - 2 cloves garlic, minced - 1/2 cup heavy cream - Freshly ground black pepper to taste - Fresh basil leaves for garnish The fresh spinach gives your gnocchi a bright green color and a lovely taste. It also adds vitamins and minerals. Ricotta cheese brings creaminess and richness to the dish. The egg helps bind the ingredients together. All-purpose flour gives structure to the gnocchi. Nutmeg adds warmth and depth, while Parmesan cheese gives a salty kick. Garlic adds flavor to the sauce, and heavy cream creates a smooth texture. Lastly, fresh basil makes the dish pop with color and fragrance. If you can’t find fresh spinach, try frozen spinach. Make sure to thaw and drain it first. For a lighter option, use low-fat ricotta cheese. You can swap all-purpose flour with gluten-free flour if needed. Instead of heavy cream, use half-and-half or a non-dairy milk for a lighter sauce. If you want a different flavor, try using feta cheese instead of Parmesan. {{ingredient_image_1}} To start, take a large bowl. Mix 2 cups of chopped fresh spinach, 1 cup of ricotta cheese, 1 cup of flour, 1 egg, 1/2 teaspoon of salt, and 1/2 teaspoon of nutmeg. Stir the mix until it forms a soft and slightly sticky dough. If the dough feels too sticky, add flour one tablespoon at a time. Now, dust a clean surface with flour. Divide the dough into four equal parts. Roll each piece into a long rope, about ½ inch thick. Cut each rope into 1-inch pieces. For added texture, use a fork to press ridges onto each piece. This helps the sauce stick better. Bring a large pot of salted water to a boil. Carefully drop the gnocchi in batches. Cook until they float to the top, which takes about 2 to 3 minutes. Use a slotted spoon to remove them and place them on a plate. In a large skillet over medium heat, add 2 tablespoons of olive oil and 2 minced garlic cloves. Sauté until the garlic smells good, about 30 seconds. Then, pour in 1/2 cup of heavy cream. Let it simmer for 2 to 3 minutes. Stir in 1/4 cup of grated Parmesan cheese until it melts and becomes smooth. Season with salt and black pepper to taste. Add the cooked gnocchi to the skillet with the cream sauce. Gently toss everything together. Warm it through for about 2 minutes. This lets the gnocchi soak up the flavors. Plate the creamy spinach ricotta gnocchi. Garnish with fresh basil leaves and more Parmesan cheese if you like. This dish is perfect for a cozy dinner! To make the best gnocchi, you need fresh ingredients. Always use fresh spinach and creamy ricotta. Measure your flour carefully. Too much flour makes gnocchi heavy. A light touch is key when mixing. Mix until just combined to keep the dough soft. One common mistake is overworking the dough. If you mix too much, your gnocchi can turn tough. Avoid adding too much flour too soon; only add more if the dough sticks. Another mistake is not boiling the water enough. Use a large pot of boiling water for best results. For a creamy sauce, use heavy cream. Heat it gently with garlic. Add Parmesan cheese slowly to ensure it melts well. If the sauce is too thick, add a splash of pasta water. This keeps the sauce silky and light. Don’t forget to season with salt and pepper for flavor. Pro Tips Use Fresh Spinach: Fresh spinach adds a vibrant flavor and color to the gnocchi. For best results, wash and chop it right before using. Don't Overwork the Dough: When mixing the dough, be careful not to overwork it. Overmixing can make the gnocchi tough instead of light and fluffy. Perfect Cooking Time: Gnocchi is done cooking when it floats to the surface of the boiling water. Keep an eye on them to avoid overcooking. Enhance the Sauce: Feel free to add herbs like thyme or oregano to the cream sauce for an extra layer of flavor. A splash of white wine can also elevate the sauce. {{image_2}} You can add protein to your creamy spinach ricotta gnocchi. Chicken or shrimp works well. For chicken, cook diced chicken breast in the skillet. Make sure it's cooked through. Then, add it to the cream sauce before mixing in the gnocchi. For shrimp, just sauté them in the garlic and olive oil. Once they turn pink, add the cream and gnocchi. This adds flavor and makes the dish more filling. If you need gluten-free gnocchi, use gluten-free flour. You can find blends made from rice, almond, or cassava flour. Just replace the all-purpose flour with this gluten-free option. The texture may change slightly, but the taste remains delicious. Always check your flour package for the right amount and instructions. To make this dish vegan, swap the ricotta cheese for a tofu-based substitute. Blend firm tofu with nutritional yeast, lemon juice, and a bit of salt. For the cream, use coconut cream or cashew cream. This gives you that rich taste without dairy. Choose a vegan pasta option for the gnocchi or make your own with flour and water. Enjoy your tasty vegan spin on this dish! To keep your creamy spinach ricotta gnocchi fresh, store it in an airtight container. Let it cool to room temperature first. Place layers of parchment paper between gnocchi if you stack them. This helps prevent sticking. Store it in the fridge for up to three days. When you're ready to enjoy your gnocchi again, reheat it gently. You can use a skillet or the microwave. For the skillet, add a bit of cream or water to keep it moist. Heat on low until warm, stirring occasionally. In the microwave, heat it in short bursts of 30 seconds. Stir in between to ensure even heating. If you want to freeze gnocchi, do it before cooking. Place the uncooked gnocchi on a baking sheet in a single layer. Freeze until solid, then transfer to a freezer bag. This keeps them fresh for up to three months. When ready to cook, you can boil the frozen gnocchi directly without thawing. Just add a couple of extra minutes to the cooking time. To make gnocchi from scratch, you need just a few simple steps. Start by mixing fresh spinach, ricotta cheese, flour, an egg, salt, and nutmeg in a bowl. Stir until the mixture forms a soft dough. Dust your surface with flour, then roll the dough into ropes. Cut the ropes into small pieces. Use a fork to create ridges on each piece. These ridges help the sauce stick. Yes, you can use frozen spinach! Just make sure to thaw and drain it well. Remove any extra water before mixing it into your dough. This helps keep the gnocchi from getting too wet. Frozen spinach works well and can save you time in the kitchen. You know the gnocchi is cooked when it floats in the boiling water. This usually takes about 2-3 minutes. Once they rise to the top, they are ready to be removed. Use a slotted spoon for easy handling. Creamy spinach ricotta gnocchi pairs nicely with a simple salad. A light arugula salad with lemon dressing adds a fresh touch. Garlic bread is also a great side to soak up the creamy sauce. For a heartier meal, serve it with grilled chicken or shrimp. Homemade gnocchi can last in the fridge for about 2 days. If you want to keep it longer, freeze it! Place the uncooked gnocchi on a baking sheet to freeze first. Once frozen, transfer them to a bag. They can last in the freezer for up to 2 months. In this post, we explored the whole process of making creamy spinach ricotta gnocchi. We covered the ingredients, steps, and tips to help you succeed. You can experiment with variations like adding chicken or using gluten-free options. Remember to store gnocchi properly for best taste later. Enjoy making this dish and have fun with it. You can impress your friends and family with your new skills!

Creamy Spinach Ricotta Gnocchi Delightful Dinner Idea

Are you ready to transform your dinner routine? This Creamy Spinach Ricotta Gnocchi is a delightful twist on your classic

- 1 cup orzo pasta - 1 cup cherry tomatoes, halved - 1 cucumber, diced - 1/2 red onion, finely chopped - 1/4 cup fresh parsley, chopped The orzo pasta is the star of this dish. It cooks quickly and has a fun shape. I love how it absorbs flavors. Cherry tomatoes bring a burst of sweetness. Diced cucumber adds a crisp texture. The red onion gives a mild zing. Fresh parsley adds a touch of color and freshness. - 2 tablespoons olive oil - 2 tablespoons fresh lemon juice - 2 cloves garlic, minced - Salt and pepper to taste For the dressing, I use olive oil and lemon juice. This combo makes the salad bright and tangy. Minced garlic adds a strong flavor. Adjust the salt and pepper to your taste. These simple ingredients bring everything to life. - 1/4 cup feta cheese, crumbled (optional) - Additional herbs If you want a creamy touch, add feta cheese. It gives a nice salty flavor. You can also sprinkle in more herbs, like basil or dill. These optional add-ins let you make the salad your own. {{ingredient_image_1}} First, take a medium saucepan and pour in 2 cups of vegetable broth. Place it on the stove over high heat. You want to bring the broth to a boil. While it heats, measure out 1 cup of orzo pasta. Once the broth is boiling, add the orzo. Cook it according to the package directions, usually around 7 to 9 minutes. You want it to be al dente, which means it should still have a slight bite. When the time is up, drain the orzo in a colander. Rinse it under cold water to stop the cooking. This also cools it down for the salad. While the orzo cooks, wash and chop your vegetables. Start with 1 cup of cherry tomatoes. Cut each tomato in half. Next, take 1 cucumber and dice it into small pieces. Now, grab a red onion. Use half of it and chop it finely. For freshness, take a 1/4 cup of fresh parsley and chop it as well. Once all the veggies are ready, set them aside for later. In a small bowl, whisk together 2 tablespoons of olive oil and 2 tablespoons of fresh lemon juice. Add 2 cloves of minced garlic for that strong flavor. Then, sprinkle in salt and pepper to taste. After whisking, taste the dressing. If you want it tangier, add more lemon juice. If it needs a bit more salt, adjust that too. This dressing ties all the flavors together in the salad. - Avoiding Mushiness: To keep orzo from becoming mushy, cook it for just the right time. Usually, this is 7 to 9 minutes. Check the package for exact times. Stir it gently while it cooks. This helps it cook evenly and prevents clumping. - Cooling Techniques: After cooking, drain the orzo. Rinse it under cold water. This stops the cooking process and cools it quickly. It also keeps the orzo firm for your salad. - Adding Spices or Herbs: Feel free to get creative! Fresh herbs like basil or dill can brighten your salad. You can also try spices like paprika or cumin for a twist. Just add a pinch and taste. - Tasting and Adjusting: Always taste your salad before serving. If it needs more flavor, add salt, pepper, or extra lemon juice. Adjust it to your liking for the best results. - Serving Suggestions: Serve the salad in a large bowl or on a platter. This makes it easy for everyone to help themselves. For a more personal touch, you can use individual bowls. - Garnishing Ideas: Make your salad pop with garnishes. Add extra parsley or whole cherry tomatoes on top. This adds color and makes the dish more inviting. Pro Tips Cook Orzo Perfectly: To achieve al dente orzo, avoid overcooking it; check the package instructions and taste test a minute before the suggested time. Enhance Flavor: For a stronger flavor, consider toasting the orzo in a dry skillet for a few minutes before cooking it in broth. Vegetable Variations: Feel free to add other vegetables like bell peppers or olives for extra color and taste. Make Ahead: This salad keeps well in the fridge for up to 3 days, making it a great option for meal prep or a potluck. {{image_2}} You can switch out the orzo for gluten-free options. Quinoa or rice pasta work well. They give a similar texture and taste. You can also add different veggies to the salad. Try bell peppers, zucchini, or even spinach. Each will bring a new flavor and twist. If you want a creamy touch, mix in some yogurt or sour cream. This makes the salad rich and smooth. For lighter options, try different vinaigrettes. A balsamic or honey mustard vinaigrette can add a nice kick. You can serve this salad as a main dish or a side. If you want a hearty meal, add grilled chicken or shrimp. For a side, it pairs well with grilled meats or fish. You can enjoy it cold right out of the fridge. It also tastes great warm if you mix it right after cooking the orzo. To keep your Lemon Garlic Orzo Salad fresh, refrigerate it right after serving. Place it in an airtight container. This helps maintain its flavor and texture. Glass or plastic containers with tight lids work best. You can freeze this salad, but it may change texture. If you choose to freeze, pack it in a freezer-safe container. Make sure to leave some space for expansion. When you are ready to eat it, thaw it in the fridge overnight. Reheat gently in a pan over low heat. Avoid high heat, as it can turn the orzo mushy. In the fridge, the salad lasts about 3 to 5 days. Check for signs of spoilage, like an off smell or slimy texture. If you notice any of these, it’s best to toss it. Keeping an eye on your salad helps you enjoy it at its best! It takes about 10 minutes to prep your ingredients. The total time for this salad is 50 minutes. Most of the time goes to cooking the orzo and chilling the salad. This helps the flavors mix well and taste great. Yes, you can make this salad ahead of time. It tastes even better after sitting in the fridge for a few hours. You can prepare the orzo and chop the veggies the day before. Just mix everything together when you are ready to serve. This salad pairs well with grilled chicken or fish. You can also serve it with a nice piece of crusty bread. For a light meal, enjoy it with a bowl of soup. This combo makes a tasty and complete meal. You learned how to make a delightful Lemon Garlic Orzo Salad. We covered the main components, like orzo and fresh veggies, along with tasty dressings and add-ins. I shared step-by-step instructions to follow for best results. You also discovered useful tips for cooking and presenting your salad. Remember, you can adjust this salad to your liking with different ingredients. Have fun experimenting with flavors and variations. Enjoy your delicious creation, and make it your own!

Lemon Garlic Orzo Salad Fresh and Flavorful Delight

Are you craving a dish that bursts with fresh flavors? Look no further than this Lemon Garlic Orzo Salad! This

- 4 cups mixed salad greens (spinach, arugula, kale) - 1 large apple, cored and thinly sliced (preferably Honeycrisp or Fuji) - 1 cup fresh cranberries (or dried if out of season) - 1/2 cup pecans, toasted - 1/4 cup feta cheese, crumbled (optional) - 1/4 cup red onion, thinly sliced - 1/4 cup olive oil - 2 tablespoons apple cider vinegar - 1 tablespoon maple syrup - Salt and pepper to taste This salad is a bright mix of flavors and colors. The greens bring a fresh crunch. For the apple, I suggest using a Honeycrisp or Fuji. They add a sweet and juicy bite. If apples are not in season, you can use dried cranberries. Just make sure they are unsweetened to keep the taste balanced. The pecans add a toasty crunch. Toast them in a dry pan over low heat for about 5 minutes. You want them fragrant but not burnt. If you like cheese, you can add feta for a creamy touch. For the dressing, you need olive oil, apple cider vinegar, maple syrup, and some salt and pepper. This mix ties everything together and makes the salad pop. Each ingredient plays a role in creating a tasty and healthy dish. {{ingredient_image_1}} First, rinse and dry the fresh cranberries. This will help remove any dirt and enhance their taste. If you prefer dried cranberries, make sure they are unsweetened. This keeps the balance of flavors just right. Next, let’s toast the pecans. Place them in a dry skillet over medium heat. Stir them for about five minutes until they smell fragrant. Keep an eye on them to avoid burning. Toasted pecans add a warm, nutty flavor to the salad. When slicing the apple, use a sharp knife for clean cuts. I love using Honeycrisp or Fuji apples. These varieties are sweet and crisp. Slice the apple thinly to ensure every bite has a bit of the juicy flavor. Now, let's make the dressing. In a small bowl, whisk together olive oil, apple cider vinegar, and maple syrup. This mix brings a sweet and tangy taste. Don’t forget to add salt and pepper for extra flavor. Taste it and adjust as needed. You want it to be just right. For the best flavor, layer your ingredients. Start with the mixed salad greens at the bottom. Next, add the sliced apple, cranberries, and toasted pecans. If you choose to use feta cheese, sprinkle it on top. This adds a creamy contrast to the crunchy salad. When serving, you have two great options. You can divide the salad into individual plates for a nice touch. Or, serve it family-style in a big bowl. This makes it easy for everyone to help themselves. For a special look, arrange the salad in layers. A clear bowl shows off the colorful ingredients beautifully. Choosing the right apple makes a big difference. Honeycrisp apples are sweet and crunchy. Fuji apples also have a nice sweetness. Granny Smith apples are tart and great for a different flavor. Each type gives a unique taste to the salad. I recommend using Honeycrisp or Fuji for the best results. You can change the dressing if you want. Try using lemon juice instead of apple cider vinegar. This gives a bright flavor. For sweetness, consider agave syrup instead of maple syrup. Both options will keep your salad fresh and tasty. You can mix and match to find your favorite. Making your salad look good is fun! Layer the salad in a clear bowl for a great view. This shows off the bright colors of the cranberries and greens. You can also add extra cranberries and pecans on top for a fancy touch. This small step makes your dish look more inviting and appetizing. Pro Tips Choose the Right Apple: Opt for sweet and crisp varieties like Honeycrisp or Fuji for a refreshing crunch. Toast the Pecans: To enhance their flavor, toast the pecans until they are fragrant. This adds depth to the salad. Dress Just Before Serving: To keep the greens crisp, add the dressing right before serving the salad. Experiment with Cheese: Try goat cheese or blue cheese instead of feta for different flavor profiles that complement the salad. {{image_2}} You can boost the Cranberry Apple Pecan Salad with protein. Try adding grilled chicken for a savory twist. Simply slice it thin and toss it in. You can also use chickpeas or black beans for a plant-based option. These additions make the salad more filling and satisfying. Adapting this salad for different seasons makes it fun. In spring, add fresh strawberries for a sweet touch. In summer, include peach slices for a juicy bite. In fall, swap the apple for a pear. You can change the dressing too. A citrus vinaigrette can brighten up the winter months. Making this salad vegan is easy. Skip the feta cheese and use a vegan dressing. For gluten-free eaters, ensure your dressing does not contain gluten. You can also check for gluten-free beans if you add them. These changes keep everyone happy at the table. To keep your salad fresh, store it in an airtight container. This helps avoid wilting. If possible, separate the dressing from the salad until you are ready to eat. Mixing the dressing in too early makes greens soggy. Use a clean spoon each time you serve to keep it fresh. When stored properly, your salad lasts about three days in the fridge. The greens may start to lose their crispness after a day or two. The apples can brown quickly, so eat them sooner. Cranberries and pecans stay good longer, about a week. You can make parts of this salad ahead of time. Wash and dry the greens, then keep them in the fridge. Slice the apples just before serving to keep them crisp and fresh. You can also prepare the dressing a day ahead. Just shake it well before using to mix it back up. To make this salad vegan, skip the feta cheese. You can use a vegan cheese or leave it out completely. For the dressing, replace the maple syrup with agave syrup, if desired. Check that your olive oil is pure and free of animal products. Yes, you can use dried cranberries. They will add a sweet flavor. However, dried cranberries may change the salad's texture. Fresh cranberries provide a nice tart bite, while dried ones are sweeter and chewier. You can customize this salad to your taste! Add grilled chicken for protein or chickpeas for a vegan option. Other great additions include avocado, sliced almonds, or even orange segments for a citrus twist. This salad is nutritious and delicious. A serving has about 200 calories. It contains around 10 grams of fat, 25 grams of carbs, and 4 grams of protein. Adjust the ingredients for different nutritional needs. This blog post provided a detailed guide on making cranberry apple pecan salad. We covered ingredients, preparation steps, and how to assemble the dish. You learned about choosing apples, dressing variations, and ways to make the salad visually appealing. I also shared tips for storage and customization. Enjoy creating this tasty salad, whether you're serving it to family or friends. Each step is simple and fun, making it easy to adapt to your tastes. Happy cooking!

Cranberry Apple Pecan Salad Flavorful and Fresh Mix

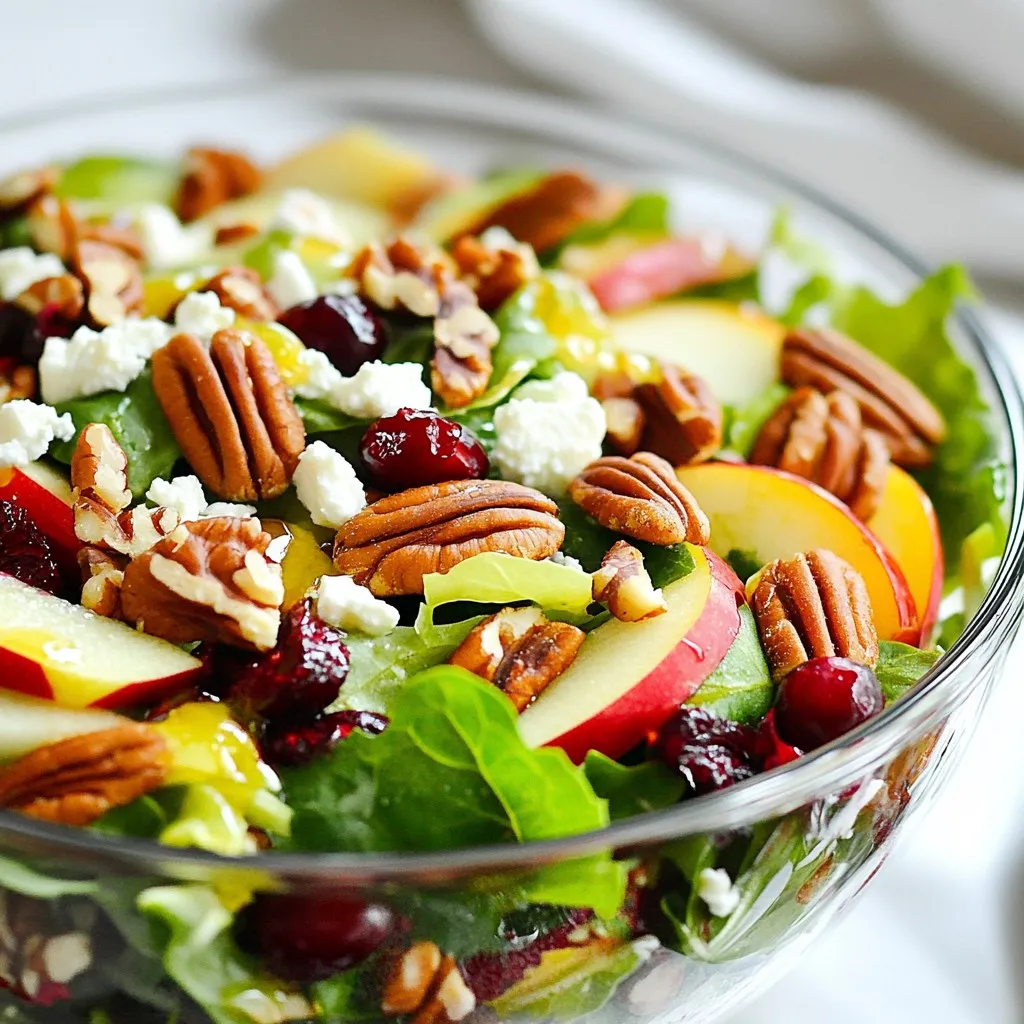
Looking for a fresh and flavorful salad that’s easy to make? Your search ends here! My Cranberry Apple Pecan Salad

Older posts
Newer posts
← Previous Page1 … Page128 Page129 Page130 … Page137 Next →

dsad

© 2025 Recipes Pursuit • Built with GeneratePress

Our Policies

  • Copyright Policy
  • Cookie Policy
  • GDPR Policy
  • Privacy Policy
  • Disclaimer
  • Terms Of Use

More Information

  • Home
  • About
  • Contact
  • Appetizers
  • Dessert
  • Dinner
  • Drinks
©2025, Recipes Pursuit About Back To Top