Skip to content
DisclaimerTerms Of UseGDPR PolicyCookie Policy

Recipes Pursuit

  • Home
  • Drinks
  • Appetizers
  • Dinner
  • Dessert
  • About
  • Contact
  • Privacy Policy
DisclaimerTerms Of UseGDPR PolicyCookie Policy

Emma Smith

- 2 pounds chicken wings - 2 tablespoons olive oil - Zest of 2 lemons - 4 tablespoons lemon juice - 1 tablespoon black pepper - 1 teaspoon garlic powder - 1 teaspoon onion powder - 1 teaspoon paprika - Salt to taste - Fresh parsley, chopped (for garnish) - Choosing fresh chicken wings: Look for wings that are pink and firm. Avoid wings with brown spots. Fresh wings taste better and cook evenly. - High-quality olive oil: Use extra virgin olive oil for rich flavor. It enhances the taste of the wings. - Freshly grated lemon zest: Fresh zest gives a bright flavor. You can use a microplane to get fine shavings from the lemon. Avoid bottled zest for the best taste. {{ingredient_image_1}} 1. Preheat the oven: Start by preheating your oven to 400°F (200°C). This step is key for crispy wings. Line a baking sheet with aluminum foil or parchment paper. This makes cleanup easy. Place a wire rack on top of the baking sheet. This helps the air flow around the wings. 2. Prepare the chicken wings: Take 2 pounds of chicken wings and place them in a large bowl. Drizzle 2 tablespoons of olive oil over the wings. Toss them well to coat evenly. This oil helps the seasonings stick and adds flavor. 1. Mixing spices and lemon juice: In a small bowl, combine the zest of 2 lemons, 4 tablespoons of lemon juice, 1 tablespoon of black pepper, and 1 teaspoon each of garlic powder, onion powder, and paprika. Add salt to taste. Mix these ingredients thoroughly until well blended. This mixture gives the wings their zesty flavor. 2. Coating the wings thoroughly: Pour the seasoning mixture over the chicken wings. Toss the wings again to ensure they are evenly coated. This step is vital for maximum flavor. 1. Arranging wings on a wire rack: Place the seasoned wings in a single layer on the wire rack. This allows the hot air to circulate, making them crispy. 2. Baking time and flipping technique: Bake the wings in the preheated oven for 40-45 minutes. Halfway through, flip the wings over. This helps them brown evenly on both sides. Keep an eye on them for that perfect golden look. To get those wings nice and crispy, you need the right baking techniques. First, always preheat your oven to 400°F (200°C). This ensures even cooking. Using a wire rack is key. It lets hot air circulate around the wings. This helps them crisp up nicely. Place the wings in a single layer on the rack. Flip them halfway through baking for even crispiness. Marinating the wings is very important. It allows the flavors to soak in deeply. You can marinate for at least 30 minutes, but longer is better. For a stronger taste, adjust the spice levels to your liking. If you love heat, add more black pepper or a pinch of chili powder. Taste as you go to find your perfect balance. Garnishing ideas can elevate your dish. Fresh parsley adds color and a burst of flavor. Serve the wings with lemon wedges on the side for extra zest. You can pair them with dips like ranch or blue cheese. They also go well with sides like celery sticks or a fresh salad. This makes for a complete, tasty meal. Pro Tips Use Fresh Lemon Zest: For the best flavor, use fresh lemon zest instead of bottled. It adds a vibrant citrus aroma and taste to the wings. Adjust the Spice Level: If you prefer spicier wings, consider adding cayenne pepper or a dash of hot sauce to the seasoning mix for an extra kick. Let Them Rest: After baking, allow the wings to rest for a few minutes before serving. This helps the juices redistribute, making them more tender and flavorful. Serve with Dipping Sauces: Pair these wings with your favorite dipping sauces like ranch or blue cheese for an extra layer of flavor that complements the lemon pepper seasoning. {{image_2}} You can make lemon pepper chicken wings in different ways. - Grilling lemon pepper chicken wings: Grilling adds a smoky flavor. Preheat your grill to medium heat. Place the wings on the grill and cook for about 20-25 minutes. Turn them often for even cooking. You will love the charred bits! - Air frying for a healthier option: An air fryer cooks wings with less oil. Preheat the air fryer to 380°F (193°C). Place the wings in a single layer. Cook for 25-30 minutes, shaking the basket halfway. They will be crispy and delicious! Changing the flavors keeps things exciting. - Adding chili powder for heat: If you like spice, mix in chili powder. Just a teaspoon will add a nice kick. You can adjust this based on how spicy you want it. - Experimenting with herbs: Fresh herbs can enhance the dish. Try adding thyme or rosemary for a fresh twist. Mix them with the lemon zest for a fragrant boost. Making the dish fit your needs is easy. - Gluten-free considerations: All the ingredients in this recipe are gluten-free. Just check any spice blends to ensure they are safe. - Low-carb adaptations: If you're watching carbs, this recipe works well. Chicken wings are naturally low in carbs. Just skip any sugar in sauces or dips. Enjoy guilt-free! To keep your lemon pepper chicken wings fresh, start by letting them cool. Place the wings in a shallow dish. Cover them tightly with plastic wrap or foil. You can also use an airtight container for better results. Store the wings in the fridge for up to four days. Always label your containers with the date to track freshness. When you're ready to enjoy leftovers, preheat your oven to 350°F (175°C). Place the wings on a baking sheet. Heat for about 15-20 minutes. This method keeps them crispy. If you prefer a quicker option, use a microwave. Just be careful, as it may make the wings soggy. For the best flavor, reheating in the oven is always my go-to. You can freeze cooked lemon pepper chicken wings for longer storage. First, let the wings cool completely. Then, place them in a freezer-safe bag or container. Remove as much air as possible to prevent freezer burn. They can last for up to three months. When you're ready to eat, thaw them in the fridge overnight. Reheat them in the oven for crispiness. Enjoy your tasty treat anytime! Lemon pepper chicken wings stay fresh in the fridge for about 3 to 4 days. Store them in an airtight container to keep them safe from odors. For the best taste, eat them within this time frame. Yes, you can make lemon pepper chicken wings in advance. Cook them, let them cool, and then store them in the fridge. This way, you can enjoy them later. Just reheat them before serving for the best flavor. You can serve lemon pepper chicken wings with a variety of sides. Here are some great options: - Fresh veggies with dip - Crispy fries or potato wedges - A light salad - Coleslaw - Garlic bread On a scale of 1 to 10, these wings are about a 3. The black pepper adds a nice kick, but they are not too hot. If you want more heat, feel free to add chili powder or hot sauce to the mix. Lemon pepper chicken wings are easy to make and delicious. We covered key ingredients like fresh chicken wings and lemon zest. I shared tips on choosing quality items and baking them to crispy perfection. You can also explore cooking methods and flavor variations. Try these tasty wings for your next meal. Enjoy experimenting with flavors and serving options. Whether grilling or air frying, you can't go wrong. The goal is to make wings you and your friends will love!

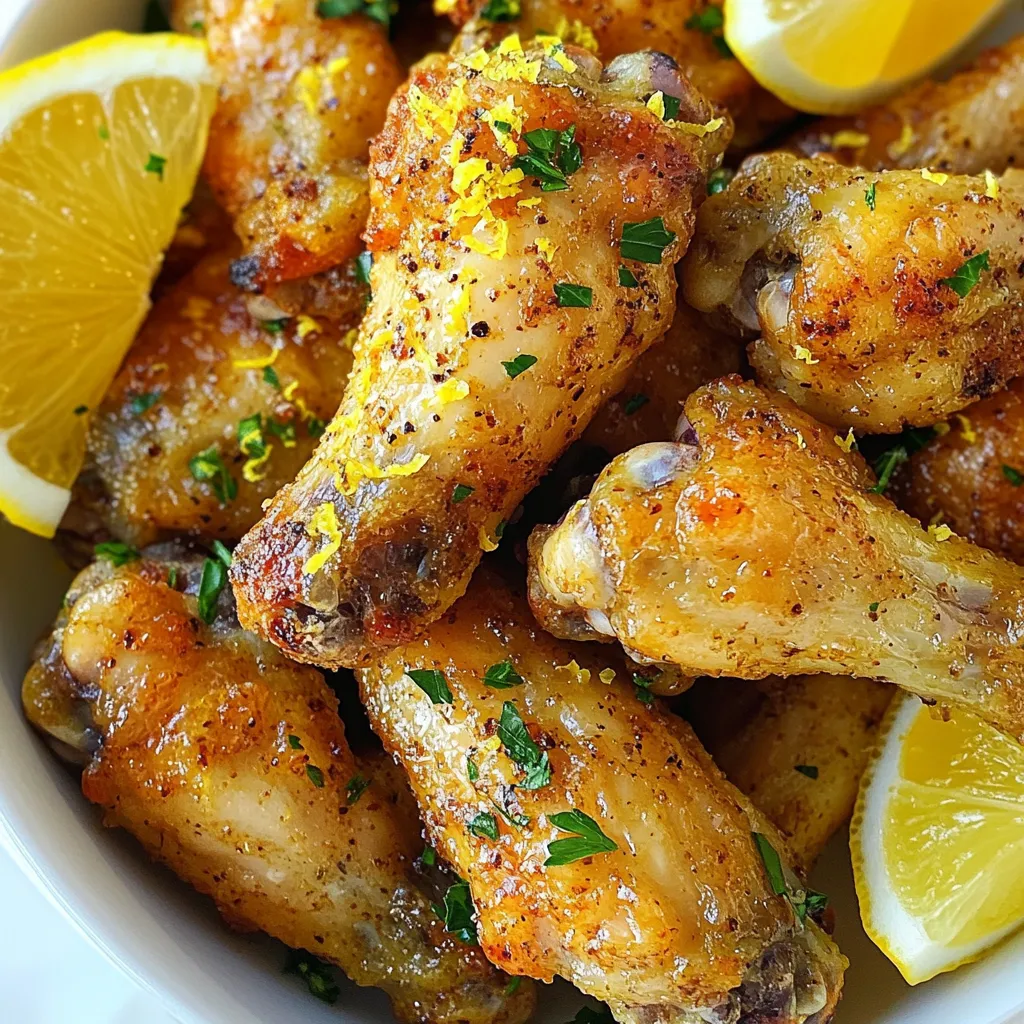
Lemon Pepper Chicken Wings Zesty and Flavorful Treat

If you’re craving a zesty and flavorful treat, look no further than lemon pepper chicken wings! These crispy delights are

- 4 boneless, skinless chicken breasts - 1/4 cup honey - 1/4 cup lime juice (freshly squeezed) - 2 tablespoons soy sauce - 2 tablespoons olive oil For this honey lime grilled chicken, you need fresh, quality ingredients. The chicken is the star. Boneless and skinless breasts work best. They cook evenly and stay juicy on the grill. The marinade is where the magic happens. Honey adds sweetness, while lime juice brings a bright tang. Soy sauce adds depth, and olive oil keeps the chicken moist. Mix these well for a smooth marinade. - 2 garlic cloves, minced - 1 teaspoon ground cumin - 1 teaspoon paprika - Salt and pepper to taste - Fresh cilantro, chopped (for garnish) For flavor, add minced garlic. It gives a nice kick. Ground cumin adds warmth and a hint of earthiness. Paprika brings color and a mild taste. Don’t forget salt and pepper to enhance all the flavors. After grilling, garnish with fresh cilantro. It adds a burst of color and a fresh taste. This step makes your dish pop and look gourmet! {{ingredient_image_1}} To make the marinade, grab a medium bowl. Add 1/4 cup honey, 1/4 cup lime juice, 2 tablespoons soy sauce, and 2 tablespoons olive oil. Then, toss in 2 minced garlic cloves, 1 teaspoon ground cumin, and 1 teaspoon paprika. Season with salt and pepper to taste. Whisk all the ingredients together until smooth. This marinade adds great flavor to the chicken. Marinating chicken is key. It helps the chicken soak up all the tasty flavors. I like to marinate for at least 1 hour. For even better taste, try to marinate for up to 4 hours. Just keep it in the fridge during this time. Next, preheat your grill to medium-high heat. This step is important for getting those delicious grill marks. Once your grill is hot, remove the chicken from the marinade. Let the excess marinade drip off and throw away what’s left. Now, grill the chicken for about 6-7 minutes on each side. You want the chicken to reach an internal temperature of 165°F. This ensures it’s fully cooked and safe to eat. Check for nice grill marks and a golden color. When the chicken is done, take it off the grill and let it rest for 5 minutes. Resting helps keep the juices inside. After resting, slice the chicken into strips. For a lovely touch, garnish it with fresh chopped cilantro. For presentation, serve the chicken on a platter. Add lime wedges around it and sprinkle cilantro on top. This makes your dish colorful and inviting for everyone at the table. For the best flavor, marinate your chicken for at least 1 hour. If you have more time, let it sit for up to 4 hours. This allows the flavors to soak in well. If you need to change things up, you can swap out honey for agave syrup. For a gluten-free option, use tamari instead of soy sauce. To get those perfect grill marks, preheat your grill on medium-high heat. Make sure the grill grates are clean and lightly oiled. Place the chicken on the grill and resist the urge to move it too much. Grill for 6-7 minutes on each side. Check the internal temperature to ensure it reaches 165°F. Common grilling mistakes include not preheating your grill or overcrowding it. Both can lead to uneven cooking. Always give each piece of chicken enough space to cook properly. Pro Tips Marinate Longer for More Flavor: For the best flavor, marinate the chicken for at least 4 hours. If you have the time, overnight marination is ideal! Use a Meat Thermometer: Ensure the chicken is fully cooked by checking its internal temperature. It should reach 165°F (75°C) for safe consumption. Let it Rest: After grilling, let the chicken rest for 5 minutes before slicing. This allows the juices to redistribute, making the chicken more tender. Garnish Creatively: Enhance the presentation by serving with lime wedges and a sprinkle of fresh cilantro, making the dish visually appealing. {{image_2}} You can change the taste of your honey lime grilled chicken in many ways. Start by adding spices or herbs. For a kick, try cayenne pepper or chili powder. If you want a fresh note, add cilantro or basil. Both herbs brighten the dish. You can also adjust the sweetness. If you want less honey, use maple syrup or agave. You can even play with fruit juices. Try orange or pineapple juice for a fruity twist. These changes make your chicken unique. Grilling is fun, but you can cook this chicken in other ways. Oven baking is a great option. To do this, preheat your oven to 375°F (190°C). Place the marinated chicken on a baking sheet. Bake for about 25-30 minutes. Check that the chicken reaches an internal temperature of 165°F (75°C). If you prefer indoor cooking, use a skillet. Heat the skillet over medium-high heat. Add a bit of olive oil, then cook the chicken for 6-7 minutes per side. This method gives you a nice sear and keeps the chicken juicy. Each method brings a different flavor, so try them all! After enjoying your honey lime grilled chicken, let it cool down. Place the chicken in an airtight container. Refrigerate it within two hours to keep it safe. The chicken will stay fresh for about three to four days in the fridge. When you reheat grilled chicken, do it slowly. You can use the oven or a skillet. Heat it to 165°F (75°C) to ensure it’s safe to eat. Adding a splash of water or broth can help keep it moist. Cover the chicken while reheating to avoid dryness. You can freeze both pre-marinated and cooked chicken. If you freeze the marinated chicken, place it in a freezer bag. Squeeze out the air before sealing. This way, it will stay fresh for up to three months. For cooked chicken, let it cool completely. Then, wrap it tightly in plastic wrap and foil. This will help prevent freezer burn. Cooked chicken can last in the freezer for about four months. Always label your bags with the date to keep track. Marinating honey lime chicken is key for flavor. I recommend marinating for at least 1 hour. This allows the chicken to soak up the honey and lime goodness. For even better taste, you can marinate it for up to 4 hours. The longer you marinate, the more flavor it gets. Yes, you can use chicken thighs! Thighs have more fat, making them juicier. They also absorb the marinade well. Just keep the cooking time similar. Ensure the internal temperature reaches 165°F or 75°C for safety. Honey lime grilled chicken pairs well with many sides. Here are some great options: - Rice: A simple white or cilantro-lime rice works well. - Salad: A fresh green salad with lime vinaigrette adds brightness. - Grilled veggies: Bell peppers, zucchini, or corn enhance the meal. - Potatoes: Try roasted or mashed potatoes for a hearty option. These sides will complement the chicken's sweet and tangy flavors. Enjoy your meal! In this blog post, I shared how to make honey lime grilled chicken. We covered the main ingredients, such as chicken, honey, and lime juice. I walked you through marinating, grilling, and serving tips to elevate your dish. Remember to experiment with flavors and techniques. Whether you grill or bake, you can enjoy this tasty recipe. Storing leftovers properly ensures you can savor your meal later. With these tips, you'll impress everyone with your chicken skills!

Honey Lime Grilled Chicken Bold and Flavorful Recipe

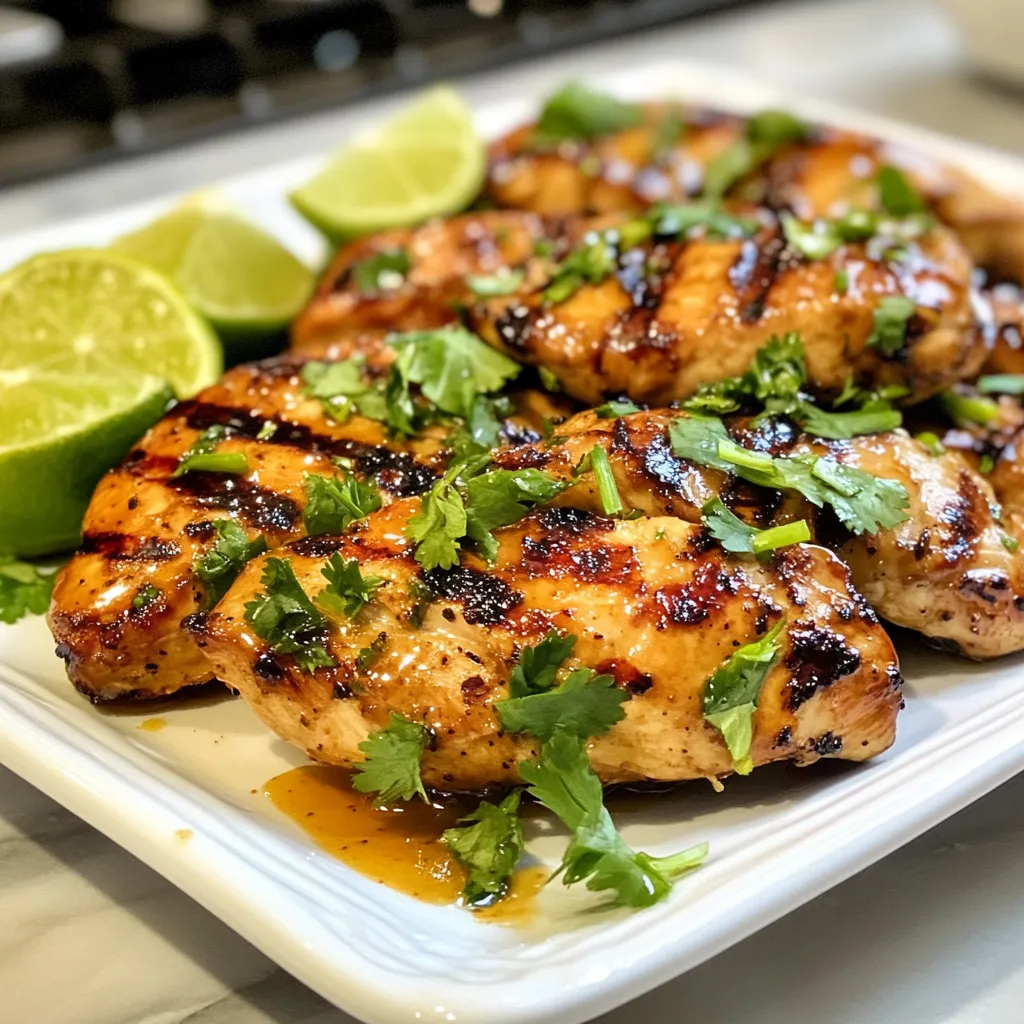
Ready to elevate your grilling game? This Honey Lime Grilled Chicken recipe packs a punch with bold flavors and simple

To make the crust, you need these key ingredients: - 1 ½ cups graham cracker crumbs - ½ cup unsalted butter, melted - 1 tablespoon sugar These ingredients create a solid base for your cheesecake bars. The graham cracker crumbs give a nice crunch, while the melted butter binds everything together. The sugar adds a touch of sweetness. The filling brings the flavors together. Here’s what you will need: - 2 cups cream cheese, softened - 1 cup sugar (for filling) - 2 large eggs - 1 teaspoon vanilla extract - 1/4 cup lemon juice (freshly squeezed) - Zest of 1 lemon - 1 cup fresh raspberries - 1 tablespoon cornstarch The cream cheese creates a rich, creamy texture. Fresh lemon juice and zest add a bright, tangy flavor that pairs perfectly with the raspberries. The eggs help set the filling, while cornstarch keeps it smooth. To finish your delicious bars, consider these garnishes: - 2 tablespoons powdered sugar (for dusting) Dusting with powdered sugar adds a sweet touch and makes the bars look pretty. You can also serve them with extra raspberries or a drizzle of lemon glaze. {{ingredient_image_1}} First, set your oven to 325°F (160°C). This temperature is perfect for baking. Next, take an 8x8 inch baking dish. Line it with parchment paper. Leave some paper hanging over the edges. This helps you lift the dessert out later. In a mixing bowl, combine 1 ½ cups of graham cracker crumbs, ½ cup of melted unsalted butter, and 1 tablespoon of sugar. Mix them until it looks like wet sand. Press this mixture into the bottom of your lined baking dish. Make sure it's even. Bake this crust for 10 minutes. Remove it from the oven and let it cool a bit. Grab a large mixing bowl. Beat 2 cups of softened cream cheese until it's smooth. Use an electric mixer for this step. Slowly add in 1 cup of sugar. Mix until it’s creamy. Now, add in 2 large eggs, one at a time. After each egg, mix on low speed. Then, stir in 1 teaspoon of vanilla extract, ¼ cup of freshly squeezed lemon juice, and the zest of 1 lemon. Keep mixing until everything is just combined. Take 1 cup of fresh raspberries and toss them in a separate bowl with 1 tablespoon of cornstarch. This helps them stay intact. Gently fold the raspberries into the cheesecake mixture. Be careful not to break them too much. Pour the cheesecake filling over your cooled crust. Spread it out evenly. Bake in the oven for 25-30 minutes. The center should be set but still jiggle a bit. Once done, take it out and let it cool at room temperature for about an hour. Then, place it in the refrigerator for at least 3 hours. This chilling time helps it set completely. To make the best graham cracker crust, use fresh crumbs. You can crush whole graham crackers in a food processor or a bag. Mix the crumbs with melted butter and sugar until it feels like wet sand. Press it firmly into the baking dish. This helps the crust hold its shape. Bake it for just 10 minutes. This step firms up the crust and adds a nice flavor. For a smooth cheesecake, make sure your cream cheese is soft. Let it sit at room temperature for about 30 minutes before mixing. Beat it well until creamy, then add sugar slowly. Mix in the eggs one at a time. This helps avoid lumps. Overmixing can add too much air, which is not good. Keep it simple and mix until just combined. Cooling your cheesecake is key for the perfect texture. After baking, let it cool at room temperature for an hour. Then, move it to the fridge. Chill it for at least three hours. This helps it set properly. If you wait longer, it gets even better! When ready to serve, dust it with powdered sugar for a nice touch. Enjoy your delicious bars! Pro Tips Use Fresh Ingredients: Always opt for fresh raspberries and freshly squeezed lemon juice to enhance the flavor of your cheesecake bars. Don’t Overmix: When adding eggs and flavorings to the cream cheese, mix just until combined to prevent a dense texture. Chill Properly: Allow the cheesecake bars to chill in the refrigerator for at least 3 hours to ensure they set properly and are easier to cut. Dust Before Serving: Lightly dust the cheesecake bars with powdered sugar just before serving for an elegant presentation. {{image_2}} You can swap raspberries for other fruits. Strawberries bring a sweet, fresh taste. Blueberries offer a nice burst of flavor. Blackberries add a tart twist. Always use fresh fruit for the best taste. You can also mix different fruits. Just keep the same amount for a balanced cheesecake. The crust can change based on your taste. Try using crushed cookies like Oreos for a chocolatey base. Almond flour mixed with butter makes a gluten-free option. For a nutty flavor, use crushed nuts. Each type of crust adds its own unique touch. Experiment to find your favorite! You can add more flavors to your cheesecake bars. A bit of melted chocolate mixed into the filling creates a rich taste. You can also try adding lime or orange juice for a citrus kick. A hint of coconut can add a tropical vibe. These enhancements make each bite exciting! To keep your raspberry lemonade cheesecake bars fresh, store them in an airtight container. Place them in the fridge. This helps them stay cool and tasty. You can also cover the pan with plastic wrap if you prefer. Make sure they stay sealed to prevent drying out. They can last about 3 to 5 days in the fridge. If you want to save some bars for later, freezing works well. First, cut the bars into squares. Then, wrap each piece in plastic wrap. After that, place them in a freezer-safe bag or container. This keeps them safe from freezer burn. They can stay in the freezer for up to 3 months. When you’re ready to enjoy them, let them thaw in the fridge overnight. The shelf life of your raspberry lemonade cheesecake bars depends on how you store them. In the fridge, they last about 3 to 5 days. If you freeze them, they can last up to 3 months. Always check for any changes in smell or texture before eating. Enjoy your sweet treat at its best! Yes, you can use frozen raspberries in this recipe. They work well and add great flavor. Just remember to thaw them first. Drain any excess juice to avoid a soggy filling. Frozen berries may break apart more easily, so handle them gently when mixing. If you need a substitute for cream cheese, try using Greek yogurt or cottage cheese. Both options will change the texture a bit but still taste great. For a dairy-free option, use vegan cream cheese. Adjust the sweetness since some alternatives can be less sweet. To check if the cheesecake is done, look for a slight jiggle in the center. It should not be fully firm but should hold its shape. A toothpick inserted into the filling should come out mostly clean. Don't overbake it, or it may crack. This post explored how to make delicious cheesecake bars. We covered key ingredients for the crust and filling, plus optional garnishes. You learned step-by-step baking instructions, tips for the best results, and fun variations for flavor. In closing, with careful steps, you can create a treat everyone will love. Enjoy your cheesecake bars, and don't be afraid to experiment!

Raspberry Lemonade Cheesecake Bars Delightful Treats

If you’re craving something sweet and tangy, you’ll love these Raspberry Lemonade Cheesecake Bars! They combine a creamy cheesecake filling

To make Buffalo Chicken Mac and Cheese, you need these main ingredients: - 2 cups elbow macaroni - 1 pound boneless, skinless chicken breasts, cooked and shredded - 1 cup buffalo sauce (adjust to taste) - 4 tablespoons butter - 1/4 cup all-purpose flour - 3 cups milk - 3 cups shredded sharp cheddar cheese - 1 cup shredded mozzarella cheese - 1 teaspoon garlic powder - 1 teaspoon onion powder - Salt and pepper to taste These ingredients create a tasty blend of flavors. The elbow macaroni gives a nice base. The chicken adds protein, and the buffalo sauce brings in the heat. The butter and flour create a smooth cheese sauce that holds everything together. Garnishes can make your dish look great. Here are some options: - Chopped green onions - Blue cheese crumbles Adding green onions gives a fresh taste. Blue cheese adds a rich flavor that many love. Feel free to mix and match to find your favorite look and taste. Cheese is key to a great mac and cheese. I recommend these varieties: - Sharp cheddar cheese - Mozzarella cheese Sharp cheddar gives a strong flavor. Mozzarella makes the dish creamy and gooey. You can also try other cheeses like gouda or pepper jack for a twist on the classic taste. {{ingredient_image_1}} Start by boiling a large pot of salted water. Once it boils, add 2 cups of elbow macaroni. Cook the pasta until it is al dente, about 7-8 minutes. Drain the pasta in a colander and set it aside. This step is key for a perfect texture in your mac and cheese. Next, take 1 pound of cooked, shredded chicken breasts. In a bowl, mix the chicken with half of the buffalo sauce. This gives the chicken a nice, spicy kick. Set this bowl aside while you make the cheese sauce. In a large saucepan, melt 4 tablespoons of butter over medium heat. Once the butter melts, whisk in 1/4 cup of all-purpose flour. Stir this mixture for about 1-2 minutes until it turns lightly golden. Gradually add 3 cups of milk, whisking until smooth. Keep cooking and stirring for about 5-7 minutes until the sauce thickens. Now, reduce the heat to low and stir in 3 cups of sharp cheddar cheese and 1 cup of mozzarella cheese. Add 1 teaspoon of garlic powder, 1 teaspoon of onion powder, salt, and pepper to taste. Keep stirring until all the cheese melts and the sauce is smooth. Add the drained macaroni and the buffalo chicken mixture to the cheese sauce. Stir everything together until the pasta is coated evenly. This is where all the flavors come together, making your dish truly delicious. If you want a baked version, preheat your oven to 350°F (175°C). Transfer the mac and cheese to a greased baking dish. Sprinkle some extra cheese on top. Bake for about 20 minutes or until it is bubbly and golden. When you remove the mac and cheese from the oven, drizzle the remaining buffalo sauce on top. Garnish with chopped green onions and blue cheese crumbles if you like. Serve this dish hot for a comforting meal that is sure to please everyone. To cook pasta just right, use plenty of water. Add a good amount of salt. This helps flavor the pasta. Follow the package time for cooking. For elbow macaroni, aim for al dente. This means it should be firm but not hard. If you overcook it, the pasta will get mushy. Drain the pasta well and set it aside for later. To make a great cheese sauce, start with a roux. Melt butter in a large saucepan over medium heat. Add the flour and whisk for one to two minutes. This will help thicken your sauce. Slowly whisk in the milk after the roux is golden. Keep stirring until the sauce thickens, which takes about five to seven minutes. Once thick, add the cheddar and mozzarella cheeses. Stir until all the cheese melts smoothly. This will give you a rich, creamy sauce. Buffalo sauce can vary in heat. If you like it mild, use less sauce. You can always add more later. Mix half of the sauce with the shredded chicken first. Taste it before adding more. If you want more heat, drizzle extra sauce on top when serving. For a different kick, consider adding a pinch of cayenne pepper or smoked paprika to the cheese sauce. Adjust the spice to fit your taste! Pro Tips Adjust the Heat: Modify the amount of buffalo sauce based on your spice preference. Start with less and add more for a spicier kick. Use Fresh Cheese: For the best flavor and texture, opt for freshly grated cheese instead of pre-shredded. It melts better and enhances the creaminess. Mix It Up: Feel free to incorporate additional ingredients like cooked bacon or vegetables such as broccoli for added flavor and nutrition. Storing Leftovers: Store any leftovers in an airtight container in the fridge for up to 3 days. Reheat in the oven or microwave, adding a splash of milk for creaminess. {{image_2}} You can change the protein in Buffalo chicken mac and cheese easily. Try using shredded rotisserie chicken for a quick meal. You can also swap in turkey for a lighter option. If you like beef, shredded cooked brisket adds a bold taste. For a fun twist, use pulled pork. Each protein brings its flavor to this dish. Adjust your buffalo sauce to match the protein's taste. This way, you keep the dish exciting and new. For a vegetarian version, skip the chicken. You can add hearty veggies like broccoli or spinach. Roasted cauliflower is a great choice, too. These veggies blend well with the creamy cheese sauce. You might even want to add beans for extra protein. Keep the buffalo sauce to give it that kick. This version stays rich and comforting while being meat-free. It's a great way to enjoy the flavors without the chicken. To make a vegan version, you can use plant-based cheese. Many brands offer good options that melt well. Swap the milk for almond, soy, or oat milk to keep it creamy. Instead of butter, use vegan margarine or coconut oil. For protein, add chickpeas or lentils to the mix. You can still use buffalo sauce, but check it’s vegan-friendly. This way, you can enjoy this dish while keeping it plant-based and delicious. To store leftovers, cool the Buffalo Chicken Mac and Cheese first. Then, place it in an airtight container. This helps keep it fresh. You can store it in the fridge for up to three days. If you plan to eat it later, you can freeze it. Just make sure to add a layer of plastic wrap before sealing the container. When you want to reheat, you can use the microwave or the oven. For the microwave, place a portion in a bowl. Heat it on medium power for about two to three minutes. Stir halfway through to warm it evenly. If using the oven, preheat it to 350°F (175°C). Place the mac and cheese in an oven-safe dish. Cover it with foil and heat for about 20 minutes. Freezing is a great option if you want to save some for later. Make sure it cools completely before freezing. Portion it into smaller containers for easy meals. It can last up to three months in the freezer. When ready to eat, let it thaw in the fridge overnight. Then follow the reheating instructions to enjoy a warm meal. Yes, you can use store-bought buffalo sauce. It saves time and adds great flavor. Just mix it with the shredded chicken. If you like it spicy, feel free to add more sauce. This keeps the dish easy and tasty. Buffalo Chicken Mac and Cheese lasts about 3 to 5 days in the fridge. Store it in an airtight container. Make sure it cools down first before sealing. You can enjoy it as a quick meal later in the week. You can serve Buffalo Chicken Mac and Cheese with a fresh salad. A simple green salad balances the rich flavors. You can also add celery sticks or carrot sticks. They add crunch and pair well with the dish. If you want something heartier, try garlic bread. In this blog post, I shared how to make Buffalo Chicken Mac and Cheese. We covered essential ingredients, including cheeses and garnishes. I detailed step-by-step cooking methods, from pasta to baking. You learned useful tips for perfect pasta and creamy sauce. I also shared fun variations and key storage info. Buffalo Chicken Mac and Cheese is easy to make and full of flavor. With a few simple changes, you can make it your own. Enjoy this dish with friends or family for a perfect meal.

Buffalo Chicken Mac and Cheese Flavorful Comfort Meal

Welcome to the ultimate comfort meal: Buffalo Chicken Mac and Cheese. This dish combines creamy cheese, zesty buffalo chicken, and

- 4 pieces of garlic naan - 1 cup marinara sauce - 1 ½ cups shredded mozzarella cheese - 1 small red onion, thinly sliced - 1 jalapeño, sliced (adjust for spice preference) - 1 cup cherry tomatoes, halved - 1 teaspoon red pepper flakes - 3 tablespoons olive oil - 3 tablespoons fresh cilantro, chopped - Salt and pepper to taste You can customize your spicy garlic naan pizza with fun add-ins. Try adding cooked chicken for protein. Pepperoni or sausage can add a nice flavor too. If you like veggies, bell peppers, or spinach work well. You can even add some feta cheese for a tangy twist! If you can't find garlic naan, regular naan works just as well. You can use any pizza sauce if marinara isn’t available. For cheese, feel free to swap mozzarella with gouda or cheddar. If you want a vegan option, use dairy-free cheese and skip the marinara. You can also replace jalapeños with banana peppers for less heat. {{ingredient_image_1}} Start by preheating your oven to 450°F (230°C). This step is key for crispy naan. Next, grab four pieces of garlic naan. Place them on a baking sheet. Brush each side with olive oil. This adds flavor and helps them brown nicely. Now, let’s layer our pizza. Spread marinara sauce on each naan. Leave a little space at the edges. This prevents spills. Next, sprinkle shredded mozzarella cheese on top of the sauce. Make sure to cover it well. Then, add the thinly sliced red onion, jalapeño, and cherry tomatoes. Distribute them evenly for great taste. Finally, sprinkle red pepper flakes over everything. Adjust the spice to your liking. Add a pinch of salt and pepper to boost the flavors. Place the baking sheet in your preheated oven. Bake for 8 to 10 minutes. Watch for the cheese to melt and bubble. The edges of the naan should turn crispy. Keep an eye on it to avoid burning. Once done, take it out and sprinkle fresh cilantro on top. This adds a fresh touch. Cut into slices and enjoy your Spicy Garlic Naan Pizza! To get that nice, crispy edge on your naan pizza, start by preheating your oven to 450°F (230°C). This high heat helps the naan crisp up quickly. Brush both sides of the naan with olive oil. This oil not only adds flavor but also aids in crisping. Place the naan on a baking sheet, leaving space between each piece. Bake for 8-10 minutes until the cheese bubbles and the edges are golden. Adjusting the spice level is easy and fun. If you love heat, add more jalapeño slices and red pepper flakes. For a milder pizza, use fewer jalapeños. You could also try using sweet peppers if you want a hint of sweetness instead. Make sure to taste as you go, so you can find the right balance that suits your palate. Get creative with your toppings! Add ingredients like bell peppers, mushrooms, or even olives. You can also try different cheeses, like feta or goat cheese, for a unique twist. Fresh herbs like basil or arugula can add freshness. The key is to layer flavors that excite your taste buds. Just remember not to overload the naan, so it stays crispy! Pro Tips Use Fresh Ingredients: Fresh garlic, herbs, and vegetables will enhance the flavor of your naan pizza significantly. Experiment with Toppings: Feel free to add your favorite ingredients like bell peppers, olives, or even cooked chicken for a different twist. Watch the Baking Time: Keep an eye on the naan while baking to prevent overcooking. Every oven is different! Serve with Dips: Pair your naan pizza with yogurt sauce or a spicy dip for an extra layer of flavor. {{image_2}} You can easily make your Spicy Garlic Naan Pizza vegetarian. Swap the red onion with bell peppers. Add spinach or mushrooms for extra flavor. Use olives for a salty kick. Fresh basil or arugula can also give a nice touch. The key is to mix and match veggies you love. For a vegan version, replace the mozzarella cheese with vegan cheese. Look for brands that melt well. You can use a creamy cashew sauce too. Just blend soaked cashews with nutritional yeast, lemon juice, and garlic. It adds creaminess and flavor. Also, check the marinara sauce for dairy. While marinara is great, you can try other sauces. Pesto gives a fresh, herby taste. BBQ sauce adds a sweet, smoky flavor. For a spicy kick, use sriracha or harissa. A white sauce made with garlic and olive oil is also tasty. Experiment with what you enjoy most! To store leftovers, let the pizza cool first. Wrap each slice in plastic wrap. Place the wrapped slices in an airtight container. This keeps the pizza fresh for up to three days. Reheat your pizza in the oven for the best taste. Set your oven to 350°F (175°C). Place the slices on a baking sheet and heat for about 10 minutes. This warms the pizza and keeps it crispy. You can also use a microwave, but it may turn soggy. You can freeze the pizza too! Wrap individual slices in plastic wrap, then foil. Place them in a freezer-safe bag. They stay good for about two months. To eat, thaw in the fridge overnight and reheat in the oven. Yes, you can make Spicy Garlic Naan Pizza ahead. Prepare the naan and toppings, then store them separately in the fridge. When ready to eat, assemble and bake. This saves time and keeps the naan fresh. Just remember to bake it right before serving for the best taste. I love pairing Spicy Garlic Naan Pizza with simple side dishes. Here are some great options: - Crispy salad: A fresh salad with greens and a light dressing. - Garlic bread: It adds extra garlic flavor, which I adore. - Roasted veggies: They bring a healthy touch to the meal. - Yogurt dip: A cooling dip balances the spice in the pizza. These sides make the meal more fun and tasty. Absolutely! You can use any naan you like. Try whole wheat naan for a healthier choice. For a twist, use cheese naan for extra flavor. Just make sure the naan is sturdy enough to hold the toppings. Enjoy experimenting with different types! In this blog, we covered how to make Spicy Garlic Naan Pizza. You learned about key ingredients, optional add-ins, and substitutions. You also found step-by-step instructions to bake the perfect pizza. I shared tips for crispy edges and spice levels. Plus, we explored variations like vegetarian and vegan options. Enjoy customizing your pizza! With these tips, you can make it tasty and unique. Go ahead, have fun in the kitchen!

Spicy Garlic Naan Pizza Irresistible Flavor Awaits

If you’re craving a unique pizza experience, Spicy Garlic Naan Pizza is the answer. This fusion dish combines the soft,

- 1 lb Brussels sprouts, halved - 4 cloves garlic, minced - 1/4 cup grated Parmesan cheese - 1/4 cup olive oil - 1 teaspoon salt - 1/2 teaspoon black pepper - 1/2 teaspoon red pepper flakes (optional) - Fresh parsley, chopped (for garnish) The main ingredients in this recipe create a flavor explosion. The Brussels sprouts bring a nutty taste when roasted. Garlic adds a bold kick, while the Parmesan cheese brings creaminess and depth. The olive oil ensures everything crisps up nicely. For seasoning, salt enhances the natural flavors. Black pepper adds warmth, and red pepper flakes bring a touch of heat if you like spice. Fresh parsley provides a vibrant finish and a pop of color. Each ingredient plays a vital role in making these Brussels sprouts a hit. You can mix and match some of these elements to suit your taste. If you crave more cheese, feel free to add extra Parmesan. If you want a fresh twist, try adding lemon zest or a splash of balsamic vinegar. {{ingredient_image_1}} First, you need to clean the Brussels sprouts. Rinse them under cold water. Then, trim the ends and remove any yellow leaves. Next, cut each sprout in half. This helps them cook evenly and get crispy. Now, let’s prepare the garlic. Mince four cloves of garlic. Set both the sprouts and garlic aside. Grab a large mixing bowl. Add the halved Brussels sprouts and minced garlic. Pour in a quarter cup of olive oil. Then, sprinkle in one teaspoon of salt, half a teaspoon of black pepper, and half a teaspoon of red pepper flakes if you like heat. Now, toss everything together. Make sure every sprout is well-coated with the oil and spices. This step is key for flavor. Preheat your oven to 400°F (200°C). Spread the Brussels sprouts on a baking sheet. Place them cut side down. This helps them brown nicely. Bake for 20 to 25 minutes. Stir the sprouts halfway through. This ensures even roasting and crispiness. When they turn golden brown, they are ready. Take them out and sprinkle a quarter cup of grated Parmesan cheese on top. The heat will make the cheese melt just right. Garnish with fresh chopped parsley before serving. To get those Brussels sprouts super crispy, place them cut side down on the baking sheet. This lets the heat hit the flat surface, creating a nice, golden crust. Halfway through cooking, stir them gently. This helps to cook all sides evenly and keeps them from burning. You can adjust the garlic for your taste. If you love garlic, add more! Want it spicy? Toss in extra red pepper flakes. For a cheesy twist, try adding different types of cheese on top. A sprinkle of goat cheese or feta can add a new layer of flavor. When serving, use a large white platter. This makes the golden Brussels sprouts pop! Add a sprinkle of extra Parmesan for a touch of elegance. Fresh parsley on top adds color and freshness, making it more inviting for guests. Pro Tips Use Fresh Brussels Sprouts: For the best flavor and texture, select Brussels sprouts that are firm and bright green, avoiding any that are yellow or wilted. Adjust the Seasoning: Feel free to customize the seasoning to your taste. Adding lemon zest or a splash of balsamic vinegar can elevate the flavor profile. Don’t Overcrowd the Pan: For optimal crispiness, make sure the Brussels sprouts are spread out in a single layer on the baking sheet. This allows hot air to circulate around them. Serve Immediately: These Brussels sprouts are best enjoyed hot out of the oven. If you let them sit too long, they may lose their crispiness. {{image_2}} You can switch up the Parmesan cheese for other options. Pecorino Romano adds a salty kick. Asiago cheese gives a nutty flavor that works well. Try mixing them together for a unique taste. Each cheese brings its own charm to the dish. You can enhance these Brussels sprouts with balsamic vinegar or honey. A splash of balsamic adds a sweet and tangy touch. Honey gives a nice glaze and balances the garlic. Fresh herbs like thyme or rosemary can also spice things up. They add depth and freshness to the flavor. If you want a vegan option, use nutritional yeast instead of cheese. It has a cheesy flavor without dairy. You can also swap olive oil for melted coconut oil for a different taste. These swaps keep the dish light and tasty while still being satisfying. To store your Crispy Garlic Parmesan Brussels sprouts, let them cool first. Place them in an airtight container. This helps keep them fresh and tasty. I recommend using a glass container with a tight lid. Glass is great because it does not hold odors. The Brussels sprouts stay crispier this way. When reheating, aim to keep that crunch. The best method is to use an oven. Preheat your oven to 350°F (175°C). Spread the sprouts on a baking sheet. Heat them for about 10-15 minutes. Check them often to avoid burning. If you want a quick option, you can use a skillet. Just heat on medium heat for about 5-7 minutes. Stir them gently to avoid sticking. Yes, you can freeze crispy Brussels sprouts! For best results, freeze them before cooking. Spread the halved sprouts on a tray and freeze them for about 2 hours. Once frozen, transfer them to a freezer bag. Remove as much air as you can. If you freeze them after cooking, they may lose some crunch. I recommend using them within three months for the best taste. Brussels sprouts cook in different ways and times. If you roast them in the oven, it takes about 20-25 minutes at 400°F (200°C). Make sure to check for a golden brown color and crisp texture. If you steam them, it takes around 6-8 minutes until they are tender. You can also sauté them on the stove, which takes about 10-15 minutes. Always stir or flip them halfway for even cooking. Yes, you can prep these Brussels sprouts ahead of time. Halve and clean them, then mix with garlic, oil, and spices. Store them in the fridge for up to 24 hours. When you’re ready to cook, just pop them in the oven. If you have leftovers, you can store them in an airtight container for about 3 days. Reheat them in the oven to keep them crispy. These Brussels sprouts pair well with many dishes. Try serving them with roasted chicken or grilled steak for a hearty meal. They also go great with a fresh salad or some quinoa for a lighter option. For a fun twist, add them to a pasta dish. Their crispy texture and bold flavor really elevate your meal! This blog post covered how to make Crispy Garlic Parmesan Brussels Sprouts. You learned about key ingredients, step-by-step prep, and helpful tips for perfect roasting. We also explored variations to suit different tastes and how to store leftovers effectively. Remember, small changes can make a big impact. Enjoy these delicious sprouts at your next meal! With their crispiness and flavor, they are sure to please everyone. Embrace your cooking skills and have fun experimenting with this recipe. Your kitchen adventures await!

Crispy Garlic Parmesan Brussels Sprouts Flavor Explosion

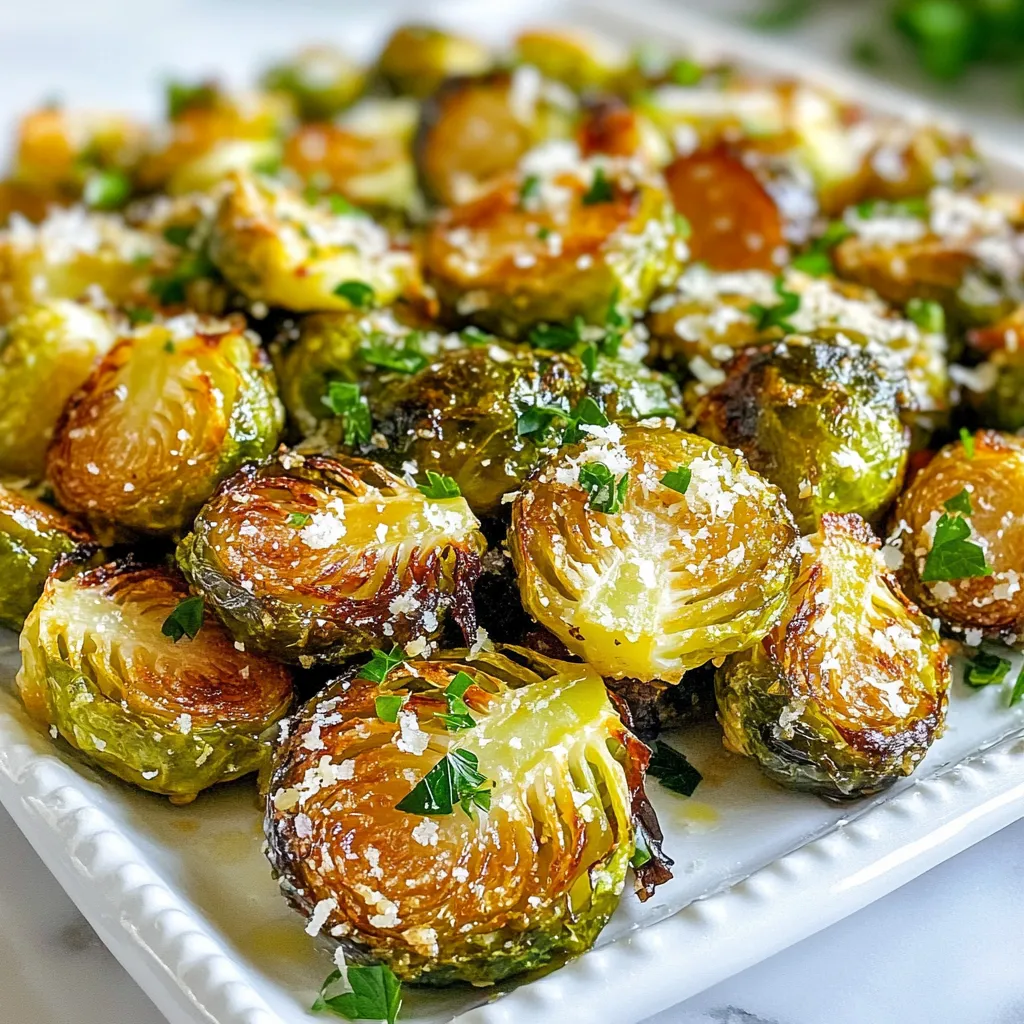
Are you ready to elevate your veggie game? Crispy Garlic Parmesan Brussels Sprouts are here to take your taste buds

To make Vanilla Almond Chia Pudding, gather the following items: - 1/4 cup chia seeds - 1 cup almond milk (unsweetened) - 2 tablespoons maple syrup (or honey) - 1 teaspoon vanilla extract - Pinch of salt - 1/4 teaspoon almond extract - Fresh berries (strawberries, blueberries, or raspberries) for topping - Sliced almonds for garnish These ingredients blend well to create a tasty and healthy treat. If you want to switch things up, here are some great options: - Agave syrup: A light choice that adds sweetness. - Coconut sugar: This gives a rich, caramel flavor. - Stevia: A low-calorie option that works well. For flavors, consider using: - Coconut extract: This adds a tropical twist. - Espresso powder: A touch of coffee flavor can enhance the pudding. Feel free to experiment with these options to suit your taste. Now, let’s break down the health benefits: - Chia seeds: High in fiber, protein, and omega-3 fatty acids. They help keep you full and support heart health. - Almond milk: Low in calories and rich in vitamin E. Great for skin health and a dairy-free choice. - Maple syrup: Contains antioxidants and is a natural sweetener. It can boost your immune system. - Vanilla extract: Adds flavor and has antioxidant properties. - Almond extract: Provides flavor and can help reduce stress. - Fresh berries: Packed with vitamins, fiber, and antioxidants. They support overall health. - Sliced almonds: A good source of healthy fats, protein, and magnesium. They promote heart health and help with weight management. Each ingredient brings its own benefits, making this pudding not just delicious but also nutritious. {{ingredient_image_1}} 1. Grab a mixing bowl. Add 1/4 cup chia seeds. Pour in 1 cup of unsweetened almond milk. 2. Add 2 tablespoons of maple syrup or honey. Next, include 1 teaspoon of vanilla extract. 3. Don't forget the pinch of salt and 1/4 teaspoon of almond extract. 4. Whisk everything together. Make sure the chia seeds mix well with the liquid. - Make sure to whisk for about one minute. This helps the chia seeds absorb the milk faster. - If you see clumps, break them up. A smooth mix helps the pudding set better. - You can also use a jar instead of a bowl. Just screw on the lid and shake it well. - Cover the bowl with plastic wrap. You can also seal the jar with a lid. - Place it in the fridge for at least 4 hours, or overnight if you can wait. - This chilling helps the chia seeds swell. They will turn into a thick pudding. - Once set, stir the pudding again. If it’s too thick, add a splash of almond milk to thin it out. To get the best texture, use the right amount of chia seeds. Too few seeds make it runny, while too many make it too thick. A quarter cup works well. Mix the seeds with the almond milk, syrup, and extracts until they are evenly spread. Let it sit for a few minutes, then whisk again. This helps prevent clumps. After chilling, if the pudding is thick, add more almond milk to thin it out. Make your pudding look great! Use clear glasses or jars to show off the layers. After you stir the pudding, layer it with fresh berries. Use strawberries, blueberries, or raspberries for color. Top with sliced almonds for a nice crunch. This not only tastes good but also looks pretty! You can even create a gradient effect with the berries for a fun twist. Watch out for these common errors. First, don’t skip the chilling time. It’s key to getting a nice texture. If you don’t chill it long enough, the seeds won’t swell. Next, be careful with the amount of sweetener. Too much can overpower the flavor. Finally, remember to stir the pudding after chilling. This helps make it smooth and creamy. Avoid these mistakes, and you’ll have great chia pudding every time! Pro Tips Perfect Chia Ratio: Ensure the chia seeds are thoroughly mixed with the almond milk to avoid clumping, achieving an even texture throughout the pudding. Flavor Variations: Experiment with different extracts like coconut or hazelnut to create unique flavor profiles for your chia pudding. Make Ahead: Prepare the chia pudding the night before for a quick breakfast option. It keeps well in the fridge for up to 5 days. Garnish Creatively: Use a mix of berries and nuts for garnish to add color, texture, and nutritional benefits to your pudding. {{image_2}} Chia pudding is fun because you can change it up easily. Here are some great ways to enjoy your vanilla almond chia pudding. You can mix in different flavors for a new twist. Try adding: - Chocolate: Mix in 1 tablespoon of cocoa powder for a rich flavor. - Matcha: Add 1 teaspoon of matcha powder for a green boost. - Coconut: Use coconut milk instead of almond milk to make it tropical. Each flavor brings a new taste. Experiment and see what you like best! This recipe is already dairy-free. Just use almond milk, and you are set! For a vegan option, stick with maple syrup for sweetness. It keeps the pudding plant-based. Fruits add freshness and color to your chia pudding. Here are some ideas based on the season: - Spring: Use fresh strawberries and cherries for a bright look. - Summer: Top with blueberries and raspberries for a burst of flavor. - Fall: Add diced apples and a sprinkle of cinnamon for warmth. - Winter: Use pomegranate seeds for a pop of color and crunch. Mixing in seasonal fruits makes every bowl special. Enjoy exploring these variations! To keep your vanilla almond chia pudding fresh, store it in a sealed container. Glass jars work great for this. Make sure the lid is on tight. This helps keep out air and moisture. Always place your pudding in the fridge right after making it. This keeps it cold and safe to eat. When stored properly, your chia pudding lasts about five days in the fridge. After that, it may lose its taste and texture. If you see any mold or weird smells, throw it away. Always check before you dig in! Yes, you can freeze chia pudding! However, the texture may change. To freeze, place the pudding in an airtight container. It can last up to three months in the freezer. When you are ready to eat, move it to the fridge overnight. Stir well before serving to restore some creaminess. Yes, you can use other types of milk. Almond milk is great, but you can also try coconut milk, soy milk, or oat milk. Each type adds a unique flavor. If you like creaminess, use full-fat coconut milk. For a nut-free option, go for oat milk. Just keep the same amounts for the best results. To reduce the sweetness, cut back on the maple syrup or honey. You can start with one tablespoon instead of two. Taste the mixture before it chills. If it still needs sweetness, add a little more. You can also leave out the sweetener entirely. The chia seeds and toppings add flavor, too. Chia pudding is very healthy! Chia seeds are high in fiber, omega-3 fats, and protein. They help you feel full and support good digestion. Almond milk is low in calories and high in vitamins. This pudding can be a great breakfast or snack option. Plus, it’s easy to make and packed with nutrients! In this post, we covered how to make chia pudding step by step. You learned about ingredients, mixing techniques, and tips to avoid common mistakes. I shared ways to personalize your pudding with fun flavors and toppings. Proper storage tips ensure your pudding stays fresh. Chia pudding is not just a treat; it's a healthy option. You can mix it up to fit your taste. Now, you have all the tools to create the perfect chia pudding every time. Enjoy your delicious and nutritious creation!

Vanilla Almond Chia Pudding Simple and Healthy Recipe

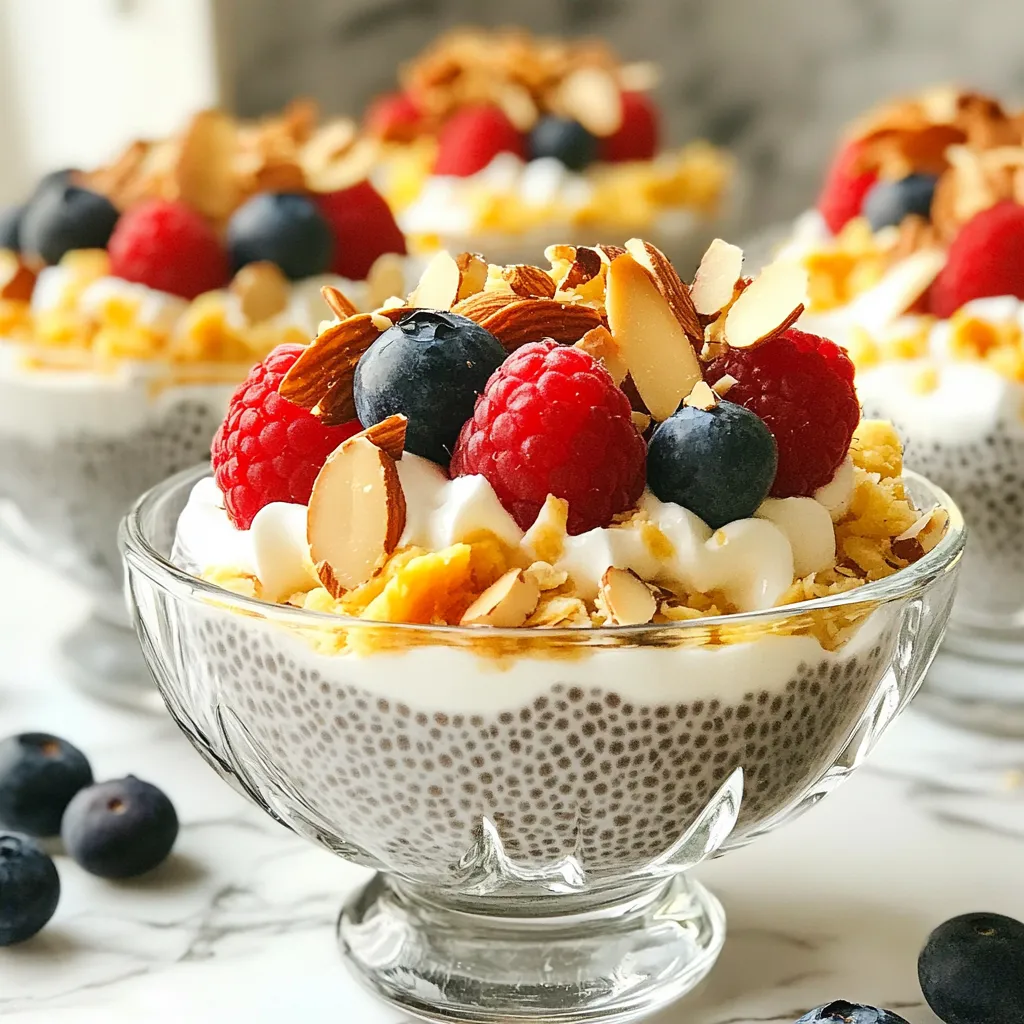
Looking for a delicious and healthy snack? You’re in the right place! Today, I’ll share my simple recipe for Vanilla

- 1 lb boneless, skinless chicken thighs - 2 tablespoons Jamaican jerk seasoning - 1 mango, diced - 1 small red onion, thinly sliced - 1 red bell pepper, sliced - 8 small corn tortillas - 1 avocado, sliced The main ingredients form the heart of our tacos. Chicken thighs give a rich, juicy flavor. Jamaican jerk seasoning adds a spicy kick. Fresh produce like mango, red onion, and red bell pepper adds crunch and sweetness. Finally, corn tortillas hold everything together. - 2 tablespoons olive oil - 1 teaspoon garlic powder - 1 teaspoon onion powder - 1/2 teaspoon salt - 1/4 teaspoon black pepper Seasoning and marinade make the chicken shine. Olive oil keeps the chicken moist while grilling. Garlic and onion powders give great depth. Salt and black pepper enhance all the flavors. Mix these with the chicken and let it marinate for at least 30 minutes. This step is key for tasty results. - Fresh cilantro - Lime wedges Garnishes are not just for looks; they boost flavor. Fresh cilantro adds a bright note that contrasts with the spice. Lime wedges provide a zesty punch when squeezed over the tacos. Together, they elevate each bite, making your tacos a feast for the senses. {{ingredient_image_1}} To start, you need to combine the chicken with the marinade. In a bowl, mix 1 pound of boneless, skinless chicken thighs with 2 tablespoons of Jamaican jerk seasoning, 2 tablespoons of olive oil, 1 teaspoon of garlic powder, 1 teaspoon of onion powder, 1/2 teaspoon of salt, and 1/4 teaspoon of black pepper. Toss the chicken well until every piece is coated. For best results, marinate the chicken in the fridge for at least 30 minutes. You can also let it sit for up to 2 hours. The longer you marinate, the more flavor it will absorb. Try to plan ahead for deeper taste. Next, preheat your grill or grill pan over medium-high heat. This step is key for getting those beautiful grill marks. Once the grill is hot, remove the chicken from the marinade. Grill the chicken for about 6-7 minutes on each side. You want it to reach an internal temperature of 165°F (75°C). Using a meat thermometer helps you check for doneness. Once grilled, transfer the chicken to a cutting board. Allow it to rest for a few minutes before slicing it into strips. This resting time helps keep the juices inside. Now, it’s time to warm your corn tortillas. Heat a dry skillet over medium heat and warm each tortilla for about 30 seconds on each side. This makes them soft and easy to fold. To build your tacos, layer slices of jerk chicken on each tortilla. Add diced mango, thinly sliced red onion, and red bell pepper on top. Finish off with avocado slices and a sprinkle of fresh cilantro. Don't forget lime wedges on the side! They add a delightful zing to every bite. Choose a good jerk seasoning for your chicken. You want the seasoning to be bold and flavorful. Look for blends with spices like allspice, thyme, and scotch bonnet peppers. If you have allergies, you can make your own mix. Use herbs, spices, and citrus juices. This way, you stay safe while enjoying great taste. Let the chicken marinate for at least 30 minutes. For more flavor, you can let it sit for up to 2 hours. The longer it marinates, the better the taste. Just remember to cover it! To get those perfect grill marks, preheat your grill well. Make sure it is hot before placing the chicken. This helps create those beautiful lines. Place the chicken on the grill and do not move it for the first few minutes. Flip it only when it is ready to release. Using a meat thermometer is key. Check that the chicken reaches 165°F (75°C). This way, you know it is safe to eat. If you do not have one, press the thickest part of the chicken. If the juices run clear, it’s done. Pair your tacos with fresh sides. A light salad or rice works great. The bright flavors of these dishes balance well with the spicy chicken. You can also add grilled corn for a sweet touch. For drinks, try a refreshing beverage. Limeade or a light beer complements the spices. If you want something non-alcoholic, coconut water is a great option. It’s hydrating and tasty! Enjoy your meal with friends and family for a festive feast. Pro Tips Marinate for Maximum Flavor: Allow the chicken to marinate for at least 2 hours, or overnight if possible, to fully absorb the jerk seasoning's bold flavors. Perfect Grill Marks: Ensure your grill is preheated before adding the chicken to achieve those beautiful grill marks and prevent sticking. Warm Tortillas Properly: Warming the tortillas in a dry skillet enhances their flavor and texture, making them more pliable for easy folding. Fresh Ingredients Matter: Use ripe, fresh mango and avocado for the best flavor and creaminess in your tacos, elevating the overall dish. {{image_2}} You can swap out chicken thighs for tofu or shrimp. For tofu, use firm or extra-firm types. Press the tofu to remove extra water, then marinate just like the chicken. Grill it until golden. For shrimp, choose large, peeled shrimp. Toss them with jerk seasoning and grill for just 2-3 minutes per side. Both options offer a tasty twist. Jackfruit is a fantastic substitute for meat in these tacos. It has a similar texture. Use young green jackfruit packed in water or brine. Drain and rinse it, then sauté with the jerk seasoning. You can also consider using other plant-based proteins like lentils or chickpeas. These add protein while keeping the dish flavorful. Adding spices or salsas can elevate your tacos. Try mixing in some cumin or smoked paprika for extra depth. Fresh mango salsa adds sweetness and heat. Just combine diced mango, red onion, jalapeño, and lime juice. This brightens up the dish and adds a refreshing kick. Don't be afraid to experiment with flavors! To store leftover Jamaican jerk chicken tacos, first, let them cool down. Place the chicken and toppings in separate airtight containers. This keeps them fresh and prevents sogginess. You can refrigerate them for up to three days. For longer storage, you can freeze the chicken. Wrap it in plastic wrap and then in foil. This helps to prevent freezer burn. You can freeze the chicken for up to three months. Just remember to label the containers. When you’re ready to enjoy your leftovers, you have a few options. For the best taste, reheat the chicken in the oven. Preheat it to 350°F (175°C). Place the chicken on a baking sheet and cover it with foil. Heat for about 15 minutes or until warm. If you’re in a hurry, use a microwave. Place the chicken in a microwave-safe bowl and cover it. Heat in short bursts, stirring in between. This helps keep it juicy and tasty. Warm the tortillas in a dry skillet for about 30 seconds before serving. Your Jamaican jerk chicken should stay fresh in the fridge for about three days. If you freeze the chicken, it can last up to three months. After that, the quality may drop. Always check for any off smells or changes in color before eating. If you're unsure, it's better to throw it away. Jerk seasoning is a blend of spices from Jamaica. It is famous for its bold flavors. The key ingredients include: - Allspice - Scotch bonnet peppers - Thyme - Garlic - Ginger - Nutmeg This mix gives jerk chicken its spicy and smoky taste. You can find it in stores or make your own at home. Yes, you can make these tacos ahead of time. This helps save time for busy days. Here are some tips: - Marinate the chicken a day before. - Grill the chicken and slice it. - Store it in an airtight container in the fridge. You can warm the chicken and tortillas when ready to eat. Jamaican jerk chicken tacos go well with several sides and drinks. Here are some tasty ideas: - Rice and peas - Grilled corn - Plantains - Tropical fruit salad For drinks, try a cold ginger beer or a fruity rum punch. You can adjust the spice level in your tacos easily. Here’s how: - For milder tacos, use less jerk seasoning. - You can also add honey or sugar to tone down heat. - For spicier tacos, add sliced Scotch bonnet peppers or extra seasoning. Taste as you go to find your perfect heat level. In this blog post, we explored how to make delicious Jamaican Jerk Chicken Tacos. We covered ingredients, marinating, grilling, and serving. You can customize these tacos with different proteins and enhance flavors with various spices. Remember to store leftovers correctly and reheat to enjoy them again. I hope you try these tacos. They promise a burst of flavor that everyone will love. Happy cooking!

Jamaican Jerk Chicken Tacos Flavorful and Fresh Feast

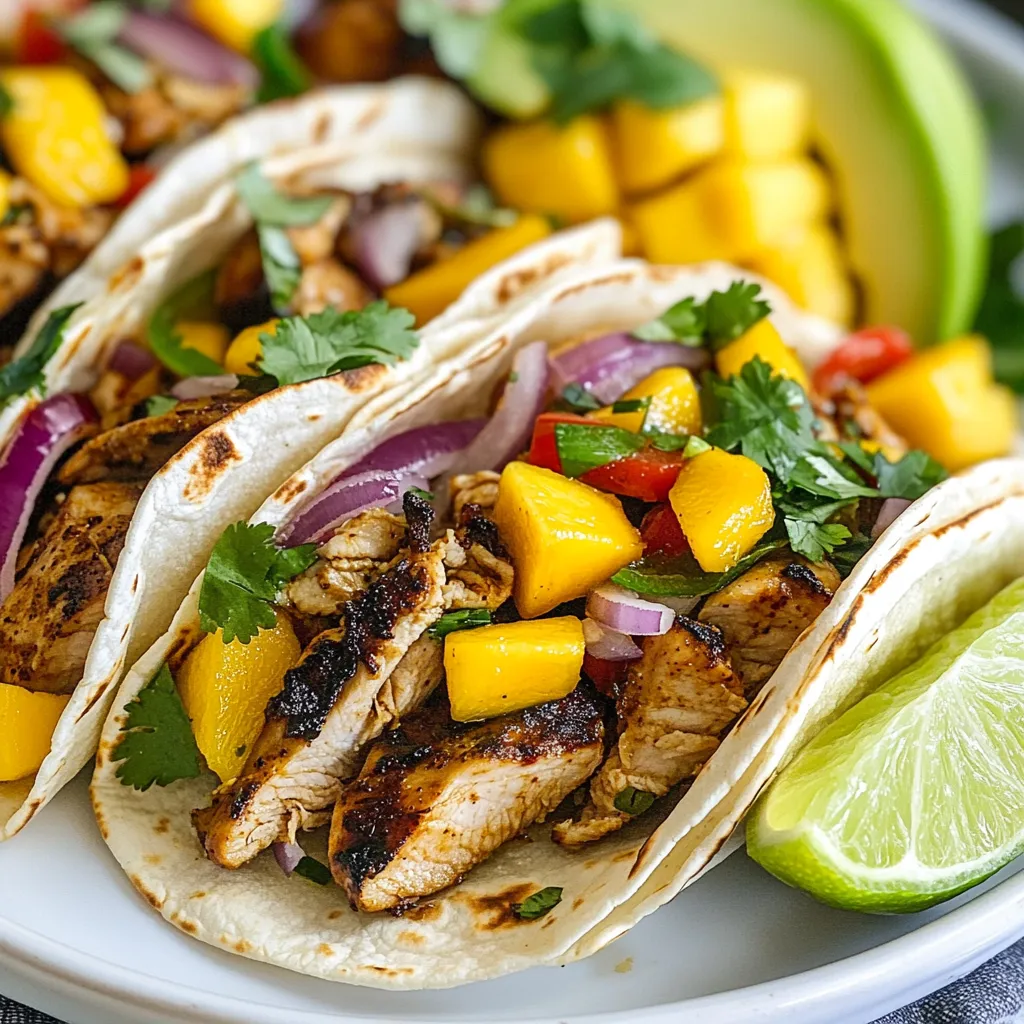
If you’re ready to spice up your taco night, Jamaican Jerk Chicken Tacos are the way to go! These tacos

- 1 lb ground chicken or turkey - 1/2 cup panko breadcrumbs - 1/4 cup green onions, finely chopped - 2 cloves garlic, minced - 1 tablespoon fresh ginger, grated - 1 tablespoon soy sauce (low sodium) For the meatballs, I prefer using ground chicken or turkey. It gives a light and tasty base. Panko breadcrumbs help keep the meatballs juicy and tender. Green onions add a nice crunch and fresh flavor. Garlic and ginger bring a punch of zest that elevates each bite. Lastly, soy sauce rounds out the flavor with a touch of umami. - 1 tablespoon sesame oil - 1 teaspoon honey - 1/2 teaspoon black pepper - 1/4 teaspoon red pepper flakes (optional for heat) - 1 tablespoon sesame seeds To enhance the taste, I add sesame oil for its nutty richness. Honey balances the saltiness and adds a hint of sweetness. Black pepper brings a warm spice, while red pepper flakes add a kick if you like heat. A sprinkle of sesame seeds on top gives a nice crunch and look. - 2 cups mixed vegetables (like bell peppers, broccoli, and carrots) - 2 tablespoons olive oil - Salt to taste Mixed vegetables add color and nutrition to the dish. I like to use bell peppers, broccoli, and carrots for their sweet and crunchy texture. Toss these veggies in olive oil and salt to make them shine. When roasted, they become tender and caramelized, making them a perfect side to the meatballs. {{ingredient_image_1}} First, I preheat the oven to 400°F (200°C). Next, I line a baking sheet with parchment paper. This step helps with easy cleanup later. In a large bowl, I mix ground chicken or turkey, panko breadcrumbs, green onions, minced garlic, grated ginger, soy sauce, sesame oil, honey, black pepper, and a pinch of salt. I stir gently until everything blends together well. Now, I shape the mixture into golf ball-sized meatballs. It’s fun to roll them in my hands! I place the meatballs on the prepared baking sheet, making sure to leave space between them. This helps them cook evenly. In another bowl, I toss mixed vegetables, like bell peppers, broccoli, and carrots, with olive oil and salt. I also add a sprinkle of sesame seeds for extra flavor. Once coated, I scatter the seasoned veggies around the meatballs on the sheet. This creates a colorful and tasty meal. I bake the meatballs and vegetables in the oven for 20-25 minutes. I check the internal temperature of the meatballs with a meat thermometer. They should reach 165°F (74°C) to be safe to eat. The vegetables should look tender and slightly caramelized. This process fills my kitchen with a wonderful aroma! To make great meatballs, mix the ingredients well. This helps them cook evenly. I use ground chicken or turkey for a lighter option. Aim for a nice blend of panko and meat. This keeps the texture soft yet firm. The best internal temperature for meatballs is 165°F (74°C). Use a meat thermometer for best results. When done, meatballs should be brown outside and juicy inside. Choosing the right veggies makes a big difference. I love using bell peppers, broccoli, and carrots. They add color and crunch. Try to pick fresh, seasonal vegetables. This adds flavor and nutrients. You can also switch them up based on what’s available. For example, asparagus and zucchini work great, too. Presentation adds fun to your meal. Serve the meatballs and veggies on a bed of rice or quinoa. This makes it filling and adds texture. You can drizzle some extra sesame oil on top. For a little heat, sprinkle some chili flakes. A sprinkle of green onions gives a nice touch. Enjoy your meal with family or friends! Pro Tips Use Fresh Ingredients: Fresh garlic and ginger will elevate the flavor of your meatballs, making them more aromatic and delicious. Don’t Overmix: When combining the ingredients, mix just until combined to keep the meatballs tender. Overmixing can lead to a tough texture. Customize Your Veggies: Feel free to use any vegetables you have on hand. Zucchini, snap peas, or asparagus can be great alternatives! Check for Doneness: Use a meat thermometer to ensure meatballs reach an internal temperature of 165°F (74°C) for safe consumption. {{image_2}} You can use either ground chicken or ground turkey in this recipe. Ground turkey has a leaner taste, while ground chicken is juicier. Both options work well for meatballs. If you follow a vegetarian diet, try using lentils or chickpeas. Both will give you a great texture and flavor. Want to add a twist? Consider adding spices like cumin or coriander. These spices enhance the meatballs and give them a new depth. You can also add sauces like hoisin or sriracha for a bolder taste. Fresh herbs like cilantro or basil can brighten the dish, too. Just chop them finely and mix them in for a fresh kick. Seasonal vegetables make a big difference. Try using zucchini in the summer or squash in the fall. Just remember to cut them into similar sizes for even cooking. Roasting techniques can also elevate your dish. Toss the veggies in olive oil and salt for a tasty caramelization. This adds a nice crunch and deep flavor, making your meal even more delightful. To keep your meatballs fresh, store them in the fridge. Use airtight containers to prevent drying out. Placing parchment paper between layers can help. Try to eat them within three days for the best taste. You can reheat meatballs in the oven or the microwave. For the oven, set it to 350°F (175°C). Place meatballs on a baking sheet and heat for about 10-15 minutes. In the microwave, heat them in short bursts. Add a splash of water to keep them moist. For veggies, stir them in a pan with a bit of oil. This keeps them crisp. Freezing meatballs is great for meal prep. Shape the meatballs and place them on a baking sheet. Freeze until solid, then transfer to a freezer bag. Label them with the date. They can last up to three months. To cook, thaw in the fridge overnight. Bake at 400°F (200°C) for 20-25 minutes, checking the internal temperature. Make sure it reaches 165°F (74°C). You can use several options to bind meatballs without breadcrumbs. Here are some great alternatives: - Oats: Use rolled oats for a wholesome texture. - Ground nuts: Almond or walnut flour adds flavor and crunch. - Cooked rice: This gives moisture and a chewy bite. - Mashed potatoes: They create a soft and moist meatball. Experiment with these options to find what you like best! Yes, you can switch the meat in these meatballs. Here are some tasty choices: - Ground beef: This adds a rich flavor. - Pork: Use ground pork for a juicy bite. - Lamb: This gives a unique taste and aroma. - Plant-based meat: Great for a vegetarian or vegan option. Each type will change the flavor, so choose what you enjoy! Many vegetables work well with sesame ginger meatballs. Here are some popular choices: - Bell peppers: They add sweetness and color. - Broccoli: This offers a nice crunch and nutrients. - Carrots: Their natural sweetness complements the meatballs. - Snap peas: They provide a fresh and crisp texture. Feel free to mix and match based on what you have. To check if your meatballs are ready, look for these signs: - Golden brown color: They should be nicely browned on the outside. - Internal temperature: Use a meat thermometer. It should read 165°F (74°C). - Firm texture: They should feel firm when pressed. These cues will help you serve perfectly cooked meatballs. Making this recipe ahead of time is simple! Here are some tips: - Prep the meatballs: You can make them and store in the fridge for up to a day. - Freeze them: Shape the meatballs and freeze them raw. Just bake from frozen when ready. - Cook the veggies: You can roast the veggies in advance and store them in the fridge. With these steps, you’ll enjoy a quick meal anytime! This blog post guides you through making tasty sesame ginger meatballs. We covered main ingredients like ground chicken, panko, and veggies. You learned step-by-step instructions for mixing and baking, plus tips for perfecting your meatballs. I also shared storage tips for leftovers and ideas for variations. Now, you can create a flavorful dish that suits your taste. Enjoy experimenting with this easy recipe for tasty meals!

Sheet Pan Sesame Ginger Meatballs Flavorful and Easy

Are you ready to spice up your dinner routine? These Sheet Pan Sesame Ginger Meatballs are not only bursting with

- 1 pound ground beef - 1 small onion, diced - 2 cloves garlic, minced - 1 can (15 oz) black beans, drained and rinsed - 1 can (10 oz) diced tomatoes with green chilies - 1 cup corn (fresh or frozen) - 2 tablespoons taco seasoning - 1 cup shredded cheddar cheese - 1 cup enchilada sauce - 4 small flour tortillas, cut into strips - 2 tablespoons olive oil - Fresh cilantro, for garnish - Sour cream, for serving (optional) These ingredients create a hearty and rich flavor. The ground beef serves as the base, while the beans add protein. Diced tomatoes bring freshness, and the corn adds a sweet crunch. Taco seasoning gives it that classic flavor we love. - Jalapeños, diced (for heat) - Avocado slices (for creaminess) - Lime wedges (for zest) - Extra cheese varieties (like Monterey Jack) Adding jalapeños can spice up your dish. Avocado slices add a nice creamy touch. Lime wedges offer a fresh twist that brightens the flavors. - Large skillet - Spatula - Cutting board - Knife - Measuring cups and spoons Using the right tools makes cooking easier. A large skillet allows you to mix all the ingredients well. A good spatula helps in breaking down the beef as it cooks. {{ingredient_image_1}} First, grab a large skillet and heat two tablespoons of olive oil over medium heat. When the oil is hot, add one small diced onion. Sauté the onion for about three minutes until it becomes soft and clear. Next, add two cloves of minced garlic and one pound of ground beef. Cook the beef for five to seven minutes. Keep breaking it up with a spatula until it turns brown. This step makes sure your meat cooks evenly and mixes well with the veggies. Now it's time to add flavor! Stir in two tablespoons of taco seasoning to your beef. Then, add one can of diced tomatoes with green chilies, one can of drained and rinsed black beans, and one cup of corn. Mix all these ingredients well. This tasty combination gives your dish a rich flavor. After mixing, pour in one cup of enchilada sauce. Make sure to stir it all around so the sauce coats everything evenly. To bring it all together, gently fold in four small flour tortillas that you've cut into strips. This will help them soak up all that delicious sauce. Next, sprinkle one cup of shredded cheddar cheese over the top. Cover the skillet with a lid and let it cook for about three to five minutes. This step melts the cheese perfectly and makes everything nice and gooey. Once the cheese is melted and everything is bubbling, take it off the heat. Garnish with fresh cilantro, and if you like, add a dollop of sour cream for extra creaminess. Enjoy your savory beef enchilada skillet! To make a great beef enchilada skillet, start with fresh ground beef. It gives the best flavor. Use a large skillet to fit all the ingredients. Heat the olive oil first, then add the onion. Cooking the onion until soft is key. Next, brown the beef well. This adds depth to your dish. Don't rush this step; take about 5-7 minutes. Mix in the taco seasoning for flavor. Stir in the diced tomatoes, black beans, and corn. They bring color and texture. Pour the enchilada sauce evenly over everything. This will tie all the flavors together. Finally, add the tortilla strips gently. This helps them soak up the sauce. Cook the beef over medium heat. This ensures it cooks evenly. Keep the skillet covered while melting the cheese. This takes about 3-5 minutes. Keep an eye on it to avoid burning. For the best results, serve right after cooking. Enjoy the dish while the cheese is gooey and hot. Serve the beef enchilada skillet directly from the pan. This keeps it warm and inviting. Garnish with fresh cilantro for a burst of color. You may add slices of avocado for creaminess. A dollop of sour cream enhances the flavor too. Pair it with a side of tortilla chips for crunch. This makes a fun and filling meal. Pro Tips Use Lean Beef: Opt for lean ground beef (like 90% lean) to reduce excess fat while still getting that rich flavor. Customize Your Heat: If you like it spicy, consider adding jalapeños or using hot enchilada sauce to give your dish an extra kick. Add Fresh Vegetables: Incorporate bell peppers or zucchini for added nutrition and texture, enhancing the overall flavor profile. Make It Ahead: This dish can be prepped in advance; just combine the ingredients and store in the fridge until you're ready to cook! {{image_2}} You can easily swap ground beef for turkey. Turkey keeps the flavor but cuts fat. For a vegetarian mix, use black beans or lentils. These options add protein and taste. If you need gluten-free, look for corn tortillas. They work great in this dish. Many brands offer soft, tasty corn tortillas that fit right in. You can boost nutrition by adding more veggies. Try bell peppers, zucchini, or spinach. They cook down well and blend in nicely. For spice lovers, add jalapeños or chili powder. A little heat makes the dish exciting! To store leftovers, let the Beef Enchilada Skillet cool first. Then, transfer it to an airtight container. You can keep it in the fridge for up to three days. If you want to enjoy it later, store it in smaller portions. This makes it easy to reheat. The best way to reheat this dish is in a skillet. Heat it over medium heat. Stir occasionally to warm it evenly. If the mix is dry, add a little water or extra enchilada sauce. You can also use a microwave. Heat in short bursts, stirring in between. To freeze, place the cooled Beef Enchilada Skillet in a freezer-safe container. Seal it tightly to avoid freezer burn. You can freeze it for up to three months. When ready to eat, thaw it overnight in the fridge. Reheat it on the stove or microwave. Enjoy a quick meal anytime! Yes, you can make this dish ahead of time. Cook the beef mixture and let it cool. Then, store it in the fridge for up to two days. When ready to eat, reheat it on the stove. Add cheese and tortillas just before serving. This keeps everything fresh and tasty. You can serve this dish with many sides. Here are some ideas: - Rice: Spanish rice or cilantro lime rice works well. - Salad: A fresh green salad adds a nice crunch. - Guacamole: Creamy guacamole pairs well with the flavors. - Chips: Tortilla chips are great for dipping. These sides will make your meal more filling and fun. You can easily change the spice level in this skillet. Here are a few tips: - Add More Taco Seasoning: Use an extra tablespoon for more heat. - Use Spicy Enchilada Sauce: Swap regular sauce for a hot version. - Add Fresh Peppers: Diced jalapeños or serranos can bring a kick. - Top with Hot Sauce: Let each person add their favorite hot sauce. These options let you control the heat to match your taste. Beef Enchilada Skillet is easy to make and full of flavor. We covered essential and optional ingredients, tools, and steps to prepare your dish. Tips for perfect cooking and delicious serving ideas were shared, along with variations for different diets. Proper storage and reheating methods ensure freshness. You can customize meals based on your taste. Now you have the tools to create your own Beef Enchilada Skillet. Enjoy your cooking adventure!

Savory Beef Enchilada Skillet Quick and Easy Recipe

If you’re craving a tasty meal but short on time, you’re in luck! My Savory Beef Enchilada Skillet combines all

Older posts
Newer posts
← Previous Page1 … Page127 Page128 Page129 … Page137 Next →

dsad

© 2025 Recipes Pursuit • Built with GeneratePress

Our Policies

  • Copyright Policy
  • Cookie Policy
  • GDPR Policy
  • Privacy Policy
  • Disclaimer
  • Terms Of Use

More Information

  • Home
  • About
  • Contact
  • Appetizers
  • Dessert
  • Dinner
  • Drinks
©2025, Recipes Pursuit About Back To Top