Skip to content
DisclaimerTerms Of UseGDPR PolicyCookie Policy

Recipes Pursuit

  • Home
  • Drinks
  • Appetizers
  • Dinner
  • Dessert
  • About
  • Contact
  • Privacy Policy
DisclaimerTerms Of UseGDPR PolicyCookie Policy

Emma Smith

Here’s what you need for Blueberry Coconut Overnight Oats: - 1 cup rolled oats - 1 cup coconut milk (or any milk of choice) - 1/2 cup Greek yogurt (or coconut yogurt for dairy-free) - 1 cup fresh blueberries (or frozen) - 2 tablespoons shredded coconut (unsweetened) - 2 tablespoons maple syrup (or honey) - 1 teaspoon vanilla extract - Pinch of salt - Fresh mint leaves for garnish (optional) Gather these simple ingredients. They create a tasty, healthy breakfast. Rolled oats form the base. Coconut milk gives a creamy texture. Greek yogurt adds protein. Blueberries bring sweetness and color. Shredded coconut enhances the tropical vibe. Maple syrup or honey offers natural sweetness. Vanilla extract boosts flavor. A pinch of salt balances everything out. Mint leaves are a fun touch for garnish. This mix is not just healthy; it's delicious and fun to make! {{ingredient_image_1}} 1. In a medium bowl, mix the rolled oats, coconut milk, Greek yogurt, maple syrup, vanilla extract, and a pinch of salt. Stir until smooth. 2. Next, gently fold in the blueberries and shredded coconut. Make sure the blueberries spread evenly throughout the mixture. 3. Now, divide the mixture into two jars or containers. Seal them tightly and place them in the fridge overnight. - The best chilling time is overnight, but at least six hours will work. - Letting the oats soak overnight is key. This helps them absorb the liquid and soften, making them creamy and delicious. - In the morning, stir each jar well to combine everything. - If the oats seem too thick, add a splash of extra coconut milk. This helps you get the right consistency. - Top with more fresh blueberries, a sprinkle of shredded coconut, and mint leaves for a nice look before serving. For a dairy-free option, use coconut yogurt instead of Greek yogurt. This keeps the creamy texture while adding coconut flavor. You can also choose almond or soy milk instead of coconut milk. If you want to change the sweetness, use honey instead of maple syrup. You can also use agave syrup or stevia for lower calories. To ensure even blueberry distribution, fold them gently into the mixture. This helps keep the berries whole and spread throughout. When layering in jars, add some oats first, then blueberries, and a sprinkle of coconut. Repeat this until you fill the jar. This makes each layer look nice and colorful. For garnishing, top your oats with fresh blueberries, a sprinkle of shredded coconut, and mint leaves. This adds a fun pop of color. Serve your overnight oats in clear jars. This way, you can show off the beautiful layers of blueberries and coconut. It makes for a stunning breakfast! Pro Tips Use Chilled Ingredients: For a refreshing start to your day, ensure your coconut milk and yogurt are chilled before mixing. This will enhance the overall flavor and texture of your overnight oats. Experiment with Toppings: Don't hesitate to mix and match toppings! Consider adding nuts, seeds, or other fruits like bananas or strawberries for added texture and flavor. Make a Larger Batch: If you love these overnight oats, double or triple the recipe! They keep well in the fridge for up to 4 days, making them perfect for meal prep. Adjust Sweetness to Taste: Feel free to adjust the amount of maple syrup or honey based on your preference. Taste the mixture before refrigerating to find your perfect level of sweetness. {{image_2}} You can enhance your Blueberry Coconut Overnight Oats with different flavors. Try adding spices like cinnamon or nutmeg. A sprinkle of these spices gives your oats warmth and depth. You can also switch up the fruit. Instead of blueberries, use fresh strawberries or juicy peaches. This change brightens the dish and adds a new twist. For a chewier bite, consider using steel-cut oats instead of rolled oats. Steel-cut oats take longer to soak but offer a nutty flavor. You can also mix in seeds like chia or flaxseed. These seeds add crunch and boost the nutrition of your oats. They also help thicken the mixture, making it even more filling. Sweetness is key in overnight oats. You can adjust it by using different sweeteners. Try honey or agave syrup for a unique touch. If you want less sugar, reduce the added sweeteners. Your oats will still taste great, especially with the natural sweetness of fruit. This balance keeps your breakfast healthy and delicious. You can keep your blueberry coconut overnight oats in the fridge for up to four days. This makes it a great option for meal prep! If you want to freeze them, you can store them in freezer-safe containers. They will last for about three months in the freezer. Just make sure to let them cool fully before freezing. These oats are best served chilled. Just grab a jar from the fridge, give it a stir, and enjoy! If you want a warm version, you can microwave them. Heat for about 30 seconds, then stir well. If they are too thick, add a splash of coconut milk. Check for a sour smell or off texture. If the oats smell strange or have a slimy feel, it’s time to toss them out. Also, if the blueberries look mushy or discolored, they may not be good to eat. Always trust your senses! Overnight oats are a no-cook method for making oatmeal. You mix oats with liquid and let them sit overnight. This process softens the oats and blends the flavors. The result is creamy, ready-to-eat oatmeal. Overnight oats are quick, easy, and healthy. They are great for busy mornings. You can customize them with fruits, nuts, or seeds. They are also high in fiber and keep you full longer. Yes, you can easily make these oats vegan! Use coconut yogurt instead of Greek yogurt. For milk, coconut milk is a great choice. You can also use almond or oat milk. Instead of honey, use maple syrup. These swaps keep the recipe tasty and plant-based. You should refrigerate overnight oats for at least 6 hours. Ideally, let them sit overnight. This allows the oats to absorb the liquid. The longer they sit, the creamier they become. If you're in a rush, 6 hours is the minimum. Just know that the texture might not be as creamy. Absolutely! You can use any milk you prefer. Almond milk, soy milk, or oat milk work well. Each type changes the flavor a bit. Coconut milk adds a rich, creamy taste. Almond milk is lighter and nutty. Choose what you like best for your oats. In this blog post, we explored the world of overnight oats, focusing on key ingredients and easy steps to prepare. You learned how to mix oats, milk, yogurt, and fresh berries, plus tips for flavoring and serving. Remember, overnight oats are versatile and adjustable to your taste. You can store them in the fridge or freezer for convenience. Enjoy your delicious creation, and don't hesitate to try new flavors. Your breakfast routine just got better with overnight oats!

Blueberry Coconut Overnight Oats Easy Healthy Recipe

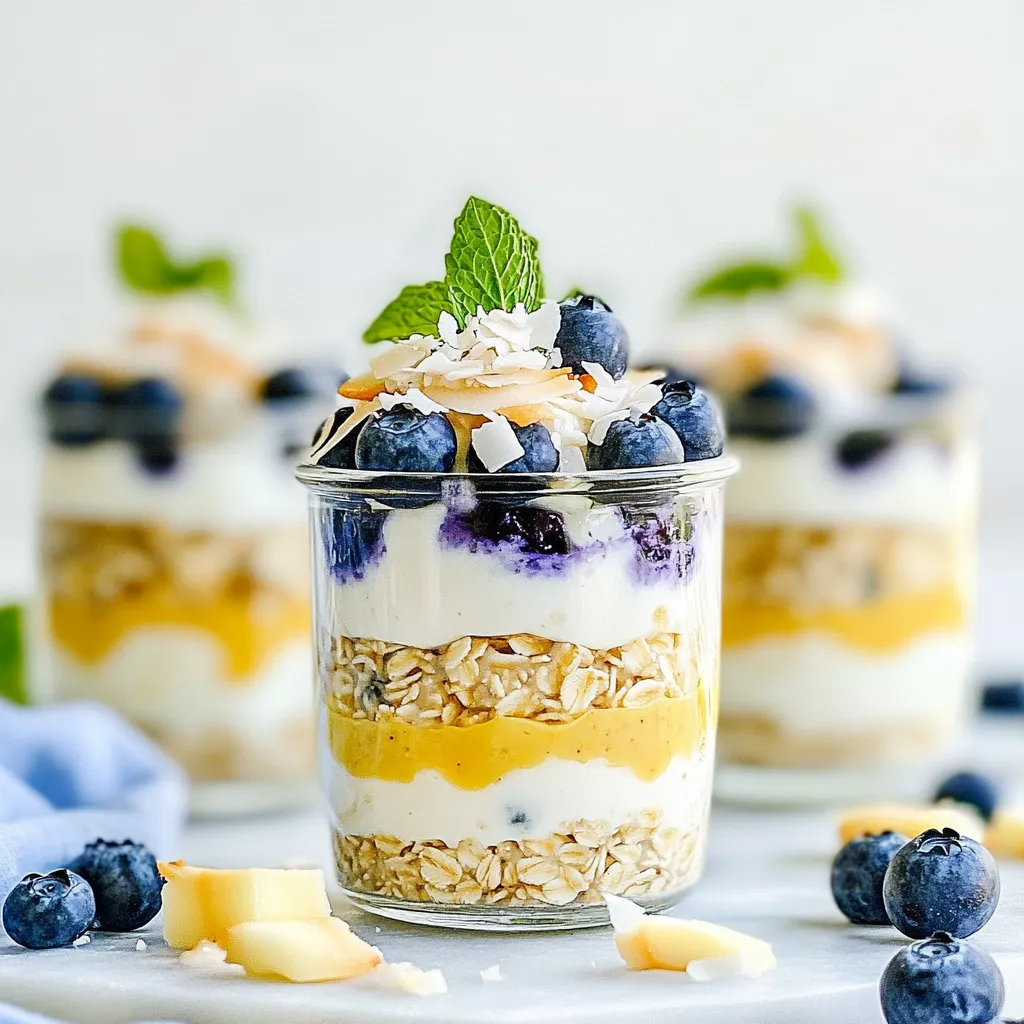
Start your day off right with my Blueberry Coconut Overnight Oats! This easy and healthy recipe combines creamy coconut milk,

To make these muffins, gather these items: - 1 cup plain Greek yogurt - 2 large eggs - 1/2 cup granulated sugar - 1/4 cup honey - 1/4 cup vegetable oil - Zest of 1 lemon - 2 tablespoons fresh lemon juice - 1 teaspoon vanilla extract - 1 1/2 cups all-purpose flour - 1 teaspoon baking powder - 1 teaspoon baking soda - 1/2 teaspoon salt - 1 cup fresh blueberries (or frozen, if not in season) If you need to make some swaps, here are a few ideas: - Greek yogurt can be replaced with regular yogurt. - Granulated sugar can switch to brown sugar for a deeper flavor. - Honey can be substituted with maple syrup for a different sweetness. - Vegetable oil can be replaced with melted coconut oil or applesauce. - All-purpose flour can be swapped with whole wheat flour or gluten-free flour. Each muffin has about: - Calories: 150 - Total fat: 5g - Saturated fat: 1g - Cholesterol: 30mg - Sodium: 150mg - Carbohydrates: 23g - Fiber: 1g - Sugar: 8g - Protein: 4g This information helps you enjoy your muffins while staying aware of their nutritional value. Enjoy baking! {{ingredient_image_1}} First, set your oven to 350°F (175°C). This temperature is perfect for baking. Next, grab a muffin tin. You can line it with paper liners or spray it with cooking spray. This step helps prevent sticking. It also makes clean-up easy. In a large bowl, combine the Greek yogurt, eggs, granulated sugar, and honey. Add the vegetable oil, lemon zest, lemon juice, and vanilla extract. Whisk these ingredients together until they blend well. This mixture gives your muffins moisture and flavor. In another bowl, sift together the all-purpose flour, baking powder, baking soda, and salt. This step breaks up any lumps and aerates the flour. It ensures your muffins rise nicely and have the right texture. Now, slowly add the dry ingredients to the wet mixture. Use a spatula or wooden spoon to stir just until combined. Do not overmix the batter. A few lumps are okay. This helps keep your muffins light and fluffy. Gently fold in the blueberries using your spatula. Be careful not to squish them. You want whole blueberries in your muffins for bursts of flavor. This step adds a beautiful touch to your muffins. Spoon the batter into the muffin tin until each cup is about two-thirds full. Place the tin in the preheated oven. Bake for 18-22 minutes. Check if they are done by inserting a toothpick in the center. If it comes out clean, your muffins are ready. To get that perfect muffin texture, start with fresh ingredients. Use room temperature eggs and yogurt. This helps the batter mix well and rise nicely. Mix the wet and dry ingredients until just combined. Overmixing can make your muffins tough. Aim for a few lumps in the batter. This keeps your muffins light and fluffy. When adding blueberries, be gentle. Use a spatula to fold them in. Stir slowly and watch for broken berries. If you want to avoid this, coat the blueberries in flour before folding. This helps them stay whole and evenly spread in the batter. Remember to save some for the top. This adds a nice touch when baking. If your muffins sink, it may be from too much mixing or too little baking time. Always check with a toothpick. If it comes out wet, bake a bit longer. For dry muffins, try using more yogurt or oil next time. If you notice uneven tops, make sure you fill each muffin cup evenly. This ensures they all bake at the same rate. Pro Tips Use Room Temperature Ingredients: Make sure your eggs and yogurt are at room temperature for a smoother batter and better rise. Don’t Overmix: Mix the batter until just combined. Overmixing can lead to dense muffins. Choose the Right Blueberries: Fresh blueberries are ideal, but if using frozen, do not thaw them to prevent excess moisture in the batter. Check for Doneness: Insert a toothpick into the center of a muffin; it should come out clean or with a few moist crumbs. {{image_2}} You can change the fruit in your muffins for fun. Try using strawberries or raspberries. These fruits add their own unique taste. Just chop them into small pieces. Mix them in the same way as blueberries. This keeps the muffins yummy and colorful. You can even mix in different fruits for a fruity surprise. Want gluten-free muffins? It’s easy! Swap the all-purpose flour with a gluten-free blend. Many brands offer a mix that works well. Make sure it has xanthan gum for the right texture. Follow the same steps in the recipe. Your muffins will be soft and tasty, just like the original. If you want to cut sugar, use other sweeteners. You can swap granulated sugar for coconut sugar. It has a lower glycemic index. Honey can be reduced if you use maple syrup. Just remember, these sweeteners may change the taste a bit. Experiment to see what you like best! To keep your lemon blueberry yogurt muffins fresh, store them in an airtight container. Place a paper towel at the bottom to absorb moisture. This helps prevent sogginess. You can keep them at room temperature for up to three days. If you want them to last longer, consider refrigerating them. Freezing these muffins is easy. First, let them cool completely. Then, wrap each muffin tightly in plastic wrap. Place them in a freezer bag or a container. Label the bag with the date. They can stay fresh in the freezer for up to three months. When you're ready to eat, just thaw them at room temperature or warm them in the microwave for a few seconds. Lemon blueberry yogurt muffins can stay fresh for about three days at room temperature. If you store them in the fridge, they might last up to a week. For the best flavor, enjoy them within a few days of baking. Yes, you can use frozen blueberries. They work well in this recipe. Just remember to add them straight from the freezer. Do not thaw them, as this keeps them from getting mushy. Frozen blueberries may tint your batter blue, but they still taste great. To check if the muffins are done, use a toothpick. Insert it into the center of a muffin. If it comes out clean or with just a few crumbs, the muffins are ready. Baking usually takes 18 to 22 minutes at 350°F (175°C). Keep an eye on them after 18 minutes. These muffins pair well with many items. You can serve them with butter or cream cheese for a rich touch. A side of fresh fruit or yogurt adds a nice balance. They also taste great with a cup of tea or coffee, making them perfect for breakfast or a snack. Lemon blueberry yogurt muffins bring fresh flavors and easy steps to your kitchen. We covered key ingredients, mixing, and baking, along with tips for the perfect texture. Explore tasty variations and storage methods to keep your muffins fresh. Enjoy them warm or freeze them for later. These muffins are a great treat and perfect for sharing. Have fun baking and enjoy your tasty creations!

Lemon Blueberry Yogurt Muffins Tasty and Easy Recipe

Are you ready to bake something delicious? Lemon blueberry yogurt muffins are a perfect treat! They are moist, tangy, and

- Chicken thighs: bone-in, skin-on - Marinade components: garlic, lime juice, olive oil, honey - Seasonings: smoked paprika, cumin, salt, black pepper - Garnish: fresh cilantro To make garlic lime chicken thighs, start with fresh, high-quality chicken. For this dish, I use bone-in, skin-on thighs. They stay juicy and flavorful during cooking. Next, we have the marinade. The key ingredients include: - Garlic: Use four cloves, minced. Garlic adds a strong, rich flavor. - Lime juice: A quarter cup of fresh lime juice gives a zesty kick. - Olive oil: Two tablespoons of olive oil help the marinade cling to the chicken. - Honey: One tablespoon of honey balances the acidity with sweetness. Now for the spices. The seasonings include: - Smoked paprika: This spice adds a warm, smoky flavor. - Cumin: One teaspoon of cumin brings an earthy touch. - Salt: One teaspoon enhances all the flavors. - Black pepper: A half teaspoon adds light heat. Finally, don't forget the garnish. Fresh cilantro adds color and freshness on top. Gather these ingredients before you start cooking. This dish is simple but packed with flavor. {{ingredient_image_1}} To start, grab a large bowl. You will mix several key ingredients to create a flavorful marinade. Add 4 minced garlic cloves, 1/4 cup of fresh lime juice, 2 tablespoons of olive oil, and 1 tablespoon of honey. Next, sprinkle in 1 teaspoon of smoked paprika, 1 teaspoon of cumin, 1 teaspoon of salt, and 1/2 teaspoon of black pepper. Stir everything together until well combined. Once your marinade is ready, it’s time to add the chicken. Place 4 bone-in, skin-on chicken thighs into the bowl. Make sure each piece is fully coated in the marinade. Cover the bowl with plastic wrap and refrigerate for at least 30 minutes. For even better flavor, let it sit for up to 2 hours. After marinating, it’s time to prepare for cooking. Preheat your oven to 400°F (200°C). This ensures a nice, hot environment for roasting. While the oven heats, remove the chicken thighs from the marinade. Place them skin-side up on a lined baking sheet. This helps with easy cleanup later. Now, it’s time to roast those chicken thighs. Place the baking sheet in the preheated oven. Let the chicken roast for about 30 to 35 minutes. You want the internal temperature to reach 165°F (75°C). Check the skin; it should be crispy and golden. If you love a bit of extra crunch, there’s an optional step. For crispier skin, switch on the broiler for an additional 2 to 3 minutes. Just keep a close eye on it to prevent burning. Once done, take the chicken out of the oven. Let it rest for a few minutes before serving. Garnish with fresh chopped cilantro for a lovely touch. Enjoy your juicy and flavorful garlic lime chicken thighs! Marination is key for flavor. The chicken absorbs the marinade, making it tasty. I suggest marinating for at least 30 minutes. For more flavor, marinate up to 2 hours. This will make a big difference. To marinate chicken, mix all marinade ingredients in a bowl. Coat the chicken thighs well. Cover the bowl and chill in the fridge. This keeps the chicken fresh and safe. To get crispy skin, start with dry chicken. Pat the skin with a paper towel. This helps the skin crisp up in the oven. Place the chicken skin-side up on a lined baking sheet. Use a meat thermometer to check doneness. The chicken needs to reach 165°F (75°C). Insert the thermometer into the thickest part of the thigh. This ensures it cooks evenly and is safe to eat. Garlic lime chicken pairs well with many sides. Try serving with rice, roasted veggies, or a fresh salad. These sides balance the rich flavors of the chicken. For a garnish, sprinkle fresh chopped cilantro on top. It adds color and a fresh taste. You can also add lime wedges for extra zing. Pro Tips Marinate Longer for Depth of Flavor: For the best results, let the chicken marinate for at least 2 hours. This allows the flavors to penetrate the meat more effectively. Use a Meat Thermometer: To ensure your chicken is perfectly cooked, use a meat thermometer to check that the internal temperature reaches 165°F (75°C). Achieve Extra Crispy Skin: For even crispier skin, broil the chicken for the last 2-3 minutes of cooking. Keep a close eye to avoid burning. Garnish for Freshness: Don’t skip the fresh cilantro garnish! It adds a burst of freshness that complements the flavors of the dish beautifully. {{image_2}} You can easily change the flavor of garlic lime chicken thighs. Here are a few ways to do it: - Add spices: For a spicy kick, try cayenne pepper. You can also mix in herbs like oregano or thyme. They will give the dish a fresh twist. - Use different citrus: If you want a new taste, swap lime for lemon or orange. Each fruit brings its unique flavor, adding variety to your meal. Switching up your cooking method can make this dish even more exciting: - Grilling: Instead of roasting, you can grill the chicken thighs. This adds a smoky flavor and crispy texture. Just marinate and grill them on medium heat for about 6-8 minutes per side. - Instant Pot or slow cooker: If you're short on time, use an Instant Pot. Cook on high pressure for 10-12 minutes. For a slow cooker, set it on low for 4-6 hours. Both methods make the chicken tender and juicy. Making this dish fit different diets is simple: - Gluten-free: This recipe is naturally gluten-free. Just ensure all ingredients are labeled gluten-free. - Other modifications: You can omit honey for a low-sugar option. If you need it dairy-free, this recipe already fits the bill. Each change keeps the chicken flavorful and enjoyable. To keep your garlic lime chicken thighs fresh, store them safely in the fridge. Place any leftovers in an airtight container. This helps keep the chicken moist and flavorful. Make sure to eat them within three days for the best taste. Remember to cool the chicken completely before sealing it. If you want to save the chicken for later, freezing is a great option. Allow the cooked chicken thighs to cool, then place them in freezer bags. Remove as much air as possible to prevent freezer burn. They can stay frozen for up to three months. When you are ready to eat, thaw them in the fridge overnight for best quality. Avoid thawing at room temperature, as this may cause bacteria to grow. Reheating garlic lime chicken thighs can be simple and effective. The best method is to use an oven. Preheat it to 350°F (175°C). Place the chicken on a baking sheet and cover it with foil. Heat for about 15-20 minutes or until the internal temperature reaches 165°F (75°C). This method keeps the chicken juicy and helps to crisp the skin. You can also use a microwave for quick reheating, but the texture may change. If you choose the microwave, heat it in short bursts and check often. You should marinate the chicken for at least 30 minutes. For the best flavor, I recommend marinating for up to 2 hours. The longer you marinate, the more the chicken absorbs the great lime and garlic taste. Yes, you can use boneless thighs. They cook faster than bone-in thighs. Adjust the cooking time to about 25-30 minutes. Always check for doneness to avoid overcooking. These chicken thighs go well with many sides. Try serving them with rice, quinoa, or a fresh salad. Roasted vegetables also pair nicely. You can add some black beans for extra flavor. The chicken should reach an internal temperature of 165°F (75°C). Look for clear juices when you cut into the meat. The skin should be crispy and golden brown. If it looks good, it likely is! Yes, lime zest adds more flavor. It gives the dish a bright and fresh taste. Using zest enhances the lime's aroma and makes the dish even more tasty. Add about 1 tablespoon of lime zest for a boost! This garlic lime chicken recipe brings together simple ingredients for a delicious meal. We covered how to marinate chicken thighs, bake them to perfection, and enjoy tasty sides. Remember, marination enhances flavor and don’t skip checking for doneness. You can also explore variations with spices or cooking methods. Keep leftovers safe by storing them correctly. You now have all the tools to make this dish shine. Enjoy your cooking and impress yourself and others!

Garlic Lime Chicken Thighs Juicy and Flavorful Dish

Looking to spice up your dinner repertoire? Garlic Lime Chicken Thighs are juicy, flavorful, and easy to make. This dish

- 1 cup all-purpose flour - 1/2 cup unsweetened cocoa powder - 1/2 teaspoon baking powder - 1/4 teaspoon salt - 1/2 cup sugar - 2 large eggs - 1 teaspoon vanilla extract - 1/2 cup pistachios, roughly chopped - 1/2 cup semi-sweet chocolate chips - Optional: powdered sugar for dusting To make Chocolate Pistachio Biscotti, gather all your ingredients first. This will help you stay organized. Start with all-purpose flour and unsweetened cocoa powder. These form the base of your biscotti. Baking powder and salt add the right texture and flavor. Next, you need sugar, which sweetens the dough. Eggs bring moisture and help bind everything together. Don’t forget the vanilla extract for that lovely aroma. Now, let’s add the star ingredients: pistachios and semi-sweet chocolate chips. Chopped pistachios give a nice crunch and a rich taste. The chocolate chips add a sweet touch, balancing the cocoa. If you want, you can dust your biscotti with powdered sugar after baking. This makes them look fancy and adds a touch of sweetness. Make sure to measure everything correctly. This helps your biscotti turn out perfect every time. Enjoy the process and get ready for a delicious treat! {{ingredient_image_1}} Start by setting your oven to 350°F (175°C). Line a baking sheet with parchment paper. This helps the biscotti not to stick. It also makes cleanup easy. In a medium bowl, whisk together the flour, cocoa powder, baking powder, and salt. This keeps the dry mix smooth. In a larger bowl, beat the sugar and eggs for about 2 minutes until thick. Add the vanilla extract next. Mix well. Gradually add the dry mix to the egg mixture. Stir until just combined. The dough will feel thick. Finally, fold in the chopped pistachios and chocolate chips. Make sure they are evenly mixed. Once your dough is ready, transfer it to a lightly floured surface. Shape it into a log. Aim for about 12 inches long and 3 inches wide. Place this log on the prepared baking sheet. Bake for 25 to 30 minutes until firm to the touch. After baking, let it cool for 10 minutes. Next, reduce the oven temperature to 325°F (160°C). After cooling, slice the log diagonally into 1/2-inch thick slices. Arrange the slices cut side down on the baking sheet. Bake these for another 10 to 12 minutes. Flip the biscotti and bake for another 10 to 12 minutes. They should feel firm and slightly dry. Let them cool completely on a wire rack. If you like, dust them with powdered sugar before serving. Enjoy your delicious chocolate pistachio biscotti! To get the best texture, mix the dough well. Do not overmix, or your biscotti may turn tough. The dough should be thick, but easy to shape. Bake the first log until it feels firm. This is key to a crunchy finish. For a softer bite, reduce the second bake time by a few minutes. Store your biscotti in an airtight container. They stay fresh for up to two weeks. You can also freeze them for up to three months. Just make sure they cool completely before you freeze them. When ready to eat, thaw at room temperature. Serve your biscotti with coffee or tea. They also pair well with milk. For a special touch, dust them with powdered sugar. You can even dip them in melted chocolate for extra flavor. Enjoy them as a sweet treat or share with friends! Pro Tips Chilling the Dough: Allowing the dough to chill for 30 minutes in the refrigerator before shaping helps it to firm up, making it easier to work with. Uniform Slicing: Use a serrated knife to slice the biscotti, as it creates clean cuts and prevents the log from crumbling. Flavor Variations: Experiment with different nuts or add spices like cinnamon for a unique twist on the classic flavor. Storage Tips: Store the biscotti in an airtight container at room temperature for up to two weeks, or freeze them for longer shelf life. {{image_2}} You can mix up the flavors in your biscotti easily. Instead of pistachios, try walnuts or almonds for a different crunch. You can also add dried fruits like cranberries or apricots for a sweet twist. If you love spices, a dash of cinnamon or cardamom can add warmth. For a burst of freshness, consider orange or lemon zest. Each choice gives you a new taste journey. The type of chocolate you use affects the taste a lot. Semi-sweet chocolate chips give a rich flavor, but dark chocolate offers a stronger taste. If you prefer something sweeter, use milk chocolate chips. For a fun surprise, you could even mix different types! Each chocolate brings its own character, making your biscotti unique. If you need a gluten-free option, you can use almond flour or a gluten-free flour blend. These flours work well in biscotti recipes. Just remember to check if the other ingredients are gluten-free too. You can still enjoy the same great taste and crunch without gluten. Enjoy experimenting with these options for a treat that suits your needs! Each ingredient in the Chocolate Pistachio Biscotti adds something special. Here’s a quick look: - All-purpose flour: This gives structure and helps the biscotti hold its shape. - Unsweetened cocoa powder: It brings rich chocolate flavor and a dark color. - Baking powder: This helps the biscotti rise a bit, giving a soft interior. - Salt: Just a pinch enhances the overall taste. - Sugar: It sweetens the dough and helps with browning. - Eggs: These bind the dough and add moisture. - Vanilla extract: It adds warmth and depth to the flavor. - Pistachios: They offer crunch and a nutty taste. - Semi-sweet chocolate chips: These provide bursts of melty chocolate. - Powdered sugar (optional): This adds a sweet finish, making them look pretty. You can swap some ingredients for a healthier version: - Use whole wheat flour instead of all-purpose for more fiber. - Try coconut sugar instead of regular sugar for a lower glycemic index. - Replace eggs with flax eggs for a vegan option. - Use dark chocolate chips for a richer taste and more antioxidants. - Add dried fruit like cranberries for natural sweetness and nutrients. Each serving of these biscotti has about 90 calories. This can vary based on your ingredient choices. Here’s a rough breakdown: - Flour, cocoa powder, and sugar contribute most calories. - Eggs and nuts add protein and healthy fats. - Chocolate chips add extra calories, but they also bring joy! Enjoy these biscotti as a sweet treat with your coffee or tea! Yes, you can freeze Chocolate Pistachio Biscotti. Place them in an airtight bag. Remove as much air as possible. They stay fresh for up to three months. When you're ready to enjoy them, just thaw them at room temperature. They taste great even after freezing! To check if your biscotti is done, look for a firm texture. It should feel hard when touched. The edges will be slightly golden. If you want a crunchier bite, bake them a bit longer. The second bake also helps them dry out and become crisp. Biscotti pairs well with many drinks. Try serving it with coffee or tea. Hot chocolate is another great match. You can also enjoy biscotti with dessert wines. They add a nice touch to any snack time or dessert table. You learned how to make delicious chocolate pistachio biscotti. We covered the ingredients, steps, tips, and fun variations. Biscotti can be crunchy, sweet, and full of flavor. You can even try different nuts or chocolate types! Remember to store them properly for the best taste. Enjoy baking and sharing these treats with friends and family. Happy baking, and don’t forget to experiment with your own ideas!

Chocolate Pistachio Biscotti Delicious Treat Recipe

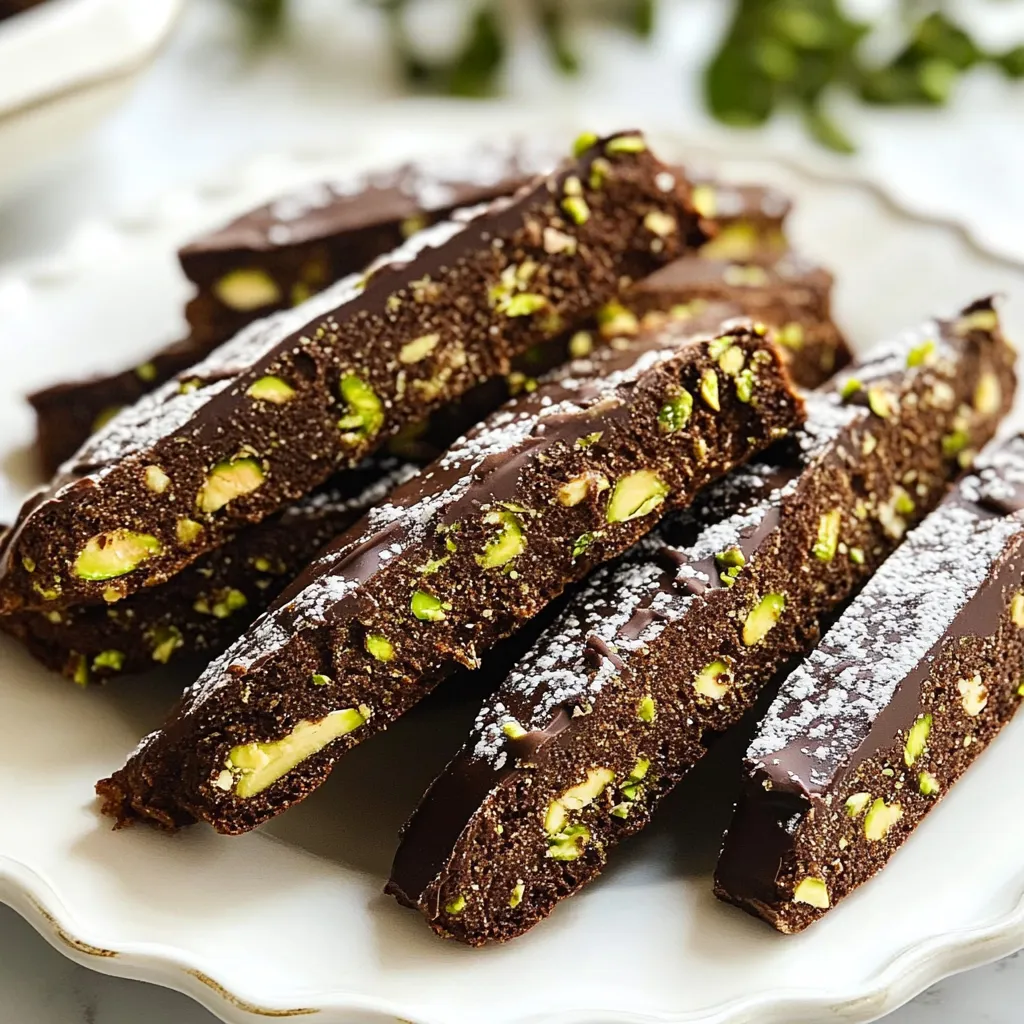
If you love a crunchy treat that pairs perfectly with coffee, you’re in for a delight! This Chocolate Pistachio Biscotti

- 1 cup cookie butter - 1/2 cup unsalted butter, melted - 1 cup brown sugar, packed - 1/2 cup granulated sugar - 2 large eggs - 1 teaspoon vanilla extract - 1 1/2 cups all-purpose flour - 1/2 teaspoon baking soda - 1/4 teaspoon salt - 1/2 cup white chocolate chips - 1/2 cup crushed speculoos cookies (optional) Cookie butter blondies use simple, tasty ingredients. Each adds great flavor and texture. Cookie butter gives a warm, sweet taste. Unsalted butter makes the blondies rich and chewy. Brown sugar adds moisture and depth. Granulated sugar balances the sweetness. Eggs help bind everything together. Vanilla extract adds a lovely aroma. The flour gives structure to the blondies. Baking soda helps them rise a little. Salt brings out all the flavors. White chocolate chips add sweet bites of creaminess. If you like crunch, add crushed speculoos cookies. They give a nice texture and extra spice. Gather these ingredients before you start. This will make it easier to mix them together. Trust me, these blondies will be worth it! {{ingredient_image_1}} - Preheat your oven to 350°F (175°C). - Grease a 9x9 inch baking pan or line it with parchment paper. - In a large bowl, mix melted butter and cookie butter until smooth. - Add brown sugar and granulated sugar, whisking until creamy. - Beat in two large eggs, one at a time. Then stir in one teaspoon of vanilla extract. - In another bowl, mix 1 1/2 cups of all-purpose flour, 1/2 teaspoon baking soda, and 1/4 teaspoon salt. - Carefully fold the dry mix into the wet mix. Don't overmix. - Gently add 1/2 cup of white chocolate chips and 1/2 cup of crushed speculoos cookies if you want extra crunch. - Pour the batter into your prepared pan. Smooth the top with a spatula. - Bake for 25-30 minutes. Check if a toothpick comes out clean from the center. - Let the blondies cool in the pan for about 10 minutes. - Lift them out using the parchment paper. Cool completely on a wire rack. - Cut into squares and enjoy! To get the right texture in your cookie butter blondies, do not overmix the batter. Overmixing can make your blondies tough. Mix just until the flour disappears. This keeps them soft and chewy. Spacing in baking is also key. Make sure to leave some space around the pan. This helps the heat circulate, so the blondies bake evenly. Choosing the right cookie butter brand can make a big difference. I recommend using brands like Biscoff or Trader Joe's. They have rich flavors that shine through in your blondies. Also, use quality chocolate chips. I love using white chocolate chips for their creamy sweetness. They balance the spice in cookie butter perfectly. For a beautiful presentation, serve your blondies dusted with powdered sugar. A scoop of vanilla ice cream on the side adds a nice touch. Drizzling extra cookie butter on top makes them even more special. This adds extra flavor and makes them look amazing. Your guests will love it! Pro Tips Check Your Cookie Butter: Make sure to use a smooth and creamy cookie butter for the best texture in your blondies. Don't Overmix: When combining the wet and dry ingredients, mix just until incorporated to keep your blondies soft and chewy. Cool Completely: Allow the blondies to cool completely before cutting them to ensure clean and neat squares. Storage Tips: Store leftover blondies in an airtight container at room temperature for up to 5 days or freeze for longer storage. {{image_2}} You can change up the mix-ins to fit your taste. Try adding nuts like walnuts or pecans. They add a nice crunch. Dried fruits like cranberries or apricots also work well. They bring a sweet and chewy texture. If you love chocolate, swap in dark chocolate chips. They add a rich flavor that pairs great with cookie butter. You can mix in both white and dark chocolate for a fun twist. Want to spice things up? Add some ground cinnamon or nutmeg to the batter. These spices give an extra warmth to your blondies. Just a little bit can change the whole flavor. You can also swap the cookie butter for other spreads. Try peanut butter or almond butter. Each spread gives a different taste and makes the blondies unique. If you need gluten-free options, use almond flour or oat flour instead of regular flour. These flours work well in this recipe and keep the blondies soft. For vegan substitutions, replace the eggs with flax eggs. Mix one tablespoon of ground flaxseed with two and a half tablespoons of water. Let it sit for five minutes to thicken. Use coconut oil instead of butter for a dairy-free treat. To keep your blondies fresh, use an airtight container. This will help them stay moist and tasty. Store the container at room temperature for up to five days. If you want them to last longer, you can refrigerate them. Just remember, cold storage may change the texture a bit. You can freeze blondies before or after baking. If you freeze them before, wrap the unbaked batter tightly in plastic wrap. It will stay good for about three months. For baked blondies, let them cool completely. Then cut them into squares and place them in a freezer bag. These will also last up to three months. When you're ready to eat your frozen blondies, thaw them in the fridge overnight. If you want them warm, pop them in the oven at 350°F for a few minutes. This will help restore their soft and gooey texture. Enjoy every bite! Yes, you can use crunchy cookie butter. It will add a nice texture to the blondies. You will get little bits of cookie in every bite. This makes them even more fun to eat! You can use the toothpick test. Insert a toothpick in the center of the blondies. If it comes out clean or with a few moist crumbs, they are done. If the toothpick has wet batter, bake them a bit longer. If you want to swap white chocolate chips, try dark chocolate chips. They give a richer taste. You could also use butterscotch chips for a sweeter flavor. Each option will change the dessert's taste a bit. Yes, you can make them ahead of time. Once they cool, store them in an airtight container. This keeps them fresh. You can also freeze them if you want to enjoy them later. Just thaw before serving! In this post, we explored how to make delicious blondies using cookie butter and white chocolate chips. I provided step-by-step instructions and tips for storage and variations. These blondies are simple to make and can delight anyone. Remember to not overmix and use quality ingredients for the best flavor. Enjoy the process and don't hesitate to experiment with your own mix-ins. You now have all the tools to bake the perfect treat!

Cookie Butter Blondies Irresistible and Easy Treat

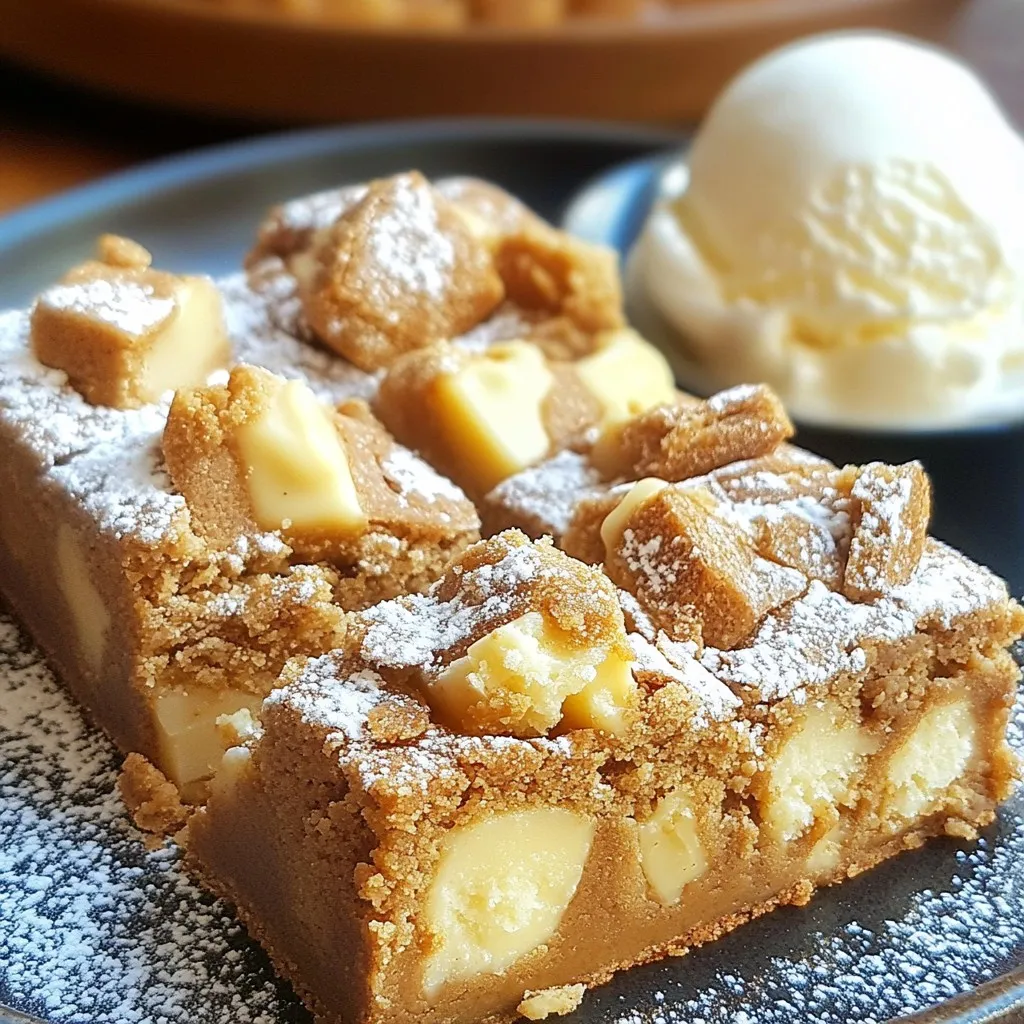
If you’re looking for a sweet treat that’s simple to make, you’re in the right spot! These Cookie Butter Blondies

- 12 mini sweet peppers (various colors) - 8 oz cream cheese, softened - 1/4 cup fresh herbs (basil, chives, parsley) - 1 clove garlic, minced - 1 tablespoon lemon juice - 1/2 teaspoon smoked paprika - Salt and pepper to taste - Olive oil for drizzling Choosing the right ingredients makes a big difference. Mini sweet peppers are colorful and sweet. They add a nice crunch to each bite. Cream cheese provides a creamy base for the filling. Fresh herbs give it a bright taste. I love using basil, chives, and parsley together. They create a wonderful flavor mix. Minced garlic adds depth, while lemon juice brightens everything up. Smoked paprika gives a hint of warmth. Finally, a drizzle of olive oil adds richness. One serving of these stuffed peppers has around 150 calories. The breakdown includes about 10g of fat, 3g of protein, and 12g of carbs. This makes them a tasty yet light appetizer. They fit well into many diets, offering good flavor without excessive calories. You can swap cream cheese for ricotta or goat cheese. Both add a different texture and taste. If you want a fresh twist, try using dill or cilantro instead of the herbs listed. These changes keep the recipe fun and exciting. {{ingredient_image_1}} First, I set my oven to 375°F (190°C). This temperature helps the peppers cook just right. Next, I take my mini sweet peppers and slice them in half lengthwise. I make sure to remove the seeds. I place them cut side up on a baking sheet. This makes it easy to fill them later. In a medium mixing bowl, I combine the softened cream cheese, fresh herbs, minced garlic, lemon juice, smoked paprika, salt, and pepper. I mix these until they are smooth and creamy. To get the right texture, I make sure the cream cheese is softened well. A smooth mixture makes it easy to fill the peppers. Now it’s time to fill the peppers. Using a small spoon or a piping bag, I fill each pepper half generously with the herb cream cheese mixture. After that, I drizzle a little olive oil over the stuffed peppers. This adds flavor and keeps them moist. I then bake them in my preheated oven for 15-20 minutes. I look for the peppers to be tender and the cream cheese to be slightly golden on top. To make your herb cream cheese stuffed mini peppers even better, try adding some spices. Some great options include: - A pinch of cayenne for heat - A dash of Italian seasoning for extra zest - Fresh dill for a fresh taste You can also add toppings like: - Crumbled feta cheese for a salty kick - Chopped olives for a briny touch - A drizzle of balsamic glaze for sweetness When serving these peppers, think about how to make them look beautiful. Here are some ideas: - Arrange them on a colorful platter. - Garnish with extra chopped herbs for a pop of color. - Serve with a side of creamy dip, like tzatziki or ranch. This pairing adds a fun element to your appetizer and invites guests to enjoy more. Having the right tools makes stuffing peppers easier. Here are my top picks: - Piping bags: Use these for a neat filling. - Small spoons: They work well if you prefer a simpler method. - Baking sheets: Choose ones with a non-stick surface for easy cleanup. These tools help you achieve great results and keep your kitchen tidy. Pro Tips Choose Colorful Peppers: Using a variety of colored mini peppers not only enhances the visual appeal of your dish but also provides a range of flavors. Experiment with Herbs: Feel free to mix and match fresh herbs based on your preferences; dill, cilantro, or thyme can all add unique flavors to the cream cheese mixture. Perfect Baking Time: Keep an eye on the stuffed peppers while baking; you want them tender but not too soft. Aim for a slight char on the cream cheese for extra flavor. Make Ahead: These stuffed peppers can be prepared in advance and stored in the refrigerator before baking. Just bake them when you’re ready to serve! {{image_2}} You can easily make these stuffed mini peppers vegan. Use dairy-free cream cheese as a substitute. Brands like Tofutti or Kite Hill offer great options. You can also blend silken tofu with herbs for a creamy texture. For more vegetable fun, consider zucchini or mushrooms. Slice zucchini into boats or use large mushrooms. Both hold the filling well. These options add a twist to your dish while keeping it fresh and tasty. Want to change up the flavors? Try a Mediterranean twist! Add chopped olives or crumbled feta to the cream cheese mixture. The salty flavors pair well with the sweetness of the peppers. For a Southwest flair, mix in taco seasoning and shredded cheddar. This adds a spicy kick that is perfect for game day or casual gatherings. Each bite bursts with flavor, making it a hit. These peppers shine at any event. They are perfect for parties, holidays, and game days. The bright colors and tasty filling grab attention on any table. You can serve them as an appetizer or make them a light main course. Pair with a salad or grilled veggies for a complete meal. Their versatility makes them a great choice for all occasions. To keep your leftover herb cream cheese stuffed mini peppers fresh, place them in an airtight container. Store them in the fridge. They will stay good for up to 3 days. When you're ready to enjoy them again, reheat the peppers in the oven. Set the oven to 350°F (175°C) and heat for about 10 minutes. This way, they'll taste fresh and warm. These stuffed mini peppers are best eaten within 3 days. After this time, the cream cheese may spoil. You can tell if they have gone bad by checking for any off smells or changes in color. If they look or smell strange, it's best to toss them. You can freeze unbaked stuffed mini peppers easily. Place them on a baking sheet and freeze until firm. Then transfer them to a freezer bag. They can last up to 3 months in the freezer. For baked peppers, let them cool completely before freezing. When you're ready to enjoy them, thaw them overnight in the fridge. Reheat the unbaked peppers directly from frozen. Bake them at 375°F (190°C) for about 20-25 minutes. For baked ones, reheat at 350°F (175°C) for 10-15 minutes. Stuffed mini peppers bake in about 15 to 20 minutes. Preheat your oven to 375°F (190°C) to get the best results. You want the peppers to be tender and the cream cheese slightly golden. Keep an eye on them so they don’t overcook. Yes, you can prepare these stuffed peppers ahead of time. Stuff the mini peppers and cover them with plastic wrap. Store them in the fridge for up to 24 hours. When you are ready to bake, just pop them into the oven. You may need to add a few extra minutes for baking if they are cold. These stuffed peppers pair well with a variety of sides. Consider serving them with: - Fresh salad - Hummus - Pita chips - A dipping sauce, like ranch or tzatziki These options will make your meal more complete and enjoyable. Mini sweet peppers are very healthy! They are low in calories and high in vitamins. They provide vitamin C, which helps boost your immune system. They also have fiber, which is good for digestion. Adding them to your diet can support overall health. Herb cream cheese stuffed mini peppers are a tasty and healthy treat. We covered the ingredients, nutritional info, and easy steps to make them. You learned about flavor variations and how to store extras too. These peppers work for gatherings or just a snack. I hope you give this recipe a try. Enjoy experimenting and make it your own!

Herb Cream Cheese Stuffed Mini Peppers Easy Appetizer

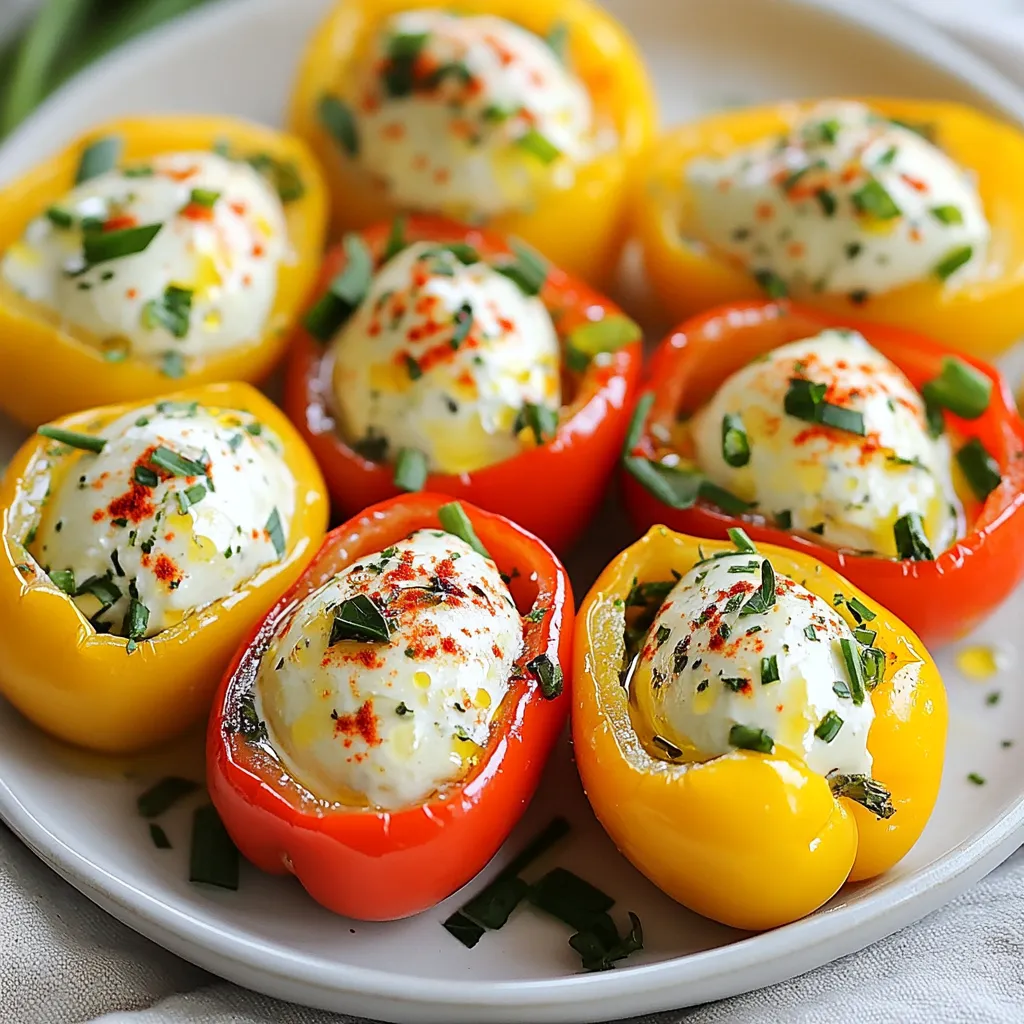
Looking for a quick and tasty appetizer? These Herb Cream Cheese Stuffed Mini Peppers are perfect! With just a few

- 1 pound baby carrots (or regular carrots, peeled and cut into sticks) - 3 tablespoons honey - 2 tablespoons olive oil - 3 cloves garlic, minced - 1 teaspoon fresh thyme leaves (or ½ teaspoon dried thyme) - Salt and pepper to taste - 1 tablespoon balsamic vinegar (optional) - Fresh parsley for garnish The key to making honey garlic roasted carrots is in the ingredients. Start with one pound of baby carrots. You can also use regular carrots if you prefer. Just peel and cut them into sticks. Next, honey adds sweetness. Three tablespoons is the perfect amount. It helps the carrots caramelize nicely. Olive oil is next. Two tablespoons will give them a nice texture. Garlic brings a rich flavor. Use three cloves of minced garlic. Fresh thyme adds a touch of earthiness. One teaspoon of fresh thyme works best, but dried thyme is fine too. Don't forget salt and pepper. They enhance the taste. Use them to your liking. If you want a hint of acidity, add one tablespoon of balsamic vinegar. Finally, fresh parsley makes a great garnish. It adds color and freshness to the dish. These ingredients come together to create a tasty and flavorful side dish. {{ingredient_image_1}} - Preheat your oven to 425°F (220°C). - Grab a large mixing bowl. Add 3 tablespoons honey, 2 tablespoons olive oil, 3 minced garlic cloves, 1 teaspoon fresh thyme, salt, and pepper. Mix well to create a tasty marinade. - Add 1 pound of baby carrots to the bowl. Toss the carrots in the marinade until they are coated evenly. - Spread the carrots in a single layer on a lined baking sheet. - Roast in the oven for 25-30 minutes. Stir the carrots halfway through for even cooking. They should be tender and caramelized when done. - For extra flavor, drizzle with 1 tablespoon balsamic vinegar before roasting. - Once the carrots are done, let them cool slightly. Garnish with freshly chopped parsley. - Serve warm as a delicious side dish. These honey garlic roasted carrots pair well with chicken or fish. They can also brighten any veggie platter. To get the best taste from your honey garlic roasted carrots, follow these tips: - Ensuring even roasting: Cut your carrots into similar sizes. This helps them cook at the same rate. If you use baby carrots, they usually roast well without further cutting. Spread them out in one layer on your baking sheet. Leave space between each carrot for air to flow. - Adjusting seasoning for taste: Always taste your marinade before adding carrots. You can add a pinch of salt or a dash of pepper to enhance the flavor. If you want a sweeter taste, add a bit more honey. For a bit more zing, consider adding some balsamic vinegar. Serve your honey garlic roasted carrots with these ideas in mind: - Pairing recommendations: These carrots go great with grilled chicken or roasted pork. They also work well with a fresh green salad. Their sweet and savory flavor enhances many dishes. - Presentation ideas: When serving, place the carrots on a beautiful platter. Garnish them with fresh parsley for a pop of color. You can also drizzle a bit of balsamic glaze over the top for added flair. You can adjust the recipe based on what you have at home: - Alternatives for honey: If you don’t have honey, try using maple syrup or agave nectar. Both add sweetness with a unique flavor. - Options for herbs or oils: If you don’t have thyme, you can use rosemary or oregano. For oils, try avocado or coconut oil as tasty alternatives. Pro Tips Choose the Right Carrots: Opt for baby carrots for a sweeter flavor and more tender texture. If using regular carrots, cut them into uniform sticks for even cooking. Adjust the Sweetness: Feel free to modify the amount of honey based on your taste preference. You can also substitute maple syrup for a different flavor profile. Experiment with Herbs: Try adding different herbs like rosemary or oregano to the marinade for a unique twist on the flavor. Perfect Roasting: Stir the carrots halfway through roasting to ensure even caramelization and prevent burning. {{image_2}} You can change the taste of honey garlic roasted carrots easily. Adding spices can give them a nice kick. Try a dash of cayenne pepper or red pepper flakes for heat. You can also add smoked paprika for a warm, smoky flavor. If you want to switch the sweetener, you can use maple syrup or agave nectar. Both options add a unique taste. They work well with garlic and thyme, giving your dish a twist. While carrots are great, you can also use other veggies. Sweet potatoes and parsnips roast nicely with honey and garlic. They share flavors, making them perfect partners. Combining different root vegetables makes the dish fun and colorful. You can mix carrots, beets, and turnips for a vibrant look. Each veggie adds its own taste and texture. If you want to make this dish vegan, just swap out the honey. Use agave syrup or maple syrup instead. Both still provide that sweet flavor you love. For gluten-free options, this recipe is already safe! All the ingredients are gluten-free. Just make sure to check labels if using pre-packaged items. This way, everyone can enjoy these tasty roasted carrots. To keep your honey garlic roasted carrots fresh, follow these steps: - Let the carrots cool completely before storing. - Use an airtight container to prevent moisture loss. - Store in the fridge for up to four days for the best taste. When reheating, you want to keep the carrots tasty. Here are good methods: - Use the oven at 350°F (175°C) for about 10-15 minutes. - You can also use a microwave for quick reheating. - To keep the carrots crisp, cover them with a damp paper towel in the microwave. Yes, you can freeze honey garlic roasted carrots! Here’s how: - Place cooled carrots in a freezer-safe bag. - Remove as much air as possible before sealing. - Store in the freezer for up to three months. When you’re ready to eat, here’s what to do: - Thaw the carrots overnight in the fridge. - Reheat in the oven or microwave as mentioned above. How do I make honey garlic roasted carrots more flavorful? To boost flavor, add spices like cumin or paprika. You can also mix in lemon juice. Fresh herbs like rosemary or dill work well too. A sprinkle of chili flakes gives heat. Can I use frozen carrots for this recipe? Yes, you can use frozen carrots. Thaw them first and pat dry. This prevents excess water from steaming the carrots. They may be softer than fresh carrots, but they still taste great. Can I make this recipe ahead of time? You can prepare the carrots in advance. Toss them in the marinade and store in the fridge. Roast them right before serving for the best taste and texture. What are the health benefits of carrots? Carrots are rich in vitamins A and C. They support eye health and boost the immune system. They also provide fiber, which aids digestion and keeps you full. Caloric content per serving? Each serving of honey garlic roasted carrots has about 100 calories. This can vary based on added ingredients. The dish is low in calories and full of nutrients. What's the best oven temperature for roasting? The best temperature for roasting carrots is 425°F (220°C). This high heat helps caramelize the sugars in the carrots. It gives them a nice, sweet flavor. How long to roast carrots for different textures? For tender carrots, roast for 25-30 minutes. If you like them crisp-tender, check at 20 minutes. Stir halfway through for even cooking and golden edges. Honey garlic roasted carrots are simple and tasty. We covered the key ingredients and steps needed for great flavor. With tips on variations, storage, and serving, you can make this dish your own. Try different herbs or spices to suit your taste. These carrots can fit into many diets and are easy to save for later. Enjoy the sweet and savory taste of honey garlic roasted carrots in your meals. Your family will love them!

Honey Garlic Roasted Carrots Tasty Flavorful Dish

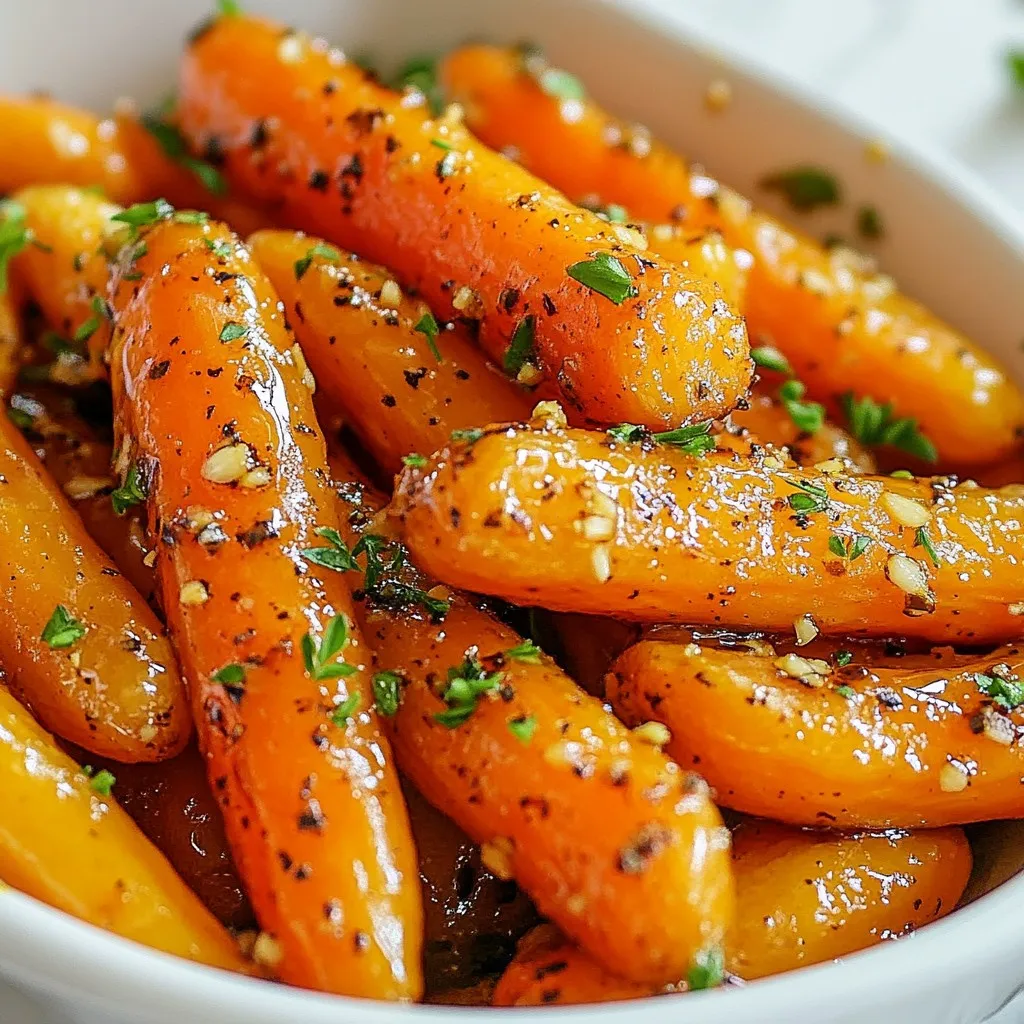
Looking for a simple yet delicious side dish? Honey Garlic Roasted Carrots are the perfect answer! These sweet, savory treats

To make Honey Sriracha Glazed Salmon, you will need: - 4 salmon fillets (6 oz each) - 3 tablespoons honey - 2 tablespoons Sriracha sauce - 1 tablespoon soy sauce (or tamari for gluten-free) - 1 tablespoon fresh ginger, grated - 2 cloves garlic, minced - 1 tablespoon lime juice - 2 tablespoons olive oil - Salt and pepper to taste - 2 green onions, sliced for garnish - Sesame seeds for garnish You can swap some ingredients if you want. Here are a few ideas: - Use maple syrup instead of honey for a different sweetness. - Try chili paste if you want more spice instead of Sriracha. - For a low-sodium option, use coconut aminos instead of soy sauce. - Fresh herbs like cilantro can be used instead of green onions for garnish. Choosing fresh salmon is key for great taste. Here are some tips: - Look for bright, shiny skin with no dull spots. - Check for a fresh ocean smell, not a fishy one. - The flesh should be firm and bounce back when pressed. - If possible, ask your fishmonger when the salmon was caught. - Wild-caught salmon often has better flavor than farmed salmon. Getting good salmon makes the dish even better. Enjoy the process! {{ingredient_image_1}} To make the marinade, you start by mixing some simple ingredients. In a mixing bowl, whisk together: - 3 tablespoons honey - 2 tablespoons Sriracha sauce - 1 tablespoon soy sauce (or tamari for gluten-free) - 1 tablespoon fresh ginger, grated - 2 cloves garlic, minced - 1 tablespoon lime juice This mixture gives the salmon a sweet and spicy kick. Whisk until everything blends well. The honey adds sweetness, while Sriracha brings heat. This balance makes the salmon really tasty. Next, it's time to marinate the salmon. Take 4 salmon fillets and place them in a large resealable bag or a shallow dish. Pour the marinade over the salmon. Make sure each fillet gets coated well. Seal the bag or cover the dish and put it in the fridge for 30 minutes. This step is key. It lets the flavors soak into the fish, making it more delicious. Now, you can choose how to cook your salmon. You can grill or bake it. - Grilling: If you grill, preheat your grill to medium-high heat. Lightly oil the grill grates. Remove the salmon from the marinade, but keep the marinade. Grill the salmon for 4-5 minutes on each side. It’s done when it flakes easily with a fork. - Baking: If you prefer baking, preheat your oven to 400°F (200°C). Place the salmon on a parchment-lined baking sheet. Bake for 12-15 minutes. Just like grilling, it's done when it flakes easily. In the last minute of cooking, brush the reserved marinade over the salmon. This adds more flavor and makes it shine. Remember, always cook the marinade to ensure it is safe to eat. To make the glaze shine, use fresh ingredients. Fresh ginger adds a nice zing. Minced garlic enhances the flavor too. Mix honey and Sriracha well for a balanced taste. You want it sweet, spicy, and a bit tangy. The soy sauce adds depth, so don’t skip it. If you like more heat, add extra Sriracha. For a thicker glaze, let it cook a bit longer. Cooking time is key for perfect salmon. If grilling, aim for medium-high heat. Grill each side for 4-5 minutes. You want it to flake easily. If baking, set your oven to 400°F (200°C). Bake the salmon for 12-15 minutes. Always check for doneness. The internal temperature should reach 145°F (63°C). This ensures it's safe and tasty. Presentation makes your dish pop. Serve the salmon on a bed of quinoa or rice. Add some steamed veggies on the side. This adds color and nutrition. Drizzle any extra glaze over the salmon for extra flavor. Garnish with sliced green onions and sesame seeds. It makes the dish look gourmet. Enjoy the compliments from your guests! Pro Tips Choose Fresh Salmon: Opt for wild-caught salmon if possible as it has a richer flavor and better texture compared to farmed salmon. Adjust Spice Level: If you prefer a milder dish, reduce the amount of Sriracha in the marinade or add more honey for sweetness. Marinate Longer: For an even deeper flavor, consider marinating the salmon for up to 2 hours in the refrigerator. Rest Before Serving: Allow the salmon to rest for a few minutes after cooking to let the juices redistribute for better flavor and moisture. {{image_2}} You can make a fun bowl with this salmon. Start with a base of rice or quinoa. Add your cooked salmon on top. Then, pile on fresh veggies like cucumbers, carrots, and avocado. Drizzle more honey Sriracha sauce over the top. This adds a sweet and spicy kick. You can even garnish with sesame seeds and green onions for color. If you want a different flavor, try adding garlic. Mix honey, Sriracha, and minced garlic for a new glaze. This adds a rich, savory layer to your dish. Just follow the same steps to marinate and cook. You’ll love the extra depth of flavor. For a gluten-free option, swap regular soy sauce with tamari. This keeps the dish safe for those with gluten issues. All other ingredients remain the same. Enjoy the same delicious taste while being mindful of dietary needs. After enjoying your Honey Sriracha Glazed Salmon, you may have leftovers. Store them in an airtight container. Place the salmon in the fridge. It will stay fresh for up to three days. Make sure to keep the glaze separate if you can. This keeps the salmon from getting soggy. If you want to save your salmon for later, freezing works great. Wrap each fillet tightly in plastic wrap. Then place them in a freezer bag. Make sure to remove as much air as possible. You can freeze the salmon for up to three months. For best results, freeze it before cooking. When it's time to eat your leftover salmon, reheat it gently. You can use the oven, microwave, or stovetop. To reheat in the oven, set it to 350°F (175°C). Place the salmon on a baking sheet and cover it with foil. Heat for about 10-15 minutes. If using a microwave, heat it in short bursts. This way, it won’t dry out. Enjoy your tasty salmon warm! You need to marinate the salmon for 30 minutes. This time allows the flavors to soak in. If you have more time, you can marinate it longer, up to two hours. Just remember, if you go overboard, the fish may become too salty. Yes, you can use frozen salmon. Just make sure to thaw it completely first. You can do this overnight in the fridge or in cold water for a quicker option. After thawing, pat the salmon dry before marinating. This step helps the glaze stick better. You can serve this salmon with many sides. Here are some great options: - Steamed rice or quinoa for a healthy base - Roasted or steamed vegetables like broccoli or asparagus - A fresh salad with a light dressing - Noodles tossed with sesame oil and veggies These sides will complement the sweet and spicy flavors of the salmon nicely! You now know how to prepare Honey Sriracha Glazed Salmon from start to finish. We discussed key ingredients, preparation tips, and cooking methods. You also learned about fun variations and storage options. Remember, fresh salmon makes a big difference in taste. Don't be afraid to experiment with flavors and sides. Enjoy your cooking and impress your friends and family with this tasty dish!

Honey Sriracha Glazed Salmon Tasty and Simple Dish

Are you ready to elevate your dinner game with a blast of flavor? Honey Sriracha Glazed Salmon is your answer.

For Lemon Dill Baked Cod, you will need: - 4 fillets of cod (about 6 oz each) - 3 tablespoons olive oil - 2 tablespoons fresh lemon juice - Zest of 1 lemon - 3 cloves garlic, minced - 1 teaspoon fresh dill, chopped - 1 teaspoon dried thyme - Salt and pepper to taste - Lemon slices, for garnish - Fresh dill sprigs, for garnish You will need a few simple tools: - Baking dish - Parchment paper - Small bowl - Whisk - Fork Each serving of Lemon Dill Baked Cod is healthy and tasty. Here’s what you get: - Calories: Approximately 280 - Protein: About 25 grams - Fat: Roughly 18 grams - Carbohydrates: Around 4 grams - Fiber: 0 grams This dish offers a good source of protein and healthy fats. It keeps your meals light and nutritious. Enjoy this delightful dish without guilt! {{ingredient_image_1}} First, set your oven to 400°F (200°C). This step is key for baking the cod. While it heats, line a baking dish with parchment paper. This makes cleanup easy and helps the fish cook evenly. In a small bowl, mix three tablespoons of olive oil, two tablespoons of fresh lemon juice, and the zest of one lemon. Add three cloves of minced garlic, one teaspoon of chopped dill, and one teaspoon of dried thyme. Season with salt and pepper. Whisk it all together until it's well combined. This sauce gives the cod a bright, fresh taste. Now, place four cod fillets in your prepared baking dish, skin-side down if they have skin. Pour the lemon-dill mixture evenly over the fillets. Make sure they are fully coated. This step ensures every bite is tasty. Bake them in your preheated oven for 15-20 minutes. The cod is ready when it flakes easily with a fork. Once it’s done, remove the dish from the oven and let it rest for a couple of minutes. Garnish with fresh lemon slices and dill sprigs before serving. Enjoy your meal! To make Lemon Dill Baked Cod shine, focus on fresh ingredients. Use fresh lemon juice and zest for the best flavor. Fresh dill adds a bright taste that dried herbs can't match. Make sure to preheat your oven to 400°F (200°C). This helps the fish cook evenly. When mixing the lemon-dill sauce, whisk thoroughly. This ensures all the flavors blend well. One common mistake is overcooking the cod. Cod cooks quickly, usually in 15-20 minutes. Check for doneness by using a fork. If it flakes easily, it’s ready. Another mistake is not seasoning enough. Salt and pepper enhance the dish. Don’t skip these simple steps. Garnish your cod with fresh lemon slices and dill sprigs for a lovely look. Serve it with rice or a green salad to balance the meal. You could also pair it with steamed veggies for extra color and nutrients. Pro Tips Choose Fresh Cod: Always opt for fresh cod fillets for the best flavor and texture. If you use frozen cod, make sure to fully thaw it beforehand for even cooking. Marinate for More Flavor: If time allows, marinate the fish in the lemon-dill mixture for 30 minutes to an hour in the refrigerator. This enhances the flavors significantly. Check for Doneness: Cod is done when it flakes easily with a fork and has an internal temperature of 145°F (63°C). Keep an eye on it to avoid overcooking. Serve with Sides: Pair this dish with a light salad or steamed vegetables for a balanced meal. Quinoa or rice also complement the flavors beautifully. {{image_2}} You can change the flavor of your cod by using different herbs and spices. For a fresh twist, try parsley, basil, or cilantro. If you like heat, add some red pepper flakes. You can mix and match to find your favorite flavor. Each herb gives a unique taste to the dish. Baking is not the only way to cook cod. You can grill it for a smoky flavor. Simply brush the fillets with olive oil and season as you like. Cook on medium heat until the fish flakes easily. Frying is another option, giving a crispy texture. Use a hot skillet with oil and cook each side for a few minutes. Pair your lemon dill baked cod with fresh sides. Steamed vegetables like asparagus or green beans work well. A light salad with mixed greens adds a nice crunch. You can also serve it with rice or quinoa for a filling meal. These sides balance the flavors and make your meal complete. After your meal, let the cod cool down first. Place any leftovers in an airtight container. This helps keep the fish fresh. Store it in the fridge for up to three days. Label the container with the date. This way, you won't forget when you cooked it. To reheat, you can use the oven or a microwave. For the oven, set it to 350°F (175°C). Place the cod on a baking sheet and cover it with foil. Heat for about 10 minutes or until warm. If using a microwave, put the cod on a plate. Heat in 30-second bursts until warm. Be careful not to overcook it, or it will get dry. If you want to freeze the cod, do it right away. Wrap each fillet tightly in plastic wrap. Then, place the wrapped fillets in a freezer bag. Label the bag with the date. You can freeze it for up to three months. When you're ready to eat, thaw it in the fridge overnight before reheating. Yes, you can use frozen cod fillets. Just thaw them before cooking. Thawing helps the fish cook evenly. You can thaw fillets in the fridge overnight or use cold water. If you use frozen fillets, adjust your cooking time. They may need a few extra minutes in the oven. If you don't have dill, you can use parsley or thyme. Both herbs add flavor without being too strong. You can also try tarragon, as it has a nice taste. Choose an herb that you enjoy. Just remember, each herb has a unique flavor. Cod is done when it flakes easily with a fork. You can check the thickest part of the fillet. Look for a white, opaque color. The internal temperature should reach 145°F (63°C). If you see these signs, your cod is ready to eat! This blog post covers cod cooking from start to finish. We explored key ingredients and equipment needed. I shared a step-by-step guide for baking cod, along with tips to improve your dish. We also discussed variations and how to store leftover cod. Whether you grill, fry, or bake, you can enjoy this tasty fish. Follow the methods here for a delightful meal. Cooking cod is simple and rewarding. You now have the tools to make it a hit at your table.

Lemon Dill Baked Cod Flavorful and Simple Dish

If you’re looking for a dish that’s both easy and delicious, you’ve found it! Lemon Dill Baked Cod is a

To make Creamy Cilantro Lime Pasta, you need some fresh ingredients and pantry staples. - Fresh ingredients needed: - 8 ounces fettuccine or spaghetti - 1 tablespoon olive oil - 3 cloves garlic, minced - 1 cup heavy cream - 1/2 cup grated Parmesan cheese - 1/4 cup fresh cilantro, chopped (plus more for garnish) - Zest and juice of 2 limes These fresh items add great taste and texture to the dish. The lime gives a bright, zesty flavor, while the cream makes it rich. The cilantro adds a fresh note that ties everything together. - Pantry staples required: - Salt and pepper to taste - Red pepper flakes (optional, for a kick) Salt and pepper boost all the flavors in your dish. Red pepper flakes add a nice bit of heat, but you can skip them if you prefer something milder. - Optional add-ins for extra flavor: - Grilled chicken or shrimp - Extra veggies like cherry tomatoes or spinach These add-ins can make your pasta heartier. They also introduce new flavors and textures. Try them for a fun twist! {{ingredient_image_1}} To start, bring a large pot of salted water to a boil. This step is key for flavor. Add 8 ounces of fettuccine or spaghetti to the pot. Cook it until it's al dente, which means it should still have a slight bite. Follow the package instructions for precise timing. Remember to reserve 1/2 cup of pasta water before draining. This starchy water helps in making the sauce creamy later. When draining, do it carefully to avoid losing any pasta. A colander works well for this task. Next, let's prepare the garlic. I recommend using fresh garlic for the best flavor. You will need 3 cloves, minced. Heat a tablespoon of olive oil in a large skillet over medium heat. Add the minced garlic, but watch it closely. Sauté it for about one minute until it's fragrant. Be careful not to burn it, as burnt garlic can ruin the dish. Garlic adds depth to our dish. Its rich flavor pairs well with lime and cilantro. Now, let's make the creamy sauce. Pour in 1 cup of heavy cream into the skillet and bring it to a gentle simmer. Whisk in 1/2 cup of grated Parmesan cheese. Adding the cheese slowly helps it melt evenly. This keeps the sauce smooth and creamy. If the sauce feels too thick, use some reserved pasta water. This will adjust the consistency to your liking. Stir in 1/4 cup of chopped cilantro, the zest, and juice of 2 limes. Season it with salt, pepper, and red pepper flakes if you want some heat. Finally, combine the drained pasta with the sauce. Toss it well to coat every strand. Let it cook for another 2-3 minutes to absorb those delicious flavors. To get the best taste, balance lime and cilantro. The lime gives a bright zing, while cilantro adds freshness. Start with the juice of one lime and add more if you want it tangy. You can use zest for extra flavor. For seasonings, salt and pepper are key. They enhance the pasta's taste. Red pepper flakes can add heat. Use them if you like a kick. Adjusting spice levels is easy. Start with a small amount of red pepper flakes. Taste as you go. This way, you can find your perfect heat level. If you need substitutes for heavy cream, try coconut milk or cashew cream. Both give a rich texture without dairy. To get a velvety sauce, whisk well. This helps mix the cream and cheese evenly. If the sauce feels too thick, add reserved pasta water. It will help loosen it up. Prevent clumping of cheese by adding it slowly. Stir constantly as you add it. This keeps the sauce smooth and creamy. If you see lumps, keep whisking. They will break down with a bit of effort. Pro Tips Perfect Pasta: Always cook your pasta until al dente for the best texture, as it will continue to cook slightly when mixed with the sauce. Flavor Boost: For an extra flavor kick, consider adding a splash of white wine to the sauce after sautéing the garlic, letting it reduce for a minute before adding the cream. Texture Matters: To achieve a creamier sauce, ensure the cream is at room temperature before adding it to the skillet, preventing it from curdling. Fresh is Best: Use freshly grated Parmesan cheese instead of pre-grated for a richer flavor and smoother sauce consistency. {{image_2}} You can add protein to make this dish heartier. Chicken, shrimp, or tofu work well. For chicken, use cooked, diced pieces. Shrimp should be sautéed until pink and firm. Tofu should be cubed and cooked until golden. Adjust cooking times based on what you choose. Chicken and shrimp can cook quickly in the sauce. Tofu may take longer to heat through. Ensure your protein is fully cooked before adding it to the pasta. To make this dish plant-based, swap heavy cream for coconut cream or cashew cream. Both give a rich taste. For cheese, use nutritional yeast or a vegan cheese substitute. These options will keep your creamy texture while being plant-friendly. If you want to add depth, include some fresh herbs. Basil or parsley can enhance the flavors. You can boost flavor with herbs and spices. Try adding basil or parsley for a fresh twist. A pinch of cumin or smoked paprika can add warmth. Adding vegetables is another great option. Spinach, bell peppers, or cherry tomatoes can add nutrition and color. Cook them briefly before adding the pasta. This way, they stay vibrant and crisp. To keep your creamy cilantro lime pasta fresh, store it properly. Start by letting it cool at room temperature for about 30 minutes. Then, place the pasta in an airtight container. This helps prevent the pasta from drying out. Use glass or plastic containers with tight lids. These containers keep the flavors intact and minimize odors from other foods. - Best practices for storing leftovers: - Allow the pasta to cool before storing. - Use airtight containers to keep moisture in. - Separate sauce and pasta if possible for best taste. Reheating your creamy cilantro lime pasta can be simple. You want to keep it creamy and tasty. The best way is to use a skillet over low heat. Add a splash of water or cream to help it regain moisture. Stir gently to keep the texture smooth. - How to reheat without sacrificing texture: - Use a skillet on low heat. - Add a splash of water or cream. - Stir often to avoid sticking. - Tips for adding moisture back into the dish: - Use reserved pasta water if you have any. - Add a little extra cream for richness. - Stir in a few drops of lime juice for freshness. You can store Creamy Cilantro Lime Pasta in the fridge for 3 to 5 days. Keep it in an airtight container to retain its freshness. The flavors will meld together, making it even tastier the next day. Yes, you can make this dish ahead of time. Cook the pasta and sauce separately. Store the pasta and sauce in different containers. When ready to serve, just combine them and heat gently. This keeps the pasta from getting mushy. This pasta pairs well with many dishes. You can serve it with grilled chicken or shrimp for protein. A fresh salad or roasted vegetables make great sides too. For a light touch, offer lime wedges and extra cilantro for garnish. Yes, you can freeze leftovers, but the texture may change. Store it in a freezer-safe container. It’s best to eat it within 1 to 2 months. To reheat, thaw overnight in the fridge and warm gently on the stove. Adding a splash of cream can help restore some creaminess. In this article, we explored how to make Creamy Cilantro Lime Pasta. We covered ingredients, cooking techniques, and tips for flavor. You learned the importance of using fresh ingredients and how to achieve the best texture. Remember, adjusting flavors and adding proteins or veggies can really enhance your dish. Proper storage and reheating methods keep leftovers tasty. Enjoy making this dish your own. Happy cooking!

Creamy Cilantro Lime Pasta Quick and Flavorful Dish

Are you ready to spice up your dinner night? This Creamy Cilantro Lime Pasta is quick to make and bursting

Older posts
Newer posts
← Previous Page1 … Page125 Page126 Page127 … Page137 Next →

dsad

© 2025 Recipes Pursuit • Built with GeneratePress

Our Policies

  • Copyright Policy
  • Cookie Policy
  • GDPR Policy
  • Privacy Policy
  • Disclaimer
  • Terms Of Use

More Information

  • Home
  • About
  • Contact
  • Appetizers
  • Dessert
  • Dinner
  • Drinks
©2025, Recipes Pursuit About Back To Top