Skip to content
DisclaimerTerms Of UseGDPR PolicyCookie Policy

Recipes Pursuit

  • Home
  • Drinks
  • Appetizers
  • Dinner
  • Dessert
  • About
  • Contact
  • Privacy Policy
DisclaimerTerms Of UseGDPR PolicyCookie Policy

Emma Smith

To make Honey Mustard Salmon Patties, gather these simple ingredients: - 1 can (14 oz) wild-caught salmon, drained and flaked - 1/4 cup breadcrumbs (preferably whole wheat) - 2 tablespoons honey - 1 tablespoon Dijon mustard - 1 tablespoon mayonnaise - 1/4 cup green onions, finely chopped - 1 egg, beaten - 1 teaspoon garlic powder - 1/2 teaspoon black pepper - 1 teaspoon salt - 2 tablespoons olive oil (for frying) These items create a tasty mix that is easy to work with. If you need to swap out any items, here are some ideas: - Salmon: You can use canned tuna or fresh salmon for a twist. - Breadcrumbs: Oats or crushed crackers work well if you're out of breadcrumbs. - Honey: Maple syrup can replace honey for a different flavor. - Dijon Mustard: Yellow mustard is a good substitute if Dijon is not available. - Mayonnaise: Greek yogurt can add creaminess and cut calories. - Green Onions: Chopped regular onions or shallots can be used instead. These swaps keep the recipe flexible and fun. Each serving of Honey Mustard Salmon Patties offers great nutrition. Here’s a rough breakdown: - Calories: About 250 per serving - Protein: 20 grams, thanks to the salmon - Fat: 15 grams, mainly from olive oil and mayonnaise - Carbohydrates: 10 grams, mostly from breadcrumbs - Fiber: 1 gram, if whole wheat breadcrumbs are used This dish is a balanced choice for a meal or snack. Enjoy the flavors while feeling good about your food choices! {{ingredient_image_1}} To start, gather all your ingredients. You will need canned salmon, breadcrumbs, honey, Dijon mustard, mayonnaise, green onions, an egg, garlic powder, black pepper, and salt. This recipe is simple and takes just 15 minutes to prep. You can also make it in about 30 minutes from start to finish. 1. First, drain the can of salmon and flake it into a large bowl. 2. Add the breadcrumbs, honey, Dijon mustard, mayonnaise, and chopped green onions to the bowl. 3. Next, beat the egg in a separate bowl and add it to the mixture. 4. Sprinkle in the garlic powder, black pepper, and salt. 5. Use your hands to mix everything well until it forms a sticky blend. 6. Shape the mixture into small patties, about 2 to 3 inches wide. You will make around 8 patties. 7. Heat 2 tablespoons of olive oil in a large skillet over medium heat. 8. Once the oil is hot, carefully place the patties in the skillet. 9. Fry for about 4 to 5 minutes on each side. You want them golden brown and crispy. 10. After cooking, place the patties on a plate lined with paper towels to soak up extra oil. - Total cooking time is about 30 minutes. - For best results, ensure the oil is hot before adding the patties. - If you want extra flavor, add more green onions or spices to the mix. - Serve the patties on a bed of greens and drizzle with honey mustard dressing. To cook your Honey Mustard Salmon Patties evenly, follow these tips: - Use a consistent patty size. Aim for 2-3 inches in diameter. This helps them cook at the same rate. - Preheat your skillet. This ensures a nice sear right away. A hot pan keeps the patties from sticking. - Don’t overcrowd the pan. Fry in batches if needed. This allows each patty to get enough heat. Crispy patties are key to a great texture. Here’s how to get that perfect crunch: - Use enough oil. Coat the skillet with olive oil. This helps the patties fry instead of steam. - Don’t flip too soon. Wait until the bottom is golden brown. This takes about 4-5 minutes. - Press down lightly. When frying, gently press the patties. This helps them get crispy all over. Pair your salmon patties with tasty sides or sauces for a complete meal. Here are some ideas: - Fresh salad. Serve on a bed of mixed greens. Add a drizzle of honey mustard dressing. - Roasted veggies. Try carrots or broccoli on the side. They add color and nutrition. - Dipping sauces. Serve with extra honey mustard, tartar sauce, or a zesty yogurt dip. Each adds a fun twist. Pro Tips Keep it Moist: Adding a bit more mayonnaise or a splash of lemon juice can enhance the moisture of the patties, ensuring they stay juicy while cooking. Chill Before Cooking: Allowing the formed patties to chill in the refrigerator for about 30 minutes before frying helps them hold their shape better. Perfect Pancakes: For a crispier exterior, consider adding a tablespoon of cornmeal to the breadcrumb mixture for added texture. Flavor Variations: Experiment with different herbs and spices, such as dill or smoked paprika, to create unique flavor profiles for your patties. {{image_2}} You can make these salmon patties even better by adding veggies. Chopped bell peppers or carrots work well. Spinach or zucchini can add moisture and flavor. You can also swap salmon for other protein sources. Try canned tuna or even cooked chickpeas for a different taste. These changes keep each meal unique. If you want a gluten-free option, use gluten-free breadcrumbs. Almond flour is another great substitute. Both options work well in binding the patties. You can even skip the breadcrumbs altogether. Just add an extra egg to help hold everything together. This makes the dish friendly for everyone. Want to spice things up? Add a pinch of cayenne pepper for heat. Paprika gives a nice smoky flavor. You can also try fresh herbs like dill or parsley. They add freshness and depth to the taste. Mix and match spices to find your favorite blend. Each tweak brings something special to the table. To store leftover honey mustard salmon patties, place them in an airtight container. Keep them in the fridge. They stay fresh for up to three days. Make sure they cool down first. This helps retain their texture and flavor. When you're ready to eat your leftovers, reheat them in a skillet. Use medium heat and add a splash of oil to prevent sticking. Heat each side for about 3 minutes until warm. You can also use an oven. Set it to 350°F (175°C) and bake for 10-12 minutes. This method keeps them crispy. You can freeze salmon patties for later. First, let them cool completely. Then, place them in a single layer on a baking sheet. Freeze for about an hour. Once frozen, transfer them to a freezer bag. Remove as much air as possible. They can last for up to two months. When ready to eat, thaw them overnight in the fridge before reheating. Yes, you can use fresh salmon instead of canned. Just cook the fresh salmon first. You can bake, grill, or steam it. Once cooked, flake it into small pieces. This option gives you a fresher taste. It also allows you to control the seasoning. Fresh salmon can be a bit more costly, but it’s worth it for the flavor. To make the patties less oily, reduce the olive oil in the pan. Start with less oil and add more if needed. You can also use a non-stick skillet, which helps to fry without much oil. Another tip is to drain the patties on paper towels right after cooking. This helps remove excess oil. You can also bake the patties instead of frying them for a lighter option. These patties pair well with many sides. Try serving them on a bed of fresh greens. A light salad with lemon dressing works great too. You can also add roasted vegetables or sweet potato fries. For a dipping sauce, mix honey and Dijon mustard together. This adds extra flavor and ties everything together. Enjoy experimenting with different sides! In this post, we explored how to make delicious Honey Mustard Salmon Patties. We covered the key ingredients and their swaps, plus provided nutrition facts. You learned step-by-step cooking instructions and tips for great results. We shared ideas for variations and discussed how to store leftovers safely. Remember, cooking is fun! Experiment with flavors and ingredients. Enjoy your tasty salmon patties and share them with friends.

Honey Mustard Salmon Patties Easy and Tasty Recipe

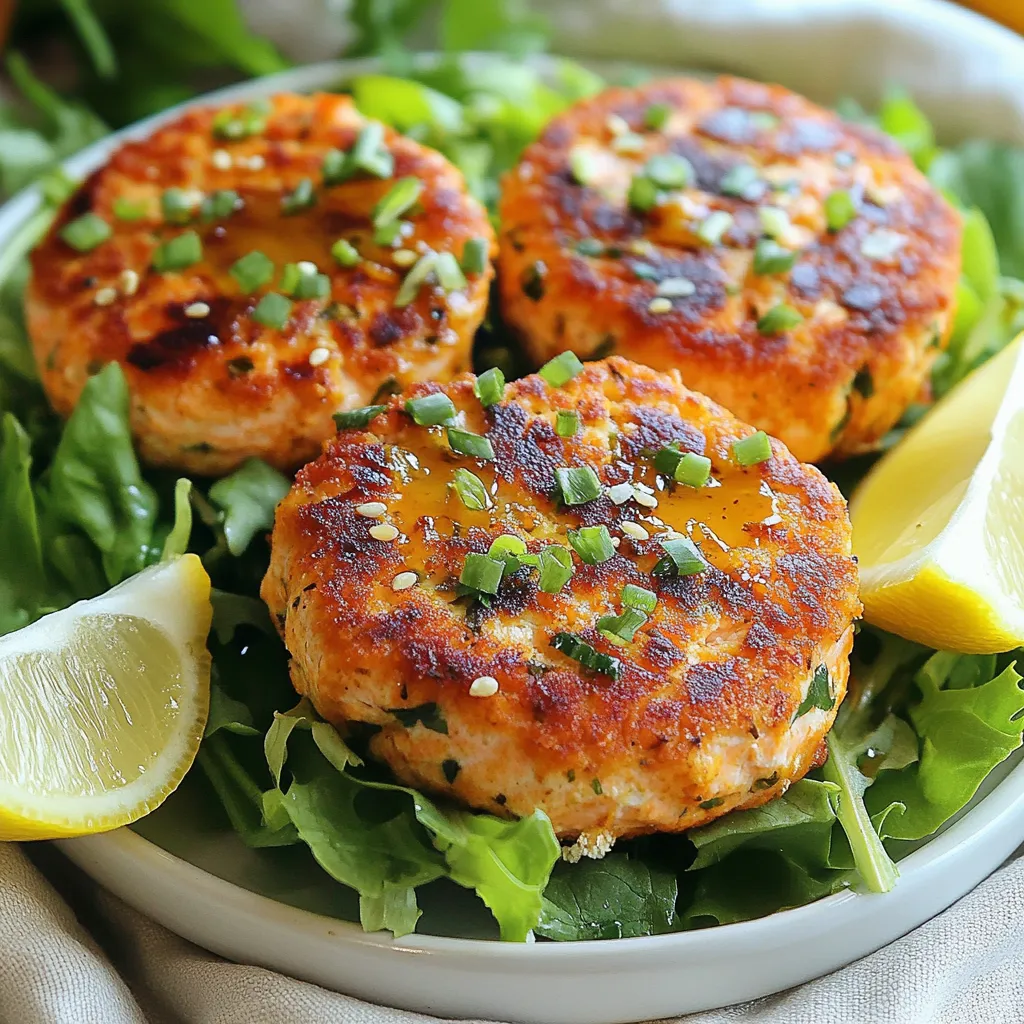
Are you ready to elevate your dinner game? These Honey Mustard Salmon Patties are easy and delicious. With simple ingredients

To make this meal, gather these fresh ingredients: - 2 medium zucchinis (for zoodles) - 8 oz shrimp, peeled and deveined - 1 cup fresh basil leaves - 1/4 cup pine nuts - 1/4 cup grated Parmesan cheese - 2 cloves garlic, minced - 1/4 cup olive oil - Salt and pepper to taste These fresh ingredients create a bright and tasty dish. The zoodles replace pasta, making it lighter. Shrimp adds protein and a nice flavor. Pesto brings together all the tastes beautifully. For extra flair, you can add: - Cherry tomatoes, halved (for garnish) - Additional pine nuts for topping (optional) These garnishes not only look nice but also add a splash of color and flavor. Cherry tomatoes give a fresh crunch, while more pine nuts add nuttiness. You will need a few kitchen tools: - Food processor for making pesto - Spiralizer or vegetable peeler to create zoodles - Non-stick skillet for cooking - Measuring cups and spoons Having the right tools makes cooking easier. A food processor helps blend your pesto quickly. A spiralizer turns zucchini into fun noodles. {{ingredient_image_1}} To start, gather your ingredients for the pesto. You will need fresh basil leaves, pine nuts, grated Parmesan cheese, minced garlic, salt, pepper, and olive oil. 1. Place the basil, pine nuts, cheese, and garlic into a food processor. 2. Pulse the mixture until it becomes coarse. 3. While the food processor runs, slowly add the olive oil. 4. Keep blending until the pesto is smooth. 5. Taste it and add salt and pepper as needed. Set it aside. Zoodles are fun and easy to make. They replace pasta and add great nutrition. 1. Take two medium zucchinis. 2. Use a spiralizer or a vegetable peeler to create long, thin strips. 3. Make sure to set the zoodles aside for later. Now, let’s cook the shrimp and bring everything together. 1. Heat a non-stick skillet over medium-high heat. 2. Add a splash of olive oil to the pan. 3. Once hot, add the shrimp. Cook them for 2-3 minutes on each side until they turn pink and opaque. 4. Remove the shrimp from the skillet and set them aside. 5. In the same skillet, add the zoodles. Sauté them for 2-3 minutes until they soften but still have a bit of crunch. 6. Return the shrimp to the skillet. Pour the pesto over the shrimp and zoodles. 7. Toss everything together until well coated. Heat for another 2 minutes. 8. Finish by adding halved cherry tomatoes for a fresh taste. Toss gently to combine. For a lovely presentation, serve your dish in a large bowl. Sprinkle extra pine nuts and Parmesan cheese on top for a beautiful finish. Enjoy your meal! To make great pesto, use fresh basil. It gives the best taste. Use good-quality olive oil for a rich flavor. You can add more garlic if you like it strong. Pine nuts add a nice crunch. If you don’t have pine nuts, try walnuts or almonds. Blend until the mix is smooth, but keep it a bit chunky for texture. Taste your pesto and adjust salt and pepper as needed. This step is key to perfecting your flavor. Zoodles cook fast, so keep an eye on them. After you sauté them for about 2-3 minutes, they should be tender but still crunchy. Overcooking makes them mushy and watery. You want to keep their fresh taste. If you’re unsure, taste a strand. It should have a slight bite. I like to cook them in the same pan as the shrimp to absorb some of that yummy flavor. Serve your pesto shrimp zoodles in a big bowl. This makes it easy to share. Top with extra pine nuts for a nice crunch. A sprinkle of grated Parmesan on top adds flavor and looks good. Pair this dish with a light salad or some crusty bread. A glass of white wine can also complement the meal well. For a fresh touch, add halved cherry tomatoes right before serving. They brighten the dish and add color. Pro Tips Use Fresh Basil: Fresh basil is key to a vibrant pesto. Look for bright green leaves and avoid any that are wilted or brown. Perfectly Cooked Shrimp: Be careful not to overcook the shrimp; they should be pink and opaque. Remove them from the heat as soon as they reach this stage. Customize Your Zoodles: Feel free to add other vegetables to the zoodles, such as bell peppers or carrots, for extra flavor and nutrition. Storing Pesto: If you have leftover pesto, store it in an airtight container in the fridge. A thin layer of olive oil on top will help preserve its color and flavor. {{image_2}} You can swap shrimp for other proteins. Chicken, tofu, or scallops work well. Chicken breast is a great choice. Cook it like the shrimp. Tofu adds a nice texture. Make sure to press it before cooking. Scallops cook quickly and taste amazing with pesto. Any of these proteins can bring new flavors to your dish. While pesto shines here, you can explore other sauces. Try Alfredo for a creamy twist. Tomato sauce can add a bright touch. A drizzle of lemon butter can brighten up the dish. Each sauce brings its own charm, so feel free to experiment. You can make it your own! For a low-carb meal, stick with zoodles. You can add more veggies like bell peppers or spinach. For a vegan option, use plant-based cheese. Nutritional yeast can replace the Parmesan. You can also use chickpeas or lentils for protein. These changes make the dish healthy and flavorful. Enjoy your cooking adventures! To store leftover pesto shrimp zoodles, place them in an airtight container. Make sure to cool the dish first. You can keep it in the fridge for up to three days. To keep the zoodles fresh, avoid mixing them with the pesto until ready to eat. When it's time to enjoy your leftovers, reheat gently. You can use a skillet over low heat. Stir the mixture often to prevent sticking. If you want, add a splash of olive oil to keep it moist. Another option is to microwave it in a safe dish. Heat in short bursts, stirring in between, until warm. Freezing zoodles and pesto is easy but needs care. First, freeze the zoodles raw. Place them in a single layer on a baking sheet. Once frozen, transfer them to a freezer bag. For the pesto, pour it into an ice cube tray. Freeze until solid, then store the cubes in a bag. This method keeps the flavors fresh! Zoodles are zucchini noodles. They are a fun, low-carb swap for pasta. To make zoodles, you need a spiralizer or a vegetable peeler. Start with medium zucchinis. Cut off the ends, then spiralize or peel them into long, thin strands. You can set them aside and use them later in your dish. Yes, you can use store-bought pesto. It saves time and still tastes great. Just choose a brand with fresh ingredients. Look for one without added preservatives. This way, you can enjoy a quick meal without losing flavor. Cooked shrimp turn pink and opaque. They usually take 2-3 minutes per side. You should also check if they curl into a “C” shape. If they do, they are fully cooked. Avoid overcooking, as this can make them tough. You've learned how to create delicious pesto shrimp zoodles. Fresh and optional ingredients add great flavor. The right tools help make this meal easy. Following the step-by-step guide ensures tasty results. Remember to avoid overcooking your zoodles. Try different proteins or sauces for variety. Store any leftovers properly for best taste. Now, you can impress friends and family with this dish! Enjoy your cooking journey!

Pesto Shrimp Zoodles Easy and Flavorful Meal

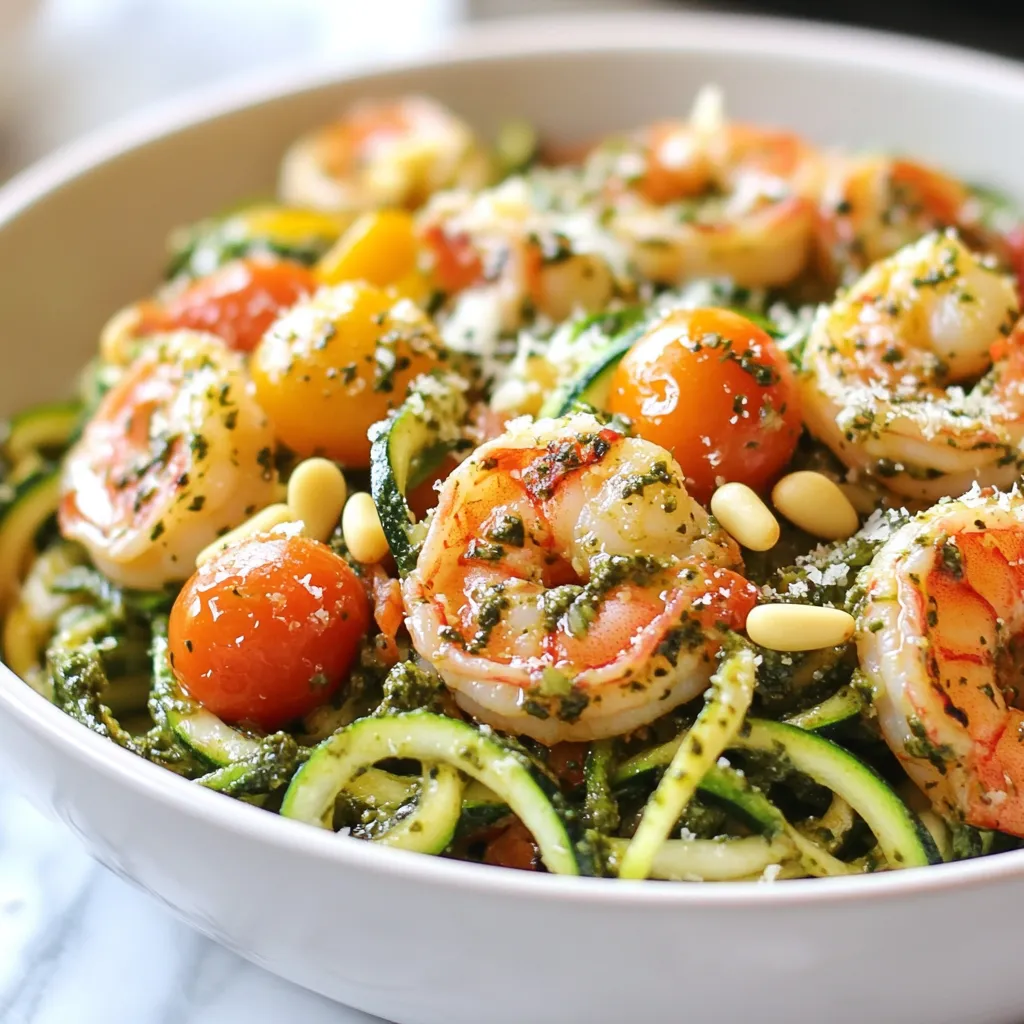
Are you ready to whip up a meal that is both easy and bursting with flavor? Pesto Shrimp Zoodles combine

To make your Chocolate Caramel Pretzel Bark, you will need: - 2 cups pretzel sticks - 1 cup chocolate chips (dark or milk chocolate) - 1 cup caramel sauce (store-bought or homemade) - 1/2 cup sea salt (for sprinkling) You can add a personal touch with these optional ingredients: - 1/2 cup chopped nuts (like pecans or almonds) Gather these items to prepare your bark: - Baking sheet - Parchment paper - Small saucepan - Spatula - Microwave (if using store-bought caramel) - Cooling rack (optional) These simple ingredients and tools make it easy to create this tasty treat. The pretzels give a nice crunch, while the chocolate and caramel bring all the flavors together. {{ingredient_image_1}} Start by preheating your oven to 350°F (175°C). This step warms up the pretzels for a crunchy bite. Line a baking sheet with parchment paper. This makes cleanup easy later. Spread 2 cups of pretzel sticks evenly on the sheet in a single layer. Bake them for 5 to 7 minutes. Keep an eye on them. You want them lightly golden and warm, which helps hold the toppings later. While the pretzels bake, it’s time for the caramel sauce. If you have store-bought caramel, just warm it. Place it in a small saucepan over low heat. Stir occasionally until it’s pourable. If you prefer, microwave it for about 30 seconds. Homemade caramel works too, but it takes longer to make. Once ready, set it aside for a moment. Remove the pretzels from the oven and let them cool for a few minutes. Pour the warm caramel sauce over the pretzels. Make sure each pretzel gets some love. Use a spatula to spread it around if needed. Next, sprinkle 1 cup of chocolate chips over the caramel-coated pretzels. The heat will melt them a bit. After a minute, use a spatula to spread the soft chocolate evenly. If you like nuts, sprinkle 1/2 cup of chopped nuts on top. Finally, add a generous layer of sea salt for a savory touch. Let the bark cool at room temperature or refrigerate it for about 30 minutes. Once set, break it into pieces. Enjoy your delicious chocolate caramel pretzel bark! To get that perfect crunch in your bark, start with fresh pretzel sticks. You want them to be crisp before you add the toppings. Bake the pretzels for just 5 to 7 minutes at 350°F (175°C). This step warms them and keeps them crunchy. Avoid baking too long, or they may burn. Allow the pretzels to cool slightly before moving on. This will help them hold their shape and texture. When it comes to chocolate, choose chips that melt well. Dark or milk chocolate chips are great options. They add rich flavor and smooth texture. If you prefer, you can also use chocolate bars. Simply chop the bars into small pieces for even melting. Make sure to melt the chocolate slowly over low heat to avoid burning. For serving, place the bark on a decorative platter. This makes it look inviting. You can also break the bark into fun shapes or sizes. For a sweet gift, package the pieces in clear bags tied with ribbons. This adds a personal touch. You can sprinkle a few extra sea salt flakes on top for a finishing touch! Pro Tips Choose the Right Chocolate: Opt for high-quality chocolate chips for a smoother melt and richer flavor. Dark chocolate brings a nice balance to the sweetness of the caramel. Ensure Even Coating: When pouring the caramel, make sure to drizzle it evenly over the pretzels. This helps every bite to be deliciously balanced with sweet and salty flavors. Keep It Crunchy: Baking the pretzels before adding the toppings ensures they stay crunchy even after the caramel and chocolate are added. Don’t skip this step! Storage Tips: Store the pretzel bark in an airtight container at room temperature for up to a week. If it’s warm in your kitchen, refrigerate it to keep the chocolate from melting. {{image_2}} If you want a nut-free version, simply skip the nuts. You can replace them with more pretzel sticks or even crispy rice cereal. This keeps the crunch and adds a fun texture. To make your bark even better, consider adding spices. A sprinkle of cinnamon adds warmth. Or try a bit of cayenne for a spicy kick. You could also add a splash of vanilla extract to the caramel for extra flavor. You can choose any type of chocolate for your bark. Dark chocolate offers a rich taste, while milk chocolate gives a sweet flavor. White chocolate is also a fun option. Mixing different chocolates can create a tasty look and flavor boost. To keep your chocolate caramel pretzel bark fresh, store it in an airtight container. Place parchment paper between layers to prevent sticking. This method helps maintain the bark's crunchiness and flavor. Keep the container in a cool, dry place, away from sunlight. Avoid storing it in the fridge as it can make the chocolate sweat and lose texture. When stored properly, chocolate caramel pretzel bark lasts about two weeks. For the best taste, enjoy it within the first week. If you notice any changes in texture or smell, it’s best to toss it out. Always check for any signs of spoilage before indulging. You can freeze chocolate caramel pretzel bark for longer storage. Cut the bark into pieces and place them in a single layer on a baking sheet. Freeze for about an hour until solid. Then, transfer the pieces into a freezer-safe bag or container. Label it with the date. The bark can last up to three months in the freezer. To enjoy, thaw it in the fridge or at room temperature. Yes, you can use different nuts in Chocolate Caramel Pretzel Bark. Pecans and almonds work great. You can also try walnuts or hazelnuts for a unique flavor. Just chop them small enough to mix well with the bark. If you want a nut-free version, skip the nuts entirely. Making homemade caramel sauce is easy! You need sugar, butter, and cream. Start with one cup of sugar in a pan over medium heat. Stir until it melts and turns golden. Then add six tablespoons of butter and stir until melted. Finally, slowly pour in half a cup of cream and mix well. Let it cool before using. Absolutely! You can make Chocolate Caramel Pretzel Bark a few days ahead. Just store it in an airtight container. Keep it in a cool, dry place to maintain freshness. If you want to keep it longer, refrigerate it. It stays tasty for about a week. Chocolate Caramel Pretzel Bark pairs well with many treats. Try it with a glass of milk or hot cocoa for a sweet snack. You can also serve it alongside popcorn for a fun movie night. For more flavor, enjoy it with coffee or tea. This blog post covered how to make chocolate caramel pretzel bark. We detailed the key ingredients, optional tweaks, and the tools you need. You learned step-by-step instructions for each process. I shared tips for perfecting the bark and highlighted fun variations. Lastly, I discussed storage and answered common questions. Enjoy creating this treat. Experiment with flavors and enjoy sharing with friends. Your baking adventure will be fun and tasty!

Chocolate Caramel Pretzel Bark Irresistible Snack

Are you ready for a snack that combines sweet, salty, and crunchy? Chocolate Caramel Pretzel Bark is the treat you

- 2 cups plain Greek yogurt - 1 cup dark chocolate chips - 1 cup fresh strawberries, hulled and sliced - 2 tablespoons honey or maple syrup - 1 teaspoon vanilla extract - 1/2 cup crushed nuts (almonds or pistachios) - Pinch of sea salt Gathering your ingredients is the first step. You’ll need plain Greek yogurt. It gives a creamy base. Dark chocolate chips add a rich taste. Fresh strawberries bring sweetness and color. If you want, you can add honey or maple syrup for extra sweetness. Vanilla extract is a nice touch. Crushed nuts add crunch. A pinch of sea salt boosts all the flavors. Mix and match these ingredients to fit your taste. Don't be afraid to get creative! {{ingredient_image_1}} - Line a baking sheet with parchment paper. This helps later with easy removal. - In a bowl, combine 2 cups of plain Greek yogurt, 2 tablespoons of honey or maple syrup, and 1 teaspoon of vanilla extract if you like. Mix until smooth. - Spread the yogurt mixture evenly on the baking sheet. Aim for a thickness of 1/4 to 1/2 inch. - Melt 1 cup of dark chocolate chips in the microwave. Do this in 30-second bursts, stirring after each. This will keep the chocolate smooth. - Drizzle the melted chocolate over the yogurt. Use a spoon to swirl it in. This creates a lovely marbled effect. - Now, add 1 cup of sliced strawberries and 1/2 cup of crushed nuts on top. This gives a nice crunch. - Sprinkle a pinch of sea salt over everything. This enhances the sweet flavors. - Place the baking sheet in the freezer for 3 to 4 hours or until solid. - Once frozen, break the bark into pieces with your hands or a knife. Enjoy fresh or store in a container in the freezer for up to two weeks. To get the best yogurt consistency, use full-fat Greek yogurt. This gives a creamy and rich texture. Mix the yogurt with honey or maple syrup until it is smooth. You can add a teaspoon of vanilla extract for extra flavor. For melting chocolate smoothly, use a microwave-safe bowl. Heat the dark chocolate chips in 30-second bursts. Stir between each burst to avoid burning. This method helps you control the heat and achieve a silky texture. When serving your yogurt bark, consider garnishing with extra strawberries or nuts. You can also drizzle more melted chocolate over the top for a fancy touch. Serve it in small pieces for easy sharing. Pair this treat with fresh fruit or a scoop of ice cream for a fun twist. It also goes well with a cup of coffee or tea, making it a perfect snack. For a gluten-free version, ensure your chocolate chips are gluten-free. Most brands are, but check the label to be sure. If you want a dairy-free option, use dairy-free yogurt and chocolate. When it comes to sweeteners, you can use agave syrup or stevia for lower sugar needs. Adjust the amount based on your taste. This allows you to enjoy a delicious treat while sticking to your dietary goals. Pro Tips Use Full-Fat Yogurt: For a creamier texture and richer flavor, opt for full-fat Greek yogurt. It makes the bark more indulgent and satisfying. Experiment with Toppings: Don’t limit yourself to just strawberries and nuts! Try adding other fruits like blueberries or raspberries, or even a sprinkle of coconut flakes for added texture. Melting Chocolate Tips: Be cautious when melting chocolate; stir every 30 seconds to prevent burning. You can also use a double boiler for more control over the heat. Storage Suggestions: Store the yogurt bark in an airtight container to prevent freezer burn. For easy serving, layer pieces between parchment paper. {{image_2}} You can change the fruits for different tastes. Try bananas, blueberries, or raspberries. Each fruit offers a unique flavor and color. Use your favorites! You can also swap Greek yogurt for dairy-free yogurt. This keeps it creamy and tasty for everyone. White chocolate and dark chocolate have different flavors. Dark chocolate is rich and bold, while white chocolate is sweet and creamy. You can melt both easily. If you want a lighter option, use cocoa powder. Mix it with a little coconut oil to create a smooth, chocolatey topping. If you want a nut-free option, skip the nuts or use seeds. Sunflower seeds or pumpkin seeds add a nice crunch too. Other toppings can include shredded coconut or granola. These swaps keep the bark fun and exciting! To store yogurt bark, place it in an airtight container. Make sure to layer parchment paper between pieces. This keeps them from sticking together. You can freeze yogurt bark for up to two weeks. For best results, freeze it flat in your freezer. When you want to eat it, take a piece out and let it sit at room temperature. Thaw it for about 5 to 10 minutes. This helps keep the texture creamy. If you thaw it too long, it may become mushy. Yogurt bark lasts for about two weeks in the freezer. After that, it may lose its taste and texture. Keep an eye on the bark for signs of spoilage. If it has ice crystals or a strange smell, throw it away. You should also check for freezer burn. If the surface looks dry or discolored, it's best not to eat it. Always trust your senses; if it looks or smells off, it’s safer to discard it. To cut chocolate yogurt bark, you need a sharp knife. First, let the bark sit at room temperature for a few minutes. This helps it soften slightly. Then, score the bark lightly where you want to cut. This will guide your cuts. Finally, press down firmly with the knife to cut through. Avoid dragging the knife, as this may melt the chocolate. Yes, you can use flavored yogurt. However, this changes the taste. For example, strawberry yogurt will add more fruity flavor. Keep in mind that flavored yogurt may also alter the texture. Make sure to taste the yogurt first. You may want to reduce the honey or syrup based on the yogurt's sweetness. This recipe is not vegan as it contains Greek yogurt and honey. To make it vegan, use plant-based yogurt, like almond or coconut yogurt. You can substitute maple syrup for honey. Also, check that your chocolate chips are dairy-free. These changes will keep the treat both vegan and tasty. This blog post covered making a tasty yogurt bark treat using simple ingredients. We discussed the main components, optional additions, and easy step-by-step instructions. I shared tips for texture and flavor, along with variations to keep things fresh. Storing and serving ideas ensure your yogurt bark stays delicious. Enjoy creating your own yogurt bark, tailoring it to your taste. It's easy, fun, and a healthy treat!

Chocolate Strawberry Yogurt Bark Simple Treat Idea

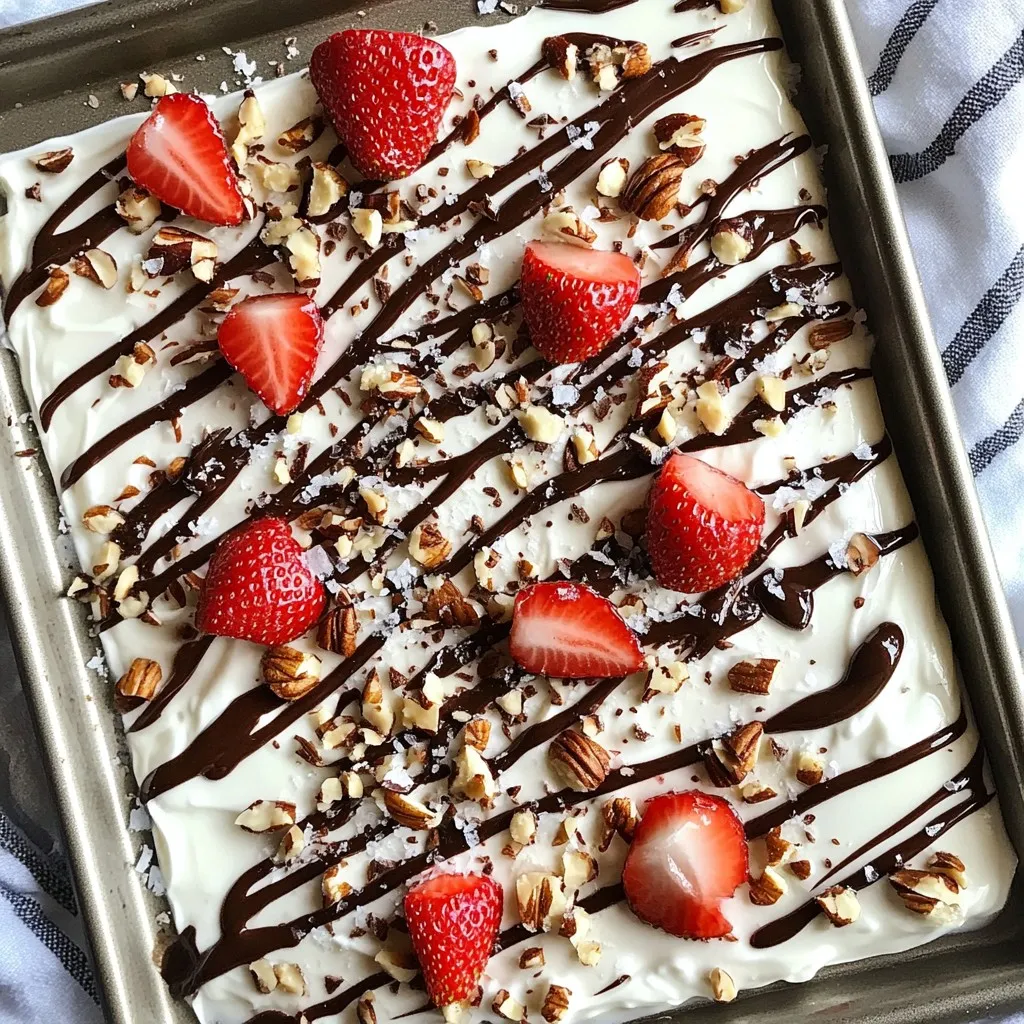
Looking for a quick and tasty treat? Try my Chocolate Strawberry Yogurt Bark! It’s fun, easy, and perfect for any

- 4 boneless, skinless chicken breasts - 1 cup sun-dried tomatoes (packed in oil), drained and roughly chopped - 1 cup heavy cream - 1/2 cup chicken broth - 1/2 cup grated Parmesan cheese - 3 cloves garlic, minced - 1 teaspoon dried basil - 1 teaspoon dried oregano - 1 tablespoon olive oil - Salt and pepper to taste - Fresh basil leaves for garnish - Optional: Garlic bread For this creamy sun-dried tomato chicken, start with fresh ingredients. You need tender chicken breasts for a juicy bite. The sun-dried tomatoes pack a punch of flavor. Their rich taste complements the creamy sauce well. Next, use heavy cream to create a luscious texture. It adds richness that makes the dish feel special. Chicken broth adds depth to the sauce, making it even more flavorful. Don’t forget the grated Parmesan cheese. It melts into the sauce, adding a nice salty note. For seasoning, minced garlic is key. It brings out the best in the sun-dried tomatoes. Dried basil and oregano add aromatic notes that tie everything together. Use olive oil to cook the chicken. It helps achieve a golden crust while keeping it moist. To finish, fresh basil leaves make a lovely garnish. They add color and a fresh taste. If you like, serve the chicken with garlic bread. It’s perfect for soaking up that creamy sauce! {{ingredient_image_1}} - First, season the chicken breasts with salt and pepper. Make sure to coat them well. - Next, heat olive oil in a large skillet over medium-high heat. Once hot, add the chicken. - Cook the chicken for about 5-7 minutes on each side. Look for a golden brown color. - When fully cooked, remove the chicken from the skillet and set it aside on a plate. - In the same skillet, add minced garlic and sauté for about 30 seconds. You want it to smell great. - Then, stir in the roughly chopped sun-dried tomatoes. Cook them for 2 minutes to soften. - Pour in the chicken broth and bring this mixture to a simmer. Let it reduce for 3-4 minutes. - Lower the heat, then add heavy cream while stirring well. This will make the sauce creamy. - Sprinkle in grated Parmesan cheese, dried basil, and oregano. Stir until the cheese melts. - Now, return the cooked chicken to the skillet. Make sure each piece is well coated in sauce. - Let everything warm through for about 2-3 minutes. Taste the sauce and adjust seasoning as needed. - Serve the creamy sun-dried tomato chicken over pasta or rice. Enjoy this tasty meal! - To ensure the chicken is cooked properly, use a meat thermometer. Aim for 165°F (75°C). - For perfect sauce consistency, let the sauce simmer until it thickens. Stir often to avoid sticking. - This dish pairs well with pasta, rice, or sautéed veggies. - Plate the chicken and drizzle the creamy sauce over it. Add fresh basil leaves for color. - Prep ingredients in advance. Chop sun-dried tomatoes and mince garlic the night before. - Use a pressure cooker to cut cooking time. It cooks chicken quickly and keeps it tender. Pro Tips Marinate for Extra Flavor: Consider marinating the chicken breasts in olive oil, garlic, and herbs for at least 30 minutes before cooking to enhance the flavor. Use Fresh Sun-Dried Tomatoes: If possible, opt for sun-dried tomatoes that are dry rather than oil-packed for a more intense flavor. Rehydrate them in hot water if needed. Adjust Creaminess: For a lighter sauce, substitute half of the heavy cream with Greek yogurt or a non-dairy alternative. Perfect Pairings: Serve with a side of garlic bread or over a bed of spinach to complement the dish’s rich flavors and add a nutritious element. {{image_2}} You can switch the chicken for turkey or shrimp. Both options keep the flavor rich. Turkey provides a leaner choice, while shrimp cooks quickly and adds a fresh twist. If you prefer lighter meals, try using half-and-half or coconut milk instead of heavy cream. This change still gives creaminess but with fewer calories. Add fresh spinach or mushrooms to the sauce. Both ingredients blend well with sun-dried tomatoes. Spinach adds nice color and nutrients, while mushrooms bring a savory depth. You can also mix in herbs like thyme or rosemary for added flavor. These herbs enhance the dish and create a unique taste. For a low-carb meal, serve the chicken over zoodles (zucchini noodles). This swap cuts carbs and adds veggies. If you need a dairy-free option, use almond milk or a dairy-free cream. These swaps keep your meal creamy while catering to dietary needs. To store leftovers, place the chicken in an airtight container. This keeps it fresh. You can store it in the fridge for up to three days. Make sure to let it cool before sealing. When preparing the dish for freezing, let it cool completely. Then, transfer the chicken and sauce to a freezer-safe bag. Remove as much air as possible before sealing. You can freeze it for up to three months for best quality. To thaw, move the bag to the fridge overnight. For faster thawing, place it in a bowl of cold water. To reheat without losing flavor, use the stove. Place the chicken in a skillet over low heat. Add a splash of chicken broth to keep it moist. Stir occasionally and heat until warm. Avoid overcooking by checking the chicken’s internal temperature. It should reach 165°F again. You can also use a microwave, but be careful not to dry it out. Enjoy your creamy sun-dried tomato chicken! You can pair creamy sun-dried tomato chicken with many tasty sides. Here are some great options: - Cooked pasta, like fettuccine or penne - Steamed rice or risotto - Sautéed vegetables, such as broccoli or green beans - Garlic bread for dipping in the sauce - A fresh salad with mixed greens These sides enhance the dish and make your meal complete. Yes, you can prepare this dish ahead of time. Here's how: - Cook the chicken and sauce as directed. - Let the dish cool before storing it. - Place it in an airtight container in the fridge. - It will last for about 3-4 days. To reheat, warm it in a skillet over low heat. Add a splash of cream for extra moisture. If you want some heat, here are a few easy ideas: - Add crushed red pepper flakes to the sauce. - Mix in diced jalapeños or serrano peppers. - Use a spicy seasoning blend. These additions can give your creamy sun-dried tomato chicken a nice kick! This blog covered how to make creamy sun-dried tomato chicken. You learned about the key ingredients, step-by-step instructions, and helpful tips. We also discussed various ways to customize the dish and storage methods. Enjoy making this meal and share it with loved ones. It’s easy, tasty, and a sure hit at the dinner table. Happy cooking!

Creamy Sun-Dried Tomato Chicken Flavorful Dinner Idea

Are you ready to elevate your dinner game? Creamy Sun-Dried Tomato Chicken is a dish bursting with flavor and comfort.

- 1 lb large shrimp, peeled and deveined - 1/4 cup honey - 2 tablespoons fresh lime juice - Zest of 1 lime - 2 tablespoons olive oil - 2 cloves garlic, minced - 1 teaspoon chili powder - 1/2 teaspoon salt - 1/4 teaspoon black pepper - 1/4 cup fresh cilantro, chopped (for garnish) - Lime wedges (for serving) When making Honey Lime Grilled Shrimp, fresh shrimp is key. You can use large or jumbo shrimp. If you want a twist, try using scallops instead. Honey adds sweetness. If you want less sugar, you can swap honey with agave syrup. Fresh lime juice gives a bright flavor. You can use bottled lime juice, but fresh is best. For the garlic, fresh cloves pack more punch than pre-minced. Using fresh ingredients makes a big difference. Fresh shrimp tastes better and cooks more evenly. Fresh lime juice brightens the dish and adds zest. The garlic gives a rich flavor. Each ingredient works together to create a balanced taste. This dish shines when you focus on quality. Always seek fresh herbs and spices for the best results. Fresh cilantro not only adds flavor but also color to your plate. When you use fresh ingredients, you elevate your cooking. {{ingredient_image_1}} To make Honey Lime Grilled Shrimp, start by making the marinade. In a medium bowl, mix together: - 1/4 cup honey - 2 tablespoons fresh lime juice - Zest of 1 lime - 2 tablespoons olive oil - 2 cloves garlic, minced - 1 teaspoon chili powder - 1/2 teaspoon salt - 1/4 teaspoon black pepper Whisk the ingredients until they blend well. Next, add 1 pound of peeled and deveined shrimp to the bowl. Toss the shrimp gently to coat them in the marinade. Cover the bowl and place it in the refrigerator. Let it sit for 30 minutes. This step helps the flavors soak into the shrimp. While the shrimp marinates, it's time to get your grill ready. Preheat your grill or grill pan to medium-high heat. If you use wooden skewers, soak them in water for 15 minutes. This prevents them from burning on the grill. Make sure your grill grates are clean and lightly oiled. This will help the shrimp cook evenly and prevent sticking. Once the grill is hot, it's time to cook the shrimp. Thread the marinated shrimp onto the skewers. Place the skewers on the grill and cook for 2-3 minutes on each side. Look for the shrimp to turn pink and opaque. Be careful not to overcook them, as they can become tough. Remove the skewers from the grill and let the shrimp rest for a couple of minutes. This allows the juices to settle, making each bite juicy and flavorful. Serve the grilled shrimp hot, garnished with fresh cilantro and lime wedges. Enjoy your meal! When picking shrimp, size matters. Look for large or jumbo shrimp. These hold up well on the grill. Check for a fresh smell, not fishy. The shells should be shiny and clean. If you can, buy shrimp that are wild-caught. They often taste better than farmed ones. Cooking shrimp takes just a few minutes. Grill them for 2-3 minutes on each side. They turn pink and opaque when done. Watch closely, so they don't overcook. Overcooked shrimp can turn rubbery and tough. Remove them from the grill as soon as they are done. Let the shrimp marinate for at least 30 minutes. This helps the flavors blend. You can marinate up to 2 hours for a stronger taste. Just don't go longer than that. The acid in lime juice can start to cook the shrimp. After marinating, they will have a nice honey-lime flavor that shines when grilled. Pro Tips Marinate Longer for Depth: For a more intense flavor, consider marinating the shrimp for up to 2 hours. This allows the honey and lime to penetrate the shrimp more deeply. Use Fresh Ingredients: Whenever possible, opt for fresh lime juice and garlic rather than bottled versions to enhance the overall flavor of the dish. Perfect Skewering Technique: When threading shrimp onto skewers, leave a little space between each piece to ensure even cooking and prevent them from steaming. Watch Cooking Time: Shrimp cook quickly; be attentive and remove them from the grill as soon as they turn pink and opaque to avoid overcooking. {{image_2}} You can add some heat to your honey lime shrimp. Just mix in some hot sauce or cayenne pepper. I like to use 1 teaspoon of cayenne for a nice kick. This adds bold flavor without losing the sweet and tangy notes. You still get the honey and lime, but now it has a fun twist. Turning this dish into tacos is easy and fun. Just grill the shrimp as usual. Then, place them in a warm tortilla. You can add toppings like diced avocado, shredded cabbage, and more lime juice. These tacos are fresh and perfect for lunch or dinner. They are sure to impress your friends at any gathering. For a lighter meal, try this shrimp salad. Start with mixed greens as your base. Grill the shrimp and let them cool slightly. Toss them on top of the greens. For the dressing, mix honey, lime juice, and olive oil. This dressing adds a zesty flavor that makes the salad burst with freshness. You can also add nuts or seeds for extra crunch! After a tasty meal, you might have shrimp left. To store it right, place the shrimp in an airtight container. Keep the container in the fridge. This keeps the shrimp fresh. Use it within two days for the best taste. If you wait too long, it might not taste great. When you want to eat the shrimp again, reheating is key. The best way to reheat shrimp is on the stove. Heat a pan over medium heat. Add a bit of olive oil to the pan. Once hot, add the shrimp. Stir gently until the shrimp are warm. This keeps them juicy and tasty. Avoid the microwave; it can make shrimp rubbery. If you want to save shrimp for a long time, freezing works well. First, let the shrimp cool to room temperature. Then, place them in a freezer-safe bag. Remove as much air as you can. This helps prevent freezer burn. Label the bag with the date. You can freeze the shrimp for up to three months. When ready to eat, thaw in the fridge overnight. After thawing, follow the reheating tips for the best flavor. Yes, you can use frozen shrimp. Just make sure to thaw them first. Place the shrimp in the fridge overnight or run them under cold water. This step helps the shrimp cook evenly. Frozen shrimp can still taste great with the honey-lime marinade. Shrimp are done when they turn pink and opaque. They should also curl into a C shape. If they remain gray or translucent, they need more time on the grill. Cooking shrimp too long can make them tough, so watch them closely. Many sides go well with these tasty shrimp. Here are some ideas: - Rice: White or brown rice soaks up the honey-lime flavor. - Salad: A fresh green salad adds crunch and color. - Grilled Veggies: Bell peppers, zucchini, or asparagus add great taste. - Corn on the Cob: Sweet corn complements the shrimp well. Try any of these sides to make a complete meal. Enjoy the bright flavors of the shrimp! This article covered how to make Honey Lime Grilled Shrimp. We discussed key ingredients and their substitutes. Fresh ingredients are crucial for good flavor. I shared step-by-step instructions to marinate and grill shrimp perfectly. You learned tips for choosing and timing shrimp cooking. We also explored tasty variations like tacos and salads. Finally, I provided storage tips for leftovers. With these insights, you can enjoy shrimp that tastes great every time. Happy cooking!

Honey Lime Grilled Shrimp Savory and Simple Delight

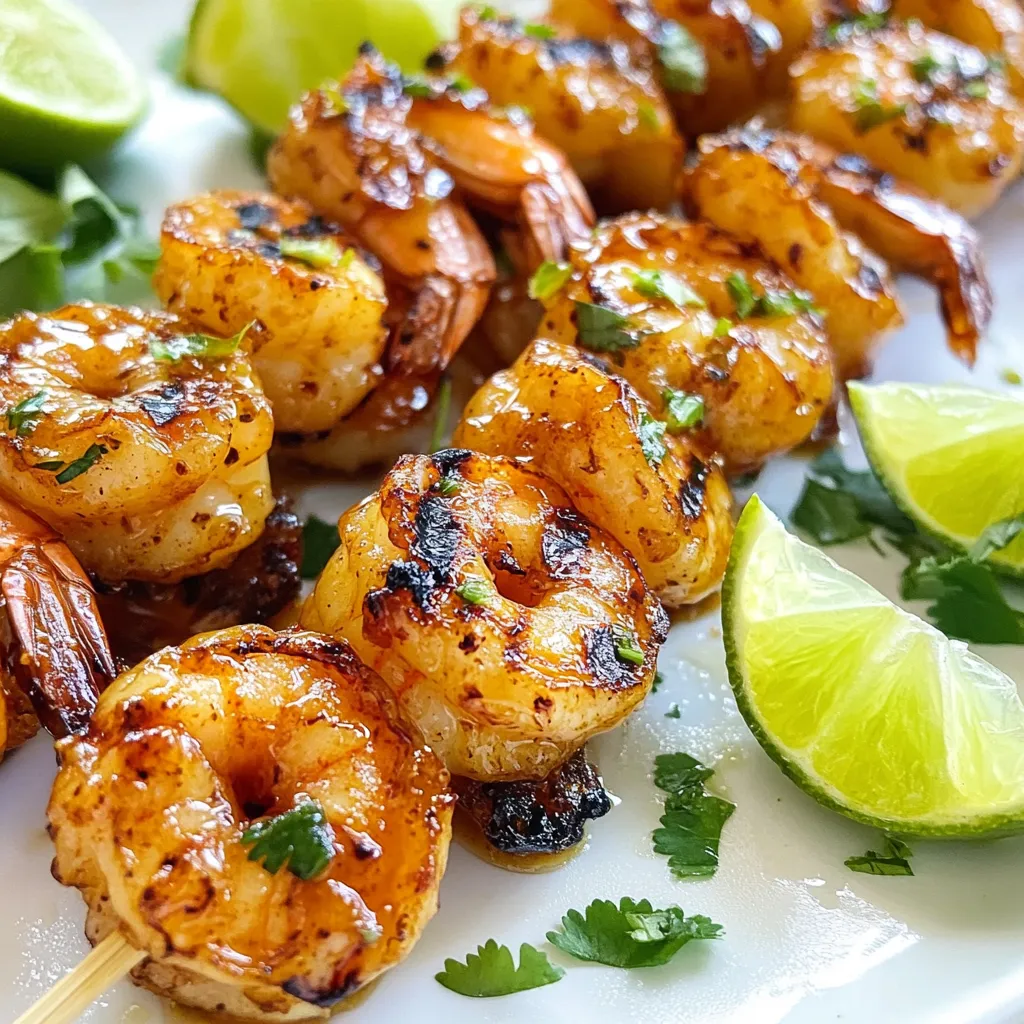
Looking for an easy and tasty dish that impresses? Honey Lime Grilled Shrimp offers a burst of flavor in every

- 1 pound fresh green beans, trimmed - 2 tablespoons sesame oil - 4 cloves garlic, minced - 1 tablespoon soy sauce - 1 teaspoon rice vinegar - 1 tablespoon sesame seeds - 1 teaspoon chili flakes (optional for heat) - Salt and pepper to taste - Scallions, sliced for garnish The first step to making sesame garlic green beans is gathering the right ingredients. Fresh green beans are the star of this dish. They add a crisp texture and bright flavor. I love using sesame oil, as it gives a wonderful nutty taste. Minced garlic adds depth and aroma. Soy sauce and rice vinegar bring a perfect balance of salty and tangy. Sesame seeds add a delightful crunch. If you like some heat, chili flakes can spice things up. You can adjust the salt and pepper to your liking. Finally, don’t forget to garnish with sliced scallions. Having fresh, quality ingredients makes a big difference. You can find these items at your local grocery store or farmer’s market. Enjoy the process of gathering your ingredients, as it sets the stage for a great cooking experience! {{ingredient_image_1}} 1. Blanching the green beans: Start by boiling a pot of water. Once it’s boiling, add the trimmed green beans. Cook them for 3-4 minutes. They should look bright green and feel tender-crisp. 2. Cooling in ice water: Quickly move the beans to a bowl filled with ice water. This stops the cooking and keeps them bright. Let them cool for a few minutes. After that, drain the beans and pat them dry. 1. Sautéing garlic and green beans: In a large skillet or wok, heat 2 tablespoons of sesame oil over medium heat. When the oil is hot, add 4 cloves of minced garlic. Cook for 1 minute. The garlic should smell nice but not burn. 2. Adding soy sauce and seasoning: Next, toss in the blanched green beans. Stir them in the garlic oil for about 2-3 minutes. They need to heat through. Drizzle in 1 tablespoon of soy sauce and 1 teaspoon of rice vinegar. If you like heat, add 1 teaspoon of chili flakes. Season with salt and pepper to taste. Cook for another 1-2 minutes to blend the flavors. 1. Garnishing with sesame seeds and scallions: Remove the skillet from the heat. Sprinkle 1 tablespoon of sesame seeds over the green beans and gently toss to coat them. For a fresh look, add sliced scallions on top. Serve warm and enjoy this tasty side dish! To get the perfect blanching, bring a pot of water to a rolling boil. Add the green beans and let them cook for 3-4 minutes. They should be bright green and tender-crisp. This step helps keep the beans vibrant and firm. After blanching, quickly move the beans to a bowl of ice water. This cools them fast and stops the cooking. Drain and pat them dry before cooking. Balancing flavors is key. Use fresh garlic for a strong taste. Sesame oil adds a rich, nutty flavor. Soy sauce brings saltiness, while rice vinegar adds brightness. Adjust these to suit your taste. If you like heat, add chili flakes, but use sparingly to avoid overpowering the dish. Sesame garlic green beans pair well with many main dishes. They work great with grilled chicken or fish. You can also serve them with rice or noodles for a complete meal. For presentation, arrange the green beans in a nice dish. Sprinkle sesame seeds on top for crunch. Add scallions for a fresh touch. A colorful plate makes the dish even more inviting. One common mistake is overcooking green beans. They should stay crisp, not mushy. Keep an eye on the time while blanching. Another mistake is burning garlic. Garlic cooks quickly. If it turns brown, it tastes bitter. Cook it just until fragrant, then add the beans. This keeps the garlic's flavor bright and fresh. Pro Tips Blanching Technique: Make sure to plunge the green beans into ice water immediately after blanching to preserve their vibrant color and crunch. Garlic Timing: Avoid overcooking the garlic; it should be just fragrant and not browned for the best flavor. Seasoning Balance: Taste as you go! Adjust the soy sauce and vinegar to achieve the flavor balance you prefer. Garnish for Freshness: Fresh scallions not only add color but also a fresh crunch that elevates the dish. {{image_2}} You can mix things up by using different types of beans. Try snap peas or asparagus for a fresh twist. Edamame beans work well too. They add a unique flavor and fun texture. If you want to change the oil, try olive oil or avocado oil. Both oils add a nice taste. You can also swap soy sauce for tamari for a gluten-free option. Experiment with different seasonings, like ginger or lemon zest, to give your dish a new flavor. Adding protein makes this dish heartier and more filling. You can toss in cooked chicken for a savory touch. Use grilled or shredded chicken for the best results. If you prefer plant-based options, try adding tofu. Firm tofu works best. Cube it and sauté it until golden before adding the green beans. Shrimp is another tasty choice. Just sauté it with the garlic for a quick flavor boost. You can cook these green beans in different ways. Oven-roasting gives them a nice crisp texture. Toss the green beans with oil, garlic, and seasonings. Spread them on a baking sheet and roast at 425°F for about 15 minutes. Stovetop sautéing is faster and keeps them bright green. Just follow the steps in the recipe. Both methods taste great, so choose the one you like best! To keep your sesame garlic green beans fresh, place them in an airtight container. Refrigerate them as soon as they cool down. This helps keep their crispness and taste. When stored properly, they can last up to three days in the fridge. If you want to save them for later, you can freeze the green beans. First, blanch them as per the recipe, then cool and drain. Spread them on a baking sheet and freeze until solid. Once frozen, transfer them to a freezer bag. This method helps prevent clumping and keeps them fresh for about three months. When it’s time to eat your leftovers, you’ll want to reheat them without losing flavor. The best way is to use a skillet. Heat a little sesame oil over medium heat. Add the green beans and toss them gently. This way, they warm up nicely while retaining their taste. You can also add a splash of soy sauce for extra flavor. You can microwave them too. Place the green beans in a microwave-safe bowl, cover, and heat in short bursts. Stir every 30 seconds until they are warm. How long do sesame garlic green beans last in the fridge? If stored correctly, they can last for about three days. After that, they may lose their texture and flavor. Always check for any off smells or signs of spoilage before eating them. Yes, you can make sesame garlic green beans ahead of time. Cook them as usual, and let them cool down. Store in an airtight container in the fridge for up to three days. When you are ready to eat, just reheat in a pan or microwave. This method keeps the flavor intact. If you don’t have sesame oil, you can use olive oil or avocado oil. They both add a nice flavor. However, sesame oil has a unique taste. Try to find toasted sesame oil for a richer flavor, if possible. Yes, sesame garlic green beans are great for meal prep. They hold up well and taste good even after a few days. You can pair them with rice or noodles for a full meal. Just remember to store them in a sealed container to keep them fresh. This dish is already vegetarian and can be easily made vegan. Just use soy sauce that is labeled vegan. This way, you can enjoy the same great flavors without any animal products. Feel free to add extra veggies for more color and nutrients. You now have a complete guide to sesame garlic green beans. We've covered ingredients, step-by-step cooking, and helpful tips. You learned how to enhance flavor and avoid mistakes. Remember, perfect blanching is key, and garnishing makes your dish shine. Explore variations and try adding protein for a full meal. Proper storage keeps leftovers fresh for later enjoyment. Enjoy every bite of this vibrant dish. It's easy, tasty, and sure to impress!

Sesame Garlic Green Beans Tasty Side Dish Delight

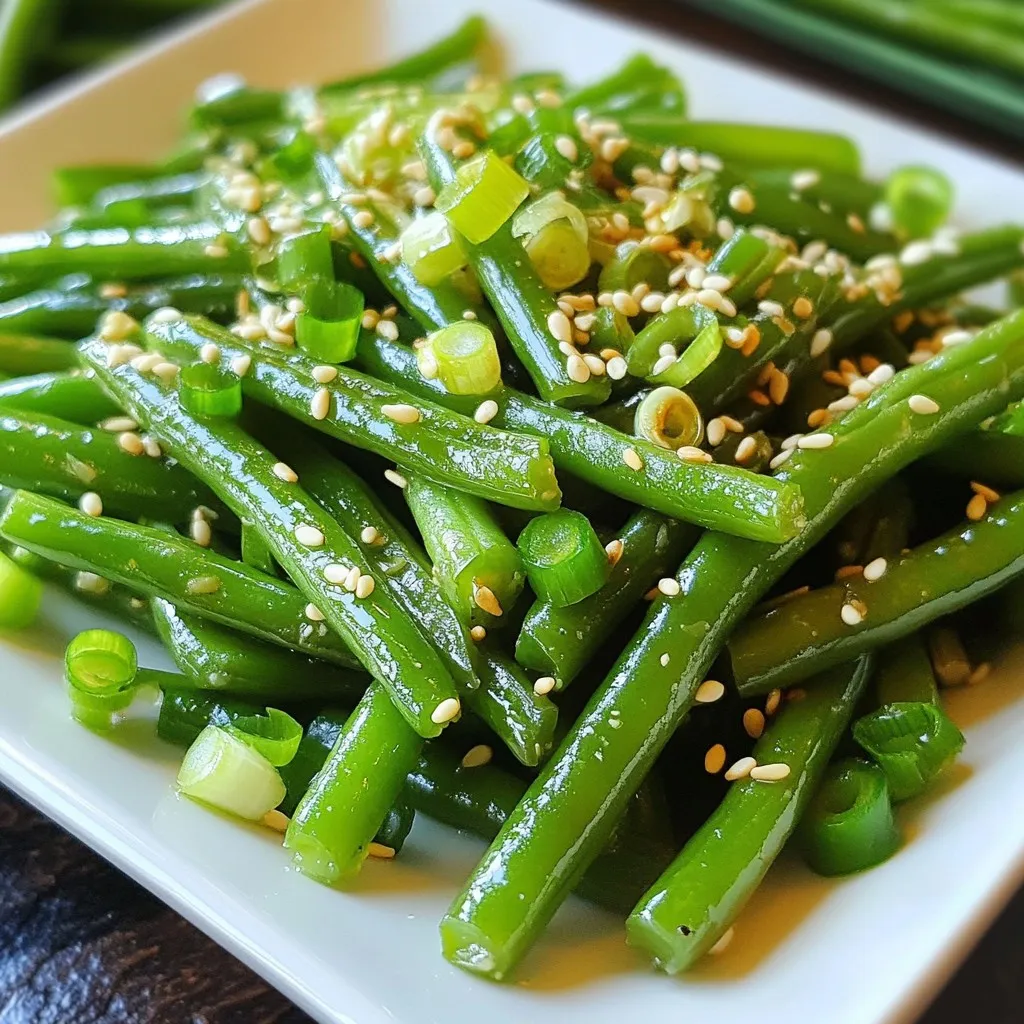
Are you ready to elevate your side dishes? Sesame Garlic Green Beans offer a simple yet tasty option. With fresh

- 4 tablespoons all-purpose flour - 4 tablespoons granulated sugar - 2 tablespoons unsweetened cocoa powder - 1/8 teaspoon baking powder - 1/8 teaspoon salt - 3 tablespoons milk (or a non-dairy alternative) - 2 tablespoons peanut butter - 1 tablespoon vegetable oil - 1/2 teaspoon vanilla extract - Optional: chocolate chips for extra richness You can add chocolate chips for a richer taste. They melt nicely in the mug cake. You might also enjoy a pinch of cinnamon for warmth. A dash of espresso powder can enhance the chocolate flavor too. If you don’t have all-purpose flour, try oat flour or almond flour. For sugar, use brown sugar or coconut sugar for a deeper flavor. If you need a dairy-free option, almond milk or oat milk works well. You can swap peanut butter with almond butter or sunflower seed butter for a different twist. {{ingredient_image_1}} To make this mug cake, start by gathering your ingredients. You will need: - 4 tablespoons all-purpose flour - 4 tablespoons granulated sugar - 2 tablespoons unsweetened cocoa powder - 1/8 teaspoon baking powder - 1/8 teaspoon salt - 3 tablespoons milk (or a non-dairy alternative) - 2 tablespoons peanut butter - 1 tablespoon vegetable oil - 1/2 teaspoon vanilla extract - Optional: chocolate chips for extra richness First, take a microwave-safe mug. In the mug, mix the flour, sugar, cocoa powder, baking powder, and salt. Make sure to stir well. This step is key to avoid lumps. Next, add the milk, peanut butter, vegetable oil, and vanilla extract. Whisk these ingredients together until you have a smooth batter. It should be thick and creamy. If you want, toss in some chocolate chips for a richer taste. Now it’s time to cook! Place the mug in the microwave. Set the timer for 1 minute and 10 seconds. Every microwave is different, so watch it closely. You don’t want it to overflow. Once the time is up, carefully take the mug out. It will be hot, so use a towel if needed. Let it cool for about a minute. To check if your mug cake is done, look for a few signs. The cake should be puffed up and firm to the touch. If it jiggles too much, it may need more time. You can also use a toothpick. Insert it in the center; if it comes out clean, your cake is ready. Remember, it’s better to slightly undercook than overcook. The mug cake will continue to cook a bit after you take it out. Enjoy your delicious treat! To make the best chocolate peanut butter mug cake, start with the right mug. Use a large, microwave-safe mug. This way, your cake has room to rise. Mix your dry ingredients first. Combine flour, sugar, cocoa powder, baking powder, and salt well. This helps avoid lumps. Next, add wet ingredients. Stir in milk, peanut butter, oil, and vanilla until the batter is smooth. For extra flavor, toss in a few chocolate chips. Just remember not to over-mix. This keeps your cake fluffy and light. One mistake is using a small mug. A small mug can cause the cake to overflow. Also, watch the cooking time closely. Every microwave is different. If you cook it too long, your cake can dry out. Avoid using cold ingredients. Room temperature items mix better and cook evenly. Lastly, don’t skip the cooling step. Let it sit for a minute before enjoying. This helps the cake set and makes it easier to eat. Serving is part of the fun! Keep it simple by serving in the mug. For a nice touch, add a dollop of peanut butter on top. You can also add whipped cream or extra chocolate chips. If you're feeling fancy, sprinkle cocoa powder or crushed peanuts on top. This adds a nice crunch and looks great. You can serve it warm or at room temperature, but I love it warm! Enjoy your treat with a scoop of ice cream on the side for a special twist. Pro Tips Use Room Temperature Ingredients: Make sure your peanut butter and milk are at room temperature for a more homogenous batter that mixes easily. Watch the Cooking Time: Every microwave is different; start with 1 minute, and check for doneness to prevent overcooking. Customize Your Toppings: Feel free to get creative! Add sliced bananas, a drizzle of honey, or even a scoop of ice cream for a decadent treat. Mind the Mug Size: Choose a large mug to give your cake room to rise without spilling over during cooking. {{image_2}} You can add nuts to your mug cake for extra crunch. Walnuts or pecans work great. Just chop them up and mix them in with the other wet ingredients. You can add about 2 tablespoons of your favorite nuts. This adds a nice texture and flavor to your cake. Want a vegan option? You can easily make this mug cake without dairy. Substitute milk with almond milk or oat milk. Use a plant-based butter instead of peanut butter, or try a nut-free spread. Your mug cake will still taste amazing and be friendly for everyone. If you want to cut down on sugar, you can use a sugar substitute. Try stevia or erythritol instead of granulated sugar. Use the same amount as the recipe calls for. Your cake will still be sweet without all the extra sugar. This way, you enjoy a treat without the guilt. If you have any leftover chocolate peanut butter mug cake, store it in a sealed container. Place it in the fridge. It can stay fresh for up to two days. Cover it tightly to keep it moist. If you don't have a container, wrap the mug with plastic wrap. This will keep it nice and safe. When you want to eat your leftover cake, simply microwave it. Heat it for about 10 to 15 seconds. Check if it’s warm enough. If not, heat for another 10 seconds. Be careful! The mug can get hot. You want your cake warm but not dry. You can freeze the mug cake, but it’s best to eat it fresh. If you want to freeze it, let it cool completely first. Wrap it in plastic wrap, then put it in a freezer-safe bag. It can last up to a month. When you’re ready to eat it, thaw it in the fridge overnight. Then reheat it in the microwave. Enjoy your sweet treat whenever you like! You can tell the mug cake is done when it rises and looks firm. A toothpick inserted in the center should come out clean. If it still has batter on it, microwave for an extra 10 seconds. Watch closely to avoid overcooking. Overcooked cake may become dry. Yes, you can prepare the dry ingredients in advance. Store them in a sealed container. When you’re ready, add the wet ingredients and mix. However, I recommend cooking it right before eating for the best taste and texture. You can use almond butter or sunflower seed butter as a swap. Both options give a nice flavor. If you want a nut-free version, try using applesauce. It will change the taste, but it still works well in the cake. In this blog post, we covered how to make a simple and tasty mug cake. I shared the key ingredients and optional items for added flavor. You learned about preparation and cooking steps, plus tips for perfect results. We also explored fun variations, from vegan to low-sugar options. Lastly, I provided storage tips to keep your mug cake fresh. Remember, with just a few easy steps, you can enjoy a delicious treat anytime! Try it out and discover your favorite flavor twist.

Chocolate Peanut Butter Mug Cake Simple and Sweet Treat

Craving a sweet treat that’s quick and easy? You’ll love this Chocolate Peanut Butter Mug Cake! In just a few

- 2 lbs chicken wings - 3 tablespoons olive oil - 4 cloves garlic, minced - 1 teaspoon garlic powder - 1 teaspoon onion powder - 1 teaspoon paprika - ½ teaspoon black pepper - ½ teaspoon salt - ½ cup grated Parmesan cheese In this recipe, chicken wings are the star. They soak up the flavors well. The marinade includes olive oil, garlic, and spices to give great taste. The Parmesan cheese adds a rich, salty flavor that makes these wings special. - 2 tablespoons fresh parsley, chopped (for garnish) - Additional Parmesan cheese Fresh parsley adds color and a light taste. You can sprinkle extra Parmesan on top for more flavor. These garnishes make the wings look nice and taste even better. - Ranch dressing - Blue cheese dressing Ranch dressing is a classic. It’s creamy and cool, which pairs well with the wings. Blue cheese dressing adds a strong flavor that many love. Both sauces are great choices for dipping. {{ingredient_image_1}} First, I preheat my air fryer to 380°F (193°C). This step takes about 5 minutes. While it heats, I prepare the air fryer basket. I make sure to clean it and lightly oil it. This helps the wings cook evenly and prevents sticking. Next, I grab a large bowl. In this bowl, I combine 3 tablespoons of olive oil, 4 minced garlic cloves, 1 teaspoon of garlic powder, 1 teaspoon of onion powder, 1 teaspoon of paprika, ½ teaspoon of black pepper, and ½ teaspoon of salt. I stir these together to make a smooth marinade. Now, I add 2 pounds of chicken wings into the bowl. I toss them well until they are coated with the marinade. To add flavor, I sprinkle ½ cup of grated Parmesan cheese over the wings. I toss them again to make sure the cheese sticks well to the wings. It's time to arrange the wings in the air fryer basket. I lay them in a single layer. I avoid crowding them. If I have too many wings, I cook them in batches. I set the timer for 25 minutes. Halfway through, I flip the wings to ensure they crisp up evenly. After 25 minutes, I check the wings. They should look golden brown and crispy. If they need more time, I add an extra 5 minutes. Once cooked, I take the wings out and toss them with the remaining Parmesan cheese while they are hot. I finish by garnishing them with fresh parsley. To make your wings extra crispy, set your air fryer to 380°F (193°C). This temperature helps the wings brown well. It is also key not to overcrowd the basket. If wings overlap, they will steam instead of crisp. Cook in batches if needed for the best results. To boost flavor, think about adding spices like cayenne pepper or smoked paprika. These add heat and depth. For deeper flavor, let the wings marinate for at least 30 minutes. If you can, marinate them overnight. This gives the garlic and spices time to soak in. Serve your wings with celery sticks and your favorite dipping sauce. Ranch dressing and blue cheese work great. For a nice touch, arrange the wings on a large platter. Sprinkle fresh parsley on top for color. This makes your dish look even tastier and more inviting. Pro Tips Pat the Wings Dry: For extra crispiness, pat the chicken wings dry with paper towels before marinating. This helps to remove excess moisture. Use Fresh Garlic: Freshly minced garlic will give you a more intense flavor compared to garlic powder alone. Don't skip this step! Adjust Cooking Time: Depending on the size of your wings, you may need to adjust the cooking time. Always check for doneness with a meat thermometer; it should read 165°F (74°C). Experiment with Spices: Feel free to customize the seasoning by adding your favorite spices or hot sauce for a kick. The possibilities are endless! {{image_2}} You can spice things up with different seasonings for your wings. Here are two fun ideas: - Spicy garlic parmesan wings: Add some heat! Mix cayenne pepper or chili powder into your marinade. This gives the wings a kick that many enjoy. - Lemon pepper wings: For a zesty twist, use lemon zest and black pepper. Simply swap some garlic for these flavors in your marinade. Both options keep the garlic and Parmesan, but add new layers of taste. Want to switch up how you cook your wings? Here are two great options: - Oven baking method: Preheat your oven to 400°F (204°C). Place the marinated wings on a baking sheet. Bake for 40-45 minutes, flipping halfway. This method gives a nice crispy texture, too. - Grilling option for wings: If you love the smoky flavor, grill the wings! Preheat your grill to medium heat. Cook them for 20-25 minutes, flipping often. Both techniques can produce tasty wings, just like the air fryer. You can easily adapt this recipe to fit different diets. Here are some ideas: - Gluten-free wing options: Check your spices and use gluten-free alternatives. Most of the ingredients are naturally gluten-free, so it’s simple to fit this dish into a gluten-free diet. - Low-calorie modifications: Use less olive oil and skip the extra Parmesan for a lighter dish. You can also use skinless chicken wings to cut down on fat. These adjustments allow everyone to enjoy tasty wings without worry. After enjoying your wings, let them cool for about 30 minutes. This step helps prevent moisture buildup. Place the cooled wings in an airtight container. Glass or plastic containers work well. Make sure to seal them tightly. This keeps them fresh for up to three days. To bring back that crispy texture, use your air fryer. Set it to 350°F (175°C) for about 5 to 7 minutes. This method warms the wings while keeping them crispy. You can also use an oven. Preheat to 375°F (190°C) and reheat for 10 to 12 minutes. Flipping them halfway helps with even heating. To freeze wings, first, let them cool completely. Place them in a freezer-safe bag, removing as much air as possible. This prevents freezer burn. Label the bag with the date. You can freeze them for up to three months. When ready to eat, thaw the wings in the fridge overnight. For quicker thawing, submerge the bag in cold water for about an hour. This keeps them juicy and ready to cook. How long do air fryer wings take? Air fryer wings typically take about 25 to 30 minutes to cook. You cook them at 380°F (193°C). Flip them halfway to get even crispiness. Can I use frozen wings in an air fryer? Yes, you can use frozen wings. Just cook them for about 30 to 35 minutes. Make sure to check for doneness. What can I replace Parmesan cheese with? You can replace Parmesan cheese with Pecorino Romano or nutritional yeast for a vegan option. Both add a nice flavor. How to adjust the recipe for boneless wings? For boneless wings, cut chicken breast into bite-sized pieces. Cook them for about 15 to 20 minutes, checking for doneness. Should I dry the wings before marinating? Yes, drying the wings helps the skin get crispy. Pat them dry with paper towels before adding the marinade. How can I tell when wings are fully cooked? Wings are fully cooked when they reach an internal temperature of 165°F (74°C). They should be golden brown and crispy. In this post, we covered how to make crispy air fryer chicken wings. We discussed essential ingredients like chicken wings and marinade components. You learned step-by-step instructions, from prepping the air fryer to serving suggestions. We shared tips for extra crispiness and delicious variations. Remember, proper storage keeps leftovers fresh. Enjoy experimenting with flavors and methods. With these tips, you can impress everyone at your next gathering! Now, go enjoy your tasty wings!

Air Fryer Garlic Parmesan Wings Crispy and Flavorful

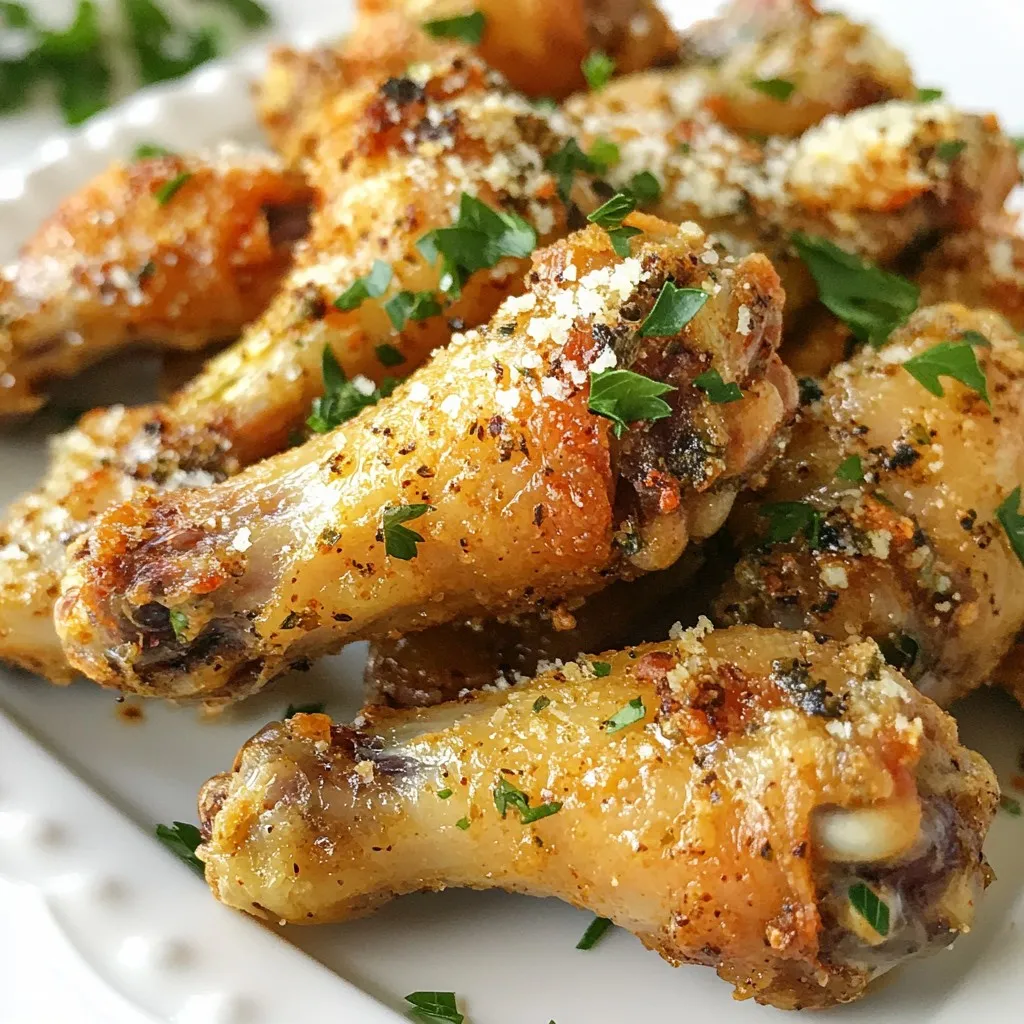
Craving something tasty yet simple? Let’s dive into making Air Fryer Garlic Parmesan Wings! These wings are crispy, flavorful, and

To make this tasty dish, gather these simple ingredients: - 8 oz. fettuccine or spaghetti - 1 cup heavy cream - 1 tablespoon lemon zest - 1/4 cup fresh lemon juice - 1/2 cup grated Parmesan cheese - 2 tablespoons unsalted butter - 2 cloves garlic, minced - 1 cup fresh spinach, chopped - 1/4 cup fresh basil, chopped - Salt and pepper to taste - Optional: extra lemon wedges for garnish These ingredients create a rich and bright flavor. The lemon adds zest, while the cream makes it smooth. To cook this dish, you will need a few key tools: - Large pot for boiling pasta - Large skillet for making the sauce - Measuring cups and spoons - Wooden spoon or spatula for stirring - Colander for draining pasta Having the right tools makes cooking easier and more fun. You can make your dish even better with these additions: - Extra lemon wedges for a fresh touch - Toasted pine nuts for crunch - Grilled chicken or shrimp for protein - Cherry tomatoes for a pop of color These options let you customize your creamy lemon herb pasta. Mix and match to find your favorite version! {{ingredient_image_1}} To start, bring a large pot of salted water to a boil. This adds flavor to the pasta. Add 8 oz. of fettuccine or spaghetti into the boiling water. Cook according to the package instructions until it is al dente. This means it is firm but not hard. Once done, drain the pasta and save 1/2 cup of the water. This water is starchy and will help the sauce later. In a large skillet, melt 2 tablespoons of unsalted butter over medium heat. When the butter is melted, add 2 cloves of minced garlic. Sauté the garlic for about 1 minute until it smells nice. Make sure it does not brown. Next, pour in 1 cup of heavy cream, 1 tablespoon of lemon zest, and 1/4 cup of fresh lemon juice. Stir this mixture well and let it simmer for about 3 minutes. This helps the sauce thicken a bit. After that, add 1/2 cup of grated Parmesan cheese and stir until it melts. If the sauce feels too thick, add some of that reserved pasta water until it reaches the right consistency. Now it’s time to mix everything! Add the cooked pasta into the skillet with the cream sauce. Toss it well so the pasta is coated. Then, fold in 1 cup of chopped fresh spinach and 1/4 cup of chopped fresh basil. Cook this just long enough for the spinach to wilt. Finally, taste the dish and add salt and pepper as needed. Serve the creamy lemon herb pasta hot, and if you like, add extra lemon wedges for a fresh touch. Enjoy your meal! To make your sauce creamy, start with heavy cream. It has a rich flavor. When you add the Parmesan cheese, stir it in slowly. This helps it melt well. If the sauce feels too thick, use some reserved pasta water. This adds creaminess and helps blend the flavors. If you need a lighter option, try half-and-half instead of heavy cream. For a dairy-free version, use coconut milk. This gives a nice creamy texture too. If you are gluten-free, choose gluten-free pasta. These swaps keep the dish tasty and enjoyable for everyone. Fresh herbs make a big difference. I love adding basil for a sweet flavor. You can also try parsley or thyme. For a kick, sprinkle in some red pepper flakes. This adds warmth without too much heat. Always taste your sauce before serving to balance the flavors. Pro Tips Use Fresh Ingredients: Fresh herbs and a real lemon will enhance the flavor of your creamy sauce significantly. Adjust Creaminess: If you prefer a lighter sauce, substitute half of the heavy cream with vegetable or chicken broth. Perfect Pasta Cooking: Always reserve some pasta water to help adjust the sauce consistency when combining. Flavor Variation: Add grilled chicken or shrimp for added protein, making it a more hearty meal. {{image_2}} You can easily add protein to your creamy lemon herb pasta. Chicken is a great option. Simply cook bite-sized pieces in the skillet before adding garlic. Shrimp also works well. Sauté shrimp in butter until they turn pink. Mix them in with the pasta for a filling meal. If you want a vegetarian or vegan dish, swap the heavy cream with coconut cream. Use nutritional yeast instead of Parmesan for a cheesy flavor. You can also add more veggies like mushrooms or bell peppers for extra texture. These changes keep the dish creamy and tasty while fitting your diet. You can change the veggies based on the season. In spring, try adding asparagus or peas for a fresh taste. During summer, cherry tomatoes add color and sweetness. In fall, consider roasted butternut squash for a warm flavor. Winter calls for hearty greens like kale or Swiss chard. These seasonal swaps keep your dish exciting and full of flavor. After enjoying your creamy lemon herb pasta, store leftovers in an airtight container. Make sure the pasta cools first. This helps keep it fresh. Place it in the fridge if you plan to eat it within three days. To avoid sogginess, try not to mix in extra sauce before storing. When you’re ready to enjoy your leftovers, reheat them slowly. You can use a skillet over low heat. Add a splash of water or extra cream to keep it creamy. Stir often to heat evenly. If you're in a hurry, a microwave works too. Just cover the dish and heat in short intervals. You can freeze creamy lemon herb pasta for later. First, let it cool completely. Then, place it in a freezer-safe bag or container. Remove as much air as you can. It can last up to three months in the freezer. When ready to eat, thaw it in the fridge overnight before reheating. Yes, you can prepare Creamy Lemon Herb Pasta ahead of time. Cook the pasta and make the sauce. Store them separately in the fridge. Keep the pasta in a sealed container. Store the sauce in another container. When you are ready to eat, heat the sauce and mix it with the pasta. Add fresh herbs and season again for the best flavor. If you need a substitute for heavy cream, try using half-and-half. You can also mix milk with butter. Use three-quarters cup of milk with a quarter cup of melted butter. This mix gives a creamy texture. For a lighter option, use Greek yogurt or cashew cream. These alternatives change the flavor a bit but still taste great. Yes, Creamy Lemon Herb Pasta is perfect for meal prep. It stays fresh when stored correctly. You can pack it in meal prep containers. This dish is great for lunch or dinner throughout the week. Just remember to store the pasta and sauce separately. Reheat them together when you are ready to eat. It’s quick and delicious! You’ve learned how to make Creamy Lemon Herb Pasta from scratch. We covered the key ingredients, cooking methods, and even tips for personalizing your dish. Don't forget to try different proteins and veggies to make it your own. Proper storage ensures you enjoy leftovers without losing flavor. Keep these ideas in mind as you cook and experiment. Enjoy your tasty pasta, and share your creations with friends and family!

Creamy Lemon Herb Pasta Delightful and Simple Recipe

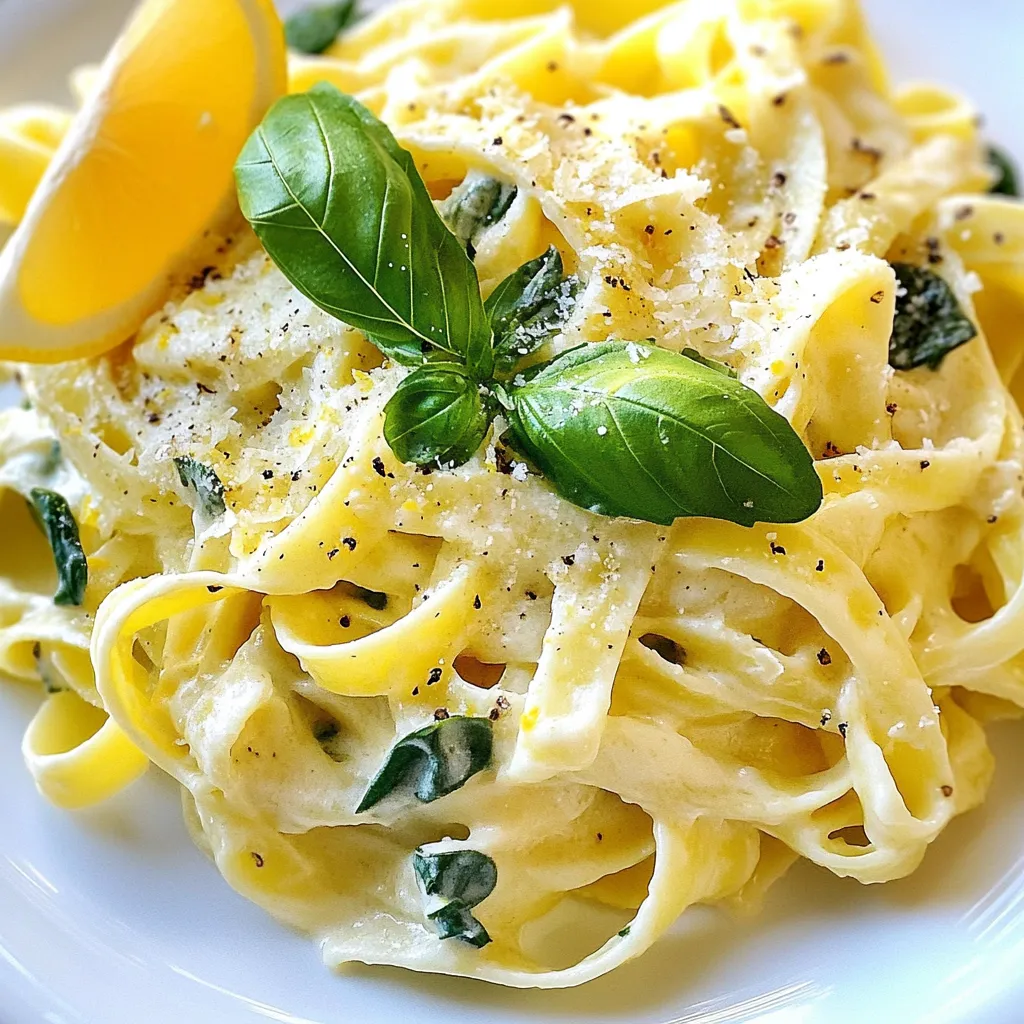
Looking for a quick and tasty meal? My Creamy Lemon Herb Pasta is the answer! This delightful dish is simple

Older posts
Newer posts
← Previous Page1 … Page124 Page125 Page126 … Page137 Next →

dsad

© 2025 Recipes Pursuit • Built with GeneratePress

Our Policies

  • Copyright Policy
  • Cookie Policy
  • GDPR Policy
  • Privacy Policy
  • Disclaimer
  • Terms Of Use

More Information

  • Home
  • About
  • Contact
  • Appetizers
  • Dessert
  • Dinner
  • Drinks
©2025, Recipes Pursuit About Back To Top