Skip to content
DisclaimerTerms Of UseGDPR PolicyCookie Policy

Recipes Pursuit

  • Home
  • Drinks
  • Appetizers
  • Dinner
  • Dessert
  • About
  • Contact
  • Privacy Policy
DisclaimerTerms Of UseGDPR PolicyCookie Policy

Emma Smith

- 1 lb large shrimp, peeled and deveined - 2 bell peppers (red and yellow), sliced - 1 red onion, sliced - 4 cloves garlic, minced - Zest and juice of 2 limes The large shrimp are the star of this dish. They soak up the bold flavors. The bell peppers and red onion add color and crunch. Garlic brings that aromatic punch, while lime adds brightness. - 3 tablespoons olive oil - 1 tablespoon chili powder - 1 teaspoon cumin - 1 teaspoon smoked paprika - Salt and pepper to taste The marinade is key to flavor. Olive oil keeps the shrimp moist. Chili powder and cumin add warmth, while smoked paprika gives depth. Salt and pepper enhance every bite. - Fresh cilantro, for garnish - Lime wedges, for serving - Warm tortillas, for serving Fresh cilantro adds a pop of color and freshness. Lime wedges provide extra zing. Serve with warm tortillas, so everyone can build their own fajitas. This makes for a fun, interactive meal. 1. Preheat the oven and prepare the baking sheet Start by heating your oven to 425°F (220°C). This high heat helps cook the shrimp and veggies fast. While the oven warms, line a large baking sheet with parchment paper. This keeps the food from sticking and makes cleanup easy. 2. Make the marinade In a large bowl, mix together 3 tablespoons of olive oil, 4 minced garlic cloves, the zest and juice of 2 limes, 1 tablespoon of chili powder, 1 teaspoon of cumin, 1 teaspoon of smoked paprika, and salt and pepper to taste. Stir well until all the ingredients blend together nicely. This marinade gives the dish a bright and zesty flavor. 3. Toss shrimp and vegetables in the marinade Add 1 pound of peeled and deveined shrimp, 2 sliced bell peppers, and 1 sliced red onion to the marinade. Use your hands or a spoon to toss everything together until the shrimp and veggies are evenly coated. This step is key; it ensures that every bite is full of flavor. 4. Arrange on the baking sheet Spread the shrimp and vegetable mix on the prepared baking sheet. Make sure to arrange them in a single layer. This helps them cook evenly. If they are piled on top of each other, they may not cook as well. 5. Bake and check for doneness Place the baking sheet in the preheated oven. Bake for 10-12 minutes. Keep an eye on the shrimp; they should turn pink and opaque when done. The veggies should become tender but not mushy. 6. Cool and garnish before serving Once cooked, take the baking sheet out of the oven. Let the dish cool for a couple of minutes. Just before serving, sprinkle fresh cilantro on top for a pop of color and flavor. Serve with lime wedges for an extra zesty kick. This method is simple and lets the flavors shine. Enjoy your fajitas with warm tortillas for a fun meal! Marinate shrimp for at least 15 minutes. This helps the shrimp soak in all the tasty flavors. If you want to switch things up, try adding lime zest or fresh herbs like oregano or thyme. You can even use soy sauce for a different twist. To avoid overcooking shrimp, watch the time closely. Bake them for just 10-12 minutes. Shrimp turn pink when they are done. For even cooking of veggies, cut them into similar sizes. This way, they cook at the same rate. Serve the fajitas on a large platter. Place tortillas on the side, so guests can build their own. You can also add bowls of guacamole and salsa for color and flavor. Fresh cilantro makes a lovely garnish and adds freshness. {{image_2}} You can switch out shrimp for chicken or tofu. Chicken thighs work well, too. Just cut them into strips. Tofu is great for a vegetarian option. Use firm tofu and press it to remove extra water. This helps the tofu absorb the flavors better. Feel free to mix in seasonal veggies. Zucchini, corn, or asparagus add great taste. You can also try adding jalapeños if you like heat. Slice them thin and toss them in with the other veggies. They give a nice kick to the dish. You can change the spice level to fit your taste. Add more chili powder for more heat or reduce it for a milder dish. If you want some sweetness, try a touch of honey or agave. For extra tang, squeeze in more lime juice. Adjusting flavors lets you make this dish your own! To store leftovers, place the shrimp and veggies in an airtight container. Keep them in the fridge for up to three days. For longer storage, you can freeze them. Use freezer bags and remove as much air as possible. They can last up to three months in the freezer. To reheat, place the leftovers in a skillet over medium heat. Stir gently until warmed through. This helps keep the shrimp tender and the veggies crisp. Avoid the microwave, as it may make the shrimp rubbery. You can prepare the shrimp and veggies in advance. Marinate them in the fridge for up to 24 hours before baking. This saves time during busy nights. Just spread them on the baking sheet and bake when ready to eat. Yes, you can use frozen shrimp. Start by thawing the shrimp. Place the frozen shrimp in a bowl of cold water. Let it sit for about 15-20 minutes. Change the water if it gets warm. Once thawed, pat them dry with a paper towel. This helps the shrimp absorb the marinade better. To make this dish gluten-free, choose gluten-free tortillas. Many brands offer tasty options made from corn or almond flour. Always check the label to ensure it's certified gluten-free. You can also serve the shrimp and veggies over rice or lettuce for a fun twist. To boost the flavor, consider adding more spices. A pinch of cayenne pepper gives heat. You can also try adding a teaspoon of oregano for extra depth. Fresh lime juice over the finished dish adds a zesty kick. For toppings, try diced avocado, sour cream, or fresh salsa. These not only add flavor but also texture. Fresh cilantro gives a nice finish, making your fajitas pop. This blog post covered a tasty shrimp dish, highlighting key ingredients and steps. You learned about marinating and baking shrimp with bell peppers and red onion for great flavor. I shared tips to enhance your dish and suggested variations if you want to mix things up. Proper storage methods keep leftovers fresh, and reheating tips ensure they taste great later. With these insights, you can confidently create a delicious meal today. Experiment and enjoy the process in your kitchen!

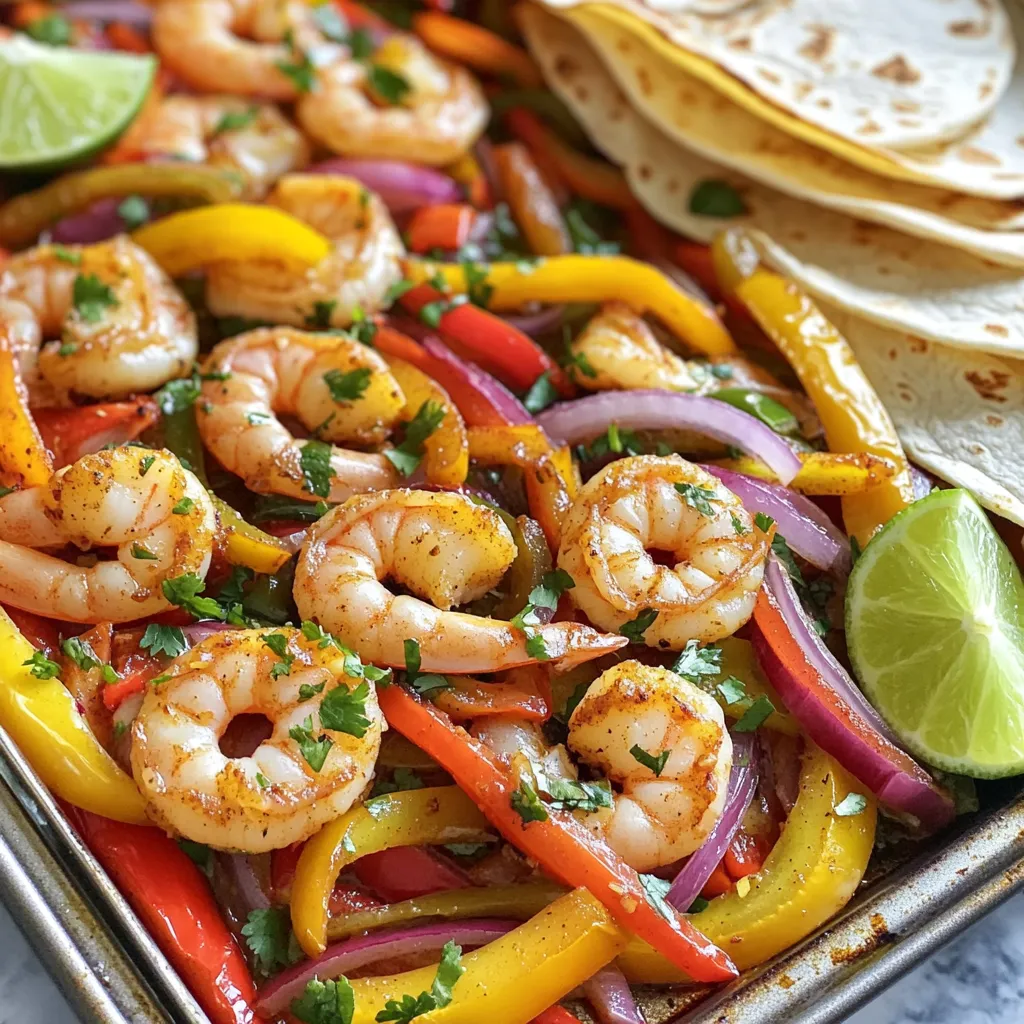
Sheet Pan Garlic Lime Shrimp Fajitas Flavorful Dish

Get ready for a burst of flavor with my Sheet Pan Garlic Lime Shrimp Fajitas! This easy dish combines juicy

To make roasted butternut squash hummus, gather these key items: - 1 medium butternut squash, peeled and cubed - 1 can (15 oz) chickpeas, rinsed and drained - 2 tablespoons tahini - 2 tablespoons olive oil - 2 tablespoons lemon juice - 1 garlic clove, minced - 1 teaspoon ground cumin - ½ teaspoon smoked paprika - Salt and pepper to taste - 2-3 tablespoons water (as needed for consistency) - Fresh parsley, chopped (for garnish) These ingredients create a rich and creamy dip that bursts with flavor. You can customize your hummus with extra flavors. Here are some great ideas: - A pinch of cayenne for heat - Roasted garlic for a sweet taste - A splash of apple cider vinegar for tanginess - Ground coriander for a citrusy note - Chopped nuts for crunch Feel free to mix and match these options to find your favorite blend! This hummus is not only tasty but also packed with nutrients. Here’s a quick look at the benefits: - Butternut squash is high in vitamins A and C, great for your skin and immune system. - Chickpeas provide protein and fiber, keeping you full. - Tahini adds healthy fats and calcium. This dip is a healthy option that satisfies your cravings while nourishing your body. Each serving is a delicious way to enjoy wholesome ingredients. First, gather your ingredients. You need one medium butternut squash, canned chickpeas, tahini, olive oil, lemon juice, garlic, ground cumin, smoked paprika, salt, and pepper. Start by preheating your oven to 400°F (200°C). This temperature helps the squash roast perfectly. Next, peel and cube your butternut squash. The cubes should be about one inch. Toss these cubes with one tablespoon of olive oil, salt, and pepper. Spread them out evenly on a baking sheet. Make sure they are not crowded. Roast in the oven for 25 to 30 minutes. The squash should become tender and lightly browned. After roasting, take them out and let them cool slightly. Now it’s time to blend. In a food processor, combine the cooled butternut squash, rinsed chickpeas, tahini, remaining olive oil, lemon juice, minced garlic, ground cumin, smoked paprika, and a pinch of salt and pepper. Blend until smooth. If the hummus is too thick, add water, one tablespoon at a time, until you reach your desired texture. Taste the hummus and adjust the seasoning if needed. Finally, transfer it to a serving bowl. Drizzle a little olive oil on top and sprinkle with chopped parsley for a nice touch. Enjoy your tasty dip! To get the right texture for your hummus, start with the roasted butternut squash. After you roast it, let it cool a bit. When you blend it, add water in small amounts. This way, you control the creaminess. If your hummus is too thick, add one tablespoon of water at a time. Blend until smooth. If it's too runny, add more chickpeas or squash. You can boost the flavor of your hummus easily. Try adding a touch of lemon zest for brightness. A pinch of cayenne pepper gives a nice kick. You can also mix in fresh herbs like cilantro or basil. If you like it smoky, add more smoked paprika. Always taste and adjust the salt and pepper to your liking. Garnishing makes your hummus more appealing. Drizzle some olive oil on top for shine. Add a sprinkle of paprika or cumin for color. Chopped fresh parsley adds freshness and a pop of green. For a fun twist, toss in some roasted pumpkin seeds or pine nuts for crunch. {{image_2}} You can make your roasted butternut squash hummus even better. Try adding fresh herbs like basil or cilantro. You can also use spices like coriander or cayenne for a kick. These flavors bring a fresh twist to the dip. Start with a small amount, then taste and adjust. You can switch up the main ingredient too. Use roasted sweet potatoes or carrots instead of butternut squash. Both veggies provide a sweet flavor that pairs well with hummus. Make sure to roast them until tender, just like the squash. This keeps the dip creamy and delightful. This recipe is already vegan and gluten-free. You can enjoy it without worry! If you need more protein, use extra chickpeas or add some hemp seeds. This keeps the hummus hearty and filling. Always check labels on tahini and olive oil to ensure they fit your diet. To keep your roasted butternut squash hummus fresh, store it in an airtight container. This will help keep moisture in and prevent air from spoiling it. You can place a sheet of plastic wrap directly on the hummus before sealing it. This extra layer blocks air and keeps it tasty longer. Always let your hummus cool to room temperature before putting it in the fridge. It can stay fresh for up to one week in the fridge. You can freeze roasted butternut squash hummus for later use. To do this, scoop it into a freezer-safe container. Leave some space at the top for expansion when it freezes. Seal it tightly with a lid. When you want to eat it, take it out of the freezer and place it in the fridge overnight to thaw. Once thawed, stir it well. If it seems thick, add a little water or olive oil to loosen it up. Roasted butternut squash hummus lasts about one week in the fridge. If you notice any changes, it may be time to toss it. Look for these signs of spoilage: - Unpleasant smell - Change in color - Mold growth on the surface If you see any of these signs, do not eat it. Always prioritize safety when enjoying your delicious hummus! Yes, you can use frozen butternut squash. Just remember to thaw it first. Drain any excess water before using it. This helps keep your hummus from getting too watery. Frozen squash may be softer than fresh, so adjust your blending time. Blend until smooth to get the best texture. You can serve this hummus with many things. Fresh veggie sticks like carrots and celery work great. Pita bread or chips also pair well. You can even spread it on toast for a tasty snack. It makes a great dip for gatherings or a healthy addition to a meal. To make your hummus thicker, use less water when blending. You can also add more chickpeas or roasted squash. If it's still thin, try adding some tahini or a bit of olive oil. Blend again until you reach the right consistency. Always taste and adjust to your liking. To sum up, I shared key ingredients for Roasted Butternut Squash Hummus, plus optional add-ins. I provided detailed steps for preparation and roasting, then blending the mix. You learned tips for the perfect texture and flavor, along with variations to explore. I also covered storage best practices and common questions. Experimenting with recipes is part of the fun. Enjoy making this tasty, healthy snack!

Roasted Butternut Squash Hummus Flavorful Dip Recipe

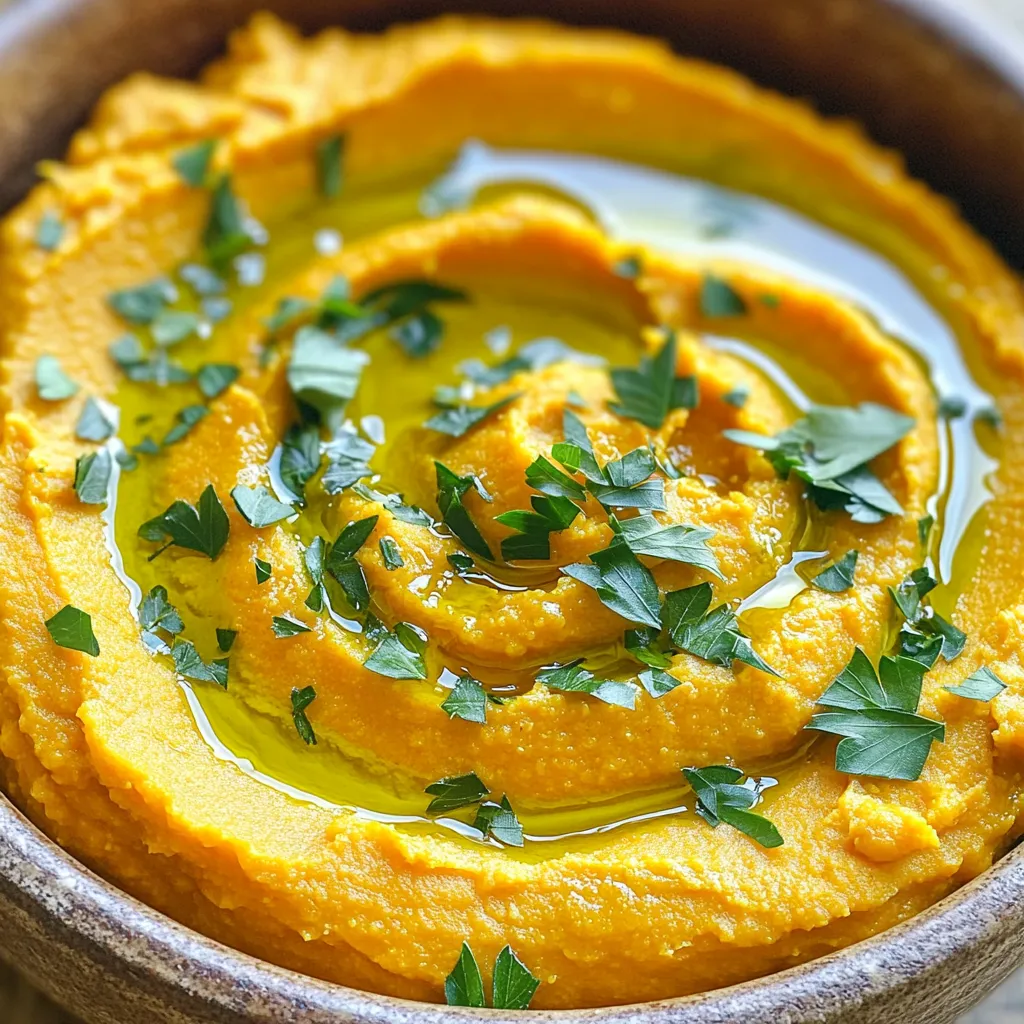
Are you ready to elevate your dip game? This Roasted Butternut Squash Hummus flavor-packed recipe combines the sweet, nutty taste

- 1 cup rolled oats - 2 cups almond milk (or any milk of choice) - 3 tablespoons chia seeds - 2 tablespoons natural peanut butter - 2 tablespoons cocoa powder - 2 tablespoons maple syrup (or honey) - 1/2 teaspoon vanilla extract - A pinch of salt - 1/4 cup chocolate chips (dark or milk) - Chopped peanuts for topping To make Peanut Butter Cup Overnight Oats, start with rolled oats. They give a hearty base, soaking up flavors and liquid well. Next, almond milk (or your favorite milk) adds creaminess. Chia seeds help thicken the mix while boosting nutrition. Natural peanut butter brings in a rich, nutty flavor. Cocoa powder adds a chocolate twist that ties everything together. Maple syrup, or honey, sweetens the oats just right. A pinch of salt balances the sweetness, enhancing the taste. Don't forget chocolate chips! They add little bursts of chocolate bliss. Lastly, chopped peanuts make a great topping, giving a crunch that contrasts the creamy oats. This simple mix of ingredients makes for a delicious breakfast that you can prepare quickly. 1. Start by gathering all your ingredients. You need rolled oats, almond milk, chia seeds, peanut butter, cocoa powder, maple syrup, vanilla extract, salt, and chocolate chips. 2. In a large mixing bowl, combine the rolled oats, almond milk, chia seeds, peanut butter, cocoa powder, maple syrup, vanilla extract, and a pinch of salt. 3. Mix the ingredients well. Stir until the peanut butter blends in smoothly. 4. Next, add in the chocolate chips. Gently stir them into the mix to spread the chocolate flavor evenly. 5. Divide the mixture into individual jars. Make sure each jar is sealed tightly with a lid. 1. Place the jars in the fridge. Let them soak overnight or for at least four hours. This soaking time helps the oats and chia seeds absorb the liquid. 2. For storage, you can use glass jars or plastic containers with lids. Choose what works best for you. 1. When ready to enjoy, take the jars out of the fridge. Give each jar a good stir. 2. If the mix seems too thick, add a splash of milk to make it creamier. 3. Before serving, top with chopped peanuts and more chocolate chips. Enjoy it cold or warm it up in the microwave if you like! You can swap out almond milk for other types of milk. Try oat milk, soy milk, or coconut milk for different flavors. If you want to cut calories, use stevia or monk fruit sweetener instead of maple syrup or honey. These options work well in this recipe. For fun toppings, add sliced bananas, berries, or shredded coconut. You can also sprinkle cinnamon or nutmeg for extra flavor. Pair your oats with yogurt for creaminess or fresh fruit for added crunch. These toppings make your breakfast even tastier. To get the right texture, let your oats soak long enough. If they seem too thick in the morning, just stir in a bit more milk. This keeps your oats creamy and enjoyable. You can also adjust the chia seeds; use less if you want a thinner mix. {{image_2}} You can spice up your peanut butter cup overnight oats in many ways. Consider adding a dash of cinnamon or nutmeg for warmth. These spices bring out the chocolate flavor and add depth. You can also use flavored protein powders. Chocolate or vanilla protein can boost taste and nutrition. Just mix it in with the dry ingredients before adding the wet ones. Think about using seasonal fruits to change things up. In summer, add fresh berries for a burst of flavor. In fall, try diced apples or pumpkin puree for a cozy vibe. You can even make holiday-themed versions. For Halloween, add orange zest and a sprinkle of cinnamon. For Christmas, mix in peppermint extract and crushed candy canes. To make these oats vegan, use almond milk or any plant-based milk. Ensure your peanut butter is free of animal products. For gluten-free options, use certified gluten-free oats. These oats are safe for those with gluten sensitivities. Always check labels to be sure. To keep your Peanut Butter Cup Overnight Oats fresh, use glass or BPA-free plastic jars. These containers seal well and make serving easy. Make sure to leave some space at the top, as the oats will expand. For best results, store them in the fridge right after you prepare them. You can keep these oats in the fridge for up to five days. Check for signs of spoilage before eating. If you see mold or notice an off smell, toss them out. Fresh oats will smell nutty and sweet, thanks to the peanut butter and maple syrup. If you want to save some for later, freezing is a great option! Just fill your containers but leave some room at the top. When you’re ready to eat, take them out of the freezer and let them thaw in the fridge overnight. You can also heat them in the microwave for a quick breakfast. Overnight oats last about 3 to 5 days in the fridge. Store them in airtight containers. Always check for any signs of spoilage before eating. If they smell off or look weird, it’s best to toss them. Yes, you can use quick oats, but the texture will be different. Quick oats can get mushy if soaked too long. They only need about 30 minutes in the fridge. Rolled oats give a chewier texture and hold up better overnight. To make it nut-free, swap peanut butter with sunflower seed butter. You can also use soy nut butter or any seed-based spread. These options still give a tasty flavor without any nuts. Yes, this recipe is great for meal prep. You can make several servings at once. Just double or triple the recipe and divide it into jars. This way, you’ll have quick breakfasts ready for the week! In this blog post, we explored making delicious peanut butter cup overnight oats. You learned about the key ingredients, easy preparation steps, and the best ways to store your oats. I shared tips for adjusting flavors, textures, and even storage methods. My final thoughts: these oats are a flexible, quick breakfast that fits any taste. With this recipe, you will enjoy a tasty meal that is easy to make and customize. Enjoy your breakfast adventure!

Peanut Butter Cup Overnight Oats Quick and Tasty Recipe

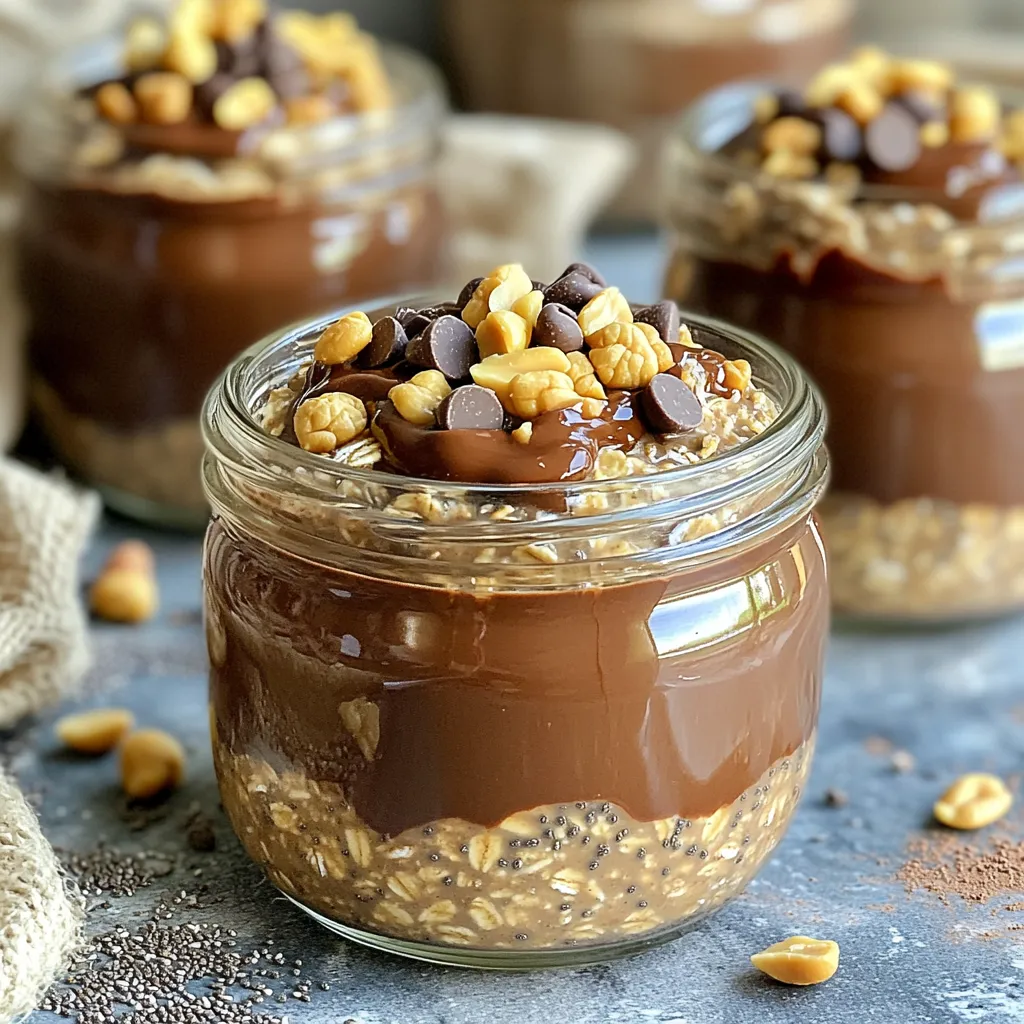
If you love peanut butter and chocolate, you’ll adore this easy recipe for Peanut Butter Cup Overnight Oats. With just

To make Matcha White Chocolate Blondies, gather these simple ingredients: - 1 cup unsalted butter, melted - 1 cup brown sugar, packed - 1/2 cup granulated sugar - 2 large eggs - 2 teaspoons vanilla extract - 2 cups all-purpose flour - 1 tablespoon matcha powder - 1/2 teaspoon baking powder - 1/4 teaspoon salt - 1 cup white chocolate chips These ingredients combine to create a sweet and rich treat. The matcha adds a unique flavor and color. You can make some swaps if needed: - Use coconut oil instead of butter for a dairy-free version. - Replace brown sugar with coconut sugar for a healthier option. - Swap white chocolate chips for dark chocolate chips for a bolder taste. - Use almond flour for a gluten-free version, but adjust the amount. These substitutions help you tailor the recipe to your needs. Each change can offer a new twist. Using high-quality ingredients makes a big difference. Fresh, unsalted butter gives a rich flavor. Good matcha powder should be vibrant green and fragrant. It adds both taste and health benefits. Quality chocolate chips melt smoothly and enhance every bite. Investing in quality ingredients ensures your blondies taste amazing. It shows in the final result and makes the baking process enjoyable. Start by preheating your oven to 350°F (175°C). This step is key for even baking. Next, grease a 9x13 inch baking pan. You can also line it with parchment paper. This will help you remove the blondies easily later. In a large bowl, combine 1 cup of melted unsalted butter with 1 cup of brown sugar and 1/2 cup of granulated sugar. Stir until the mixture is smooth. Then, add 2 large eggs and 2 teaspoons of vanilla extract. Mix well until everything blends together nicely. In another bowl, whisk together 2 cups of all-purpose flour, 1 tablespoon of matcha powder, 1/2 teaspoon of baking powder, and 1/4 teaspoon of salt. Make sure the matcha is well mixed with the flour. This ensures even flavor throughout your blondies. Now it’s time to combine the dry and wet ingredients. Gradually fold the dry mix into the wet mix. Be gentle and don’t overmix. Afterward, gently fold in 1 cup of white chocolate chips. This adds a sweet touch to your blondies. Pour the batter into the prepared pan, spreading it out evenly. Bake in your preheated oven for about 25 to 30 minutes. To check if they are done, insert a toothpick in the center. It should come out with a few moist crumbs. Allow the blondies to cool in the pan for at least 20 minutes. After that, transfer them to a wire rack to cool completely. Once cooled, cut them into squares or rectangles for serving. To get the best texture, don’t overmix the batter. Mix until the dry and wet ingredients just come together. This keeps them soft and chewy. Also, using room temperature eggs helps create a smooth batter. If your butter is too hot, it can cook the eggs. Let it cool a bit before mixing. Timing is key for perfect blondies. Bake them for 25-30 minutes. Check for doneness by inserting a toothpick into the center. If it comes out with a few moist crumbs, they are ready. Don’t wait for a clean toothpick; that means they are overbaked. Serve your blondies on a pretty platter. Dust them lightly with extra matcha powder for a nice touch. You can pair them with whipped cream or fresh berries. This adds freshness and contrast to the sweet flavor. Warm them slightly before serving for a melt-in-your-mouth experience. {{image_2}} You can add fun flavors to your matcha white chocolate blondies. Nuts like walnuts or pecans add crunch. Dried fruit, such as cranberries or apricots, gives a sweet twist. You can also mix in shredded coconut for a tropical vibe. These extras make each bite unique and exciting. If you want to make these blondies gluten-free, swap the all-purpose flour for a gluten-free blend. Many brands work well in baking. Just ensure the blend has a good mix of starches and flours. This way, you’ll keep the same tasty texture without gluten. To make vegan matcha white chocolate blondies, replace the butter with coconut oil or vegan butter. Use flax eggs instead of regular eggs. Mix one tablespoon of ground flaxseed with three tablespoons of water. Let it sit for a few minutes until it thickens. For the white chocolate, choose a dairy-free version. With these changes, you can enjoy these blondies while sticking to a vegan diet. To keep your matcha white chocolate blondies fresh, store them in an airtight container. This step helps maintain their soft texture and rich flavor. You can layer the blondies with parchment paper to prevent sticking. Avoid keeping them in warm places, as heat can dry them out. When stored properly, blondies last about 5 days at room temperature. If you want to extend their shelf life, you can refrigerate them. In the fridge, they stay fresh for up to 10 days. Reheating blondies is easy. Just place a piece on a microwave-safe plate. Heat it for 10-15 seconds. Check to see if it’s warm enough. If you want a crispy edge, pop it in the oven at 350°F (175°C) for about 5 minutes. Enjoy your warm, gooey blondie again! Matcha is a green tea powder made from finely ground tea leaves. It brings a unique, earthy taste to your blondies. The vibrant green color also makes them look stunning. Matcha has a light sweetness that pairs well with the rich white chocolate. It adds depth and a hint of bitterness, balancing the sweetness of the other ingredients. Yes, you can use different types of chocolate in this recipe. Dark chocolate or milk chocolate can work well, too. Each chocolate type adds its own flavor twist. If you prefer a stronger taste, dark chocolate is a great choice. For a sweeter treat, stick with milk chocolate. Just ensure the chocolate complements the matcha taste. To check if your blondies are done, insert a toothpick in the center. If it comes out with a few moist crumbs, they are ready. If the toothpick has wet batter on it, they need more time. Bake for about 25-30 minutes, but keep an eye on them. Overbaking can make them dry, so check early for best results. Yes, you can freeze these blondies for later enjoyment. First, let them cool completely. Then, wrap them tightly in plastic wrap or foil. Place them in an airtight container or freezer bag. They can stay fresh in the freezer for up to three months. When you're ready to eat, just thaw them at room temperature. In this blog post, we explored how to make perfect blondies. We covered key ingredients and their quality, plus fun substitutions. I shared step-by-step instructions for mixing and baking. You learned tips to get the right texture and serving ideas. Variations for flavors and dietary needs will keep your blondies fresh. Finally, I discussed storage tips to keep them tasty. Use these insights to create delicious blondies every time! Enjoy baking and sharing your treats!

Matcha White Chocolate Blondies Irresistible Treat

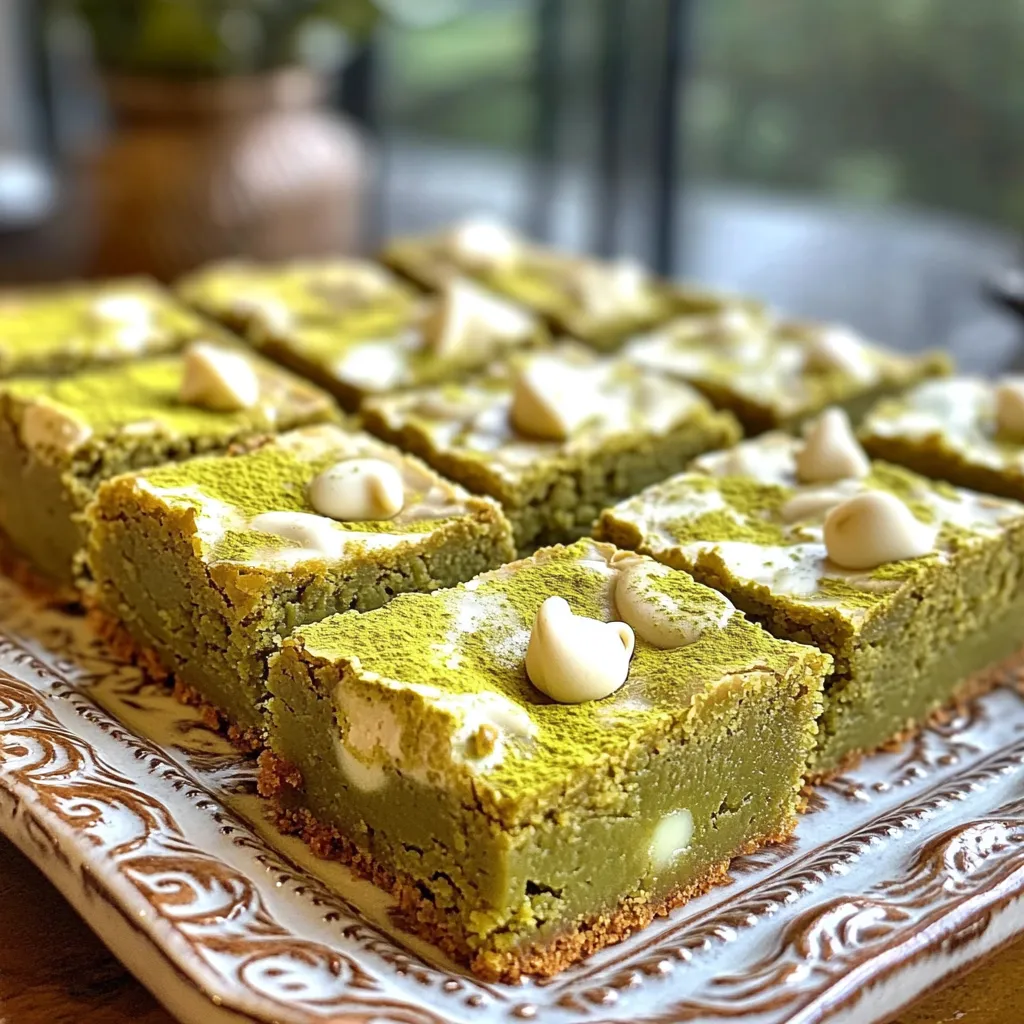
Craving a sweet treat that’s both unique and delicious? You need to try these Matcha White Chocolate Blondies! This dessert

- 1 cup cream cheese, softened - 1/2 cup powdered sugar - 1 teaspoon vanilla extract - 1/2 cup mini chocolate chips - 1 cup graham cracker crumbs - 1/4 cup unsalted butter, melted - A pinch of salt - Additional chocolate chips for garnish To make your no bake chocolate chip cheesecake bites, gather these ingredients first. Each one plays a key role in creating the creamy, sweet treat you want. Cream cheese is the base of our bites. It gives them that rich, smooth taste. The powdered sugar adds sweetness and helps balance the flavors. Vanilla extract brings warmth and depth to the mix, making every bite enjoyable. Next, we add mini chocolate chips. They provide delightful bursts of chocolate that melt in your mouth. For the crust, graham cracker crumbs mix with melted butter and salt. This combination gives a crunchy base that contrasts the creamy filling. Finally, don’t forget the extra chocolate chips for garnish. They add a nice touch and make your bites look even more tempting. Have all these ingredients ready, and you’re set to create a delicious dessert everyone will love! - Mixing bowl - Hand mixer or stand mixer - Silicone mini muffin molds or lined muffin tin - Plastic wrap Gathering the right equipment is just as important as the ingredients. You need a mixing bowl to blend your cream cheese and sugar. A hand mixer or stand mixer makes it easy to get a smooth texture. Silicone molds are perfect for shaping your cheesecake bites. They let you pop out the bites easily once they are set. If you don’t have silicone molds, a lined muffin tin works just as well. Lastly, plastic wrap will keep your cheesecake bites fresh while they chill in the fridge. With these tools in hand, you’ll be ready to whip up a batch of delightful no bake chocolate chip cheesecake bites! First, grab a mixing bowl. Add 1 cup of softened cream cheese. Then, pour in 1/2 cup of powdered sugar and 1 teaspoon of vanilla extract. Blend these ingredients together. Use a hand mixer or stand mixer to reach a smooth and creamy texture. This step creates a rich base for our cheesecake bites. Next, gently fold in 1/2 cup of mini chocolate chips. Make sure they are evenly mixed in, adding sweet bites throughout the cream cheese. Now, let’s make the base. In a separate bowl, combine 1 cup of graham cracker crumbs, 1/4 cup of melted unsalted butter, and a pinch of salt. Mix until the crumbs feel like wet sand. This mixture will hold our bites together. Take a small amount of this graham cracker mix. Press it firmly into the bottom of silicone mini muffin molds or a lined muffin tin. This will form the perfect base for each bite. Time to fill the molds! Spoon the cream cheese mixture over the graham cracker base in each mold. Fill them almost to the top for a nice, fluffy bite. Smooth the tops with a spatula for a neat look. For the final touch, sprinkle additional mini chocolate chips on top of each cheesecake bite. This adds a nice visual appeal and extra chocolatey goodness. Cover the molds with plastic wrap and place them in the fridge. Let them chill for at least 2 hours. This step helps the bites set perfectly. Once set, carefully remove the cheesecake bites from the molds. They should pop out easily. Arrange them on a serving plate and enjoy! To achieve a smooth cream cheese mixture, start with softened cream cheese. Cold cream cheese is hard to mix. Use a hand mixer to blend until you see no lumps. If your mixture is too thick, add a splash of milk. This will help you get the right texture. You want it creamy, not runny. When serving your cheesecake bites, think outside the box. Place them on a decorative platter for a fun look. Drizzling melted chocolate on top adds a nice touch. You can also garnish with fresh mint leaves. This adds color and a fresh taste. Try serving with fresh berries for a fruity twist. Many people overmix the cream cheese mixture. This can make it too airy. Mix just until smooth. Another mistake is not pressing the base firmly enough. If it’s too loose, the bites will fall apart. Press down hard to ensure they hold together well. {{image_2}} You can change the taste of your cheesecake bites easily. Adding different extracts can boost flavor. Almond extract gives a nutty taste. Coffee extract adds a rich depth. You can also mix in different chocolate chips. Try dark chocolate or white chocolate for a fun twist. If you need gluten-free options, use other crumbs. Almond flour or crushed nuts work well. For vegan substitutions, swap cream cheese for a plant-based version. Use coconut cream and a vegan sweetener for a creamy base. This way, everyone can enjoy these bites. You can make larger or smaller versions of the bites. Use a bigger mold for larger treats. For mini versions, use a smaller scoop. You can also turn this recipe into bars. Just spread the mixture in a lined baking dish. Cut into squares after chilling. These size changes keep the fun alive! To keep your No Bake Chocolate Chip Cheesecake Bites fresh, store them in the fridge. Use an airtight container to prevent drying. They stay good for up to five days. After that, the texture and flavor may change. Always check for any signs of spoilage. You can freeze these cheesecake bites for longer storage. Place them in a single layer on a baking sheet. Freeze until firm, then transfer them to a freezer-safe container. They can last for up to three months in the freezer. When you're ready to enjoy them, thaw in the fridge overnight for the best taste and texture. These cheesecake bites need to set for at least 2 hours. This time allows the flavors to meld and the texture to firm up. If you can wait longer, let them chill for 4 hours. This extra time makes them even better! Yes, you can use regular chocolate chips if you prefer. The bites will still taste great! However, mini chocolate chips mix in better and give a sweeter bite. Regular chips may create larger chunks, which can change the texture. You have a few tasty options! You can use crushed cookies like Oreos or digestive biscuits. Almond flour works as a gluten-free choice. Each option will change the flavor a bit but will still taste yummy in the bites. In this blog post, I covered how to make delicious No Bake Chocolate Chip Cheesecake Bites. You learned the ingredients, steps, and tips for success. This recipe is easy and fun, perfect for any occasion. Don’t hesitate to try different flavors or dietary options. You can store leftovers in the fridge or freeze them for later. Enjoy your cheesecake bites and impress your friends with your tasty treat! Happy baking!

No Bake Chocolate Chip Cheesecake Bites Delight

Treat yourself to a sweet, creamy delight with my No Bake Chocolate Chip Cheesecake Bites! These little bites pack all

- 1 pound boneless, skinless chicken thighs - 1 cup jasmine rice - 1 ½ cups low-sodium chicken broth - ½ cup teriyaki sauce - 1 tablespoon sesame oil - 1 tablespoon fresh ginger, minced - 3 cloves garlic, minced - 1 cup mixed bell peppers, diced - 1 green onion, sliced for garnish - 1 tablespoon sesame seeds for garnish - Salt and pepper to taste The main ingredients for this dish are chicken thighs, rice, and broth. I love using boneless, skinless chicken thighs because they stay juicy and tender while cooking. Jasmine rice gives a lovely aroma and fluffy texture. Using low-sodium chicken broth adds depth without too much salt. For flavor enhancers, teriyaki sauce is key. It brings a sweet and savory taste that pairs perfectly with chicken. Sesame oil adds a nice nutty flavor, while fresh ginger and garlic give a fragrant kick. Each ingredient plays a role in creating a balanced and tasty dish. The vegetables add color and nutrition. I like to use mixed bell peppers for their crunch and sweetness. The green onion and sesame seeds are perfect for garnishing, adding extra flavor and a nice look to the dish. Don't forget to season with salt and pepper to enhance the taste even more. With these ingredients, you can make a delicious Instant Pot Teriyaki Chicken Rice that is simple and satisfying. - First, season the chicken thighs with salt and pepper. - Next, rinse and drain the jasmine rice well to remove excess starch. - Set your Instant Pot to Sauté mode. Add the sesame oil and let it heat. - Once hot, add the chicken and sauté for 3-4 minutes until lightly browned. - Stir in the minced ginger and garlic. Sauté for 1 minute until fragrant. - Pour in the teriyaki sauce, stirring well to coat the chicken evenly. - Add the rinsed jasmine rice and chicken broth to the pot. Ensure the rice is submerged. - Gently fold in the diced bell peppers for added color and crunch. - Close the lid and set the Instant Pot to Pressure Cook for 10 minutes. - After the cooking time, allow a natural pressure release for 10 minutes. - Carefully release any remaining pressure before opening the lid. - Fluff the rice gently with a fork and check the seasoning, adjusting if needed. - Serve the teriyaki chicken rice in bowls, garnished with green onions and sesame seeds. - Adjust cooking time for your Instant Pot. If you use chicken breast, cook for 8-9 minutes. - For deeper flavor, marinate the chicken in teriyaki sauce for 30 minutes before cooking. - Use low-sodium chicken broth for better control over saltiness. - To enhance taste, add a splash of rice vinegar before serving. - Serve with steamed broccoli or snap peas for a fresh crunch. - A side of simple cucumber salad pairs well with this dish. - For meal prep, divide into containers for easy grab-and-go lunches. - Top with sliced avocado for a creamy texture. - Use chopped cilantro or fresh basil for a bright finish. - Save leftover bell peppers to toss in salads or wraps. - Sprinkle crushed red pepper for added heat if you like spice. - Drizzle with a little extra teriyaki sauce for more flavor before serving. {{image_2}} You can easily change the chicken thighs to other proteins. Chicken breast works well if you prefer a leaner cut. Tofu is a great choice for a vegetarian option. Just cut your tofu into small cubes and sauté it like the chicken. Jasmine rice is my favorite for this dish, but other rice types can work too. Brown rice adds a nutty flavor and is healthier. If you use brown rice, increase the cooking time to about 22 minutes. Want to switch up the taste? Try adding different sauces or spices. A bit of sriracha can add some heat. You could also mix in hoisin sauce for a sweeter twist. Adjusting the sweetness is easy too. If you like it sweeter, add a touch of honey or more teriyaki sauce. For less sweetness, cut back on the sauce a little. If you're looking for gluten-free options, choose gluten-free teriyaki sauce. Many brands offer this. Make sure to check the label to confirm. For low-carb alternatives, you can swap out rice for cauliflower rice. It cooks quickly and soaks up the flavor well. This way, you enjoy the taste without the carbs. To keep your teriyaki chicken rice fresh, follow these steps: - Let the dish cool down to room temperature. - Transfer it to an airtight container. - Store it in the fridge for up to 3 days. If you want to save it for later, you can freeze it: - Portion the rice and chicken into freezer-safe bags. - Remove as much air as possible before sealing. - It can stay good in the freezer for about 2 months. When you’re ready to enjoy your leftovers, here are some methods: - Use the microwave for quick reheating. - Heat in a pan on the stove over medium heat. - Add a splash of water to help steam the rice. To keep the rice fluffy and chicken tender, follow these tips: - Stir the dish while reheating to heat evenly. - Avoid overheating to prevent drying out the rice and chicken. This dish is best enjoyed fresh. - In the fridge, it stays fresh for about 3 days. - In the freezer, it can last up to 2 months. Always check for signs of spoilage before eating. For this recipe, a 6-quart Instant Pot works best. It provides enough space for all the ingredients. A smaller pot may overflow, while a larger one may not cook as evenly. Yes, you can use brown rice. However, it requires more liquid and longer cooking time. Use 1 ¾ cups of chicken broth and set the pressure cooking time to 22 minutes. Not all teriyaki sauces are gluten-free. Many contain soy sauce, which has gluten. Look for a gluten-free label or use tamari as a substitute. To add heat, include sliced jalapeños or red pepper flakes. You can also use a spicy teriyaki sauce or add sriracha to taste. This dish pairs well with steamed broccoli or snap peas. You can also serve it with a simple salad or pickled vegetables for a fresh touch. This blog post covered how to make a tasty dish using chicken, rice, and teriyaki sauce. You learned about key ingredients, the cooking steps, and tips to improve flavor. Don’t forget to try different proteins or rice types for variety. Store your leftovers properly to keep the dish fresh. Cooking can be fun and easy. Enjoy making this meal for yourself or others. The right techniques will lead to a delicious result every time. Your next meal can be exciting and flavorful!

Instant Pot Teriyaki Chicken Rice Simple and Savory

Looking for a quick dinner that bursts with flavor? You’ve just found it! This Instant Pot Teriyaki Chicken Rice is

- 1 cup rolled oats - 1 ½ cups almond milk (or milk of choice) - 1 cup fresh strawberries, hulled and sliced - 1 tablespoon chia seeds - 1 tablespoon maple syrup (or honey) - 1 teaspoon vanilla extract - ½ cup Greek yogurt (vanilla or plain) - 2 tablespoons crushed graham crackers (for topping) - Fresh mint leaves (for garnish, optional) When I make Strawberry Shortcake Overnight Oats, I love using fresh ingredients. Rolled oats form the base of this dish. They soak up the almond milk, making them soft and creamy. You can choose any milk you like, but almond milk adds a nice touch. The strawberries are the stars of this recipe. I slice them up and mix them with the oats. Chia seeds are a great addition too. They help the oats thicken and add fiber. Sweetness comes from maple syrup or honey. I prefer maple syrup for its rich flavor. Next, I add vanilla extract. It gives the oats a warm and inviting taste. Greek yogurt makes the dish extra creamy. I often use vanilla yogurt for added flavor. Finally, I sprinkle crushed graham crackers on top. They add a fun crunch and remind me of shortcake. Mint leaves can brighten the dish, but they are optional. - First, combine 1 cup rolled oats, 1 tablespoon chia seeds, 1 ½ cups almond milk, 1 tablespoon maple syrup, and 1 teaspoon vanilla extract in a bowl. Mix until everything blends well. - Next, layer half of the sliced strawberries at the bottom of a mason jar or container. This will add a fresh burst of flavor. - Pour half of the oat mixture over the strawberries. Then, add a layer of ½ cup Greek yogurt. This creamy layer adds richness. - Repeat the layers with the remaining strawberries, oats, and yogurt. Finish with a final layer of oats on top. This makes for a nice presentation. - Seal the container with a lid. Place it in the fridge overnight or at least for 6 hours. This allows the oats to soak up the flavors. In the morning, give the oats a good stir. You can top with crushed graham crackers and garnish with fresh mint leaves. Enjoy your delicious and easy breakfast! You can make this recipe your own. If you don’t like almond milk, use any milk you want. Dairy milk works well, or try oat or soy milk. You can also switch up the fruit. Blueberries and bananas are great choices. They add a different taste and color to your oats. Presentation is key! Serve your oats in clear glasses. This way, people can see the pretty layers of oats, yogurt, and strawberries. For an extra touch, add more strawberry slices on top. A dollop of yogurt can make it even better! Before you dive in, stir the oats. This helps mix everything evenly. If you like it sweeter, feel free to add more maple syrup or honey. Taste it first, then adjust as you like. {{image_2}} You can make your strawberry shortcake overnight oats even more fun with flavor twists. For a Chocolate Strawberry Shortcake, simply add cocoa powder to the oat mixture. Use about one to two tablespoons. This change gives a rich, chocolatey taste that pairs well with strawberries. Another tasty option is the Nutty Strawberry Shortcake. Just mix in some chopped nuts like almonds or walnuts. This adds a nice crunch and boosts healthy fats. You can use about a quarter cup of nuts for the best flavor. If you want a healthier option, try a low-sugar version. You can use less maple syrup or switch to a sugar alternative like stevia. This change keeps the sweetness but cuts down on sugars. For a dairy-free option, swap the Greek yogurt with a plant-based yogurt. Almond or coconut yogurt works great. This keeps your oats creamy while being dairy-free. It also makes the dish vegan-friendly. To keep your strawberry shortcake overnight oats fresh, store them in an airtight container. This helps lock in moisture and flavor. Make sure you seal the jar or container well. Overnight oats can last in the fridge for up to five days. However, for the best taste and texture, I recommend eating them within three days. Yes, you can freeze overnight oats! To freeze them, pour the mixture into a freezer-safe container. Leave some space at the top, as the oats will expand when frozen. When you're ready to eat them, thaw the oats in the fridge overnight. You can also microwave them for a quick reheat. Add fresh strawberries and graham crackers after thawing for the best taste. Strawberry shortcake overnight oats last in the fridge for up to five days. Store them in a sealed jar or container. This keeps them fresh and tasty. I love making a batch at the start of the week. It makes breakfast easy and delicious every day. Yes, you can prepare overnight oats for multiple days. Make several jars at once. Each jar can hold a serving. Just layer the ingredients as shown in the recipe. This way, you have quick meals ready to grab. It saves time and helps you stay on track with healthy eating. Chia seeds are not necessary, but they add great benefits. They help thicken the oats and give a nice texture. Chia seeds also bring fiber and healthy fats to the dish. If you don’t have them, you can skip them, but I recommend trying them for that extra nutrition! This blog post covers crafting delicious strawberry shortcake overnight oats. You learned about key ingredients, preparation, and layering. I shared tips for customization and serving. Variations let you explore flavors and health options. Lastly, we discussed storage methods to keep your oats fresh. Using these insights, you can enjoy a tasty and healthy breakfast. Get creative and make it your own! Enjoy every bite.

Strawberry Shortcake Overnight Oats Simple Delight

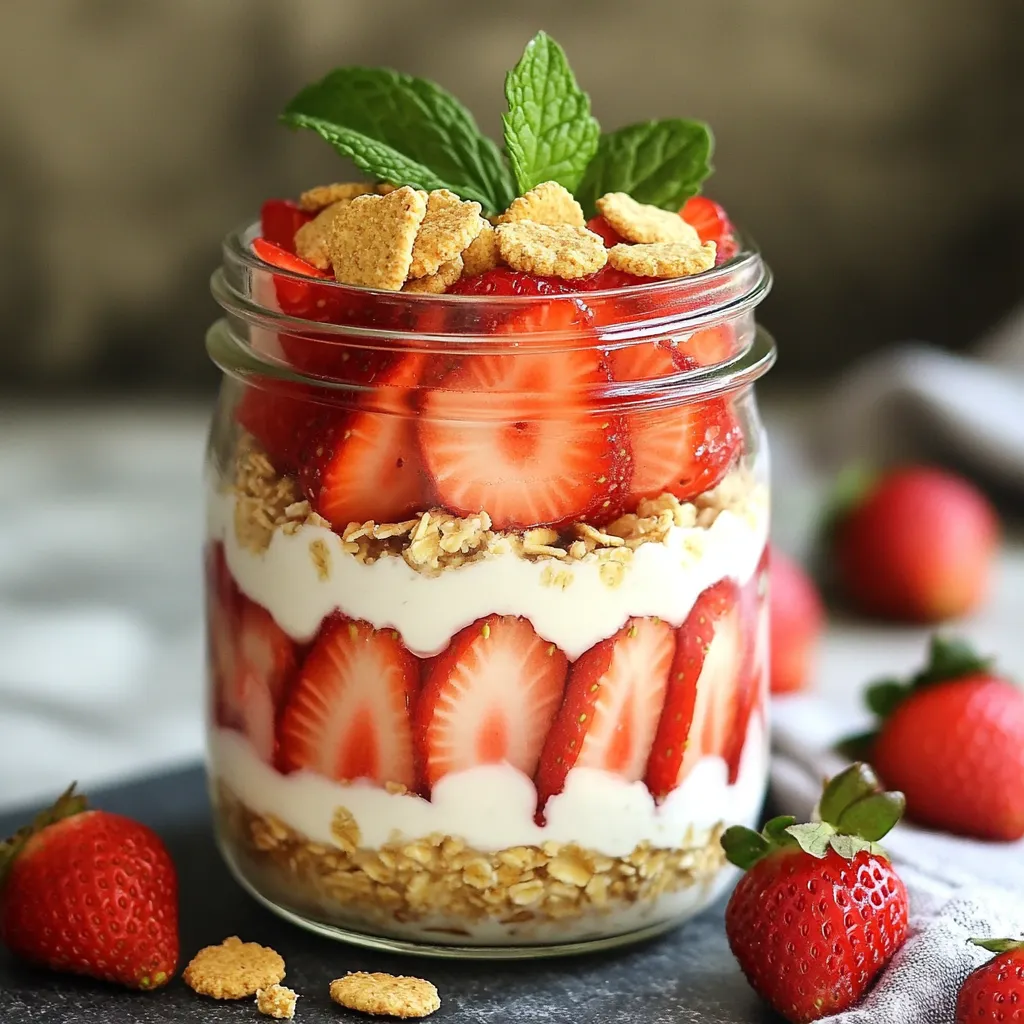
Are you looking for a quick and tasty breakfast? Let me introduce you to Strawberry Shortcake Overnight Oats! This simple

To make this slow cooker maple apple butter, you need the following items: - 6 large apples, peeled, cored, and chopped - 1 cup pure maple syrup - 1 teaspoon ground cinnamon - 1/2 teaspoon ground nutmeg - 1/4 teaspoon ground allspice - 1 teaspoon vanilla extract - 1 tablespoon lemon juice - Pinch of salt These ingredients blend to create a sweet and warm flavor. The apples are the base, and the maple syrup adds natural sweetness. Choosing the right apples is key to great apple butter. I love using: - Granny Smith: They are tart and hold their shape well. - Honeycrisp: These apples are sweet and juicy. Mixing these apples gives a nice balance of tartness and sweetness. You can boost the flavor of your apple butter with some fun add-ins. Consider these options: - A pinch of cloves for a warm spice. - A splash of bourbon for depth. - Dried fruit like raisins for added sweetness. These additions can make your apple butter unique and even more tasty! Start by peeling, coring, and chopping six large apples. I like using Granny Smith or Honeycrisp. Cut the apples into small pieces. This helps them cook evenly and break down well. Place the chopped apples in your slow cooker. Next, add the following ingredients to the apples in the slow cooker: - 1 cup pure maple syrup - 1 teaspoon ground cinnamon - 1/2 teaspoon ground nutmeg - 1/4 teaspoon ground allspice - 1 teaspoon vanilla extract - 1 tablespoon lemon juice - Pinch of salt Stir everything together until the apples are well coated. This mix of flavors is what makes the apple butter so tasty! Cover the slow cooker with its lid and set it to low heat. Cook the mixture for six to eight hours. Stir it occasionally. You will know it's ready when the apples are soft and have turned into a thick sauce. After cooking, it's time to blend. You can use an immersion blender right in the slow cooker. If you want it smoother, transfer the mix to a regular blender in batches. Blend until you reach your desired smoothness. Now, taste your apple butter. If you want it sweeter, add more maple syrup. After that, cook it for an extra hour or two with the lid slightly open. This helps thicken the apple butter even more. Once it’s thick enough, let it cool a bit before putting it in jars. When you pick a slow cooker, size matters. A 4 to 6-quart model works great for this recipe. Make sure it has a lid that fits well. A good seal keeps the heat in and helps cook the apples evenly. If your slow cooker has a “low” setting, that’s perfect for making apple butter. To get the right thickness, you must let the apple butter cook long enough. After blending, if it seems too thin, leave the lid slightly open. This lets steam escape and helps it thicken. You can also cook it longer on low heat. Check every hour until you reach the desired consistency. Taste your apple butter before you finish cooking. If it needs more sweetness, add more maple syrup. You can also play with spices. If you love cinnamon, add a bit more. For a twist, try a dash of ginger or cloves. Each change can give your apple butter a new flavor. Experiment to find your perfect blend! {{image_2}} You can make your apple butter really special by adding spices. Try using ginger for a warm kick. Cloves are great too if you want a more festive taste. You can mix and match to find your favorite blend. If maple syrup is not for you, try honey or agave. Both can add a unique flavor. For a lower-calorie option, use stevia or monk fruit sweetener. Just remember to taste as you go. This will help you find the right sweetness. Do you like bits of apple in your butter? You can make it chunky! After cooking, just blend it less. Use a fork to mash some apple pieces. This gives you a nice texture and makes it more interesting to eat. To keep your apple butter fresh, store it in clean jars. Make sure to use sterilized glass jars with tight-fitting lids. Fill the jars, leaving some space at the top. This space allows for expansion if you freeze it. Always label the jars with the date you made the apple butter. Keep it in a cool, dark place like a pantry or cupboard. Homemade apple butter lasts about two weeks in the fridge. It can stay good for a month if stored well. Always check for any signs of spoilage. If it smells off or shows mold, toss it out. For long-term storage, refrigeration is key after opening. Freezing apple butter is a great way to keep it longer. Pour the cooled apple butter into freezer-safe containers. Leave some space at the top for expansion. You can also use ice cube trays for smaller portions. Once frozen, transfer the cubes to a freezer bag. It can last up to a year in the freezer. When ready to use, thaw it in the fridge overnight. Yes, you can use many kinds of apples. Some great choices are Granny Smith, Honeycrisp, or Fuji. Each apple adds its own flavor. For a sweet touch, use Honeycrisp. For a tart taste, go with Granny Smith. Mixing two or more types gives depth to your apple butter. You know the apple butter is done when the apples turn soft and break down. Stir it occasionally. After about 6 to 8 hours, check the texture. It should be thick and smooth. If it is too thin, cook it longer with the lid slightly ajar. This allows moisture to escape. Maple apple butter is super versatile! You can spread it on toast or muffins. It makes a great topping for pancakes or waffles. You can also use it in yogurt or oatmeal. Try it as a filling in pies or pastries. It even works well with cheese on a charcuterie board. Yes, you can! If you don’t have a slow cooker, use a large pot on the stove. Just follow the same steps. Cook on low heat and stir often. It may take less time than in a slow cooker. Check the texture and taste as it cooks. To sterilize jars, start by washing them in hot, soapy water. Rinse well, then place them in a pot of boiling water for 10 minutes. You can also run them through the dishwasher on a hot cycle. Let them cool before filling them with apple butter. This keeps your food safe and fresh! In this article, we explored the essential ingredients, preparation steps, and tips for making apple butter. I shared how to choose the right apples and slow cooker, along with ways to enhance flavor. We discussed storage options to keep your apple butter fresh longer. Remember, you can customize the flavor and texture to suit your taste. With these steps, you can enjoy delicious, homemade apple butter any time. Dive in and make your own batch today!

Slow Cooker Maple Apple Butter Recipe to Try Today

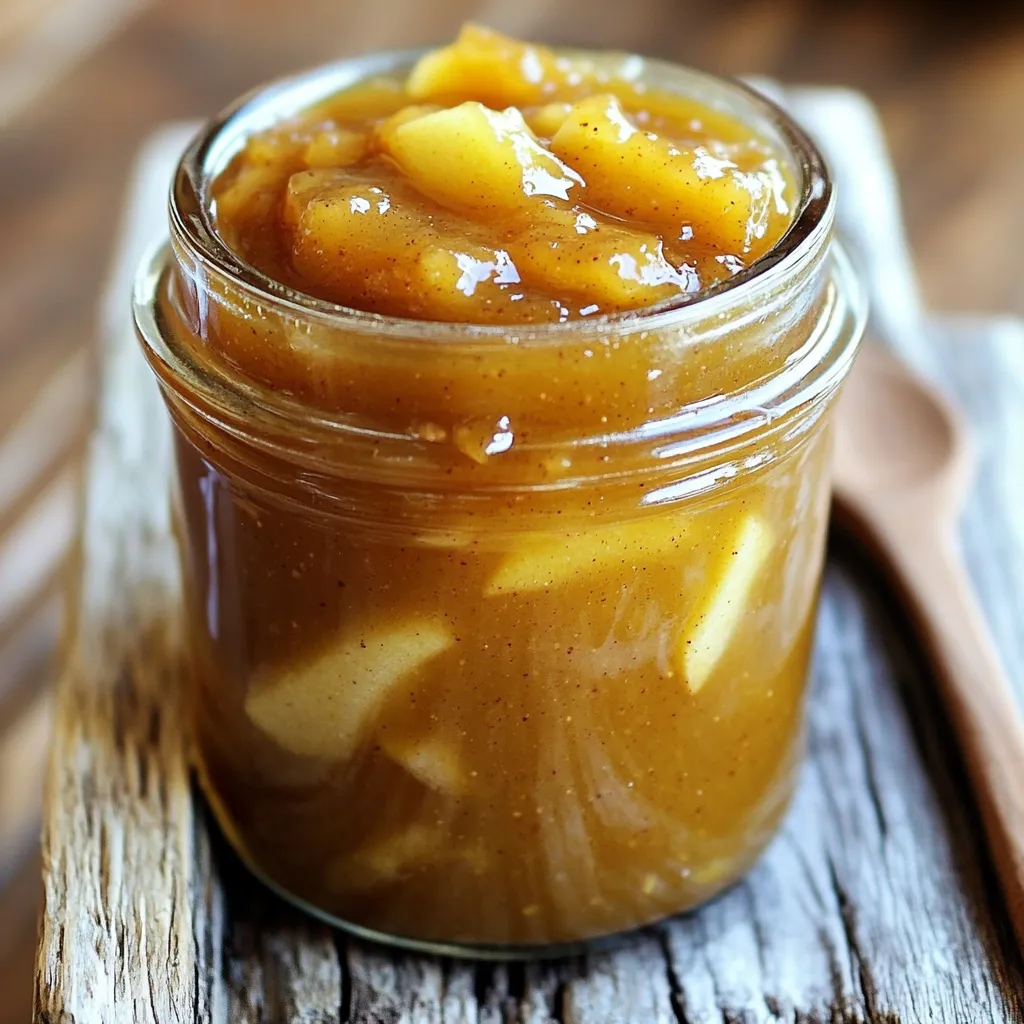
Are you ready to make your kitchen smell heavenly? This Slow Cooker Maple Apple Butter recipe is a delightful way

To make this dish, you need: - 4 boneless, skinless chicken breasts - 1/4 cup sweet chili sauce - 2 tablespoons lime juice - 1 tablespoon soy sauce - 2 cloves garlic, minced - 1 teaspoon fresh ginger, grated - 1 teaspoon olive oil - Salt and pepper to taste - Fresh cilantro for garnish These ingredients come together to create a sweet and tangy flavor. The chicken breasts soak in a tasty marinade of chili sauce and lime juice. This helps the chicken stay juicy and full of flavor as it cooks. You can add some fun twists to your dish with these optional ingredients: - Red pepper flakes for heat - Honey for extra sweetness - Sesame oil for a nutty flavor - Green onions for crunch These ingredients let you play with the recipe. You can make it spicier or sweeter, depending on your taste. For this recipe, you will need: - Medium bowl for mixing - Whisk for blending the marinade - Resealable plastic bag or shallow dish for marinating - Grill for cooking - Meat thermometer to check doneness Having the right tools makes cooking easier. You can focus on making this dish delicious and fun! {{ingredient_image_1}} To start, gather your ingredients. You will need: - 1/4 cup sweet chili sauce - 2 tablespoons lime juice - 1 tablespoon soy sauce - 2 cloves garlic, minced - 1 teaspoon fresh ginger, grated - 1 teaspoon olive oil In a medium bowl, whisk together the sweet chili sauce, lime juice, soy sauce, minced garlic, grated ginger, and olive oil. Mix until it is well blended. This marinade adds a nice sweet and tangy flavor to the chicken. Next, take the chicken breasts. Season them with salt and pepper. Place them in a resealable plastic bag or a shallow dish. Pour the marinade over the chicken. Make sure each piece is coated well. Seal the bag or cover the dish. Refrigerate for at least 30 minutes. For the best flavor, let it marinate for up to 2 hours. Now, it’s time to grill! Preheat your grill to medium-high heat. Take the chicken out of the marinade. Let the excess marinade drip off. Discard the leftover marinade. Place the chicken on the hot grill. Cook for about 6-7 minutes on each side. You want the internal temperature to reach 165°F (75°C). Look for nice grill marks too! Once cooked, remove the chicken from the grill and let it rest for 5 minutes. Slice the chicken and garnish with fresh cilantro before serving. Enjoy your sweet chili lime grilled chicken! To make the chicken taste great, marinate it well. I mix sweet chili sauce, lime juice, soy sauce, minced garlic, grated ginger, and olive oil in a bowl. The flavors blend nicely. I put the chicken in a bag and pour the marinade over it. Make sure every piece is coated. Seal the bag and chill it for at least 30 minutes. For more flavor, you can marinate it for up to 2 hours. This lets the chicken soak up all the goodness. When grilling, preheat your grill to medium-high heat. This helps cook the chicken evenly. I remove the chicken from the marinade and let the extra drip off. Discard the remaining marinade to keep it safe. Place the chicken on the hot grill and cook for about 6-7 minutes on each side. The chicken should reach 165°F (75°C) for safety. Use a meat thermometer for the best results. To get those nice grill marks, place the chicken diagonally on the grill grates. Avoid moving it around too much. After 3-4 minutes, I turn it 90 degrees to create a crosshatch pattern. Then flip it over and repeat. This not only looks good but also adds flavor from the grill. Let the chicken rest for 5 minutes after grilling. This keeps it juicy and tender. Pro Tips Marinate Longer for More Flavor: For the best flavor, marinate the chicken for at least 2 hours or overnight. This allows the flavors to penetrate the meat thoroughly. Use a Meat Thermometer: To ensure your chicken is perfectly cooked, use a meat thermometer. The internal temperature should reach 165°F (75°C). Grill Marks Matter: To achieve those perfect grill marks, avoid moving the chicken too much while it's cooking. Let it sear on one side before flipping. Rest the Chicken: Allow the chicken to rest for about 5 minutes after grilling. This helps retain its juices, making it more tender and flavorful when sliced. {{image_2}} You can swap chicken for other proteins. Tofu works great for a plant-based meal. Use firm tofu and press it to remove water first. Shrimp is another tasty choice. Just make sure to adjust cooking time. Shrimp cooks faster than chicken. Grill shrimp for 2-3 minutes per side. Mix up the marinade for new flavors. Try adding honey for sweetness. You can also add a dash of sriracha for heat. Use coconut aminos instead of soy sauce for a gluten-free option. Fresh herbs like basil or mint can add a fresh twist. Experiment with your favorite spices to find what you love. Serve your grilled chicken with fresh sides. A crisp salad pairs well with it. You can also serve it over rice or quinoa. Add grilled veggies for a colorful plate. Cilantro lime rice is a great choice for extra zest. A tangy dipping sauce can make it even better. Try mixing yogurt with lime juice and herbs for a refreshing dip. After enjoying your sweet chili lime grilled chicken, store leftovers safely. Let the chicken cool to room temperature. Place it in an airtight container. You can keep the chicken in the fridge for up to four days. Make sure to label the container with the date. This helps you track how long it has been stored. To reheat your grilled chicken, use the oven or stovetop for best results. Preheat your oven to 350°F (175°C). Place the chicken in a baking dish and cover it with foil. Heat for about 15 minutes. This keeps the chicken juicy. If using a stovetop, heat a skillet over medium heat. Add a splash of water or broth, and cover. Cook for around 5 minutes. This method helps to keep the chicken from drying out. For long-term storage, freezing is a great option. Wrap each piece of chicken tightly in plastic wrap. Then, place them in a freezer-safe bag. Make sure to remove as much air as possible. Label the bag with the date. You can freeze grilled chicken for up to three months. When ready to eat, thaw in the fridge overnight before reheating. To check if chicken is done, use a meat thermometer. Insert it into the thickest part of the breast. The safe temperature is 165°F (75°C). This ensures no harmful bacteria remain. If you don’t have a thermometer, cut into the chicken. The meat should be white and juices should run clear. Yes, you can use other chili sauces. Sriracha adds heat and flavor, while a mild sauce can make it sweeter. Experiment with your favorite sauces to find what you like best. Just remember, some sauces are hotter than others, so adjust to your taste. You can store leftovers in the fridge for up to four days. Make sure to place the chicken in an airtight container. This keeps it fresh and safe to eat. If you want to keep it longer, consider freezing it. Each serving has about 200 calories. It contains 30 grams of protein, 8 grams of fat, and 5 grams of carbs. The dish is low in carbs and provides a good amount of protein. Check the exact figures based on the brands of ingredients you use. Yes, you can prep the marinade and chicken ahead of time. Marinate the chicken for up to 2 hours. You can also grill it earlier and reheat it later. Just make sure to follow proper storage steps to keep it tasty. Sweet chili lime grilled chicken is simple yet flavorful. We covered the key ingredients, the steps for marinating and grilling, and shared useful tips. You can customize with different proteins and marinades to suit your taste. Remember to store leftovers properly for future meals. By following these steps, you can enjoy a tasty dish that impresses your family and friends. You now have the tools to make this delicious recipe your own. Happy grilling!

Sweet Chili Lime Grilled Chicken Flavorful Delight

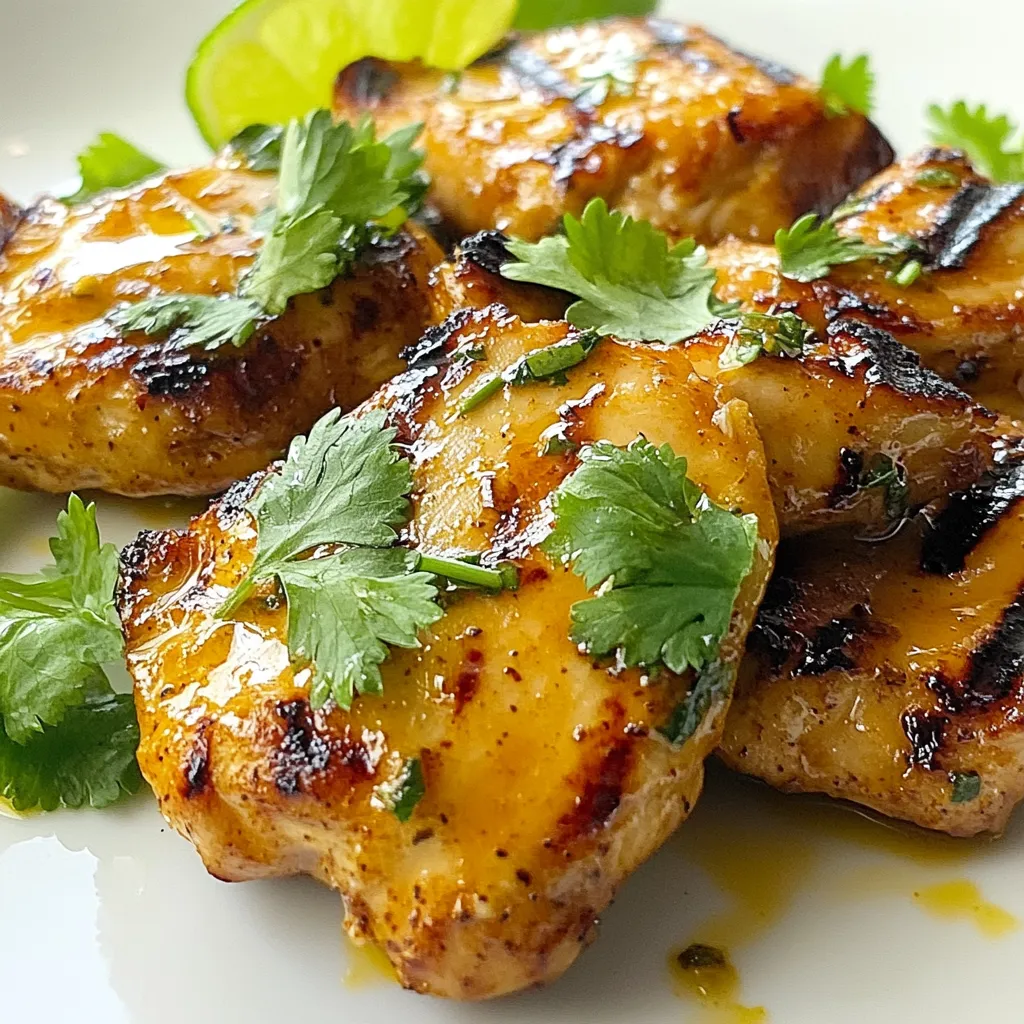
Looking to add some zest to your dinner? Sweet Chili Lime Grilled Chicken is the perfect dish! This flavorful delight

- 2 cups cooked chicken, shredded - 1 cup cream cheese, softened - 1 can (10 oz) cream of chicken soup - 1 cup sour cream - 1 cup shredded Monterey Jack cheese - 8 small flour tortillas - 1 can (4 oz) diced green chilies, drained - 1 teaspoon garlic powder - 1 teaspoon onion powder - 1 teaspoon cumin - Salt and pepper to taste - Fresh cilantro and lime wedges for garnish Gathering the right ingredients makes a big difference. Start with cooked chicken. Shredding it makes it easy to mix. Next, use cream cheese for a rich and creamy base. The cream of chicken soup adds flavor. Sour cream adds a nice tang. Shredded Monterey Jack cheese gives that gooey texture we love. Don't forget the flour tortillas. They hold everything together. Diced green chilies add a mild kick. The spices—garlic powder, onion powder, and cumin—bring it all to life. Lastly, season with salt and pepper. Fresh cilantro and lime wedges are perfect for garnishing. They add color and brightness to the dish. With these ingredients ready, you are set to create a dish that warms the heart and fills the belly. Let's get cooking! Start by gathering your ingredients in a large mixing bowl. You need: - 2 cups cooked chicken, shredded - 1 cup cream cheese, softened - 1 can (10 oz) cream of chicken soup - 1 cup sour cream - 1 teaspoon garlic powder - 1 teaspoon onion powder - 1 teaspoon cumin - 1 can (4 oz) diced green chilies, drained - Salt and pepper to taste Mix these together well. I find it best to use a sturdy spoon. Make sure every bite has a blend of flavors. This step is key for good taste. Now, take a tortilla. Spoon a good amount of the chicken mixture into the middle. I like to keep it generous but not overflowing. Roll it tightly and place it seam-side down in the slow cooker. Repeat this process for all tortillas. This way, they cook evenly and stay closed. Once all tortillas are in, sprinkle the shredded Monterey Jack cheese on top. This cheese melts nicely and adds a rich flavor. Set your slow cooker to low heat. Cook for about 4 to 5 hours. You want the cheese to be melted and bubbly. The enchiladas should be heated through and ready to serve. Check them a bit before the time is up to avoid overcooking. Enjoy the aroma while they cook; it’s mouthwatering! To get a creamy texture in your enchiladas, use high-quality ingredients. Softened cream cheese is key. It mixes well with the other ingredients. The cream of chicken soup adds richness. Sour cream enhances the creaminess too. For the best flavor, always choose fresh. Fresh cilantro and lime add brightness to each bite. Using your slow cooker well makes a big difference. First, layer the ingredients properly. Start with chicken, then add the sauce and cheese. This helps everything cook evenly. Keep the lid on while cooking. Lifting it lets heat escape. Avoid opening the lid too often. Check the cooking time; each slow cooker can vary. Pair these enchiladas with simple sides. Rice and beans complement the dish nicely. A fresh salad adds color and crunch. For presentation, serve the enchiladas on a bright plate. Top with cilantro and a lime wedge. This makes the dish look inviting. Encourage everyone to squeeze lime on top for zest! {{image_2}} You can switch up the protein in this dish. Try using shredded beef or ground turkey. Both options add a unique flavor. For a lighter version, consider using shredded tofu or jackfruit. If you need dairy substitutes, use almond cream cheese or cashew cream. These options will keep the dish creamy without dairy. Want more heat? Add sliced jalapeños to the filling. You can also drizzle hot sauce on top before serving. This will give your enchiladas a spicy kick. Fresh herbs like cilantro or parsley can balance the heat. Add them just before serving for a burst of freshness. To make these enchiladas healthier, add veggies. Spinach, bell peppers, or zucchini work well. They boost nutrition and color in your dish. For a lower-calorie version, use low-fat cream cheese and sour cream. You can also use whole wheat tortillas instead of regular flour tortillas. To store your enchiladas, let them cool first. Place them in an airtight container. This keeps them fresh and tasty. You can store them in the fridge for up to three days. When you want to reheat, place them in the microwave. Heat for about 2-3 minutes, or until hot. You can also use the oven. Preheat the oven to 350°F (175°C) and bake for about 15 minutes. Freezing enchiladas is easy and great for future meals. First, wrap each enchilada in plastic wrap. Then, place them in a freezer bag. Make sure to remove as much air as possible. They can stay in the freezer for up to three months. To defrost, move them to the fridge overnight. Reheat them in the oven at 350°F (175°C) for about 20-25 minutes. In the fridge, your creamy slow cooker white chicken enchiladas last about three days. Look for signs of spoilage, like a sour smell or mold. If you see any, it’s best to throw them out. Enjoy your meal while it’s fresh for the best taste! You can tell the enchiladas are done when the cheese is melted and bubbly. The chicken should be hot throughout. To check, use a food thermometer. The chicken should reach 165°F. If you don’t have a thermometer, you can cut one open to see if it's hot. Yes, you can use corn tortillas. They add a nice flavor but can be tricky. Corn tortillas break more easily. To avoid this, warm them up first. This helps them stay soft and flexible. You can also dip them in warm water before filling. You can serve many tasty sides with these enchiladas. Some good choices are: - Mexican rice - Refried beans - Fresh salad with lime dressing For drinks, try pairing with a light beer or a refreshing limeade. These options will complete your meal nicely. You’ve learned how to make delicious slow cooker white chicken enchiladas. We explored key ingredients and their roles in creating flavor. I shared step-by-step instructions and useful tips to enhance creaminess and avoid common slow cooker errors. You can also customize your dish using variations and storage methods for leftovers. Remember, the right ingredients and techniques yield great results. Enjoy making these enchiladas, and impress your friends and family with your cooking skills!

Savory Slow Cooker White Chicken Enchiladas Recipe

Craving a comforting main course that’s both easy and delicious? My Savory Slow Cooker White Chicken Enchiladas are the answer!

Older posts
Newer posts
← Previous Page1 … Page11 Page12 Page13 … Page137 Next →

dsad

© 2025 Recipes Pursuit • Built with GeneratePress

Our Policies

  • Copyright Policy
  • Cookie Policy
  • GDPR Policy
  • Privacy Policy
  • Disclaimer
  • Terms Of Use

More Information

  • Home
  • About
  • Contact
  • Appetizers
  • Dessert
  • Dinner
  • Drinks
©2025, Recipes Pursuit About Back To Top