Skip to content
DisclaimerTerms Of UseGDPR PolicyCookie Policy

Recipes Pursuit

  • Home
  • Drinks
  • Appetizers
  • Dinner
  • Dessert
  • About
  • Contact
  • Privacy Policy
DisclaimerTerms Of UseGDPR PolicyCookie Policy

Emma Smith

- 1 pound large shrimp, peeled and deveined - 4 tablespoons unsalted butter - 4 cloves garlic, minced For this dish, start with large shrimp. They should be peeled and deveined. This makes them easy to eat. The shrimp soak up all the flavors well. Next, use unsalted butter. It adds richness without extra salt. Finally, the minced garlic gives a strong aroma and taste. Fresh garlic is best for this recipe. - 1 teaspoon red pepper flakes (adjust to taste) - Juice and zest of 1 lemon - Salt and pepper to taste Red pepper flakes add a nice kick. You can adjust the amount based on your taste. Fresh lemon juice and zest bring bright flavor. They make the dish fresh and lively. Don’t forget salt and pepper. They help balance the dish's flavors. - 1 tablespoon fresh parsley, chopped - Lemon wedges for serving Fresh parsley adds color and a hint of freshness on top. It also looks great on the plate. Serve with lemon wedges for extra flavor. They give a nice touch when you squeeze more juice over the shrimp. For the full recipe, check out the details. - Melting the butter Start by placing a large skillet on medium heat. Add four tablespoons of unsalted butter. Let it melt slowly. Watch it closely to prevent burning. - Sautéing garlic and red pepper flakes Once the butter melts, add four cloves of minced garlic. Also, add one teaspoon of red pepper flakes. Stir the mixture for about one to two minutes. You want the garlic to smell good but not brown. - Adding shrimp to the skillet Turn up the heat to medium-high. Add one pound of peeled and deveined large shrimp to the skillet. Make sure to spread them out evenly in the pan. - Seasoning and cooking times Sprinkle salt and pepper over the shrimp. Cook them for two to three minutes. You want the shrimp to turn pink and opaque. This shows they are cooked. - Mixing in lemon juice and zest Squeeze the juice from one lemon into the skillet. Add the zest of the same lemon. Stir well to mix the flavors. Let the shrimp soak up the citrus for another minute. - Final garnish with parsley Remove the skillet from heat. Stir in one tablespoon of chopped fresh parsley. This adds color and freshness. Plate the shrimp and drizzle any sauce left in the pan over the top. Enjoy this quick and flavorful dish! For the full recipe, check out the details above. How do you know when shrimp are done? Look for a pink color. The shrimp should also be opaque. They are ready in about 2-3 minutes. To avoid overcooked shrimp, watch them closely. Remove them from heat when they turn pink. They continue to cook off the heat. You can add white wine or chicken broth for more flavor. Just pour a splash into the pan after cooking the shrimp. This adds depth to the sauce. You can also experiment with herbs. Basil and thyme work well with lemon. Adjust the spice levels to your taste. Add more red pepper flakes for heat. Serve shrimp in a shallow bowl for a nice look. Garnish with fresh parsley and lemon wedges. This adds color and freshness to the dish. Consider pairing the shrimp with a light salad. You can also serve it over fresh pasta. This makes a complete and colorful meal. {{image_2}} You can switch up the seafood in this dish. Try using scallops or lobster for a twist. If you want a vegetarian option, replace shrimp with mushrooms or zucchini. Both options will soak up the lemon garlic butter flavor well. Spices can change the whole dish. Add cumin for a warm, earthy taste. For a smoky kick, try paprika. If you like heat, mix in more red pepper flakes. You can even add some chopped jalapeños for extra spice. You can cook the shrimp in different ways. A skillet gives you quick results and great flavor. If you want a charred taste, try grilling them. For a hands-off method, bake the shrimp in the oven. Just adjust the time to ensure they cook well. Explore the full recipe for more tips on making this dish shine! To keep your Lemon Garlic Butter Shrimp fresh, place leftovers in an airtight container. Cool the shrimp to room temperature before sealing. Store them in the fridge for up to two days. This helps maintain their flavor and texture. If you want to save shrimp for later, freezing is a great choice. First, cool the shrimp completely. Then, place them in a freezer-safe bag. Remove as much air as possible to prevent freezer burn. You can freeze shrimp for up to three months. When you're ready to use them, thaw in the fridge overnight or under cold running water. To reheat shrimp, do it gently to keep them tender. The best way is to use a skillet. Heat on low and add a splash of water or broth. This keeps them moist. Stir often until heated through. Avoid the microwave, as it can make shrimp rubbery. Enjoy your flavorful dish just like fresh! For the full recipe, check back to make cooking a breeze. Yes, you can use frozen shrimp. It’s a great way to save time. To thaw frozen shrimp, place them in the fridge overnight. If you need them faster, you can put them in a bowl of cold water for about 30 minutes. Just make sure to drain them well before cooking. This helps keep the dish from getting watery. You have many delicious options! Here are some side dishes that pair well: - Light salad with a citrus vinaigrette - Steamed vegetables, like broccoli or asparagus - Fresh pasta tossed in olive oil - Rice or quinoa for a hearty meal These sides help balance the flavors of the shrimp and add more nutrients. You can adjust the spice to fit your taste! The recipe calls for red pepper flakes. Start with one teaspoon, then taste. If you want more heat, add more flakes. You can also try adding hot sauce or diced jalapeños. Just remember, it’s all about what you enjoy! Lemon Garlic Butter Shrimp is a simple yet tasty dish. We covered all the essentials, from main ingredients to cooking methods, and even tips for storing leftovers. You can customize flavors and make it your own. Remember, fresh shrimp and lemon are key to great taste. Enjoy making this dish as much as eating it. Your friends and family will love it! Happy cooking!

Lemon Garlic Butter Shrimp Quick and Flavorful Dish

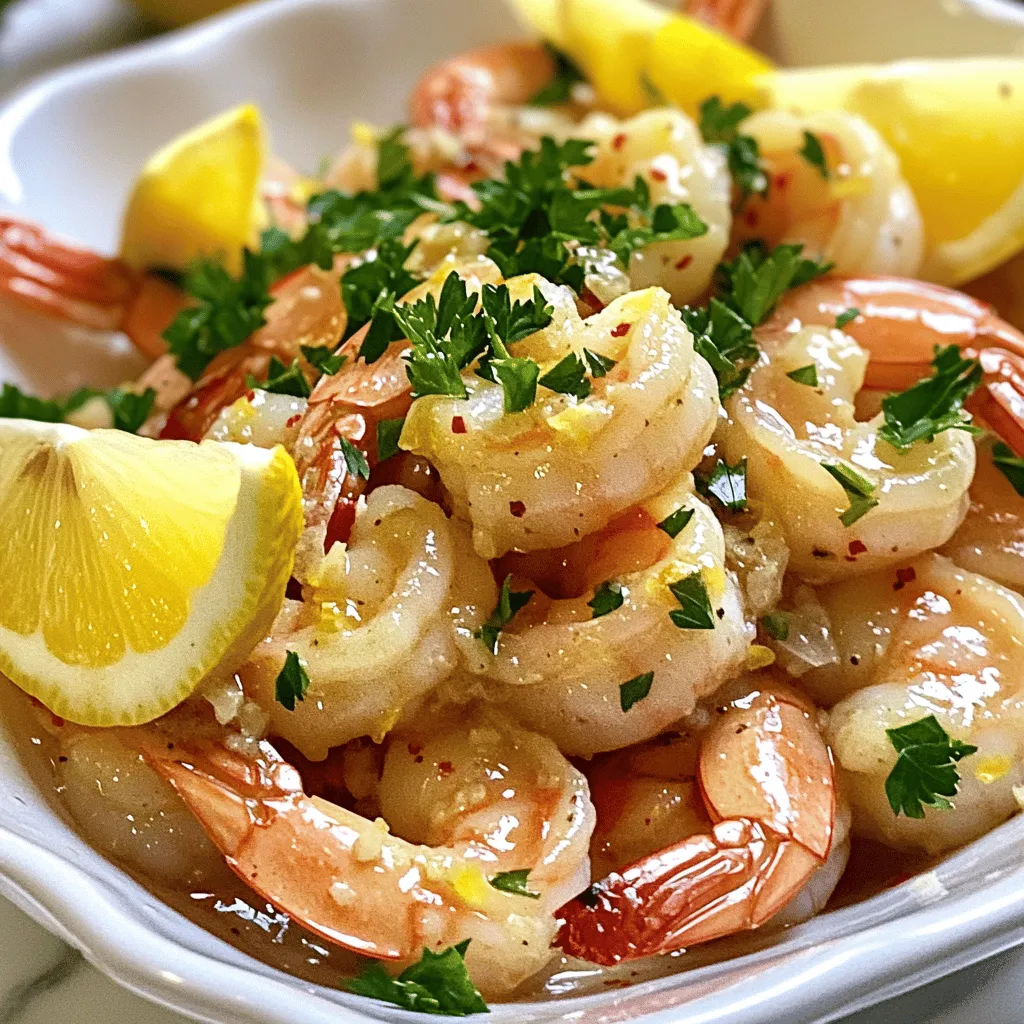
If you’re looking for a dish that’s quick, easy, and bursting with flavor, you’ve found it! Lemon Garlic Butter Shrimp

To make a delicious Vegan Sweet Potato Chili, gather these key ingredients: - 2 medium sweet potatoes, peeled and diced - 1 can (15 oz) black beans, rinsed and drained - 1 can (15 oz) kidney beans, rinsed and drained - 1 can (14 oz) diced tomatoes, with juices - 1 cup corn kernels, fresh or frozen - 1 medium onion, diced - 3 cloves garlic, minced - 2 tablespoons chili powder - 1 tablespoon ground cumin - 1 teaspoon smoked paprika - 1/2 teaspoon cayenne pepper (adjust based on spice preference) - 2 cups vegetable broth - 2 tablespoons olive oil - Salt and pepper to taste - Fresh cilantro, for garnish - Avocado slices, for topping (optional) Each ingredient plays a role in making this chili rich and tasty. Sweet potatoes add natural sweetness and creaminess. Beans provide protein and fiber, while tomatoes add acidity and depth. If you want to switch things up, consider these substitutions: - Use pinto beans or chickpeas instead of black or kidney beans. - Swap in bell peppers or zucchini for extra veggies. - Try quinoa or lentils for added texture. - Use coconut oil in place of olive oil for a different flavor. - Add vegetable stock cubes for more flavor. These swaps keep the chili vegan and can enhance its taste. Feel free to experiment based on what you have on hand! Sweet potatoes are a superfood packed with vitamins. They are high in fiber and rich in vitamin A, which is great for skin and eyes. They also contain antioxidants that fight inflammation. A vegan diet has many advantages. It can lower the risk of heart disease and helps maintain a healthy weight. Plus, it’s kinder to the planet. Eating more plants can lead to a happier, healthier life. For the full recipe, check out the Sweet & Spicy Vegan Sweet Potato Chili. First, let's prepare the sweet potatoes and vegetables. You need to peel and dice two medium sweet potatoes. Aim for small cubes to ensure they cook evenly. Next, take one medium onion and chop it finely. You will also need three cloves of garlic, which you should mince. Now, it's time to sauté the onions and garlic. Heat two tablespoons of olive oil in a large pot over medium heat. Add the diced onions and cook for about five minutes. You want them to turn translucent. Then, add the minced garlic and cook for one more minute. Be careful not to let it burn, as burnt garlic can taste bitter. Now, let’s incorporate the spices. Add the diced sweet potatoes to the pot and cook for about five minutes. Stir them occasionally so they don’t stick. After that, sprinkle in two tablespoons of chili powder, one tablespoon of ground cumin, one teaspoon of smoked paprika, and half a teaspoon of cayenne pepper. Mix well to coat the sweet potatoes with the spices. Next, pour in two cups of vegetable broth and bring this mixture to a simmer. Once it starts to bubble, add one can of rinsed black beans, one can of rinsed kidney beans, one can of diced tomatoes (with juices), and one cup of corn kernels. Stir everything together well and let it simmer for 25 to 30 minutes. This will allow the sweet potatoes to become tender and the flavors to meld. After simmering, it's time to season and adjust spice levels. Taste the chili and add salt and pepper to your liking. Let it simmer for an additional five minutes to let the flavors blend. For garnishing options, serve the chili in bowls topped with fresh cilantro and slices of avocado. This adds a nice pop of color and creaminess. If you want, serve it with crusty bread for a hearty meal. For the full recipe, check the details above! To ensure sweet potatoes cook evenly, cut them into similar-sized pieces. This helps them cook at the same rate. You can also parboil the sweet potatoes for five minutes before adding them to the chili. This quick step will speed up the cooking time. If your chili becomes too thick, simply add more vegetable broth. Stir it in slowly until you reach your desired consistency. You can also add a splash of water if you prefer. The best way to serve this chili is hot, right from the pot. Ladle it into bowls and garnish with fresh cilantro and avocado slices. This adds a nice color and creaminess. For a complete meal, pair the chili with crusty bread or warm tortillas. Serve it with a side salad for added crunch and freshness. To amp up the flavor, try adding more spices like oregano or thyme. You can also sprinkle some nutritional yeast for a cheesy taste. If you want to customize the chili's heat level, adjust the cayenne pepper. Start with less if you are unsure. You can add more later if you like it spicy. {{image_2}} You can easily change up the beans or legumes in this chili. Try using pinto beans or lentils instead of black or kidney beans. These swaps add different flavors and textures. You can also play with veggies! Add bell peppers, zucchini, or even spinach. Each addition boosts nutrition and taste. Think about how you want your chili to taste. If you're feeling Mexican, add some chopped jalapeños and cilantro. For an Italian twist, mix in some basil and oregano. If Mediterranean sounds good, try adding olives and a splash of lemon juice. Adjust the spices accordingly. Each cuisine has its unique tastes, so don’t hesitate to experiment! You can cook this chili in different ways. If you own an Instant Pot, it makes cooking quick and easy. Just set it and forget it! A slow cooker is great for letting the flavors meld over time. If you prefer, you can also make it on the stovetop. Just keep an eye on it! Oven baking is another option, and it creates a nice crust on top. Each method gives a slightly different taste and texture. For the full recipe, visit [Full Recipe]. To store your leftover chili, let it cool first. Then, place it in an airtight container. This helps keep it fresh and tasty. You can store it in the fridge for up to five days. Make sure to check for any signs of spoilage before eating. If you want to keep your chili for longer, freezing is a great option. First, let the chili cool completely. Then, divide it into portions and place them in freezer-safe bags or containers. Remove as much air as possible to prevent freezer burn. When you’re ready to eat, thaw the chili overnight in the fridge. Reheat it on the stove or in the microwave until it's hot all the way through. You can get creative with leftover chili. Try using it as a filling for tacos or burritos. It also works well as a topping for baked potatoes. If you want to mix things up, add more spices or veggies to keep it fresh. You can even blend it into a soup for a different texture. Enjoy your chili in new ways! To make Vegan Sweet Potato Chili from scratch, gather these key ingredients: - 2 medium sweet potatoes, peeled and diced - 1 can (15 oz) black beans, rinsed and drained - 1 can (15 oz) kidney beans, rinsed and drained - 1 can (14 oz) diced tomatoes, with juices - 1 cup corn kernels, fresh or frozen - 1 medium onion, diced - 3 cloves garlic, minced - 2 tablespoons chili powder - 1 tablespoon ground cumin - 1 teaspoon smoked paprika - 1/2 teaspoon cayenne pepper (adjust based on spice preference) - 2 cups vegetable broth - 2 tablespoons olive oil - Salt and pepper to taste Start by heating olive oil in a large pot. Add onions and sauté until soft. Then, stir in garlic. Next, add sweet potatoes and cook for five minutes. Sprinkle in the spices and mix well. Pour in vegetable broth and let it simmer. Finally, add beans, tomatoes, and corn. Simmer until the sweet potatoes are tender. For the full recipe, check out the complete guide. Yes, you can use many other vegetables in this chili. Some great options include: - Bell peppers - Zucchini - Carrots - Spinach Adding these veggies boosts the nutrition of the chili. They also bring different textures and flavors. Feel free to mix and match based on what you have. Yes, this Vegan Sweet Potato Chili can be gluten-free. All the ingredients listed are gluten-free. Just ensure that the vegetable broth you use is also gluten-free. You can serve this chili with many delicious sides. Here are some tasty options: - Crusty bread or rolls - Rice or quinoa - Side salad with fresh greens - Avocado slices or guacamole These sides add flavor and texture to your meal. They also make your experience more enjoyable. In this blog post, we explored how to make a delicious vegan sweet potato chili. We covered key ingredients, useful substitutions, and the health benefits of sweet potatoes. I provided step-by-step cooking instructions and shared tips for serving and storing your chili. The variations included different flavor profiles and cooking methods. Ultimately, this chili is easy to adapt to your taste. It’s a comforting dish that packs nutrition and flavor. Try it out, and enjoy the warm goodness on your next meal!

Vegan Sweet Potato Chili Packed with Flavorful Nutrition

Are you ready to dive into a warm bowl of Vegan Sweet Potato Chili? This dish is not just tasty;

To make creamy spinach artichoke dip, gather these key ingredients: - 2 cups fresh spinach, chopped - 1 cup canned artichoke hearts, drained and roughly chopped - 1 cup cream cheese, softened - 1 cup Greek yogurt - 1/2 cup sour cream - 1 cup shredded mozzarella cheese - 1/4 cup grated Parmesan cheese - 2 cloves garlic, minced - 1 teaspoon onion powder - 1 teaspoon garlic powder - Salt and pepper to taste - Optional: Fresh herbs (like basil or parsley) for garnish These ingredients blend to create a rich and creamy dip that everyone loves. Using the right amounts matters. Here’s a quick chart for your reference: | Ingredient | Quantity | |--------------------------|-----------------| | Fresh spinach | 2 cups | | Canned artichoke hearts | 1 cup | | Cream cheese | 1 cup | | Greek yogurt | 1 cup | | Sour cream | 1/2 cup | | Shredded mozzarella | 1 cup | | Grated Parmesan | 1/4 cup | | Minced garlic | 2 cloves | | Onion powder | 1 teaspoon | | Garlic powder | 1 teaspoon | | Salt and pepper | To taste | This chart ensures you get the perfect balance of flavors. Fresh ingredients can boost the taste. For spinach, fresh leaves bring a nice crunch and color. They also pack more vitamins. However, canned artichoke hearts save time. They are tender and ready to use. When using canned products, check for quality. Look for artichokes packed in water, not oil. This choice keeps the dip lighter. In summary, use fresh spinach for health and flavor. Choose canned artichokes for convenience. This mix creates the best creamy spinach artichoke dip. For the full recipe, check out the steps above. Start by preheating your oven to 375°F (190°C). This step ensures your dip cooks evenly. In a big bowl, mix together the softened cream cheese, Greek yogurt, and sour cream. Use a spatula or whisk to blend until smooth. Next, add the chopped spinach and artichoke hearts. You want these to be well distributed for great flavor. Then, sprinkle in the shredded mozzarella and grated Parmesan. Don’t forget the minced garlic, onion powder, garlic powder, salt, and pepper. Mix everything until it's all combined. This will be the heart of your creamy spinach artichoke dip. Once your mixture is ready, transfer it to a medium-sized baking dish. Spread the mixture out evenly. This helps it bake properly. Place it in the preheated oven and let it bake for about 25-30 minutes. Look for a bubbly, golden-brown top. This shows it is ready. When the time is up, remove it from the oven. Let it cool for a few minutes before serving. This cooling time helps the dip set slightly. Serving your creamy spinach artichoke dip is easy and fun. I like to serve it warm, as this brings out the flavors best. Arrange a variety of dippers around the dish. You can use toasted baguette slices, tortilla chips, or fresh veggie sticks. Each dipper adds a nice crunch and taste. If you want to impress, sprinkle some fresh herbs on top as a garnish. This adds color and freshness. For the full recipe, check the earlier section. Enjoy this dip with friends and family! When you mix the ingredients, start with the cream cheese. Soften it well for easy blending. Add the Greek yogurt and sour cream next. This combo gives a creamy base. Mix until smooth before adding other items. Then, fold in the spinach and artichokes gently. You want to keep some texture. Lastly, stir in the cheeses and spices. This method ensures every bite is full of flavor. Yes, you can make this dip ahead of time! Prepare it the day before, and store it in the fridge. Cover it well to keep it fresh. When you’re ready, just bake it. This saves time on busy days. Plus, the flavors meld together overnight. It makes the dip even tastier! To boost flavor, try adding a bit of lemon juice. It brightens the dip nicely. You can also add crushed red pepper for heat. For a smoky touch, use smoked paprika. Fresh herbs like basil or parsley add freshness. Don't forget about texture! Top the dip with extra cheese before baking. This gives a great crust on top. Enjoy the crunchy and creamy mix in every bite! {{image_2}} To make a lighter dip, swap cream cheese with cottage cheese. Use low-fat Greek yogurt instead of regular yogurt. You can also reduce the amount of cheese. This keeps the flavors but cuts some calories. Fresh spinach is great, but you can use frozen spinach too. Just thaw it and drain the extra water. Want a kick? Add some diced jalapeños or crushed red pepper flakes. For a cheesy twist, mix in some cheddar or pepper jack cheese. You can even add a splash of hot sauce to boost the flavor. If you love herbs, try adding some fresh dill or chives. Each tweak can bring a new taste to your creamy spinach artichoke dip. When it comes to serving, you have fun choices. Serve with toasted baguette slices or crispy tortilla chips. Fresh veggies like carrots and celery sticks are great too. You can even use pita chips for a crunchy bite. Arrange these around your dip for a beautiful spread. This not only looks good but also makes it easy for guests to enjoy. For the full recipe, check out the Spinach Artichoke Dream Dip. After enjoying your creamy spinach artichoke dip, let it cool. Transfer leftovers to an airtight container. This keeps the dip fresh and tasty. You can store it in the fridge for about three to four days. Make sure to seal the container well to prevent drying out. When you're ready to enjoy your dip again, preheat your oven to 350°F (175°C). Place the dip in an oven-safe dish. Cover it with foil to keep moisture in. Heat for about 15-20 minutes. Stir halfway through to ensure even warming. You can also use a microwave. Heat in short bursts, stirring in between. This keeps it creamy and delicious. If you want to keep your dip longer, consider freezing it. Place the dip in a freezer-safe container. It can last up to three months in the freezer. When ready to eat, thaw it in the fridge overnight. Reheat as mentioned above. Note that freezing may change the texture a bit, but the flavor stays great. For best results, enjoy the dip fresh using the Full Recipe. To make creamy spinach artichoke dip from scratch, you need a few key steps. Start by mixing cream cheese, Greek yogurt, and sour cream in a bowl. Stir until smooth. Then, add chopped spinach, artichoke hearts, mozzarella cheese, Parmesan cheese, garlic, onion powder, garlic powder, salt, and pepper. Mix well. Transfer this mixture to a baking dish and bake at 375°F for about 25-30 minutes. The dip should bubble and turn golden brown on top. This simple method gives you a warm, creamy dip that is simply delicious. For full details, refer to the Full Recipe. Yes, you can use frozen spinach instead of fresh. Just make sure to thaw and drain it well. Frozen spinach is often easier to work with, and it saves time. When using frozen spinach, try to squeeze out as much water as possible. This will help keep your dip creamy and thick. Fresh spinach brings a bright flavor, but frozen spinach can still give you great results. The best dippers for creamy spinach artichoke dip are varied and fun. Here are some great options: - Toasted baguette slices - Tortilla chips - Fresh vegetable sticks (like carrots, celery, or bell peppers) - Pita chips - Crackers These dippers enhance the overall experience. They add crunch and freshness to the creamy dip. Enjoy exploring different dippers to find your favorite! In this article, we covered how to make a creamy spinach artichoke dip. We explored essential ingredients and measurements for success. The step-by-step instructions ensure you achieve the perfect texture. I shared tips for prepping ahead and ways to enhance flavor. Variations allow for healthier options and fun flavors. Lastly, we talked about storage and reheating for leftovers. Enjoy sharing your dip at gatherings or snack time. You'll impress your guests with ease.

Creamy Spinach Artichoke Dip Irresistible and Easy

Craving a delicious dip that’s easy to make? Look no further than this Creamy Spinach Artichoke Dip! I’ll guide you

To make the best pumpkin pie dump cake, you need a few key items: - 1 can (15 oz) pumpkin puree - 1 can (14 oz) sweetened condensed milk - 2 large eggs - 1 teaspoon vanilla extract - 1 tablespoon pumpkin pie spice - 1 teaspoon cinnamon - 1 box yellow cake mix - 1 cup unsalted butter, melted These ingredients create the sweet and creamy base that makes this dessert shine. The pumpkin puree gives it that classic pumpkin flavor, while the sweetened condensed milk adds a rich creaminess. Eggs help bind everything together. You can also add some extras for more taste: - 1 cup chopped pecans (optional) Adding pecans gives a lovely crunch. They also add a nutty flavor that pairs well with pumpkin. If you want to make it even more special, consider a scoop of whipped cream or vanilla ice cream to serve on top. To make this dessert easy, gather these tools: - 9x13 inch baking dish - Mixing bowls - Spatula - Measuring cups and spoons - Whisk or electric mixer These tools make the process smooth. You’ll mix the ingredients, layer them, and bake everything in the baking dish. Following this setup helps create a lovely, golden brown cake that will impress everyone. For the full recipe, check out the details provided earlier. First, grab a big bowl. Add one can of pumpkin puree, one can of sweetened condensed milk, and two large eggs. Then, pour in one teaspoon of vanilla extract. Next, add one tablespoon of pumpkin pie spice and one teaspoon of cinnamon. Mix everything until it’s smooth and creamy. This mixture gives your dump cake its rich flavor. Now, take your greased baking dish and spread the pumpkin mixture evenly in it. Next, open the box of yellow cake mix. Sprinkle the dry cake mix evenly over the pumpkin layer. Make sure to cover it all. Then, drizzle the melted butter over the cake mix. Use a spatula to help moisten all the mix. If you like nuts, you can sprinkle one cup of chopped pecans on top. Set your oven to 350°F (175°C) to preheat. Once it’s hot, place your dish inside. Bake for 40 to 45 minutes. The top should turn golden brown. To check if it's done, insert a toothpick. If it comes out clean, your cake is ready. When the cake is done, pull it out and let it cool for a bit. It’s best served warm. Add a dollop of whipped cream or a scoop of vanilla ice cream on the side. For a pretty touch, sprinkle a little more cinnamon or pumpkin pie spice on top. This makes your dessert even more inviting. Enjoy your Pumpkin Pie Dump Cake! For the full recipe, check out the details above. To get the perfect texture in your Pumpkin Pie Dump Cake, focus on the layering. Start with the pumpkin mixture. It should be smooth and creamy. Make sure you mix it well. This ensures even spreading. When you add the cake mix, do it gently. You want to keep some air in the layers. Drizzling melted butter evenly helps achieve that nice, golden top. Bake until the top is brown and a toothpick comes out clean. This means your cake is fluffy and moist. You can make this cake a day ahead. Just follow the recipe, then cool it completely. Cover it well and store it in the fridge. When you are ready to serve, warm it slightly in the oven. Do not bake it again; it can dry out. If you want to store it longer, freeze it instead. Just remember to wrap it tightly in plastic wrap. For best taste, eat it within three months. This cake shines at any gathering! Serve it warm for a cozy feel. Add a scoop of vanilla ice cream or a dollop of whipped cream on top. You can also sprinkle extra cinnamon or pumpkin pie spice for flair. For a fun twist, pair it with coffee or chai tea. Your guests will love this tasty treat. Plus, it looks beautiful on the table! For the full recipe, check back to enjoy all the flavors. {{image_2}} You can make a gluten-free version of this dump cake. Start by swapping the yellow cake mix with a gluten-free cake mix. Many brands offer great gluten-free options. Just check the label to ensure it fits your needs. The rest of the recipe stays the same. You will still enjoy that rich pumpkin flavor, but without gluten. If you want a vegan version, you can easily switch some ingredients. Use coconut milk instead of sweetened condensed milk. This gives a nice creamy texture. For the eggs, replace them with flax eggs. Just mix one tablespoon of flaxseed meal with three tablespoons of water for each egg. Let it sit for a few minutes to thicken. With these swaps, your pumpkin pie dump cake will be plant-based and still delicious! Want to spice things up? Try adding chocolate or caramel! You can mix in chocolate chips right into the pumpkin mixture. Dark chocolate or semi-sweet works well for this. For caramel, drizzle some over the top before baking. You can also swirl it into the pumpkin mixture for added sweetness. These flavors bring a new twist to the classic cake. Each bite will be a tasty surprise! Check out the Full Recipe to get started on making this delightful dessert today! To keep your Pumpkin Pie Dump Cake fresh, store it in an airtight container. If you don't have one, cover the dish tightly with plastic wrap or aluminum foil. This helps to keep moisture in and prevents the cake from drying out. Make sure to let it cool to room temperature before storing. When stored properly, your dump cake lasts about 3 to 5 days in the fridge. If you want to keep it longer, consider freezing it. It can stay good for up to 2 months in the freezer. Just remember to wrap it well to avoid freezer burn. When you're ready to enjoy your Pumpkin Pie Dump Cake again, preheat your oven to 350°F (175°C). Place the cake in an oven-safe dish. Warm it for about 15 to 20 minutes. If you're in a hurry, you can microwave slices for about 30 seconds. Just be careful not to overheat, as it can make the cake tough. For the best taste, serve it warm with whipped cream or vanilla ice cream on the side. A dump cake is a simple dessert. You combine ingredients in one dish, then bake. It is quick and easy. The name comes from how you "dump" everything in. For Pumpkin Pie Dump Cake, you mix pumpkin puree, sweetened condensed milk, and spices. Then, you top it with cake mix and butter. It creates a moist cake with a crisp top. Yes, you can make Pumpkin Pie Dump Cake ahead of time. Prepare the cake and bake it as usual. Once it cools, cover it and store it in the fridge. It stays fresh for about three days. You can also freeze it for longer storage. Just make sure to thaw it in the fridge before serving. You can change some ingredients in this recipe. For example, if you want a lighter option, use low-fat condensed milk. You can also swap the yellow cake mix for a spice cake mix for more flavor. If you have nut allergies, leave out the pecans. Just be sure to keep the main ingredients, like pumpkin and eggs, for the best result. This blog post showed you how to make a tasty Pumpkin Pie Dump Cake. We covered the key ingredients, tools, and step-by-step instructions. I shared tips for the best texture and how to prepare ahead. You learned about flavor variations and how to store it well. Enjoy this easy dessert for any festive occasion. With these tips, you can impress everyone with your baking skills!

Pumpkin Pie Dump Cake Simple and Delicious Dessert

If you’re craving a fall dessert that’s simple and tasty, you’ve found it! Pumpkin Pie Dump Cake combines all the

To make Cowboy Butter Chicken Pasta, gather these items: - 8 ounces fettuccine pasta - 2 tablespoons olive oil - 2 boneless, skinless chicken breasts, diced - 1 teaspoon smoked paprika - 1 teaspoon garlic powder - 1 teaspoon onion powder - ½ teaspoon cayenne pepper (adjust for spice preference) - Salt and pepper to taste - 3 cloves garlic, minced - 1 cup cherry tomatoes, halved - 1 cup corn (fresh or frozen) - ½ cup unsalted butter, softened - 2 tablespoons Dijon mustard - 2 tablespoons Worcestershire sauce (or coconut aminos for a gluten-free option) - Juice of 1 lemon - Fresh parsley, chopped (for garnish) You can play with flavors and textures by adding: - Spinach or kale for more greens - Bell peppers for crunch and sweetness - A sprinkle of cheese, like Parmesan or feta - Extra herbs like thyme or basil for fresh notes If you have dietary needs, here are some swaps: - Use gluten-free pasta for a gluten-free meal - Swap chicken for tofu or chickpeas for a vegetarian dish - Replace butter with olive oil or vegan butter for dairy-free options - Use low-sodium broth instead of Worcestershire sauce for lower sodium meals This recipe is flexible and allows you to make it your own! If you want the full details of how to cook this dish, check out the Full Recipe. Start by filling a large pot with water. Add a good amount of salt. Bring the water to a boil. Once boiling, add 8 ounces of fettuccine pasta. Cook it according to the package instructions until it is al dente. This usually takes about 8-10 minutes. When done, drain the pasta and set it aside. Make sure to save about ½ cup of the pasta water for later. In a large skillet, heat 2 tablespoons of olive oil over medium-high heat. While the oil heats, dice 2 boneless, skinless chicken breasts. Season the diced chicken with 1 teaspoon of smoked paprika, 1 teaspoon of garlic powder, 1 teaspoon of onion powder, and ½ teaspoon of cayenne pepper. Add salt and pepper to taste. Once the oil is hot, add the chicken to the skillet. Sauté the chicken for 7-9 minutes. Cook it until it is golden brown and no longer pink inside. While the chicken cooks, grab a separate bowl. Mix together ½ cup of softened butter, 2 tablespoons of Dijon mustard, 2 tablespoons of Worcestershire sauce, and the juice of 1 lemon. Stir until the mixture is creamy and well combined. After the chicken is done, add 3 cloves of minced garlic to the skillet. Cook for about 1 minute until it smells great. Then, add 1 cup of halved cherry tomatoes and 1 cup of corn. Sauté for another 3-4 minutes until the tomatoes soften and the corn heats through. Now, return to the bowl with the cowboy butter sauce. Pour it over the chicken and veggies, tossing everything together. If the pasta seems dry, use a little of that reserved pasta water to loosen the sauce. Make sure every strand of pasta is coated in that delicious sauce! To cook chicken well, start with even pieces. Dice the chicken into uniform cubes. This helps them cook evenly. Season the chicken with smoked paprika, garlic powder, onion powder, salt, and pepper. This mix adds great taste. Sauté over medium-high heat until the chicken is golden and cooked through. Use a meat thermometer if you like. Chicken should reach 165°F to be safe. When cooking pasta, use a large pot. Fill it with water and add a good pinch of salt. Bring the water to a rapid boil. Add the fettuccine and stir it gently. Cook according to the package instructions for al dente texture. This keeps it from getting mushy. Remember to save some pasta water before draining. It helps loosen the sauce later. You can change the flavors to fit your taste. Want more spice? Add more cayenne pepper or even some red pepper flakes. For a tangy twist, mix in extra lemon juice. You can also try different herbs, like basil or thyme. If you like more veggies, toss in bell peppers or spinach. This dish is all about your personal touch. Check out the Full Recipe for even more ideas! {{image_2}} You can easily add vegetables to this dish. Vegetables add color and nutrients. I love using spinach or bell peppers. They cook quickly and fit well with the pasta. Just toss them in with the cherry tomatoes. You can also add broccoli for a crunch. The more veggies, the better the meal! Want some heat? You can adjust the spice level. If you love spice, add more cayenne pepper. Start with a little, then taste. You can always add more! If you prefer mild, skip the cayenne. Instead, use sweet paprika. This keeps the dish tasty without too much heat. You can swap chicken for other proteins. For a lighter meal, use shrimp. It cooks fast and tastes great with the sauce. If you want a vegetarian option, try chickpeas or tofu. Both soak up flavors well. Just cook them until golden for the best taste. Each option gives you a new twist on cowboy butter chicken pasta. Find the full recipe to start cooking! To keep your cowboy butter chicken pasta fresh, let it cool first. Place it in an airtight container. This will help prevent moisture loss. Store it in the fridge for up to three days. Make sure to label the container with the date. This way, you know when it was made. When you're ready to enjoy leftovers, reheat them gently. Use a skillet over low heat. Add a splash of water or broth to prevent drying out. Stir often until it’s warmed through. You can also use a microwave. Heat in short bursts, stirring in between. This ensures even heating. If you want to save some for later, freezing works well. Place cooled pasta in a freezer-safe bag or container. Remove as much air as possible to prevent freezer burn. It can last up to three months in the freezer. When you’re ready to eat, thaw it overnight in the fridge. Reheat as described above. Enjoy your cowboy butter chicken pasta again without the fuss! Cowboy Butter Chicken Pasta has roots in Southern cooking. It combines rich flavors with a fun twist. The idea came from the need for comfort food that is quick to prepare. The buttery sauce adds a creamy texture that many love. Over time, this dish gained popularity for its bold taste and ease of cooking. Yes, you can make this recipe gluten-free. Simply swap regular fettuccine with gluten-free pasta. Also, use coconut aminos instead of Worcestershire sauce. This keeps the dish flavorful without gluten. Make sure to check all labels for gluten content. To know if the chicken is done, check its color and temperature. Cooked chicken should be golden brown and no longer pink inside. Use a meat thermometer for accuracy. The safe internal temperature for chicken is 165°F. Cut into a piece to check if it’s white throughout. Serve Cowboy Butter Chicken Pasta in wide bowls. This gives a rustic look that feels homey. Garnish with fresh parsley for a pop of color. A lemon wedge on the side adds a nice touch. This dish looks great and tastes even better, making it perfect for sharing. You can find the full recipe in the earlier section. This blog covered making Cowboy Butter Chicken Pasta. You learned about the key ingredients and some optional ones too. I shared tips for perfect pasta and chicken and how to prepare the rich sauce. You can customize flavors and try variations with vegetables or different proteins. Don't forget the best storage tips to keep leftovers fresh. Enjoy your cooking journey! This dish is fun, tasty, and easy to make.

Cowboy Butter Chicken Pasta Flavorful and Easy Recipe

Ready for a flavor-packed meal that’s both easy and delicious? Cowboy Butter Chicken Pasta combines juicy chicken, a rich butter

To start with my Sesame Ginger Chicken Noodle Soup, gather these main ingredients: - 1 lb boneless, skinless chicken thighs, diced - 6 cups chicken broth - 2 tablespoons sesame oil - 1 tablespoon fresh ginger, minced - 3 cloves garlic, minced - 2 carrots, sliced thin - 1 red bell pepper, sliced - 2 cups bok choy, chopped - 4 green onions, chopped - 8 oz thin rice noodles (or egg noodles) These ingredients build the rich flavors in the soup. The chicken thighs give it a hearty bite. The broth is the base, while ginger and garlic add warmth and spice. Carrots and bell pepper provide sweetness and color. Bok choy adds a nice crunch. For seasoning, I use: - 2 tablespoons soy sauce (or tamari for gluten-free) - 1 tablespoon rice vinegar - Salt and pepper to taste Soy sauce brings umami, while rice vinegar adds a touch of tang. Adjust salt and pepper to fit your taste. This balance makes the soup savory and satisfying. To finish the soup, I recommend these garnishes: - Sesame seeds - Chopped green onions These toppings not only add flavor but also enhance the soup's appearance. The sesame seeds give a nice crunch, and green onions add freshness. Serve your soup with these garnishes for a beautiful bowl! {{ingredient_image_1}} Start by heating 2 tablespoons of sesame oil in a large pot over medium heat. Once the oil is hot, add 1 pound of diced boneless, skinless chicken thighs. Cook the chicken for about 5 to 7 minutes, stirring often. You want it to brown nicely. This adds rich flavor to your soup. Next, stir in 1 tablespoon of minced fresh ginger and 3 cloves of minced garlic. Cook these for just 1 minute. The smell will be amazing! This step brings out their flavors and makes your soup even tastier. Pour in 6 cups of chicken broth after the ginger and garlic cook. Bring the broth to a simmer. Add 2 sliced carrots and 1 sliced red bell pepper to the pot. Let these cook for about 5 minutes. They should start to soften but remain crisp. Then, add 2 cups of chopped bok choy, 2 tablespoons of soy sauce, and 1 tablespoon of rice vinegar. Let the soup simmer for another 2 to 3 minutes. This step layers the flavors beautifully. While the soup simmers, cook 8 ounces of thin rice noodles according to the package instructions. Drain them well and set aside. You can also use egg noodles if you prefer. This step gives you that comforting noodle base for your soup. To serve, divide the cooked noodles among bowls. Ladle the hot chicken vegetable soup over the noodles. Garnish with chopped green onions and a sprinkle of sesame seeds. This not only looks great but adds a nice crunch. Enjoy the warmth and flavor of your sesame ginger chicken noodle soup! To boost the taste of your soup, use fresh ginger and garlic. Their strong aroma adds depth. Toast the sesame oil before adding the chicken. This step brings out the nutty flavor. You can also try adding a splash of lime juice for a bright kick. If you like heat, toss in some red pepper flakes. One common mistake is overcooking the chicken. Cook it just until browned, about 5-7 minutes. If you cook it too long, it can become dry. Another mistake is not tasting the soup while cooking. Always check the seasoning. Adjust salt and pepper as needed for the best flavor. Lastly, don't skip the garnishes. Green onions and sesame seeds add color and crunch. This soup is great for meal prep. Store it in airtight containers in the fridge. It lasts for 3 to 4 days. To freeze, let it cool completely before placing it in freezer bags. Make sure to leave space for expansion. When ready to eat, thaw overnight in the fridge. Reheat on the stove until hot. If the noodles get soggy, cook fresh noodles when serving. Pro Tips Use Fresh Ingredients: Fresh ginger and garlic will elevate the flavor of your soup, making it fragrant and vibrant. Adjust to Your Preference: Feel free to add more vegetables like mushrooms or snap peas for added texture and nutrition. Perfect Noodle Texture: Rinse cooked noodles with cold water to prevent them from sticking together before adding them to the soup. Garnish for Flavor: A sprinkle of fresh herbs like cilantro or Thai basil can add an extra layer of flavor and freshness to your dish. {{image_2}} You can make this soup vegetarian or vegan easily. Replace chicken with firm tofu or tempeh. Use vegetable broth instead of chicken broth. The rest of the ingredients stay the same. You still get rich flavors from ginger and sesame oil. This version is hearty and satisfying. For a gluten-free soup, swap regular soy sauce for tamari. Make sure to check your noodles, too. Rice noodles are naturally gluten-free, so they work well. If you love egg noodles, choose a gluten-free brand. These small changes keep the soup tasty for those avoiding gluten. You can try different noodles in this soup. Soba noodles or udon noodles add a nice twist. Zucchini noodles are a fun, low-carb option. Each type of noodle brings its unique flavor and texture. Feel free to experiment and find your favorite combination! After enjoying your soup, let it cool down. Place any leftovers in an airtight container. Store it in the fridge. It will stay fresh for about 3-4 days. Make sure to keep the noodles separate if possible. This helps them stay firm. If you want to keep the soup longer, freezing is a great option. Pour the cooled soup into freezer-safe bags or containers. Leave some space at the top. Liquid expands when it freezes. This soup can last up to 3 months in the freezer. To reheat, you can use a pot on the stove or the microwave. If using a pot, heat over medium until warm. Stir it often to avoid burning. If using the microwave, heat in short bursts. Stir between each burst to ensure even heating. If the noodles were frozen with the soup, they may need a little extra time to heat through. Add a splash of broth if it seems too thick. Enjoy your warm and tasty soup! Yes, you can use chicken breasts. They are leaner than thighs. This may change the soup's texture. Thighs add richness and flavor, but breasts work fine too. Just ensure they are cooked through. The soup can last up to four days in the fridge. Make sure to store it in an airtight container. This helps keep it fresh and safe to eat. You can use spinach or kale instead of bok choy. Both add nice flavor and nutrients. You may need to adjust cooking time for softer greens. Yes, this recipe is great for meal prep. You can make it ahead and store it. Just keep noodles separate until serving to avoid sogginess. Ginger is good for digestion and can help reduce inflammation. Garlic boosts the immune system and adds flavor. Both are great additions to any healthy diet. This blog covered all you need for Sesame Ginger Chicken Noodle Soup. We looked at main ingredients, spices, and garnishes. I shared step-by-step instructions for preparing the soup. You now know tips to enhance flavor and avoid common mistakes. I also included storage info and answers to FAQs. With these details, you can make a delicious soup that suits your taste and needs. Enjoy this meal, and don’t hesitate to try the variations! Happy cooking!

Savory Sesame Ginger Chicken Noodle Soup Recipe

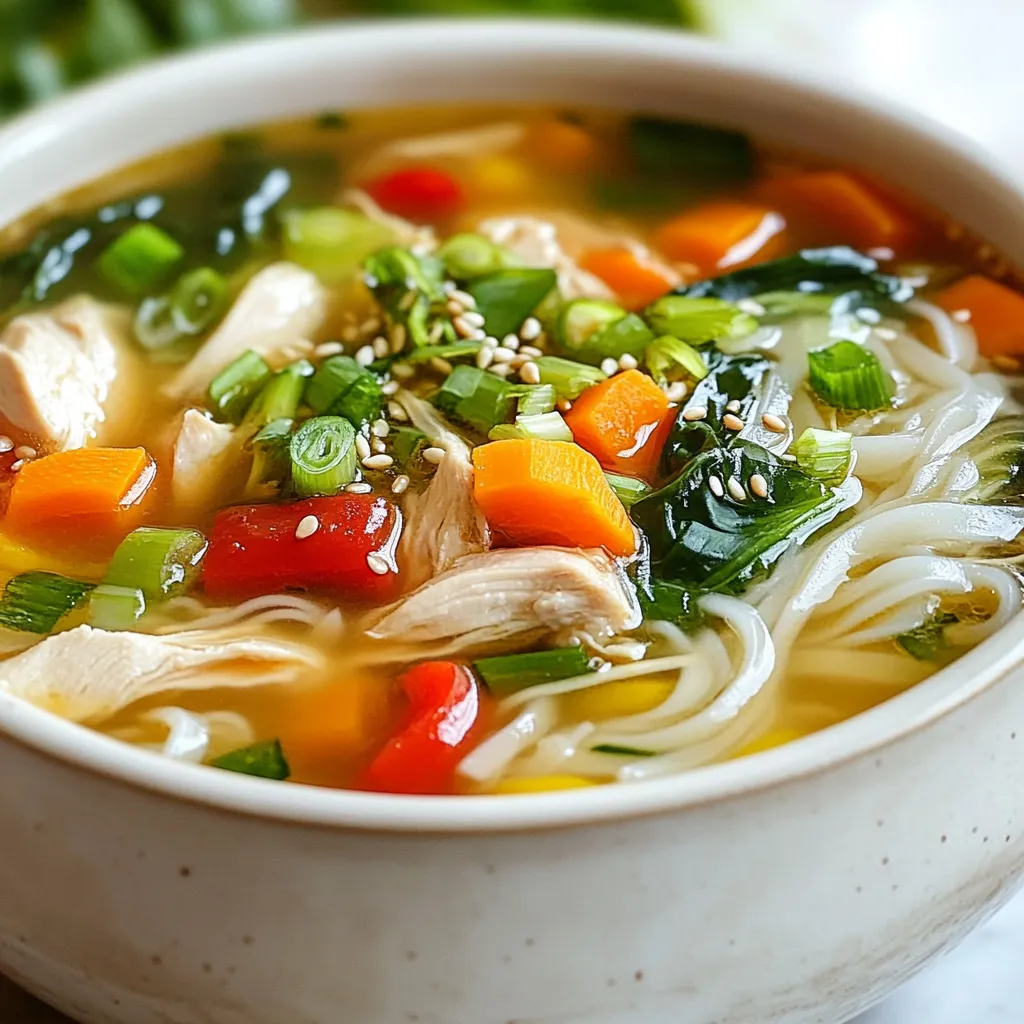
Craving a warm, comforting bowl of soup? You’ll love my savory Sesame Ginger Chicken Noodle Soup recipe. This dish blends

- 2 cups cooked chicken, shredded - 1 tablespoon olive oil - 1 medium onion, diced - 4 cloves garlic, minced - 2 medium carrots, diced - 2 celery stalks, diced - 4 cups chicken broth - 1 cup heavy cream - 1 teaspoon dried thyme - 1 teaspoon dried parsley - 1 teaspoon rosemary - Salt and pepper to taste - 2 tablespoons fresh parsley, chopped (for garnish) To make this soup, you need a few key items: - A large pot - A sharp knife - A cutting board - A wooden spoon - Measuring cups and spoons These tools help you prepare and cook the soup efficiently. You can adjust the recipe based on what you have. Here are some ideas: - Use rotisserie chicken instead of cooking your own. - Swap heavy cream with half-and-half for a lighter version. - Replace chicken broth with vegetable broth for a vegetarian soup. - Try fresh herbs if you have them; they add great flavor! - For a thicker soup, mix in a little cornstarch with water. These changes can make the recipe fit your taste and pantry. {{ingredient_image_1}} Start by heating olive oil in a large pot over medium heat. Add diced onion and sauté for 3-4 minutes. You want the onion to look soft and clear. Next, stir in minced garlic. Cook for one minute but watch closely to prevent burning. After that, add diced carrots and celery to the pot. Cook these for 5-6 minutes until they are tender. Now, pour in the chicken broth and bring it to a simmer. Once it bubbles, add shredded chicken, heavy cream, thyme, parsley, rosemary, salt, and pepper. Mix it well. Reduce the heat to low and let the soup simmer gently for 15-20 minutes. This helps all the flavors blend nicely. After simmering, taste and adjust the seasoning with more salt and pepper if needed. Serve the soup hot, topped with fresh parsley. When sautéing vegetables, keep the heat at medium. If it’s too high, your veggies might burn. Stir often to help them cook evenly. Start with onions, as they take longer to soften. Add garlic later to keep its flavor fresh. For carrots and celery, cut them into small pieces. This helps them cook faster. If you want more flavor, add a pinch of salt while sautéing. It helps draw out their natural sweetness. To make the soup creamy, use heavy cream. Add it after the broth and chicken. This step ensures the cream blends well. Stir it in gently to avoid curdling. If you want an even creamier soup, blend part of it after simmering. Use an immersion blender for easy mixing. This adds a nice texture. Always taste and adjust the seasoning before serving. Enjoy your creamy garlic herb chicken soup! To bring out the best in your Creamy Garlic Herb Chicken Soup, focus on your cooking methods. Start by sautéing the onion in olive oil until it turns clear. This step adds a sweet flavor. Next, add the minced garlic. Cooking it just until fragrant enhances the soup’s depth. When you add the carrots and celery, let them soften a bit. This step builds a nice base for your soup. One common mistake is burning the garlic. Keep a close eye on it. If it burns, it can make your soup bitter. Another mistake is not seasoning. Taste your soup as it cooks and adjust the salt and pepper. Lastly, don’t rush the simmering process. Letting the soup simmer allows flavors to mix. Patience is key! If your soup is too thin, there are easy ways to thicken it. You can let it simmer longer to reduce the liquid. Another option is to add a slurry of cornstarch and water. Mix one tablespoon of cornstarch with two tablespoons of cold water, then stir it in. This trick works quickly. You can also add more heavy cream for a richer texture. Pro Tips Use Rotisserie Chicken: For a quicker prep, use store-bought rotisserie chicken instead of cooking your own. It saves time without sacrificing flavor. Adjust the Creaminess: If you prefer a lighter soup, you can substitute half of the heavy cream with milk or a plant-based alternative like almond milk. Fresh Herbs: For the best flavor, use fresh herbs instead of dried. Add them towards the end of cooking to maintain their vibrant taste. Thicken the Soup: If you like a thicker soup, mix a tablespoon of cornstarch with cold water and stir it in during the last few minutes of cooking. {{image_2}} You can boost the taste of this soup in many ways. Try adding mushrooms for an earthy flavor. Sweet corn adds a nice crunch. If you want heat, sprinkle in some red pepper flakes. You can also toss in some spinach or kale for a healthy twist. These add-ins make the soup more colorful and tasty. If you prefer a meatless dish, swap chicken for hearty beans or lentils. Use vegetable broth instead of chicken broth. You can add more vegetables, like zucchini or bell peppers, for a filling meal. A splash of lemon juice adds brightness. Cream can be replaced with coconut milk for a unique flavor. This soup is easy to make gluten-free. Ensure your chicken broth is labeled gluten-free. You can use arrowroot powder or cornstarch to thicken the soup instead of flour. These swaps keep the same creamy texture without the gluten. Enjoy a delicious bowl without worry! After you enjoy your creamy garlic herb chicken soup, let it cool. Pour any leftover soup into an airtight container. Seal it tightly. Storing it this way keeps the flavors fresh. You can keep it in the fridge for up to three days. If you want to keep it longer, freezing is a great option. Freezing your soup is easy. Use freezer-safe containers or heavy-duty bags. Make sure to leave some space at the top. Soup expands when it freezes. Label the containers with the date. You can safely freeze it for up to three months. When you're ready to eat, just thaw it in the fridge overnight. To reheat your soup, you can use a pot on the stove or a microwave. If using the stove, heat it on low. Stir often to avoid burning. For the microwave, heat in short bursts. Stir in between to ensure even heating. If the soup is too thick, add a splash of chicken broth or water. This will help it return to the right consistency. Creamy Garlic Herb Chicken Soup stays fresh for about 3 to 4 days in the fridge. To keep it safe, store it in an airtight container. This helps lock in flavor and keep it from spoiling. Always check for signs of spoilage before eating. If it smells off or looks strange, it's best to toss it. Yes, you can use rotisserie chicken! It saves you time and adds great flavor. Just shred the chicken and mix it into the soup. This shortcut makes the dish even easier. Plus, rotisserie chicken adds a nice, smoky taste that enhances the overall flavor. You can try many herbs for extra flavor. Fresh thyme, basil, or dill work great. You might also like tarragon or oregano. Feel free to mix and match to suit your taste. Just keep in mind that fresh herbs are usually stronger than dried ones. Adjust the amount based on what you use. In this blog post, we explored the rich flavors of Creamy Garlic Herb Chicken Soup. We covered ingredients, cooking steps, and tips for extra taste. You learned about variations for different diets and how to store leftovers properly. In conclusion, this soup offers warm comfort and endless options. With just a few tweaks, you can make it your own. Enjoy the process, and happy cooking!

Creamy Garlic Herb Chicken Soup Rich and Flavorful Dish

If you’re craving a rich and flavorful dish, look no further than creamy garlic herb chicken soup. This delicious recipe

- 1 pound boneless, skinless chicken breast, cut into 1-inch cubes - 2 fresh jalapeños, seeded and finely chopped - 3 tablespoons olive oil - Zest and juice of 2 limes - 2 cloves garlic, minced - 1 teaspoon ground cumin - 1 teaspoon smoked paprika - Salt and pepper to taste The main ingredients pack a punch. The chicken breast provides a lean protein base. Fresh jalapeños add heat and flavor. Olive oil keeps the chicken juicy. Lime zest and juice bring a bright, tangy taste. Garlic gives a savory depth. Cumin and smoked paprika add warmth and earthiness. Salt and pepper balance the flavors. - Additional spices (like chili powder or cayenne) - Fresh cilantro for garnish - Lime wedges for serving You can customize the skewers with extra spices. Chili powder or cayenne can boost the heat. Fresh cilantro makes a vibrant garnish. Lime wedges enhance the fresh flavor when served. - Wooden or metal skewers (if using wooden skewers, soak them in water for 30 minutes) - Grill or grill pan You will need skewers to hold the chicken. Choose wooden or metal based on your preference. If using wooden skewers, soaking them prevents burning on the grill. A grill or grill pan is essential for cooking. Both options give great flavor and grill marks. {{ingredient_image_1}} To start, grab a large mixing bowl. Combine the chopped jalapeños, olive oil, lime juice, lime zest, minced garlic, ground cumin, and smoked paprika. Add salt and pepper to taste. Mix well until everything blends. This marinade adds flavor and spice. For effective marination, make sure to coat the chicken well. You can let it sit for at least 30 minutes. But for better flavor, aim for 2 hours if you can. The longer it sits, the better the taste. After mixing your marinade, it’s time to add the chicken. Cut your boneless chicken breast into 1-inch cubes. Place these into the bowl with the marinade. Toss the chicken pieces until each one is covered. Cover the bowl and place it in the fridge. Before grilling, preheat your grill or grill pan over medium-high heat. If using wooden skewers, soak them in water for 30 minutes. This helps prevent burning. Now, thread the marinated chicken onto the skewers. Leave a little space between each piece for even cooking. Grill the skewers for about 10 to 12 minutes. Turn them occasionally until the chicken reaches an internal temperature of 165°F. Look for nice grill marks. Once cooked, take the skewers off the grill. Let them rest for a couple of minutes. This helps keep them juicy and tender. Garnish with fresh cilantro and lime wedges if you like. Enjoy your tasty jalapeño lime chicken skewers! To make these jalapeño lime chicken skewers pop, adjust the spices to your taste. If you like heat, add more jalapeños or even some chili powder. For a milder flavor, use less jalapeño. Balancing heat and zest is key. The lime juice cuts through the spicy flavor and keeps it fresh. Marinating the chicken is very important. It helps the meat soak up all the flavors. I suggest marinating for at least 30 minutes, but 2 hours makes it even better. After grilling, always check the doneness. The chicken should reach an internal temperature of 165°F. This ensures it is safe and juicy. Pair your skewers with light sides like a fresh salad or rice. Grilled veggies also make a great match. For dips, try a cool yogurt sauce or a tangy salsa. These will enhance the dish and make it even more enjoyable. Pro Tips Marinate Longer for More Flavor: For the best flavor, marinate the chicken for at least 2 hours, or even overnight if time permits. Use Fresh Ingredients: Fresh jalapeños and cilantro will enhance the flavor of your skewers compared to dried or processed alternatives. Check Grill Temperature: Ensure your grill is preheated properly to achieve those perfect grill marks and even cooking. Rest the Skewers: Let the skewers rest for a few minutes after grilling to allow the juices to redistribute, ensuring a juicy bite. {{image_2}} You can switch from chicken to other proteins. Try using shrimp, pork, or beef. Each will bring a new taste. For shrimp, use the same marinade. Cook them until they turn pink. If you choose pork or beef, cut them into small pieces. They will soak up all the flavors. For plant-based options, tofu and tempeh work great. Press the tofu to remove water. Cut it into cubes and marinate just like chicken. You can also use seitan or jackfruit for a meat-like texture. Both absorb flavors well. Adding fruits or vegetables can change the taste. Try bell peppers or zucchini on the skewers. They add a nice crunch and flavor. You can also mix in pineapple chunks for a sweet touch. The sweet and spicy combo is always a hit. Switching up spices can create new flavors, too. Instead of cumin and smoked paprika, try chili powder or coriander. You could also add fresh herbs like basil or mint. Just remember, keep it balanced to enjoy each bite. You can cook these skewers in multiple ways. If you prefer the oven, preheat it to 400°F. Place the skewers on a baking sheet. Bake for 15-20 minutes, turning halfway. This method is great for winter days. Broiling is another option. Set your oven to broil and place the skewers on a broiler pan. Cook for about 10 minutes, flipping once. Broiling gives a nice char without a grill. It’s quick and easy. After you enjoy your spicy jalapeño lime chicken skewers, store the leftovers. Place them in an airtight container. This keeps them fresh and flavorful. In the fridge, they last for about 3 to 4 days. If you want them longer, consider freezing. Yes, you can freeze the skewers! Make sure they cool completely before freezing. Wrap them tightly in plastic wrap, then place them in a freezer-safe bag. They can last for about 2 to 3 months in the freezer. To thaw, move them to the fridge overnight. This keeps them safe and tasty. When it’s time to eat the leftovers, reheating is key. The best way is to use the grill or an oven. Preheat the oven to 350°F. Place the skewers on a baking sheet and heat for about 10 to 15 minutes. This method keeps the chicken juicy and flavorful. Avoid using the microwave, as it can make the chicken dry. Enjoy your tasty skewers again! You should marinate the chicken for at least 30 minutes. This gives the chicken time to soak up the flavors. If you have more time, try marinating it for up to 2 hours. This longer time makes the chicken even more tasty. The acid from the lime juice helps to tenderize the meat. So, a good marination time makes each bite juicy and full of flavor. If you need a substitute for jalapeños, you have options. You can use serrano peppers for more heat. For a milder taste, try bell peppers or Anaheim peppers. Both give a nice crunch without the spice. If you want a sweet twist, consider using roasted red peppers. Each option will change the flavor a bit, but they all work well in this recipe. Yes, you can cook these skewers in the oven. Preheat your oven to 400°F. Place the skewers on a baking sheet lined with foil. Bake for about 15-20 minutes, turning halfway through. This method gives you tasty, tender chicken without a grill. Just make sure the chicken reaches an internal temperature of 165°F for safety. Enjoy the same great flavors, even without a grill! In this article, we explored making delicious chicken skewers with jalapeños. We covered key ingredients and the importance of a tasty marinade. I shared tips for grilling, ensuring tender meat, and serving suggestions. You can mix things up by trying different proteins and flavors. Remember, proper storage helps keep leftovers fresh. Now, you have everything you need to enjoy these tasty skewers. Cook, share, and enjoy your creation!

Jalapeño Lime Chicken Skewers Tasty and Easy Recipe

If you’re craving a dish that bursts with flavor, these Jalapeño Lime Chicken Skewers are just what you need! This

To make this tasty Sweet Potato and Black Bean Chili, gather these ingredients: - 2 medium sweet potatoes, peeled and diced - 1 can (15 oz) black beans, drained and rinsed - 1 can (14 oz) diced tomatoes with green chilies - 1 onion, finely chopped - 2 cloves garlic, minced - 1 red bell pepper, diced - 2 cups vegetable broth - 1 tablespoon chili powder - 1 teaspoon cumin - ½ teaspoon smoked paprika - ½ teaspoon cayenne pepper (adjust for spice) - Salt and pepper, to taste - 1 tablespoon olive oil - Fresh cilantro, chopped (for garnish) - Avocado slices (for serving) If you have dietary needs, you can swap some ingredients. Here are some options: - Use quinoa or lentils instead of black beans for a different protein source. - Replace vegetable broth with water or low-sodium broth for less sodium. - For a lower-carb option, skip the sweet potatoes or use zucchini. - Use green bell pepper instead of red for a milder flavor. - If you don’t have olive oil, use any cooking oil you prefer. This chili is not just delicious; it's also healthy! Here’s the nutritional info per serving (about 1.5 cups): - Calories: 320 - Protein: 13g - Fat: 6g - Carbohydrates: 58g - Fiber: 15g - Sugar: 5g - Sodium: 450mg This dish is rich in fiber and protein, making it a great meal choice. You can find the full recipe [Full Recipe]. To make this sweet potato and black bean chili, start by gathering your ingredients. In a large pot or Dutch oven, heat 1 tablespoon of olive oil over medium heat. Add 1 finely chopped onion and stir. Cook for about 5 minutes until the onion is soft and clear. Next, add 2 minced garlic cloves and 1 diced red bell pepper. Cook for 3-4 minutes until the bell pepper softens. Now, it’s time to add the star of the show: 2 medium sweet potatoes. Peel and dice them, then toss them into the pot. Stir well for about 5 minutes. This helps the sweet potatoes start to soften. Then, pour in 1 can of diced tomatoes with their juice, 2 cups of vegetable broth, and 1 can of drained and rinsed black beans. Next, sprinkle in 1 tablespoon of chili powder, 1 teaspoon of cumin, ½ teaspoon of smoked paprika, and ½ teaspoon of cayenne pepper. Add salt and pepper to taste. Stir everything together until well mixed. Bring the chili to a gentle simmer. Cover the pot and reduce the heat to low. Let it cook for 25-30 minutes, stirring occasionally. You want the sweet potatoes to be fork-tender. If you find the chili is too thin, simmer it uncovered for an extra 5-10 minutes. Taste the chili and adjust the seasoning as needed. Finally, serve the chili hot. Garnish with chopped fresh cilantro and avocado slices for a creamy touch. Sautéing is key for great flavor. Start with the onion and cook it until it’s soft. This brings out its sweetness. When you add the garlic and bell pepper, keep stirring. This keeps the garlic from burning and adds depth. Don’t rush the layers. Each step builds flavor. Keep an eye on the heat. Start at medium for sautéing, then lower it to low for simmering. This helps the sweet potatoes cook evenly without burning. Remember, cooking time is around 45 minutes total. This includes prep time. You want to enjoy the process as much as the meal. For a thicker chili, let it simmer longer without a lid. For the complete recipe, check out the Full Recipe. When making chili, you want to avoid some common mistakes. First, do not skip the sauté step. Sautéing onion and garlic builds flavor. Second, don’t rush the cooking time. Letting the chili simmer helps the flavors blend well. If you add too much liquid, your chili may turn soupy. Always start with less broth and add more if needed. Lastly, taste as you go. This helps you catch any seasoning issues early. Spices make your chili pop! Start with chili powder and cumin; they bring warmth and depth. Adding smoked paprika gives a nice, smoky touch. If you like heat, cayenne pepper is great, but adjust to your taste. Fresh herbs like cilantro add brightness at the end. You can also try adding a dash of lime juice for a zing. Experiment with spices to find your perfect mix. Cooking in bulk saves time and energy. You can double the recipe, and it freezes well. Store leftovers in airtight containers. Divide them into single servings for easy meals later. You can also prep ingredients ahead. Chop sweet potatoes, onions, and peppers a day before. This makes cooking quicker. Finally, making chili a day ahead allows the flavors to deepen. Enjoy the convenience and taste! {{image_2}} This chili is easy to adjust. You can make it vegan by using vegetable broth, which I always do. For gluten-free needs, check your canned goods. Most brands are safe, but read labels to be sure. You can also swap sweet potatoes for butternut squash if you like. It brings a nice flavor twist. If you love heat, add more cayenne pepper. Start with one teaspoon and taste as you go. You can also mix in fresh jalapeños or serrano peppers for a kick. Another option is to add hot sauce at the end. Adjust the spice level to fit your taste buds. Toppings can elevate your chili. Fresh cilantro adds brightness. Avocado slices bring creaminess. Crumbled tortilla chips add crunch. You might even try a dollop of sour cream or Greek yogurt for a rich touch. For sides, cornbread is a classic choice. It pairs well with the chili’s warmth. For the full recipe, check out the detailed instructions above! After you enjoy your Sweet Potato and Black Bean Chili, let it cool down. Use airtight containers to store leftovers. This keeps the chili fresh and tasty. If you store it right, it can last for up to four days in the fridge. Make sure to label the containers with the date. This helps you know when to use them. To keep chili longer, freeze it! Portion the chili into smaller containers. Leave some space at the top, as it will expand when frozen. You can freeze it for up to three months. When you want to enjoy it again, thaw it in the fridge overnight. Reheat it on the stove over low heat. Stir often to avoid burning. Chili can last in the fridge for about four days. If you see mold or it smells off, throw it away. Another sign is if the chili has changed color or texture. Always trust your senses. It's better to be safe than sorry. For best taste, eat it within a few days. Yes, you can make this chili ahead of time. In fact, it often tastes better the next day. The flavors blend well when it sits. Store it in an airtight container in the fridge for up to three days. Just reheat it on the stove before serving. You can also freeze it for up to three months. Thaw it in the fridge overnight before reheating. I love serving this chili with a few tasty sides. Here are some great options: - Cornbread - Rice or quinoa - Tortilla chips - A fresh green salad - Sliced avocado on top These sides add fun textures and flavors. You can mix and match based on what you like best! Yes, this chili is a healthy choice. It is full of nutrients and fiber. Sweet potatoes provide vitamins A and C. Black beans add protein and iron. The spices also have health benefits. They can help boost your metabolism. This dish is low in fat, making it a wholesome option for everyone. Enjoy it guilt-free! For the full recipe, check out the section above! You now have a complete guide to making Sweet Potato and Black Bean Chili. We covered ingredients, cooking steps, and ways to enhance the flavor. You learned tips to avoid common mistakes and how to store leftovers. This chili is flexible, allowing for swaps and adjustments to fit your needs. Try making it your way! Enjoy a nourishing meal, packed with flavor and nutrients. Happy cooking!

Savory Sweet Potato and Black Bean Chili Recipe

Craving a warm and hearty meal? This Savory Sweet Potato and Black Bean Chili recipe is your answer! Packed with

- 1 cup rolled oats - 1 ripe banana, mashed - 1 cup milk (dairy or non-dairy) - 2 large eggs - 1 teaspoon vanilla extract - 1 teaspoon baking powder - 1/2 teaspoon cinnamon - Pinch of salt When I make banana oatmeal pancakes, I love using rolled oats. They give the pancakes a nice texture. The ripe banana adds sweetness and flavor. You can choose any milk you like, whether it’s dairy or plant-based. Eggs help bind everything together. Vanilla extract brings warmth to the taste. Baking powder makes the pancakes fluffy. A bit of cinnamon adds a cozy spice. Don't forget a pinch of salt to balance the flavors. - Cooking spray or butter for the pan - Toppings: sliced bananas, maple syrup, nuts, or berries Using cooking spray or butter on the pan helps prevent sticking. Toppings are where you can get creative. I enjoy adding sliced bananas for extra fruitiness. A drizzle of maple syrup makes everything sweeter. Chopped nuts add crunch and flavor. Berries can bring a burst of freshness. For the Full Recipe, check out the detailed instructions. Enjoy your cooking! First, take your rolled oats and put them in a blender. Blend them until they reach a flour-like consistency. This step is key. Oat flour gives the pancakes a nice texture and adds fiber. Now, add the mashed banana to the blender. Next, pour in the milk, crack in the eggs, and add the vanilla extract. Don't forget the baking powder, cinnamon, and a pinch of salt. Blend everything until it's smooth and well-combined. This should take about 30 seconds. Your batter should be thick and creamy, ready for cooking. Let the batter rest for about 5-10 minutes. This allows it to thicken a bit more. While it rests, heat a non-stick skillet or griddle over medium heat. Lightly coat the surface with cooking spray or butter. Pour about 1/4 cup of batter for each pancake. Cook them for 2-3 minutes. Watch for bubbles to form on the surface and the edges to set. Once you see them, it’s time to flip! Cook for another 2-3 minutes until they turn golden brown. Repeat this with the remaining batter. Enjoy your delicious banana oatmeal pancakes from the full recipe! To know when to flip your pancakes, watch for bubbles. When bubbles form on the surface, it’s time to flip. The edges will also look set. If the pancakes are browning too fast, lower the heat. Cooking time can change based on your stove and pan. Always keep an eye on them. You can make these pancakes your own! Try adding chocolate chips or nuts for extra flavor. If you need a vegan option, use flax eggs instead of real eggs. You can also swap regular milk for non-dairy milk. For gluten-free pancakes, use certified gluten-free oats. For the full recipe, check out the section above. Enjoy your cooking! {{image_2}} You can make banana oatmeal pancakes even better by adding protein powder. This boosts the nutrition and keeps you full longer. Just mix in a scoop of your favorite protein powder in the batter. Another great idea is to add seeds like flax or chia. These seeds add fiber and healthy fats. Simply mix in a tablespoon or two into your pancake batter for an extra crunch and nutrition. Let’s make your pancakes more exciting with different spices. Nutmeg and ginger can add warmth and flavor. Just a pinch of either spice can change the whole taste. You can also use flavored milk, like almond or coconut. These milks bring a unique twist to the pancakes. Use them instead of regular milk in the recipe for a tasty surprise. For the full recipe, check out the detailed instructions above. After you make banana oatmeal pancakes, store any leftovers in the fridge. Place them in an airtight container. They will stay fresh for up to three days. When you want to reheat, simply use a microwave or a skillet. If using a microwave, heat them for about 30 seconds to 1 minute. In a skillet, warm them over low heat for 2-3 minutes on each side. This will help keep them soft and tasty. Freezing pancakes is a great way to save them for later. Let the pancakes cool completely. Then, stack them with parchment paper in between each pancake. Place the stack in a freezer-safe bag or container. They can last up to two months in the freezer. When you are ready to eat, take out what you need. Thaw them in the fridge overnight or at room temperature for a few hours. For reheating, use the microwave for 1-2 minutes or a skillet for about 3-4 minutes. Enjoy your pancakes just like fresh! Banana oatmeal pancakes can last up to three days in the fridge. Store them in an airtight container. If you want them to last longer, freeze them. They can stay fresh for up to three months in the freezer. Yes, you can make the batter ahead of time. Just mix all the ingredients and keep the batter in the fridge. Use it within 24 hours for the best taste and texture. Shake or stir the batter before cooking, as it may thicken. Yes, banana oatmeal pancakes can be gluten-free if you use certified gluten-free oats. Check the label to be sure. The rest of the ingredients are naturally gluten-free, making it a safe option for those with gluten allergies. To keep pancakes warm, place them on a baking sheet in a low oven (around 200°F or 93°C). Cover them with a clean kitchen towel to keep them warm and moist until serving. This way, everyone enjoys warm pancakes at the same time! In this post, we covered how to make banana oatmeal pancakes step by step. We looked at key ingredients, cooking tips, and ways to customize your pancakes to fit your taste. Whether you want to add chocolate chips or store leftovers, you now have all the tools to create a delicious breakfast. Enjoy making these pancakes and have fun experimenting with flavors! You’ll find a great meal that fits your life.

Banana Oatmeal Pancakes Delicious and Easy Recipe

Start your breakfast right with my easy recipe for Banana Oatmeal Pancakes. You only need a few simple ingredients, like

Older posts
Newer posts
← Previous Page1 … Page116 Page117 Page118 … Page138 Next →

dsad

© 2025 Recipes Pursuit • Built with GeneratePress

Our Policies

  • Copyright Policy
  • Cookie Policy
  • GDPR Policy
  • Privacy Policy
  • Disclaimer
  • Terms Of Use

More Information

  • Home
  • About
  • Contact
  • Appetizers
  • Dessert
  • Dinner
  • Drinks
©2025, Recipes Pursuit About Back To Top