Skip to content
DisclaimerTerms Of UseGDPR PolicyCookie Policy

Recipes Pursuit

  • Home
  • Drinks
  • Appetizers
  • Dinner
  • Dessert
  • About
  • Contact
  • Privacy Policy
DisclaimerTerms Of UseGDPR PolicyCookie Policy

Emma Smith

- 1 can (15 oz) chickpeas, drained and rinsed - 1 tablespoon olive oil - 1 teaspoon smoked paprika - 1 teaspoon cumin - 1/2 teaspoon cayenne pepper (adjust for spice level) - 1/2 teaspoon garlic powder - Salt and pepper to taste - 1 avocado, sliced - 1 cup cherry tomatoes, halved - 1/4 cup fresh cilantro, chopped - 6 small corn or flour tortillas - Lime wedges, for serving To make Spicy Chickpea Tacos, you need chickpeas and spices. The chickpeas give protein and texture. The spices add bold flavor. Olive oil helps cook the chickpeas to crispness. You can adjust the cayenne pepper to fit your spice level. You will also need fresh toppings and tortillas. Avocado adds creaminess, while cherry tomatoes bring freshness. Cilantro adds a pop of flavor. Tortillas hold everything together. You can use corn or flour tortillas based on your taste. Optional items for customization include any toppings you like. Try adding cheese, hot sauce, or sour cream if you want. You can even switch up the veggies. The fun part is making this dish your own! For the full recipe, check the details above. This dish is quick, healthy, and full of flavor. Enjoy every bite! To kick things off, let’s prepare the chickpeas. Start by heating the olive oil in a medium skillet over medium heat. Once the oil is warm, add the drained and rinsed chickpeas. Sauté them for about 2-3 minutes until they get a bit crispy. Crispy chickpeas give the tacos a nice texture. Next, it’s time to season. Sprinkle in smoked paprika, cumin, cayenne pepper, garlic powder, salt, and pepper. Stir well, coating the chickpeas evenly with the spices. This step is key for flavor. Keep cooking for another 5-7 minutes while stirring occasionally. You want them hot and fragrant, perfect for tacos. For the right texture, don’t rush the cooking time. Let the chickpeas get just crispy enough. If you prefer more heat, adjust the cayenne pepper to your liking. More spice can add a nice kick! Now that your chickpeas are ready, let’s assemble the tacos. First, warm your tortillas to make them pliable. You can do this in a pan or microwave. If using a microwave, heat them for about 10-15 seconds. Warm tortillas help hold everything together. Next, take a generous spoonful of your spicy chickpeas and place it on each tortilla. Don’t be shy here! Layer on slices of avocado, halved cherry tomatoes, and chopped cilantro. This adds freshness and color, making your tacos look great. To serve, add lime wedges on the side. Squeezing lime over the tacos enhances the flavors. It’s a simple touch that brings everything together. For more details, check out the Full Recipe. To make the most of your spicy chickpea tacos, focus on flavors. Start by adding spices like chili powder or oregano to the chickpeas. These spices bring depth and warmth. You can also try mixing in a splash of lime juice for a zesty kick. For toppings, think outside the box. Try adding pickled onions for a tangy crunch. Sautéed bell peppers can add sweetness. Don’t forget about creamy elements like sour cream or a yogurt drizzle. These cool toppings balance the heat of the chickpeas. Balance is key. If the dish is too spicy, add fresh ingredients. Fresh cilantro or diced tomatoes can cool down the heat. Lime wedges help cut through spice and add a refreshing touch. Having the right tools makes cooking easier. You will need a medium skillet for sautéing the chickpeas. A wooden spoon or spatula is great for stirring. Use a cutting board and knife for fresh toppings. To warm tortillas, a non-stick pan works well. You can also use a microwave for quick heating. Just make sure to keep them covered to avoid drying out. If you have a taco holder, it makes serving easy and fun! Using these tools will help you create your spicy chickpea tacos with ease. Check out the Full Recipe to get started! {{image_2}} You can easily make spicy chickpea tacos vegan and gluten-free. Start with the tortillas. If you want a gluten-free option, choose corn tortillas. They are soft and tasty. You can also use lettuce wraps for a lighter version. Just take a large leaf of lettuce and fill it with your chickpea mix. For protein, chickpeas are great, but you can swap them out. Try using black beans or lentils instead. These options also pack a punch. They have the right texture and taste to shine in these tacos. Fresh ingredients can make your tacos even better. In spring, add radishes for a crunchy bite. In summer, use fresh corn for sweetness. In fall, try roasted sweet potatoes for warmth. Winter calls for hearty greens like kale. They all bring unique flavors to the dish. You can mix and match these ingredients all year long. This makes the dish adaptable and fun. Fresh produce keeps it exciting and healthy. You can enjoy spicy chickpea tacos no matter the season! To keep your spicy chickpea tacos fresh, follow these tips. First, store any leftovers in an airtight container. This will help keep them from drying out. Place the container in the fridge. They will stay good for about three days. When you want to enjoy them again, reheat the chickpeas on the stove. This keeps them crispy. If you use a microwave, do it in short bursts. Stir between bursts to avoid sogginess. Freezing the tacos is a great way to save them for later. Start by separating the chickpeas from the tortillas. Wrap the chickpeas tightly in plastic wrap or place them in a freezer-safe bag. You can freeze them for up to three months. For tortillas, stack them and wrap in foil. When you’re ready to eat, thaw the chickpeas in the fridge overnight. Reheat them on the stove until hot. Warm the tortillas in a pan or microwave before serving. Enjoy your tasty tacos anytime! These chickpea tacos can be as spicy as you want! The cayenne pepper adds heat, but you can adjust it. If you prefer mild, use less cayenne. You can also skip it altogether. To make it spicier, add more cayenne or a dash of hot sauce. Everyone has different tastes, so feel free to experiment. Remember, you can always add spice, but you can't take it away! Yes, you can prep these tacos in advance. Cook the chickpeas and store them in the fridge for up to three days. When you are ready to eat, warm them in a pan. You can also warm the tortillas ahead of time. Just keep them wrapped in a clean towel to avoid drying out. For best results, assemble the tacos just before serving. This keeps the tortillas soft and fresh. You can serve many tasty sides with these tacos. Here are some ideas: - Mexican rice: Fluffy rice pairs well with the spice. - Beans: Black or pinto beans add protein and fiber. - Salad: A fresh green salad balances the heat. - Guacamole: Creamy guacamole cools the spicy flavors. - Corn on the cob: Grilled corn adds sweetness. These options will make your meal even more enjoyable! You can find the Full Recipe in this article for more ideas and details. These chickpea tacos are a fun way to enjoy bold flavors and healthy ingredients. You learned about the key components, from chickpeas and spices to fresh toppings and tortillas. I shared tips on how to sauté the chickpeas to get the right taste and texture. You can customize the tacos for your taste by using different spices, toppings, and tortillas. Remember, these tacos are not just tasty; they are easy to store and reheat too. So, dive in, get creative, and enjoy this delicious meal any day of the week!

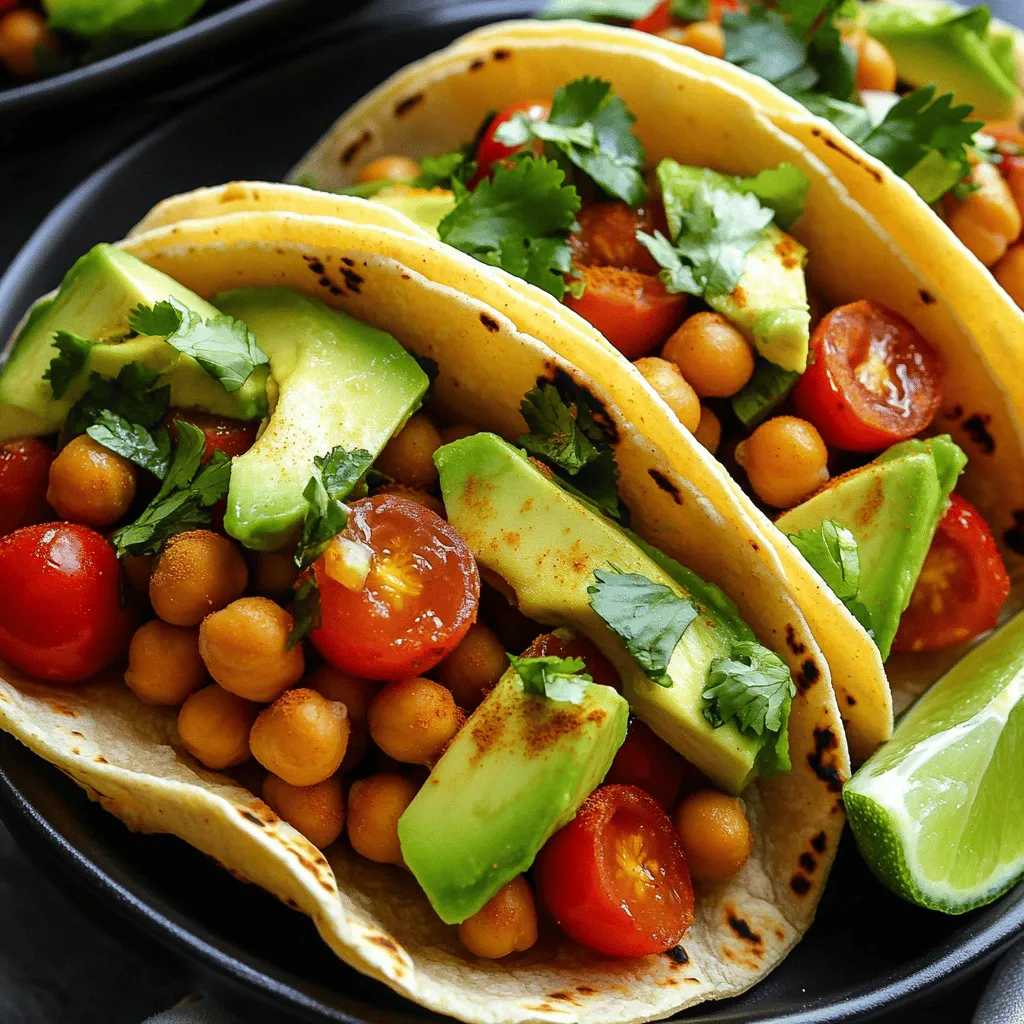
Spicy Chickpea Tacos Quick Dinner Delight

Looking for a quick and tasty dinner? Try my Spicy Chickpea Tacos! These delicious tacos are packed with flavor, easy

- 500g fresh button mushrooms, cleaned and stems trimmed - 4 tablespoons unsalted butter - 4 cloves garlic, minced - 1 tablespoon fresh parsley, chopped - 1 tablespoon fresh thyme, chopped - 1 teaspoon fresh rosemary, chopped - Salt and pepper to taste - 1 tablespoon lemon juice - Zest of half a lemon - Optional: Grated Parmesan cheese for garnish When I make herbed garlic butter mushrooms, I love using fresh button mushrooms. They have a nice texture and flavor. You can also try cremini or shiitake mushrooms for a deeper taste. I use unsalted butter as it allows me to control the salt level. If you're dairy-free, you can use vegan butter. The garlic adds zest, while the fresh herbs brighten the dish. You can switch fresh herbs for dried ones, but use less. Dried herbs are stronger than fresh. The lemon juice and zest elevate the flavor. They add a nice zing to the rich butter. For an extra treat, sprinkle some grated Parmesan cheese on top before serving. It gives a great salty kick to the dish. This dish is quick and easy to prepare. You can enjoy it as a side or main dish. For the full recipe, check out the instructions above. 1. Cleaning and trimming mushrooms: Start with fresh button mushrooms. Rinse them gently under cool water to remove dirt. Pat them dry with a paper towel. Trim the stems to about half an inch. This helps them fit well in your dish. 2. Pre-measuring ingredients: Measure out all your ingredients ahead of time. You'll need: - 500g fresh button mushrooms - 4 tablespoons unsalted butter - 4 cloves garlic, minced - 1 tablespoon fresh parsley, chopped - 1 tablespoon fresh thyme, chopped - 1 teaspoon fresh rosemary, chopped - Salt and pepper to taste - 1 tablespoon lemon juice - Zest of half a lemon - Optional: Grated Parmesan cheese for garnish Having everything ready makes cooking smoother. 1. Melting the butter and sautéing garlic: In a large skillet, melt the butter over medium heat. Wait until it becomes foamy but not browned. Add the minced garlic. Sauté for about one minute until you smell its rich aroma. Be careful not to burn it. 2. Cooking the mushrooms until golden brown: Once the garlic is ready, increase the heat to medium-high. Add the cleaned mushrooms to the skillet. Stir them well to coat in the garlic butter. Cook for about 5 to 7 minutes, stirring every now and then. Look for a golden brown color and tenderness. 3. Adding herbs and seasonings: After the mushrooms are cooked, add the chopped parsley, thyme, and rosemary. Pour in the lemon juice and sprinkle the lemon zest. Toss everything together to mix. Season with salt and pepper to taste. Cook for another one to two minutes. This lets the herbs’ flavors blend well with the mushrooms. - Serving suggestions: Serve your herbed garlic butter mushrooms hot. A rustic wooden board or a cast-iron skillet makes a great presentation. Garnish with fresh herb sprigs and a sprinkle of extra cheese if you like. Pair with crusty bread for dipping. - Essential cooking tips for best results: Always use fresh ingredients for the best flavor. If you want extra depth, try different butter brands. To prevent sogginess, avoid overcrowding the skillet. This way, the mushrooms can brown nicely. For the complete recipe, check out the [Full Recipe]. To get perfectly sautéed mushrooms, heat your skillet first. Use medium heat to melt the butter until it foams. Avoid high heat at first; this helps the mushrooms cook evenly. When you add the mushrooms, don’t overcrowd the pan. This keeps them from steaming and makes them soggy. Cook them in batches if needed. Stir them gently, so they get a nice brown color all over. To boost the flavor, think about using different herbs. You can add fresh basil or oregano for a unique twist. A pinch of red pepper flakes adds warmth too. Choose high-quality butter for a richer taste. Grass-fed butter has a deeper flavor that pairs well with the mushrooms. You can even try a mix of butters for interesting notes. These mushrooms shine as a side dish. They pair well with grilled meats or roasted veggies. A fresh salad balances their richness nicely. For presentation, serve them in a cast-iron skillet or on a rustic board. Top with fresh herb sprigs or a sprinkle of Parmesan cheese. This makes for an inviting dish at gatherings. Consider serving crusty bread alongside for dipping. For the full recipe, click here [Full Recipe]. {{image_2}} You can change the taste of herbed garlic butter mushrooms by adding different herbs. Basil, oregano, or dill can add a fun twist. Each herb brings its own flavor, so feel free to mix and match. You can also make it richer by adding a splash of white wine while cooking. The wine will add depth and a slight acidity that balances the butter. If you want a creamy version, stir in a bit of heavy cream at the end. This makes the dish even more decadent and smooth. If you want a vegan version of herbed garlic butter mushrooms, simply swap the butter for vegan butter or olive oil. This keeps the dish rich while being plant-based. For those with gluten concerns, this recipe is naturally gluten-free. Just make sure to check any added ingredients, like cheese, to ensure they are gluten-free too. You can enjoy herbed garlic butter mushrooms in many ways. For a hearty meal, toss them with cooked pasta. This makes a simple yet rich herbed mushroom pasta that everyone will love. You can also use these mushrooms as a topping on homemade pizza. They add a burst of flavor that pairs well with cheese and tomato sauce. For the full recipe, check out the detailed instructions and ingredient list! To store your herbed garlic butter mushrooms, place them in an airtight container. This keeps them fresh and prevents odors from mixing. You should refrigerate them within two hours of cooking. Cooked mushrooms can last in the fridge for up to three days. After that, they may lose their taste and texture. When reheating mushrooms, aim for low and slow. You can use a skillet over medium heat. Just add a little butter or oil to keep them moist. Avoid the microwave, as it can make them rubbery. Try not to overheat them, as they can become soggy if cooked too long. Yes, you can freeze herbed garlic butter mushrooms! To do this, let them cool completely. Then, place them in a freezer-safe bag. Squeeze out as much air as possible before sealing. They can last in the freezer for up to three months. When ready to use, thaw them in the fridge overnight before reheating. How long do herbed garlic butter mushrooms last in the fridge? Herbed garlic butter mushrooms stay fresh for about 3 to 5 days in the fridge. Store them in an airtight container to keep them safe. I always recommend eating them soon for the best taste and texture. Can I use dried herbs instead of fresh? Yes, you can use dried herbs, but use less. Dried herbs are more potent. For this dish, use about one-third of the amount called for fresh herbs. This way, you still get great flavor without overwhelming the dish. What’s the best way to clean mushrooms? The best way to clean mushrooms is to wipe them with a damp cloth or paper towel. Avoid washing them under water as they can absorb moisture. This helps keep them firm and tasty. How can I make the recipe spicier? To spice up the recipe, add crushed red pepper flakes or diced fresh chili peppers. You can also add a dash of hot sauce while cooking. Just remember to add a little at a time, so it doesn't overpower the dish. What wine pairs well with herbed garlic butter mushrooms? A light white wine, like Sauvignon Blanc, pairs well with these mushrooms. The crispness of the wine complements the earthy mushrooms. If you prefer red, a light Pinot Noir works nicely too. Can I double the recipe for a larger group? Yes, you can easily double the recipe. Just ensure your skillet is large enough. If it gets crowded, the mushrooms may steam instead of sauté. Cook them in batches if needed for the best results. For the full recipe, refer back to the earlier section. In this post, I covered the essential ingredients and steps for making herbed garlic butter mushrooms. You learned how to clean, cook, and enhance these tasty treats. I also shared tips on storing leftovers and answered common questions. These mushrooms are versatile and easy to adapt for any diet. Embrace the flavors and enjoy experimenting in your kitchen. With these skills, your meals will impress family and friends. Happy cooking!

Herbed Garlic Butter Mushrooms Savory and Flavorful Dish

Are you in search of a tasty side dish that packs a punch? Look no further! Herbed garlic butter mushrooms

To make this savory avocado toast with feta and tomatoes, you need a few fresh ingredients. Here’s the list: - 2 ripe avocados - 4 slices of whole-grain or sourdough bread - 100 grams feta cheese, crumbled - 1 cup cherry tomatoes, halved - 1 tablespoon olive oil - 1 tablespoon balsamic vinegar - 1 teaspoon red pepper flakes (optional) - Salt and pepper to taste - Fresh basil or parsley leaves for garnish Each ingredient plays a key role. The avocados provide creaminess. Feta adds a salty punch. Cherry tomatoes bring sweetness and color. You can choose whole-grain bread for health or sourdough for a tangy taste. Olive oil and balsamic vinegar enhance flavors, while the red pepper flakes add a kick. Use fresh herbs to brighten the dish. You can find the full recipe at the end. First, choose good bread. I like whole-grain or sourdough. Place the slices in a toaster. Toast until golden brown and crispy. This step gives crunch and flavor. While the bread toasts, grab your ripe avocados. Cut each in half and remove the pit. Scoop the green flesh into a mixing bowl. Mash the avocado with a fork. Make it smooth but keep some chunks for texture. Add olive oil, balsamic vinegar, salt, and pepper. Mix until everything is well combined. Now, it's time to layer. Spread a generous amount of the avocado mixture on each slice of toast. Next, take your halved cherry tomatoes. Place them on top of the avocado. Sprinkle crumbled feta cheese over the tomatoes. If you like heat, add a dash of red pepper flakes. Finish with fresh basil or parsley for a pop of color. Enjoy this savory avocado toast with feta and tomatoes delight! Check out the Full Recipe for all the details. To make your avocado toast shine, texture matters. Start by choosing ripe avocados. They should feel slightly soft when you squeeze them. Next, mash them with a fork. I like to leave some chunks for a nice bite. This adds a creamy feel. Now, add a pinch of salt and pepper. This step brings out the avocado's natural flavor. Olive oil and balsamic vinegar add a touch of richness. Mix everything well, but don’t overdo it. You want a smooth blend with some texture. Think about what to serve with your toast. A light salad pairs well. You can use mixed greens, or add some cucumber slices. A refreshing drink is also great. Try a citrusy lemonade or iced tea. Both drinks balance the creamy toast. If you want something warm, a cup of soup works too. Tomato soup is a classic choice. It adds warmth and comfort to your meal. Want to spice things up? Add more toppings to your toast. Sliced radishes give crunch and color. A sprinkle of microgreens adds freshness. You can also add a poached egg for protein. This makes your toast more filling. If you enjoy spice, try jalapeños or hot sauce. These will wake up your taste buds. For a sweet touch, add sliced strawberries or a drizzle of honey. Each addition makes your toast unique and tasty. This recipe is a delight. For the full details, check the Full Recipe. {{image_2}} When it comes to avocado toast, variety is the spice of life. You can change the bread, toppings, or spices to make it your own. Choosing the right bread can make your toast shine. You can use: - Whole-grain bread for a nutty flavor. - Sourdough for its tangy taste. - Gluten-free bread if you want to avoid wheat. - Artisan bread for a crusty texture. Each type of bread brings a unique taste and texture. Feel free to try different kinds to find your favorite. The toppings on your toast can really switch things up. Besides feta, think about adding: - Goat cheese for a creamy twist. - Ricotta for a light and fluffy feel. - Cooked eggs for extra protein. - Smoked salmon for a rich, savory flavor. Mix and match these toppings to suit your taste or mood. The options are endless! Adding spices can take your toast to the next level. Here are some ideas: - Sprinkle chili powder for a kick. - Add fresh herbs like cilantro or dill for brightness. - Drizzle lemon juice for a zesty touch. - Use garlic powder for a savory punch. These added flavors can change your toast from good to great. Enjoy experimenting! For the full recipe, check out the details above. To store leftover avocado mixture, put it in an airtight container. Press plastic wrap directly onto the surface to reduce air exposure. This helps keep it from turning brown. Store the container in the fridge and use it within a day or two for the best taste. The freshness of your ingredients matters. Ripe avocados last about 1 to 2 days at room temperature. Once cut, they stay fresh in the fridge for up to 2 days if stored well. Feta cheese can last about a week after opening when kept in the fridge. Cherry tomatoes stay good for about a week if stored in a cool place. Reheating avocado toast is simple. However, it's best to avoid direct heat, as it can make the avocado mushy. Instead, use a microwave. Heat it for about 10-15 seconds, just to warm it up. You can also place it in a toaster oven for a few minutes to maintain the crispiness of the bread. Enjoy this tasty delight with fresh flavors from the Full Recipe! Yes, you can make this recipe vegan. For the feta, try using a plant-based cheese. Look for brands that mimic feta's taste and texture. You can also use nutritional yeast for a cheesy flavor without dairy. Instead of using balsamic vinegar with olive oil, consider a simple drizzle of lemon juice for a fresh kick. To pick ripe avocados, gently squeeze the fruit. It should feel slightly soft but not mushy. Check the color too; darker skin often means ripeness. If you see a small stem, remove it. If it’s green underneath, the avocado is ripe. If it’s brown, choose another one. Avocado toast pairs well with many sides. You can serve it with a fresh salad or a bowl of soup. A fruity smoothie adds a sweet touch. For breakfast, try it with a poached egg on top. These sides make your meal more filling and fun. This blog post covered a simple, tasty avocado toast recipe. We discussed the key ingredients, how to prepare the bread and avocado mix, and tips for serving. You can customize it with different toppings or bread choices. Remember to store leftovers well for the best taste. Enjoy experimenting with avocado toast in your kitchen. This dish is not only delicious but also fun to make! Dive in and enjoy your creation!

Savory Avocado Toast with Feta and Tomatoes Delight

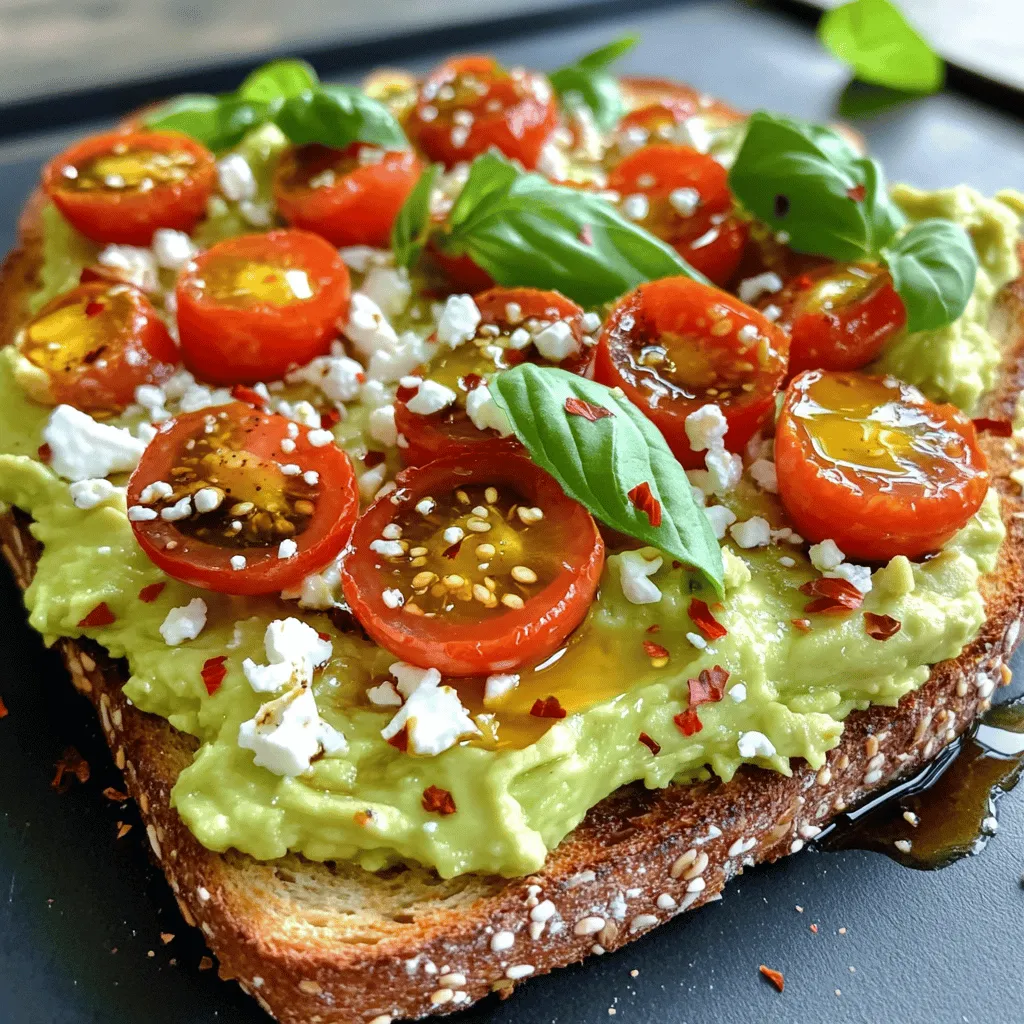
Get ready to elevate your breakfast game with my Savory Avocado Toast with Feta and Tomatoes Delight! This tasty treat

- 1 cup rolled oats - 1/2 cup natural peanut butter - 1/4 cup honey or maple syrup These three main ingredients create a solid base for your energy bites. Rolled oats give you fiber and energy. Natural peanut butter brings protein and healthy fats. Honey or maple syrup adds sweetness and binds the mix. - 1/2 cup mini chocolate chips - 1/4 cup ground flaxseed - 1/4 cup shredded coconut or chopped nuts Adding mini chocolate chips makes these bites fun and tasty. Ground flaxseed boosts omega-3s and fiber. You can also use shredded coconut or chopped nuts for extra texture and flavor. - 1/2 teaspoon vanilla extract - A pinch of salt Vanilla extract enhances the sweet notes in the bites. A pinch of salt balances the flavors, making each bite even better. For the full recipe, check the details above! 1. Mixing dry ingredients: Start by taking a large mixing bowl. Add 1 cup of rolled oats, 1/4 cup of ground flaxseed, and a pinch of salt. Stir these dry ingredients well until they blend evenly. 2. Combining wet ingredients: In another bowl, mix 1/2 cup of natural peanut butter, 1/4 cup of honey or maple syrup, and 1/2 teaspoon of vanilla extract. Stir until smooth and creamy. This mixture adds flavor and binds the energy bites. 1. Shaping the mixture: Pour the peanut butter mixture into the bowl with dry ingredients. Add 1/2 cup of mini chocolate chips. Mix everything well until you have a sticky blend. Next, use your hands to shape the mixture into small balls, about 1 inch wide. 2. Refrigeration process: Place the shaped energy bites on a baking sheet lined with parchment paper. After forming them all, refrigerate for at least 30 minutes. This helps the bites become firm and easier to handle. - Presentation ideas: Serve these energy bites in a small glass jar tied with twine for a cute look. You can also place them on a colorful plate and sprinkle extra cocoa powder on top for flair. - Pairing options: Enjoy these bites with a glass of milk or a smoothie. They are perfect for a quick snack or a pre-workout boost. For a fun twist, serve them alongside fresh fruit. For the full recipe, check out the details above. To keep your energy bites fresh, store them in an airtight container. This helps prevent them from drying out. You can also use a glass jar with a lid. Place a piece of parchment paper between layers if you stack them. These bites can last about one week in the fridge. If you want them to stay fresh longer, you can freeze them. They keep well for up to three months in the freezer. You can easily adjust the recipe for your dietary needs. For a nut-free option, try sunflower seed butter. If you need a vegan choice, use maple syrup instead of honey. To enhance flavors, add spices like cinnamon or a splash of almond extract. You can also mix in dried fruit for added sweetness and texture. Be creative! Making these energy bites ahead of time saves you time. You can prepare them on the weekend for quick snacks during the week. Just follow the steps and shape them into balls. If you want to freeze them, shape the bites first. Place them on a tray to freeze individually before transferring them to a bag. This way, you can take out just what you need later. {{image_2}} You can switch up the flavor of your energy bites easily. Try using different nut butters. Almond butter or cashew butter adds a unique taste. You might also want to add spices like cinnamon. Just a dash can give your bites a nice warmth. Changing the texture is fun too. Use different types of oats. Quick oats can make your bites softer, while steel-cut oats add crunch. You can also incorporate seeds, like chia or sunflower seeds. These not only change the texture but also boost nutrition. If you want to make this recipe even healthier, consider sugar substitutes. Stevia or agave syrup can work well in place of honey. For those who need gluten-free options, use gluten-free oats. This way, everyone can enjoy these tasty bites. For the full recipe, check out the details! Peanut Butter Chocolate Chip Energy Bites pack a punch of energy. They help fuel your day with whole ingredients. Oats provide fiber, which keeps you full and supports digestion. Peanut butter adds protein, helping with muscle repair. The healthy fats in peanut butter also support heart health. Honey or maple syrup gives a natural sweetness while boosting energy levels. - Rolled oats: Great source of fiber and nutrients. - Natural peanut butter: Loaded with protein and healthy fats. - Honey or maple syrup: Natural sweetener for energy. Serving size is important for enjoying these bites. One serving is about one energy bite. You can expect to get around 12 to 15 bites from this recipe. Each bite has about 100 calories. This makes them a perfect snack! - Recommended servings: 1 bite per snack. - Caloric breakdown: Roughly 100 calories per bite. These energy bites can fit many diets. They are easy to make vegan by using maple syrup instead of honey. For those with nut allergies, try sunflower seed butter. Always check for allergens, especially with chocolate chips. - Vegan options available: Use maple syrup instead of honey. - Allergen information: Contains peanuts and may include chocolate. These energy bites last about one week in the fridge. Store them in an airtight container. This keeps them fresh and tasty. If you want them to last longer, you can freeze them. Just make sure to wrap each bite in plastic wrap. Then, place them in a freezer-safe bag. This helps prevent freezer burn. Yes, you can freeze these energy bites! Freezing is a great way to keep them fresh. To freeze, first shape the bites and chill them in the fridge for 30 minutes. Then, place them in a single layer on a baking sheet. Freeze them for about one hour. After they are firm, transfer them to a freezer bag. Label the bag with the date. They can stay in the freezer for up to three months. If you need a substitute, there are many options! Almond butter is a great choice. It has a similar texture and taste. Sunflower seed butter is another good option, especially for nut-free diets. Cashew butter adds a creamy flavor, too. You can also use tahini, made from sesame seeds. Just keep in mind that each butter has its own unique taste. These energy bites are simple to make and packed with nutrients. We covered key ingredients like rolled oats, natural peanut butter, and honey. You learned about optional mix-ins and seasoning that can add flavor. I shared step-by-step instructions and tips on storage and modifications. These bites are perfect for a quick snack or energy boost. In the end, you can customize these bites to fit your taste. Enjoy experimenting!

Peanut Butter Chocolate Chip Energy Bites Easy Recipe

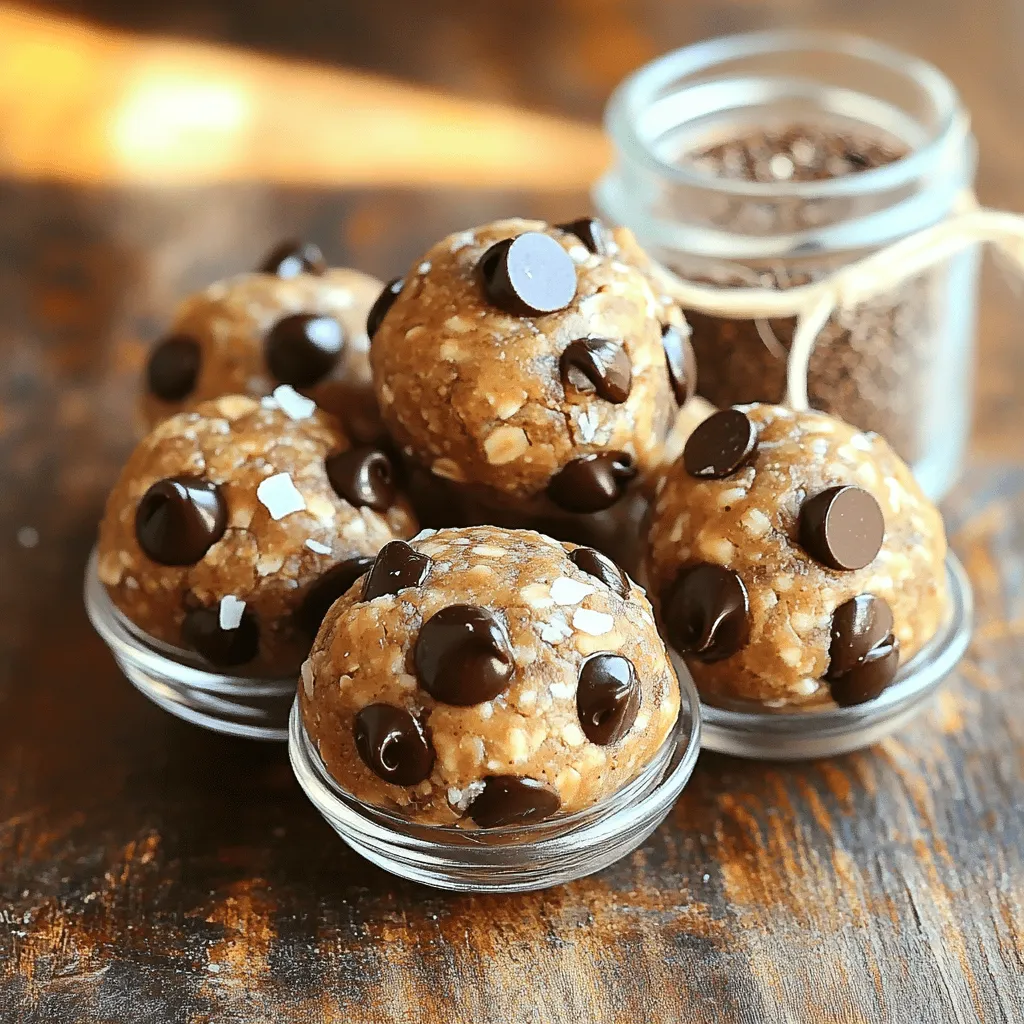
Looking for a quick snack that’s both tasty and healthy? My Peanut Butter Chocolate Chip Energy Bites are just what

Mango salsa shines with vibrant, fresh flavors. Here are the main ingredients: - 2 ripe mangos, diced - 1 medium red onion, finely chopped - 1 red bell pepper, diced - 1 jalapeño, deseeded and minced - 1/4 cup fresh cilantro, chopped - Juice of 2 limes - Salt to taste - Black pepper to taste Each ingredient adds a unique taste. The sweet mango pairs well with the crunchy onion and bell pepper. The jalapeño gives a spicy kick, while cilantro adds a fresh herbal note. Lime juice brightens the whole dish, making it refreshing. Choosing ripe mangoes is key. Look for smooth, slightly soft mangoes. The skin should be yellow or slightly red. A sweet smell at the stem end shows ripeness. Avoid mangoes with dark spots or wrinkles. Ripe mangoes have a juicy, sweet flesh that enhances the salsa. To make your mango salsa even better, try these optional ingredients: - Diced avocado for creaminess - Chopped garlic for a bold taste - Pineapple for extra sweetness - A splash of orange juice for a citrus twist These additions can transform your salsa into something unique. Mix and match to find your favorite flavors. You can find the Full Recipe online for more details on how to prepare it. To make mango salsa, start by gathering your ingredients. You will need ripe mangos, red onion, red bell pepper, jalapeño, cilantro, lime juice, salt, and black pepper. First, peel and dice the mangos into small pieces. The size matters, as it helps mix well. Next, finely chop the red onion and dice the red bell pepper. Mince the jalapeño, removing the seeds for less heat. Don’t forget to chop the fresh cilantro. This adds a bright flavor to your salsa. When mixing the salsa, use a large bowl. Combine all the prepared ingredients in the bowl. Be gentle while folding them together. You want to mix them well but not mash the mangos. The goal is to keep the chunks nice and firm. After mixing, squeeze the juice of two limes over the top. This adds freshness and helps the flavors pop. Season with salt and black pepper to your taste. Let the salsa sit for about 15 minutes before serving. This allows the flavors to meld nicely. If you want more heat, you can add more jalapeño. Adjust lime juice for extra tang. You can also add a pinch of sugar if the salsa is too tart. For a twist, try adding diced avocado or pineapple. These ingredients add new flavors and textures. Check out the Full Recipe for more details. To cut mangoes, start with a ripe fruit. Place it on a cutting board. Hold the mango upright. Cut down along the pit on both sides. You will get two large pieces. Use a knife to score the flesh in a grid pattern. Then, scoop out the chunks with a spoon. This method makes cutting mangoes quick and easy. To change the heat, adjust the jalapeño. For less heat, remove all seeds. If you want more spice, add more jalapeño. You can also use other peppers like serrano for a kick. For a milder option, use bell pepper instead. Always taste as you mix to find your perfect balance. Serve mango salsa fresh for the best taste. Use a colorful bowl to show off its beauty. Keep it cool until serving. This salsa pairs well with grilled meats and fish. You can also use it as a topping for tacos. For a fun twist, serve it with tortilla chips. Enjoy this fresh and flavorful delight! For the complete recipe, check the Full Recipe section. {{image_2}} You can mix mango with many fruits. Each adds its own taste. Try pineapple for a sweet twist. The tartness of kiwi works well too. For a tropical vibe, add diced papaya. You can even mix in berries like strawberries or blueberries. These fruit combinations will surprise your taste buds! While lime juice and salt are classics, you can experiment. Try adding honey for sweetness. A splash of orange juice can brighten the flavor. You may also want to use garlic or onion powder for depth. For a spicy kick, consider crushed red pepper. Each seasoning brings a new layer to your salsa. Mango salsa can easily become a dip. To do this, blend the salsa until smooth. This change makes it perfect for chips or veggies. You can also add cream cheese or sour cream for a creamy texture. This variation will impress your guests and elevate your snacks. For the full recipe, check out the steps above. To keep your mango salsa fresh, place it in an airtight container. This will help seal in flavors and prevent spoilage. You can also cover the bowl tightly with plastic wrap if you don’t have a container. Always store it in the fridge right after serving. Mango salsa lasts about 3 to 5 days in the fridge. If you freeze it, the texture may change when thawed. I recommend using it within three months for the best taste. To freeze, put the salsa in a freezer-safe bag, removing as much air as possible. Use glass or plastic containers with tight lids. Glass containers allow you to see the salsa and won’t absorb smells. If you use plastic, make sure it is BPA-free for safety. Choose a container that fits your salsa amount to avoid extra air exposure. For the full recipe of mango salsa, check the earlier section! You can serve mango salsa with many dishes. It pairs well with grilled chicken or fish. The sweet and spicy taste enhances tacos and burritos. You can also use it as a dip with tortilla chips. For a light meal, add it to salads or wraps. The bright flavors complement rice and quinoa bowls too. Get creative and try it with your favorite dishes! Yes, you can make mango salsa ahead of time. It tastes even better after sitting for a while. The flavors blend and develop, making it more delicious. To keep it fresh, store it in an airtight container. Place it in the fridge until you are ready to serve. Just remember to mix it gently before serving. This helps to keep the texture nice! Absolutely, you can make mango salsa without cilantro. If you don't like cilantro, try fresh parsley instead. This will add a nice green flavor. You could also use mint for a refreshing twist. Feel free to skip the herbs if you prefer a simpler taste. Mango salsa is still tasty without cilantro! You can find the full recipe for mango salsa in the Full Recipe section above. Mango salsa is a tasty treat made easy by choosing ripe mangoes and mixing simple ingredients. We covered how to prepare, cut, and serve it for the best flavor. You can even try fun fruit combos and spice levels to match your taste. Remember, store your leftovers well to enjoy them later. With these tips and recipes, you’ll make mango salsa like a pro. Experiment and share your creations!

Mango Salsa: Fresh and Flavorful Delight for All

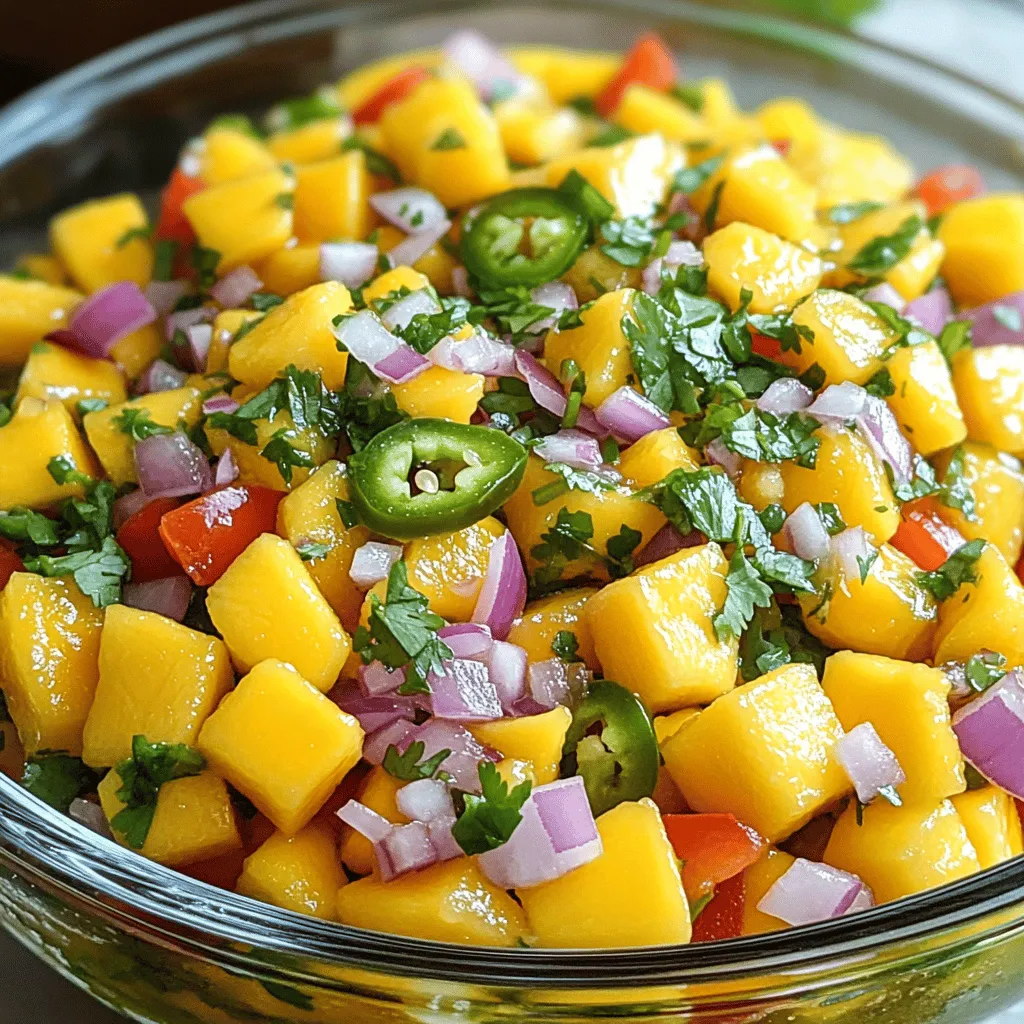
Mango salsa is a vibrant blend of sweet and spicy that can elevate any dish. You can turn simple meals

To make Garlic Parmesan Air Fryer Wings, you need fresh and simple ingredients. Each one adds flavor and makes the dish special. Here’s what you’ll need: - 2 pounds chicken wings - 1 tablespoon olive oil - 1 teaspoon garlic powder - 1 teaspoon onion powder - 1 teaspoon smoked paprika - ½ teaspoon salt - ½ teaspoon black pepper - ½ cup grated Parmesan cheese - 2 tablespoons fresh parsley, chopped - Zest of 1 lemon - 1 tablespoon lemon juice These ingredients come together to create a tasty wing dish. The chicken wings are the star, while the seasoning and sauce bring out their best. Using olive oil helps the spices stick and crisp the wings. Garlic powder and onion powder add a savory punch. Smoked paprika gives a subtle smokiness, while salt and black pepper balance the flavors. The Garlic Parmesan sauce is where the magic happens. Grated Parmesan makes it rich. Fresh parsley adds color and freshness. Lemon zest and juice brighten the sauce, making it zesty. Together, these ingredients create a flavorful delight that will have everyone asking for more. {{ingredient_image_1}} 1. Drying the chicken wings: First, use paper towels to pat the chicken wings dry. This step helps them get crispy when cooked. 2. Creating the seasoning mix: In a large bowl, mix the olive oil, garlic powder, onion powder, smoked paprika, salt, and black pepper. Stir until the spices blend well. 3. Tossing the wings in the seasoning: Add the dried wings to the bowl. Toss them in the seasoning mix until every wing is evenly coated. This ensures every bite is flavorful. 1. Preheating the air fryer: Set your air fryer to 400°F (200°C). Preheat it for about 5 minutes. This step helps the wings cook evenly. 2. Air frying the wings: Arrange the seasoned wings in a single layer in the air fryer basket. Cook them for 25 to 30 minutes. Shake the basket halfway through so they cook evenly. 1. Making the garlic parmesan sauce: In a small bowl, mix the grated Parmesan cheese, chopped parsley, lemon zest, and lemon juice. This sauce adds a fresh and zesty flavor. 2. Coating the wings after cooking: Once the wings are golden and crispy, remove them from the air fryer. Immediately toss them in the garlic parmesan sauce until they are fully coated. 3. Serving suggestions: Plate the wings and add some extra parsley and Parmesan cheese on top. This makes them look even more appealing. Enjoy your delicious garlic parmesan wings! To make your wings extra crispy, you need to dry them well. Use paper towels to pat each wing. This step helps remove moisture. Less moisture means better crispiness. Next, you can try a simple trick: let the wings air dry for 30 minutes. This enhances the crispiness even more. When cooking, avoid overcrowding the air fryer. Place wings in a single layer. This allows hot air to circulate. Shake the basket halfway through cooking. This ensures even crisping on all sides. To spice up your wings, think about adding cayenne pepper or smoked paprika. These give a nice kick. You can also use chili powder for a different flavor. For your garlic parmesan sauce, adjust to your taste. Want more garlic? Add a bit more garlic powder or fresh minced garlic. If you like a tangy touch, squeeze in more lemon juice. It brightens the flavor and balances the richness. Feel free to experiment with herbs too. Try adding thyme or oregano for a fresh twist. You can create your own unique version of garlic parmesan wings! Pro Tips Dry Wings for Crispiness: Make sure to pat the wings dry thoroughly before seasoning. This helps achieve that perfect crispy texture when air frying. Shake for Even Cooking: Don’t forget to shake the air fryer basket halfway through cooking. This ensures that all wings get evenly crispy and browned. Fresh Ingredients Matter: Use fresh parsley and freshly grated Parmesan cheese for the best flavor in your Garlic Parmesan sauce. It makes a noticeable difference! Experiment with Spices: Feel free to adjust the seasoning mix according to your taste. Adding a pinch of cayenne pepper can give your wings an extra kick! {{image_2}} To mix things up, try spicy garlic parmesan wings. Add a kick by including cayenne pepper or hot sauce in the seasoning mix. This boosts heat and flavor, perfect for spice lovers. You can also make honey garlic wings. Just add honey to your garlic parmesan sauce. This sweet touch pairs well with the savory cheese and garlic. If you don't have an air fryer, you can bake the wings in the oven. Preheat your oven to 425°F (220°C). Place the seasoned wings on a baking sheet. Bake them for about 40-45 minutes, flipping halfway. This method still gives you crispy wings. Grilling is another tasty option. Preheat your grill to medium-high heat. Place the wings on the grill and cook for about 20-25 minutes. Turn them often to avoid burning. This adds a smoky flavor, making them even more delicious. To keep your garlic parmesan air fryer wings fresh, use proper storage methods. First, let the wings cool to room temperature. This step prevents condensation and sogginess. Next, place the wings in an airtight container. You can use glass or plastic containers with tight lids. These containers will keep the wings safe from air and moisture. If you want to keep them longer, wrap the wings in foil or plastic wrap before putting them in a container. This will add extra protection. When it's time to enjoy your wings again, reheating is key. I recommend using the air fryer for the best results. Set it to 350°F (175°C) and place the wings in the basket. Heat them for about 5-7 minutes. This method keeps them crispy. You can also use an oven. Preheat it to 375°F (190°C) and lay the wings on a baking sheet. Bake for about 10-12 minutes. If you want to avoid dryness, cover them with foil for the first half of reheating. Enjoy your wings just as tasty as the first time! You should air fry chicken wings for 25 to 30 minutes. Set your air fryer to 400°F (200°C). Make sure to shake the basket halfway through. This helps cook the wings evenly. The wings will turn golden brown and crispy. Yes, you can use frozen wings. Just add a few extra minutes to the cooking time. Air fry them for about 30 to 35 minutes. Check for doneness by ensuring they reach an internal temperature of 165°F (74°C). This way, you can enjoy crispy wings even if they're frozen. Garlic parmesan wings pair well with many sides. Here are some tasty options: - Celery sticks with ranch or blue cheese dip - Crispy French fries or sweet potato fries - A fresh garden salad for a light option - Garlic bread to complement the flavors These sides will enhance your meal and make it even more enjoyable! We covered all you need to make great chicken wings. From ingredients to cooking steps, it’s simple. I shared tips for crispiness and variations for flavors. Storage and reheating methods help you enjoy leftovers. You can impress family and friends with these wings anytime. Try different sauces or cooking methods to find your favorite. Enjoy the process and the tasty results!

Garlic Parmesan Air Fryer Wings Flavorful Delight

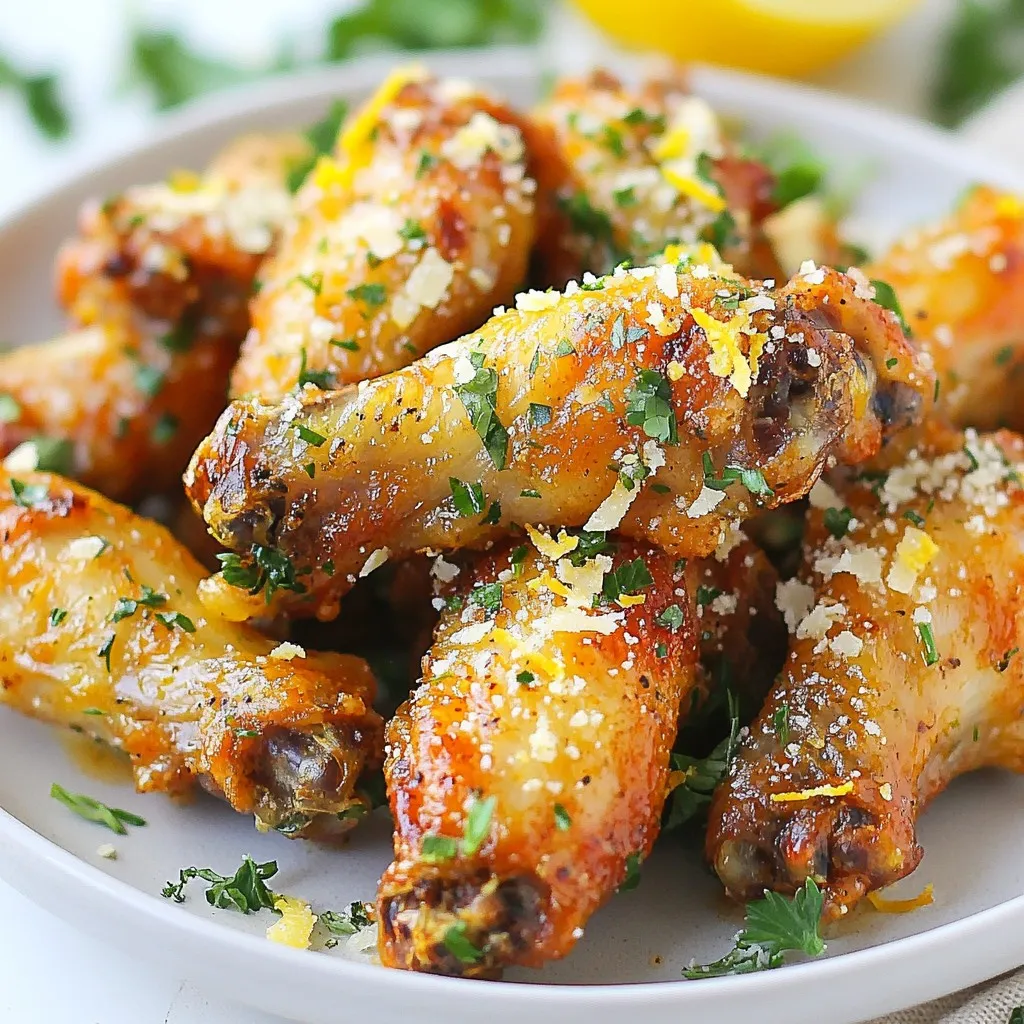
Are you ready to satisfy your craving for a tasty snack? Garlic Parmesan Air Fryer Wings are a game changer!

The main ingredients for this dish are simple yet full of flavor. You will need: - 1 lb (450g) large shrimp, peeled and deveined - 4 tablespoons unsalted butter - 4 cloves garlic, minced - 1 tablespoon fresh lemon juice - 1 teaspoon red pepper flakes (adjust to taste) - Salt and black pepper to taste - 2 tablespoons fresh parsley, chopped - Zest of 1 lemon - Cooked rice or pasta for serving These ingredients create a rich and buttery sauce that coats the shrimp perfectly. The garlic brings a warm flavor, while the lemon adds a bright touch. You can add some optional ingredients to make your dish even better. Here are a few ideas: - A splash of white wine for depth - A pinch of smoked paprika for warmth - Chopped green onions for freshness - A sprinkle of Parmesan cheese for a savory touch These extras allow you to customize the dish to your taste, adding layers of flavor that delight the palate. When buying shrimp, freshness is key. Here are some tips to help you choose the best: - Look for shrimp that smell like the ocean, not fishy. - Choose shrimp that are firm to the touch. - The shells should be shiny and moist. - If possible, buy shrimp that are still in their shells. Fresh shrimp makes a huge difference in taste and texture. When you select high-quality shrimp, your garlic butter shrimp will shine! For more details, check the Full Recipe. To start, rinse the shrimp in cold water. This makes them fresh and clean. Next, pat them dry with paper towels. This step is key for a nice sear. You want to make sure no water stays on them. While you get the shrimp ready, gather your ingredients. You will need butter, garlic, lemon, and spices. Having everything at hand helps the cooking flow. Heat a large skillet over medium heat. Add the butter and let it melt fully. Do not let it turn brown, as that can change the flavor. Once melted, toss in the minced garlic. Sauté it for about one minute. You want it fragrant, not burnt. Then, mix in the red pepper flakes and lemon zest. This adds a nice kick and brightness. After 30 seconds, add the shrimp in a single layer. Cook them for about 2-3 minutes without stirring. You will see them turn pink. Flip the shrimp and add lemon juice, salt, and black pepper. Cook them for another 2-3 minutes until they are opaque. This means they are fully cooked. Remove the skillet from heat and sprinkle fresh parsley on top. Serve the garlic butter shrimp over cooked rice or pasta for a tasty meal. Drizzle any sauce left in the skillet over the dish. For a nice touch, garnish with lemon slices and parsley. This adds color and flavor. Pair it with a light side salad for balance. Enjoy this simple yet delightful dish, perfect for any night! Get the full recipe for detailed steps. One common mistake is overcooking the shrimp. Shrimp cook quickly, usually in just 5-6 minutes. If you cook them too long, they can turn tough and rubbery. Always watch the color; shrimp should turn pink and opaque. Another mistake is burning the garlic. Sauté garlic for only 1 minute to keep its flavor bright. If garlic burns, it will make your dish taste bitter. Lastly, don’t forget to season properly. A pinch of salt and pepper enhances the taste. To spice things up, add more red pepper flakes. You can start with a pinch and taste as you go. If you prefer less heat, use fewer flakes or omit them completely. For a milder option, consider using sweet smoked paprika instead. This adds flavor without the heat. You can also serve hot sauce on the side for those who want extra kick. A good non-stick skillet is a must for this recipe. It helps prevent sticking and makes cleanup easy. A garlic press is handy for quickly mincing garlic. If you cook often, invest in a quality set of measuring spoons. They help you get the right amounts every time. Lastly, a fish spatula works great for flipping shrimp without breaking them. These tools make cooking simple and fun! For the full recipe, check out the complete details. {{image_2}} You can easily add veggies to garlic butter shrimp. Vegetables like bell peppers, spinach, or zucchini work well. These will add color and nutrients to your dish. To add them, chop the veggies into bite-sized pieces. Sauté them in the butter before adding garlic. This way, they soak up the flavor. Cook the veggies until they are tender but still crisp. Then, follow the rest of the recipe. You’ll love the added crunch and taste! If you want to switch things up, try scallops or chicken. Scallops cook quickly and have a sweet flavor. Use the same cooking method as for shrimp. Just remember, they need less time. Cook them for about 2-3 minutes per side. Chicken is another good choice. Cut it into small pieces to ensure even cooking. Cook the chicken until it’s golden brown and no longer pink inside. Both options will still be rich and tasty. Herbs and spices can change the taste of your dish. Try adding fresh herbs like basil or thyme. These add a garden-fresh flavor. You can also use dried herbs if fresh is not available. For a kick, add more red pepper flakes or even cayenne pepper. A splash of soy sauce can add a nice umami taste, too. Experiment with these flavors and find your favorites. Each variation brings a new twist to your garlic butter shrimp. For the full recipe, check out the main article! To keep your garlic butter shrimp fresh, store it in an airtight container. Let the shrimp cool down to room temperature first. This prevents moisture buildup. Place the container in the fridge. It can last up to three days. If you plan to eat it later, try to avoid mixing it with rice or pasta. This way, each part stays tasty. When reheating garlic butter shrimp, use low heat. You can use a skillet or microwave. For the skillet, add a little butter and warm it gently. Stir often to avoid overcooking. If using a microwave, place the shrimp in a bowl and cover it with a damp paper towel. Heat in short bursts, checking every 30 seconds. This keeps the shrimp juicy and soft. Freezing garlic butter shrimp is a great way to keep it longer. First, let it cool completely. Then, place it in a freezer-safe bag or container. Remove as much air as possible. It can last for up to three months in the freezer. When you're ready to eat it, thaw it in the fridge overnight. Reheat gently, as mentioned before, for the best flavor. You can enjoy this dish again with its delightful taste! You can tell shrimp are cooked when they turn pink and opaque. They should curl into a "C" shape. If they curl into an "O," they may be overcooked. Cooking time varies, but shrimp usually take about 4-6 minutes. Always check the center for any translucent areas. Perfect shrimp should be firm but not rubbery. Yes, you can use frozen shrimp! Just thaw them first. To do this, place them in cold water for about 15-20 minutes. Make sure to drain and dry them well before cooking. This helps achieve that nice sear. Frozen shrimp can be just as tasty as fresh shrimp when cooked properly. Garlic butter shrimp pairs well with many sides. Here are some great options: - Cooked rice - Pasta with olive oil - Garlic bread - A fresh green salad - Steamed vegetables These sides soak up the buttery sauce. They balance the strong flavors of the shrimp. For the full recipe, check the earlier section on Garlic Butter Shrimp Delight. This post covered how to make simple garlic butter shrimp. We discussed the key and optional ingredients, and tips for choosing fresh shrimp. You learned step-by-step preparation and cooking techniques. We shared helpful tips to avoid common mistakes and ways to adjust spice levels. You can also explore variations like adding vegetables or using scallops. Finally, we looked at storage methods to keep shrimp tasty. Use these insights to create a dish that shines at your table. Enjoy cooking!

Simple Garlic Butter Shrimp Flavors that Delight

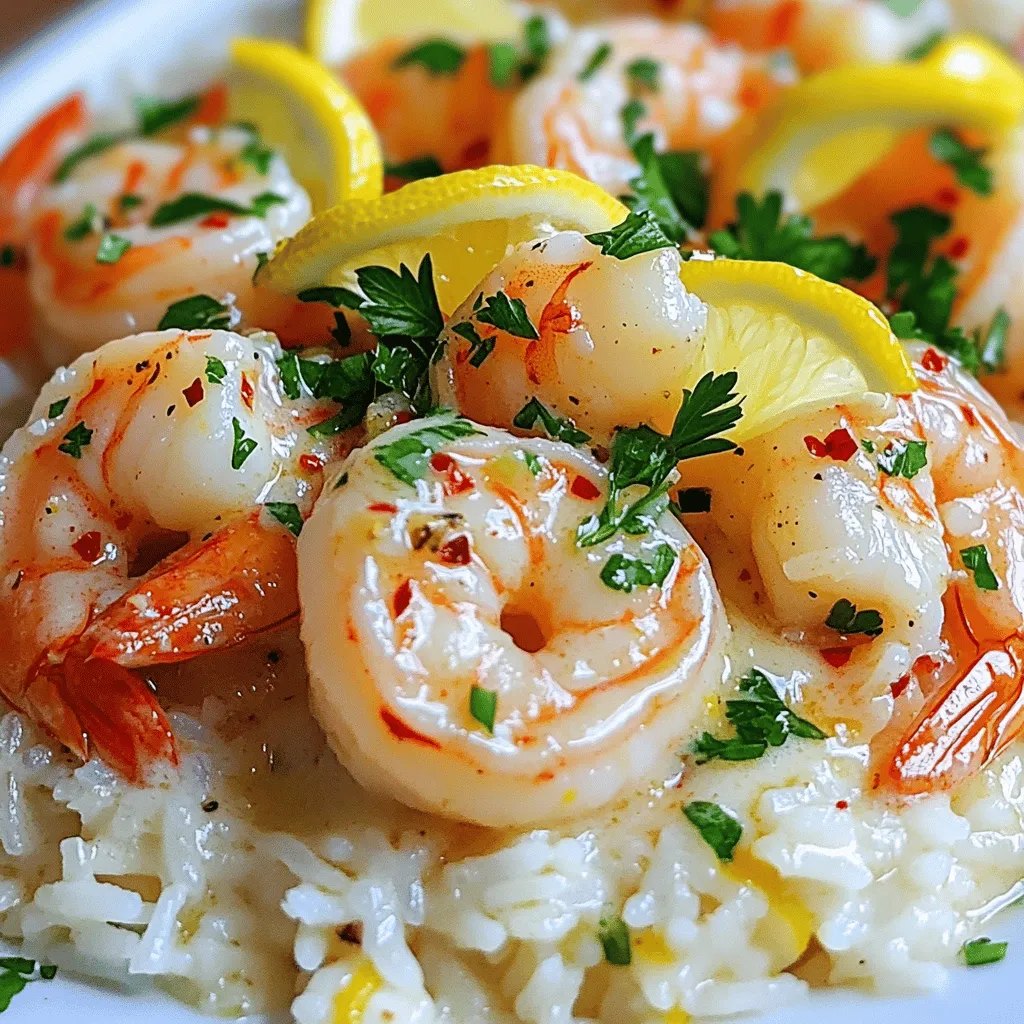
Welcome to my kitchen! If you love quick and tasty meals, you’ll adore this Simple Garlic Butter Shrimp recipe. It’s

- 4 boneless, skinless chicken thighs - 1/4 cup soy sauce - 1/4 cup honey - 2 tablespoons rice vinegar - 1 tablespoon sesame oil - 2 garlic cloves, minced - 1 teaspoon freshly grated ginger - 2 green onions, chopped (for garnish) - 1 tablespoon sesame seeds (for garnish) - Cooked white rice (for serving) Mouthwatering teriyaki chicken starts with fresh, quality ingredients. The chicken thighs give a juicy bite, while the soy sauce adds saltiness. Honey brings sweetness, and rice vinegar gives it a tangy twist. Sesame oil adds a rich depth to the flavor. The garlic and ginger create a fragrant base. These two ingredients enhance the taste and bring warmth. For serving, I love using green onions and sesame seeds. They not only look good but also add a mild flavor. Pair your chicken with fluffy white rice. It soaks up the delicious sauce and balances the dish. You can find the full recipe [here](#). Enjoy cooking! - Combine soy sauce, honey, rice vinegar, sesame oil, minced garlic, and ginger. - Whisk until well blended. Creating a great teriyaki marinade is key. The blend of soy sauce and honey gives that sweet and salty taste. Rice vinegar adds a nice tang. Sesame oil brings in a nutty flavor. Garlic and ginger add depth and warmth. - Place chicken thighs in a resealable bag or dish. - Pour marinade over the chicken and refrigerate for 30 minutes. Marinating is vital. It lets the chicken soak up those tasty flavors. Using a resealable bag makes it easy to coat every piece. If you can, flip the bag halfway through for even flavor. - Preheat grill or grill pan and discard leftover marinade. - Grill chicken thighs until internal temperature reaches 165°F (75°C). Grilling gives a nice char and smoky taste. Make sure your grill is hot before adding the chicken. This helps get those beautiful grill marks. I usually cook for about 6-7 minutes on each side. - Let chicken rest, slice into strips, and serve over rice. - Add garnishes of sesame seeds and green onions. Resting the chicken is important. It keeps the juices inside, making each bite juicy. Slicing it into strips makes it easy to serve. Lay it over fluffy white rice, then sprinkle sesame seeds and green onions for a fresh look. For the full recipe, check the section above. - To achieve perfect grill marks, ensure the grill is preheated properly. - Let chicken rest after cooking to retain juices. - Consider adding mushrooms or bell peppers to the marinade for extra flavor. - Use low-sodium soy sauce for a healthier option. - Arrange the rice on a platter with sliced chicken on top. - Use a colorful side of steamed vegetables for an attractive presentation. {{image_2}} You can switch up the main protein in teriyaki chicken. - Use chicken breast instead of thighs for a leaner option. - Substitute with tofu for a vegetarian version. Tofu absorbs the marinade well, giving it great flavor. You can cook teriyaki chicken in various ways. - Bake in the oven at 375°F (190°C) for 25-30 minutes. This method keeps the chicken juicy. - Stir-fry chicken pieces in a skillet for a quick, easy meal. Just cook until they are golden brown and cooked through. Feel free to get creative with flavors. - Experiment with pineapple juice for a tropical twist. This adds sweetness and acidity. - Add sriracha for a spicy version of teriyaki chicken. It gives a nice kick that balances the sweetness. These variations ensure that everyone can enjoy teriyaki chicken in their own favorite way. You can find the full recipe to get started on this delicious dish. Keep any leftover chicken and rice in an airtight container. This helps keep the food fresh. Store in the refrigerator for up to 3 days. If you wait too long, it may spoil. You can freeze marinated chicken before cooking. This makes for quick meal prep later. Cooked chicken can also be frozen for up to 2 months. Just make sure to seal it well. To reheat, use a microwave or the stovetop. Add a splash of water to keep it moist. This way, your teriyaki chicken stays delicious and tender. Enjoy your meal! To make teriyaki chicken less salty, you should use low-sodium soy sauce. You can also reduce the amount of soy sauce in the recipe. This way, you keep the flavor but cut down on the saltiness. Yes, you can cook teriyaki chicken in an air fryer. Set it to 375°F (190°C) and cook for about 15-20 minutes. Flip the chicken halfway through for even cooking. Serve teriyaki chicken over rice. Add steamed vegetables on the side. For an extra touch, garnish with sesame seeds and chopped green onions. This adds color and flavor to your meal. To check if the teriyaki chicken is cooked, use a meat thermometer. The internal temperature should reach 165°F (75°C). This ensures it is safe to eat and juicy. This blog post covered how to make teriyaki chicken that is both tasty and easy. We discussed the main ingredients, cooking steps, and helpful tips to enhance flavor. You can customize your dish with different proteins or cooking methods. Remember to store any leftovers properly for future meals. Teriyaki chicken can be simple, versatile, and enjoyable for any occasion. Now you’re ready to cook and impress your friends and family with this delicious dish!

Mouthwatering Teriyaki Chicken Tasty Quick Recipe

Are you craving a dish that’s quick, tasty, and packed with flavor? Look no further than this Mouthwatering Teriyaki Chicken

To make savory quinoa stuffed peppers, you need simple yet flavorful ingredients. Each item adds a special touch to the dish. Here's what you will need: - 4 large bell peppers (any color) - 1 cup quinoa, rinsed - 2 cups vegetable broth - 1 can (15 oz) black beans, drained and rinsed - 1 cup corn kernels (fresh or frozen) - 1 medium onion, diced - 2 cloves garlic, minced - 1 teaspoon cumin - 1 teaspoon smoked paprika - ½ teaspoon chili powder - Salt and pepper to taste - 1 cup diced tomatoes (canned or fresh) - ½ cup shredded cheese (optional, for topping) - Fresh cilantro, chopped for garnish These ingredients create a tasty and healthy meal. Quinoa provides protein and fiber, while the beans, corn, and spices add great flavors. You can also customize the recipe with different toppings or spices. For the complete recipe, check the [Full Recipe]. First, rinse 1 cup of quinoa under cold water. This helps remove any bitter taste. In a medium saucepan, combine the quinoa with 2 cups of vegetable broth. Bring to a boil. Once boiling, lower the heat and cover. Let it simmer for about 15 minutes. The quinoa will absorb all the liquid and become fluffy. Remove from heat and set aside. Take 4 large bell peppers and cut the tops off. Make sure to remove all the seeds and membranes inside. This keeps your peppers clean and ready for stuffing. Place the peppers upright in a baking dish. This helps them stand while baking. In a skillet over medium heat, add a small amount of olive oil. Sauté 1 medium diced onion for about 3 to 4 minutes until it becomes soft. Then, add 2 cloves of minced garlic and cook for another minute. This makes the kitchen smell great! Next, stir in the cooked quinoa, 1 can of drained black beans, 1 cup of corn, and 1 cup of diced tomatoes. Add 1 teaspoon of cumin, 1 teaspoon of smoked paprika, ½ teaspoon of chili powder, and salt and pepper to taste. Mix everything well and let it heat through. Now it’s time to fill the peppers! Use the quinoa mixture to stuff each pepper. Pack it in gently but fill it to the top. If you like cheese, sprinkle ½ cup of shredded cheese on top of each pepper for a tasty finish. Preheat your oven to 375°F (190°C). Cover the baking dish with aluminum foil and bake for 25 minutes. After that, take off the foil and bake for another 10 minutes. This will make the peppers tender and the cheese melt. Once done, carefully take them out of the oven. Let them cool for a few minutes. Before serving, add fresh chopped cilantro for a burst of color and flavor. You can find the full recipe with all the steps outlined above. Enjoy your Savory Quinoa Stuffed Peppers! To cook quinoa, rinse it well under cold water. This removes the bitter coating. Use two cups of vegetable broth for every cup of quinoa. Bring the broth to a boil, then reduce heat. Cover the pot and simmer for about 15 minutes. The quinoa is done when it’s fluffy and the liquid is gone. Let it sit for a few minutes before fluffing with a fork. This will give you a perfect texture. When choosing peppers, I prefer large bell peppers. They have sweet flavors and hold up well when baked. You can use any color: red, yellow, green, or orange. Each color offers a slightly different taste. Make sure the peppers are firm and free from blemishes. Hollow them out carefully to create enough room for the filling. For a lovely presentation, serve the stuffed peppers on a bright platter. Garnish with fresh cilantro for color. A wedge of lime adds a fresh touch and zesty flavor. You can also drizzle some hot sauce on top for those who enjoy a kick. These simple touches make the dish more appealing and fun to eat. For the full recipe, check out the detailed steps mentioned above. {{image_2}} You can boost the protein in your stuffed peppers easily. Try adding cooked chicken, ground turkey, or tofu for a tasty twist. You can also mix in some shredded cheese for a creamy touch. These options make the meal more filling and fun! This recipe suits both vegetarian and vegan diets. To keep it vegetarian, you can use cheese on top. For a vegan version, skip the cheese or use a plant-based alternative. The filling is packed with healthy beans and quinoa, so everyone will love it. Feel free to swap out ingredients based on what you have. You can use different beans, like kidney beans or lentils. If you want a fresh taste, add diced zucchini or spinach to the mix. These changes keep the recipe exciting and new every time. - Spice Level Adjustments Adjust the spice level to fit your taste. If you like heat, add more chili powder or some diced jalapeños. For a milder dish, cut back on the chili powder. You can also try adding fresh herbs like basil or oregano for a different flavor profile. For the full recipe, check out the details above. You can keep leftover stuffed peppers in an airtight container. They last about 3 to 5 days in the fridge. Make sure to let them cool before sealing. This keeps the peppers fresh and tasty. To reheat, place the peppers in a baking dish. Cover with foil to keep them moist. Heat in the oven at 350°F (175°C) for about 20 minutes. You can also use the microwave. Heat for 2-3 minutes on high, checking often. If you want to save some for later, freezing works great. Wrap each stuffed pepper tightly in plastic wrap and then aluminum foil. They can stay in the freezer for up to 3 months. When ready to eat, thaw in the fridge overnight and reheat as mentioned above. Enjoy your meal! For the full recipe, click here. Stuffed peppers can last about 3 to 5 days in the fridge. Make sure to store them in an airtight container. This keeps them fresh and tasty. When you are ready to eat them, just reheat. Yes, you can make stuffed peppers ahead of time. Prepare them fully and store them in the fridge. I suggest doing this the night before. This way, they are ready to bake when you need them. You can use rice, farro, or barley in place of quinoa. Each grain has its own unique flavor and texture. Choose one that you enjoy. Just make sure to adjust the cooking time based on the grain you select. No, you do not need to cook the peppers first. You can stuff them raw. Baking will soften them nicely. This method helps keep their shape and adds a nice crunch. For the full recipe, check the details above. You can create stuffed peppers packed with flavor and nutrition using simple ingredients. We discussed key ingredients like bell peppers, quinoa, black beans, and spices. The steps to prepare, cook, and stuff the peppers are easy to follow. I shared tips to perfect your dish and options for variations. Lastly, we covered how to store leftovers and answered common questions. Now you’re ready to make tasty stuffed peppers anytime. Enjoy your cooking adventure and share it with friends and family!

Savory Quinoa Stuffed Peppers Healthy and Easy Meal

Are you looking for a healthy meal that’s also easy to make? Savory quinoa stuffed peppers are your answer! This

- 1 ½ cups graham cracker crumbs - ½ cup unsalted butter, melted - ¼ cup brown sugar - 1 teaspoon cinnamon - 16 oz cream cheese, softened - ½ cup granulated sugar - 2 large eggs - 1 teaspoon vanilla extract - 1 cup sour cream - 2 medium apples, peeled, cored, and diced (Granny Smith or Honeycrisp work well) - 2 tablespoons lemon juice - ½ teaspoon cinnamon - ¼ cup granulated sugar - ½ cup caramel sauce (store-bought or homemade) - Sea salt, for garnish (optional) Each ingredient plays an important role in making these bars shine. The graham cracker crumbs give a nice crunch to the crust. The melted butter binds the crumbs together, while brown sugar adds sweetness. Cinnamon adds warmth to the crust, making it comforting. For the cheesecake layer, the cream cheese is the star. It brings a creamy texture that melts in your mouth. Granulated sugar adds sweetness, while eggs give the layer its structure. Vanilla extract enhances the flavor, and sour cream adds a bit of tang. In the apple layer, fresh apples add moisture and flavor. I love using Granny Smith or Honeycrisp for their balance of sweet and tart. Lemon juice keeps the apples bright and fresh. Cinnamon and sugar round out the flavor, making it extra delicious. Lastly, the caramel topping is the finishing touch. It adds a rich, sweet layer on top of the cheesecake. A sprinkle of sea salt gives a nice contrast, making each bite even better. You can find the full recipe for these delicious caramel apple cheesecake bars in the article. Enjoy! - Preheat the oven to 350°F (175°C). - Line an 8x8 inch baking dish with parchment paper. This helps with easy removal later. - In a mixing bowl, combine the crust ingredients: graham cracker crumbs, melted butter, brown sugar, and cinnamon. - Mix until it looks like wet sand. - Press this mixture firmly into the bottom of the baking dish. - Bake for 10 minutes until set and lightly golden. - In a large bowl, beat the cream cheese and sugar until smooth. - Add the eggs one by one. Mix well after each addition. - Stir in the vanilla and sour cream until fully combined. - Toss the diced apples with lemon juice, sugar, and cinnamon in a separate bowl. - Make sure they are evenly coated. Set aside to let them soak up the flavors. - Pour the cheesecake mixture over the cooled crust. Spread it evenly. - Gently fold in the apple mixture, distributing the apples throughout. - Bake for 30-35 minutes until the center is set but still slightly jiggly. - Once cooled, drizzle caramel sauce over the top. - If you like, sprinkle a pinch of sea salt for extra flavor. - Chill in the fridge for at least 3 hours before slicing. For the full recipe, you can refer back to the ingredients and steps listed above. Enjoy your delicious creation! The best apples for baking are Granny Smith and Honeycrisp. They balance sweet and tart flavors well. Granny Smith adds a nice tang, while Honeycrisp brings sweetness and crunch. To keep your apples firm during baking, avoid overcooking. Toss the diced apples with lemon juice right after cutting. This helps prevent browning and keeps them fresh. For a smooth cheesecake, mix cream cheese until it is soft. Start with room temperature cream cheese for the best results. Add sugar slowly and mix until there are no lumps. To avoid cracks in your cheesecake, bake at a low temperature. Bake the bars until they are just set in the center. Remember, a slight jiggle is okay! You can use store-bought caramel sauce for ease. However, making your own caramel sauce is simple and delicious. Combine sugar and water in a pan, heat until golden, and add butter and cream. When making caramel, watch it closely. It can burn quickly. If you want a richer flavor, consider adding a pinch of sea salt. For the complete process and more details, check the Full Recipe. {{image_2}} You can add nuts for a nice crunch. Walnuts or pecans work great in this recipe. Chop them into small pieces and mix them into the crust. This change adds texture and flavor. You can also sprinkle some on top before serving. This gives a nice look and extra crunch. Looking for something different? Try a chocolate twist! Instead of caramel, use chocolate ganache. To make the ganache, melt chocolate with cream until smooth. Pour it over the cooled cheesecake bars. This change makes the dessert rich and sweet. It pairs well with apples and cream cheese. You can enhance the flavor with different spices. Try nutmeg or ginger for warmth. A pinch of allspice can add depth to the taste. You can also switch apples for pears or peaches for a seasonal touch. These tweaks keep the dessert fresh and exciting. Explore these flavors to find your favorite mix! To keep your caramel apple cheesecake bars fresh, store them in the fridge. Use an airtight container to seal them well. This will help prevent the bars from drying out. If you want to keep them even fresher, place a piece of plastic wrap over the surface before sealing the container. This extra layer traps moisture, keeping the bars soft and tasty for longer. Want to save some for later? You can freeze these cheesecake bars! First, let them cool completely after baking. Then, cut the bars into squares and wrap each one tightly in plastic wrap. Place the wrapped bars in a freezer bag or container. When you're ready to enjoy them again, thaw in the fridge overnight. To serve, you can reheat them in the microwave for about 15 seconds. This will warm them up nicely without losing texture. These delicious bars last about 5 to 7 days in the fridge. Keep an eye on their appearance and smell. If you notice any off smells or changes in color, it’s best to throw them away. Fresh bars will have a creamy look and a sweet scent. Enjoy them while they are still at their best! For the full recipe, check out the details above. Yes, you can use low-fat cream cheese. It may change the taste and texture. The bars might not be as rich or creamy. This can still work if you want a lighter dessert. Just ensure it is softened well for easy mixing. No graham crackers? No problem! You can use crushed vanilla wafers or digestive biscuits. Both can make a tasty crust. Just use the same amount as the graham cracker crumbs in the recipe. Yes, you can make these bars ahead of time. Just bake and chill them the day before serving. This allows the flavors to blend well. You can also cut and store them in the fridge for quick serving. When serving, cut them into even squares. You can place them on a nice platter. Drizzle extra caramel on top for a beautiful look. Adding a sprinkle of sea salt can also enhance the flavor. Enjoy these treats with family or friends! For the complete process, refer to the [Full Recipe]. In this blog post, we explored how to create delicious apple cheesecake bars. We covered ingredients for the crust, cheesecake layer, and apple topping. I shared step-by-step instructions and helpful tips for achieving the best texture. You learned storage tips and tasty variations to try. Enjoying this dessert can be a fun experience. Making these bars lets you be creative and try new flavors too. With some practice, you will master this treat. It's a recipe worth making time and again.

Caramel Apple Cheesecake Bars Delicious Dessert Treat

Looking for a fun and tasty dessert? Let’s make Caramel Apple Cheesecake Bars! They blend creamy cheesecake, sweet apples, and

Older posts
Newer posts
← Previous Page1 … Page106 Page107 Page108 … Page138 Next →

dsad

© 2025 Recipes Pursuit • Built with GeneratePress

Our Policies

  • Copyright Policy
  • Cookie Policy
  • GDPR Policy
  • Privacy Policy
  • Disclaimer
  • Terms Of Use

More Information

  • Home
  • About
  • Contact
  • Appetizers
  • Dessert
  • Dinner
  • Drinks
©2025, Recipes Pursuit About Back To Top