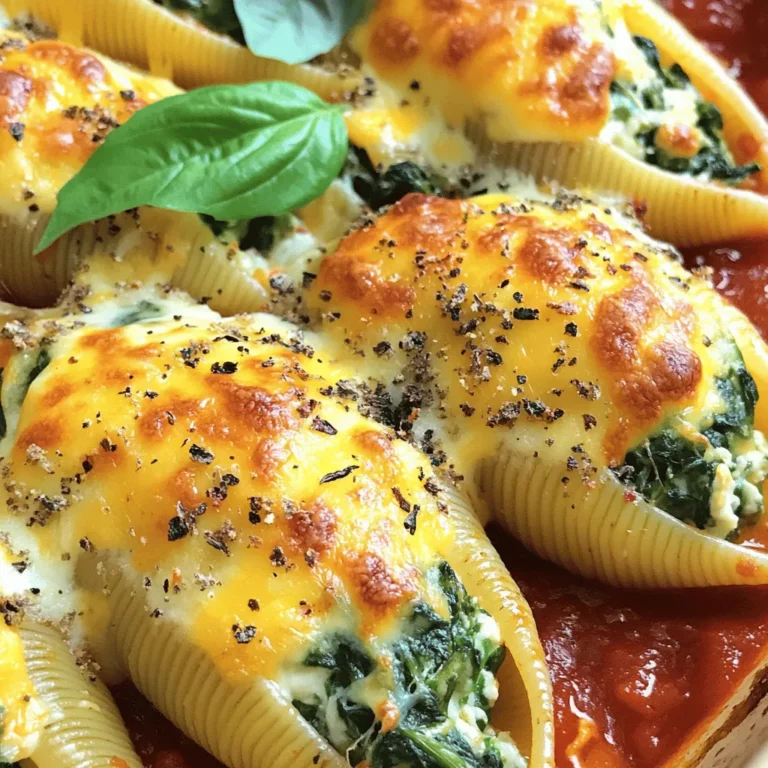
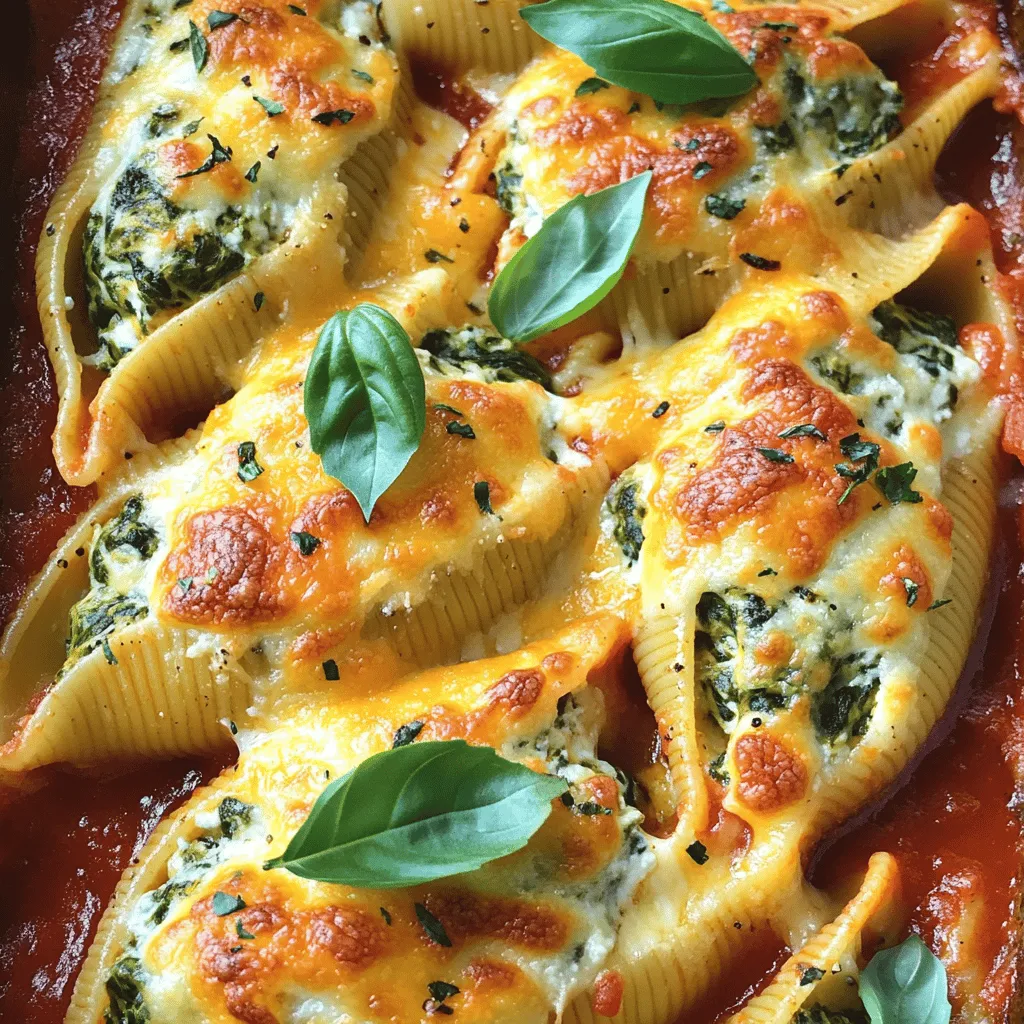
Welcome to the world of Cheesy Spinach Stuffed Shells! This dish is rich, creamy, and simple to make. You’ll love how jumbo pasta shells pack a flavorful spinach and cheese filling. Whether you’re cooking for a family dinner or a cozy night in, this dish brings joy to any table. Get ready to impress with an easy recipe that’s sure to please everyone, even picky eaters! Let’s dive in!
Ingredients
To create cheesy spinach stuffed shells, you will need the following ingredients:
– 20 jumbo pasta shells
– 2 cups ricotta cheese
– 1 cup shredded mozzarella cheese
– 1 cup grated Parmesan cheese
– 2 cups fresh spinach, chopped
– 1 egg, beaten
– 2 cloves garlic, minced
– 1 teaspoon dried oregano
– 1 teaspoon salt
– 1/2 teaspoon black pepper
– 3 cups marinara sauce
– Fresh basil leaves for garnish (optional)
These ingredients blend together to make a delicious and satisfying dish. The jumbo shells serve as the perfect vessel for the creamy cheese and fresh spinach mix. Ricotta and mozzarella add rich flavors, while Parmesan brings a nice saltiness. Fresh spinach adds a healthy touch and great color.
The egg helps bind the mixture, making it easier to stuff the shells. Garlic and oregano add depth to the flavor. Marinara sauce ties everything together, adding moisture and tang. Finally, fresh basil can enhance the presentation and taste.
This recipe is not only simple but also versatile. You can customize it to suit your tastes while keeping the core flavors intact.
Step-by-Step Instructions
Preheat the Oven
Start by preheating your oven to 375°F (190°C). This step is key as it gets your oven ready for baking.
Cook the Pasta Shells
Next, bring a large pot of salted water to a boil. Add 20 jumbo pasta shells and cook them for 8-10 minutes. You want them to be al dente, so they hold their shape. After cooking, drain and rinse the shells under cold water. Set them aside for later.
Prepare the Stuffing
In a mixing bowl, combine 2 cups of ricotta cheese, half of the mozzarella cheese, 1 cup of grated Parmesan cheese, and 2 cups of chopped fresh spinach. Add 1 beaten egg, 2 minced garlic cloves, 1 teaspoon of dried oregano, 1 teaspoon of salt, and 1/2 teaspoon of black pepper. Mix well until everything is smooth and creamy.
Stuff the Shells
Now it’s time to fill those shells! Use a small spoon or a piping bag to scoop the cheese and spinach mixture into each shell. Don’t be shy; make sure each shell is packed full of stuffing.
Assemble the Dish
Grab a 9×13-inch baking dish and spread 1 cup of marinara sauce evenly on the bottom. Place the stuffed shells in a single layer on top of the sauce. Pour the rest of the marinara sauce over the shells, making sure they are fully covered.
Add Cheese Topping
Next, sprinkle the remaining mozzarella cheese evenly over the top of the stuffed shells. This will create a delicious, gooey layer when baked.
Bake
Cover the dish with aluminum foil and bake for 25 minutes. After that, carefully remove the foil and bake for another 10-15 minutes. Look for bubbly, golden-brown cheese on top.
Serve
Once done, take the dish out of the oven and let it cool for a few minutes. If you like, add fresh basil leaves for a lovely garnish. Serve the stuffed shells warm and enjoy each cheesy bite.
Tips & Tricks
Best Practices for Stuffing Shells
To stuff the shells well, use a small spoon or a piping bag. This makes filling easy and quick. Fill each shell generously, making sure not to overfill. A well-stuffed shell gives you the best taste and texture.
How to Keep Pasta from Sticking
To prevent the pasta from sticking, rinse the shells in cold water after cooking. This helps stop the cooking process. You can also add a drizzle of olive oil to the water while boiling. Stir the shells gently during cooking to keep them separated.
Enhancing Flavor with Fresh Herbs
Fresh herbs can boost the flavor of your dish. Try adding chopped basil or parsley to the cheese mix. This gives a fresh taste. You can also sprinkle fresh herbs on top before serving for a nice touch.
Common Mistakes to Avoid
One common mistake is not cooking the shells long enough. They should be al dente. If they are too soft, they might tear when you stuff them. Also, don’t skip the marinara sauce layer. It keeps the shells moist and adds flavor.
Variations
Vegetarian Options
You can easily make Cheesy Spinach Stuffed Shells vegetarian. Focus on the cheese and spinach filling. Use more veggies like mushrooms, zucchini, or bell peppers. These add flavor and texture. You can also swap the marinara sauce for a rich tomato basil sauce. This keeps the dish hearty and plant-based.
Adding Protein: Chicken or Sausage
If you want extra protein, consider adding cooked chicken or sausage. Cook the meat first, then chop it small. Mix it into the cheese and spinach filling. This adds a nice bite to the shells. It also makes the dish more filling for a hungry crowd.
Gluten-Free Alternatives
For a gluten-free version, choose gluten-free pasta shells. Many brands offer this option now. You can still use the same filling recipe. Just check the sauce for hidden gluten. Marinara sauce is usually safe, but always read the label to be sure.
Sauce Alternatives: Alfredo or Pesto
Try different sauces to change the flavor of the dish. Instead of marinara, use Alfredo sauce. This makes a creamy, rich taste. Pesto is another great choice. It adds a fresh, herby flavor to the cheesy filling. Both options give you a chance to play with tastes. Get creative and enjoy!
Storage Info
Storing Leftovers
After you enjoy your cheesy spinach stuffed shells, you may have some left. To store them, let the dish cool completely. Then, place the leftovers in an airtight container. You can keep them in the fridge for about 3 to 5 days. Make sure to label the container with the date. This helps you stay organized and know when to eat them.
Reheating Instructions
When it’s time to eat your leftovers, reheating is simple. You can use the oven or microwave. If using the oven, preheat to 350°F (175°C). Place the shells in a baking dish and cover with foil. Bake for about 20 minutes or until hot. If you prefer the microwave, put a few shells on a microwave-safe plate. Heat for 1 to 2 minutes, checking to make sure they are warm all the way through.
Freezing for Future Meals
Want to save some cheesy spinach stuffed shells for later? Freezing them is a great option. First, let the dish cool. Then, wrap each shell in plastic wrap and place them in a freezer bag. You can also freeze the whole dish. Use a freezer-safe container and cover it tightly. These can last for up to 3 months. When you’re ready to eat, thaw in the fridge overnight, then reheat as mentioned above. Enjoy your tasty meal anytime!
FAQs
Can I use other types of cheese?
Yes, you can swap cheeses. Try using goat cheese or feta for a tangy twist. You can mix and match cheeses to suit your taste. Just keep in mind that the texture may change. Mozzarella melts well, while Parmesan adds a nice flavor kick.
How can I make Cheesy Spinach Stuffed Shells ahead of time?
To prep in advance, assemble the shells but do not bake them. Cover the dish tightly with plastic wrap or foil. You can store it in the fridge for up to 24 hours. When you are ready, bake it directly from the fridge. You may need to add a few extra minutes to the cooking time.
What can I serve with this dish?
Cheesy Spinach Stuffed Shells pair well with a fresh green salad or garlic bread. A side of steamed veggies or a light soup also works great. These sides can add color and balance to your meal.
Is this recipe kid-friendly?
Absolutely! Kids usually love cheesy dishes. The fun shape of the stuffed shells makes it more appealing. You can even let kids help stuff the shells. It’s a fun way to get them involved in cooking, which can spark their interest in food.
This recipe for Cheesy Spinach Stuffed Shells offers a simple guide to a delicious dish. You learned the key ingredients, step-by-step instructions, and even tips for success. You can tweak it for different diets and store leftovers easily. Use your creativity to enhance flavor and mix in protein. This meal is not just tasty; it’s fun to make. Enjoy cooking, and share this dish with family and friends! You won’t regret it.

